Руководство по установке SQLite в Windows 10

Обратите внимание! Все описываемые далее действия выполняются на примере базы данных SQLite 3.40.1 (2022-12-28), актуальной на момент написания настоящей статьи. Это важно учитывать, так как в будущем разработчиками могут быть внесены серьезные изменения в работу продукта, вследствие чего некоторые инструкции могут потерять свою актуальность.
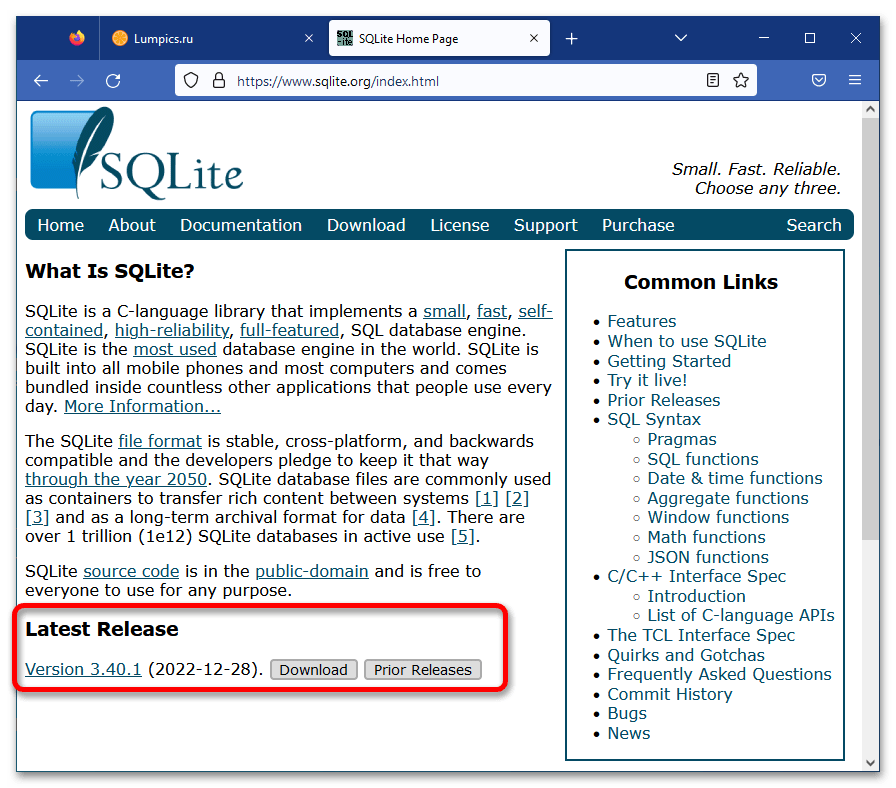
Шаг 1: Скачивание и распаковка файлов
Первостепенно необходимо скачать файлы SQLite, чтобы в дальнейшем настроить их работу для использования в операционной системе Windows 10. Загружать базу данных рекомендуется с официального сайта разработчиков, это исключит вероятность заражения компьютера вирусными программами.
Примечание! При выборе файлов для загрузки следует отталкиваться от разрядности установленной операционной системы. Если этой информацией вы не обладаете, обратитесь за помощью к другой статье на нашем сайте, после чего вернитесь и продолжите выполнять описываемые ниже действия.
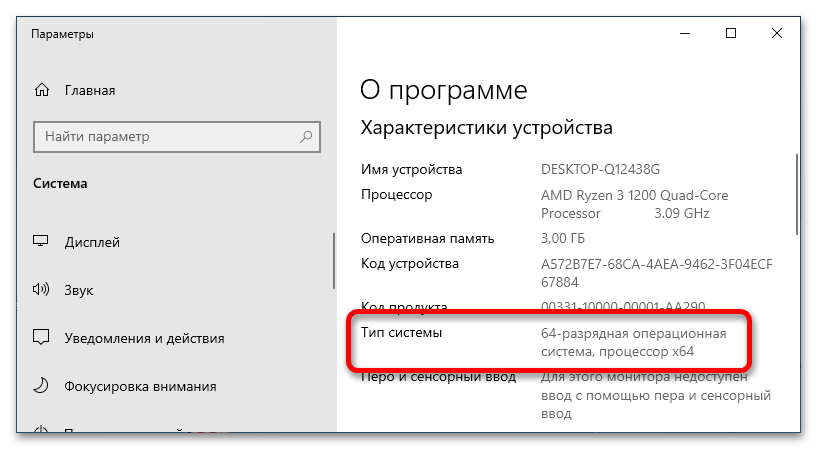
Чтобы установить SQLite в Windows 10, достаточно скачать архивы базы данных нужной версии и распаковать их в удобную для вас директорию:
-
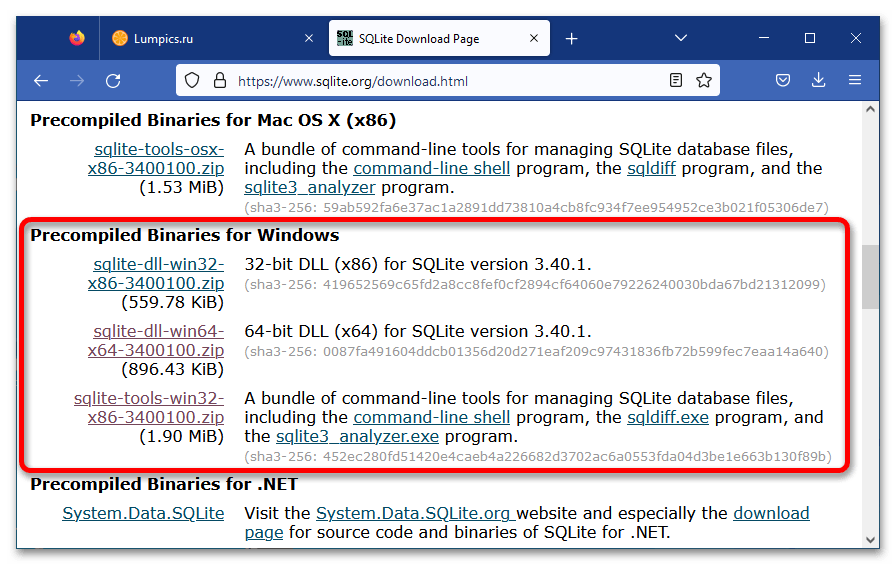
Находясь на странице загрузки, переместитесь ниже до блока «Precompiled Binaries for Windows». Затем скачайте архив под названием «sqlite-tools-win32-x86-3400100.zip», после чего кликните по ссылке «sqlite-dll-win32-x86-3400100.zip» (для 32-разрядной операционной системы) или «sqlite-dll-win64-x64-3400100.zip» (для 64-разрядной операционной системы).

Обратите внимание! Если с распаковкой архивов возникли трудности, обратитесь за помощью к другой статье на нашем сайте, в которой представлено три способа выполнения поставленной задачи.
Подробнее: Распаковка ZIP-архивов в операционной системе Windows 10
По итогу выполнения этого шага у вас на диске должен появиться каталог, в котором будут находиться пять файлов базы данных SQLite.
Шаг 2: Добавление исполняемого файла в переменную среду
Базой данных SQLite можно начинать пользоваться уже сейчас, запустив приложение «sqlite3.exe». Но для удобства вызова рабочей среды из «Командной строки» рекомендуется добавить в переменную PATH каталог, в котором размещен исполняемый файл программы. Это избавит от необходимости каждый раз открывать файловый менеджер и переходить в папку с базой данных.
-
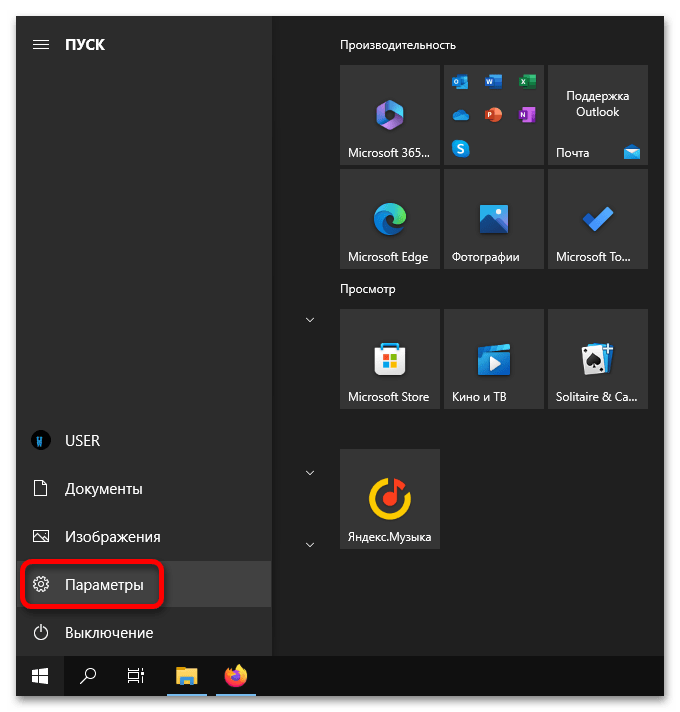
Откройте окно параметров любым доступным способом. Проще всего для этого сделать через меню «Пуск», кликнув по соответствующей кнопке в левом нижнем углу экрана.
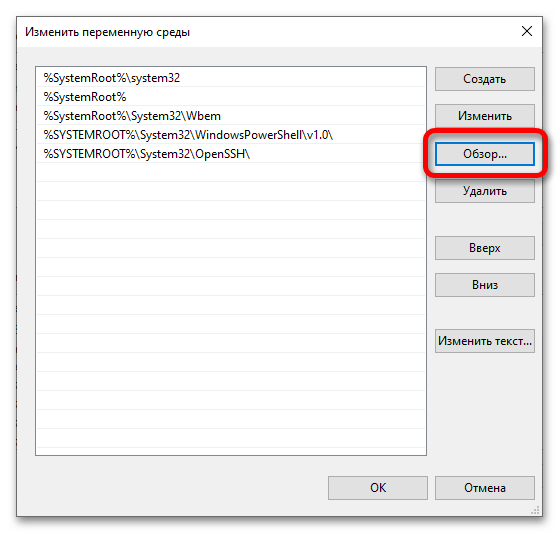
В «Проводнике» перейдите к целевой директории и выделите ее, после этого нажмите «ОК». Обратите внимание, что у вас месторасположение и название папки может отличаться.

Обратите внимание! Если в ходе работы с переменной средой Windows 10 вы столкнулись с проблемами или появилось желание более глубже изучить эту тему, рекомендуем перейти по ссылке ниже к статье, в которой подробно рассказывается о переменных PATH и PATHEXT, а также приводятся практические примеры использования этих компонентов операционной среды.
Подробнее: Изучаем переменные среды в Windows 10
Шаг 3: Проверка работоспособности
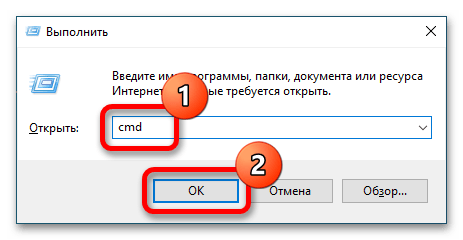
Все готово к запуску базы данных SQLite. Рабочая среда инициализируется в «Командной строке», поэтому предварительно необходимо ее открыть. Для этого проще всего вызвать окно «Выполнить» сочетанием клавиш Win + R, после чего ввести команду cmd и нажать по кнопке «ОК».
В открывшемся окне консоли пропишите команду sqlite3 или sqlite3.exe и нажмите Enter. После этого должно появиться приглашение к вводу команд SQL, выраженное надписью «sqlite>» (без кавычек) в начале строки.
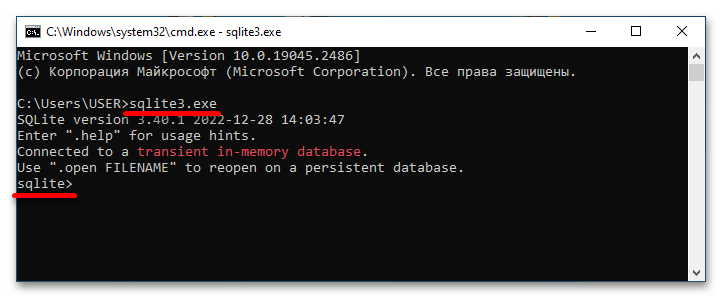
Если у вас все так, как описывается выше, то базу данных SQLite можно считать установленной и готовой к использованию. В противном случае вернитесь к шагу 2 и повторите выполнение всех перечисленных там действие.
Важно! В качестве альтернативы можно запускать оболочку SQLite через исполняемый файл в корневом каталоге, который создавался на первом шаге. Сделать это можно и через «Командную строку», прописав полный путь к программе, как это показано на скриншоте ниже.
SQLite Setting-Up Guide

SQLite is a built-in library that implements a serverless, zero-configuration SQL Database Management System (DBMS). It is a database set to null, which means there is no need to set it up on your system. Unlike other database management systems, SQLite is not a standalone process. It accesses its storage files directly.
How to Install SQLite
All the SQLite necessities are compiled and available for download and installation from the official website. If you wish, you can also compile the source code on your own. In general, SQLite code is open and can be freely modified.
To write and execute queries for SQLite databases, you can use a simple command-line shell program — sqlite3. But there are also many free (e.g., SQLiteStudio) and commercial GUI tools for managing SQLite databases.
Installing and Running SQLite on Windows
- Go to the SQLite download page and get the files that make SQLite work on Windows, including sqlite3:
2. Create a new folder on your computer, for example, C:\sqlite.
3. Extract the contents of the downloaded file to the C:\sqlite folder. There should be three tools:
- Sqlite3.exe
- Sqlite3_analizer.exe
- sqldiff.exe
4. In the command line, go to the folder with sqlite3.exe and run it. You can also specify the name of the database:
If a file with this name does not exist, it will be created automatically. If no database file name is specified in the command line, a temporary database will be created and automatically deleted when you exit sqlite3.
5. Windows users can double-click the sqlite3.exe icon to open a terminal pop-up window with SQLite running. However, since double-clicking launches sqlite3 with no arguments, no database file will be specified, and you will use a temporary database, which will be deleted when the session ends.
Installing and Running SQLite on Linux
Let’s see how to install SQLite on Linux using Ubuntu as an example.
- To install sqlite3 on Ubuntu, first, update the package list:
2. Then install sqlite3:
3. To define whether the installation was successful, you can check the version:
If successful, you’ll get something like this:
How to Create a Database in SQLite
There are several ways to create a database in SQLite:
- As mentioned above, when running sqlite3, you can specify the name of the database:
Or you can provide the full path to the file:
If my_first_db.db database already exists, it will be opened. If not, it will be created in local memory. The created database will be automatically deleted on the sqlite3 exit if no queries have been sent to the database. Therefore, to make sure the database is written on disk, you can run an empty query by typing ; and pressing Enter:
After the work session, you can save changes in the database using the special SQLite command “.save” with the name of the database:
Or the full path to the base:
You should be careful when using the “.save” command, as this command will overwrite any pre-existing files with the same name without asking for confirmation.
2. In SQLite, you can create a database using the “.open” command:
As in the first case, the database with an existing name will be opened. If it does not exist, it will be created. With the current creation method, the new SQLite database will not disappear when sqlite3 is closed, but all changes must be saved using the “.save” command before exiting the program, as in the case above.
3. As already mentioned, when running sqlite3 with no arguments, a temporary database in local memory will be used. It will be deleted when the session ends. However, this database can be saved to disk using the “.save” command.
SQLite. Create a Table
Information in SQLite databases is stored as tables. SQLite uses the CREATE TABLE query to create tables. This query must contain the table name and field (column) names and may also contain data types, field descriptions (key field), and default values. For example, let’s create a table with descriptions of the parameters of different dog breeds using CREATE TABLE in SQLite.
In our table, the id column is marked as PRIMARY KEY, which means that id will be a key column (index) and that an integer for it will be generated automatically.
Adding Records to a Table
To make a new record in a table, you need to use an INSERT INTO SQL query, specifying the table and the fields to enter new values. The request’s structure is:
If the number of values corresponds to the number of columns in the table, the field names can be excluded from the query. Table columns that don’t appear in the column list are filled with the column’s default value (specified as part of the CREATE TABLE instruction) or NULL if no default value was specified.
In the first case, the id was self-generated since this field is assigned with an index. You will need to enter the id numbers manually if you want to enter lines without specifying column names.
Using the following SQL query, you can insert several records at the same time. The id will be automatically generated.
SQLite. Table View
To view the entire contents of a table, use the SELECT query:
The result will look like this:
Using the WHERE command, you can view only those rows that satisfy some condition. For example, let’s display breeds whose speed is less than 60 km/h:
Changing Records in a Table
With the ALTER TABLE query and additional commands, you can modify the table as follows:
- RENAME TABLE,
- ADD COLUMN,
- RENAME COLUMN,
- DROP COLUMN — to delete.
For example, let’s add a column with the dogs’ height at the withers to our table:
To change the values in existing table records, you need a query in SQLite — Update. In this case, it is possible to change both the values of a cell in a group of rows and the value of a cell in a separate row. As an example, let’s enter the values of the dogs’ height at the withers in our table:
Our final table will look like this:
How to Use SQLiteStudio
You can work with SQLite databases not only from the command line but also with GUI tools, one of which is SQLiteStudio.
The SQLiteStudio tool is free, portable, intuitive, and cross-platform. It provides many of the most important features for working with SQLite databases, such as importing and exporting data in various formats, including CSV, XML, and JSON.
How to Install SQLite on Windows 10, 2016, 2019, 2022 (SQLite3)
How to Install SQLite on Windows 10, 2016, 2019, 2022 (SQLite3 Command). SQLite is popular tool due to its great feature and zero configuration needed. It is small and self contained database engine that has a lot of APIs for a variety of programming languages. This article will take you through the process of setting up SQLite on Windows 10, 2016, 2019, 2022.
What is SQLite

Structured Query Language or SQL is a programming language primarily used in database management. Specifically, it provides access to and management of all the data contained in a tabular RDBMS.
SQLite itself is an RDBMS (relational database management system). In addition, it is in the public domain, which means you are free to use its code for commercial or noncommercial use. As a result, you will not be legally restricted in terms of utilizing, modifying, or even distributing the platform.
As opposed to server/client SQL systems, like MySQL, SQLite has been optimized for simplicity, economy and requires relatively little configuration. In the context of that, it does not compete with server/client solutions.
SQLite is a very popular database management system because of the fact that it is lightweight and easy to manage.
With SQLite all data and the data objects are stored in a single file that can be accessed directly by any application. The file is stored on the file system and no further admin required to run SQLite.
However, SQLite is only capable of handling low to moderate volume HTTP requests and also the database size is usually limited to 2GB. Even SQLite has its limitations, its advantages have gained the attention of more users. The tools in SQLite in particular the SQLite3 Command Line CLI we examine here, work the same from one environment to the next.
Sqlite3
The SQLite project has simple command line program named sqlite3 or sqlite3.exe on Windows, which allows the user to manually enter and execute SQL statements against an SQLite database or a ZIP archive. In this article we go through steps how to use the sqlite3 program in Windows server.
In the next part of our article How to Install SQLite on Windows 10, 2016, 2019, 2022 (SQLite3 Command) we will point out SQLite advantages:
Also Read
Benefits of SQLite
Improves Performance
SQLite is extremely small and lightweight RDBMS, it is self contained in a small footprint. Also, it is serverless and file based. Any other RDBMS like MySQL needs a separate server for functionality, also called server/client architecture.
In fact, SQLite may take up as little as 600KB of space, depending on the system you install it on. You do not have to worry about installing any dependencies in order to make it work.
The SQLite database itself is modest by nature. Objects composing them – such as tables, indexes, and schema – are centralized within a single OS file. The combination of all these factors can lead to solid performance, in addition to high levels of dependability and stability. More specifically, SQLite runs between 10 to 20 times faster than PostgreSQL, and two times faster than MySQL. Low traffic websites will notice the difference the most.
Как пользоваться SQLite
SQLite — это C- библиотека, реализующая движок базы данных SQL. Все данные хранятся в одном файле. Программы, использующие библиотеку SQLite, могут обращаться к базе данных с помощью языка SQL без работающего выделенного процесса СУБД. Это означает, что одновременные запросы (или параллельные пользователи) должны блокировать файл для безопасного изменения БД. Данный пункт очень важен, поскольку непосредственно затрагивает сферу применения SQLite — если в основном используется чтение данных, тогда никаких проблем нет, но если необходимо делать большое количество одновременных обновлений, то приложение будет тратить больше времени на синхронизацию блокировки файлов, чем делать настоящую работу.
Возможности SQLite:
Способ подключения к базе данных SQLite во всех языках практически одинаков. Все они требуют для этого выполнить два шага: во-первых, включить в код библиотеку SQLite (предоставляющую универсальные функции подключения), и во-вторых, подключиться к базе данных и запомнить это подключение для дальнейшего использования. В PHP для этого служит библиотека php-sqlite.
Установка
Типы данных SQLite
Типы данных SQLite: INTEGER, REAL, TEXT, BLOB, NULL.
SQLite не имеют классов, предназначенных для хранения дат и/или времени. Вместо этого, встроенные функции даты и времени в SQLite способны работать с датами и временем, сохраненными в виде значений TEXT, REAL и INTEGER в следующих форматах:
В приложениях следует выбирать, в каком из этих форматов хранить даты и время, а затем можно свободно конвертировать из одного формата в другой с помощью встроенных функций даты и времени.