1 Overview
This is a quick tutorial how to install Docker on Windows and use it via CMD or Bash on Windows (Linux subsystem for Windows — WSL). It is assumed that the reader has basic knowledge of the Windows command line (CMD) and, if Bash should be used, a basic familiarity with Bash on Ubuntu on Windows. We will demonstrate a basic example to run a docker image.
2 System requirements
For detailed system requirements, see What to know before you install but main requirements are
- Hyper-V running/enabled (note that this means that VirtualBox VM images won’t run anymore and there may be other implications for high-precision applications, see details at Introduction to Hyper-V on Windows 10)
- 64bit Windows 10 Pro/Education/Enterprise (there are people claiming Docker runs on Windows 10 Home but we found this not to be true when trying ourselves as Hyper-V seems only available for Pro, Education and Enterprise versions — 1511 November update, Build 10586 or later), see also official Microsoft page on Hyper-V system requirements at Install Hyper-V on Windows 10. Windows >= 8 may work as well but we haven’t tested it.
- Virtualization must be enabled
3 Install Docker
The installation is best performed by using officially provided binary installer from Docker webpage. We recommend the stable version unless you need latest changes from development version. Once the installation is through (and PC restarted) Docker should be automatically running indicated by its icon showing in the task bar.

In case it is not running for you, one reason might be that the automatic enabling of Hyper-V during the Docker installation did not work. Check the official Microsoft page on Hyper-V at Install Hyper-V on Windows 10 to see a couple of ways to enable it. Also note that Hyper-V activation and virtualization activation are not the same thing so make sure virtualization is enabled in BIOS, too (usually the case if you used virtual machines before, e.g. via VirtualBox). See how to enable it at Step-By-Step: Enabling Hyper-V for use on Windows 10.
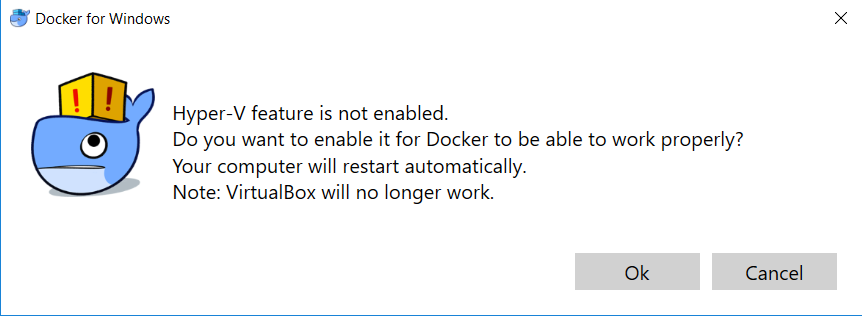
You can also check Hyper-V status on a detailed level via Powershell using below (run as admin)
4 Run Docker
Docker can be run in a few ways, we show it via CMD, Powershell and Bash on Windows. In general, CMD and Powershell usage should be fairly similar but you may require some additional wrangling for Bash. If you used the official Windows binary installer from the Docker webpage, the relevant path/environment variables should already be set and you can start using it right away. As opposed to running Docker on Linux, Windows should not require running the terminal as admin.
4.1 CMD
Check if Docker works by testing below examples. Note that you require an internet connection in case you have never used below Docker images before (e.g. hello-world) as Docker will automatically download/pull those.
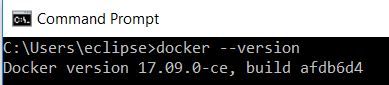
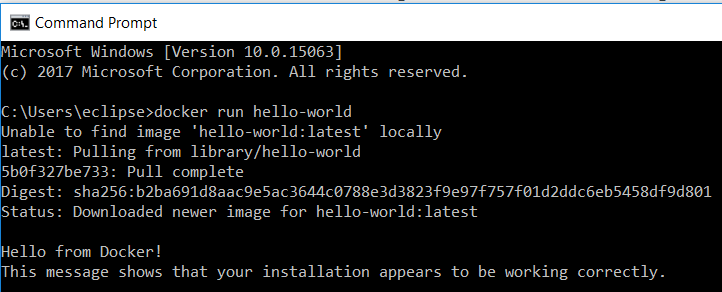
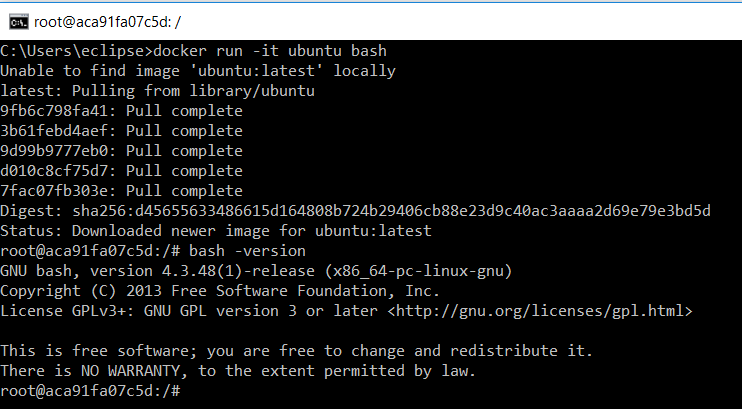
Finally you can run a more demanding example by running a Linux Ubuntu Bash terminal (this may take some time depending on your bandwidth as the complete Ubuntu image is pulled). Note that you are made root user in the shell.
4.2 Powershell
As CMD, Powershell should work out of the box so we only show the hello-world example here again. Note that the image is not pulled again as we had just used it before in CMD.
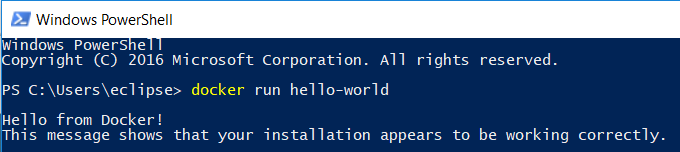
4.3 Bash on Windows
In general, Bash on Windows should inherit the PATH from Windows environment variables and thus work out of the box as well but there are a couple of things to note (note special care when working with WSL config files as outlined in subsection A general note of caution for Bash on Windows).
- Windows binary installer sets PATH variable as C:\Program Files\Docker\Docker\Resources\bin although it should actually be C:\Program Files\Docker\Docker\resources\bin , i.e. lower case r in resources . This should generally not be an issue in case-insensitive Windows but may lead to issues in Linux (WSL) although we haven’t encountered any. Still you may want to adjust it.
- We found that you get the error Unable to translate current working directory. Using C:\WINDOWS\system32 when running Docker in WSL in some directories, e.g. home (
In case you find Docker not working with an error message like The program "docker" is currently not installed. You can install it by typing: sudo apt-get install docker it is probably caused by not having set the alias correctly or because Windows does not find Docker in the PATH . You can try pointing Windows to the Docker install by including it in the PATH via .bashrc as so PATH="$PATH:/mnt/c/Program\ Files/Docker/Docker/resources/bin" .
Finally, we run the same examples as with CMD (we spare you running an Ubuntu image from an Ubuntu system as WSL although it would be possible of course).
Name already in use
docs / desktop / install / windows-install.md
- Go to file T
- Go to line L
- Copy path
- Copy permalink
- Open with Desktop
- View raw
- Copy raw contents Copy raw contents
Copy raw contents
Copy raw contents
Welcome to Docker Desktop for Windows. This page contains information about Docker Desktop for Windows system requirements, download URL, instructions to install and update Docker Desktop for Windows.
Docker Desktop terms
Commercial use of Docker Desktop in larger enterprises (more than 250 employees OR more than $10 million USD in annual revenue) requires a paid subscription.
You must meet the following requirements to successfully install Docker Desktop on Windows:
- WSL 2 backend
- Hyper-V backend and Windows containers
WSL version 1.1.3.0 or above.
Windows 11 64-bit: Home or Pro version 21H2 or higher, or Enterprise or Education version 21H2 or higher.
Windows 10 64-bit: Home or Pro 21H2 (build 19044) or higher, or Enterprise or Education 21H2 (build 19044) or higher.
Enable the WSL 2 feature on Windows. For detailed instructions, refer to the Microsoft documentation<: target rel="noopener" class >.
The following hardware prerequisites are required to successfully run WSL 2 on Windows 10 or Windows 11:
- 64-bit processor with Second Level Address Translation (SLAT)
- 4GB system RAM
- BIOS-level hardware virtualization support must be enabled in the BIOS settings. For more information, see Virtualization.
Hyper-V backend and Windows containers
Windows 11 64-bit: Pro version 21H2 or higher, or Enterprise or Education version 21H2 or higher.
Windows 10 64-bit: Pro 21H2 (build 19044) or higher, or Enterprise or Education 21H2 (build 19044) or higher.
For Windows 10 and Windows 11 Home, see the system requirements in the WSL 2 backend <: data-toggle="tab" data-target="#win-wsl2" >tab.
Hyper-V and Containers Windows features must be enabled.
The following hardware prerequisites are required to successfully run Client Hyper-V on Windows 10:
- 64 bit processor with Second Level Address Translation (SLAT)
- 4GB system RAM
- BIOS-level hardware virtualization support must be enabled in the BIOS settings. For more information, see Virtualization.
Note
Docker only supports Docker Desktop on Windows for those versions of Windows that are still within Microsoft’s servicing timeline<:target rel="noopener" class >.
Containers and images created with Docker Desktop are shared between all user accounts on machines where it is installed. This is because all Windows accounts use the same VM to build and run containers. Note that it is not possible to share containers and images between user accounts when using the Docker Desktop WSL 2 backend.
Running Docker Desktop inside a VMware ESXi or Azure VM is supported for Docker Business customers. It requires enabling nested virtualization on the hypervisor first. For more information, see Running Docker Desktop in a VM or VDI environment.
About Windows containers
Looking for information on using Windows containers?
-
describes how you can toggle between Linux and Windows containers in Docker Desktop and points you to the tutorial mentioned below.
-
provides a tutorial on how to set up and run Windows containers on Windows 10, Windows Server 2016 and Windows Server 2019. It shows you how to use a MusicStore application with Windows containers.
- Docker Container Platform for Windows articles and blog posts<:target rel="noopener" class >on the Docker website.
Note
To run Windows containers, you need Windows 10 or Windows 11 Professional or Enterprise edition. Windows Home or Education editions will only allow you to run Linux containers.
Install Docker Desktop on Windows
Double-click Docker Desktop Installer.exe to run the installer.
If you haven’t already downloaded the installer ( Docker Desktop Installer.exe ), you can get it from Docker Hub<:target rel="noopener" class >. It typically downloads to your Downloads folder, or you can run it from the recent downloads bar at the bottom of your web browser.
When prompted, ensure the Use WSL 2 instead of Hyper-V option on the Configuration page is selected or not depending on your choice of backend.
If your system only supports one of the two options, you will not be able to select which backend to use.
Follow the instructions on the installation wizard to authorize the installer and proceed with the install.
When the installation is successful, click Close to complete the installation process.
If your admin account is different to your user account, you must add the user to the docker-users group. Run Computer Management as an administrator and navigate to Local Users and Groups > Groups > docker-users. Right-click to add the user to the group. Log out and log back in for the changes to take effect.
Install from the command line
After downloading Docker Desktop Installer.exe, run the following command in a terminal to install Docker Desktop:
If you’re using PowerShell you should run it as:
If using the Windows Command Prompt:
The install command accepts the following flags:
- —quiet : suppresses information output when running the installer
- —accept-license : accepts the Docker Subscription Service Agreement<: target rel="noopener" class >now, rather than requiring it to be accepted when the application is first run
- —no-windows-containers : disables Windows containers integration
- —allowed-org=<org name> : requires the user to sign in and be part of the specified Docker Hub organization when running the application
- —backend=<backend name> : selects the default backend to use for Docker Desktop, hyper-v , windows or wsl-2 (default)
- —installation-dir=<path> : changes the default installation location ( C:\Program Files\Docker\Docker )
- —admin-settings : automatically creates an admin-settings.json file which is used by admins to control certain Docker Desktop settings on client machines within their organization. For more information, see Settings Management.
- It must be used together with the —allowed-org=<org name> flag.
- For example: —allowed-org=<org name> —admin-settings=’<"configurationFileVersion": 2, "enhancedContainerIsolation": <"value": true, "locked": false>>’
If your admin account is different to your user account, you must add the user to the docker-users group:
Start Docker Desktop
Docker Desktop does not start automatically after installation. To start Docker Desktop:
Search for Docker, and select Docker Desktop in the search results.

The Docker menu ( <: .inline>) displays the Docker Subscription Service Agreement window.
Select Accept to continue. Docker Desktop starts after you accept the terms.
Note that Docker Desktop will not run if you do not agree to the terms. You can choose to accept the terms at a later date by opening Docker Desktop.
Установка Docker на Windows
Docker Desktop для Windows — это нативное Windows-приложение, которое предоставляет среду для сборки и запуска контейнеризированных приложений. В его основе лежат нативная Hyper-V виртуализация и сеть, что является наиболее быстрым и стабильным вариантом для работы с Docker в Windows. Docker Desktop для Windows поддерживает как Windows-, так и Linux-контейнеры.
Что нужно знать перед установкой Docker на Windows?
Нам потребуется операционная система Windows 10 версии Корпоративная, Профессиональная или Образовательная. Также должны быть подключены компоненты Hyper-V и Windows Containers. Для работы с этими компонентами система должна выполнять следующие требования:
64-разрядный процессор с поддержкой преобразования адресов второго уровня (сокр. «SLAT» от англ. «Second Level Address Translation»).
Не менее 4 ГБ оперативной памяти.
Поддержка аппаратной виртуализации на уровне BIOS.
Есть два способа проверить, включена ли у вас виртуализация на уровне BIOS.
Способ №1: Посмотреть в «Диспетчер задач» > «Производительность» в поле «Виртуализация» должно быть значение «Включено» :

Способ №2: Воспользоваться утилитой systeminfo . Для этого нужно открыть приложение Windows Powershell или Командную строку с правами администратора ( Win+R ) и запустить команду systeminfo . Нас интересует последний пункт — «Требования Hyper-V» , где значением каждого подпункта должно быть «Да» :

Наличие технологии Microsoft Hyper-V является обязательным условием для установки Docker в Windows. Инсталлятор Docker для Windows предложит вам включить нужные компоненты и перезагрузить вашу машину.
Примечание: Если у вас на компьютере было установлено бесплатное ПО виртуализации VirtualBox, то после включения компонента Hyper-V VirtualBox перестанет работать, при этом все образы ваших виртуальных машин будут сохранены.
Docker для Windows включает в себя следующие компоненты:
Docker CLI клиент
Контейнеры и образы, созданные с помощью Docker Desktop для Windows, доступны всем пользователям машины, на которую он установлен, так как все пользователи используют одну и ту же виртуальную машину для сборки и запуска контейнеров.
Установка Docker на Windows 10
Существует два варианта установки Docker на Windows:
Приложение «Docker Toolbox for Windows».
Приложение «Docker for Windows».
Примечание: Обратите внимание, что «Docker Toolbox for Windows» является устаревшим решением, которым вы можете воспользоваться, если ваш компьютер не удовлетворяет требованиям установки «Docker for Windows». Более детально об установке Docker Toolbox вы можете прочитать здесь.
На этом уроке мы установим Docker через приложение «Docker for Windows», так как это решение является наиболее стабильным и надежным. Итак, сначала нам нужно скачать установщик.
Далее запускаем инсталлятор Docker Desktop Installer.exe . Следуйте инструкциям мастера установки, дайте установщику разрешение на использование прав администратора и дождитесь окончания установки.
Примечание: Приложению Docker права администратора нужны для того, чтобы установить сетевые компоненты, создать ссылки на само приложение и дать возможность Hyper-V управлять виртуальными машинами.
Чтобы запустить Docker Desktop, воспользуйтесь поиском в Windows:

Индикатором запуска Docker является иконка «кита», появившаяся в системном трее:

Если иконка «кита» скрыта в системном трее, то нажмите на стрелочку вверх, чтобы посмотреть все иконки. После установки Docker Desktop вы также получите всплывающее уведомление о том, что Docker установлен и готов к работе:

После того, как инициализация закончена, нажмите на иконку «кита» в системном трее и выберите пункт «About Docker Desktop» , чтобы проверить, что вы используете последнюю версию Docker.
Установка Docker на Windows 10
Рассмотрим установку Docker Desktop for Windows — это Community-версия Docker для систем Microsoft Windows.
Системные требования
- Windows 10 64-bit: Pro, Enterprise, Education (Build 16299 или выше).
Для успешного запуска Client Hyper-V в Windows 10 требуются следующие предварительные требования к оборудованию:
- 64 bit процессор c поддержкой Second Level Address Translation (SLAT).
- 4GB системной памяти.
- Поддержка аппаратной виртуализации на уровне BIOS должна быть включена в настройках BIOS.
Подготовка
Включаем функции Hyper-V Containers Window. Для этого переходим в панель управления — установка и удаление программ — включение или отключение компонентов Windows. Активируем пункт Hyper-V, который включает Hyper-V Managment Tools, Hyper-V Platform.
Также это можно выполнить через powershell или dism (все команды необходимо выполнять с правами администратора).
Установка
Скачиваем установщик Docker (Docker Desktop Installer) с Docker Hub.
Установка Docker Desktop включает Docker Engine, Docker CLI client, Docker Compose, Notary, Kubernetes и Credential Helper. Контейнеры и образы, созданные с помощью Docker Desktop, используются всеми учетными записями пользователей на компьютерах, на которых он установлен. Это связано с тем, что все учетные записи Windows используют одну и ту же виртуальную машину для создания и запуска контейнеров. При использовании Docker Desktop WSL 2 невозможно обмениваться контейнерами и образами между учетными записями пользователей.
Запускаем установщик Docker Desktop Installer.exe и ожидаем пока он скачает все необходимые компоненты.
После установки система потребует перезагрузки. Перезагружаемся и входим в систему.
После входа может возникнут запрос на установку дополнительного компонента WSL2. Переходим по ссылке и скачиваем необходимый пакет с официального сайта Microsoft.
После скачивания выполняем установку WSL2, после которой снова потребуется перезагрузка.
Настройка и запуск приложения
Входим в систему и ждем запуска всех служб Docker. Когда все службы будут запущены, мы увидим в трее классический значок Docker — это значит что служба установлена и запущена. Далее можно запустить приложение Docker desktop. Далее можно изменить настройки Docker при необходимости:
Рисунок 1 — Изменение параметров Docker desktop
Далее управление Docker выполняется через Powershell. Проверяем версию и выполняем тестовый запуск контейнера:

Рисунок 2 — Проверка версии Docker
После выполнения всех этих действий, Docker готов к использованию.
Нужна помощь? Настройки docker/docker swarm/docker compose мы осуществляем в рамках услуги DevOps-аутсорсинг.