Как установить Android SDK на Windows, Mac и Linux
22 октября 2008 года в Android появился магазин приложений Play Market. С тех пор прошло больше 10 лет и сегодня Google Play насчитывает почти 3 миллиона приложений в их числе Telegram с каналом AndroidInsider. Как же разработчикам со всего мира удается создавать качественные продукты? Они используют Android SDK. Чтобы получить все инструменты и средства разработки приложений, необходимо скачать среду разработки Android Studio. Но что, если вы хотите воспользоваться Android SDK с командной строкой без Android Studio и ненужных средств? В этом материале мы подскажем, как правильно установить и настроить Software Development Kit.
Ручная установка
Переходим по этой ссылке, находим раздел «Command line tools only» и скачиваем нужную версию в зависимости от вашей системы.
Создайте папку Android в корневой папке системы. В случае с Windows это локальный диск «С», а в OS X и Linux — домашняя папка пользователя. Распакуйте скачанный архив в папку Android. Для дальнейшей работы необходим установленный пакет Java на компьютере. OS X из коробки его поддерживает, чтобы проверить это, в терминале вбейте «which java», система должна выдать расположение пакета. На Windows и Linux устанавливаем JDK по этой ссылке.
Если вы используете Linux, вам понадобится установить еще несколько пакетов с помощью этой команды «sudo apt-get install lib32ncurses5 lib32stdc++6». Для других версий Linux необходимо найти подходящие пакеты ncurses5 и stdc++6.
Установка компонентов
Переходим в папку «Android/bin», находим исполняемый файл sdkmanager и запускаем, откроется следующее окно:
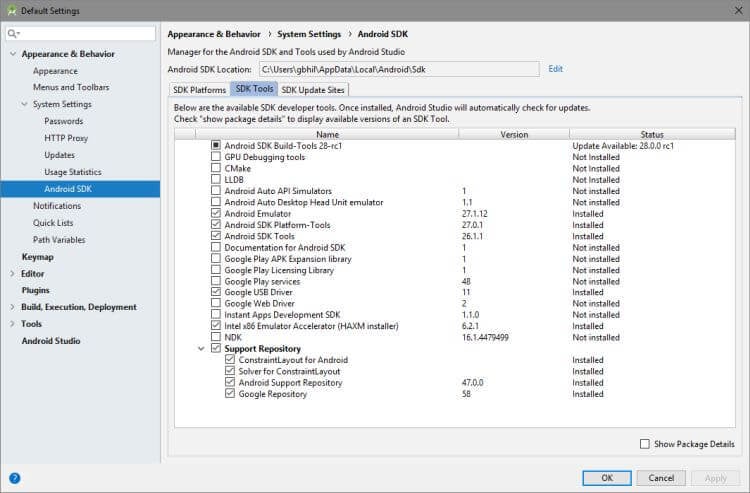
Выбираем «Android SDK Tools» и «Android SDK Platform-Tools», на Windows необходимо выбрать еще и «Google USB Driver». После этого подтвердите условия лицензионного соглашения, и начнется установка инструментов. В Windows они расположатся в папке «Windows\users\Имя пользователя\AppData\Local\Android», а на Linux и Mac в папке «.Android».
Ссылки
Теперь давайте создадим символическую ссылку на эти папки, чтобы можно было быстро запустить инструменты через командную строку.
В Windows переходим в «Этот компьютер → Свойства → Дополнительные параметры системы → Дополнительно → Переменные среды». В «Переменные среды для пользователя» находим строку «Path» и кликаем по ней 2 раза. Откроется окно, в нём нажимаем «Создать» и вставляем полный путь к инструментам через точку с запятой. Должно выглядеть примерно так «C:\Android\tools;C:\Android\platform-tools».
На Mac в домашней папке находим скрытый файл «.bash_profile» или просто «.profile». Открываем его командой «nano
/.profile» и добавляем путь до инструментов:
export PATH=»$HOME/Android/tools:$PATH»
export PATH=»$HOME/Android/platform-tools:$PATH»
Сохраняем файл комбинацией «CMD+X» и далее жмём «Y». На Linux процесс аналогичен, но нужно запускать файл .bashrc.
Вот и всё. Теперь команды Android SDK доступны через консоль. Вы сможете, например, устанавливать образы и вручную обновлять смартфон.
How to install Android SDK and setup AVD Emulator without Android Studio

If you are trying to develop to Android, you probably will end up installing the Android Studio to get the Android SDK and the AVD Emulator working properly.
But if you are using another code editor, like Sublime Text or VSCode, installing the Android Studio will just mess up with your setup and consume your precious RAM for no good reason.
I had a hard time figuring out how to properly do this setup due the lack of documentation about it, so i hope this article helps you. ��
Recommended previous knowledge:
- SDK (Standard Development Kit); Read about on Wikipedia;
- AVD (Android Virtual Device); Read about on docs;
- CLI (Command Line Interface); Read about on Wikipedia;
- Android API levels; Read about on Vanderbilt University;
- How to open, navigate and execute files in your OS terminal;
- Know what are environmental variables;
Understanding the Android SDK
Basically, the Android SDK is a bunch of packages necessary to develop for Android.
These packages stays in subfolders of a folder called “sdk” (or “android-sdk” sometimes). You do not need to know how these packages really work, just what they do.
The picture below is my Android SDK folder, these are the basic packages you will need in order to get everything working properly.
Here is a brief explanation of each package:
- tools: This package is mainly used to manage the other packages and to create AVD’s;
- emulator: As the name suggest, this is the Android emulator;
- platform-tools: Some tools to communicate with Android devices when you plug then in your computer;
- patcher: This package is automatically downloaded by the SDK. I didn’t find what exactly this is for, so just leave it as it is;
The folders bellow contain sub-folders with the packages for each Android API level.
- platforms: The platform packages are required to compile your app for the specified API level.
- system-images: These are the android images used in the emulator.
- build-tools: These are necessary to build your Android apps
Installing the Android SDK
In order to install the SDK we will use the Command Line Tools. These are some quite simple CLI’s used to manage the Android SDK. You can read the documentation here for more details.
Step 1 — Download the tools package
First, you need to download the tools package. And with this package you can download the others.
- First, go to the Android Studio download page: https://developer.android.com/studio;
- Then click in “Download Options”;
- There you will find a table named “Command line tools only”;
- This table contain some zip files. Download the appropriate file for your system (Windows, Mac or Linux);
- Extract this zip and you will get a folder called tools: This is the tools package i explained earlier;
Create a folder anywhere you prefer to place your SDK. I recommend you to stick with one of these commonly used places:
on Windows:
- Globally: C:\Android\sdk or C:\android-sdk (this is not default, but i usually set my SDK here on Windows)
- One user only: C:\Users\<username>\AppData\Local\Android\sdk
on Linux
- Globally: /opt/android/sdk or /opt/android-sdk
- One user only: /home/<username>/.android/sdk
on MacOS
- Globally: /Library/Android/sdk
- One user only: /Users/<username>/Library/Android/sdk
And move the tools folder to this new sdk folder. Make sure you have admin access to this folder and any sub-folders inside it, or the tools package will fail to download new packages.
Note: You can also download a pre-build package for your SO (like the one available on Ubuntu repository). But i do not recommend you do to so, because they probably will not be updated and will be harder to manage, since it was automatically installed.
Step 2— You need Java 8!
The Android SDK packages require Java 8. If you do not have it, you need to download. If you are using a newer version, you have to downgrade to Java 8 or you will eventually get some errors, because it is not compatible.
If you do not have the Java 8 SDK, here is how you can install it:
- download it here: https://www.oracle.com/technetwork/pt/java/javase/downloads/jdk8-downloads-2133151.html;
On Ubuntu run these commands:
- # sudo apt-get update
- # sudo apt-get install openjdk-8-jdk
Sorry for MacOS users, i don’t know how to install it on this OS.
Step 3 — Download the essential packages
Now, download the platform-tools and the emulator packages, because they contain some CLI binary files you will need later. I decided to download these packages first in order to set all the necessary environment variables at once and make the rest of the process easier.
Open a terminal window (you need to use a terminal, not the file explorer), go to your sdk folder and navigate to the /tools/bin directory.
This folder contain the SDKManager binary: this is a CLI used to list the available packages in the Google’s repository and download, update or remove them from your SDK folder.
The bellow command will list all packages installed (the first items on the list) and all packages available to download:
To download the packages, simply copy the package names and pass it as a parameter to the SDKManager CLI using the terminal:
# ./sdkmanager platform-tools emulator
If you open your sdk folder you should see these packages folders there.
Step 4 — Set your environmental variables
You need to set the below environmental variables containing the path to our SDK, so any running program can find it in your pc:
ANDROID_SDK_ROOT = Path to your SDK folder
ANDROID_HOME = The same as ANDROID_SDK_ROOT. This variable is now deprecated, but i recommend setting it because some programs still using it to locate your sdk.
And add these folders to the PATH variable, making their binary files accessible from everywhere:
To add the environment variables on WIndows, just follow these steps:
- Open the “Control Panel”;
- Go to “System and Security” option in the side menu;
- In the window “System Properties” open the tab “Advanced”;
- Click in the button “Environment Variables” in the bottom of the page;
- In the “Environment Variables” window you will see two tables: “User Variables” and ”System Variables”.
- If you created your sdk folder for one user only, set the variables in the “User Variables” table;
- But, if you create your sdk folder globally, set the variables in the “System Variables” table instead;
On Linux, you can set your environment variables in many places. So i choose the ones I found the most appropriate:
-
If you created your sdk folder for one user only, set your environment variables in the file
Here is how i set these variables in my Ubuntu, using the file /etc/environment:
And sorry again, no MacOS instructions for this task.
You can find more about these environmental variables in the oficial docs here.
Now your SDK is ready! If you do not need to run the emulator there’s no need to follow the next steps.
Step 5 — Download the platform specific packages you want
You need more three packages: The platform, the system-image and the build-tools. You can download these packages for any Android version you prefer. In this article, i will download the packages for the API Level 28.
Use the “sdkmanager — list” command to find these packages and download them using the command “sdkmanager <package name>”.
Here’s an example:
Step 5 — Create a AVD device
Creating a AVD device is a simple task: run the AVDManager command (this is a binary file located in the tools/bin folder of your sdk) with the create avd option, a name for the new AVD and the image you want to use.
Here is a example:
# avdmanager create avd — name android28 — package “system-images;android-28;default;x86”
You will be asked if you want to alter some configurations. You can also modify these configurations later in the file config.ini, located in the avd folder (this folder usually is created in your user folder, under the android directory). The currently active configurations can be find in the file hardware-qemu.ini (this file just will be created after the emulator runs for the first time).
Step 6 — Run the Android Emulator
Now you just need to run the emulator command (remember that we added this package to the environmental variables?):
# emulator -avd <your_avd_name>
The emulator take some time to init for the first time. But if you done everything correctly you should see this screen:
How To Install Android SDK Tools On Windows
It provides all the steps required to install Android Platform Tools and SDK Manager on Windows 10 without using Android Studio.
In this tutorial, we will discuss all the steps required to install Android Platform Tools and SDK Manager on Windows 10. This tutorial provides the steps for Windows 10, though the steps should be the same on other versions of Windows.
This post is useful for the developers using Android Platform Tools and SDK manager without installing Android Studio for the use cases including hybrid app development using Ionic. It also assumes that a valid JAVA_HOME environment variable exists pointing to the installation directory of Java.
You can follow How To Install Java 8 On Windows 10, How To Install Java 11 On Windows, How To Install Java 15 On Windows, or How To Install OpenJDK 15 On Windows to install Java on Windows. In case you are interested in developing Android applications using Android Studio, you can also follow How To Install Android Studio On Windows.
Step 1 — Download SDK Tools
Open the download tab of Android Studio and scroll down to the Command line tools only section. This section shows various options to download the SDK tools as shown in Fig 1.
Click the first link having the download option for Windows as highlighted in Fig 1. It will ask to accept to terms and conditions as shown in Fig 2.
Go through the details, agree on the terms and conditions and click the Download Button to start the download.
Step 2 — Install Command Line Tools
In this step, we will install the Android Command Line Tools on Windows 10. Create the directory android-sdk at your preferred location and extract the content of the downloaded SDK Tools zip to this directory. Make sure that the extracted content is available within the android-sdk directory created by us as shown in Fig 3.
Step 3 — Install Platform Tools
In this step, we will install the Android Platform Tools on Windows 10. Follow the same steps similar to Android SDK Tools to install Android Platform Tools using the download link as shown in Fig 4, Fig 5, and Fig 6.
Step 4 — Configure Environment Variable
Right-click the My Computer or This PC on the desktop and click the Properties Option. Now click the Advanced system settings. It will show the System Properties dialog having Advanced Tab options as shown in Fig 7.
Click the Environment Variables Button and click the New Button in the first section. Set the Variable Name field to ANDROID_HOME and Variable Value to the android-sdk directory created by us in the previous step.
Similarly, also configure the environment variable ANDROID_SDK_ROOT to the android-sdk directory.
Also , make sure that the JAVA_HOME environment variable is set to the JDK installation directory. It must not end with the bin as we do with the system path variable.
Step 5 — Configure Commands
In previous steps, we have downloaded and extracted the Command Line Tools and Platform Tools to the android-sdk directory. Both the tools provide several command-line utilities which we need to run by going to the appropriate directory having the executable files.
We can make these commands available at the system level without going to these directories by adding the path to tools, tools\bin, and platform-tools to the system path as shown in Fig 9. Make sure that these executables do not break other commands having the same name before adding these paths to the PATH environment variable.
Now open the Command Prompt and check the ADB and SDK Manager versions as shown in Fig 10. You might be required to restart the system to apply the environment variables set by us.
We can see that the ADB command works well and shows the version details, but the sdkmanager shows an error — «error: could not determine sdk root. error: either specify it explicitly with —sdk_root= or move this package into its expected location: <sdk>\cmdline-tools\latest\» since it expects the Command Line Tools in a version-specific directory. Now open the source.properties file from the cmdline-tools directory to check the version. It will show the version details as shown below.
Now move all the files to the directory cmdline-tools/3.0 as shown in Fig 10.
Also, update the system path as shown in Fig 11.
Now close and open the Command Prompt. Also, check the ADB and SDK Manager versions as shown in Fig 12.
Step 6 — Using the SDK Manager
List — We can list the installed and available packages and images using the list command as shown below.
Install Platform — Use the below-mentioned command to install the Android 10 (API level 30) using the SDK manager.
It will ask to accept the terms and conditions as shown in Fig 13. Enter y and hit Enter Key to accept the terms and conditions. This command creates the directory platforms within android-sdk and installs the package android-30 having all the required files to run the emulator for Android 10.
If we again check the installed packages, the list command shows the installed options as shown below.
Update SDK Manager — Update the SDK manager using the below-mentioned command.
Add System Image — We can add system images from available images shown by the list command using the SDK manager as shown below. We are adding the most recent default 64-bit system image.
Accept the License Agreement to complete the download.
There are several projects which need Google Play Services. We need system images specific to Google Play Services as shown below.
Accept the License Agreement to complete the download.
Install Emulator — We need to install the emulator before creating the AVD using SDK Manager.
Accept the License Agreement to complete the download.
Install Build Tools — Install the most recent build tool listed by the list command.
Step 7 — Using the Emulator and AVD Manager
Create Android Emulator — Create the emulator using the system image downloaded in the previous step as shown below. Replace <emulator name> with the actual name preferred by you.
The above commands ask a bunch of questions to configure the AVD if we choose the custom hardware profile option. We have excluded the details of these options from this tutorial since these configuration details depend on the actual needs. After completing all the configurations, it creates the AVD using the name provided by us while configuring it.
Similarly, we can also install the AVD of older versions as shown below.
List Android Emulators — Now go to the tools directory on the command line and check the installed platform as shown below.
Notes: Add Emulator to the system path as shown in Fig 14.
Close and re-open the Command Prompt to check the AVDs created by us in the previous steps.
It will list all the AVDs installed by us.
Run Emulator — We can run the emulator created by us as shown below.
The emulator will take some time to completely launch the AVD. The final results should look similar to Fig 15.
Delete Emulator — We can also delete an existing emulator as shown below.
Summary
This tutorial provided all the steps required to install Android Platform Tools and Android SDK Manager on Windows 10. It also provided the steps required to create and launch the AVDs using the Emulator.
How to install Android SDK and build Android App without Android Studio
This article is about installing Android SDK in Windows system and run React Native App without Android Studio. Android SDK is required to build, run and debug Android Apps on your machine. So I needed it too to build and run React Native app for android in my windows system.
But Android SDK comes with Android Studio. Yes, you are right but not every system can handle Android Studio 🙂 My system is also behind the minimum system requirements so I had to go for Android SDK separately.
Step 1: Install Chocolatey
In the official React Native Documentation, Chocolatey is recommended for downloading Node and Java. If you already have that downloaded and configured then you can skip this step.
You can either follow the complete Chocolatey Installation Doc or just run below command in your Windows Powershell Window.
Exit fullscreen mode
You will get Chocolatey installed and Environment Variables set.
Step 2: Install Java
As per the official React Native Documentation, You can use Chocolatey to install Java. If you already have that, skip this step. Just run below command in command prompt to install Node and Java. You can skip the package you have already installed.
Exit fullscreen mode
Now you must have JAVA_HOME set in your environment variables, if not then you can set. To go to environment variable you can follow below steps:
1: Go To Properties: 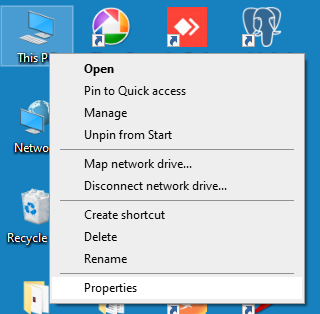
2: Go to Advance System Settings 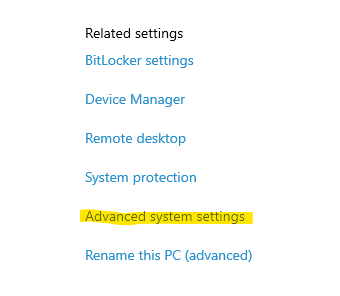
3: Go to Environment Variables 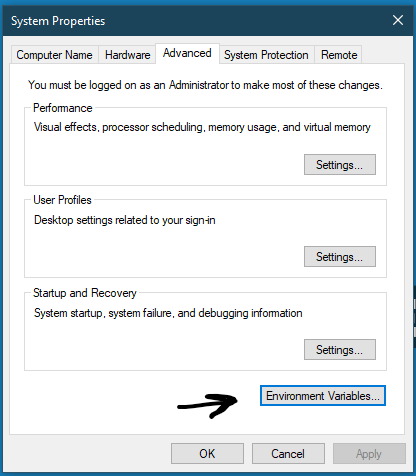
4: List of Environment Variables can be accessed here 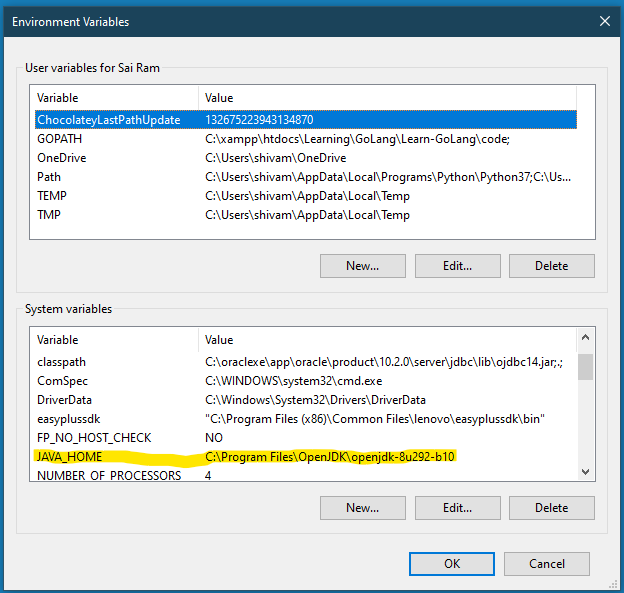
Step 3: Install SDK Manager
Now firstly we need to install Android SDK Manager to install Android SDK and other tools. For that visit the official site.
1. Download sdkmanager compressed file. 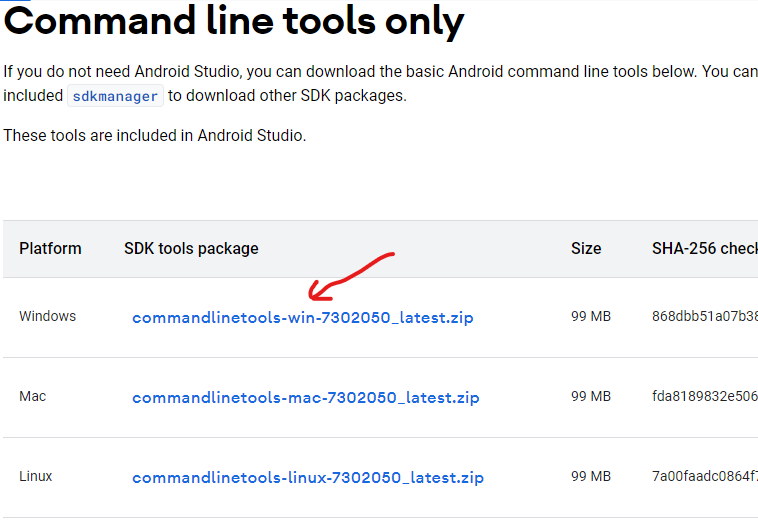
2. Now you need to create a folder, where you want to keep your all SDK packages. I created C:\Android for my case. Unzip the downloaded folder in this directory. Now I’m having the folder structure as C:\Android\cmdline-tools\<unzipped files> .
3. IMPORTANT: Now, we need to move all the unzipped files in a single folder. the name of the folder will be determined by the source.properties file’s content, which is one of these unzipped files. Open this file and It’ll be looked like this:
Exit fullscreen mode
Notice the first line, the value 4.0 is going to be our folder name.
So create a folder named as 4.0 inside C:\Android\cmdline-tools\ and move all other files into this folder. So now full directory structure will be C:\Android\cmdline-tools\4.0\<bin | lib> .
4. Now we’ll set 2 Environment variables: ANDROID_HOME and Path for cmdline-tools .
Set ANDROID_HOME to the path of the directory you made in above point 2, in my case it’s C:\Android . 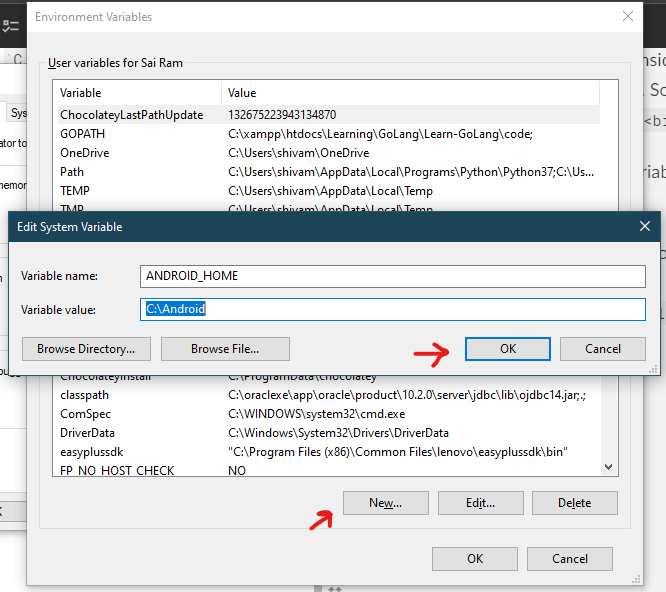
Add C:\Android\cmdline-tools\4.0\bin and C:\Android\cmdline-tools\4.0 in Path Variable. 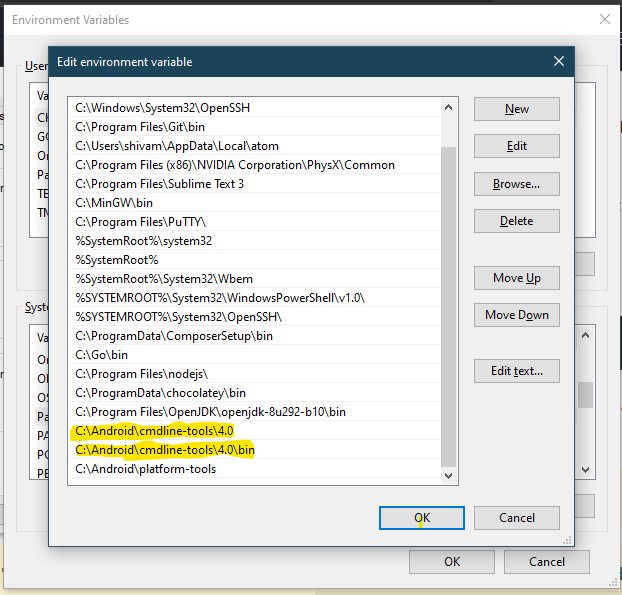
Step 4: Install Android SDK packages
We’ll now install the required packages via sdkmanager . For that, open Command Prompt.
1. Install Platform Tools (ADB & Fastboot)
Firstly we need to install adb , for that we can install platform-tools pkg via sdkmanager . Run below command or get it from here.
Exit fullscreen mode
Now add path of platform-tools in Environment Variable Path which is C:\Android\platform-tools in my case.
2. Install Platform
Use the below command to install the Android 10 (API level 30) using the SDK manager. You can download any API level by changing the name.
Exit fullscreen mode
Aceept T&C and it’ll be installed.
3. Add System Image
I am adding the most recent default 64-bit system image by running below command. Accept T&C and it’ll be installed.
Exit fullscreen mode
There are some projects which need Google Play Services. We need system image specific to Google Play Services. We can add that via command as shown below.
Exit fullscreen mode
4. Install Build Tools
I am adding the most recent build-tools 30.0.3 via below command.
Exit fullscreen mode
5. Install Emulator (Optional)
If you want to run your apps inside emulator instead of physical device then you can install emulator and system images to run that. But obviously, it requires good system specs. We’ll cover this in very short, please comment if you want detailed article on that.
1. Install Emulator
Exit fullscreen mode
2. Create emulator
Exit fullscreen mode
This will ask many questions, answer as per yoyr need.
3. Add emulator path in Path environment variable, in my case it’s C:\Android\emulator .
4. List emulator devices installed
Exit fullscreen mode
5. Run emulator
Exit fullscreen mode
6. How to use my device instead of emulator
You can follow the official documentation here and a related troubleshooting here. I’ll be adding article for my version of the same soon.
So everything is set now and you’ll be having Android SDK set up in your system. Below are some other related and useful commands.