Как сделать 404 страницу html
Create a simple 404 page with just HTML & CSS with beginner level coding! If this is your first time coding then this will really help you get started. This is a really basic version of a 404 Page. It contains neither bootstrap nor Javascript!
This was a project I used in this website a while ago (from the time of writing), which was then removed. It is made using HTML & CSS only. A pretty basic template for people who want to get into web development.
NOTE: This does not use bootstrap, hence it is not responsive, this is just a basic template.
If you don’t know what this means then in simple words, this template is not non-desktop friendly
Let’s get into the coding part:
This is the HTML of the template:
This concludes the HTML part of the template.
Moving on to CSS part
Как сделать 404 страницу

Постараюсь не сильно вдаваться в подробности, что такое 404-ая страница, достаточно открыть гугл и по запросу «Как сделать 404 страницу» — Вы обнаружите огромное количество сайтов с подробным описанием, что это такое. Я просто хочу поделиться с читателем своим способом создания 404-ой страницы. И вот, что у нас должно получиться в итоге.

Почему обязательно надо делать свою 404-ую страницу?
Главная и единственная причина – это не потерять посетителя. У каждого пользователя наверняка возникала такая ситуация, когда нажимая на ссылки на каком-нибудь сайте, браузер вместо запрашиваемой страницы показывал свою дефолтную страницу ошибки. Ошибка возникает в результате неправильно введенного запроса или запрашиваемая страница, была удалена самим веб-мастером. В таком случае все посетители ведут себя одинаково – закрывают страницу и уходят с вашего сайта.
Хватит воду лить! Давай конкретику!
Создаем два файла – 404.html и .htaccess (этот файл без имени, но с расширением htaccess), который автоматически перенаправляет посетителя на 404.html, в случае возникновения ошибки. Чтобы перенаправление работало, в этот файл надо прописать одну единственную строку:
ErrorDocument 404 http://www.site.ru/404.html
Когда оба файла будут готовы, залить их на сервер в корень домена.
Мы уже создали пустой файл 404.html и теперь будем наполнять HTML кодом саму 404 страницу, активно применяя HTML5 и CSS3. Я придумал свой способ, как сделать простую и красивую 404 страницу.
Первым делом нужно подобрать большую и качественную картинку или фотографию размером не менее 1200×750 пикселей. Существует много сайтов со свободной лицензией, откуда можно скачать очень качественные фотографии. Я бесплатно скачал с популярного сайта pixabay.com это забавное изображение.

Я хочу расположить картинку как фон на все окно браузера и в центре браузера написать – 404 страница не найдена и поставить ссылку на главную. Разберем подробнее самые важные моменты.
Эффект полупрозрачности RGBA
Выбранное изображение слишком яркое, надо его слегка затемнить, тогда текст будет более читаемый. Эффект полупрозрачного затемнения, можно получить используя RGBA, прописав в стилях блока следующую строчку кода:
background: rgba (0, 0, 0, 0.7);
Первые три буквы обозначают – красный, зеленый, синий и они равны нулю (то есть получаем черный цвет). А последняя буква «а» – представляет собой альфа-канал, отвечающий за полупрозрачность элемента. В нашем случае цифра 0.7 – говорит о 70% затемнения. Шкала от полной прозрачности до полной непрозрачности находиться между нулем и единицей (0. 1).
Позиционирование элементов
Для правильной верстки моего примера 404 страницы, без понимания как работает свойство position, будет трудно. Посмотрев на конечный результат 404 страницы, нам надо понять структуру HTML документа. Здесь мы видим три слоя, наложенных друг на друга. Нижний слой <body> – сама картинка, средний в теге <div> – полупрозрачный блок затемнения и верхний <div> – текст. Наша задача задать нужное позиционирование содержимого этих слоев.
У среднего слоя будет абсолютное позиционирование, поскольку положение элемента (блок затемнения) задается относительно краев браузера с нулевыми отступами.
Верхний текстовый слой позиционируем относительно элемента среднего слоя.
Код страницы 404
Имея этот готовый код и меняя только само изображение, можно наделать себе массу разных «ошибочных» страниц.
<!DOCTYPE html>
<html>
<head>
<meta charset=»utf-8″>
<title>Код страницы 404</title>
<style>
html < height: 100%; >
body <
background: url(your_image.jpg) no-repeat;
background-size: cover; /* Масштабирует картинку сохраняя пропорции */
>
.over <
background: rgba(0, 0, 0, 0.7); /* Цвет фона и значение прозрачности */
position: absolute; /* Абсолютное позиционирование */
left: 0; right: 0; top: 0; bottom: 0; /* Отступы от краев браузера */
>
.404 <
margin-top: 100px;
text-align: center; /* Выравнивание текста по центру */
font-size: 10em;
color: #fcf9f9;
position: relative; /* Относительное позиционирование */
z-index: 2; /* Порядок наложения элемента по высоте */
>
.notfound <
text-align: center;
color: #fff;
font-size: 2em;
position: relative; /* Относительное позиционирование */
z-index: 2; /* Порядок наложения элемента по слоям в глубину */
>
.notfound a <
color: #fff;
font-size: 0.8em;
>
.notfound a:hover <
color: yellow;
text-decoration: none;
>
</style>
</head>
<body>
<div ></div>
<div >404</div>
<div >страница не найдена<br>
<a href=»#»> перейти на главную страницу..</a>
</div>
</body>
</html>
Если Вы планируете заниматься созданием сайтов на заказ, то разобраться во всех тонкостях верстки, используя HTML5 и CSS3, Вам поможет мой видеокурс.

Копирование материалов разрешается только с указанием автора (Михаил Русаков) и индексируемой прямой ссылкой на сайт (http://myrusakov.ru)!
Добавляйтесь ко мне в друзья ВКонтакте: http://vk.com/myrusakov.
Если Вы хотите дать оценку мне и моей работе, то напишите её в моей группе: http://vk.com/rusakovmy.
Если Вы не хотите пропустить новые материалы на сайте,
то Вы можете подписаться на обновления: Подписаться на обновления
Если у Вас остались какие-либо вопросы, либо у Вас есть желание высказаться по поводу этой статьи, то Вы можете оставить свой комментарий внизу страницы.
Порекомендуйте эту статью друзьям:
Если Вам понравился сайт, то разместите ссылку на него (у себя на сайте, на форуме, в контакте):
Она выглядит вот так:
Комментарии ( 0 ):
Для добавления комментариев надо войти в систему.
Если Вы ещё не зарегистрированы на сайте, то сначала зарегистрируйтесь.
How to make a custom 404 error page for your website
![]()
It can be a mis-typed URL or a broken link that triggers a 404 error page which is server’s response to a page that does not exist. For those who aren’t familiar of how it looks, have you seen a page like this before?
Looking at this, you can imagine how cringeworthy it would feel like as a user to suddenly drop on an empty page like this. Let’s break this down into pieces real quick before creating our page.
Scenario/problem: User is attempting to look for a page that does not exist.
Known context: 404 page not found.
Solution: A friendly page informing the user of what happened in simple language and tell them what to do next.
Therefore, to ice the great UX that you’ve been iterating upon for your website, make sure that you take of the 404 case.
Let’s dive right in.
Step 1: Are you using a website builder like Squarespace or Weebly?
If yes, then it should already have a 404 error page setting which you can use directly to upload an image and add buttons. You’re pretty much done here.
In my case, I had my website running locally. If you’re like me, move on!
Step 2: Create your custom 404 page in HTML.
Step 3: Look for “.htaccess” file in the root directory of your server
FTP into your server and find this file in the root directory. You’ll need to edit it. If you can’t find it, then you will have to create it. Name it “.htaccess”. Nothing before and after. Just “.htaccess”.
Step 4: Edit .htaccess file
Open it and add the following line:
…where /not-found-page.html is the full path to the new custom 404 page that you’ve created.
With this line, we’re just telling the server that in case of 404 error scenario, return this file to the browser.
Step 5: Make sure the path is correct and test it
Try to look for a page that does not exist on your website. You should get your custom 404 page that you denoted in the .htaccess file.
Step 6: Did it work? If not, update the settings of your server
In my case, since I am running my website locally on Mac, Apache does not allow for custom .htaccess file. I had to go into Apache configuration and edit the settings.
Here is how I did it for anyone who is interested and following the same way:
Voilah! That’s pretty much it for creating a custom 404 page. It should be running perfectly for your website. If you’re still running into issues, mess around with how you can change configurations of your server to allow for custom 404 pages.
The story and the flow of your website is incomplete if you lead the user to a dead end like 404. There are so many creative examples for you to get inspired from. Remember to keep it simple, yet interesting. 🙂
Let me know if you guys have any questions or need more help regarding this. I hunted around trying to solve this for a day until I got it working and thought I’ll share.
Creating an HTML 404! Error Web Page
There can be many reasons a user cannot gain access to a website. One of these is known as a 404! error. Quite simply an HTML 404! error message is a Hypertext Transfer Protocol (HTTP) status code indicating the server could not find the requested website. In other words, your web browser can connect with the server, but the specific page you are trying to access cannot be reached. In this tutorial, we will build an HTML 404 error web page to customize what the visitor sees when they land there. We will use some CSS as well to further enhance the page.
The 404! Error

Why the 404! HTML Error Appears
When an HTTP 404 appears on your screen, it means that although the server is reachable, the specific page you are looking for is not. The web page is either broken, or it no longer exists. The 404 error code can appear in any browser, regardless of the type of browser you are using.
There are several reasons why you might be getting an HTTP 404 code:
- One typical trigger for an error 404 message is when the page has been deleted from the website.
- The page was moved to another URL and the redirection was done incorrectly.
- You entered an incorrect URL address.
- Although it happens very rarely, sometimes the server malfunctions.
- The entered domain name does not exist anymore.
Unfortunately, broken links are often left for long periods of time after the page has been deleted or moved. Even when web owners maintain their web sites, sometimes the owner may delete the site, or change the name of the site. This means that when someone clicks on an “old” link, they will no longer be able to find that site. Unfortunately, due to many people putting up URLS to web sites all over the place, there will ultimately be links that actually link to nowhere.
It is common for owners of websites to not check their external links regularly which leads to users trying to access a dead link. Web maintenance is essential for this reason.
Create a “Page Not Found” HTML Web Page
If a visitor to your website reaches an old and non-existent web page, the server that hosts that website will show a “404” error that basically says the page can not be found. Instead of allowing the server to show a bland, default error page, you can create one of your own and get as creative as you want with it.
Let us jump into step one of our tutorial.
Step 1: Create an HTML Landing Web Page
Let us start by simply creating a basic HTML page. This will be the foundation for creating a more exciting and informative 404! Error web page for visitors to land on.
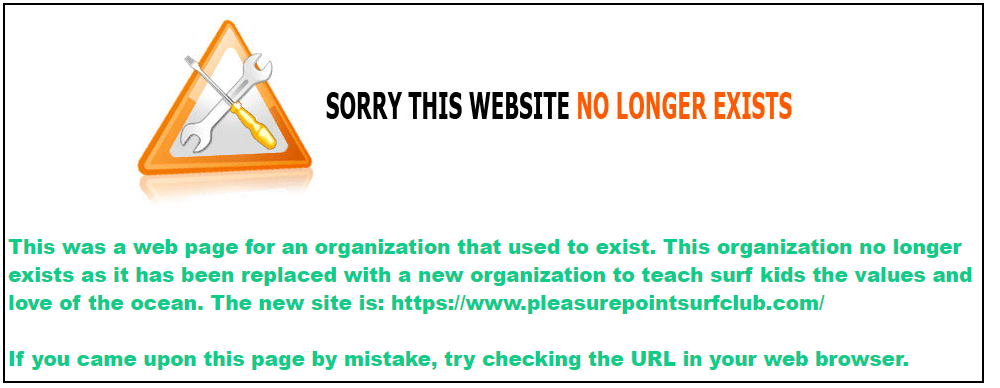
Open a text editor, save the file as “shorelinesurfteam.html” and put in the following HTML code. Save your file again when done.
To punch up the text font, let us add a style. Copy the following code and resave your HTML file.
They will see the following more informative and friendly error page that you have created.
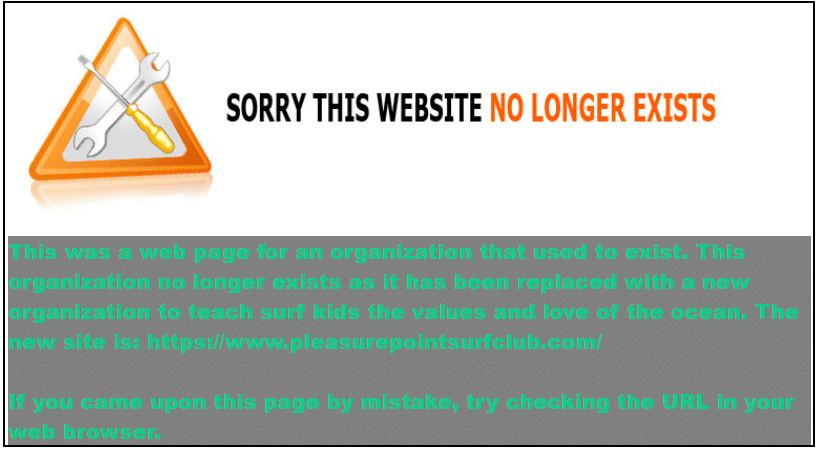
To make the green text stand out more, you can add a div element with a color background as such:
Now, you can be as artistic as you like to create your fancy, informative 404.html page. Always keep the visitor to the page in mind to enhance their experience.
See the HTML Font Families to learn how to enhance your text, and also check out the CSS Background Tutorial to learn how to enhance the background of your web page.
Where to Next?
This introduction to the 404 page error should provide a starting point for further inquiry into web page management and the unlimited creative aspects that HTML offers. In the next blogs, you will be able to explore other areas of HTML design. Continue to be inspired, explore further and dive deeper into the world of web design.