Python Requests Tutorial — GET and POST Requests in Python
![]()
In this Requests tutorial article, you will be learning all the basics of the requests module using Python to get you started with using Requests. We will be covering the following topics in this blog:
- What is the Requests module?
- Installing Requests module
- Making a GET Requests
- Downloading Image with Requests
- Making POST Requests
- Sending Cookies and Headers
- Session Objects
- Conclusion
Let us begin this “Requests Tutorial” blog by first checking out what the Requests Module actually is.
What Is Requests Module?
Requests is a Python module that you can use to send all kinds of HTTP requests. It is an easy-to-use library with a lot of features ranging from passing parameters in URLs to sending custom headers and SSL Verification. In this tutorial, you will learn how to use this library to send simple HTTP requests in Python.
Requests allow you to send HTTP/1.1 requests. You can add headers, form data, multi-part files, and parameters with simple Python dictionaries, and access the response data in the same way.
Installing The Requests module
To install requests, simply:
Or, if you absolutely must:
Making a GET Request
It is fairly straightforward to send an HTTP request using Requests. You start by importing the module and then making the request. Check out the example:
So, all the information is stored somewhere, correct?
Yes, it is stored in a Response object called as req.
Let’s say, for example, you want the encoding of a web-page so that you can verify it or use it somewhere else. This can be done using the req.encoding property.
An added plus is that you can also extract many features like the status code for example (of the request). This can be done using the req.status_code property.
We can also access the cookies that the server sent back. This is done using req.cookies, as straightforward as that! Similarly, you can get the response headers as well. This is done by making use of req.headers.
Do note that the req.headers property will return a case-insensitive dictionary of the response headers. So, what does this imply?
This means that req.headers[‘Content-Length’], req.headers[‘content-length’] and req.headers[‘CONTENT-LENGTH’] will all return the value of the just the ‘Content-Length’ response header.
We can also check if the response obtained is a well-formed HTTP redirect (or not) that could have been processed automatically using the req.is_redirect property. This will return True or False based on the response obtained.
You can also get the time elapsed between sending the request and getting back a response using another property. Take a guess? Yes, it is the req.elapsed property.
Remember the URL that you initially passed to the get() function? Well, it can be different than the final URL of the response for many reasons and this includes redirects as well.
And to see the actual response URL, you can use the req.url property.
Don’t you think that getting all this information about the webpage is nice? But, the thing is that you most probably want to access the actual content, correct?
If the content you are accessing is text, you can always use the req.text property to access it. Do note that the content is then parsed as Unicode only. You can pass this encoding with which to decode this text using the req.encoding property as we discussed earlier.
In the case of non-text responses, you can access them very easily. In fact it’s done in binary format when you use req.content. This module will automatically decode gzip and deflate transfer-encodings for us. This can be very helpful when you are dealing directly with media files. Also, you can access the JSON-encoded content of the response as well, that is if it exists, using the req.json() function.
Pretty simple and a lot of flexibility, right?
Also, if needed, you can also get the raw response from the server just by using req.raw. Do keep in mind that you will have to pass stream=True in the request to get the raw response as per need.
But, some files that you download from the internet using the Requests module may have a huge size, correct? Well, in such cases, it will not be wise to load the whole response or file in the memory at once. But, it is recommended that you download a file in pieces or chunks using the iter_content(chunk_size = 1, decode_unicode = False) method.
So, this method iterates over the response data in chunk_size number of bytes at once. And when the stream=True has been set on the request, this method will avoid reading the whole file into memory at once for just the large responses.
Do note that the chunk_size parameter can be either an integer or None. But, when set to an integer value, chunk_size determines the number of bytes that should be read into the memory at once.
When chunk_size is set to None and stream is set to True, the data will be read as it arrives in whatever size of chunks are received as and when they are. But, when chunk_size is set to None and stream is set to False, all the data will be returned as a single chunk of data only.
Downloading An Image Using Requests Module
So let’s download the following image of a forest on Pixabay using the Requests module we learned about. Here is the actual image:
This is the code that you will need to download the image:
Note that the ‘path/to/forest.jpg’ is the actual image URL. You can put the URL of any other image here to download something else as well. This is just an example showed here and the given image file is about 185kb in size and you have set chunk_size to 50,000 bytes.
This means that the “Received a Chunk” message should be printed four times in the terminal. The size of the last chunk will just be 39350 bytes because the part of the file that remains to be received after the first three iterations is 39350 bytes.
Requests also allow you to pass parameters in a URL. This is particularly helpful when you are searching for a webpage for some results like a tutorial or a specific image. You can provide these query strings as a dictionary of strings using the params keyword in the GET request. Check out this easy example:
Next up in this “Requests Tutorial” blog, let us look at how we can make a POST request!
Making a POST Request
Making a POST request is just as easy as making GET requests. You just use the post() function instead of get().
This can be useful when you are automatically submitting forms. For example, the following code will download the whole Wikipedia page on Nanotechnology and save it on your PC.
Sending Cookies and Headers
As previously mentioned, you can access the cookies and headers that the server sends back to you using req.cookies and req.headers. Requests also allow you to send your own custom cookies and headers with a request. This can be helpful when you want to, let’s say, set a custom user agent for your request.
To add HTTP headers to a request, you can simply pass them in a dict to the headers parameter. Similarly, you can also send your own cookies to a server using a dict passed to the cookies parameter.
Cookies can also be passed in a Cookie Jar. They provide a more complete interface to allow you to use those cookies over multiple paths.
Check out this example below:
Next up on this “Requests Tutorial” blog, let us look at session objects!
Session Objects
Sometimes it is useful to preserve certain parameters across multiple requests. The Session object does exactly that. For example, it will persist cookie data across all requests made using the same session.
The Session object uses urllib3’s connection pooling. This means that the underlying TCP connection will be reused for all the requests made to the same host.
This can significantly boost the performance. You can also use methods of the Requests object with the Session object.
Sessions are also helpful when you want to send the same data across all requests. For example, if you decide to send a cookie or a user-agent header with all the requests to a given domain, you can use Session objects.
Here is an example:
As you can see, the “visit-month” session cookie is sent with all three requests. However, the “visit-year” cookie is sent only during the second request. There is no mention of the “visit-year” cookie in the third request too. This confirms the fact that cookies or other data set on individual requests won’t be sent with other session requests.
Conclusion
The concepts discussed in this tutorial should help you make basic requests to a server by passing specific headers, cookies, or query strings.
This will be very handy when you are trying to scrape some web pages for information. Now, you should also be able to automatically download music files and wallpapers from different websites once you have figured out a pattern in the URLs.
I hope you have enjoyed this post on Requests Tutorial.If you wish to check out more articles on the market’s most trending technologies like Artificial Intelligence, DevOps, Ethical Hacking, then you can refer to Edureka’s official site.
Do look out for other articles in this series which will explain the various other aspects of Python and Data Science.
Name already in use
Requests is a simple, yet elegant, HTTP library.
Requests allows you to send HTTP/1.1 requests extremely easily. There’s no need to manually add query strings to your URLs, or to form-encode your PUT & POST data — but nowadays, just use the json method!
Requests is one of the most downloaded Python packages today, pulling in around 30M downloads / week — according to GitHub, Requests is currently depended upon by 1,000,000+ repositories. You may certainly put your trust in this code.
Installing Requests and Supported Versions
Requests is available on PyPI:
Requests officially supports Python 3.7+.
Supported Features & Best–Practices
Requests is ready for the demands of building robust and reliable HTTP–speaking applications, for the needs of today.
Библиотека Requests для Python: код и практика
Разбираемся в методах работы с HTTP-запросами в Python на практике.

Иллюстрация: Катя Павловская для Skillbox Media

Библиотека Requests для Python позволяет работать с HTTP-запросами любого уровня сложности, используя простой синтаксис. Это помогает не тратить время на написание кода, а быстро взаимодействовать с серверами.
Почему стоит выбрать Requests?
Python Requests — это библиотека, которая создана для быстрой и простой работы с запросами. Стандартные HTTP-библиотеки Python, например та же Urllib3, часто требуют значительно больше кода для выполнения одного и того же действия, а это затрудняет работу. Давайте сравним код для простой задачи, написанный с помощью Urllib3 и Requests.
Количество строк различается в два раза: на Urllib3 — восемь строк, а на Requests — четыре. И это только один небольшой запрос.
Устанавливаем библиотеку
Писать код на Python лучше всего в специальной IDE, например в PyCharm или Visual Studio Code. Они подсвечивают синтаксис и предлагают автодополнение кода — это сильно упрощает работу программиста. Весь код из этой статьи мы писали в Visual Studio Code.
Для начала работы с библиотекой Requests её необходимо установить в IDE. Для этого откройте IDE и введите команду в терминале:
Библиотека готова к работе. Остаётся только импортировать её:
Используем метод GET
Из всех HTTP-запросов наиболее часто используется GET. Он позволяет получить данные из указанного источника — обычно с какого-то веб-сайта. Чтобы отправить GET-запрос, используется метод requests.get(), в который в качестве параметра добавляется URL-адрес назначения:
Этот код совершает одно действие — связывается с указанным адресом и получает от сервера информацию о нём. Когда вы вводите домен в адресную строку браузера и переходите на сайт, под капотом выполняются те же самые операции. Единственное различие в том, что Requests позволяет получить чистый HTML-код страницы без рендеринга, то есть мы не видим вёрстку и разные визуальные компоненты — только код и техническую информацию.
Для проверки ответа на запрос существуют специальные НТТР-коды состояния. Чтобы воспользоваться ими, необходимо присвоить запрос переменной и «распечатать» её значение:
Если запустить этот код, то в терминале выведется <Response [200]>. Это хороший результат — значит, запрос прошёл успешно. Но бывают и другие HTTP-коды состояний.
HTTP-коды состояний
Коды состояний имеют вид трёхзначных чисел от 100 до 500. Чаще всего встречаются следующие:
- 200 — «OK». Запрос прошёл успешно, и мы получили ответ.
- 400 — «Плохой запрос». Его получаем тогда, когда сервер не может понять запрос, отправленный клиентом. Как правило, это указывает на неправильный синтаксис запроса, неправильное оформление сообщения запроса и так далее.
- 401 — «Unauthorized». Для выполнения запроса необходимы актуальные учётные данные.
- 403 — «Forbidden». Сервер понял запрос, но не может его выполнить. Например, у используемой учётной записи нет достаточных прав для просмотра содержимого.
- 404 — «Не найдено». Сервер не нашёл содержимого, соответствующего запросу.
Кодов состояния намного больше. С полным списком можно ознакомиться здесь.
Получаем содержимое страницы
Для получения содержимого страницы используется метод content. Он позволяет получить информацию в виде байтов, то есть в итоге у нас будет вся информация, не только строковая. Запустим его и посмотрим на результат:
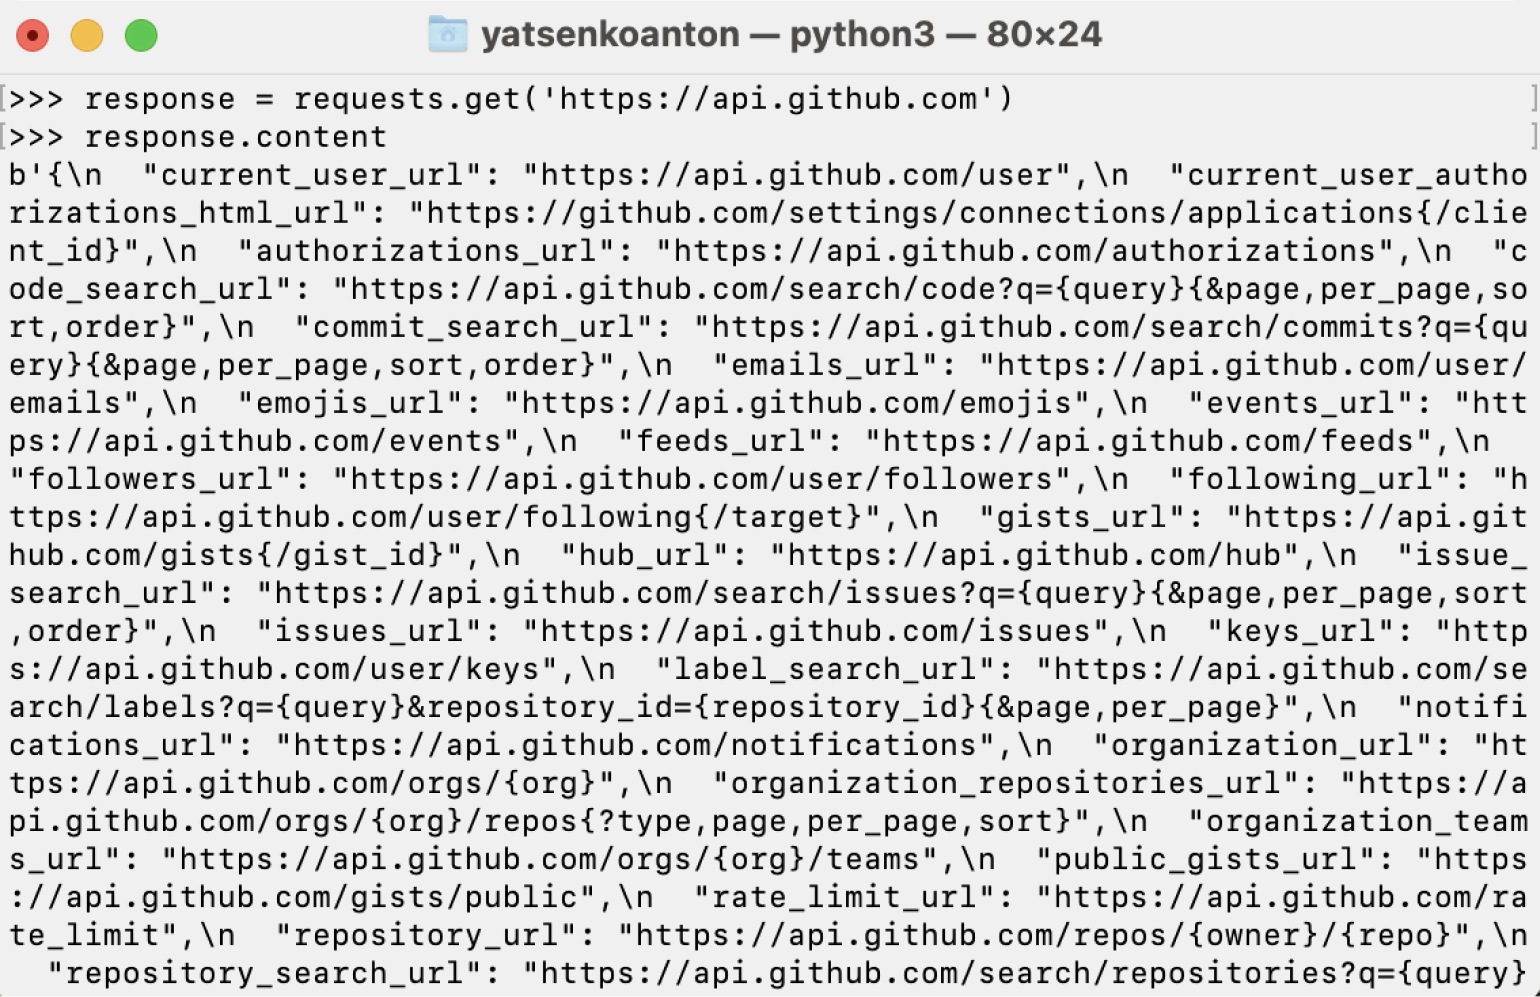
Информацию из байтового вида в строковый можно декодировать с помощью метода text:
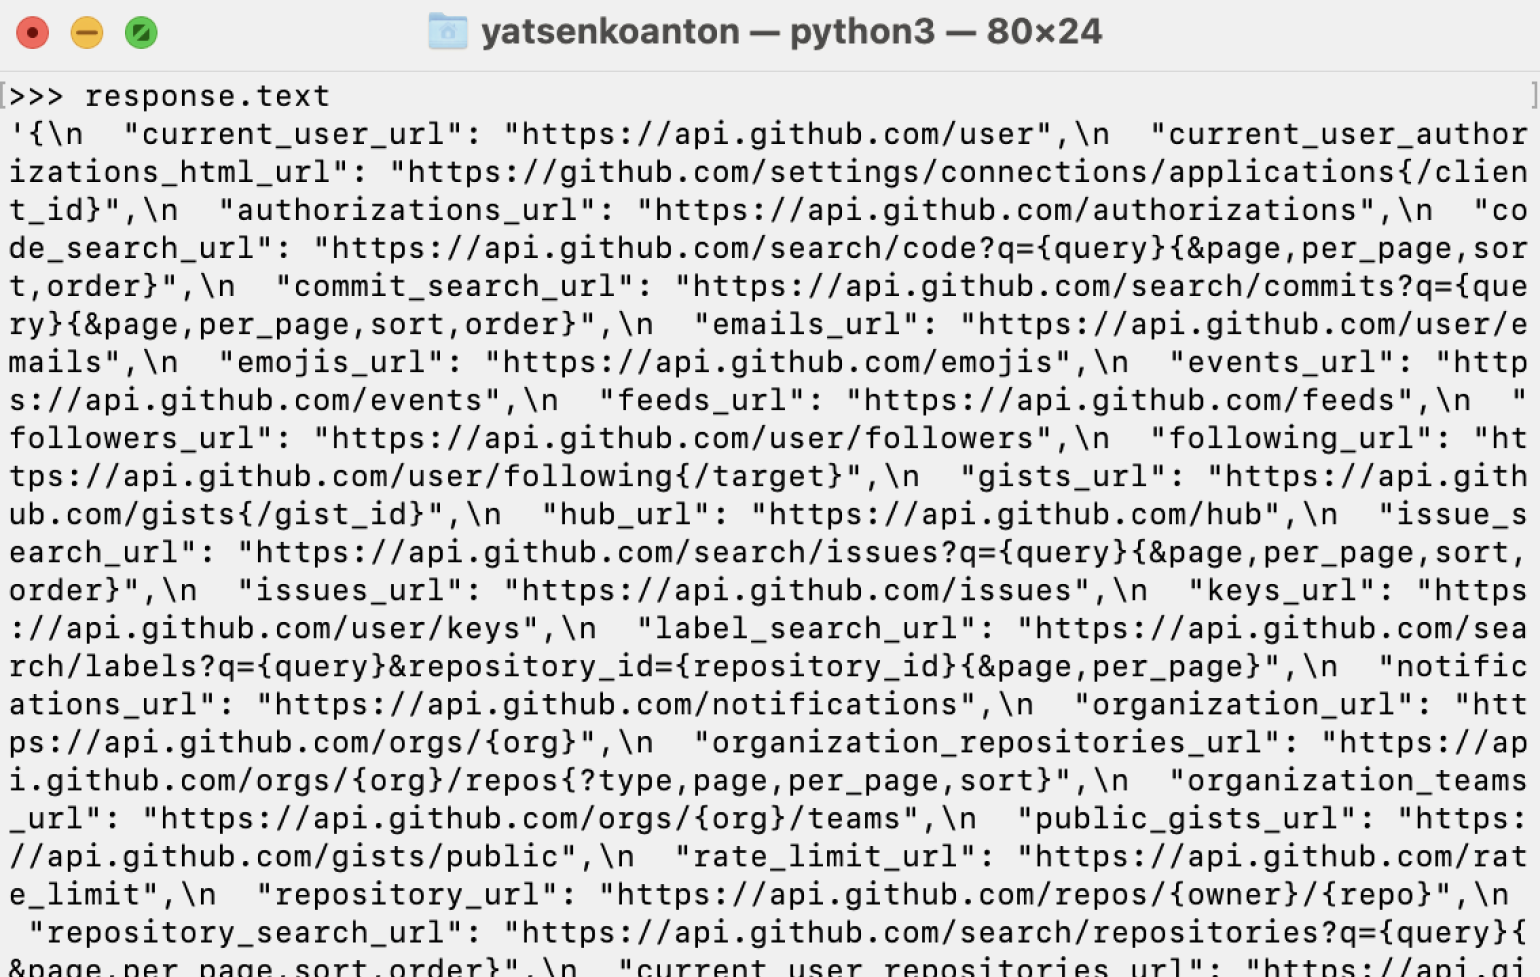
В обоих случаях мы получаем классический JSON-текст, который можно использовать как словарь, получая доступ к нужным значениям по известному ключу.
HTTP-заголовки в ответе
Заголовки ответа — важная часть запроса. Хотя в них и нет содержимого исходного сообщения, зато там можно обнаружить множество важных деталей ответа: информация о сервере, дата, кодировка и так далее. Для работы с ними используется метод headers:
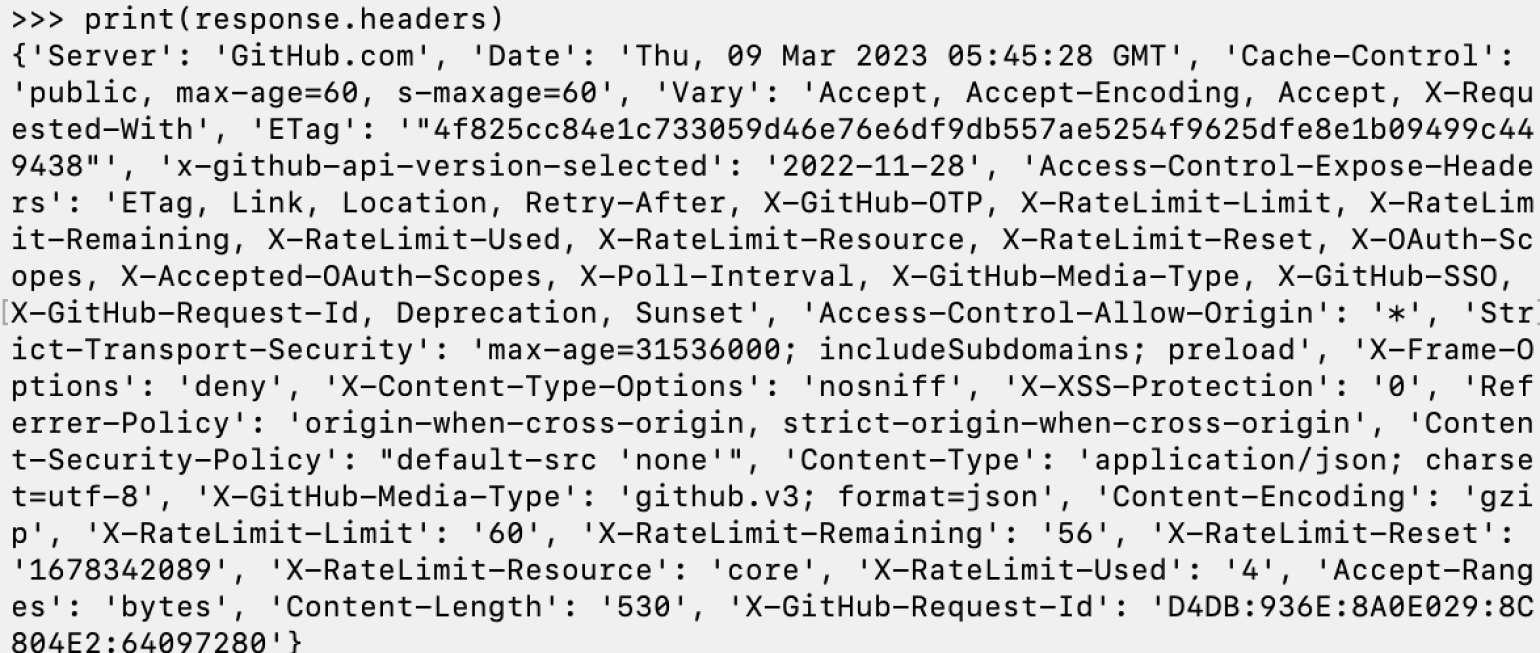
Зачем это надо? Например, таким образом мы можем узнать дату и время на сервере в момент получения запроса. В нашем случае ответ пришёл 9 марта в 05:45:28 GMT. Это помогает логировать действия для их последующей оценки, например, при поиске ошибок выполнения.
HTTP-методы в Python
| Метод | Описание |
|---|---|
| GET | GET-метод используется для обычного запроса к серверу и получения информации по URL. |
| POST | Метод запроса POST запрашивает веб-сервис для приёма данных, например для хранения информации. |
| PUT | Метод PUT просит, чтобы вложенный в него объект был сохранён под определённым URI . Если URI ссылается на уже существующий ресурс, он модифицируется, а если URI указывает на несуществующий ресурс, сервер может создать новый ресурс с этим URI. |
| DELETE | Метод DELETE удаляет объект с сервера. |
| HEAD | Метод HEAD запрашивает ответ, идентичный запросу GET, но без тела ответа. |
| PATCH | Метод используется для модификации информации на сервере. |
Python Requests: параметры запроса
Запрос GET можно настроить с помощью передачи параметров в методе params. Посмотрим, как это работает на простом примере — попробуем найти изображение на фотостоке Pixabay.
Для начала создадим переменную, которая будет содержать необходимые нам параметры:
Наш запрос для поиска изображений на стоке Pixabay представлен словарём, где:
- q — передаём ключевые слова для поиска;
- order — порядок фильтрации поиска, в нашем случае — по популярности;
- min_width и min_height — минимальная ширина и высота соответственно.
Напишем запрос и посмотрим на результат выполнения:
В ответе мы получим ссылку с нужными параметрами запроса:
Откроём её в браузере:

Всё получилось. У нас правильно настроена сортировка и размеры изображений.
Requests и аутентификация HTTP
Аутентификацию используют в тех случаях, когда сервис должен понять, кто вы. Например, это часто необходимо при работе с API. Аутентификация в библиотеке Requests очень простая — для этого достаточно использовать параметр с именем auth. Попробуем написать код для доступа к API GitHub. Для него вам потребуются данные учётной записи на сервисе — логин и пароль. Поставьте их в нужные места кода:
При запуске кода вам будет необходимо ввести пароль от своего профиля. Если пароль правильный, вернётся ответ 200, если нет — 401.
Работа с SSL-сертификатами в Requests
SSL-сертификат указывает на то, что установленное через HTTP соединение безопасно и зашифровано. Важно, что библиотека Requests не только умеет работать с SSL-сертификатами «из коробки», но и позволяет настраивать взаимодействие с ними. Для примера отключим проверку SSL-сертификата, передав параметру функции запроса verify значение False:

Мы видим, что ответ на запрос содержит предупреждение о неверифицированном сертификате. Всё дело в том, что мы отключили его получение вручную в коде выше с помощью функции verify.
Контролируем выполнение запросов с помощью класса Session
Метод GET позволяет работать с запросами на высоком уровне абстракции, не разбираясь в деталях их выполнения, при этом надо настроить лишь базовые параметры.
Однако возможности библиотеки Requests на этом не заканчиваются: с помощью класса Session мы можем контролировать выполнение запросов и увеличивать скорость их выполнения.
Класс Session позволяет создавать сеансы — базовые запросы с сохранёнными параметрами (то есть без повторного указания параметров).
Напишем код для простой сессии, позволяющей получить доступ к GitHub:
Запустим его и введём пароль. Как видим, всё сработало:

Запрос возвращает информацию с сервера при этом работает с помощью session. То есть теперь нам не придётся вводить повторные параметры авторизации при следующих запросах.
Что дальше?
Библиотека Requests — простой инструмент для работы с HTTP-запросами разного уровня сложности. Рекомендуем подробно изучить возможности библиотеки, методы и примеры их использования в официальной документации.
Installation of Requests
This part of the documentation covers the installation of Requests. The first step to using any software package is getting it properly installed.
$ python -m pip install requests
To install Requests, simply run this simple command in your terminal of choice:
Get the Source Code
Requests is actively developed on GitHub, where the code is always available.
You can either clone the public repository:
Or, download the tarball:
Once you have a copy of the source, you can embed it in your own Python package, or install it into your site-packages easily:
Requests is an elegant and simple HTTP library for Python, built for human beings. You are currently looking at the documentation of the development release.