How To Use Python For Browser Games Development?

Everyone these days loves playing games. From children to people of old age, everyone is glued to their gaming devices to have some fun and refresh their minds. As a result, the gaming industry is flourishing by day and night. According to Forbes, the gaming industry will reach over $300 billion by 2025.
The web is a growing platform to host online browser-based games that users can play from anywhere and anytime around the world. Gone are the days when web-only supported plain old 2D based games. Now, with the growing technology, you can create exciting graphics-rich online games.
Honestly, Python is not so popular when it comes to developing resources intensive gaming applications. Developers usually complain related to the performance of games built on top of Python. However, it is not the case when it comes to creating browser-based Python games. There are many web technologies and Python libraries and platforms which you can use to create graphically rich games that run on most modern-day browsers.
In this article, we will see discuss various ways and tools to make a web game in Python. With these tools, you will be able to build a game that runs on any modern-day browser.
Before getting started, let’s first see why you should target the online browser games market.
Table of Contents
Why Should You Target Online Browser Games?
People love to play mini-games on their browsers. You will probably find browser-based games on almost every genre from FPS, RPG, Arcade, to city building, war games, and so on. Therefore, if you learn how to create develop browser-based games, then you can earn some handsome amount of money as well.
Other reasons include:
- The web has infinite reach, and the games built for web browsers work well on most platforms such as PCs, smartphones, tablets, etc.
- Improved discoverability of your browser game as you can benefit from the shareability and linkability of the web.
- All revenue from your mobile game is yours, and you don’t have to pay any portion of your income to app stores.
- Your users can play your game from anywhere and anytime. All they need is an internet connection to play your browser-based Python game.
- Better engage with your game players to get feedback without any middleman.
The Role of Python in The Gaming Industry
- The AI behavior of The SIMS is scripted using Python.
- The map editor of Civilization IV supports Python programming.
- Another popular game that supports Python is Disney’s Toontown Online, which is multiplayer online role-playing (MMORPGs). It helps pandas3D for graphics of the game, and the game is quite lightweight.
- EVE Online is another MMORPGs who is using stackless Python – a variation of Python programming language for its client and server-side code.
- Battlefield Heroes uses Python for some parts of their game logic, such as scoring with cleartext and game modes.
How To Use Python For Browser Games Development?
Primary browser games utilize JavaScript and WebGL or Canvas2D for displaying graphics on the browser. There is no way to build your entire browser game using Python as web browsers use HTML to render web pages and its various elements. Therefore, you can use Python for the backend logic of your game and render it as pure HTML on browsers.
Another way is to use Python on the backend to generate interactive Flash or JavaScript to run on the browser.
Popular game engines such as Unity3D or UnrealEngine gives you the option to export game projects into a compatible HTML5 code. However, this method is quite complex and time-consuming to implement inside a game engine.
The best way is to use any native HTML 5 game engine. Using a native HTML5 game engine, you can produce optimized JavaScript code, which will also boost the performance of your browser-based games.
Let’s get down to the nitty-gritty of Python-based browser games. You have to use frontend technologies and APIs to render your game on the browser and use Python gaming libraries and frameworks at the backend for determining gaming logic.
Technology for browser-based Python game development
1. Full Screen API – If you want your browser game to run over the entire screen.
2. Gamepad API – For providing gamepads or other game controllers support to your browser game.
3. Web Audio API – Games without audio are pretty dull, and no one would like to play it. Use Web Audio API for controlling playback and manipulation of audio from JS code. You can add cool sound effects and apply them in real-time.
4. HTML and CSS – Most important to learn if you want to build your own browser game. Using HTML and CSS, you can design the interface of your browser game. <canvas> HTML tag provides an easy way to do 2D graphics.
5. JavaScript – Modern-day programming language of the web, which is fast. Using it, you can apply Python logic from the backend to control the gameplay.
6. HTML Audio – If you only require basic audio for your browser game, then you can simply apply the <audio> HTML element.
7. WebGL – Create high-performance and hardware-accelerated 3D and 2D graphics from web content.
8. WebRTC – WebRTC or Web Real-Time Communications API supports the transfer of video and audio data, including teleconferencing back and forth between multiple users. So, if you want to build an online multiplayer game and allow players to talk with each other while they are busy killing zombies, then this the API for you.
9. WebSockets – Connect your browser game to the server and facilitate real-time data transfer to support gameplay actions, chat services, and so on.
1o. Web Workers – Take advantage of modern-day multicore processors using Web Workers. Spawn background game threads running their own JS code to enhance the performance of your Python-based online game.
11. Pointer Lock API – Get exact coordinates of your user’s cursor to do accurate measurements of what players are doing in the game.
Now, that you are familiar with various web technologies that you can use for online Python game development. Let’s see various Python libraries and frameworks for game development.
Python Libraries For Online Game Development
1. PyGame
PyGame is a simple and easy to use set of Python modules for developing video games. It adds functionality on top of the SDL library. Thus, allowing you to create top-notch Python games.
Over 660 game projects have been built on the PyGame websites, including Indie Game Festival finalists, Australian Game festival, and so on.
Features:
- Multicore processor support
- Utilizes optimized C and Assembly code
- Portable
- Great control over your main loop.
- Modular
Games developed using Pygame – Magic Leap, Oculus Quest, Valve Index, Windows Mixed Reality, and so on.
2. Kivy
Kivy is a cross-platform Python framework for NUI development, which you can use to develop exciting and addictive mobile games. Whether it is a simple puzzle game or arcade game, you can bring your gaming idea into reality using Kivy.
Features:
- Kivy supports rapid application prototyping.
- Write your game code once and run it on multiple platforms, including Windows, Linux, OS X, iOS, and Android.
- Native support of taking user inputs from various devices, including Mac OS X trackpad, WM_Pen, Linux Kernel HID, etc.
- Free to use for commercial projects.
- The graphics engine utilizes OpenGL ES 2.
Games developed using Kivy – Deflectouch, FishLife, memoryKivy, ArithmeBricks, etc.
Mobile games developed using Kivy – Spikes Escape, Ants Must Die, CoinTex, Quadropoly, etc.
3. Pyganim
Pyganim, pronounced as “pig” and “animation” is a Pygame module for quickly adding sprite animations and supports both Python 2 and Python 3.
You can use it in conjunction with the PyGame library to develop your mobile game if it requires more complex sprite transformations and animations.
4. OcempGUI
OcempGUI is a python-based toolkit for creating simple GUIs. It leverages the capabilities of the PyGame library and allows you to develop a broad range of game projects.
If you want to build basic Python games that involve simple GUI elements such as entry boxes, buttons, scrolling, and simple events, then you can quickly get started with OcempGUI.
Features:
- Save your time by using a broad range of drawing functions.
- Focus on your primary task instead of getting troubled with low-level components.
- Build simple GUI Python games.
5. pyjs
pyjs is a Rich Internet Application (RIA) development platform for both developing web-based and desktop games. With pyjs, you can write your JavaScript game entirely in Python as it contains a Python-to-JavaScript compiler.
Here is an overview of how pyjs works:
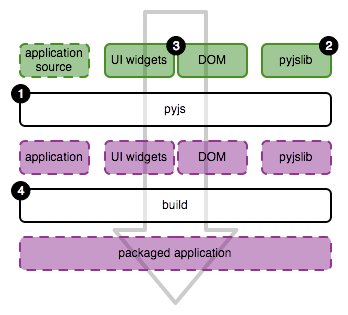
Image Source: pyjs
Features:
- Run the web-based Python game on desktop as a standalone application as well.
- Develop games using Python instead of HTML and CSS.
- AJAX library for handling browser interoperability issues.
- UI widgets and a DOM library – Written in Python and are translated to JS for your mobile game deployment.
Wrapping Up
In this article, we explored various methods and tools for creating cool Python web games that your users can play on their browsers anytime and anywhere. Python has a lot of work to do to boost its gaming performance when compared to C# and C++, which are far better alternatives to develop resource-intensive games. However, Python is still not far behind, and if you are looking to create simple yet addictive mobile games, then you can play with it.
Hello Friends! I am Himanshu, a hobbyist programmer, tech enthusiast, and digital content creator.
With CodeItBro, my mission is to promote coding and help people from non-tech backgrounds to learn this modern-age skill!
Надоел JavaScript — используй браузерный Python
«Погоди, что?» – думаю, большинство читателей отреагирует на заголовок именно так.
В смысле «просто использовать Python в браузере»?
Все знают, что в браузерах работает только JavaScript.
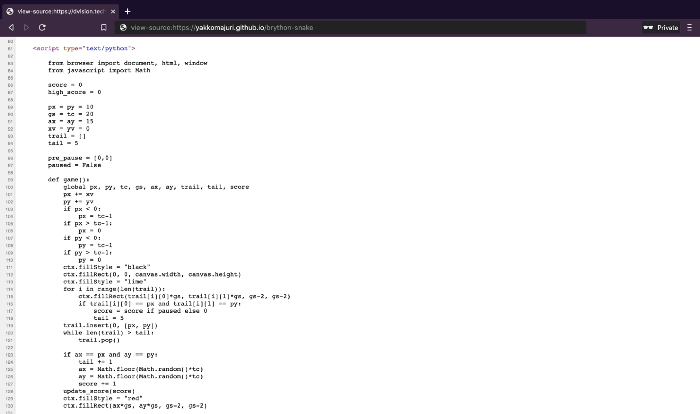
Ну, выше приведен скриншот с исходным кодом моего личного сайта. Взгляните, возможно вы увидите для себя что-то новое.
А теперь, давайте поговорим о том, как и насколько хорошо это работает, а также обсудим ряд других альтернатив JavaScript.
Знакомство с Brython
Brython — это реализация Python3, написанная на JavaScript, которая позволяет писать код на Python для веба.
По сути, это JavaScript-библиотека, которая преобразует ваш код на Python в эквивалентный JS и исполняет его в рантайме.
Поскольку написание браузерного кода на Python звучит круто, я решил попробовать.
Разработка «Змейки» на Brython
Вот ссылка на мой сайт, где вы можете попробовать версии «Змейки» на JavaScript и Brython. А вот ссылка на GitHub c исходным кодом.
Для того, чтобы опробовать Brython, я решил написать классическую «Змейку».
Так как я не специалист по работе с Canvas в HTML и не разработчик игр, я решил использовать эту JavaScript-реализацию в качестве отправной точки. Когда-то я уже создавал свою «Змейку» на основе Canvas, но эта реализация более аккуратная и компактная.
А еще автор написал ее менее чем за 5 минут. Надо отдать должное Крису Делеону, это очень впечатляет.
Итак, я добавил к реализации Криса подсчет очков и сохранение лучшего результата, а также немного улучшил интерфейс (добавил кнопку паузы и кнопку с инструкциями). Затем я портировал игру на Brython.
Также я модифицировал его код, чтобы он работал в режиме strict , так как в реализации Криса используются вещи вроде неявных глобальных переменных, которые, на мой взгляд, не отражают того, как выглядит большая часть кода на JS (не критикую автора – он программировал на время). Я хотел получить хорошее сравнение кода на Brython и JS.
JavaScript оказался таким, и я не буду размещать этот код здесь, потому наша цель – сфокусироваться на Brython.
Несмотря на то, что большая часть кода на Brython была «дословным переводом» с JS, некоторые части (например, функционал подсчета очков) были написаны непосредственно на Brython, а затем реализованы на JS – чтобы посмотреть на отличия.
Окончательный результат выглядит следующим образом:
Итак, основываясь на этом фрагменте, давайте разберемся в базовых понятиях Brython
Подключение brython.js
Для использования Brython не требуется установка. Просто импортируйте скрипт внутри head :
Запуск Brython
Для того, чтобы Brython мог транслировать и исполнять код на Python так, будто это код на JS, нам нужно вызвать Brython как раз тогда, когда загрузится тело документа. Например, так:
Этот тег будет выполнять поиск тегов script c типом "text/python" и запускать их код.
API для работы с вебом
JavaScript по умолчанию дает доступ к объектам вроде document и window , необходимым в любом JS-проекте. Соответственно, Brython тоже должен иметь возможность работать с ними.
Для решения этой проблемы создатели Brython могли бы просто дать разработчикам возможность обращаться к этим объектам из кода на Python, но это привело бы к крикам дебаггеров о undefined variable и снижению производительности.
Таким образом, чтобы использовать эти API, мы должны импортировать их точно так же, как импортируем любой другой модуль на Python:
И вам не нужно выполнять команду pip install . В конце концов, вы вставляете все это в HTML! Просто добавьте требуемые импорты, с остальным разберется Brython.
Чтобы увидеть насколько хорошо все это работает, я попробовал использовать несколько различных методов из Web API: alert , setInterval , addEventListener и т.д. Все они сработали так, как должны были.
Встроенные объекты и методы JavaScript
В «Змейке», как только змея съест яблоко, нам нужно сгенерировать новое яблоко в случайном месте.
Однако, я не могу использовать модуль random из библиотеки Python*. Так как же я могу сгенерировать случайное число (без написания собственной библиотеки)?
Оказалось, что в Brython более широкая поддержка JavaScript, чем я думал. Смотрите:
Благодаря модулю javascript , если есть объект, к которому я могу получить доступ с помощью JS, то я могу получить к нему доступ с помощью Brython.
Если я импортирую JavaScript-библиотеку (jQuery, Bootstrap) и захочу использовать ее методы — я могу сделать это с помощью from javascript import <библиотека> . И, естественно, я также могу использовать встроенные JS-объекты, например, Date или String .
Специфические конструкции
В Python, если я хочу распаковать список, я могу написать list2 = [*list1] . Также, если я хочу присвоить переменной значения исходя из некоторого условия, я могу написать foo = 10 if condition else 20 .
У этих конструкций есть эквиваленты в JavaScript: оператор spread ( [. arr] ) и тернарный оператор ( let foo = condition ? 10 : 20 ).
Но поддерживает ли их Brython?
Я попробовал их, и они отлично сработали. Вы можете увидеть, что распаковка списка из Python и условное присваивание используются в моем коде.
Отладка
Честно говоря, я думал, что отладка в Brython будет ужасной.
На самом деле все не так уж и плохо.
Конечно, я написал совсем небольшой и не очень сложный проект, но ошибки, брошенные Brython были в основном точными и довольно понятными.
Это верно, по крайней мере, в отношении синтаксических ошибок. Импорт модулей из библиотеки Python – совсем другая история.
Производительность
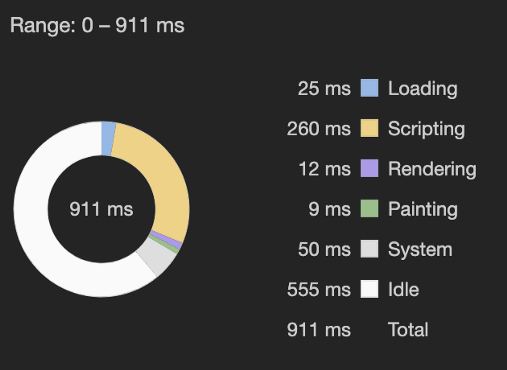
JavaScript Snake
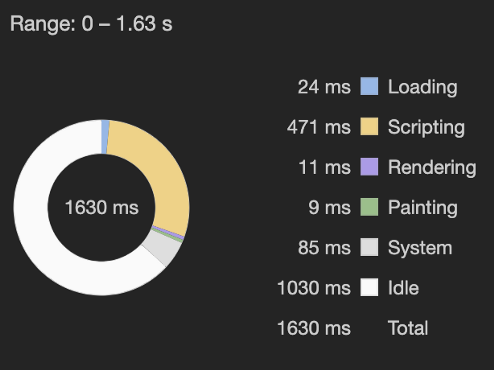
Brython Snake
Как и ожидалось, код на Brython работает медленнее, чем JavaScript. В моем случае он был примерно в 1.7 раз медленнее.
Подозреваю, что в более сложных проектах Brython будет в несколько раз медленнее, чем чистый JS.
Тем не менее, вы можете выполнить транспиляцию вашего кода на Brython заранее и использовать на странице только JavaScript, который должен работать лучше.
Я действительно пытался использовать редактор Brython Editor для преобразования моего кода на Brython в JS и запуска получившегося кода на веб-странице, но из-за огромного количества ошибок я пока от этого отказался. Впрочем, я приложил к этому не слишком много усилий.
Заключительные мысли о Brython
Честно говоря, я был весьма впечатлен Brython. Вот несколько плюсов и минусов из моего собственного опыта работы с языком:
- Мне удалось написать «Змейку» без лишних хлопот, причем опыт отладки оказался на удивление положительным.
- В моем простом проекте Brython беспрепятственно взаимодействовал с нативными JavaScript-объектами, доступными на странице
- Я ценю тот факт, что мой код выглядит чище на Python, а также мне нравится, что я могу использовать полезные конструкции из Python для написания браузерного кода.
- В случае с моей игрой, хоть Brython загружается медленнее, чем JavaScript, пользователь этой разницы не замечает.
- Мне приятно видеть Python в исходном коде моего сайта.
- Брайтон работает значительно медленнее, чем чистый JS.
- Для использования Brython разработчику необходимо иметь опыт работы с JavaScript.
- Вы неизбежно столкнетесь с большим количеством ошибок и его сайту есть куда расти в плане удобства навигации и возможностей обучения
- У Brython отсутствует сильная экосистема и инструменты развития.
Тем не менее, я считаю, что в настоящее время Brython больше подходит для JavaScript-разработчиков, знакомых с Python и уставших от JS, а не для Python-разработчиков, которые хотят заниматься веб-разработкой, не изучая JavaScript.
Я думаю, что понимание JavaScript необходимо для того, чтобы хорошо работать с Brython. И если вы решите потратить время на изучение JavaScript, чтобы вам было легче писать на Brython, то вы можете просто использовать JavaScript.
Другие альтернативы JS в браузере
Причина, по которой я выбрал Brython, заключалась в том, что из большинства вариантов перехода от Python к JS, о которых я впервые узнал, он был единственным, у кого ведется активная разработка на GitHub. Большинство просмотренных мною транспайлеров из Python в JavaScript не имеют коммитов в течение нескольких лет.
Впрочем, есть и другие альтернативы.
Pyodide, например, кажется интересным вариантом. Он компилирует Python (вместе с его научными библиотеками) в WebAssembly, что позволяет ему запускаться в браузере.
WebAssembly, как следует из названия, является ассемблером для веба. Подобно тому, как ассемблер на наших компьютерах может работать в качестве посредника между языками высокого уровня и машинным кодом, WebAssembly делает то же самое в вебе.
Таким образом, можно написать компилятор, который будет переводить Python (или любой другой язык) в WebAssembly, что позволит ему работать в браузере.
Это амбициозный и перспективный проект, который, скорее всего, приведет к тому, что мы увидим все больше веб-разработок без JavaScript.
Тем не менее, он все еще находится в зачаточном состоянии (
3 года), так что, вероятно, потребуется некоторое время, прежде чем мы увидим, что JavaScript регулярно заменяется другими языками.
И пока мы этого ждем, вам придется воспользоваться инструментами вроде Brython, если вы действительно не можете иметь дело с JavaScript.
Но, честно говоря, это неплохое начало!

Узнайте подробности, как получить востребованную профессию с нуля или Level Up по навыкам и зарплате, пройдя платные онлайн-курсы SkillFactory:
Peer To Peer Gaming With Arcade and Python Banyan — A Proof Of Concept

I recently read a RealPython article about Paul Craven’s Arcade gaming library for Python. After examining the Arcade examples, I was impressed by Arcade’s consistency and ease of use.
The Arcade library was designed to create 2D games to be run on a single computer, and it accomplishes that goal brilliantly. That being said, having run an after-school Scratch club for a local middle school, one of the things my students always wished for was the ability to create multi-player networked games. Sadly, Scratch does not support this, and the students were left disappointed. Thinking of my students, I decided to see if I could use Arcade to create multi-player games. And thus, this multi-player proof of concept began.
In this posting, I will discuss how to create a multi-player game using the Python Arcade gaming library in conjunction with the Python Banyan framework. Banyan augments Arcade by providing the networking and messaging support required for multi-player games.
What will be covered:
- A short discussion of multi-player software architectures.
- The self-imposed requirements and goals of the proof-of-concept presented in this posting.
- How I selected a game to demonstrate the concepts.
- How to install and run the demo code.
- Getting into the details:
- A quick introduction to Python Banyan.
- Looking at how the code was assembled.
Multiplayer Support Schemes — Client/Server vs. Peer To Peer
Multiplayer games generally are implemented using one of 2 schemes, client/server being one, and peer to peer(p2p) being the other.
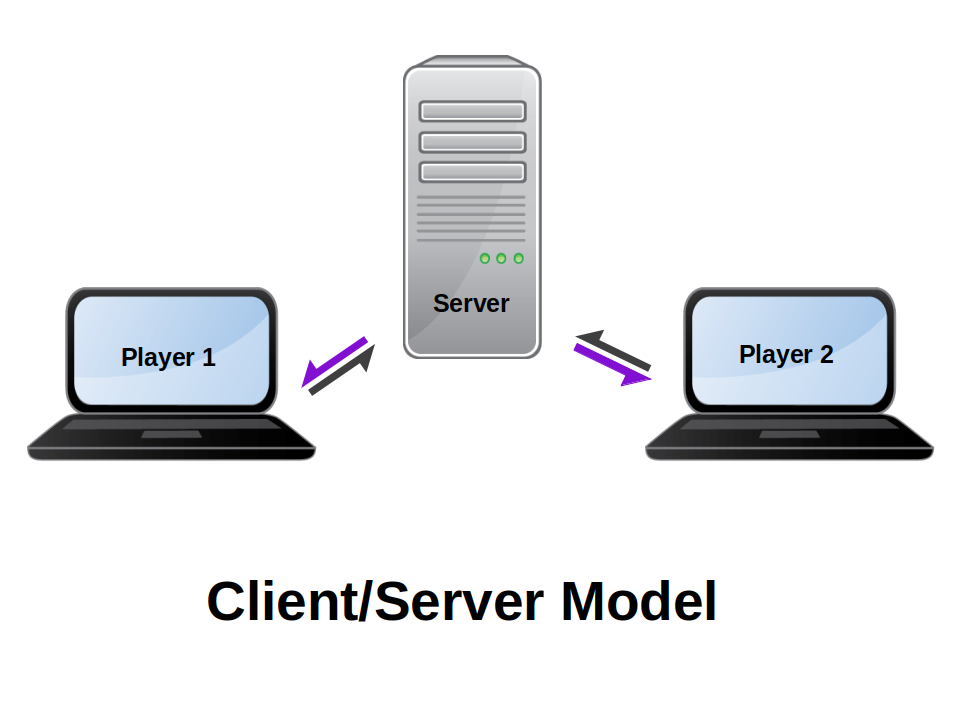
With the client/server model, the players connect to a central server. The server receives the individual player’s interaction events (keyboard presses, mouse moves, joystick motion, etc.), updates the game based on the events received, and then generates and sends screen updates to the individual players.
- Relatively easy to implement.
- Cheating is averted since the server monitors all events
- It requires a separate server or server process.
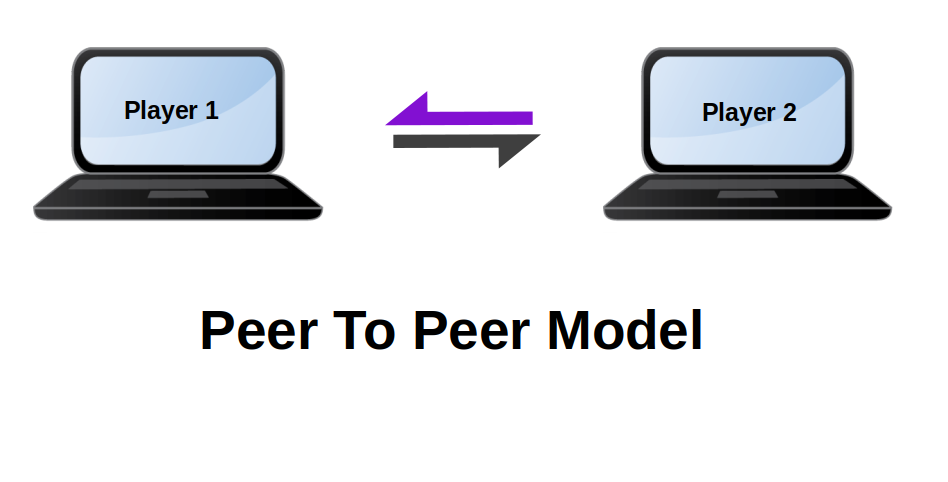
With peer to peer (p2p), there is no central server. As each player generates screen events, the local game instance sends screen update requests to each of the players.
- No central server required. Players communicate directly with each other.
- More difficult to implement than the client/server model.
- Potential for game cheating since no central authority is in control.
Goals and Requirements Of The Project
Taking the road less traveled, I decided to explore using the p2p model. Here are the requirements I set for myself:
- The game is intended to be confined to a single LAN. Restricting support to within a single LAN avoids security issues and simplifies routing.
- The game is to consist of a single Python script run as two separate processes on a single computer, or on two different computers.
- Player role selection is accomplished using a command-line option.
- Linux, macOS, and Windows are to be supported.
- As each player generates game events, screen updates must be fast and in sync with the other player.
- Compatible with Python 3.7 and above.
The Proof Of Concept
Finding A Game Candidate
Realizing that I am not the best at designing computer games, I wanted to find an existing game that I could modify to illustrate my proof of concept ideas. Turning to the Arcade examples, I chose the Collect Coins that are Bouncing example
But Isn’t That A One-Player Game?
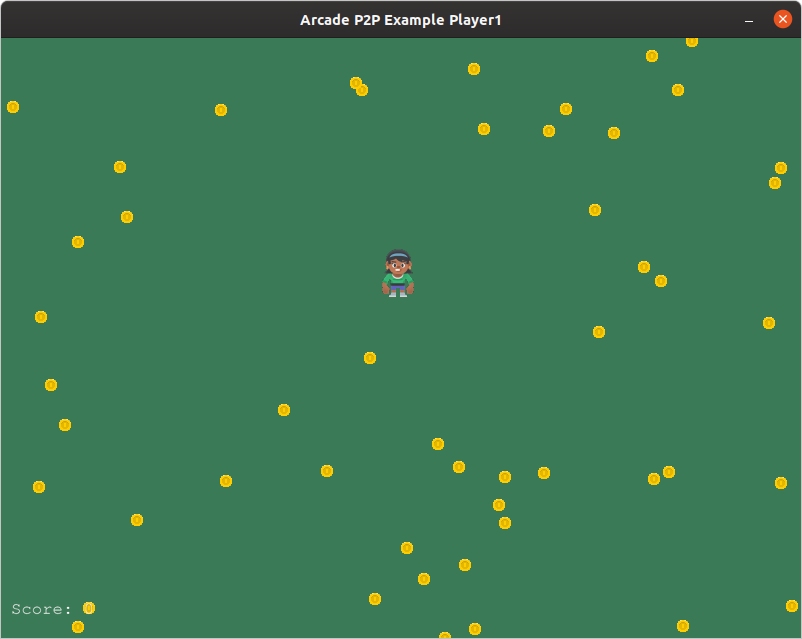
When first looking at the game, it appears that there is only one player. The goal of the game is for the player, using the mouse, to collect all of the randomly bouncing coins. When the female sprite touches a coin, the coin is removed from play, and the score is incremented by 1.
This looks like a single-player game, but what if we viewed the game in a slightly different way. What if the female sprite, which we call player 1, was controlled on one computer, and the coins and their random motion on another computer. We can then consider the coins as player 0. In this way, we have a two-player game with one player, player 1 being human-controlled, and the other player, player 0, being computer-controlled.
Each of the players would need to have a copy of the mouse-controlled player sprite, the 50 coin sprites, and game score text. Each player is responsible for updating their own domain and notifying the peer of these updates. Both player’s screens need to be updated in unison in near real-time!
A Video Demo Of The P2P Game
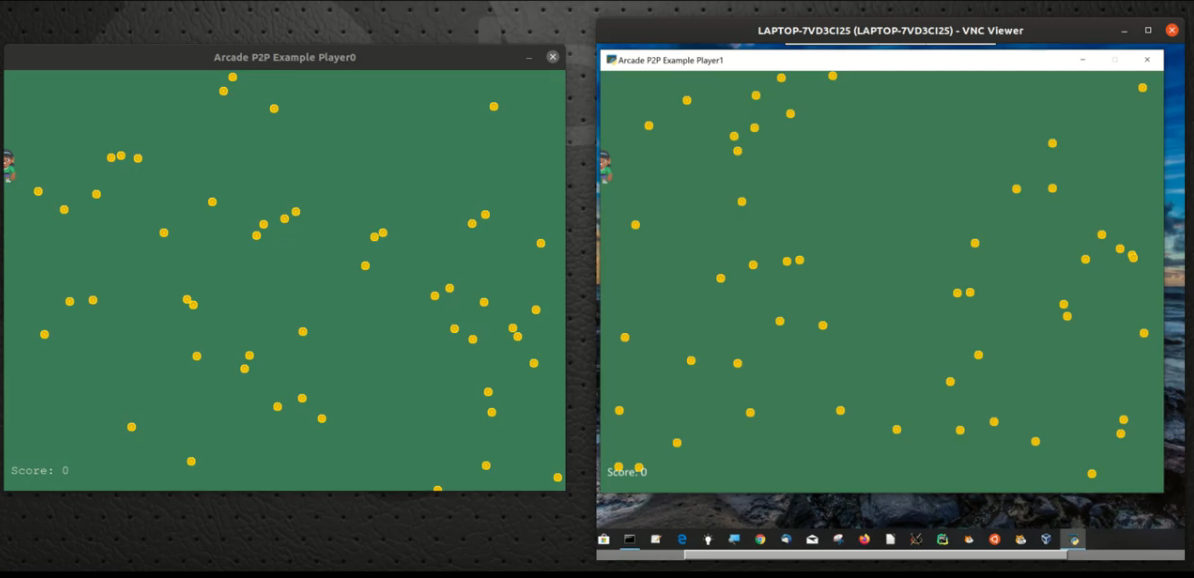
Before learning how all this works, it may be beneficial to see an actual demo of the proof of concept. The demo was run on a Linux computer with an AMD 3700x processor for one of the peers, and on a Windows 10 laptop using an Intel i7-6600q processor for the second peer. Both computers are running RealVNC to allow for screen-capture of both machines.
The left-hand side of the screen is the Linux computer, and it controls the coins. The right-hand side is the Windows computer, and it controls the female collection sprite.
NOTE: Swapping the players on the computers does not affect performance.
What You Will See
When each instance of the game starts, it generates its own copy of the female collection sprite and the 50 coin sprites. The collection sprite is initially placed at the same screen location for both players. The coins for each player, are initially placed randomly on each screen. Therefore at this time, the coin placements differ for each of the players. This is shown below.
When the left mouse button is clicked, the coins will go into motion. Notice that once that happens, the positions of the coins are aligned on both screens.
After the right mouse button is clicked to enable coin collection when the female sprite touches a coin sprite, the coin is removed, and the score is increased by one.
Multiplayer Game Programming for Teens with Python: Part 1
Have you ever wondered how a multiplayer game works? This tutorial will teach teens and adults about multiplayer game programming in python with PyGame. By .
Sign up/Sign in
With a free Kodeco account you can download source code, track your progress, bookmark, personalise your learner profile and more!
Already a member of Kodeco? Sign in
Sign up/Sign in
With a free Kodeco account you can download source code, track your progress, bookmark, personalise your learner profile and more!
Already a member of Kodeco? Sign in
Share this
Twitter
Facebook
Email
Contents
Multiplayer Game Programming for Teens with Python: Part 1
- Getting Started
- The Rules of the Game
- Object-Oriented Programming: A Quick Introduction
- Setting Up a Basic Object-Oriented Game
- Drawing the Board and Lines on the Screen
- Adding Other Types of Lines
- Finishing Touches
- Where to Go from Here?
This is a post by Tutorial Team Member Julian Meyer, a 13-year-old python developer. You can find him on Google+ and Twitter.
I’m sure that once in a while, you and your friends go online to play a multiplayer game. Have you ever wondered about the inside of that game and how everything works?
In this tutorial, you will learn about multiplayer game programming by creating a sample game. Along the way you will also learn about object-oriented programming.
For this tutorial, you will be using Python and the PyGame modules. If you are new to Python or PyGame, you should first look at this earlier tutorial on beginning game programming, which explains some of the basics of PyGame.
Getting Started
The first step is to make sure that you have PyGame installed. You can download a Mac installer for PyGame here. Make sure you download the Lion installer if you have Mac OSX 10.7 or up. Otherwise, download the Snow Leopard installer.
You can also download and install PyGame in these ways:
- With MacPorts using: sudo port install python2.7 py27-game
- With Fink using: sudo fink install python27 pygame-py27
- With Homebrew and pip using the command found here.
If you are running Windows, then you can find your installer here.
Note: If you had trouble in the last tutorial, make sure you have the 32-bit version of Python on your system. If you have a 64-bit system, then you need to run python2.7-32 to run Python.
Lastly, download the resources for this project, which include some images and sounds that you’ll need for this game.
The Rules of the Game
The game you’re going to make in this tutorial is called “Boxes”. You may be familiar with playing this game on paper with some friends while you were in school!
In case you’re not familiar with the game, here are the rules:
- The board consists of a 7×7 grid of points (which makes a 6×6 grid of cubes if you were to connect the dots).

- On each player’s turn, the player fills in the horizontal or vertical line segment connecting two neighboring points.

- If filling in a line segment completes a box on the grid, the player becomes the owner of that square and gets a point. The player also gets to place another line segment on the same turn.

- The player with the most squares/points at the end of the game wins!
Although these rules are very simple, it’s a fun game to play, especially if you’re bored. But wouldn’t it be great if you could play this online?
Object-Oriented Programming: A Quick Introduction
Before we begin, let’s discuss something called Object-Oriented Programming which you’re going to use in this tutorial.
Object-oriented programming, also known as OOP, is a type of programming based on objects. Object are bundles of data and associated logic. For example, you might have a “dog” object that consists of some data (the dog’s name or favorite treat) and associated logic (for example, instructions on how to bark).
Objects are made from templates called classes that define what kinds of data the object can hold and what kinds of things the object can do. These are known as the object’s properties and methods, respectively.
Methods are functions that represent something you can ask the object to do. For example, the statement car.drive() can be interpreted as telling the object in the “car” variable to “drive”. Properties are variables that belong to an object. Continuing the example, your car object might have a property called gas , and the statement car.gas = 100 would set the car’s gas to 100.
These two statements manipulate a car object that already exists. Recall that the car’s class is the template that defines how to make a car object and what a car is by defining its properties and methods. Within the definitions of those methods, you will find the code that manipulates the car from the inside. For instance, instead of car.gas = 100 , you might find self.gas=100 , which is a car object telling itself – self , get it? – to set its own gas to 100.
OOP is a large topic but the basics above are all you need to get started. Your code will describe the Boxes game as the interaction of various objects. Those objects all have properties and methods, which you will define in the object’s class. And when you write a piece of code, you should remember whether you’re writing the class code that defines what an object can do from the “inside” of the object, or code that manipulates an object from the “outside” of that object.
Setting Up a Basic Object-Oriented Game
There are a couple of ways to use an object-oriented framework for your game. Your Boxes game will take a simple approach in which there is one class for the client and one for the server. For now, let’s just create the main client class that will run when the user starts the game.
At the start of making every game, I like to make a folder for the game. When you unzipped the resources for this project, it should have created a folder or you called boxes. This is where you will put your source code for the game – right here alongside all the images.
Create a file in this directory called boxes.py using your favorite text editor (if you don’t have one, you can use TextEdit on the Mac, or Notepad in Windows). Then add this import of the file:
This imports the PyGame module for you to use. Before you go any further, you should test that at least this much is working. To do this, open Terminal and switch to your boxes directory using the cd command. Then enter python boxes.py. For example, here’s what it looks like on my machine:
If you get no errors after running this, that means you have PyGame installed correctly, and you are good to go.
Note: If running the code above gives you an ImportError saying there is “No module named pygame”, then you have not installed PyGame or else you have installed PyGame into a copy of Python different from the one you are running. For instance, if you used MacPorts to install Python 2.7 and PyGame with port install python2.7 py27-game , then make sure to run the same Python by calling python2.7 from the Terminal.
If running the code above gives you this specific error:
That means you need to run Python in 32-bit mode, like this:
Next add the class definition, as well as one thing every class should have:
The first line of this code tells the compiler that you are creating a new class called BoxesGame. The second line defines a method called __init__ . The surrounding double underscores are a hint that this is a special method name. In fact, this name identifies the method as the class’s __init__ method, the method that you run whenever you want to create or instantiate an object of the class.
Now you’ll fill in the body of the init function to do some PyGame initialization. Add this to the code you wrote above, in place of the comment beginning with #put something here. :
Make sure you indent it correctly, so that everything lines up to the left margin of where the “#put something here…” comment was. You can read more about the matter here: Python Indentation.
Let’s look at the code you just added, one chunk at a time:
- First you initialize PyGame and two variables that you’ll use to set up the screen, width and height .
- Then you initialize the screen using those two variables. You also set the title of the screen.
- Finally, you initialize the PyGame clock, which you’ll need for tracking time in the game.
Next let’s add the update() loop, which runs every periodically to update the game, draw the graphics and receive user input. Do this by simply adding the following after the __init__ method (the left margin should be equal to the left margin of __init__):
This is a basic update loop that clears the screen and checks to see if the user wants to quit the game. You’ll be adding more to this later.
Running the Python file now won’t do anything yet, as all you’ve done is defined the class BoxesGame. You still need to create an object of this class and start the game!
Now that you have the update loop ready, let’s add the code that will run the main game class. After that, you’ll set up some of the basic graphics in the game, such as drawing the board.
Add this code to the end of the file to start the game (the left margin should be equal to the left margin of the file):
This is the nice thing about object-oriented programming: The code that actually makes things happen is only three lines long!
At this point, the entire file should look like this:
That’s it. Now wasn’t that easy? This is a good time to run the game:

As you can see, running the game results in a very impressive black screen! Yay!
You may not understand this now, but game writing is a strategic process. Think of it as being an architect. You have just built a strong base for your building. Large buildings must have very good bases and so you must think your plan through before you start.
Let’s add another method. If you don’t remember what this means, reread the section of the tutorial called, “Object Oriented Programming: A Quick Introduction.”
Drawing the Board and Lines on the Screen
In PyGame, the upper left of the window is coordinate (0, 0). So let’s define a coordinate system for the points in the Boxes grid that is similar, with (0,0) representing the upper left point and (6,6) representing the bottom right point:

Somehow, you need a way to represent the potential line segments in the game. Well, there are two different types of line segments: horizontal and vertical lines. Let’s imagine you make a list of all the potential horizontal and vertical line combinations. It would look something like this:

In programming terms, a list is also known as an array. And when you have a list of lists, like the horizontal and vertical line combinations here, that’s called a 2D array.
For example, to represent the horizontal line from (0, 0) to (1, 1), that would be row 0, column 0 in the “horizontal lines” list.
Note that the horizontal lines list has 6 rows and 7 columns, and the vertical lines list has 7 rows and 6 columns.
Add these two lines to __init__ to define these two arrays:
A quick way to create an array is to do this: [valuePerItem for x in y] . In this case, you fill an array with an array filled with False s. False stands for an empty space.
Now that you have the board representation, let’s get to the code of drawing the board.
First of all, create a new method called initGraphics() . This method will be something you call from __init__ but, to keep your code organized, you’re creating a separate method just for the purpose of loading the graphics. Add this right before the __init__ function:
As you can see, you have three main sprites: an normal (empty) line, a done (occupied) line and a hover line. You rotate each of these lines by 90 degrees to draw the horizontal versions of them. These files came with the resources you downloaded earlier and should be in the same directory as your Python file.
You have a method to load all of the graphics, but you have yet to call it. Try to guess where to add what!
Once you have an answer, click the Show button below to see if you’re right.
[spoiler title=”Solution”]Add this at the end of __init__:
Next you should add the code that actually draws the board. To loop through every x and y in a grid, you must add a for loop inside of a for loop. (For all of you Inception fans, a for-loop-ception.) You need a loop that loops through the x- and y-values. Add this right after the __init__ method:
This code simply loops through the grid and checks whether or not that part on the grid has been clicked. The code does this for both the horizontal and vertical lines. self.boardv[x][y] and self.boardh[x][y] returns either true or false, depending on whether the appropriate line segment has been filled in yes.
Running the program now still won’t do anything. All you’ve done is defined what the game should do if it ever gets that method call.
Now let’s add the method call to the update function. Add this after you clear the screen with screen.fill(0) :
And of course, as a good programmer, you remember to add a comment to explain the code.
Run your code now. When you do, you should see the grid drawn on the screen:

Every time I write map drawing code, I like to test it out, both because it’s fun and because it’s a good way to find bugs. Add this after you initialize the boards by defining self.boardh and self.boardv :
Run the code and as you can see, one horizontal line is lit up – the line from (5, 3) to (5, 4):

Pretty cool, huh? Delete the line of test code you just added.
Good job. You’ve finished drawing your map, which is one of the most difficult things to do in game programming.
Adding Other Types of Lines
Next you need to find the line to which the mouse is closest so that you can draw a hover line at that spot.
First, at the top of the file, add this line to import the math library, which you’ll need soon:
Then, before pygame.display.flip() , add this big chunk of code:
Wow! That’s a lot of code. Let’s go over the sections one-by-one:
- First you get the mouse position with PyGame’s built-in function.
- Next you get the position of the mouse on the grid, using the fact that each square is 64×64 pixels.
- You check if the mouse is closer to the top and bottom or the left and right, in order to determine whether the user is hovering over a horizontal or vertical line.
- You get the new position on the grid based on the is_horizontal variable.
- You initialize the variable board as either boardh or boardv , whichever is correct.
- Finally, you try drawing the hover line to the screen, taking into consideration whether it is horizontal or vertical and on the top, bottom, left or right. You also check if the line is out of bounds. If it is, or if the line has already been drawn, you don’t draw the hover line.
Run the program and you get. drum roll, please. a map where a line lights up as your mouse moves over it!
If you’re like me, you probably have your mouse whizzing across the board by now. Take some time to enjoy your results.
OK, now you have a grid that lights up when the player’s mouse moves over a line. But this isn’t a game where you just have to move your mouse around a bunch. You need to add the click-to-lay-down-line functionality.
To do this, you’re going to use PyGame’s built-in mouse function, which is simply pygame.mouse.get_pressed()[0] . The function returns either 1 or 0, depending on whether the mouse button is currently pressed down.
Before I tell you how to implement this in your game, try figuring it out yourself. Remember how you used if statements before and how to create a piece on the board.
[spoiler title=»Solution»]Add this directly after the last block of code defining hover behavior:
Run the program now and voilà! If you click, you place a line just where you were hovering. As you can see, the code you added checks if the mouse is pressed and if the line should be horizontal or vertical, and places the line accordingly.

One problem, though, is that if you click at the bottom of the screen (below where the boxes are drawn), the game crashes. Let’s see why this is. When something crashes, usually it gives you an error report in the Terminal. In this case, the report looks like this:
This error is saying that the array boardh that you tried to access doesn’t go as far as where you clicked. Remember that variable called isoutofbounds ? That will come in handy here. Simply change this:
Now if you try clicking outside of the board, the game doesn’t crash. Good job – you have just demonstrated the word debugging!
Before you begin implementing the game logic on the server side, let’s first add some finishing touches to the client side.
Finishing Touches
One thing that really bugs me are the spaces at the junctions of the lines. Fortunately, you can fix this quite easily using a 7×7 grid of square dots to fill in those spaces. Of course, you do need the image file, so let’s load that right now and at the same time add all of the other images you will be using in this section.
Add this to the end of initGraphics() :
Now that you image is loaded, let’s draw each of the 49 dots onto the screen. Add this to the end of drawBoard() :
All right, enough code! It’s time for a test run. Run the game, and you should get a better-looking grid.

Next, let’s put a head-up display or HUD at the bottom of the screen. First, you need to create the drawHUD() method. Add this code after drawBoard() :
This code also draws the background of the score panel.
Let me go over the way PyGame handles fonts. There are three steps:
- First you define a font with a set size.
- Next you call font.render(«your text here») to create a surface for those letters in that font.
- Then you draw the surface just as you would an image.
Now that you know that, you can use this information to draw the next part of the HUD: the «Your Turn» indicator. Add this code at the bottom of drawHUD() :
Also add this after the call to pygame.init() :
This code creates the font, renders it in white and then draws it onto the screen. Before you try running the game, add this after the call to self.drawBoard() :
Run the program and you should get some text that says «Your Turn» at the bottom of the screen. If you look closely, you can also see the nicely textured background.

This is great, but you still need to add the indicator after the «Your Turn» text to let the player know it’s their round.
Before you do, though, you want the game to know whose turn it is. Make sure it knows by adding this to the end of __init__ :
Now for that indicator. Add this to the end of drawHUD() :
Run the game and you will see the green score indicator. You can check that off of your list of things to do.
Next let’s add the text for each player’s score. Initialize the variables for the two scores by tacking this onto the end of __init__ :
Here you also add another variable that you will use later in this step.
Remember how to add text? You’re going to do the same type of thing you did before, but with differently sized fonts. Add this to the end of drawHUD() :
Run the game to check out your work.

You are now officially done with the HUD. There are just a couple more things to do on the client side, so bear with me.
Next, let’s add a very simple owner grid that contains values representing a player. These values will let you keep track of who owns which squares. You need this to color the squares properly, and to keep track of the score. Remember, the person who controls the most squares wins!
First initialize another array by adding this at the end of __init__ :
Now draw the owner grid onto the screen using the same kind of 2d-array loop that you used to loop through the lines arrays. Add this to the bottom of the class:
This method checks if it needs to draw in a given square and if it does, it draws the correct color (each player will have his or her own color).
Right now this code won’t work because you need the server to tell the client which color to draw, which you will do in the next part of the tutorial. For now, you just won’t call this method.
You have one more thing to add to the user interface: winning and losing screens. Define this last method and add it to the bottom of the class:

Of course, there is no way yet to trigger these screens in the game. That, too, you’ll take care of in the next part of the tutorial, when you implement the server side of the game.
Remember that by adding all of these game elements now, you are making sure that the server will be able to manipulate the client however it wants. From here on out, you won’t need to make many changes to the client other than a little glue between the client and the server.
But just to make sure it works, try calling the finished() method in the last part of __init__ . You should get a game over screen that looks like the image to the right.

Where to Go from Here?
Here is the source code from the tutorial so far.
Congratulations! You have finished the client side of a very organized and good-looking game. This, of course, is not the end since you haven’t implemented any game logic, but excellent job on the client side!
Now you should go look at Part 2 of this tutorial, which is all about the server-side — and you’ll finally start making this game truly multiplayer!
Sign up/Sign in
With a free Kodeco account you can download source code, track your progress, bookmark, personalise your learner profile and more!
Already a member of Kodeco? Sign in
Sign up/Sign in
With a free Kodeco account you can download source code, track your progress, bookmark, personalise your learner profile and more!
Already a member of Kodeco? Sign in
Sign up/Sign in
With a free Kodeco account you can download source code, track your progress, bookmark, personalise your learner profile and more!