Java Architecture
![]()
In this article, you will learn how a java program compiles and run in simple language. we can write any simple java program in any text editor (Notepad, Sublime Text, Atom, etc) but the condition is your java program should contain correct language syntax and .java formate.
For Example, I have created a simple java program with the name of FirstJavaProgram with.java Formate.
Now after creating this program whenever we compile this program by using java Compile javac it will generate a Bytecode file with the class name and with .class formate. For example below image showing a compilation of the above java program.
After Compilation of the java Program, We can see that bytecode is generated as shown in the below image.
Why Java is Platform Independent?
We can see that after compilation of the java program there is a .class generated automatically. now, this .class file is interpreted by JVM and JVM converts this .class file into machine code(Binary Code). So this is the reason why java is a platform-independent language because it first generates Byte code this Bytecode is further interpreted by JVM which is a machine depended.
Now let's see What is JVM(Java Virtual Machine) but before going to understand we should clear understanding of the whole java program process which is shown in the below Image.
The following figure represents the Java Architecture in which each step is elaborate graphically.
Summary Of Java Architecture
Java Architecture is a collection of components, i.e., JVM, JRE, and JDK. It integrates the process of interpretation and compilation. It defines all the processes involved in creating a Java program. Java Architecture explains each and every step of how a program is compiled and executed.
Java Architecture can be explained by using the following steps:
- There is a process of compilation and interpretation in Java.
- Java compiler converts the Java code into byte code.
- After that, the JVM converts the byte code into machine code.
- The machine code is then executed by the machine.
JVM(Java Virtual Machine)
The main feature of Java is Write Once Run Anywhere. The feature states that we can write our code once and use it anywhere or on any operating system. Our Java program can run any of the platforms only because of the Java Virtual Machine. It is a Java platform component that gives us an environment to execute java programs. JVM’s main task is to convert byte code into machine code.
now lets see every component one by one.
ClassLoader Sub-System
classLoader SubSystem is Responsible for the following three Activities.
1)Loading
2)Linking
3)Initialization
1.Loading
Loading means reading Class files and store corresponding Binary Data in Method Area.
For each Class file, JVM stores the following method in Method Area.
- Fully Qualified Name of the loaded Class or Interface or Enum.
- Fully Qualified Name of its immediate Parent class.
- Variable information
- Method information
- Modifiers information
- Constant Pool Information
After loading .class files into Method Area Immediately JVM will create an object of The type Class to represent Class level binary information on Heap Memory.
The Class Object can be used by Programmer to get Class Level Information Like Fully Qualified Name of the Class, Parent Name, Methods and Variables Information Etc.
Note: For Every loaded .class file Only One Class Object will be created, even though we are using Class Multiple Times in Our Application.
2.Linking
Linking Consists of 3 Activities
- Verification
- Preparation
- Resolution
Verification
It is the process of ensuring that the Binary Representation of a Class is Structurally Correct OR Not.
That is JVM will Check whether .class File generated by Valid Compiler OR Not.i.ewhether .class File is Properly Formatted OR Not.
Internally Byte Code Verifier which is Part of ClassLoader Sub System is Responsible for this Activity.
If Verification Fails then we will get Runtime Exception Saying java. lang.VerifyError.
Preparation
In this phase, JVM will allocate Memory for Class Level Static variables and assign default values (Not Original Value).
Note: Original Value Assign into initialization part.
Resolution
It is the process of Replaced Symbolic References used by the loaded type with original References.
Symbolic References are Resolved into Direct References by searching through Method Area to Locate the Referenced Entity.
In the above Program, There are Three Classes
- String Class
- Student Class
- Object Class (Object class is Parent Class of all java Classes)
For the above program ClassLoader SubSystem Loads Student.class, String.class and Object.class.
The Name of These Class Names is stored in the Constant Pool of Student Class.
In Resolution Phase these names are Replaced with Actual References from the method Area.
3.Initialization
In this Phase, All Static Variables will be assigned with Original Values and Static Blocks will be executed from top to bottom and from Parent to Child.
so summary of the ClassLoader subsystem is shown below figure.
Types Of ClassLoader
ClassLoader SubSystem Contains the Following three ClassLoaders.
- Bootstrap ClassLoader OR Primordial ClassLoader
- Extension ClassLoader
- Application ClassLoader
BootStrap ClassLoader
This ClassLoader is Responsible to load Classes from jdk\jre\lib.
All the core java API classes are present in rt.jar.which is present in this location only. Hence all API classes like(String, StringBuffer) will be loaded by BootStrap ClassLoader only.
It is implemented in Native languages like C and C++.
Extension ClassLoader
It is the Child of Bootstrap ClassLoader.
ThisClassLoader is Responsible for Load Classes from jdk\jre\lib\ext.
Application ClassLoader
It is the Child of Extension ClassLoader.
This ClassLoader is Responsible for Load Classes from Application Class Path (Current Working Directory).
It Internally Uses Environment Variable Class Path.
Let's see an example of All ClassLoader
lets Output of the Above program is
For String Class From Bootstrap Class-Path by Bootstrap ClassLoader Output is null because we see above BootStrap classpath is implemented in C and C++ so that Bootstrap ClassLoader is Not Java Object. Hence we are getting null in the 1st Case.
While Ketan class is part of Application ClassLoader because we can get Ketan.class file in the Current Working Directory.
Various Memory Area Of JVM
Whole Loading and Running a Java Program JVM required Memory to Store Several Things Like Byte Code, Objects, Variables, Etc.
Total JVM Memory is organized into the following 5 Categories:
- Method Area
- Heap Area OR Heap Memory
- Java Stacks Area
- PC Registers Area
- Native Method Stacks Area
Method Area
Method Area will be Created at the Time of JVM Start-Up.
It will be Shared by All Threads (Global Memory).
This Memory Area Need Not be Continuous.
Method area shows runtime constant pool.
Total Class Level Binary Information including Static Variables Stored in Method Area.
Heap Area
Programmer Point of View Heap Area is Consider an Important Memory Area.
Heap Area can be accessed by All Threads (Global OR Sharable Memory).
Heap Area Need Not be Continuous.
All Objects and corresponding Instance Variables will be stored in the Heap Area.
Every Array in Java is an Object and Hence Arrays Also will be stored in Heap Memory Only.
Stack Memory
For Every Thread, JVM will Create a Separate Runtime Stack.
Runtime Stack will be Created Automatically at the Time of Thread Creation.
All Method Calls and corresponding Local Variables, Intermediate Results will be stored in the Stack.
For Every Method Call, a Separate Entry will be added to the Stack and that Entry is Called Stack Frame. After completing that Method Call the corresponding Entry from the Stack will be removed.
The Data stored in the Stack can be accessed by Only the corresponding Thread and it is Not Available to Other Threads.
PC Register Area(Program Counter)
For Every Thread, a Separate PC Register will be Created at the Time of Thread Creation.
PC Registers contains Address of Current executing Instruction.
Once Instruction Execution Completes Automatically PC Register will be incremented to Hold Address of Next Instruction.
Native Method Stack
For Every Thread, JVM will Create a Separate Native Method Stack.
All Native Method Calls invoked by the Thread will be stored in the corresponding Native Method Stack.
Method Area and Heap Area are for JVM. Whereas Stack Area, PC Registers Area, and Native Method Stack Area are for Thread.
That is One Separate Heap for Every JVM
One Separate Method Area for Every JVM
One Separate Stack for Every Thread
One Separate PC Register for Every Thread
One Separate Native Method Stack for Every Thread
Summary:
Static Variables will be stored in Method Area.
Instance Variables will be stored in Heap Area.
Local Variables will be stored in Stack Area.
Execution Engine
This is the Central Component of JVM.
Execution Engine is Responsible to Execute Java Class Files.
Execution Engine contains 2 Components for executing Java Classes.
- Interpreter
- JIT Compiler
Interpreter
It is Responsible to Read Byte Code and Interpret (Convert) into Machine Code (Native Code) and Execute that Machine Code Line by Line.
The Problem with Interpreters is it Interpreters Every Time Even the Same Method Multiple Times. Which Reduces the Performance of the System.
To Overcome this Problem SUN People Introduced JIT Compilers in 1.1 Version.
JIT Compiler
The Main Purpose of JIT Compiler is to Improve Performance which is a disadvantage of java Interpreter.
Internally JIT Compiler Maintains a Separate Count for Every Method whenever JVM Come Across any Method Call.
First, that Method will be interpreted normally by the Interpreter, and JIT Compiler Increments the corresponding Count Variable.
This process will be continued for Every Method.
Once if any Method Count Reaches Threshold (The Starting Point for a New State) Value, then JIT Compiler Identifies that Method Repeatedly used Method.
Immediately JIT Compiler Compiles that Method and Generates the corresponding Native Code. Next Time JVM Come Across that Method Call then JVM Directly Uses Native Code and Executes it Instead of interpreting Once Again. So that Performance of the System will be Improved.
The Threshold Count Value varied from JVM to JVM.
Some Advanced JIT Compilers will Re-compile generated Native Code if Count Reaches Threshold Value Second Time So that More optimized Machine Code will be generated.
Summary of Execution Engine
JVM Interprets Total Program Line by Line at least Once.
JIT Compilation is Applicable Only for Repeatedly invoked Methods. But Not for Every Method.
Инструменты для запуска и разработки Java приложений, компиляция, выполнение на JVM
Ни для кого не секрет, что на данный момент Java — один из самых популярных языков программирования в мире. Дата официального выпуска Java — 23 мая 1995 года.
Эта статья посвящена основам основ: в ней изложены базовые особенности языка, которые придутся кстати начинающим “джавистам”, а опытные Java-разработчики смогут освежить свои знания.
* Статья подготовлена на основе доклада Евгения Фраймана — Java разработчика компании IntexSoft.
В статье присутствуют ссылки на внешние материалы.
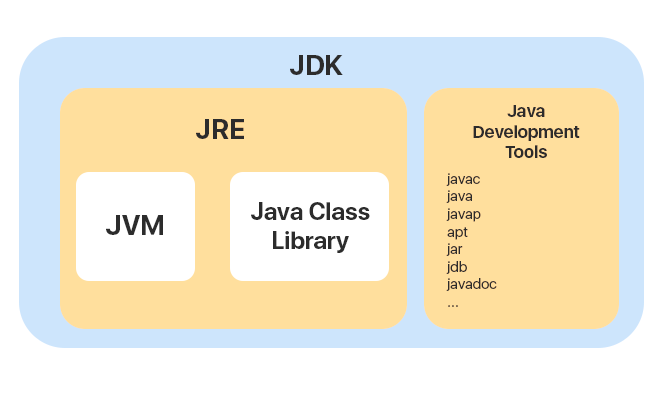
1. JDK, JRE, JVM
Java Development Kit — комплект разработчика приложений на языке Java. Он включает в себя Java Development Tools и среду выполнения Java — JRE (Java Runtime Environment).
Java development tools включают в себя около 40 различных тулов: javac (компилятор), java (лаунчер для приложений), javap (java class file disassembler), jdb (java debugger) и др.
Среда выполнения JRE — это пакет всего необходимого для запуска скомпилированной Java-программы. Включает в себя виртуальную машину JVM и библиотеку классов Java — Java Class Library.
JVM — это программа, предназначенная для выполнения байт-кода. Первое преимущество JVM — это принцип “Write once, run anywhere”. Он означает, что приложение, написанное на Java, будет работать одинаково на всех платформах. Это является большим преимуществом JVM и самой Java.
До появления Java, многие компьютерные программы были написаны под определенные компьютерные системы, а предпочтение отдавалось ручному управлению памятью, как более эффективному и предсказуемому. Со второй половины 1990-х годов, после появления Java, автоматическое управление памятью стало общей практикой.
Существует множество реализаций JVM, как коммерческих, так и с открытым кодом. Одна из целей создания новых JVM — увеличение производительности для конкретной платформы. Каждая JVM пишется под платформу отдельно, при этом есть возможность написать ее так, чтобы она работала быстрее на конкретной платформе. Самая распространённая реализация JVM — это JVM Hotspot от OpenJDK. Также есть реализации IBM J9, Excelsior JET.
2. Выполнение кода на JVM
Согласно спецификации Java SE, для того, чтобы получить код, работающий в JVM, необходимо выполнить 3 этапа:
- Загрузка байт-кода и создание экземпляра класса Class
Грубо говоря, чтобы попасть на JVM, класс должен быть загружен. Для этого существуют отдельные класс-загрузчики, к ним мы вернемся чуть позже. - Связывание или линковка
После загрузки класса начинается процесс линковки, на котором байт-код разбирается и проверяется. Процесс линковки в свою очередь происходит в 3 шага:
3. Загрузчики классов и их иерархия
Вернемся к загрузчикам классов — это специальные классы, которые являются частью JVM. Они загружают классы в память и делают их доступными для выполнения. Загрузчики работают со всеми классами: и с нашими, и с теми, которые непосредственно нужны для Java.
Представьте ситуацию: мы написали свое приложение, и помимо стандартных классов там есть наши классы, и их очень много. Как с этим будет работать JVM? В Java реализована отложенная загрузка классов, иными словами lazy loading. Это значит, что загрузка классов не будет выполняться до тех пор, пока в приложении не встретится обращение к классу.
Иерархия загрузчиков классов
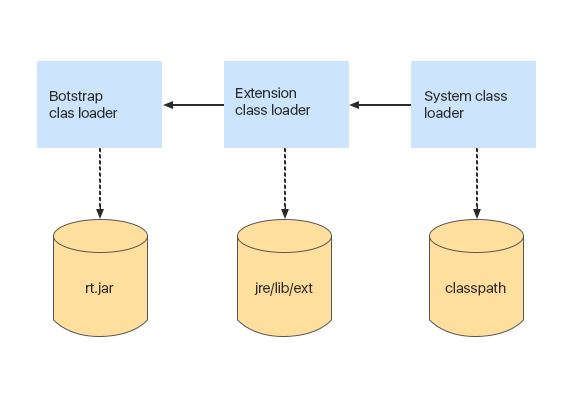
Первый загрузчик классов — это Bootstrap classloader. Он написан на C++. Это базовый загрузчик, который загружает все системные классы из архива rt.jar. При этом, есть небольшое отличие между загрузкой классов из rt.jar и наших классов: когда JVM загружает классы из rt.jar, она не выполняет все этапы проверки, которые выполняются при загрузке любого другого класс-файла т.к. JVM изначально известно, что все эти классы уже проверены. Поэтому, включать в этот архив какие-либо свои файлы не стоит.
Следующий загрузчик — это Extension classloader. Он загружает классы расширений из папки jre/lib/ext. Допустим, вы хотите, чтобы какой-то класс загружался каждый раз при старте Java машины. Для этого вы можете скопировать исходный файл класса в эту папку, и он будет автоматически загружаться.
Еще один загрузчик — System classloader. Он загружает классы из classpath’а, который мы указали при запуске приложения.
Процесс загрузки классов происходит по иерархии:
- В первую очередь мы запрашиваем поиск в кэше System Class Loader (кэш системного загрузчика содержит классы, которые уже были им загружены);
- Если класс не был найден в кэше системного загрузчика, мы смотрим кэш Extension class loader;
- Если класс не найден в кэше загрузчика расширений, класс запрашивается у загрузчика Bootstrap.
4. Структура Сlass-файлов и процесс загрузки
Перейдем непосредственно к структуре Class-файлов.
Один класс, написанный на Java, компилируется в один файл с расширением .class. Если в нашем Java файле лежит несколько классов, один файл Java может быть скомпилирован в несколько файлов с расширением .class — файлов байт-кода данных классов.
Все числа, строки, указатели на классы, поля и методы хранятся в Сonstant pool — области памяти Meta space. Описание класса хранится там же и содержит имя, модификаторы, супер-класс, супер-интерфейсы, поля, методы и атрибуты. Атрибуты, в свою очередь, могут содержать любую дополнительную информацию.
Таким образом, при загрузке классов:
- происходит чтение класс-файла, т.е проверка корректности формата
- создается представление класса в Constant pool (Meta space)
- грузятся супер-классы и супер-интерфейсы; если они не будут загружены, то и сам класс не будет загружен
5. Исполнение байт-кода на JVM
В первую очередь, для исполнения байт-кода, JVM может его интерпретировать. Интерпретация — довольно медленный процесс. В процессе интерпретации, интерпретатор “бежит” построчно по класс-файлу и переводит его в команды, которые понятны JVM.
Также JVM может его транслировать, т.е. скомпилировать в машинный код, который будет исполняться непосредственно на CPU.
Команды, которые исполняются часто, не будут интерпретироваться, а сразу будут транслироваться.
6. Компиляция
Компилятор — это программа, которая преобразует исходные части программ, написанные на языке программирования высокого уровня, в программу на машинном языке, “понятную” компьютеру.
Компиляторы делятся на:
- Не оптимизирующие
- Простые оптимизирующие (Hotspot Client): работают быстро, но порождают неоптимальный код
- Сложные оптимизирующие (Hotspot Server): производят сложные оптимизирующие преобразования прежде чем сформировать байт-код
Также компиляторы могут классифицироваться по моменту компиляции:
- Динамические компиляторы
Работают одновременно с программой, что сказывается на производительности. Важно, чтобы эти компиляторы работали на коде, который часто исполняется. Во время исполнения программы JVM знает, какой код выполняется чаще всего, и, чтобы постоянно не интерпретировать его, виртуальная машина сразу переводит его в команды, которые уже будут исполняться непосредственно на процессорe. - Статические компиляторы
Дольше компилируют, но порождают оптимальный код для исполнения. Из плюсов: не требуют ресурсов во время исполнения программы, каждый метод компилируется с применением оптимизаций.
7. Организация памяти в Java
Стек — это область памяти в Java, которая работает по схеме LIFO — “Last in — Fisrt Out” или “Последним вошел, первым вышел”.
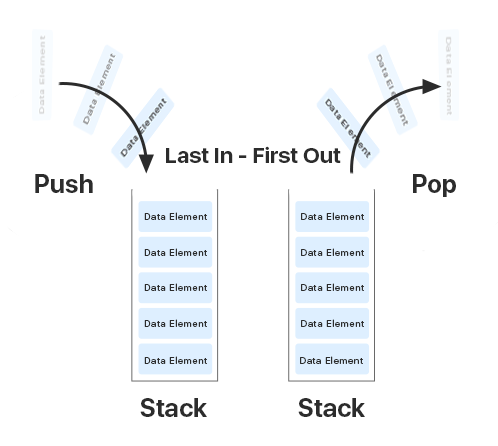
Он нужен для того, чтобы хранить методы. Переменные в стеке существуют до тех пор, пока выполняется метод в котором они были созданы.
Когда вызывается любой метод в Java, создается фрейм или область памяти в стеке, и метод кладется на его вершину. Когда метод завершает выполнение, он удаляется из памяти, тем самым освобождая память для следующих методов. Если память стека будет заполнена, Java бросит исключение java.lang.StackOverFlowError. К примеру, это может произойти, если у нас будет рекурсивная функция, которая будет вызывать сама себя и памяти в стеке не будет хватать.
Ключевые особенности стека:
- Стек заполняется и освобождается по мере вызова и завершения новых методов
- Доступ к этой области памяти осуществляется быстрее, чем к куче
- Размер стека определяется операционной системой
- Является потокобезопасным, поскольку для каждого потока создается свой отдельный стек
Куча разбита на несколько более мелких частей, называемых поколениями:
- Young generation — область, где размещаются недавно созданные объекты
- Old (tenured) generation — область, где хранятся “долгоживущие” объекты
- До Java 8 существовала ещё одна область — Permanent generation — которая содержит метаинформацию о классах, методах, статических переменных. После появления Java 8 было решено хранить эту информацию отдельно, вне кучи, а именно в Meta space
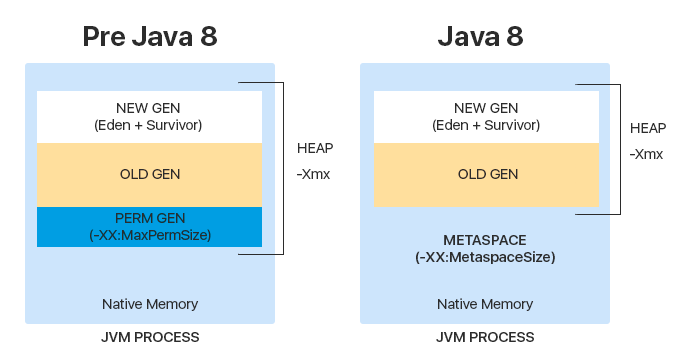
Почему отказались от Permanent generation? В первую очередь, это из-за ошибки, которая была связана с переполнением области: так как Perm имел константный размер и не мог расширяться динамически, рано или поздно память заканчивалась, кидалась ошибка, и приложение падало.
Meta space же имеет динамический размер, и во время исполнения он может расширяться до размеров памяти JVM.
Ключевые особенности кучи:
- Когда эта область памяти заполняется полностью, Java бросает java.lang.OutOfMemoryError
- Доступ к куче медленнее, чем к стеку
- Для сбора неиспользуемых объектов работает сборщик мусора
- Куча, в отличие от стека, не является потокобезопасной, так как любой поток может получить к ней доступ
Основываясь на информации выше, рассмотрим, как происходит управление памятью на простом примере:
У нас есть класс App, в котором единственный метод main состоит из:
— примитивной переменой id типа int со значением 23
— ссылочной переменной pName типа String со значением Jon
— ссылочной переменной p типа person

Как уже упоминалось, при вызове метода на вершине стека создаётся область памяти, в которой хранятся данные, необходимые этому методу для выполнения.
В нашем случае, это ссылка на класс person: сам объект хранится в куче, а в стеке хранится ссылка. Также в стек кладется ссылка на строку, а сама строка хранится в куче в String pool. Примитив хранится непосредственно в стеке.
Для вызова конструктора с параметрами Person (String) из метода main() в стеке, поверх предыдущего вызова main() создается в стеке отдельный фрейм, который хранит:
— this — ссылка на текущий объект
— примитивное значение id
— ссылочную переменную personName, которая указывает на строку в String Pool.
После того, как мы вызвали конструктор, вызывается setPersonName(), после чего снова создается новый фрейм в стеке, где хранятся те же данные: ссылка на объект, ссылка на строку, значение переменной.
Таким образом, когда выполнится метод setter, фрейм пропадет, стек очистится. Далее выполняется конструктор, очищается фрейм, который был создан под конструктор, после чего метод main() завершает свою работу и тоже удаляется из стека.
Если будут вызваны другие методы, для них будут также созданы новые фреймы с контекстом этих конкретных методов.
8. Garbage collector
В куче работает Garbage collector — программа, работающая на виртуальной машине Java, которая избавляется от объектов, к которым невозможно получить доступ.
Разные JVM могут иметь различные алгоритмы сборки мусора, также существуют разные сборщики мусора.
Мы поговорим о самом простом сборщике Serial GC. Сборку мусора мы запрашиваем при помощи System.gc().

Как уже было упомянуто выше, куча разбита на 2 области: New generation и Old generation.
New generation (младшее поколение) включает в себя 3 региона: Eden, Survivor 0 и Survivor 1.
Old generation включает в себя регион Tenured.
Что происходит, когда мы создаем в Java объект?
В первую очередь объект попадает в Eden. Если мы создали уже много объектов и в Eden уже нет места, срабатывает сборщик мусора и освобождает память. Это, так называемая, малая сборка мусора — на первом проходе он очищает область Eden и кладёт “выжившие” объекты в регион Survivor 0. Таким образом регион Eden полностью высвобождается.
Если произошло так, что область Eden снова была заполнена, garbage collector начинает работу с областью Eden и областью Survivor 0, которая занята на данный момент. После очищения выжившие объекты попадут в другой регион — Survivor 1, а два остальных останутся чистыми. При последующей сборке мусора в качестве региона назначения опять будет выбран Survivor 0. Именно поэтому важно, чтобы один из регионов Survivor всегда был пустым.
JVM следит за объектами, которые постоянно копируются и перемещаются из одного региона в другой. И для того, чтобы оптимизировать данный механизм, после определённого порога сборщик мусора перемещает такие объекты в регион Tenured.
Когда в Tenured места для новых объектов не хватает, происходит полная сборка мусора — Mark-Sweep-Compact.

Во время этого механизма определяется, какие объекты больше не используются, регион очищается от этих объектов, и область памяти Tenured дефрагментируется, т.е. последовательно заполняется нужными объектами.
Name already in use
java-lesson-1 / answers on questions Les1.txt
- Go to file T
- Go to line L
- Copy path
- Copy permalink
- Open with Desktop
- View raw
- Copy raw contents Copy raw contents
Copy raw contents
Copy raw contents
This file contains bidirectional Unicode text that may be interpreted or compiled differently than what appears below. To review, open the file in an editor that reveals hidden Unicode characters. Learn more about bidirectional Unicode characters
Write Once, Run Anywhere
One of the main promises that Java offers is “Write Once, Run Anywhere”. The idea is that Java code can be run on almost any platform.
This is stronger than the promise made by (though not always fulfilled by) many programming languages of being portable to many platforms. A C++ programmer, for example, who pays careful attention to language standards might have very good reason to believe that his source code could be copied to a platform with a completely different CPU or operating system, recompiled on that platform, and then executed.
Java, however, offers the promise that your source code can be compiled on one platform, the compiled object code transferred to a platform with a different CPU or operating system, and then executed without requiring recompilation of the source.
We’ll explore that promise in this lab.
1 Compiling the Code
Log in to one of the Dept’s Linux machines. cd to any convenient working directory.
Using a text editor (e.g., emacs or gedit ), create a file named HelloWorld.java with the following content (feel free to copy and paste):
We’ll look at this code in detail in a later lesson. But for now, let’s compile and run it.
Java programs get compiled into object code for an imaginary CPU called the “ Java Virtual Machine ” ( JVM ). Consequently, you can’t execute compiled Java code directly. You must run a program that simulates a JVM and let that simulated computer execute the Java code.
That may seem a little convoluted, but the JVM simulator is easier to write than a “true” compiler. This means that Java programs can be compiled on one machine and then run on platforms for which no such compiler exists. Also, JVM simulators can be built into other programs (such as web browsers), allowing Java code compiled on one machine to be executed on almost any other machine. By contrast, a true native-code compiler (e.g., g++) produces executables that can only be run on a single kind of computer.
The command to compile Java code is “ javac ” (“c” for compiler) and the command to execute compiled Java code is “ java ”. So a typical sequence to compile and execute a single-file Java program like the one you have just produced would be
Try issuing these two commands now. You should see the expected greeting appear on your screen.
If you now do an
you can see that the javac command created a file named HelloWorld.class. That’s the compiled object code for the imaginary JVM machine. The java command actually launches the emulator for the JVM, tilling it to run the program in the HelloWorld class.
2 Running Elsewhere
Now transfer that HelloWorld.class file to the machine at which you are actually seated. I’ll assume,for the sake of this lab, that you are seated at a Windows PC. (If you are seated at a Linux machine, you might want to find something else to work on for a bit, because otherwise the rest of this exercise won’t be impressive at all.)
A typical Windows machine will already have a JVM emulator, because your web browser would use it whenever it visited a web page with applets. To check this, open up a cmd window (click the Start button and type “cmd” into the “Search programs and files” box for Windows 7 or select “Run…” and then type “cmd” into the “Open:” box for older Windows versions). Within the cmd window, type
and you should get a version message confirming that java is available.
Now, in that cmd window, cd to the folder into which you transferred the HelloWorld.class file. Give the command
and you should see the familiar greeting.
3 A Larger Example
Return to one of the Unix/Linux machines, this time connecting via X or NX.
Copy the file RunAnywhere.java into a convenient directory. If you are using the same directory as earlier, delete any .class files already in that directory.
3.1 Compilation Flags
Like almost any compiler, javac has a number of options that can be given on the command line. Some common ones are:
-cp pathlist Add the directories and jar files named in the pathlist (multiple items may be separated by ‘:’) to the list of places searched when locating other Java source or object code. -g Include debugging information in compiled code (required if you want to be able to run the gdb debugger. -depend Check each class used in the code being compiled to see if those mentioned classes’ source code has been changed since they were last compiled. If so, automatically recompile those classes. -deprecation Check the code for features that used to be legal in Java, but are expected to become illegal in the near future. -O Optimize the compiled code (produces smaller, faster programs but takes longer to compile)
Of these, you would probably use -g almost all the time (unless you are one of those mythical programmers who never needs to debug their code).
So, compile this program with
then run the program with
You should see window pop up shortly. Try clicking on the word “run”.
3.2 Execution Options
Like the compiler, the java execution program allows for some command-line options. The most commonly used are:
-cp pathlist Add the directories and jar files named in the pathlist (multiple items may be separated by ‘:’) to the list of places searched when locating other Java object code. -jar Instead of looking for a compiled class file, execute the “default” class in a .jar file. -Xmx _N_ Sets the amount of memory to be reserved for the heap in the JVM emulator. N is a memory size consisting of an integer followed by a units indicator, usually M for megabytes, e.g., -Xmx512M .
To see the effect of the -cp option, try doing this:
The first attempt to execute the program fails because, after we have moved into a different directory, the java program cannot find our compiled class. The -cp option in the second command tells it where to look for that class and so is able to run the program.
Now cd back into your working directory and do an
Notice that you have more than one .class file, even though you compiled only one .java file. That’s a fairly common occurrence.
4 Packaging
Of course, compiling a larger project consisting of several separate .java files is also likely to result in several .class files. It could be awkward if, every time you wanted to transfer a compiled Java program to another platform, you had to transfer an arbitrary number of different .class files. This awkwardness can be relieved by packaging the compiled class files into a single Java Archive (jar).
A jar file is actually a conventional “zip” compressed archive file with a little bit of extra directory information written into a special file (called the manifest ) included in the archive.[^
You could create a jar file like this:
The -c option indicates that we want to create a new jar archive. The e option in the second form states that we are going to give a default entrypoint (i.e., a default program to execute).[^ The ‘e’ option, as of 8/2015, does not work on OS/X.]
Use the first form if you are simply packing a group of “utility” classes, none of which is a full executable application, or if you are choosing to package together several different programs, none of which is more deserving of a “default” status than any other.
For now, use the second form to create allInOne.jar .
To show that the jar file really is just a variation on a conventional zip archive, try
to see what’s inside it.
Then delete the .class files and execute the program:
The first java command uses the -cp option to tell where to look for compiled code (in the jar file) and explicitly names the program ( RunAnywhere ) that we want to look for. The second simply states that we want to execute the default program in that jar file. Both should work.