Optimize Interaction to Next Paint
Learn how to optimize your website’s Interaction to Next Paint.


Interaction to Next Paint (INP) is a pending Core Web Vital metric that assesses a page’s overall responsiveness to user interactions by observing the latency of all qualifying interactions that occur throughout the lifespan of a user’s visit to a page. The final INP value is the longest interaction observed (sometimes ignoring outliers).
To provide a good user experience, websites should strive to have an Interaction to Next Paint of 200 milliseconds or less. To ensure you’re hitting this target for most of your users, a good threshold to measure is the 75th percentile of page loads, segmented across mobile and desktop devices.
Depending on the website, there may be few to no interactions—such as pages of mostly text and images with few to no interactive elements. Or, in the case of websites such as text editors or games, there could be hundreds—even thousands—of interactions. In either case, where there’s a high INP, the user experience is at risk.
Objective
It takes time and effort to improve INP, but the reward is a better user experience. In this guide, a path to improving INP will be explored.
Figure out what’s causing poor INP #
Before you can fix slow interactions, you’ll need data to tell you if your website’s INP is poor or needs improvement. Once you have that information, you can move into the lab to begin diagnosing slow interactions, and work your way toward a solution.
Find slow interactions in the field #
Ideally, your journey in optimizing INP will start with field data. At its best, field data from a Real User Monitoring (RUM) provider will give you not only a page’s INP value, but also contextual data that highlights what specific interaction was responsible for the INP value itself, whether the interaction occurred during or after page load, the type of interaction (click, keypress, or tap), and other valuable information.
Objective
If you’re not relying on a RUM provider to get field data, the INP field data guide advises using the Chrome User Experience Report (CrUX) via PageSpeed Insights to help fill in the gaps. CrUX is the official dataset of the Core Web Vitals program and provides a high-level summary of metrics for millions of websites, including INP. However, CrUX often does not provide the contextual data you’d get from a RUM provider to help you to analyze issues. Because of this, we still recommend that sites use a RUM provider when possible, or implement their own RUM solution to supplement what is available in CrUX.
Diagnose slow interactions in the lab #
Ideally, you’ll want to start testing in the lab once you have field data that suggests you have slow interactions.
Objective
Optimize interactions #
- The input delay, which starts when the user initiates an interaction with the page, and ends when the event callbacks for the interaction begin to run.
- The processing time, which consists of the time it takes for event callbacks to run to completion.
- The presentation delay, which is the time it takes for the browser to present the next frame which contains the visual result of the interaction.
The sum of these three phases is the total interaction latency. Every single phase of an interaction contributes some amount of time to total interaction latency, so it’s important to know how you can optimize each part of the interaction so it runs for as little time as possible.
Identify and reduce input delay #
When a user interacts with a page, the first part of that interaction is the input delay. Depending on other activity on the page, input delays can be considerable in length. This could be due to activity occurring on the main thread (perhaps due to scripts loading, parsing and compiling), fetch handling, timer functions, or even from other interactions that occur in quick succession and overlap with one another.
Whatever the source of an interaction’s input delay, you’ll want to reduce input delay to a minimum so that interactions can begin running event callbacks as soon as possible.
Objective
The relationship between script evaluation and long tasks during startup #
A critical aspect of interactivity in the page lifecycle is during startup. As a page loads, it will initially render, but it’s important to remember that just because a page has rendered, doesn’t mean that the page is finished loading. Depending on how many resources a page requires to become fully functional, it’s possible that users may attempt to interact with the page while it’s still loading.
One thing that can extend an interaction’s input delay while a page loads is script evaluation. After a JavaScript file has been fetched from the network, the browser still has work to do before that JavaScript can run; that work includes parsing a script to ensure its syntax is valid, compiling it into bytecode, and then finally executing it.
Depending on the size of a script, this work can introduce long tasks on the main thread, which will delay the browser from responding to other user interactions. To keep your page responsive to user input during page load, it’s important to understand what you can do to reduce the likelihood of long tasks during page load so the page stays snappy.
Objective
Optimize event callbacks #
The input delay is only the first part of what INP measures. You’ll also need to make sure that the event callbacks that run in response to a user interaction can complete as quickly as possible.
Yield to the main thread often #
The best general advice in optimizing event callbacks is to do as little work as possible in them. However, your interaction logic may be complex, and you may only be able to marginally reduce the work they do.
If you find this is the case for your website, the next thing you can try is to break up the work in event callbacks into separate tasks. This prevents the collective work from becoming a long task that blocks the main thread, which allows other interactions that otherwise would be waiting on the main thread to run sooner.
setTimeout is one way to break up tasks, because the callback passed to it runs in a new task. You can use setTimeout by itself or abstract its use into a separate function for more ergonomic yielding.
Objective
Yielding indiscriminately is better than not yielding at all—however, there is a more nuanced way of yielding to the main thread, and that involves only yielding immediately after an event callback that updates the user interface so rendering logic can run sooner.
Yield to allow rendering work to occur sooner #
A more advanced yielding technique involves structuring the code in your event callbacks to limit what gets run to just the logic required to apply visual updates for the next frame. Everything else can be deferred to a subsequent task. This not only keeps callbacks light and nimble, but it also improves rendering time for interactions by not allowing visual updates to block on event callback code.
For example, imagine a rich text editor that formats text as you type, but also updates other aspects of the UI in response to what you’ve written (such as word count, highlighting spelling mistakes, and other important visual feedback). In addition, the application may also need to save what you’ve written so that if you leave and return, you haven’t lost any work.
- Update the text box with what the user typed and apply any required formatting.
- Update the part of the UI that displays the current word count.
- Run logic to check for spelling mistakes.
- Save the most recent changes (either locally or to a remote database).
The code to do this might look something like the following:

The following visualization shows how deferring any non-critical updates until after the next frame can reduce the processing time and thus the overall interaction latency. Click the above figure to see a high-resolution version.
While the use of setTimeout() inside a requestAnimationFrame() call in the previous code example is admittedly a bit esoteric, it is an effective method that works in all browsers to ensure that the non-critical code does not block the next frame.
Avoid layout thrashing #

Layout thrashing—sometimes called forced synchronous layout—is a rendering performance problem where layout occurs synchronously. It occurs when you update styles in JavaScript, and then read them in the same task—and there are many properties in JavaScript that can cause layout thrashing. An example of layout thrashing, as shown in the performance panel of Chrome DevTools. Rendering tasks that involve layout thrashing will be noted with a red triangle at the upper right corner of the portion of the call stack, often labeled **Recalculate Style** or **Layout**.
Layout thrashing is a performance bottleneck because by updating styles and then immediately requesting the values of those styles in JavaScript, the browser is forced to do synchronous layout work it otherwise could have waited to perform asynchronously later on after event callbacks have finished running.
Objective
Minimize presentation delay #
The presentation delay of an interaction marks spans from when an interaction’s event callbacks have finished running, up to the point at which the browser is able to paint the next frame that shows the resulting visual changes.
Minimize DOM size #
- During the initial page render, where a large DOM requires a lot of work to render the page’s initial state.
- In response to a user interaction, where a large DOM can cause rendering updates to be very expensive, and therefore increase the time it takes for the browser to present the next frame.
Objective
Bear in mind that there are instances in which large DOMs can’t be significantly reduced. While there are approaches you can take to reduce DOM size, such as flattening your DOM or add to the DOM during user interactions to keep your initial DOM size small, those techniques may only go so far.
Use content-visibility to lazily render off-screen elements #
One way you can limit the amount of both rendering work during page load and rendering work in response to user interactions is to lean on the CSS content-visibility property, which effectively amounts to lazily rendering elements as they approach the viewport. While content-visibility can take some practice to use effectively, it’s worth investigating if the result is lower rendering time that can improve your page’s INP.
Objective
Be aware of performance costs when rendering HTML using JavaScript #
Where there’s HTML, there’s HTML parsing, and after the browser has finished parsing HTML into a DOM, it must apply styles to it, perform layout calculations, and subsequently render that layout. This is an unavoidable cost, but how you go about rendering HTML matters.
When the server sends HTML, it arrives in the browser as a stream. Streaming means that the HTML response from the server is arriving in chunks. The browser optimizes how it handles a stream by incrementally parsing chunks of that stream as they arrive, and rendering them bit by bit. This is a performance optimization in that the browser implicitly yields periodically and automatically during page load, and you get that for free.
While the first visit to any website will always involve some amount of HTML, a common approach starts with a minimal initial bit of HTML, and then JavaScript is used to populate the content area. Subsequent updates to that content area also occur as the result of user interactions. This is usually called the single-page application (SPA) model. One drawback of this pattern is that, by rendering HTML with JavaScript on the client, you not only get the cost of the JavaScript processing to create that HTML, but also the browser will not yield until it has finished parsing that HTML, and rendering it.
It’s vital to remember though, that even websites that aren’t SPAs will probably involve some amount of HTML rendering through JavaScript as the result of interactions. This is generally fine, so long as you’re not rendering large amounts of HTML on the client, which can delay presentation of the next frame. However, it’s important to understand the performance implications of this approach to rendering HTML in the browser, and how it can impact the responsiveness of your website to user input if you are rendering a lot of HTML via JavaScript.
Objective
Conclusion #
Improving your site’s INP is an iterative process. When you fix a slow interaction in the field, the chances are good that—especially if your website provides lots of interactivity—you’ll start to find other slow interactions, and you’ll need to optimize them too.
The key to improving INP is persistence. In time, you can get your page’s responsiveness to a place where users are happy with the experience you’re providing them. The chances are also good that as you develop new features for your users, you may need to go through the same process in optimizing interactions specific to them. It will take time and effort, but it’s time and effort well spent.
Hero image from Unsplash, by David Pisnoy and modified in accordance with the Unsplash license.
Optimize And Measure Interaction to Next Paint (INP)
Interaction to Next Paint (INP) is a new metric that Google uses to measure how quickly your website reacts to user interactions. It will become one of the Core Web Vitals metrics that impact Google rankings in March 2024.
This article takes a look at what INP measures and what you can do to optimize it.
What is Interaction to Next Paint?
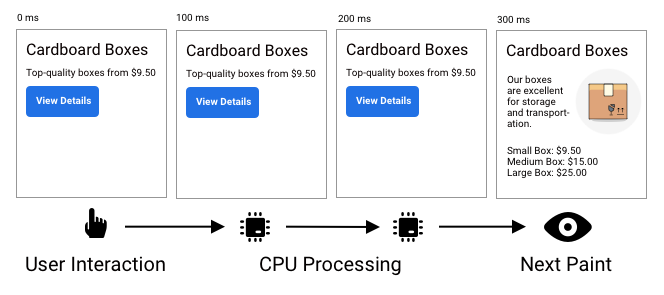
Interaction to Next Paint (INP) is a web performance metric that measures user interface responsiveness – how quickly a website responds to user interactions like clicks or key presses.
Specifically, it measures how much time elapses between a user interaction like a click or key press and the next time the user sees a visual update on the page.
How is Interaction to Next Paint measured?
INP measures how much time elapses between user input, like clicks and key presses, and the next UI update. This delay consists of three components:
- Input Delay: waiting for background tasks on the page that prevent the event handler from running
- Processing Time: running event handlers in JavaScript
- Presentation Delay: recalculating the page layout and painting page content
This diagram shows an example timeline of different CPU tasks, and how they add up to INP activity. Interaction to Next Paint spans the entire time frame from the mouse, touch, or keyboard input up to the point when the next frame is rendered by the browser.
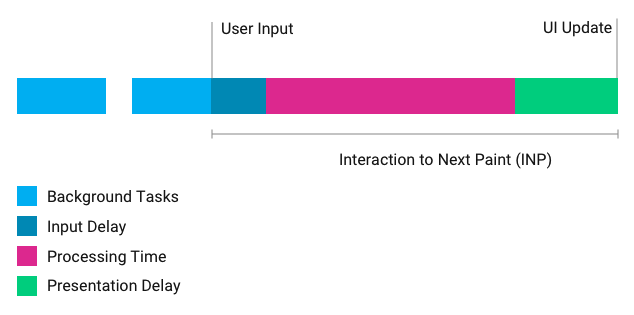
The processing time can be made up of multiple event handlers, for example keydown and keyup events.
What's a good Interaction to Next Paint value?
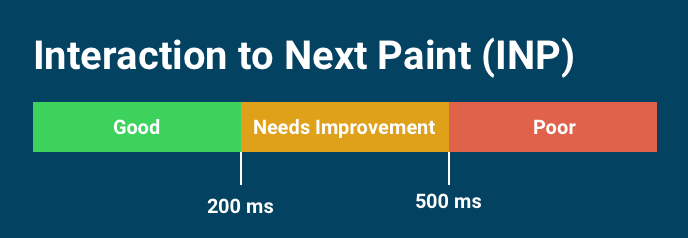
A good INP is less than 200 milliseconds. An INP over 500 milliseconds is poor.
Interaction to Next Paint will become one of the Core Web Vitals metrics in March 2024 and therefore become a Google ranking factor.
How to optimize Interaction to Next Paint
The best way to reduce INP is reducing the amount of CPU processing that happens on your page. You can also run more of your code asynchronously so that the user gets an immediate UI update even some work is still ongoing.
Optimizing INP involves profiling your own website code as well as reviewing third-party scripts that may make your website less responsive.
The DevTools performance profiler is a great tool to find out what's happening on the page main thread and how you can optimize it.
Identify common user interactions on your page and create a recording of on-page CPU activity that occurs during the interaction. Then you can investigate the interactions with the biggest delay.

Reduce the Input Delay component
To reduce the Input Delay component of INP, reduce and break up background CPU activity on the main thread.
When reviewing lab data you can look at the Total Blocking Time metric to see if there is background activity that would block user interactions.
If third-party code is responsible for background tasks check if the code is configurable to reduce the amount of work or if it's possible to only load the third-party script when necessary.
Reduce the processing component
How you then optimize that CPU activity will depend heavily on your app. You need to investigate where the browser is spending most of its time and optimize those parts.
In a React app you might be able to avoid unnecessary rerenders of your components to speed up your website.
If a lot of CPU activity consists of layout work, check if you can reduce relayouts.
If you need to do heavy JavaScript processing in response to user input, consider updating the UI before starting the CPU task. For example you:
- show a spinner and then do the work in a setTimeout callback
- do CPU-intensive work on a separate thread using a web worker
Reduce the presentation delay
The amount of presentation delay will depend on the complexity of the page and how much of the page is updating.
If rendering the page contents is slow, consider only showing important "above the fold" content first to deliver the next frame more quickly.
How is Interaction to Next Paint different from First Input Delay?
There are two differences between FID and INP: FID only measures the initial processing delay while INP measures the full amount of time between user input and the UI update. FID als only counts the first user interaction on a page, while INP looks at (roughly) the worst delay.
First Input Delay measures how long it takes for the browser to start processing user input. The actual time spent responding to the event or updating the UI isn't included.
As the name suggests, FID only considers the first time the user interacts with the page. Especially for pages that stay open for a long time, like single-page apps, this first interaction might not be representative of the overall user experience.
Interaction to Next Paint generally measures the worst input delay on the page. However, if there are many user experiences outliers will be ignored, and Google will measure the 98th percentile of interaction delay. So if the INP on a page is 250 milliseconds, 2% of user interactions had a latency greater than 250 milliseconds.
Is Interaction to Next Paint a Core Web Vitals metric?
INP will become a one of Google's Core Web Vitals metrics in March 2024. At that point it will replace First Input Delay.
Becoming a Core Web Vitals metric means that poor Interaction to Next Paint can impact your Google rankings.
Why is INP a field metric?
The Interaction to Next Paint metric requires user input to measure, and so is generally available in field data collected from real users.
Google collects real user data on INP as part of the Chrome User Experience Report (CrUX).
You could script a user interaction in a lab environment to collect lab data for INP. Keep in mind that each page interaction can have different performance characteristics, depending on what UI element the user interact with and when that interaction happens.
Does INP measure the slowest response on a page?
When a user visits a page they may click on multiple different UI elements. If they are filling out a form they will press many keys on their keyboard. How does INP account for that?
INP will report the slowest 2% of UI responses. Usually that means the worst delay will be reported, but if a page receives a lot of interactions only one of the slowest will be reported.
For example, if a page takes 50 milliseconds to respond to 100 interactions, and then there is one interaction with a 300 millisecond delay then INP will be reported as 50 milliseconds.
However, if there are three 300-millisecond delays then the 98th percentile will be 300 milliseconds, and this will be reported as the INP.
What user interactions does INP consider?
The following interactions are counted for INP:
- Mouse clicks
- Taps (on a touch screen)
- Key presses
The following interactions do not count:
- Hovering
- Scrolling
Changes to the INP definition
Google continuously refines how their Core Web Vitals metrics are defined. If you see unexplained changes to your metrics this may be due to a change in how INP is measured. Check out the INP changelog to see what changes have been made in different Chrome versions.
How to measure Interaction to Next Paint
You can use a number of tools to measure Interaction to Next Paint, for example:
- The DebugBear website speed test
- Google PageSpeed Insights
- Our Site Speed Chrome extension
- The Web Vitals library
Measure Interaction to Next Paint with DebugBear
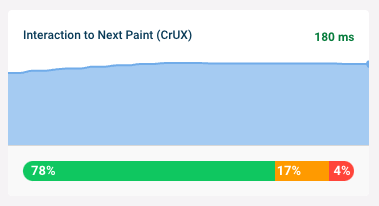
The free website speed test by DebugBear can show you what Interaction to Next Paint is like for real users on your website.
Simply enter your URL, run the test, and open the Web Vitals tab. There you can find Interaction to Next Paint under the Additional Web Vitals heading.
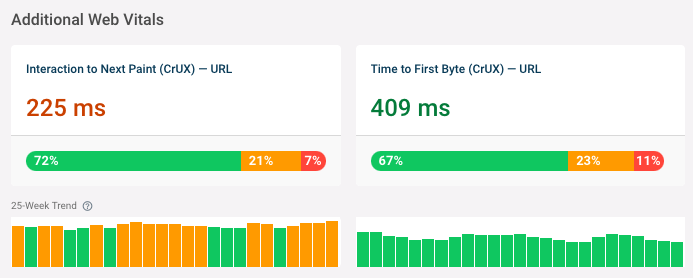
In addition to looking at the CrUX data for the last 28 days you can also see a history of how INP has changed over the last 25 weeks.
Use the URL and Origin toggle near the top of the page to switch between data for the specific test URL and the whole website.
Interaction to Next Paint in PageSpeed Insights
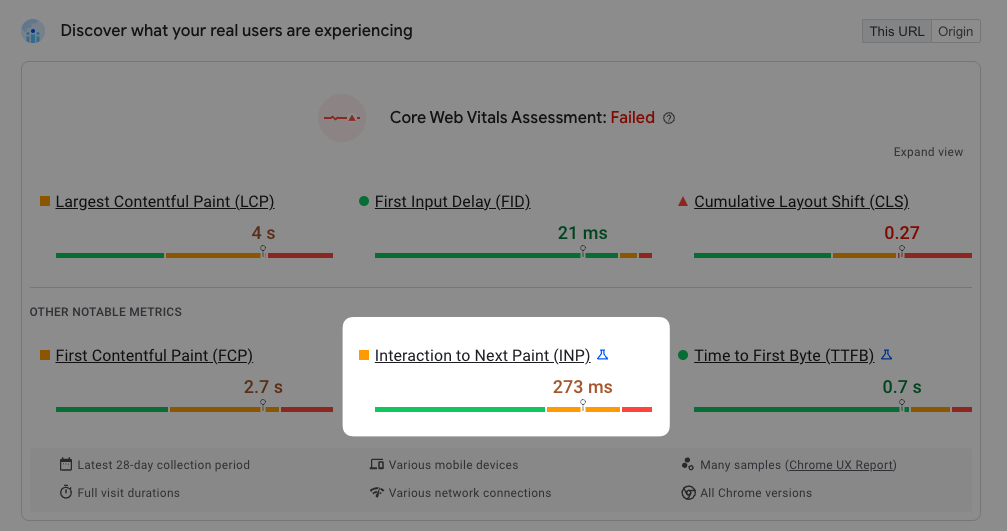
The real user section on Google PageSpeed Insights shows the INP metric indicating how quickly the page responds to user interactions.
The metrics shows the 75th percentile. For example, if the INP is 273 milliseconds that means that for the 25% of visitors with the slowest INP the worst delay between input and the next UI update that they experienced was 273 milliseconds.
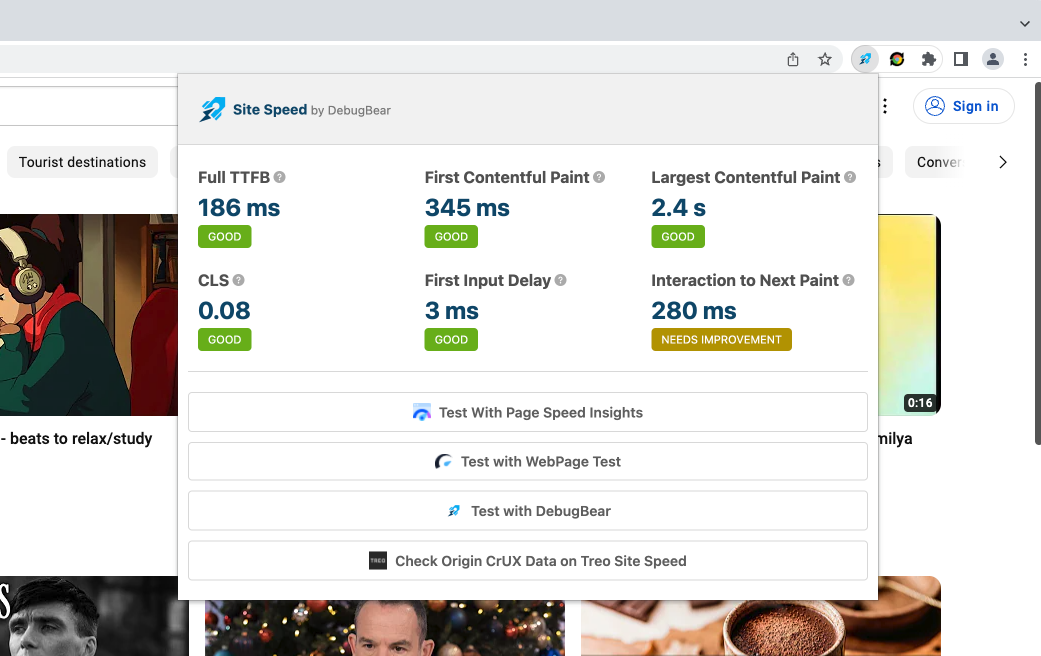
View INP with the Site Speed Chrome extension
You can install the Site Speed Chrome Extension to view Core Web Vitals and INP for the website that's currently open.
This value will only be available once you've interacted with the page, for example by clicking on it or typing in a text field.
Measure INP with the web-vitals library
If you want to measure INP programmatically with JavaScript you can use the web-vitals library. This allows you obtain measurements from real users and send them back to your analytics provider.
You can load the library with a script tag like this:
You can then use the onINP method on the webVitals object to see when the Interaction to Next Paint value changes.
The value of the INP metric can change through the lifetime of the page as the user continues interacting with it. reportAllChanges ensures that even preliminary values are reported.
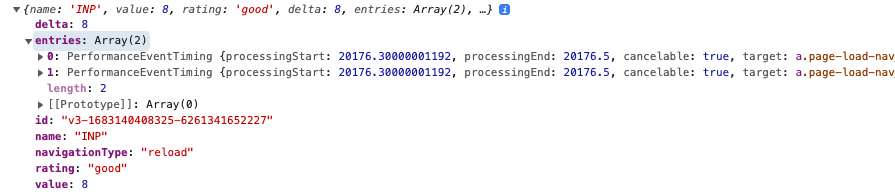
In addition to reporting the INP value the web-vitals library also reports a list of entries . These are the individual user interactions that have contributed to the INP score.
The target tells you what page element the user interacted with.
The startTime is the timestamp in milliseconds when the user interaction occurred. processingStart indicates when the event handler started to run. processingEnd is when the event has been processed.
Monitoring Interaction to Next Paint
Start a free 14-day trial of DebugBear to monitor INP and other Core Web Vitals metrics. Our provides both real-user data from Google and detailed lab reports to help you optimize your website.
JavaScript: заметка о сканере предварительной загрузки и пропуске невидимого контента

Обе технологии используются браузером для повышения скорости загрузки веб-приложений.
Теоретическая часть представляет собой адаптированный и дополненный перевод этой статьи. Практическая часть — это небольшой эксперимент по применению новых свойств CSS , о которых рассказывается в этой статье (перевод).
Если вам это интересно, прошу под кат.
Сканер предварительной загрузки
Что такое сканер предварительной загрузки?
В каждом браузере есть основной парсер (primary parser) HTML (далее — просто парсер), который токенизирует (tokenize) разметку и преобразует ее в объектную модель. Разбор разметки продолжается до тех пор, пока парсер не встретит блокирующий ресурс, такой как стили, загружаемые через элемент link , или скрипт, загружаемый через элемент script без атрибута async или defer .
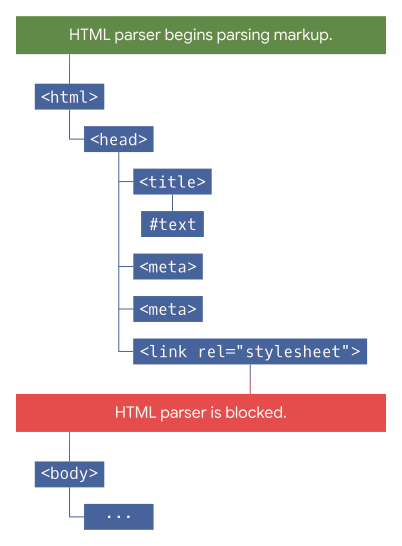
На приведенной диаграмме парсер блокируется загрузкой внешнего CSS-файла с помощью элемента link . Браузер не будет разбирать остальной документ и ничего не будет рендерить до тех пор, пока не загрузит и не разберет эту таблицу.
В случае с файлами CSS парсинг и рендеринг блокируются во избежание вспышки нестилизованного контента (flash of unstyled content, FOUC), когда на мгновение появляется нестилизованная версия страницы перед применением к ней соответствующих стилей.

Браузер также блокирует парсинг и рендеринг страницы, когда встречает тег script без атрибута async или defer .
Обратите внимание: скрипты с type="module" загружаются отложено по умолчанию.
Причина такого поведения браузера состоит в том, что скрипт может модифицировать DOM до завершения обработки разметки парсером.
Блокировка парсинга и рендеринга является нежелательной, поскольку может помешать обнаружению других важных ресурсов. К счастью, кроме основного, в браузере также имеется дополнительный парсер (secondary parser), который называется сканером предварительной загрузки (preload scanner) (далее — просто сканер).

Основной парсер блокируется обработкой CSS и не "видит" изображение в body . Однако сканер продолжает свою работу, обнаруживает изображение и загружает его, не дожидаясь разблокировки парсера.
Роль сканера — исследование разметки с целью обнаружения ресурсов для предварительной загрузки, т.е. до обнаружения этих ресурсов парсером.
Как увидеть работу сканера?
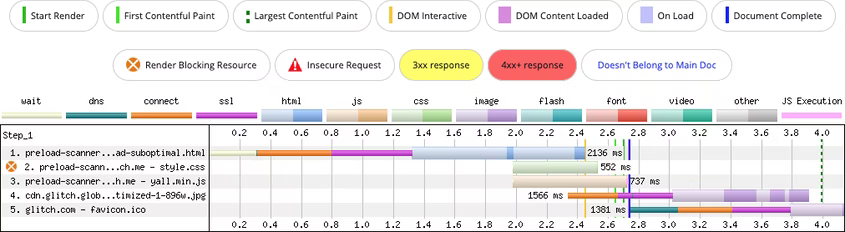
Рассмотрим страницу со стилизованными изображением и текстом. Блокировка парсинга и рендеринга файлом CSS позволяет реализовать искусственную задержку в 2 секунды с помощью прокси-сервера. Задержка помогает увидеть работу сканера на сетевом водопаде (network waterfall):
Сканер обнаружил элемент img , несмотря на блокировку парсинга и рендеринга. Без этой оптимизации браузер не сможет предварительно загружать ресурсы в период блокировки. Это означает, что будет больше последовательных запросов и меньше параллельных.
Может ли разработчик помочь сканеру? Нет. Но он может ему не мешать. Рассмотрим парочку примеров.
Внедренные скрипты
Предположим, что в head у нас имеется такой код:
Внедренные (injected) скрипты ( ym.min.js ) по умолчанию являются асинхронными (как будто у них имеется атрибут async ). Такие скрипты запускаются сразу и не блокируют рендеринг. Звучит прекрасно, не правда ли? Да, но если расположить такой script после link , загружающего внешний файл CSS , то результат будет следующим:
Страница содержит одну таблицу стилей и встроенный асинхронный скрипт. Сканер не может обнаружить такой скрипт в период блокировки, поскольку он внедряется на клиенте.
Вот что здесь происходит:
- Сначала запрашивается основной документ.
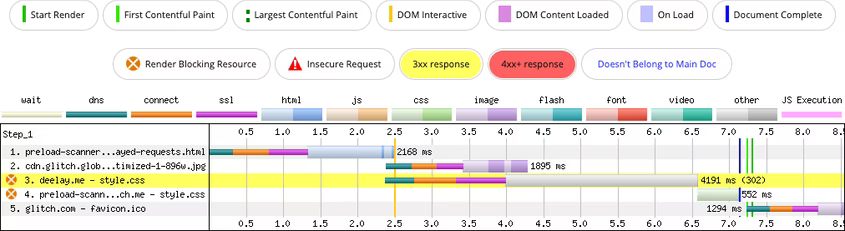
- На 1,4 секунды прибывает первый байт навигационного запроса.
- На 2 секунде запрашиваются стили и изображение.
- Парсер блокируется загрузкой стилей и встроенный JS , который внедряет асинхронный скрипт, выполняется только на 2,6 секунды.
Таким образом, запрос на получение скрипта выполняется только после завершения загрузки стилей. Это может негативно сказаться на времени до интерактивности (Time to Interactive, TTI).
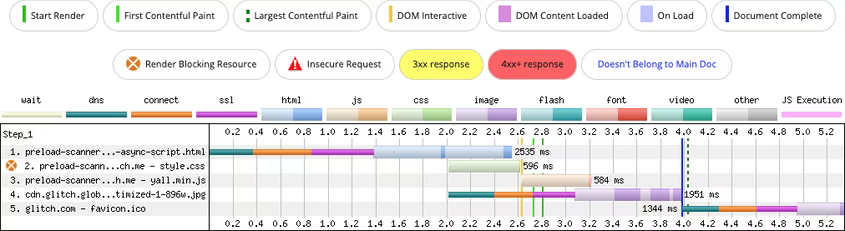
Перепишем код следующий образом:

Сканер обнаруживает асинхронный скрипт в период блокировки и загружает его одновременно со стилями.
Данную проблему также можно решить с помощью rel="preload":

Предварительная загрузка решает задачу, но возникает другая проблема: в первом примере асинхронный скрипт загружается с "низким" приоритетом, а таблица стилей с "наивысшим", во втором случае стили также загружаются с "наивысшим" приоритетом, а приоритет загрузки скрипта становится "высоким".
Чем выше приоритет загрузки ресурса, тем больше пропускной способности выделяется ему браузером. Высокий приоритет скрипта может стать проблемой при медленном соединении или большом размере файла.
Ответ прост: если скрипт требуется при запуске приложения, не внедряйте его в DOM с помощью встроенного JS .
Ленивая загрузка с помощью JS
Ленивая или отложенная (lazy) загрузка — отличный метод обработки данных, часто применяемый к изображениям. Однако неправильное применение этой техники может привести к тому, что важные ресурсы не будут своевременно обнаружены сканером (получение ссылки на изображение, его загрузка, декодирование и отображение).
Взглянем на такую разметку:
Использование атрибута data-* является распространенной практикой, используемой ленивыми загрузчиками (lazy loaders, например, vanilla-lazyload). Когда изображение попадает в область просмотра, загрузчик меняет data-src на src . Обычно, это реализуется с помощью Intersection Observer API. Это заставляет браузер загрузить ресурс.
Паттерн работает до тех пор, пока изображение не находится в области просмотра при запуске приложения. Поскольку сканер не читает атрибут data-src как атрибут src (или srcset ), ссылка на изображения остается скрытой. Более того, загрузка изображения откладывается до загрузки, компиляции и выполнения кода ленивого загрузчика.
В отдельных случаях при нахождении "ленивого" изображения в области просмотра при запуске приложения замены data-src на src вообще не происходит, поэтому при использовании, например, react-lazyload, иногда приходится вручную вызывать метод forceCheck для определения нахождения элемента в области просмотра.
Обратите внимание: у элемента img (и iframe ) есть специальный атрибут для ленивой загрузки — loading="lazy". Как только поддержка этого атрибута Safari станет стабильной, всем будет счастье. Много изображений на сайте? Рассмотрите возможность использования Imgproxy.
В зависимости от размера изображения или размера занимаемой им части области просмотра, изображение может стать целью для оценки скорости загрузки основного контента (Largest Contentful Paint, LCP) страницы.
Убедитесь в том, что изображения и другие ресурсы, находящиеся в области просмотра при запуске приложения, загружаются незамедлительно (eager):

Фоновые изображения CSS
Помните, что сканер исследует разметку. Он не сканирует другие ресурсы, такие как стили, в которых изображения могут запрашиваться в свойстве background-image.
Как и HTML , CSS преобразуется в объектную модель — CSSOM. При обнаружении внешних ресурсов при конструировании CSSOM , они запрашиваются во время обнаружения, а не предварительно.
Предположим, что кандидат LCP — это элемент с background-image :

Загрузка изображения начинается только после его обнаружения парсером CSS .
Эту проблему можно решить предварительной загрузкой изображения с помощью rel="preload" :

Общая рекомендация такова: везде, где это возможно, вместо background-image следует использовать элемент img .
Рендеринг разметки на стороне клиента
Не секрет, что JS замедляет скорость загрузки страницы. Речь идет о тех случаях, когда JS используется для доставки контента. Это обеспечивает лучший опыт разработки. Но лучший опыт разработки не всегда означает лучший пользовательский опыт.
Рендеринг разметки на стороне клиента нивелирует работу сканера:

Поскольку контент формируется JS и рендерится фреймворком, изображение в разметке остается скрытым для сканера. Это замедляет обнаружение важных ресурсов и негативно влияет на LCP .
Рендеринг разметки на стороне клиента также может негативно сказаться на интерактивности до следующей отрисовки (Interaction to Next Paint, INP).
Более того, рендеринг очень большого объема разметки на клиенте похож на выполнение тяжелой, а, значит, продолжительной вычислительной задачи (long task) по сравнению с обработкой разметки, полученной браузером от сервера. Дело в том, что разметка, полученная от сервера, делится браузером на небольшие части ("чанки", chunks) во избежание выполнения длительных задач, что может привести к утрате браузером интерактивности. Клиентская разметка, в свою очередь, обрабатывается как единая монолитная задача, что может ухудшить такие показатели, как общее время блокировки (Total Blocking Time, TBT) и время ожидания до первого взаимодействия с контентом (First Input Delay, FID).
Рендеринг разметки на стороне сервера (Server-Side Rendering, SSR) или генерация статической разметки всегда более предпочтительна, чем рендеринг HTML на стороне клиента. Альтернативой может служить генерация статической разметки на сервере и ее гидратация на клиенте.
Пропуск невидимого контента
Новое свойство CSS content-visibility позволяет разработчику предоставлять браузеру разрешение на пропуск рендеринга невидимого контента, т.е. контента, находящегося за пределами области просмотра при запуске приложения. В настоящее время данное свойство поддерживается только браузерами на основе WebKit. Делается это следующим образом:
По моим наблюдениям, браузер рендерит видимый контент с запасом, примерно равным размеру области просмотра. Другими словами, пропускается рендеринг контента, находящего "далее" приблизительно 200% размера области просмотра.
Дефолтным размером "пропущенного" контента является 16x16px . Последующий рендеринг такого элемента может привести к ужасному опыту скроллинга, когда полоса прокрутки прыгает вверх и вниз или в лучшем случае остается на месте. Во избежание этого рекомендуется указывать "типичный" размер контента с помощью свойства contain-intrinsic-size. Сигнатура:
Ширина и высота пока могут задаваться только в пикселях (если указано одно значение, оно будет применяться и к ширине, и к высоте). Значение auto указывает браузеру запоминать размер отрендеренного элемента (пропуск невидимого контента выполняется "туда и обратно": пропускается рендеринг не только тех элементов, которые еще не попали в область просмотра, но и тех, которые из нее вышли).
В простейших случаях (как в примере из оригинальной статьи) это прекрасно работает: пропуск невидимого контента действительно на порядок повышает скорость рендеринга страницы. Но будет ли это работать при рендеринге разметки на стороне клиента? Давайте это проверим.
Обратите внимание: для разработки приложения я буду использовать React и TypeScript, но выбор фреймворка и использование типизатора особого значения не имеют. Для работы с зависимостями я буду использовать Yarn.
Разработка приложения
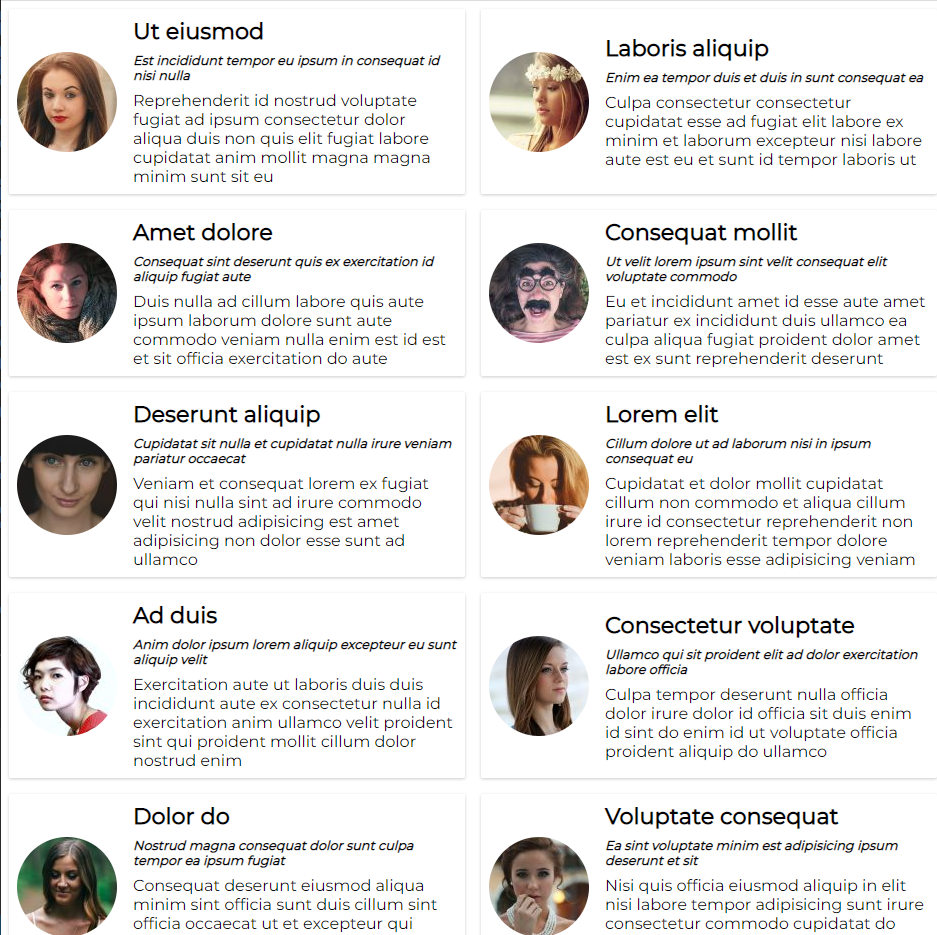
Разработаем простое приложение для рендеринга карточек пользователей в количестве 1000 штук.
Создаем шаблон приложения с помощью Vite:
Переходим в созданную директорию и устанавливаем пакет для генерации "рыбатекста":
Приводим директорию src к следующему виду:
Подключаем шрифт в index.html :
Начнем с компонента карточки пользователя ( UserCard.tsx ):
Здесь все просто: компонент принимает адрес изображения, заголовок, подзаголовок и описание, формирует и возвращает разметку. О перенаправлении ссылки поговорим чуть позже.
Займемся основным компонентом ( App.tsx ).
Импортируем зависимости и компонент, определяем функцию для генерации "рыбатекста" и переменную для идентификатора аватара пользователя:
Для получения ссылок на аватары прибегнем к помощи Pravatar. Данный ресурс предоставляет всего 70 разных изображений, поэтому нам и нужен счетчик.
Мы хотим, чтобы размер карточек был динамическим, т.е. зависел от ширины области просмотра (как в реальных приложениях). Но что делать с contain-intrinsic-size ? Один из вариантов — измерить размер первой карточки после рендеринга и внедрить соответствующие стили в head :
Можно пойти дальше и переопределять contain-intrinsic-size при каждом изменении размера области просмотра:
Но такие вычисления будут негативно влиять на производительность приложения, поэтому обойдемся без них.
Определяем стили в index.css :
Запускаем приложение с помощью команды yarn dev :
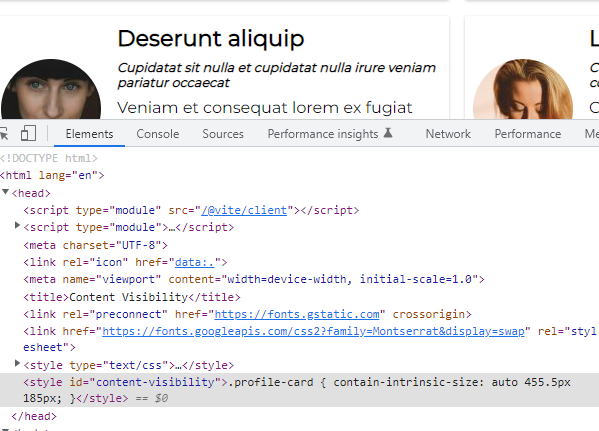
Открываем инструменты разработчика и "перебираем" элементы с классом profile-card посредством наведения курсора. В определенный момент получаем от браузера сообщение о том, что "потомки элемента пропущены из-за content-visibility":

Заглянув в head , убедимся во внедрении стилей, определяющих типичный размер контента:
Ускорило ли это рендеринг страницы? Для чистоты эксперимента создадим 2 сборки приложения.
Выполняем команду yarn build . Это приводит к генерации директории dist с файлами сборки в корне проекта. Меняем название данной директории на with-cv .
Удаляем content-visibility: auto; из index.css и все, что связано с contain-intrinsic-size , из App.tsx , и снова выполняем сборку с помощью yarn build . Меняем название директории dist на without-cv .
В качестве локального сервера для запуска приложений используем serve. Устанавливаем его глобально:
И запускаем оба приложения:
Открываем приложения в браузере в анонимном режиме.
Для измерения производительности приложения воспользуемся вкладкой Performance инструментов разработчика. Открываем данную вкладку и нажимаем на кнопку обновления в верхнем левом углу:

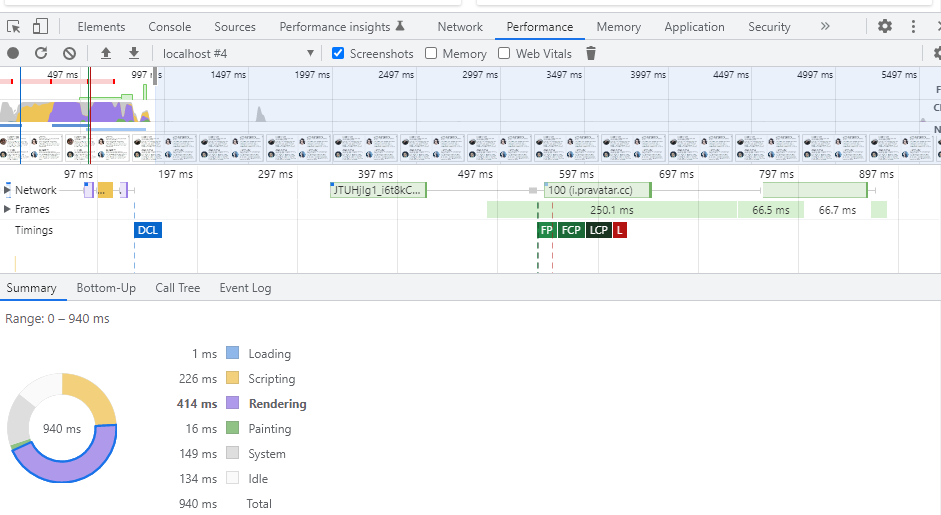
Нас интересуют показатели Rendering и Painting . Честно говоря, результаты получаются не очень стабильными: иногда значения примерно одинаковые, но, в среднем, скорость рендеринга и отрисовки страницы, на которой браузеру разрешено пропускать невидимый контент, в 2 раза выше. Таким образом, даже в случае рендеринга разметки на стороне клиента браузер делает все возможное для ускорения загрузки страницы.
Подведем некоторые итоги:
- скорее всего, к моменту стандартизации contain-intrinsic-size будет принимать значения не только в пикселях, но и, как минимум, в процентах;
- пока не очень понятно, как вычислять contain-intrinsic-size без использования JS в случае с динамическим размером содержимого;
- использование content-visibility: auto со временем может стать хорошей альтернативой или дополнением к другим паттернам ленивой загрузки;
- учитывая очевидные преимущества пропуска рендеринга невидимого контента, можно предположить, что content-visibility: auto в будущем (в той или иной степени) станет поведением браузера по умолчанию.
Пожалуй, это все, чем я хотел поделиться в этой заметке. Надеюсь, вы нашли для себя что-то интересное и не зря потратили время.
Interaction to Next Paint (INP): What is it and How to Improve It
Interaction to Next Paint (INP) is a performance metric that assesses how well your page handles visitor interactions. Every time a visitor clicks a button or taps the screen, your page should be ready to respond quickly for the best possible page experience. INP tracks how long it takes for your page to respond to any of these visitor inputs, so you’ll know if your pagesh feel snappy and quick or slow and unresponsive.
If you’ve not already heard of Interaction to Next Paint (INP), expect to hear more about it over the next year or so. INP will be the successor to First Input Delay (FID), one of Google’s Core Web Vitals. This means boosts to your INP will improve your UX and be a factor that Google considers when ranking your content on its search engine.
To get an edge over your competition, you should start optimising for Interaction to Next Paint now. Doing so will give your visitors the best experience possible and reap the SEO benefits of Google’s future algorithm change.
Table of Contents
Interaction to Next Paint is a metric that shows your page’s responsiveness. It does this by tracking the time between someone interacting with a page (such as: clicking with a mouse, tapping on a device with a touchscreen or pressing a key on a physical or virtual keyboard) and when the next paint is not blocked. In that sense, INP sets out to measure the ability to paint versus the entire duration of the painting action.
Once a person leaves your page, that session will be given an INP measurement. Typically, that measurement will be the slowest response time recorded in that session.
For example, if a visitor enters your page and performs three interactions, they could look something like this:
- Clicks drop-down: Next paint occurs 60 ms later.
- Clicks the arrow keys to move to the next slideshow image: Next paint occurs 350 ms later.
- Taps login button: Next paint occurs 100 ms later.
The INP measurement for this particular session would be 350 ms to match the slowest response time.
Pages with more than 50 interactions will be scored slightly differently. Instead of taking the absolute worst response time, the INP will instead be based on one of the worst response times. Typically, the measurement in these cases is based on a 98th percentile response time, so if you have one slow next paint, it won’t skew the metric.
First Input Delay (FID) only measures the first interaction on a page, while INP measures all interactions throughout a session. Since the INP score is based on more interactions, it’ll be more representative of a visitor’s actual experience with your website.
For this reason, you should make the change now, even if INP hasn’t officially replaced FID yet. If you’re solely optimising for FID, you may not see major performance issues after the initial interaction. With INP, you’ll be sure that all your pages provide snappy experiences for your visitors.
To get a quick idea of your INP, use our free Core Web Vitals Checker.
Calibre’s Core Web Vitals Checker uses data from Google’s Chrome User Experience Report (CrUX) to find your INP measurements. This data set is based on real people interacting with your site on the Chrome browser. Although it’s not ideal to be pulling solely from Chrome sessions, this is currently the best data set available for INP.
Enter the URL of the page or domain you want to test, click enter, and then scroll down to the correct metric.
Check if your site passes the Core Web Vitals assessment in one click.
Based on Google’s guidelines, a good INP score is less than 200 ms. Okay ones are between 200 and 500 ms. Anything exceeding 500 ms should be addressed as a significant web performance problem.
One caveat to be aware of is that your visitors’ devices and internet connections impact INP. If your product or website caters to people with slower devices or connections, your INP score will be negatively influenced.
In these cases, you still want your INP to be as quick as possible, but scores lower than 200 ms may be hard to achieve.
To get the best INP on your site, you’ll need to optimise your pages to deliver the quickest possible responses to user interactions.
A browser’s main thread is where all the work to run a webpage happens. The main thread is responsible for downloading resources, painting pages, and handling user inputs. If your main thread is busy doing large tasks, it can’t do anything else—including reacting to inputs from your visitors. This will negatively affect your INP measurement as the browser will need to wait for whatever task it’s working on to complete before it handles the visitor input.
To improve main thread availability on your page, you should:
- Split large tasks: Tasks that take more than 50ms to complete should be split up using a tool like Webpack, ESBuild, Rollup or Parcel. This way, there are more breaks in main thread availability where it can handle user inputs.
- Avoid thrashing: Thrashing is when a page needs to be repainted or reflowed because the JavaScript files have conflicting information. Get rid of thrashing by auditing your JavaScript code for common thrashing causes.
- Lazy Load non-critical tasks: Lazy loading allows you to delay loading selected files until the main thread is free. For best results, only lazy load files that are non-critical and below the fold so there’s no noticeable difference to your visitors.
One of the biggest drags on INP is that there’s too much to load for your browser. The more your main thread has to do, the harder it is to keep interaction times quick. Boost your INP by removing or optimising your JavaScript and third-party scripts.
To find places to reduce, you should:
- Audit third-party scripts: Third-party scripts are pieces of code injected into your site to give it extra functionality. These scripts may be integral to your site, but too many can quickly slow your site to a crawl. Use Calibre’s Third Party Tracker to see how much each script is slowing your site, and then choose to remove the worst offenders or find lighter-weight alternatives.
- Optimise and Remove JavaScript: Although all files impact performance, JavaScript is the most data-intensive. For this reason, finding cuts here can make the biggest impact. Optimise your JavaScript files by minifying your code and bundling it for fewer redundancies.
- Use facades: When possible, replace the need to immediately load third-party scripts or JavaScript by using facades. Facades are static images that can “trick” your visitors into thinking something has loaded before it has. For instance, we load an image of our chat widget instead of the widget itself to help our pages load 30% faster. Learn more about employing facades in our guide to perceived performance.
Since INP is based on the worst response times, it makes sense to target specific long interactions and improve them. This process will need to happen on a page-by-page basis, as each page will have a unique INP measurement.
Here’s how to get started:
- Check your page’s INP: Use our Core Web Vitals Checker to see how your top pages do on INP. Note any pages that are have INP higher than 500 ms.
- Find causes for slowdowns: Using Google Lighthouse’s timespan feature, you can interact with your page and find out which events cause slowdowns. Learn more in this video from Google’s Annie Sullivan.
- Fix and retest: After you’ve found your problem and attempted a fix, make sure to retest your page. If you’re using a tool like our Core Web Vitals Checker or Pagespeed Insights, it might take up to a month to observe changes to the INP data. While CrUX updates daily, the mechanism is based on a 28-day pageview sliding window, so it takes a while to filter out past visit measurements.
Interaction to Next Paint is a great place to start when it comes to improving web performance, as it helps ensure snappy interactions with your site. However, INP is just one of several essential metrics worth tracking and optimising.
If you’re new to web performance, it can be challenging to know exactly where to get started when it comes to performance metrics. To make it easier, we’ve created a list of all the performance metrics worth tracking. By following this list, you’ll have all the data you need to understand your site’s performance and where you could make improvements. This way, you can work towards giving your visitors the best possible experience when they access your site.
Karolina is a Co-founder and Product Design Lead at Calibre. With years of design experience under her belt, she’s responsible for the comprehensive user experience spanning over product, visuals and content. Find her on Mastodon or LinkedIn.
Become a site speed expert
Join thousands of subscribers keeping up-to-date with web performance news and advice.