How To Rotate, Move And Flip The Canvas In Clip Studio Paint
You can very easily rotate, invert, flip, zoom and others in Clip Studio Paint. These are very useful tools and actions that I almost subconsciously do all the time. I zoom in and out to add details or to see how the whole illustration looks from a distance. I pan around my work a lot!
The same goes for rotating and flipping my canvas! There also many ways to do each of these actions.
How can you easily rotate and move the canvas? To rotate and flip, go to the ‘View’ menu and right at the top of it, you have some rotating options that you can use. To move, you can use the hand tool, that stands on the toolbar and now you can pan freely through the canvas!
As I said, there are many ways to do this and some shortcuts to reach these tools faster! Let’s go over not only how to rotate and invert, but also the many ways to zoom in and out of your document and even change the canvas size!
Table Of Contents
Rotating And Inverting The Canvas In Clip Studio Paint
While working on a new drawing, sometimes it might be useful to rotate or invert the canvas, even if it’s just to check if everything makes sense. For example, when drawing people, it is common to flip the document from time to time, to check if the proportions are right.
Our brain stays for so long looking at the drawing in one view, that it might look that everything is placed perfectly well. Then, we invert our image and suddenly the face looks all wrong!
This is something good to have in mind while drawing. Always invert your canvas as you work, so you’re sure you’re drawing your characters in the right way!
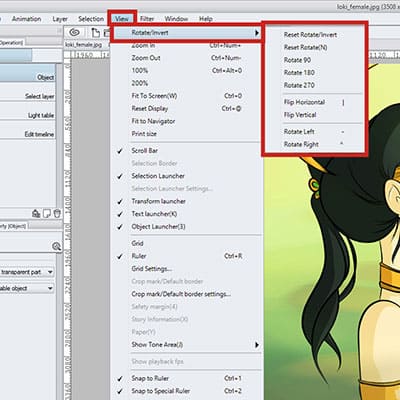
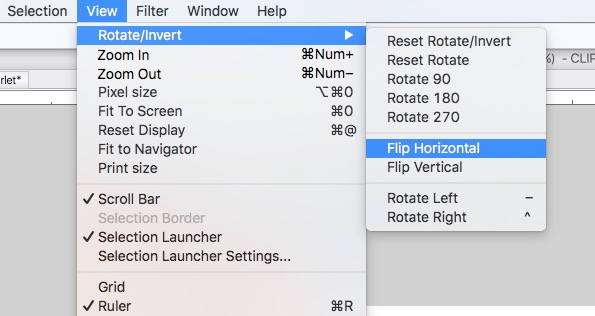
To Invert or Rotate your canvas, without really changing the orientation on your file, simply go to ‘View -> Rotate/Invert’ and choose one of the options. What’s interesting about this option is that what changes is your view of the document.
Let’s say you forgot to put the canvas back to normal and save your drawing. The image will be saved in their original position and not upside down or flipped!
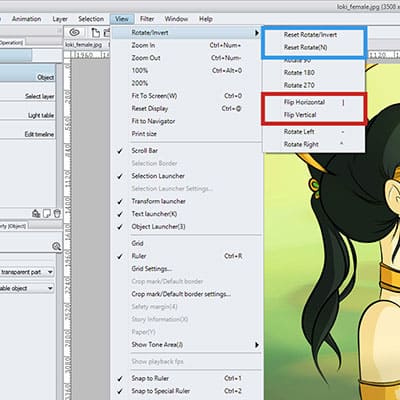
Notice that one of the options in the ‘Rotate/Invert’ menu is to reset your rotation. If you click it, the view of the canvas will go back to how it was originally.
If instead, you really want to flip or rotate your canvas because you decided your work looks better in another position, you can go to ‘Edit -> Rotate/Invert canvas’ and choose one of the options.
Finally, there’s is also a rotating tool that you can use and can help you a lot. I actually use this one all the time! Simple press ‘R’ on your keyboard and now you can rotate your canvas at will.
Flipping The Canvas In Clip Studio Paint
Besides rotating you can also just flip clip studio paint’s canvas horizontally or vertically! Again, this will be very helpful to you when drawing characters and their faces. Just flip horizontally and then back to the original position to be sure everything is in the right places.
To flip your canvas in clip studio paint, you can go to ‘View -> Rotate/Invert -> Flip Horizontal’ or ‘View -> Rotate/Invert -> Flip Vertical’. Now you can view your document flipped very easily.
To reset, just go to the View menu again and choose the first option, ‘Reset Rotate/Invert’ and the document will go back to its original view.
Just like before, if you what you really want is to edit and flip your drawing because you feel it looks better turned to the other side, go to ‘Edit -> Rotate/Invert canvas -> Flip Horizontal or Vertical’. Alternatively, you can use free transform in clip studio paint to flip, scale or rotate your image or selections of it!
You can even mesh transform your art.
It is worth mentioning that it’s very useful to add some shortcuts to these options. This way, you can flip your canvas very quickly with just one button and go back to the original position with another.
Instead of running to the ‘View’ menu all the time, which can be counterproductive. You can assign simple keys to it. This is especially useful if you tend to be the kind of artist that flips the canvas constantly. I don’t do it as much as I should, but I do know a lot of people that do it all the time while working!
Adding A Shortcut To Flip Your Canvas In CSP
As I mentioned, adding a shortcut to these actions can be very useful. In fact, shortcuts in Clip Studio Paint or any other drawing software are our best friends! By using a shortcut (also known as a hotkey) to flip your canvas and even go back to the original position will lower the time you spend while working.
This is why it can be very helpful to add a shortcut to flip your canvas in clip studio paint.
Clip Studio usually has some hotkeys assigned to the rotating and flipping options. Some of them might work, others might feel weird.
If you like how they are, you can leave them as is. However, if you want to add a new shortcut or change the hotkey for one of the actions, you can just go to ‘File -> Shortcut Settings’. Choose the setting area as ‘Main Menu’ and now scroll until you find the ‘View’ menu.
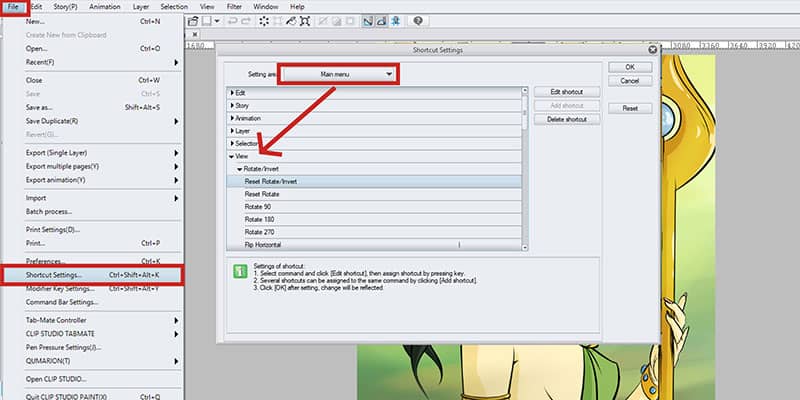
Set a shortcut to rotate or flip the canvas in clip studio paint!
Open it up and all the options should show up. You can add, edit or even delete a shortcut as you wish!
- Ctrl + Shift + F to flip horizontally
- Ctrl + Shift + R to flip vertically
Quick reminder that these aren’t set by default! You need to add them yourself as we talked earlier by going to File -> Shortcut Settings.
Scrolling / Panning Through The Canvas
As we work, we often need to move the canvas around. A lot of times, we’re working with our work very zoomed in and so moving around is a must.
If you need to pan through your canvas you can go to the tool tab, select the second icon from the top and then select the Hand Tool. With this one selected, you can move through the canvas without risking moving anything in your layers by accident.
While the hand is active, only the canvas will move and nothing else. There is a quicker and more automatic way to get to this tool.
When working with most of the tools, if you press the ‘Space’ bar of your keyboard a small hand icon will appear as your cursor. As long as you’re holding the press bar, you can freely pan through the document!
Zooming In And Out Of Your Canvas
Zooming In and Out is also another very used tool. We need to look at our work closer, to draw in the details and then zoom out to see if everything looks good and perceptible from a distance.
- Toolbar: You can go to the toolbar and use the magnifying glass tool. You can choose if you want to use Zoom In or Zoom Out, accordingly.
- Bottom Bar of Clip Studio: At the bottom of your screen there are a couple of icons and options. You can use the small bar to zoom in and out of your work. Right next to it, there are also two magnifying glass icons. The left one will zoom out and the one to the right will zoom in!
- The Mouse Wheel: You can move the mouse wheel up and down to zoom in your work or out. Up to get a closer look and down to zoom out.
- Shortcuts: Yes, I love shortcuts! And these are always right at the tip of my fingers. If you need to zoom in, simply press ‘Ctrl+’. To zoom out, press ‘Ctrl-’ on your keyboard!
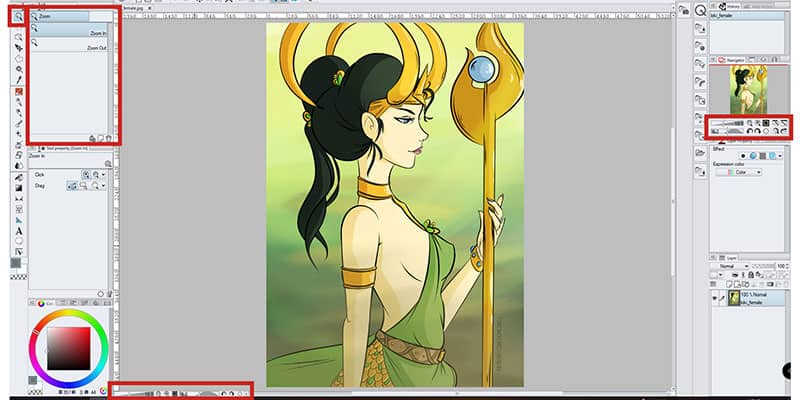
Finally, there’s also a panel where you can use the Zoom tools, rotate, and flip options! If you look to your right, on the ‘Navigation Window’. There you can use the bars to zoom in and out or to rotate. And to the side of it, there are the usual icons to do the same as well as two buttons to flip the canvas, both horizontal and vertically!
Changing The Canvas Size
Changing the Canvas Size in Clip Studio Paint is actually quite fun! Mostly, because you can visualize the changes right away and more easily. If you need to change the size of your canvas, you can go to ‘Edit -> Change Canvas Size…’.
When you do so, a new window will prompt and a frame around the canvas will appear. Let’s start with the window. On it, you can change the Width or the Height as well as the Unit you want your measurements in. You can also set a reference point from where the canvas will change.
Now for the best part! I mentioned a frame around the canvas, you can actually edit this frame! This means you can change the size of your canvas from there. I really like this option because it gives me more control, instead of changing numbers.
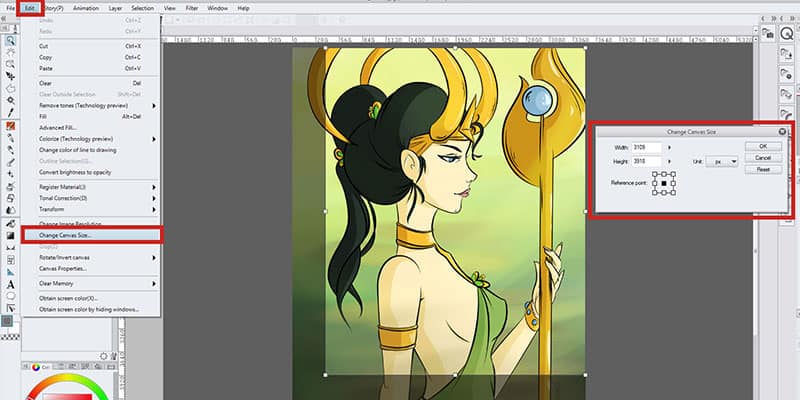
If I don’t need my canvas to have a certain size, I’m free to move the frame around until I’m happy with how the canvas look.
It is also worth to mention that when you input new numbers on the width or height space, the frame will adjust accordingly right away, to give you a preview on how the document will look like!
And now that we’ve gone through ways to rotate, flip and change the canvas in clip studio paint, here are 30 Clip Studio Paint Shortcuts To Create Art Quicker!
Flipping the Canvas Display Horizontally
The image is only temporarily flipped and can be returned to it’s original direction later.
Navigator palette function
This manages the view of the image shown in the canvas window. It allows you to adjust its display position, scale, and angle.
When turned on, the navigator palette horizontally reverses the display in the canvas window.
Flipping the Canvas Itself
To flip the canvas horizontally, select [Edit] menu > [Rotate/Invert canvas] > [Flip Horizontal].
Use this option when you want to flip the canvas itself, and not just its display.
● Text layers and 3D layers are converted to raster layers when the canvas is flipped or rotated.
● Brush patterns and spraying effects on vector layers may change upon flipping or rotating.
● Screentones may appear differently after flipping or rotating.
Couldn’t find an answer to your problem?
Got Questions?
Clip Studio ASK is a support community for finding answers to your Clip Studio questions. Expert creators are on hand to help!
How To Flip An Image
Artists often hold their art up to a mirror to see if it looks just as good when it’s flipped left-to-right as it does on the drawing board. If you’ve never used this trick, you’d be amazed at how well it works. Try it with something you’ve drawn on a piece of paper. Take it into the bathroom and hold it up to the mirror above the sink. If something is wonky, you’ll spot it instantly.
In the digital world, it’s a bit more awkward to hold a mirror up to the computer screen to see the art reversed.
Instead, a lot of image manipulation programs will have a shortcut to reverse an image for you on the screen.
Clip Studio Pain has a way to do this, of course.
The Navigator Pane
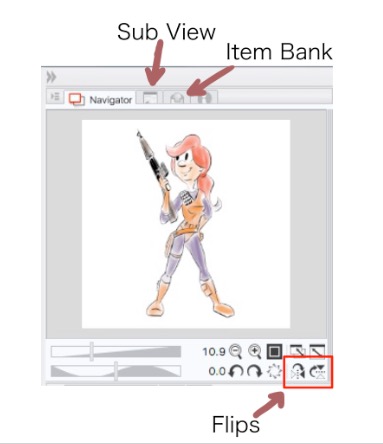
Flipping an image in CSP is as easy as a button press in the Navigator pane. If you don’t see your Navigator pane, look for the Sub View or Item Bank. By default, those tabs share the same pane.
Switch over to the Navigator.
In the bottom right corner, you’ll see a couple sets of arrows that will flip the image for you. The one on the far right will flip the image upside down. The one just to its left where the triangles point to each other across a vertical line is the mirror flip you’re looking for.
Note that when the image is flipped in your work area, the Navigator continues to show it in its original, unflipped, state.
You can click the same button over and over again to look at it in its original state and its mirrored state.
Use the Menu
If you don’t want to interrupt one of the other tabs that are currently showing there, of course, there’s also a way to do this through the menus. Go to View –> Rotate/Invert –> Flip Horizontal.
Keyboard Shortcut
Unlike the rotate commands, there is no default keyboard shortcut for this. You can, however, make one. If this is a technique you plan on using a lot, then it’s worth it to create a keyboard shortcut for it.
If you’re on a Mac, click the “CLIP STUDIO PAINT” item in the upper left corner of the OS X title bar. Click on “Shortcut Settings.”
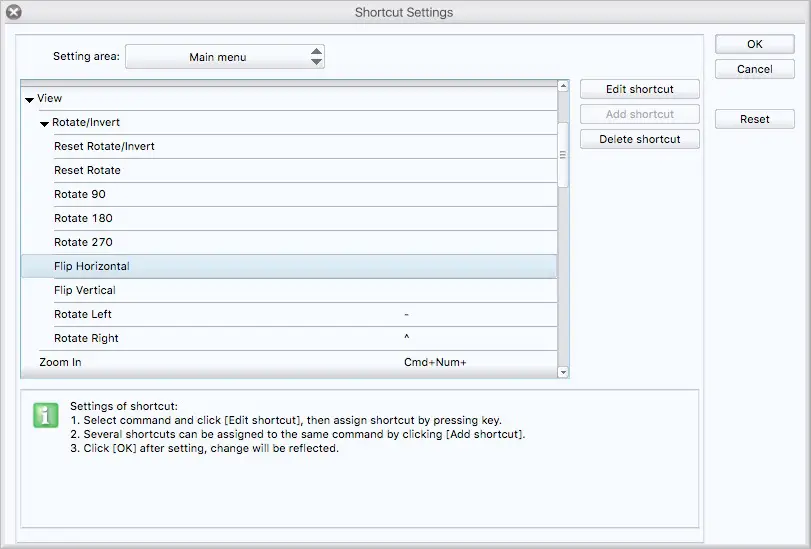
In the “Setting Area” dropdown box, choose “Main Menu.” Then click on the same sequence as you did in the menu bar before. View –> Rotate/Invert –> Flip Horizontal. Double click on that last one or click on the “Edit Shortcut” button, and a spot on the right side will open up for your keyboard shortcut. Press the key command you want to use and away you go.
I used “F” for flip. I was surprised to see that the “F” key wasn’t taken already. I was prepared to go with CTRL-F or CTRL-SHIFT-F. I got lucky, I suppose.
Further Reading
There are threads on this painting message board and this CG art board that discuss why the mirror technique works.
Honestly, I looked for more, but the Google search terms are all over the place for this kind of topic…
How to mirror an image layer in Clip Studio Paint
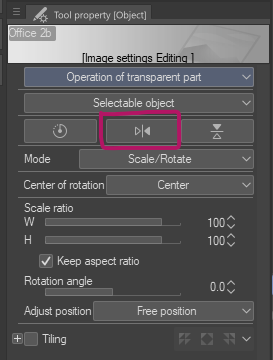
Image Layers can be rotated, flipped and mirrored in Clip Studio Paint. Choose the Object Selection tool (cube icon), then select the layer and take a look at the Tool Properties. There are two icons with arrows here, one to mirror the layer from left to right, the other to flip it upside down.
Hope this helps!
Share this:
If you enjoy my content, please consider supporting me on Ko-fi. In return you can browse this whole site without any pesky ads! More details here.
Leave a Comment Cancel reply
Support this site ��
If you enjoy my content, consider supporting me via Patreon or Ko-Fi. There are many other ways to support me too, like shopping via my Amazon links, YouTube Super Chats or PayPal donations.