Буклет в индизайне как сделать

По просьбам читателей, выкладываю урок по созданию буклета в InDesign. Обычно буклеты изготавливаются на бумаге A4 или А3 формата. Буклетом считается печатная продукция, сфальцованная любым способом двумя и более сгибами. Сейчас мы рассмотрим буклет А4 формата, напечатав который нужно будет сделать сгиб двумя фальцами. Вид фальцовки у нас «раскладушка», давайте рассмотрим ее схему:

Примечание. Прошу обратить внимание, точные размеры границ в буклете для фальцовки вам следует уточнить в типографии, где он будет печататься и фальцеваться, это нужно для того, чтобы быть уверенным в правильном загибе буклета.
Итак, приступим к созданию буклета. Я выбрала тему «кофе», этапы создания буклета — это просто образец техники выполнения, «как бы я это делала».
1. Запустим программу InDesign. В окне запуска, в поле Create New выберем Document (Создать новый документ).

2. В окне New Document выставим настройки: Number of Pages (Число страниц) – 2, в поле Page Size (Размер листа) выберем A4, Orientation (Ориентация) – горизонтально, Сolumns (Колонки) – 3, Gutter (Расстояние между колонками) – 8 мм., Margins (Поля) – 4 мм везде и Bleed (Блиды / Выпуск за обрез) по 2 мм.

Откроется рабочая область нашего будущего буклета. Если нажать F12, выйдет палитра Pages, будут видны две страницы.

3. Слева и вверху рабочей области видна линейка, если поставить на нее указатель мыши и потянуть — мы создадим направляющую. Выставим эти направляющие между колонками.

4. В меню Window выберем палитру Mini Bridge, в ней удобно работать с файлами, если же у вас более ранняя версия, можно добавлять файлы с помощью File > Place (Поместить). На панели инструментов выберем инструмент «Фрейм» (Restangle Frame Tool).

Начертим прямоугольник, далее в палитре Mini Bridge выберем папку, в которой будут находиться графические файлы для нашего буклета.

5. Перетягиваем картинку во фрейм левой кнопкой мыши. Если она больше или меньше фрейма, жмем горячую клавишу Alt+Shift+Ctrl+E или заходим Object (Объект) > Fitting (Установка)> Fit Content Proportionally (Заполнить фрейм пропорционально). Также можно трансформировать картинку во фрейме «белой» стрелкой с нажатой клавишей Shift.

6. С помощью инструмента «прямоугольник»

рисуем фон квадратами различных оттенков,

подобрав цвета с картинки с помощью инструмента «пипетка».

Нажимаем F6 (открываем палитру «Цвет» (Color)) и регулируем цвета, вбивая их вручную или меняя оттенки с помощью ползунков. Сверху картинки накладываем еще один прямоугольник, задаем оттенок пипеткой с картинки или с помощью палитры Color, установим ему прозрачность 35%.

7. На панели инструментов выберем инструмент Текст (Type Tool)

. и создадим текстовый блок, в моем случае «COFFee». Черной стрелкой можно трансформировать и вращать текст, если подвести стрелку к верхнему или нижнему уголку фрейма. Зайдем в меню Window > Type > Character или нажмем Ctrl+T. Отредактируем текст по своему вкусу,

. и зададим ему цвет в палитре Color (F6).
8. Создадим текст по окружности. Выберем инстумент Эллипс,

и начертим его вдоль блюдечка.

Далее выберем инструмент «Текст по контуру» (Type on a Path),

. щелкнем по окружности и наберем текст.

С помощью инструмента выделения (Selection Tool, белая стрелка)

можно будет правильно направить текст по окружности.

Убрать обводку у окружности можно будет также в палитре Color (F6).

Не забываем периодически переключаться в режим Preview в нижней части панели инструментов, для более удобного отображения результата работы.
Печать брошюр
Функция «Печать буклетов» позволяет создавать печатные развороты для профессиональной печати. Например, при редактировании 8-полосного буклета страницы отображаются последовательно в окне макета. Однако на печатных разворотах страница 2 размещается рядом со страницей 7. Напечатанные на одном листе бумаги, сложенные и укомплектованные страницы в итоге оказываются расположенными в правильном порядке.

Процесс создания печатных разворотов из разворотов макета называется спуском полос. При составлении схемы спуска полос для страниц настройки можно изменить таким образом, чтобы настроить интервал между страницами, поля, выпуск за обрез и смещение. Эти изменения никак не отражаются в документе InDesign, поскольку спуск полос обрабатывается полностью в потоке печати. Страницы документа не перемешиваются и не переворачиваются.
Джефф Витчел (Jeff Witchel) из Infiniteskills.com демонстрирует процесс печати буклетов с настольного принтера.
Вы не можете создать новый документ основанные на наложенных страницах. Кроме того, если в документе содержатся страницы разных форматов, невозможно использовать функцию «Печать буклетов» для наложения документа.
Чтобы использовать настройки печати текущего документа, определенные в диалоговом окне «Печать», выберите в меню «Стиль печати» команду «Текущие настройки документа».
Диапазоны страниц указываются через дефис и разделяются запятыми. Например, значение 3-7, 16 определяет спуск полос для страниц с 3 по 7, а также страницы 16.
Если документ состоит из разделов с номерами страниц, в поле «Диапазон» следует ввести номера страниц раздела (например, «Sec2:11»).
Количество страниц в буклете должно быть кратно четырем. Если печатать производится на PDF-принтере, для создания буклета в PDF вставляются пустые страницы.
Adobe рекомендует
SHSUWatkins
Типы брошюр
Существует три типа спуска полос: «Брошюра (фальцовка перегибом листов по средней линии)», «Книга (внакладку несколькими тетрадями для бесшвейного скрепления)» и «Буклет — фальцовка гармошкой».
Брошюра (фальцовка перегибом листов по средней линии)
Создаются двухстраничные печатные развороты с примыкающими страницами, которые подходят для печати на обеих сторонах, последующей комплектации, складывания и сшивания. При необходимости InDesign добавляет к концу готового документа пустые страницы. Параметры «Расстояние между страницами», «Выпуск за обрез между страницами» и «Размер печатного листа» для этого типа спуска полос недоступны.
Функция «Печать буклетов» раскладывает страницы на основе настроек привязки. Если у документа есть настройка «Привязка справа налево», функция «Печать буклетов» раскладывает страницы соответственно. Выберите «Файл» > «Параметры документа» , чтобы просмотреть настройки привязки документа.
Книга (внакладку несколькими тетрадями для бесшвейного скрепления)
Создаются двухстраничные печатные развороты с примыкающими страницами, которые размещаются на печатных листах заданного размера и подходят для печати на обеих сторонах, обрезки и клеевого крепления к обложке. Если число страниц, подлежащих спуску полос, не делится на две равные части с учетом заданного размера печатного листа, InDesign по мере необходимости добавляет в конце готового документа пустые страницы.
Если у буклета цветная обложка и черно-белое содержимое, из одного и того же документа можно создать два отдельных спуска полос: один для передней обложки, внутренней передней обложки, внутренней задней обложки и задней обложки, а другой для 24 полос внутри буклета. Чтобы подготовить цветной печатный лист, в разделе «Страницы» диалогового окна «Настройки печати» в поле «Диапазон» введите значение 1–2, 27–28 (или соответствующие номера страниц разделов). Для черно-белых внутренних полос введите в этом поле значение 3-26 .
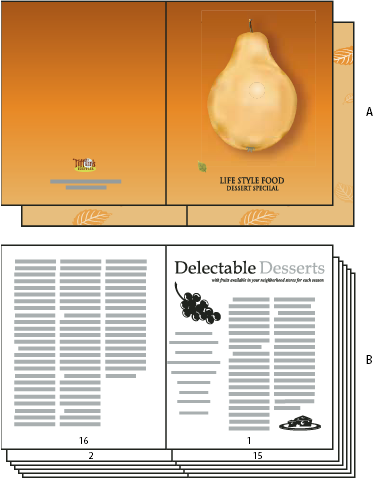
A. Цветной печатный лист для обложки B. Черно-белая внутренняя страница
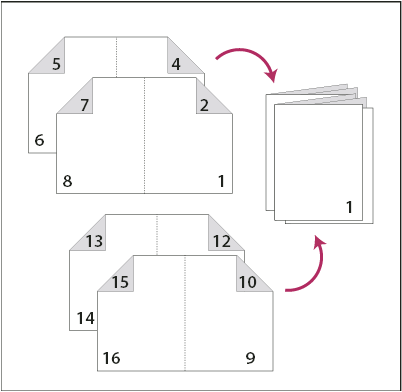
Буклет (фальцовка «гармошкой»)
Создается двух-, трех- или четырехполосный лист, подходящий для сфальцованного буклета или брошюры. Параметры «Выпуск за обрез между страницами», «Смещение» и «Размер печатного листа» для этого типа спуска полос недоступны.
Например, если необходимо создать печатные развороты для традиционной 6-сторонней брошюры, складываемой втрое, выберите «Буклет (3-полосный, фальцовка гармошкой)». Возможно, будет привычнее подготовить складываемую втрое брошюру в виде одной страницы, содержащей три колонки. Функция спуска полос в InDesign позволяет легко создавать страницы, соответствующие по размеру каждой палитры.

Параметры интервала, выпуска за обрез и колонки для печати брошюры
В области «Настройка» диалогового окна «Печать буклетов» могут быть заданы следующие параметры.
Расстояние между страницами
Определяет интервал между страницами (справа от левой страницы и слева от правой). Значение этого параметра может быть задано для всех типов буклетов, за исключением «Брошюра (фальцовка перегибом листов по средней линии)».
Для документов типа «Книга (внакладку несколькими тетрадями для бесшвейного скрепления)» при использовании смещения (с отрицательным значением) минимальное значение параметра «Расстояние между страницами» равно ширине смещения. Если печатные листы создаются вручную (например, при использовании в одном документе разных типов бумаги), значение параметра «Расстояние между страницами» может задавать начальное смещение для разворотов, относящихся к разным печатным листам.
Выпуск за обрез между страницами
Определяет, сколько места элементы страницы должны уступить промежутку, заданному стилями разворотов «Книга (внакладку несколькими тетрадями для бесшвейного скрепления)». Иногда этот параметр называют пересечением. Допускаются значения от 0 до половины значения параметра «Расстояние между страницами». Этот параметр может быть задан только в том случае, если выбран тип «Книга (внакладку несколькими тетрадями для бесшвейного скрепления)».
Определяет размер отступа, необходимого для компенсации толщины бумаги и складки на каждом печатном листе. В большинстве случаев указывается отрицательное значение для создания эффекта плотной сборки. Этот параметр может быть задан для типов «Брошюра (фальцовка перегибом листов по средней линии)» и «Книга (внакладку несколькими тетрадями для бесшвейного скрепления)» (см. раздел Основные сведения о смещении).
Размер печатного листа
Определяет число страниц на каждом печатном листе для документов типа «Книга (внакладку несколькими тетрадями для бесшвейного скрепления)». Если число страниц, подлежащих спуску полос, не делится на две равные части с учетом заданного размера печатного листа, по мере необходимости к концу документа добавляются пустые страницы.
Автоматически настроить размеры полей в соответствии с метками и выпуском за обрез
InDesign будет вычислять размер полей, достаточных для выпуска за обрез, и других определенных на данный момент параметров типографских меток. При выборе этого параметра поля будут недоступны для изменения, но будут отражать фактические значения, применяемые при подгонке меток и выпуска за обрез. Если отменить выбор этого параметра, поля могут быть настроены вручную.
Определяет размер отступа, окружающего фактический печатный разворот после обрезки. Чтобы задать отдельные значения для параметров «Сверху», «Снизу», «Слева» и «Справа», отмените выбор параметра «Автоматически настроить размеры полей в соответствии с метками и выпуском за обрез» и увеличьте значения, чтобы расширить выделенное по умолчанию пространство за пределами меток и выпуска за обрез. (Уменьшение этих значений может привести к отсечению меток и выпуска за обрез). Значения полей могут быть заданы для всех типов печати буклета.
Печатать пустые развороты
Если число страниц, подлежащих спуску полос, с учетом заданного размера печатного листа не делится на две равные части, то к концу документа добавляются пустые страницы или развороты. Этот параметр определяет, следует ли их печатать. Обратите внимание на то, что печатью других пустых страниц в документе управляет параметр «Пустые страницы» в диалоговом окне «Печать».
Основы смещения
Смещение задает расстояние, на которое страницы перемещаются от корешка для компенсации толщины бумаги и складки в документах типа «Брошюра (фальцовка перегибом листов по средней линии)» и «Книга (внакладку несколькими тетрадями для бесшвейного скрепления)». InDesign рассматривает «обложку» итогового документа как внешний печатный разворот, а корешковый фальц — как внутренний. Понятие лист подразумевает два печатных разворота: на лицевой и на оборотной стороне листа. Шаг смещения вычисляется путем деления заданного значения смещения на общее число листов минус единица.
При положительном значении смещения корешковый фальц не регулируется, но страницы на внешних листах смещаются от корешка. При отрицательном значении смещения обложка не регулируется, но страницы на внутренних листах смещаются к корешку.
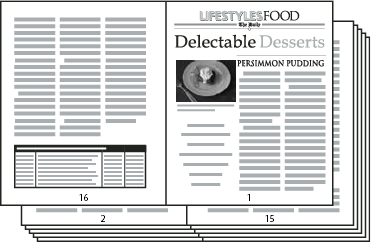
Например, для 16-страничного документа InDesign потребуется 8 печатных разворотов или 4 листа. На лицевой стороне первого листа находится первый печатный разворот (страницы 16 и 1), а на его оборотной — второй печатный разворот (страницы 2 и 15).
Если значение смещения в данном примере составляет 24 пункта (значение для большей наглядности преувеличено), шаг смещения составит 8 пунктов на лист (24 разделить на 3). Величина смещения для внутреннего листа составит 24 пункта, для третьего листа — 16 пунктов, для второго — 8 пунктов. Смещения первого внешнего листа не будет.
Для каждого последующего листа величина смещения сокращается на шаг смещения. В итоге, все страницы внутреннего листа будут смещены от сгиба на 12 пунктов (половина значения смещения, равного 24 пунктам для этого листа), все страницы третьего листа — на 8 пунктов (половина значения смещения, равного 16 пунктам для этого листа), а все страницы второго листа — на 4 пункта (половина значения смещения, равного 8 пунктам для этого листа) от сгиба.
Просмотр отчета и сводки при печати буклета
Область просмотра диалогового окна «Печать буклетов» позволяет просматривать цветные миниатюры печатных разворотов, созданных в соответствии с выбранным типом спуска полос. Доступны для просмотра также типографские метки, заданные в диалоговом окне «Печать».
How to Make a Booklet in InDesign

Laura Keung Last updated Sep 15, 2022


 What You’ll Be Creating
Ready to take the next step in layout design? In this tutorial, I’ll show you how to make a booklet in InDesign. For this stylish design, we’ll use essential tools for setting up pages that will help you in your future projects.
Booklets are a form of brochure containing more than four pages and not more than 48 pages (the page count should be divisible by four). This non-periodical publication is great for marketing purposes because it allows you or your client to show your business in detail.
In a hurry? We’ve got amazing InDesign booklet templates over at Envato Elements, just like this one:


 This modern booklet template for Adobe InDesign is ready to download from Envato Elements.
In this tutorial, I’ll show you how to make a booklet in InDesign CS6 and above. You can also keep this as a four-page document to create a brochure in InDesign. Regardless of which you choose to do, you’ll be learning essential tools that will help grow your layout skills. We’ll be touching on Parent Pages, Paragraph Styles, Color Swatches, and many other tips and tricks.
If you prefer to learn about all of this by following a video tutorial, you’re in luck! Watch this new video from the Envato Tuts+ YouTube channel to learn how to create a booklet in InDesign CC:
What You’ll Learn in This Booklet Template Adobe InDesign Tutorial
- How to create a booklet in InDesign
- How to set up guides and parent pages for your booklet design
- How to create the cover of your InDesign booklet layout
- How to create the inside spreads of your booklet template pages
- How to export a file for printing
What You’ll Need
You’ll need access to Adobe InDesign; if you don’t have the software, you can download a trial from the Adobe website. You’ll also need the following assets to create your booklet template for InDesign:
Download the assets and make sure the font is installed on your system before starting. When you’re ready, we can dive into this tutorial on making a booklet in InDesign!
1. How to Create a Booklet in InDesign
Step 1
In InDesign, go to File > New. Name the document Booklet. We’ll create a letter size InDesign booklet template. Set the file to the following dimensions:
- Width to 8.5 in
- Height to 11 in
- Orientation to Portrait
- Units to Inches
- Pages to 12
- Check Facing Pages
- Margins: 0.75 in
- Bleeds to 0.125 in (it’s best to seek your professional printer’s preference)
Click Create.


Step 2
For this tutorial on making a print booklet template in InDesign, we’ll work with different Layers. Organising layers is an important practice to keep all the elements in the file organised. Bring up the Layers panel by going to Window > Layers. Double-click on Layer 1 and rename it Copy (Back).
In the Layers panel main menu, select New Layer. Name it Background. Click OK. Create two additional layers named Images and Copy (Front).


Step 3
Head over to Window > Color > Swatches to expand the Swatches panel. Choose New Color Swatch button from the main menu. Set the Swatch Name and values to the following:
- Light: C=15 M=35 Y=45 K=0
- Medium:C=35 M=80 Y=80 K=40
- Dark:C=65 M=70 Y=70 K=75
Click Add and OK after you input each of the color values.


Step 4
For this tutorial, we’ll create a list of Paragraph Styles that we’ll use to format parts of the InDesign layout for our booklet design.
Head over to Window > Styles > Paragraph Styles to open the Paragraph Styles panel. In the main menu, select New Paragraph Style, and set the Style Name to Title. Select the Basic Character Formats option from the left side menu. Use the following settings:
- Font Family: Bw Modelica
- Font Style: Black Condensed
- Size: 30 pt
- Tracking: 25
- Case: All Caps
Select the Character Color option from the left side menu. Set the color to the Medium swatch. Click OK.


Create a New Paragraph Style, setting the Style Name to Deck. In the Basic Character Formats option, use the following settings:
- Font Family: Bw Modelica
- Font Style: Regular Condensed
- Size: 18 pt
- Tracking: 25
Select the Character Color option from the left side menu. Set the color to the Medium swatch. Click OK.
Create a New Paragraph Style, setting the Style Name to Copy. In the Basic Character Formats option, use the following settings:
- Font Family: Bw Modelica
- Font Style: Regular Condensed
- Size: 9 pt
- Leading: 12 pt
- Tracking: 10
Select the Indents and Spacing option from the menu on the left and set the Space Between Paragraphs Using Same Style: 0.1 in.
Select the Character Color option from the left side menu. Set the color to the Dark swatch. Click OK.
Create a New Paragraph Style, and set the Style Name to Pull-quote. In the Basic Character Formats option, use the following settings:
- Font Family: Bw Modelica
- Font Style: Bold Condensed
- Size: 20 pt
- Tracking: 10
Select the Character Color option from the left side menu. Set the color to the [Paper] swatch. Click OK.
Create a New Paragraph Style, setting the Style Name to Folio-Page number. In the Basic Character Formats option, use the following settings:
- Font Family: Bw Modelica
- Font Style: Bold Condensed
- Size: 8 pt
- Tracking: 100
Select the Character Color option from the left side menu. Set the color to the Medium swatch. Click OK.
Create a New Paragraph Style, setting the Style Name to Folio-Section. In the Basic Character Formats option, use the following settings:
- Font Family: Bw Modelica
- Font Style: Harline Condensed
- Size: 420 pt
- Tracking: 10
Select the Character Color option from the left side menu. Set the color to the Light swatch. Click OK.


2. How to Set Up Guides and Parent Pages for Your Booklet Design
Step 1
On the Pages panel, double-click on the A-Parent pages. Head over to Layout > Create Guides. In the Create Guides option window, set the Rows Number to 5 and Gutter to 0. Set the Columns Number to 8 and the Gutter to 0.1875 in. Under Options, select Fit Guides to: Margins. Click OK.


Repeat this process on the opposite page of the booklet design.


Step 2
On the Layers panel, select the Copy (Front) layer.
Using the Text Tool (T) from the toolbar, create a text box under the bottom left corner margin. Right-click on the text box and select Insert Special Character > Markers > Current Page Number. A letter “A” will represent the page number. On the second line, you can add the title of your booklet.


Select the text and head over to the Paragraph Styles panel. Format the text with the Folio-page number style.


Select the text box and press Command-C to Copy and Command-V to Paste. Place this duplicated text box on the opposite page. Press T to activate the formatting tools on the Control panel. Select the paragraph formatting tool and set the text box to Align Right.


Step 3
On the Layers panel, select the Background layer. Using the Rectangle Tool (M), create a small rectangle with a Width of 0.7 in and Height of 0.4 in. Using the Swatches panel, set the color to the Medium swatch.
Place the rectangle on the left margin of the left page. Duplicate it by pressing Option and drag. Place the newly duplicated element on the right margin of the right page. This is a great anchor for the title in the InDesign layout of your booklet.


Step 4
Head over to the Pages panel, right-click on A-Parent and select Apply Parent to Pages. Under To Pages, type 2-11. Click OK. These are the pages the A-Parent page will be applied to.


3. How to Create the Cover of Your InDesign Booklet Layout
Step 1
On the Layers panel, click on the Background layer.
Head over to Page 1. Using the Rectangle Tool (M), create a shape on the top portion of the cover of your print booklet template for InDesign.
While selecting the rectangle, press Command-D to Place the Close up of coffee seeds image. Select the image with the Direct Selection Tool (A) and resize the image on the Control bar to 20%.


Create another rectangle of the same size as above. Head over to the Swatches panel, select the Dark swatch, and set the Tint to 60%.


Step 2
Create a rectangle for the bottom portion of the cover with the Rectangle Tool (M). Using the Swatches panel, set the color to the Dark swatch.


Using the Line Tool (\), create a line that goes across the width of the page. On the Swatches panel, set the stroke color to the Light color swatch. On the Control panel, set the Stroke Weight to 5 pt.
Place the line between the image and the bottom of the cover.


Step 3
On the Layers panel, lock all the layers and leave Copy (Front) unlocked.
Using the Text Tool (T), add a title and a deck to the booklet and place it in the top left corner of the page.
Open the Character panel (Window > Type & Tables > Character). For the title, set the Font to Bw Modelica Bold Condensed, Size 55 pt, and Leading 50 pt.
For the deck, set the Font to Bw Modelica Light Condensed and Size 18 pt.


Step 4
Using the Text Tool (T), add a text box to fit the width of the page and place it over the bottom margin. While selecting the text box, press Command-B to open the Text Frame Options window. Under Columns, set the Number to 3. Click OK.


Add contact information to the text frame. On the Character panel, set the font to Bw Modelica Light Condensed and Size 9 pt.


4. How to Create the Inside Spreads of Your Booklet Template Pages
Step 1
Let’s work on Pages 2-3 of the booklet. On the Layers panel, unlock the Images layer.
Head over to Page 2 and using the Rectangle Tool (M), create a rectangle that measures 10 in in Width and 11.25 in in Height. This element will go over the gutter of the page.
Select the rectangle and press Command-D to place the Coffee cup with roasted beans image inside it. Using the Direct Selection Tool (A), move the image to find a good placement.


To make the page number visible, we need to change the color. Press Shift-Command and click on the page number to unlock it from the Parent Page. Using the Swatches panel, change the color of the type to [Paper].
Lock the text frame by pressing Command-L.


Step 2
On Page 3, add a text box using the Text Tool (T). Place the text box at the very top of the page, and add a title and a deck. Using the Paragraph Styles panel, format the title and the deck with their corresponding styles.


Create a text box using the Text Tool (T) for the bottom portion of the page—this will house the body copy. This text box should take the remaining width of the page. While selecting it, press Command-B to open the Text Frame Options window. Under Columns, set the Number to 2 and the Gutter to 0.1667 in. Click OK.


Add content and use the Paragraph Styles panel to format it to the Copy style.


On the Layers panel, select the Copy (Back) layer (lock all the other layers if necessary). Using the Text Tool (T), draw a text box and add the section number. Using the Paragraph Styles panel, format the text box to the Folio-Section style. Place the section number anywhere on the page—I chose to display it near the title and deck.
Now we can use this spread as a base for the rest of the inside pages.


Step 3
For Pages 4-5 of your print booklet in InDesign, we’ll create a mirrored layout of what we created on Pages 2-3.
Select all the elements on Pages 2-3, and press Command-C to Copy. Head over to Pages 4-5 and press Shift-Option-Command-V to Paste in Place.
The elements will be pasted onto one layer, but it’s best to move the elements to their respective layers. You can do so by selecting an element on the page, heading over to the Layers panel, and dragging the square on the right to another layer.


Using the Selection Tool (V), move the image to the right. Select all the elements on the right side of the page and move them towards the left side.


Let’s start editing by changing up the image. Select the image and press Command-D to Place the All kinds of coffee on spoons image. Using the Direct Selection Tool (A), select the image followed by R to Rotate the image.
To add a pull-quote to the booklet template in InDesign, create a text box using the Text Tool (T). While selecting the text box, press Command-B to open the Text Frame Options window. On the window, set the Inset Spacing to 0.375 in on all sides. Click OK.
Using the Paragraph Styles panel, format the text box with the Pull-quote style. For the quote credit, open the Character panel. Set the Font to Bw Modelica Light Condensed and Size 14 pt.


Use the Text Tool (T) to add your own copy on Page 4.
To add a pull-quote on the body copy, create a text box with the Text Tool (T). Format the text box on the Character panel, setting the Font to Bw Modelica Bold Condensed, Size 14 pt.
On the Swatches panel, set the color to Medium.
On the Text Wrap panel (Window > Text Wrap), select the Wrap around bounding box. Set all the Offset sides to 0.125 in.


Step 4
For Pages 6-7, we’ll create a resting spread to our InDesign booklet template. This will give the reader a visual break.
Press Shift-Command, select both of the rectangles on each side at the top of the page, and press Delete.
On the Layers panel, select the Background layer. Using the Rectangle Tool (M), cover the spread with a rectangle. Use the Swatches panel to set the color to the Dark swatch. Lock the Background layer on the Layers panel and select the Images layer.


Press Command-D to add the Experienced barista making coffee and Hot drink warm up images. Feel free to arrange them as you wish—here I placed both on opposite sides of the spread.


Copy the pull-quote from Page 5 by pressing Command-C. Paste the element by pressing Command-V on Pages 6-7. Use the Text Tool (T) to edit the quotes.


Step 5
Pages 8-9 will have a different layout than the rest of the booklet. This interview style spread is a good visual contrast to the rest of the layout.
Press Shift-Command, select the rectangle on Page 9, and press Delete.
Using the Rectangle Tool (M), cover the spread with a rectangle and make sure this is on the Background layer. Use the Swatches panel to set the color to the Dark swatch. Lock the layer and select the Images layer.


Copy (Command-V) and Paste in Place (Shift-Option-Command-V) the title text box from Page 4 onto Page 8. Use the Text Tool (T) to edit the text. Using the Swatches panel, change the color of the text to the Light swatch.


Create a text box using the Text Tool (T). Head over to the Control bar, and set the Width to 2.9 in and the Height to 5.7 in.
Using the Text Tool (T), add copy, and use the Paragraph Styles to format the text to the Copy style. Select the text and change the color on the Swatches panel to Light.
Select three words from the beginning of the text box, and head over to the Character panel. Set the Font to Bw Modelica Black Condensed. This is a great way to let the reader know where each interview starts.


Select the Ellipse Tool (L), and click on the document to open the Ellipse option window. Set the Width and Height to 1 in. Click OK. Place the ellipse over the text frame and use the Align panel to Center both elements.
Using the Text Tool (T), create a small text frame under the ellipse. This will serve as the name/title text. Use the Paragraph Styles to format the text to the Copy style. With the help of the Swatches panel and the Character panel, create your own combination of styles.


Duplicate the text frame and circle three times by pressing Shift-Option and dragging. Repeat these elements on the opposite page.
Select each circle and press Command-D to Place the following images: A person holding a sign, Portrait of pretty young waitress, Barista cafe, and Attractive business owner. Using the Direct Selection Tool (A), select each image within the ellipse to move and resize.


Step 6
For Pages 10-11, we’ll go back to the initial layout.
Copy (Command-C) and Paste in Place (Shift-Option-Command-V) the title, deck, section number and copy from Page 4 onto Page 10. Use the Text Tool (T) to edit the copy.


To create a copy that extends to the next page, we’ll use the threading option. Duplicate the text frame onto Page 11 by pressing Shift-Option and dragging. Delete the text in the new text box.


Select the text box on Page 10. If you have overflowing text, you’ll see a red plus symbol on the bottom right. If you don’t have any overflowing text, you’ll see an empty blue box. Click on the red plus symbol or blue box, followed by a click on the empty text box on Page 11. This will allow you to continue the text on the next page or anywhere you’re threading the text box.


Press Command-D to place the Coffee image. Place the image in the bottom left corner of Page 10, and make sure it’s bleeding out of the page. Head over to the Text Wrap panel (Window > Text Wrap) and select the Wrap around bounding box button.


Press Command-D to place the Barista at work image. This time, place the image in the top right corner of Page 11. Make sure it’s bleeding out of the page and covering the first inside column of Page 10. Head over to the Text Wrap panel and select the Wrap around bounding box button. Set the Offset to 0.125 in—this will help with the text frame underneath.


Step 7
Using the Rectangle Tool (M), cover the back page. While selecting the rectangle, press Command-D to Place the Coffee beans image.
Create another rectangle of the same size as above. Head over to the Swatches panel, select the Dark swatch and set the Tint to 60%.
Copy (Command-C) and Paste (Command-V) the contact information from the front cover.


5. How to Export a File for Printing
Before exporting a file for printing, it’s useful to take a look around all the edges of the design. This is to make sure all the images and vectors bleeding out are touching the bleeds.
Step 1
To export the file, go to File > Export. Name the file Booklet and choose Adobe PDF (Print) from the Format dropdown menu. Click Save.


Step 2
In the Export Adobe PDF window, set the Adobe PDF Preset to Press Quality. Under Pages, select Export As Pages.


On the left side of the panel, select Marks and Bleeds. Check All Printer’s Marks and Use Document Bleed Settings. Click Export. You’ll have a ready-to-print PDF file.


Great Job! You’ve Finished Your Booklet Template Pages!
In this tutorial, we learned how to make a booklet in InDesign CS6 and above. We covered important tools that will help you set up a multi-page InDesign template. If you lowered the page count, you can use this as an InDesign brochure template. Today, we learned to:
- create a ready-to-print InDesign file
- set up Parent Pages with folios
- organise Paragraph Styles to format text
- add Color Swatches
- format text boxes into columns
- use the Text Wrap tool on images and text
If you’re new to InDesign and need booklet templates right away, head over to Envato Elements. We’ve got many options to explore!


Top InDesign Booklet Templates From Envato Elements
Booklet making in InDesign is a valuable skill to have. It can also be a time-consuming skill to put into practice. If you need to create a handout quickly, you’ll want to use print booklet InDesign templates from Envato Elements.
There are a few thousand print booklet InDesign templates to choose from, but we’ll look at five here:
1. Square Booklet (INDD, IDML, AI, EPS, PSD)


This square booklet design is a top option for your next project. It lets you showcase your images across 14 unique pages. This InDesign booklet template can also be used for all types of businesses. Booklet making will be easier and less time-consuming!
2. Damelan Case Study Booklet (INDD)


Looking to highlight some case studies? There are few booklet templates for InDesign that can handle them like Damelan. It features professional layouts that draw attention to your written and visual content.
Creating a booklet in InDesign doesn’t have to take forever with this option! There are 36 pages in this print booklet InDesign template, but you can always add or remove some.
3. Furniture and Household Lookbook Gallery Booklet (INDD, IDML, PNG)


If you want to sell furniture, you’ll need to have a stunning lookbook. This InDesign booklet template has a contemporary style that will hold up for years to come.
There are two sizes included here, so you can select the one that fits your content best. Modern and minimal, it’s the ideal booklet template for Adobe InDesign for your next booklet.
4. Green Lifestyle Brochure (INDD)


Green Lifestyle blends an elegant style and useful features into a booklet template for InDesign. This booklet template for Adobe InDesign comes in US Letter size and makes great use of white space for better readability. You’ll also be able to use features like:
- automatic page numbering
- separated and organized layers
- parent pages for editing
Choose this option if you need a versatile booklet design for fashion, business, or art.
5. Health Insurance Brochure Vol.2 (INDD, PDF)


Let’s wrap up our list with this InDesign print booklet that’s landscape. It has a health-oriented theme, but you can customize it to fit your needs. There are 16 custom pages included in this print booklet InDesign template, as well as placeholders for your photos.
Start Creating a Booklet in InDesign Today
If you’re looking for specific tutorials on how to make a brochure in InDesign, we’ve got plenty of those! Our Envato Tuts+ instructors have put together many useful tutorials and guides to help you learn, including this free InDesign course for beginners:
If you liked this tutorial on creating a booklet in InDesign, you might like these:


Editorial Note: This post has been updated with contributions from Maria Villanueva. Maria is the Associate Editor of the Tuts+ Design channel.
Создание евробуклета с помощью InDesign
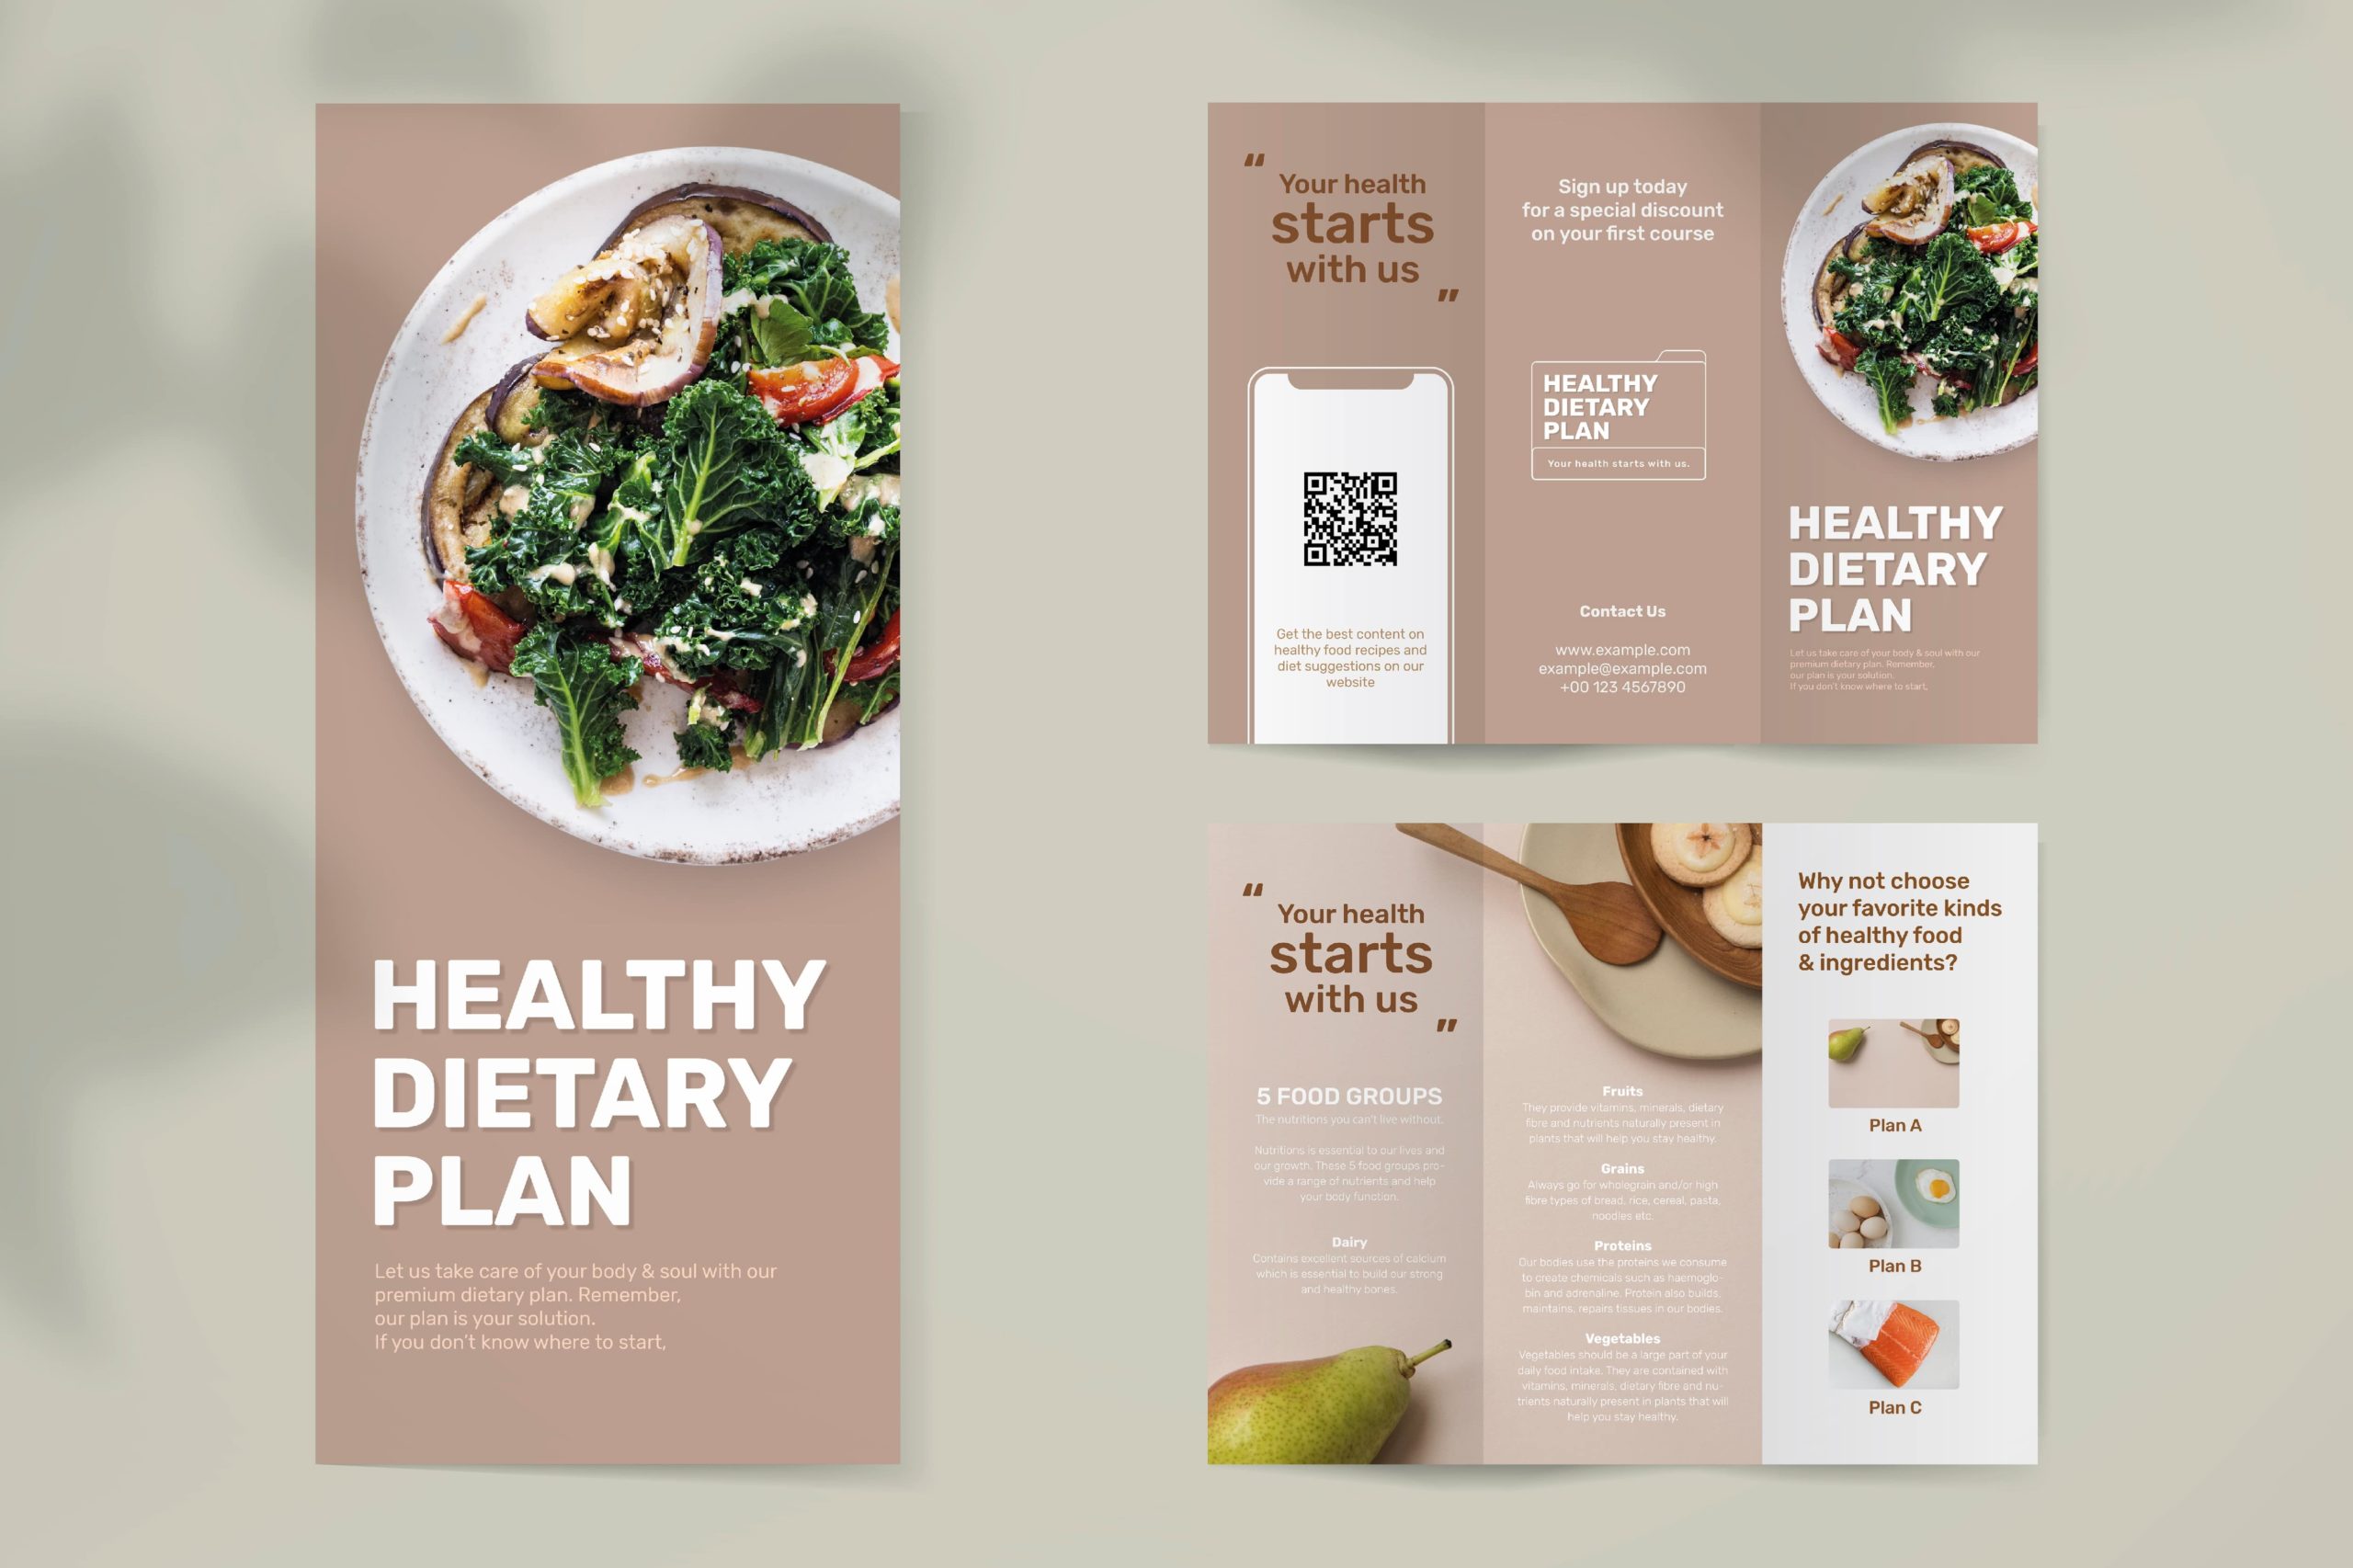
Даже сегодня почти ни одна компания не обходится без буклетов, флаеров и брошюр. В этой статье вы узнаете, как быстро и легко создавать евробуклеты с помощью Adobe InDesign.
Создание документа
1. Откройте InDesign и создайте новый документ с помощью кнопки → Файл → Новый → Документ.

2. На вкладке Печать выберите предварительную настройку документа A4.
3. Укажите альбомную ориентацию страницы.
4. Деактивируйте опцию разворот страницы, сняв галочку в соответствующем поле.
5. Введите для параметра Столбцы величину 3 и расстояние между столбцами (средник) 5 мм.

6. Откройте раздел «Поля» и установите 6,5 мм в поле «Сверху». Поскольку все поля связаны, значение автоматически обновляется также для нижнего, левого и правого полей.
7. Откройте область Выпуск за обрез и служебное поле и введите в поле «Сверху» 4 мм. Значение также автоматически переносится и в другие поля.
8. Нажмите на кнопку → Создать. Вы уже определили основные параметры для своих евробуклетов.

9. Добавьте направляющие, чтобы выровнять элементы текста и изображения. Для этого в верхней части панели меню выберите Макет → Создать направляющие.

В области Строки введите значение 3, а расстояние между строками (средник) 5 мм. Подтвердите ввод, нажав кнопку OK.

Работа с текстом
10. Чтобы разместить текст, выберите инструмент «Текст» на панели инструментов слева и, удерживая кнопку мыши, перетащите прямоугольник в нужное место.
11. Введите свой текст или скопируйте подготовленные тексты из других документов в свой файл. Затем переключитесь на панель управления справа. Выберите текст и установите нужный шрифт в разделе «Символ» (если на панели управления нет данного раздела, то его можно добавить через вкладку Окно). В этом же разделе задайте размер шрифта 8 пт и межстрочный интервал 12 пт.

12. В разделе Абзац выберите выключку по центру.

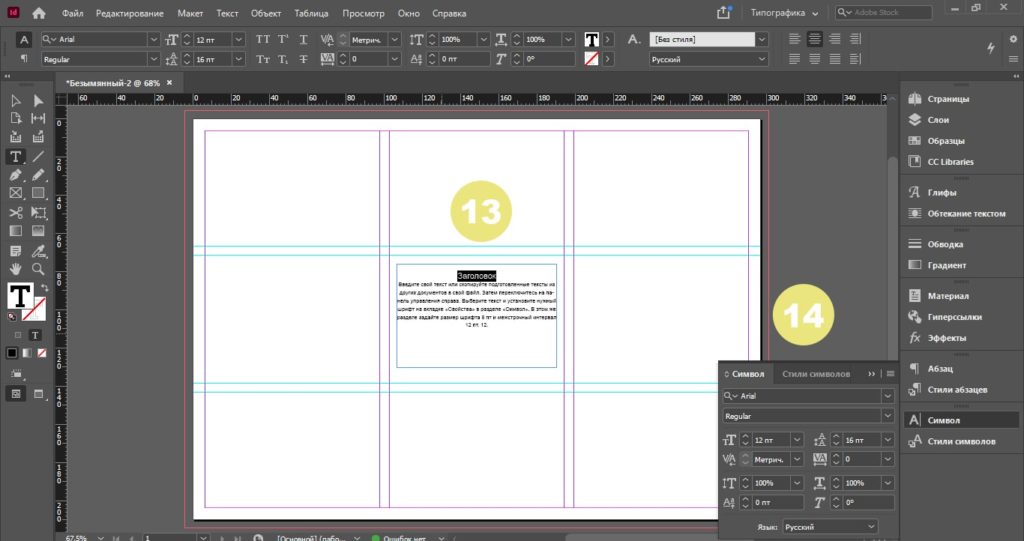
13. Установите курсор перед первой буквой текста и дважды нажмите клавишу Enter. Введите свой заголовок и выделите его.
14. На вкладке «Свойства» определите нужный шрифт, установите размер шрифта 12 пт и межстрочный интервал 16 пт.
Работа с изображениями
15. Выберите инструмент «Прямоугольник» на левой панели инструментов и перетащите его вдоль сетки.
16. Щелкните один раз за пределами документа, а затем выберите кнопку Импорт файла на правой панели в разделе Свойства (если на панели управления нет данного раздела, то его можно добавить через вкладку Окно). Затем выберете нужное изображение. Подтвердите выбранное изображение, нажав кнопку Открыть. Затем перетащите его в прямоугольник.

17. Протестируйте различные варианты в разделе «Расположение во фрейме», пока не будете удовлетворены результатом.

18. Выбрав в верхней строке меню Объект → Эффекты → Градиентная растушевка, вы можете придать краям изображения эффект затухания.

19. Задайте угол 90° в диалоговом окне «Эффекты». Затем нажмите на белый ползунок на панели точек градиента и введите 79% в поле Путь доступа. Чтобы проверить настройки, активируйте флажок Просмотр в левой нижней части окна. Когда вы будете удовлетворены результатом, подтвердите свои записи, нажав кнопку OK.

Заканчиваем работу над евробуклетом
20. Аналогичным образом добавьте в документ другие элементы текста и изображения.
21. Чтобы получить подходящий цвет фона для вашего макета, нарисуйте прямоугольник в средней колонке по ширине колонки. При двойном щелчке по полю цвета на левой панели инструментов появляется селектор цветов. Выберите пипетку в селекторе цветов. Теперь, удерживая кнопку мыши нажатой, щелкните на нужной области изображения одной из ваших фотографий, чтобы подобрать цвет фона.

22. Прямоугольник перекрывает все элементы в средней колонке. Вы можете изменить это, щелкнув правой кнопкой мыши или нажав Ctrl в строке меню и выбрав команды Упорядочить → На задний план.

Теперь вы знаете самые важные инструменты, с помощью которых можно разрабатывать евробуклеты. Протестируйте различные эффекты при включении изображений, определите подходящую типографику и создайте евробуклеты!