Learn Clip Studio Paint — Second Edition by Liz Staley
Get full access to Learn Clip Studio Paint — Second Edition and 60K+ other titles, with a free 10-day trial of O’Reilly.
There are also live events, courses curated by job role, and more.
The Auto Action palette
The Auto Action palette can be found by clicking on the Window heading in the File Menu and then clicking on Auto Action . If this menu item is already checked, then the palette is already in the interface somewhere. By default, it is a tab in the Layer palette.
The following screenshot shows the Auto Action palette:
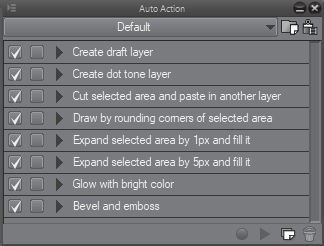
Let’s break down the parts of this palette. The drop-down menu at the top of the palette allows us to switch between different sets of auto actions. The set of actions in the preceding screenshot is the Default set, and comes included in Clip Studio Paint. The icons to the right of the drop-down menu are .
Get Learn Clip Studio Paint — Second Edition now with the O’Reilly learning platform.
O’Reilly members experience books, live events, courses curated by job role, and more from O’Reilly and nearly 200 top publishers.
CSP Post — Auto Actions
Hello! My name is Liz Staley and I’m a long-time user of Clip Studio Paint (I started using the program back when it was known as Manga Studio 4!). I was a beta-tester on the Manga Studio 5 program and for Clip Studio Paint, and I have written three books and several video courses about the program. Many of you probably know my name from those books, in fact!
Auto actions are often overlooked by digital artists, either because they don’t know what they are or because creating your own can seem intimidating. But they’re an extremely useful feature of CSP and can save you a ton of time on tasks that you do over and over again.
In this article we will cover the following topics:
What is an Auto action?
Making a custom Auto Action
Setting up Auto Action shortcuts
Let’s dive right in!
What is an Auto Action?
Auto actions are sets of recorded steps that can be “played back” to automate a task with the simple press of a button. Just about anything that you can do in Clip Studio Paint can be recorded into an auto action, making tedious tasks like resizing images, creating layers, or applying effects a snap once the action is made!
The Auto Action options are found in the Auto Action window, which by default is bundled with the Layer palette, as seen in the following screenshot.

The actions listed above are the default ones that come included with Clip Studio Paint when installed. Clicking on one of the actions will show the play controls in the lower right corner, as shown in the following image.

To begin playing the currently selected action, click on the “Play” button, which looks like a triangle. The red circle is the “Record” button and is what we will use to create our own actions later in this tutorial.
We can examine the steps in any recorded auto action by clicking the “>” to the left of the action’s name. In the image below we are looking at the steps under the “Making a clipping folder” action.

These steps show us exactly what Clip Studio Paint will do to achieve the goal of the action. If you want to omit a certain step, you can click the checkmark to the left of that step to turn it off temporarily. CSP will skip any unchecked steps in the action.
Some preset actions require you to have an active selection before playing it. These actions will usually have “selected” or “selection” in the title, so make a selection before playing those!
Making a Custom Auto Action
Before creating your own auto action, think about the tasks that you go through on a regular basis in your workflow that require a set of steps. Auto actions can be simple (like creating a new layer and setting it to Draft), or they can be long and complex series of steps that achieve an effect. It’s up to you to decide what part of your process you’d like to automate! In the past, I have made auto actions for layer setup and naming, and file resizing and saving for the internet.
Before you make an auto action, perform the process a few times so you know what the steps are. This will ensure you don’t make any mistakes during the recording process that will cause undesired results in the final recording (and prevent you from having to start the recording process over!)
Auto actions do have some limitations. For instance, they cannot record changing between tools (i.e. changing from the pencil tool to the pen tool) or changing the size of a brush. They can record changing a drawing color, a layer name, and more.
One of my favorite actions to record is setting up all the layers I typically need for a drawing file, so that is what I’ll be teaching in this tutorial to give you an idea of how to make your own actions. Once you know the basics, you can record your own and streamline your workflow!
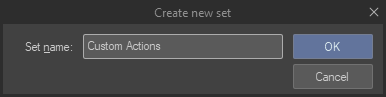
To begin, I like to create a new auto action set to keep all my custom actions in. To do this, click the “Create new auto action set” icon to the right of the drop-down menu at the top of the Auto action palette. Enter a name for your new action set and click OK in the window that comes up.
After clicking OK, a new action will show up under the new set and will be waiting for you to enter a name. I decided to name my action “Layer Setup”.
Once you’ve created your new set and named your new action, your Auto action palette should look similar to the image below.

Now we can click on the red “Record” button at the bottom of the palette window to start recording our auto action. After clicking the record button it will change from a red circle to a square “stop” button.
Click the Record button, then create a new layer in the Layer palette. Double-click the new layer and change the name. I’m naming mine “Rough Sketch”. Then I repeated this process to make a “Refined Sketch” and “Inks” layer.
Once you’ve completed the steps you want to include in your action, go back to the auto action palette and click on the Stop button to finish recording. The image below shows my Layer palette next to the auto action that I just made.

This auto action takes 6 steps (creating and renaming three layers) and simplifies it to two clicks (one to select the action and one to hit Play). In the next section, we’ll learn how to simplify the process even more by setting up keyboard shortcuts for our actions, which will save even more time!
Another potentially monotonous task that can be automated using auto actions is resizing and saving images for display on the internet. To create this auto action, I first opened one of my art scans in Clip Studio Paint. I scan my colored pencil drawings at 600dpi so they need to be shrunk quite a bit before they can be posted on my website and social media! I often forget what size I change my images to before sharing them, so creating an auto action will save me time because I won’t have to constantly go check previous images to see what their width and height are before saving new ones.
In the auto action palette, I make sure that I’m in the “Custom Actions” set that we created earlier before creating my new action. To add a new recorded action to this set, click on the icon indicated by the arrow in the image below.

After clicking this icon, enter a name for the new action and press “Enter” on the keyboard. Then click the Record icon to start recording the new action.
For the “Image Resize for Web” action, I simply clicked on Edit — Change Image Resolution and entered the numbers shown in the screenshot below to resize my scanned image. I clicked on OK when satisfied with the dimensions of the web image.

Then I clicked File — Export Single Layer — JPG and saved my resized image. Once that was done, I stopped the action recording. Now, to resize future images all I have to do is play this action and Clip Studio Paint will automatically resize the image and bring up the Save screen for me to save a flattened JPG of my work!
These are two extremely simple examples of auto actions you can create. With lots of planning, however, you can turn long and complicated processes into effects that you can achieve with the press of one button. The color halftone look in the image below is a 53 step auto action I created with the help of a halftone tutorial!

Now that you know how to create your own auto actions, let’s make them even more useful by setting up keyboard shortcuts that will allow us to run any action with the press of a button.
Setting up Auto Action Shortcuts
For the actions that you use all the time, you can make them even easier to use by setting up shortcuts. We can assign keyboard shortcuts to auto actions and even add them to the command bar at the top of the Clip Studio Paint interface! Having shortcuts set up will reduce the amount of time you spend going through palettes and menus to find your actions, which will then speed up your workflow and make your creation process streamlined.
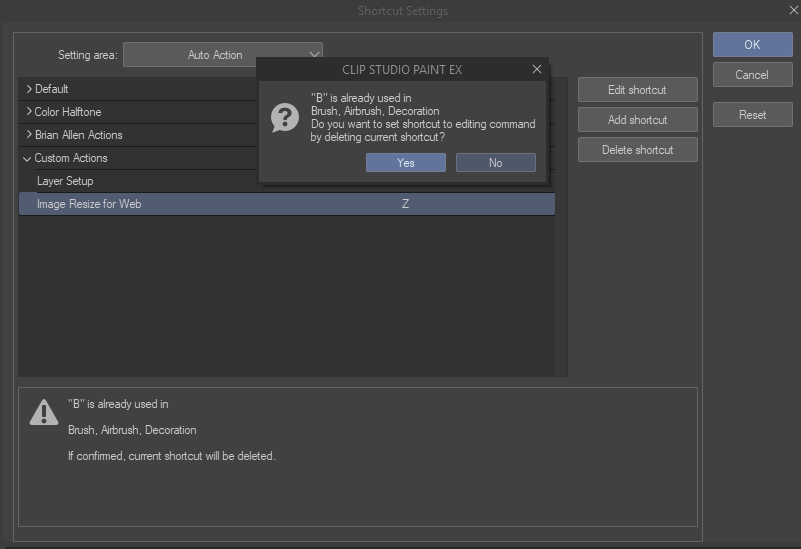
To create a keyboard shortcut, click on File — Shortcut Settings to open the keyboard shortcut menu. At the top of the Shortcut Settings window there will be a “Setting area” drop-down menu. Use this menu to change to the “Auto Action” settings. You should now see your action sets in the Shortcut Settings window, like in the image below.

Find the action to assign a shortcut to and click on it to select it. In this case, I’m going to be assigning my “Layer Setup” action to a key command, so I’ve selected it. Click on “Edit Shortcut” and a text window will appear to the right of the action name.
Now, you will need to press the key or keys that you want to set the action to on your keyboard. In this example, I’m going to be setting Layer Setup to a shortcut of “Ctrl + F1”, so I will hold down the Ctrl button on my keyboard and then press the F1 button. Click somewhere else on the Shortcut window to set the key command.
If you select a key command that is already set to another shortcut, CSP will show a warning both after you press the key and before it confirms the new shortcut if you click out of the shortcut entry.
Once you’ve finished setting up your keyboard shortcut, click on OK to exit the Shortcut Settings.
We can also add our frequently used auto actions to the command bar on Clip Studio Paint so they are accessible with just a click of an icon at the top of the program window! This is great if you work without easy access to a keyboard in front of you. For me, I have a tablet monitor on a monitor arm that I pull down into my lap when I do art, so my monitor is in the way of my keyboard and that makes it difficult to use keyboard shortcuts.
To edit the Command Bar, click on File — Command Bar Settings. Use the drop-down menu at the top of the Command Bar Settings window to select the Auto Actions category. Open the category that contains the action you want to add to the command bar and click on the name of the action. In the following image, I’m going to be adding the Layer Setup action we created earlier to the command bar.

Click “Add” to put an icon on the Command bar. I added both the Layer Setup and the Image Resize for Web actions to my command bar, and you can see them in the following screenshot.

Now these actions are available quickly even when I can’t get to my keyboard!
Conclusion
I hope this tutorial has introduced you to a new feature of CSP if you didn’t know what auto actions are before. And if you did know, I hope that it’s given you some ideas of areas of your process you can automate using auto actions! These little actions are great ways to save yourself some precious time.
How to use auto action clip studio paint
(1) Select the auto action to run. (2) Click [Play auto action]. When a certain command within the auto action is selected, operations from the selected command onwards are run. You can also run an auto action by double clicking its name.
Beside above, how do I add an automatic action clip in studio paint?
People ask also, does clip studio have actions? Just about anything that you can do in Clip Studio Paint can be recorded into an auto action, making tedious tasks like resizing images, creating layers, or applying effects a snap once the action is made! … The actions listed above are the default ones that come included with Clip Studio Paint when installed.
You asked, how do you use the auto select tool in clip studio paint?
Also, how do I set up auto action?
How do you use gradient sets in clip studio paint?
If you wish to create a Gradient Map Layer, go to ‘Layer -> New Correction Layer -> Gradient Map…’. Alternatively, you can right-click any layer that you already have, right-click on it, then select ‘New Correction Layer -> Gradient Map…’. The new layer will appear on top of the layer you selected.
Where is auto action CSP?
The Auto Action palette is shown when [Window] menu > [Auto Action] is selected.
How do I register for Auto Action Palette?
To register an auto action set, use [Register set as material] on the Auto Action palette menu.
Does clip studio paint have chromatic aberration?
A new version is available. A simple yet effective chromatic aberration effect for some retro/VHS/vaporwave vibes, to spice up your drawings ! Feel free to combine it with a grainy texture or some noise.
How do you record on CSP?
If you want to record a timelapse of an existing or in-progress file, you can start recording by checking [File] menu > [Timelapse] > [Record timelapse]. You can also enable it from the [Edit] menu > [Canvas Properties] or [Story] menu (EX) > [Change basic page settings], [Change basic work settings].
How do you flip a selection in clip studio paint?
There are different ways to flip your work or selection in Clip Studio. You can do it through Free Transform. Simple press ‘Ctrl+T’ and then you have two buttons on the Free Transform tab: one will flip the selection horizontally, the second vertically. Choose the one you want and when you’re done, press enter.
How do you select and move in clip studio paint?
How do you expand a selection in clip studio paint?
- 1Using a selection tool, create a selection.
- 2Select the [Select] menu > [Expand Selected Area].
- 3In the dialog box that appears, adjust the [Expansion width] and [Expansion type], then click [OK].
- 4The selected area will expand by the specified amount.
What is a gradient map?
The Gradient Map command maps the tonal range of an image to the colors of a gradient fill. Tonal range describes the image’s colors, with the lightest color (usually white) at one end and the darkest color (usually black) at the other end.
Auto Action Starter Guide

Auto Action is a great feature tool provided in Clip Studio Paint. It is a tool where you can "record" your actions and "play" it to repeat all your recorded steps. Almost every action you do in CSP (transform, tonal correction, colorize etc.) are able to be recorded as long as you are not drawing on the canvas.
Before we dive into the functionalities of this beautiful tool, we need to know what are the benefits it provides us. Because, if you do not know the benefits, you would not be using it much right?
⊹ BENEFITS OF AUTO ACTION ⊹
⌛ SAVE TIME AND ENERGY ⌛
Auto Action is typically useful when the actions you make are repetive and will be used again. Auto Actions is capable to perform your recorded actions with just one click away. This is to save time as well as our energy when doing these repetitive work.
To illustrate this, let me give you all an example:
I for one, love to do some touch ups after I finish coloring my illustrations. I always like to add some kind of soft glow effect for my end product.
My typical steps to achieve this are:
1. Flatten layers
2. Copy layer
3. Paste layer
4. Gaussian blur layer at 80 point
5. Apply Hard Light on blurred layer
6. Tone down the Opacity to 70%
7. Apply Hue and Saturation
Yes, the end product looks really nice but imagine doing all these steps for all of my illustrations, it wastes a lot of time and no one likes to repeatly do all these steps again and again.
This is where Auto Action comes in.
With Auto Action, I can just "record" all of these steps, and use it again just by hitting the play button! Easy as that.
�� ALMOST ALL ACTIONS ARE ABLE TO BE RECORDED ��
As mentioned above, almost any actions can be recorded as long as you are not drawing on the canvas or doing something it is hard to capture. This includes ▹ALMOST◃ all of the functionalities you can find under CSP menu (File, Edit, Animation, Layer, Filter, Select, View etc.)
Typically, people love to use settings under Edit, Layer and Filter menu.
�� SIMPLIFY PROCESSES AND VERSATILE ��
Since it can record almost any actions, you can totally be as creative as possible to create any sets of actions you like. It can be just as simple as setting up your folders and layers or as complex as creating special effects and filters for your illustrations.
⊹ FUNCTIONALITIES ⊹
First thing first, make sure you have your Auto Action window is open or visible.
Go to Window > Auto Action to have it open.
Here are some of the basics functionalities and terms used when using Auto Action, this is also for the convenience of explaining steps and tips in upcoming sections
➀: Set of Auto Action
➤ Contains a group of Auto Actions
➤ It is advised to your Auto Actions that are related in terms of purpose
➤ Click it to open drop down menu to view and select other set of Auto Action
➁: Auto Action
➤ Here is where all your actions are recorded
➂: Commands
➤ Commands are actions that are recorded when hitting on "Record" button
➃: Run Switch
➤ When checked, command will run during execution of Auto Action
➄: Settings Switch
➤ When enabled, settings is configurable during execution of Auto Action.
➤ In this screenshot, one is able to change the layer name during execution.
➀: Create new Auto Action set
➁: Import Auto Action set from Materials
➤ this is to import Auto Action assets downloaded from Clip Studio
➤ assets are great resources to further save more time
➂: Record Button
➤ Click to record your actions to be included as commands
➃: Play Button
➤ Click to play your recorded Auto Action
➤ CSP will do its magic and perform all the commands flawlessly
➄: Add New Auto Action to current set
———————————————————————————
I will be showcasing on how to use Auto Action in 2 kinds of possible ways:
1. Setting up folders and files with Auto Action
2. Create filters for illustration
⊹ SETTING UP FOLDERS AND FILES WITH AUTO ACTION ⊹
It might seem like this is no needed but hey, few seconds can render to few minutes and then few hours.
I will be introducing some basic tips for creating new set of Auto Action in this section too.
Please keep in mind that although the steps I will be demonstrating later are my typical ways to set up my folders when drawing webcomics (excluding dialogues). It is just a simple guide for you all to get started especially when you never use Auto Action before.
For my webcomic setup, the goal result we want to achieve in this section will look like this:
◈ 1: CREATE NEW SET OF AUTO ACTION ◈
To create a new set of Auto Action, simply click on this icon as shown below, it is recommended to give it a meaningful name so you won't confused yourself when going through your sets of Auto Action.
Let's name it Setup.
◈ 2: CREATE NEW AUTO ACTION ◈
To create new Auto Action, click on the icon shown below, it is situated at the bottom of the Auto Action window, right beside the play button. Let's name our action, Comic Folder Setup.
◈ 3: Record Your Actions ◈
To achieve the goal result, here are the actions I need to perform to have it recorded:
* : Important Step when using Auto Action so that the action is recorded
Step 1: Create New Folder
Step 2: Rename Folder to "Panels"
Step 3: Add new Vector Layer
Step 4: Rename Vector Layer to "Lineart"
Step 5: Add new Folder
Step 6: Rename Folder to "Color"
*Step 7: Layer > Layer Order Down (Below Lineart layer)
Step 8: Add new Layer in Color Folder
Step 8: Rename Layer to "Silhouette Base"
Step 9: Add New Folder above Silhouette Base layer
Step 10: Rename Folder to "Base Colors"
Step 11: Clip Folder
Step 12: Add New Layer in Base Colors folder
Step 13: Rename Layer to "Skin"
Step 14: Add New Layer in Base Colors folder
Step 15: Rename Layer to "Clothes"
Step 16: Add New Layer in Base Colors folder
Step 17: Rename Layer to "Face"
Step 18: Add New Layer in Base Colors folder
Step 19: Rename Layer to "Hair"
Step 20: Add New Layer
Step 21: Rename Layer to "Shading"
*Step 22: Layer > Layer Order > Up
Step 23: Clip Layer
Step 24: Change Blending Mode to Multiply
Step 25: Change Opacity to 70% (or switch on Setting Switch so it can be configured)
To record these steps, simply, click on the red round button as shown below, this is the Record button. Once clicked, it will changed to a red square button which is a Stop button.
Once you do all the steps, remember to click on the Stop button to stop recording your actions. And TADA, you can see all the steps recorded into a list as shown below.
To perform this Auto Action, all you gotta do is to click on the Play button ▶ and CSP will do its magic! ✨ ✨
As you can see, even though it looks not much in the shown goal result, when you list the steps out, you can tell the steps are long and there are always lazy people like me who always end up don't name our layers at all and confused ourselves later XD. With this, all of these problems can be solved, how cool is that!
⊹ CREATE FILTERS USING AUTO ACTIONS ⊹
Ever thought of applying some nice filters for your illustrations or sketches, drawings in general in CSP?
I believe some of you will thought of using Blending Modes, Tonal Corrections, Filters and so on to achieve your own desired end results. However, this process tends to be long and repetitive, and sometimes you would be forgetful and unable to remember what steps you took to achieve the results. To combat this problem, Auto Action is here to help.
In this section, I will show you one of my favorite ways to give my illustration a dreamy purple-ish glowy feel. Here is an example of an illustration I drew and its before and after. This effect is achieved by tweaking yhe settings in Tonal Correction, Filters and Blending Modes.
I will go through with you all step by step in achieving the shown result.
With the learning outcomes from previous section, please remember to create a new set for this Auto Action and name it whatever you like to call it 🙂
Now, let's begin to record our actions!!
◈ 1: COPY AND PASTE YOUR ONE LAYER ILLUSTRATION ◈
This is very important, make sure your illustration is on one layer, you can flatten your layers manually or record your action beforehand. I tend to flatten the layers manually so I can make sure all blending modes are incorporated nicely.
◈ 2: BINARIZATION ◈
Go to Layer > New Correction Layer > Binarization
And set the settings as below or whatever you feel is right.
◈ 3: REMOVE WHITE AREAS◈
To remove white areas, go to Edit > Convert Brightness to Opacity.
◈ 4: GAUSSIAN BLUR ◈
Now we want to blur it!
Go to Filter > Gaussian Blur and set the settings based on your preference. It is recommended not go over 25 strength.
◈ 5: CUT LAYER AND ADD TO NEW FOLDER ◈
Cut the layer that you just blurred, we are going to add it into a Folder.
Create a Folder, name it Filter Effect and set the blending mode to Through.
Paste your cut layer inside the Folder.
Your Layers window should be looking this by the end of this step.
◈ 6: SET MULTIPLY BLENDING MODE FOR THE PASTED LAYER ◈
Now we want our blurred binarized layer to be set to multiply.
◈ 7: CREATE GRADIENT MAP LAYER AND CLIP IT◈
Now we are going to add some gradients.
Go to Layer > New Correction Layer > Gradient Map
(Psst! You can also right click on the Filter Effect Folder instead of going to Layer menu)
A gradient window will pop up, you are free to choose which gradient you desired, I suggest picking something soft and pastel. You can also create your own gradient on the fly by tweaking the settings and color picking your colors manually.
Remember to CLIP it after clicking ok!
The gradient I used here is downloaded from Assets in Clip Studio and it can be found here:
◈ 8: CREATE LEVEL CORRECTION LAYER, SET OPACITY TO 50% ◈
Go to Layer > New Layer Correction > Level Correction
Tweak just the way you like, I recommend to NOT make it too contrast, too bright or too dark tho!
Remember to set opacity to 50%, as we don't need it as much (unless you want to XD)
◈ 9: CREATE COLOR BALANCE LAYER, SET OPACITY TO 50% ◈
Go to Layer > New Correction Layer > Color Balance.
Since the desired end result for me is a purple-ish glowy feel, the settings I tweaked are close to that range of colors.
You are free to make it any shades you like, tho remember different colors gives different mood and feeling to your illustration!
E.g.
Blue — cold or gloomy
Yellow/Orange — nostalgic and feeling of longing
Red — energetic or rage
Similar like before, set opacity to 50%!
◈ 10: CREATE HUE/SATURATION/LUMINOSITY LAYER, SET OPACITY TO 50% ◈
Go to Layer > New Correction Layer > Hue/Saturation/Luminosity
Increase the values for Saturation and Luminosity, while tweaking Hue is optional.
After you are done, set opacity to 50%!
◈ 11: YOU MADE IT, CLICK STOP RECORDING AND WE'RE DONE! ◈
Your Auto Action and Layers should be looking like this by the end of this step:
⊹ ASSETS ⊹
I have complied two of the Auto Actions I demonstrated into my Getting Started Set. Feel free to download and experiment with it!
Also feel free to explore more assets on Clip Studio where you can find a lot of useful Auto Actions that you can use!
⊹ MORE TIPS ON AUTO ACTION ⊹
◈ SHORTCUT KEYS = SAVE MORE TIME ◈
Do you know that you can set shortcut keys for your Auto Actions?
With shortcut keys, you can further save more time!
Simply go to File > Shortcut Settings, look for Auto Action in the drop down menu, and you can start adding some shortcuts for your Auto Actions.
◈ COLOR CODE YOUR FOLDERS FOR EASY VIEWING ◈
It is optional yet recommended to assigned Palette Color to your folders and layers so that it is easier to differentiate and categorize your layers!
It is especially useful when you have a lot of layers involved.
⊹ THANK YOU FOR READING! ⊹
That's it for now! Hope you guys enjoy this tutorial. Auto Action is a tool with full potential, and it is up to us to unlock it. Experiment and explore its functionalities, hope this tutorial is able to help you guys to start creating your very own favorite Auto Action with ease!