Install Windows 2019 Server (LTSC & SAC) on VirtualBox with ISO/VHDX
It is always advisable to install and test the new Operating Systems in the virtual platform before trying it in a live environment, especially the server version we use in production. In this guide, let me show the steps I followed to install Windows 2019 server LTSC and SAC versions on Oracle VirtualBox. The Windows 2019 server OS was built on the firm foundation of the earlier Windows 2016 server. Windows 2016 was the most popular and fastest adopted Windows server Operating System ever, and Microsoft expects the 2019 version to overtake it.
You can check here to learn more about what is new in Windows 2019. As a Windows server administrator or a learner, you would love the new features it brings up. The project Honolulu is something I’m incredibly interested in and happy to have.
Two Versions of Windows 2019
You must understand the significant difference between both Windows 2019 versions. I have shown how to install Semi-Annual Channel (SAC) and Long-Term Servicing Channel (LTSC) on VirtualBox with my Windows 10 computer. Find below the major differences between both versions.
- It gets feature updates from Microsoft twice a year. Your organization should have Software Assurance to be eligible for the upgrade.
- The Windows 2019 SAC doesn’t have GUI. So, it is like Windows Server Core or Nano installation. It is well secured and optimized, but management is not easy without GUI.
- It is for organizations that prefer the more traditional release of feature updates in two to three years.
- It comes with both Server Core and Desktop Experience (GUI) versions.
Let’s dive into the installation of the Windows 2019 server on VirtualBox.
I already published a guide showing how to install Windows 2012 R2 on VirtualBox with a pre-installed VHD file from Microsoft. At the moment, Microsoft Provides ISO and VHD files of the Windows 2019 server on their official website.
To continue further, you must be able to download the Windows 2019 ISO file from the Microsoft Windows Insider Program website. It will help if you have a Windows live account that is part of the Insider program (Free to join). Here is the URL to download Windows 2019 server version for testing and demo installation purposes.
Windows 2019 Server VHDX on VirtualBox
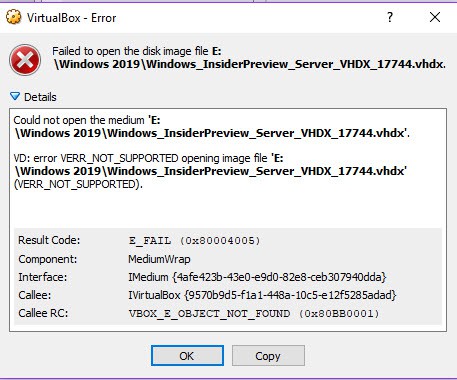
Unfortunately, I could not use the VHDX file of both Windows 2019 SAC and LTSC versions on the VirtualBox. VirtualBox was unable to read the VHDX file properly. Therefore it can’t be used to boot the virtual machine from it.
It threw the following error while attaching the VHDX, “Failed to open the disk image file..” with the “MediumWrap” “E_FAIL”. It is still doubtful whether VHDX is supported in VirtualBox for reading and writing access. It looks like it supports only read-only as of now. As you know, VHDX files are mainly made for Microsoft Hyper-V hypervisor.
VHDX to VHD
I used “vboxmanage clonemedium” command to convert the VHDX to VHD, and it succeeded and converted the Windows 2019 Server VHDX to VHD. Also, this time I managed to add the converted VHD disk to the new Virtual Machine. But it did not boot. It gave the error saying, “No Bootable medium found.” To reconfirm the readability of the converted VHD file, I attached the disk to another working Windows VM and managed to read the content on the VHD file. I’m yet to find the solution in mounting the preinstalled Windows 2019 Server VHDX on VirtualBox and see how it works.
At the moment, the final solution is to use the ISO file and do the fresh installation.
Windows 2019 Semi-Annual Channel (SAC) on VirtualBox
It worked, but I’m not sure why you need to install a Server Core version in VirtualBox without Desktop experience. But for a full-fledged test lab setup, you can install it in multiple VMs to test the Windows 2019 server cluster and server farm feature.
I assume that you have already worked on the Server Core version. The installation is straightforward. Download the ISO file of Windows 2019 SAC from Microsoft and start installing.
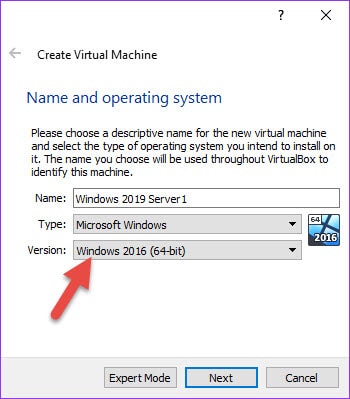
1. Select the Operating System as “Windows 2016” or Windows 2019 based on your Oracle VirtualBox version.
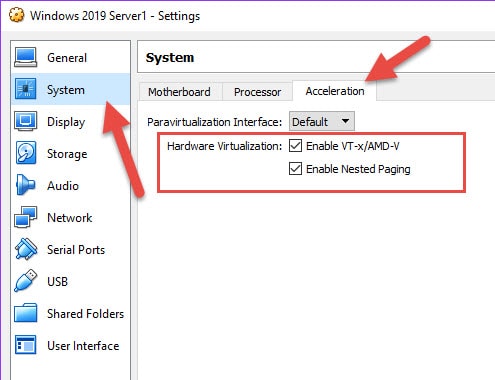
2. Make sure that Processor settings remain the same as below. By default, when you select the Windows 2016 version, it sets automatically.
3. Set the RAM; I allocated 4GB RAM and 50GB of new hard disk.
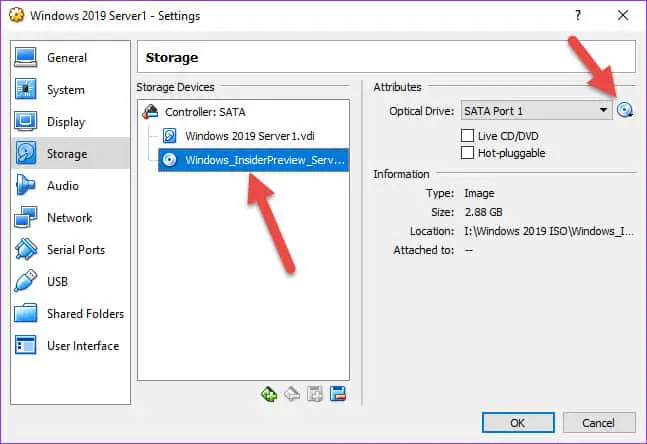
4. Attach the downloaded ISO and start the Virtual Machine.
5. Select the “Standard” or “Data Center” versions to install. I selected the Data Center version and continued the installation.
6. Once installation is completed, you will get the first screen to set up an administrator account. It will be the server core version; you must play with the command prompt and PowerShell. Mouse and keyboard integration works fine.
7. With the ‘sconfig’ command you can configure the Windows 2019 Core on VirtualBox.
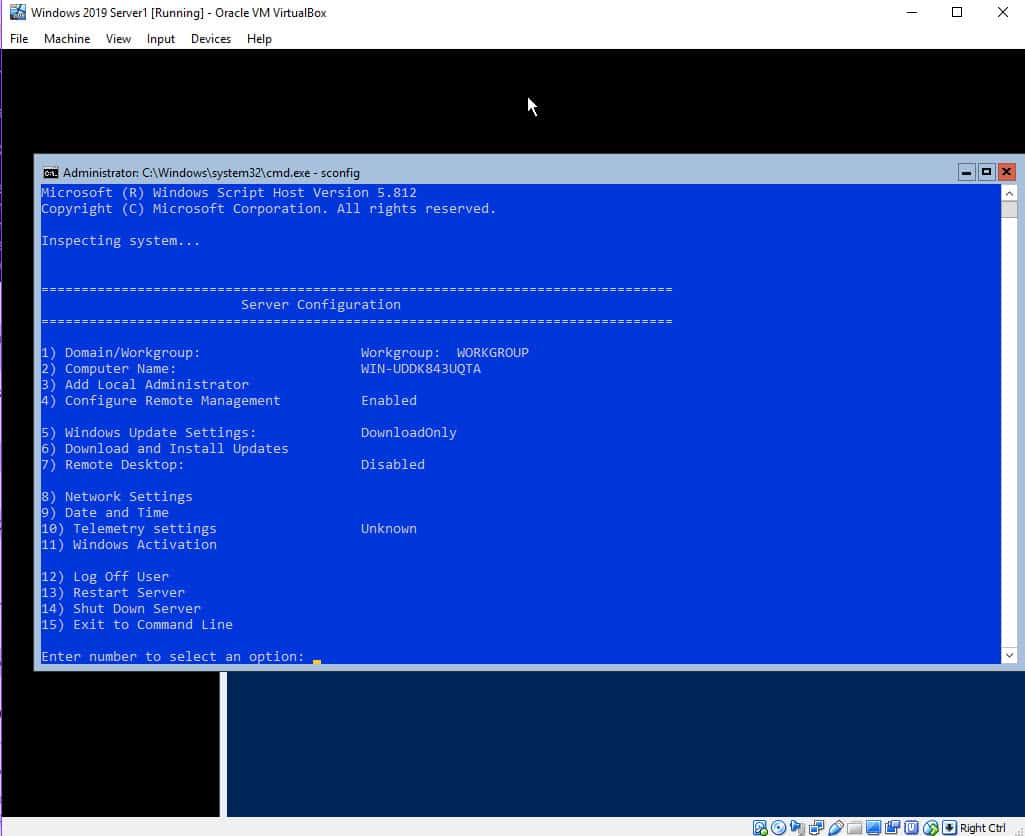
8. Network worked without installing VirtualBox additions inside VM (NAT type, it should work with any type including Bridged or Internal only).
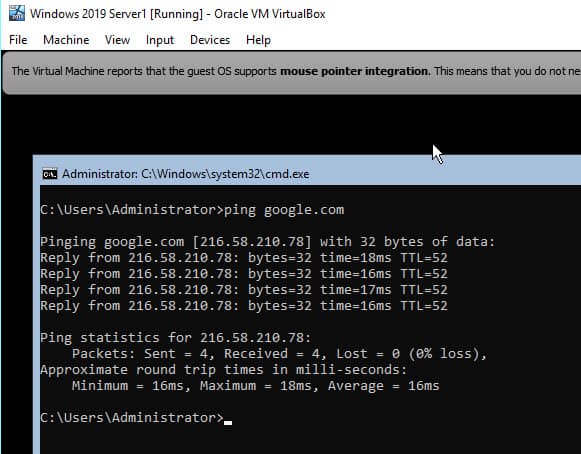
Since it doesn’t have a desktop graphical interface, we do not need to install guest additions on this Server Core.
Windows 2019 Long-Term Servicing Channel (LTSC) on VirtualBox
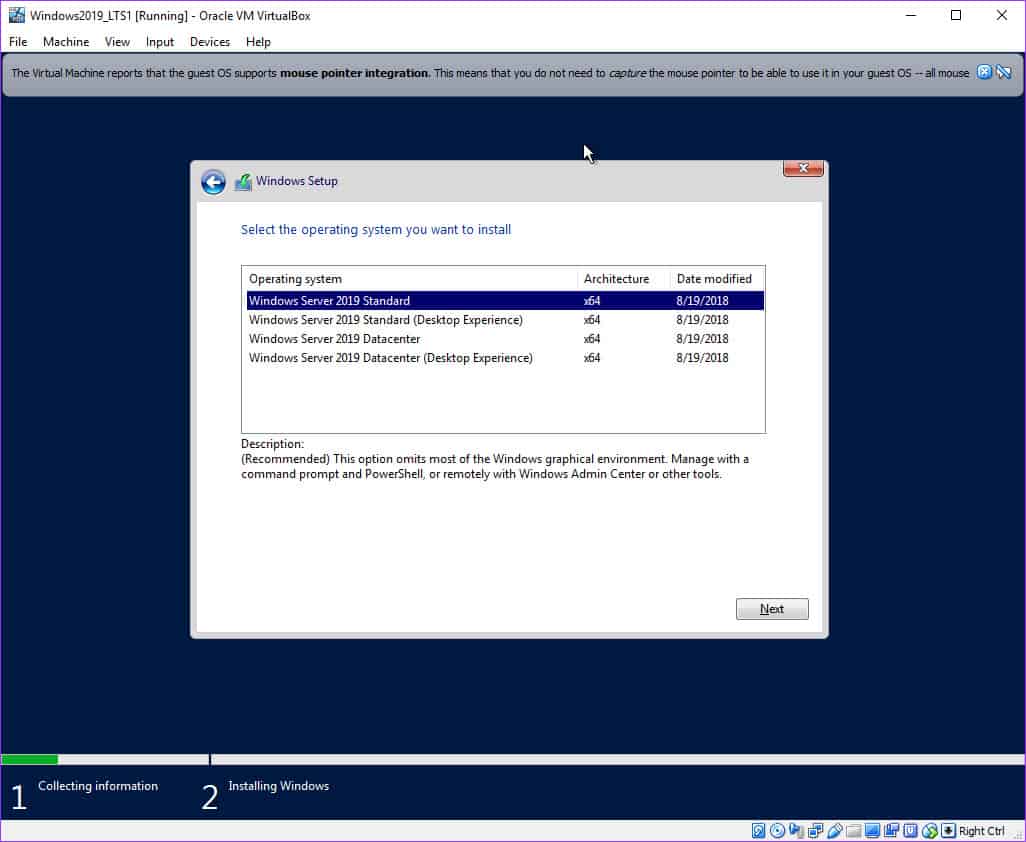
The LTSC version of Windows 2019 Standard and Datacenter have desktop experience GUI and core installation. Here I selected the Datacenter with the desktop experience.
9. The installation steps are the same as the SAC server mentioned earlier. Select the correct version you want to test with the Desktop experience as mentioned
10. You can leave the OS key, enabling your evaluation period once the installation is completed. You need to set a new complex password for the Administrator account. You will land on the Windows 2019 server desktop, almost identical to Windows 2016 and 2012 R2 versions.
Below is the first screen without VirtualBox guest additions. You can see the space between the console and Windows 2019 virtual machine desktop because no guest additions were installed hence the auto-size of the display is not working.
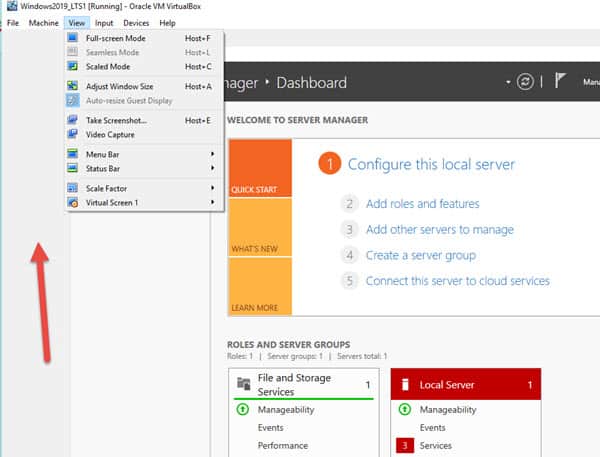
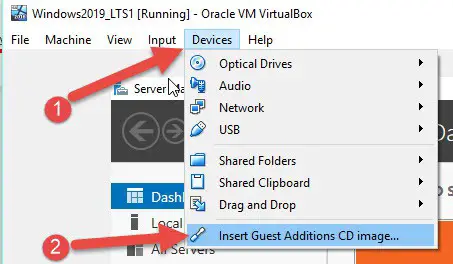
11. Click on Devices and mount the guest additions as shown below.
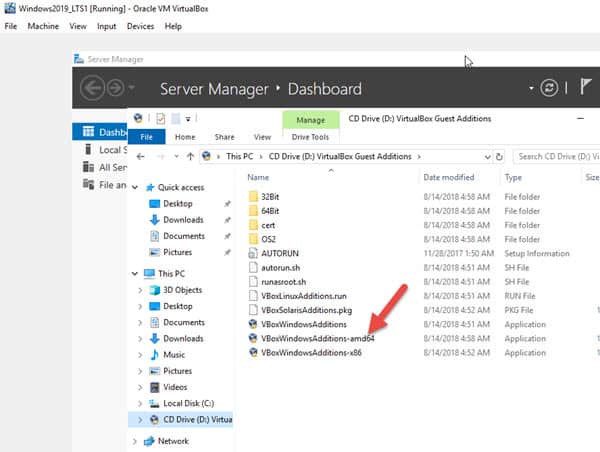
12. It will be the DVD inside the VM. Open it and execute the 64-bit version (even you can execute the normal one which will detect the OS and install the appropriate version).
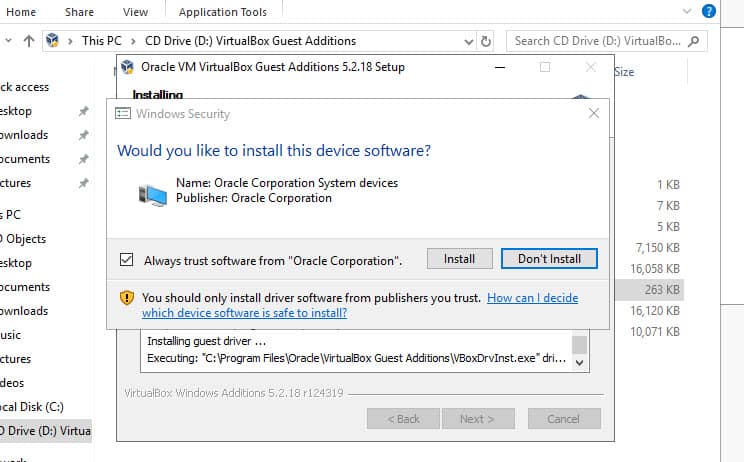
13. Click yes to install if the warning comes as not a trusted driver.
14. Reboot the VM after completion.
15. Once it is rebooted and logged in, you will see a better display, mouse integration and performance enhancement inside the VM. Also, the auto display re-size will work fine.
Take a snapshot before you make any changes from this point.
There you go, you have both versions of the Windows 2019 server (LTSC and SAC) on your Windows 10 desktop or laptop by using Oracle VirtualBox. I hope this guide is useful for the testing or demo lab setup at home/office.
If any of the above solutions did not fix the Windows PC issues, we recommend downloading the below PC repair tool to identify and solve any PC Issues.
Dinesh
Dinesh is the founder of Sysprobs and written more than 400 articles. Enthusiast in Microsoft and cloud technologies with more than 15 years of IT experience.
You Can Read Next
How to Install TrueNAS in VirtualBox – Windows 11 Host

Extend Volume Greyed Out in Windows Server, How to Extend a Volume?
Best Free Virtual Machine Software in 2023 – Start Your New Career

How to Join Windows 11 to Domain – Remove Also
Windows 2022 Active Directory Setup on VirtualBox Windows 11 Host
How to Install VM OS on iSCSI Disks in VirtualBox
1 thought on “Install Windows 2019 Server (LTSC & SAC) on VirtualBox with ISO/VHDX”
This site is awesome! Thank you very much for the tools and great articles.
Comments are closed.
 report this ad

report this ad
UP NEXT FOR YOU
Must-Read Guides
report this ad
How to Install Windows Server 2019 on Oracle VM VirtualBox
 Last Updated: June 2, 2022 | Microsoft Server | Tolga Bagci
In this article, we will install Windows Server 2019 on Windows 10 with Oracle VM VBox virtualization program step by step.

How to Setup Windows Server 2019 in Windows 10 PC using VirtualBox
Microsoft released the Server 2019 Preview version on March 20, 2018. The Windows Server 2019 full version will be available in the second half of 2018.
Windows Server 2019 is built on the powerful infrastructure of Windows Server 2016, and the most striking feature is Project Honolulu. Project Honolulu is a central console that allows you manage Windows Server 2019, 2016, and 2012 R2 using either the GUI or GUI-less. In the next article, we will examine the Project Honolulu installation and configuration in more detail.
In the previous article, we installed Microsoft Server 2019 with the VMware Workstation program.
After briefly discussing MS Server 2019 and Project Honolulu, let’s move on to the steps of setting up Server 2019 with Oracle VM.
How to Install Windows Server 2019 using Virtual Machine
You can install Microsoft Server 2019 on a physical server. Or you can use virtualization programs to install and experience it on your desktop or laptop computer.
Before installing Windows Server 2019 on a physical server, it is a good idea to build and test it in a virtual environment.
First of all, if you are using Windows operating system, install VirtualBox on Windows 10. But if you are using a Linux based Ubuntu/Debian/Linux Mint, install VirtualBox on Ubuntu.
Then, download the Server 2019 ISO file to your computer by clicking here. Finally, follow the steps below to run Microsoft Server 2019.
Step 1
First, create a new virtual computer on VirtualBox. Select Windows Server 2016 (64-bit) in the operating system selection window in the steps for creating a VM. Next, open the Server virtual machine’s settings and click the System / Acceleration tab.
NOTE: Server 2019 is available in the virtual machine operating system selection window in 6.0 version of the Oracle VM program.
In the Hardware Virtualization section, select the Enable VT-x/AMD-V and Enable Nested Paging options, and finally, add the Microsoft Server 2019 ISO file to the virtual pc.

Step 2
After preparing the MS Server 2019 virtual machine, run the virtual machine by clicking the Start button.

Step 3
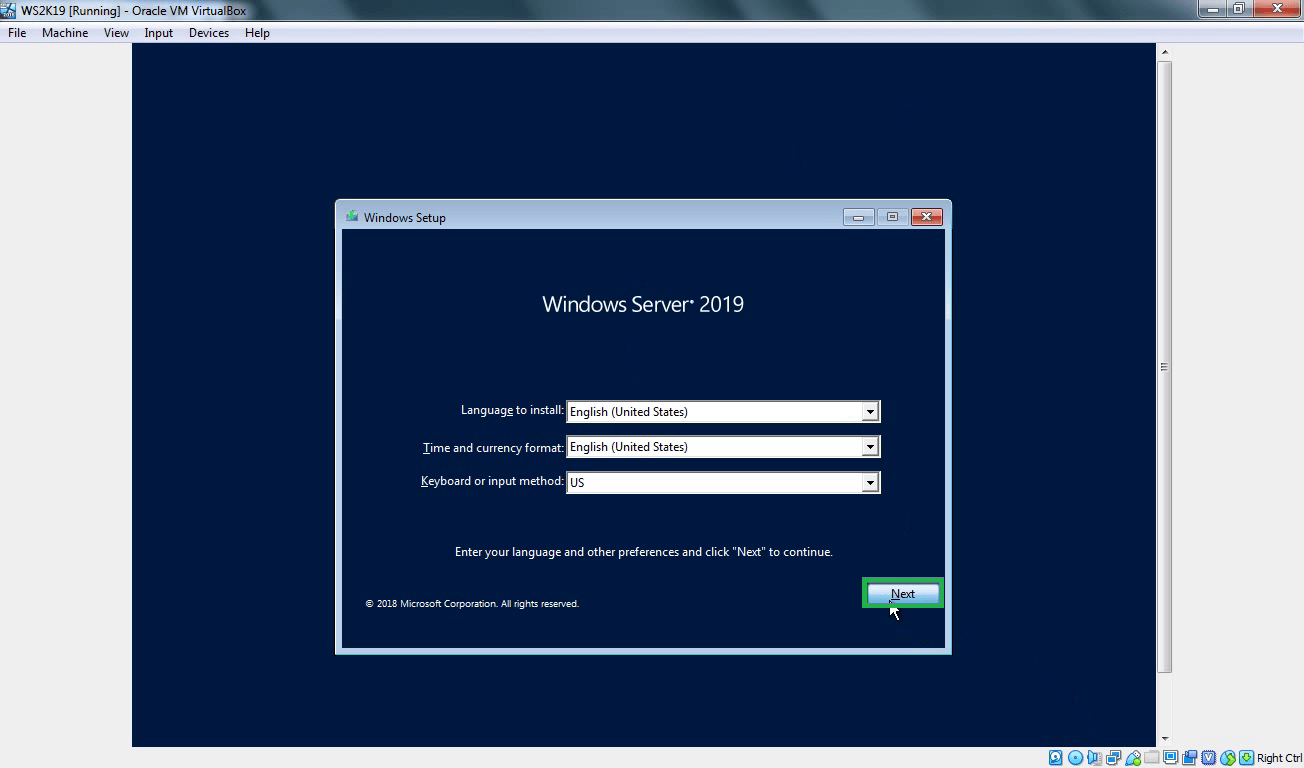
Configure the language, time settings, and keyboard layout for MS Server 2019 and click Next.

Step 4
Select the Windows Server Standard (Desktop Experience) version and click Next.

Step 5
Accept the MS Server 2019 license agreement, and then click Next.

Step 6
To install Windows Server 2019 without updating it, click Custom.

Step 7
Configure the virtual hard disk size for your virtual machine and click Next to select the partition you want to install Server 2019 on.

Step 8
Wait while being installed Windows Server 2019 with VirtualBox…

Step 9
Wait while getting devices ready…

Step 10
You need to set a complex password for your Administrator account. Type in a difficult and complicated password and click on the Finish button.

Step 11
Click on Input / Keyboard / Insert Ctrl-Alt-Del to open the account lock of Server 2019.

Step 12
Type your Administrator password that you created and press Enter.

Step 13
Once you have successfully completed the steps for setting up Server 2019, you can check the Server Manager information as shown in the following image.

How to Install Guest Additions on Windows Server 2019
After you install it with VirtualBox, you should install Guest Additions. To install guest additions for Windows clients, click on the image below to read our related article.

How to Run Server 2019 Step by Step ⇒ Video
You can watch the video below to run it on VirtualBox virtual machine step by step, and also subscribe to our YouTube channel to support us.
Final Word
In this article, we have installed MS Server 2019 Technical Preview step by step, a free and popular virtualization program. You can also install Windows Server 2019 on ESXi. Thanks for following us!
Related Articles
Hello, I’m Tolga! I am a computer specialist who has been specializing in computer technologies for about 20 years. I provide solutions to problems encountered in many areas such as hardware, system, network, virtualization, server systems, and operating systems, and create relevant content on my website by explaining how to solve these problems. My goal is to be a reliable source of expert, quality, and trustworthy solutions for your computer problems. By following innovations and using the latest technologies, I aim to be successful in my job and provide you with the best service. Don’t hesitate to contact me for any questions or curiosity about technology. Have a nice day, stay up to date 🙂
Bonjour Monsieur;
je viens de suivre, le tuto et j’aimerais savoir si l’installation de Windows server 2019 sous VirtualBox prend beaucoup de temps
How to Install Windows Server 2019 in Virtual Box
In this post, we will see the process to install windows server 2019 in Virtual Box. But before we start installation let’s check minimum system requirement to install windows server 2019.
Minimum system requirement to install windows server 2019.
- Processor: At least 1.4 GHz or faster 64-bit supported processor
- RAM: 512 MB
- Free Space: 32 GB of available free disk space.
How to install Windows Server 2019
First download Windows server 2019 Evaluation edition ISO image from Microsoft TechNet Evaluation Center. https://www.microsoft.com/en-US/evalcenter/evaluate-windows-server-2019
Link to download Oracle VirtualBox: Click Here
Start your VirtualBox and create one VM with below configuration.
- Name: As you wish
- Type:- Microsoft Windows
- Version:- Windows 2016 (64-bit)
- RAM:- 2048 MB
- Create Dynamically Expanding VDI with size 100 GB
After creating VM click on start.
Mount the ISO image which we have downloaded earlier.
Step:1 On Windows Setup console select the installation language, time and currency format and keyboard layout. You can simply use default settings which will be OK.
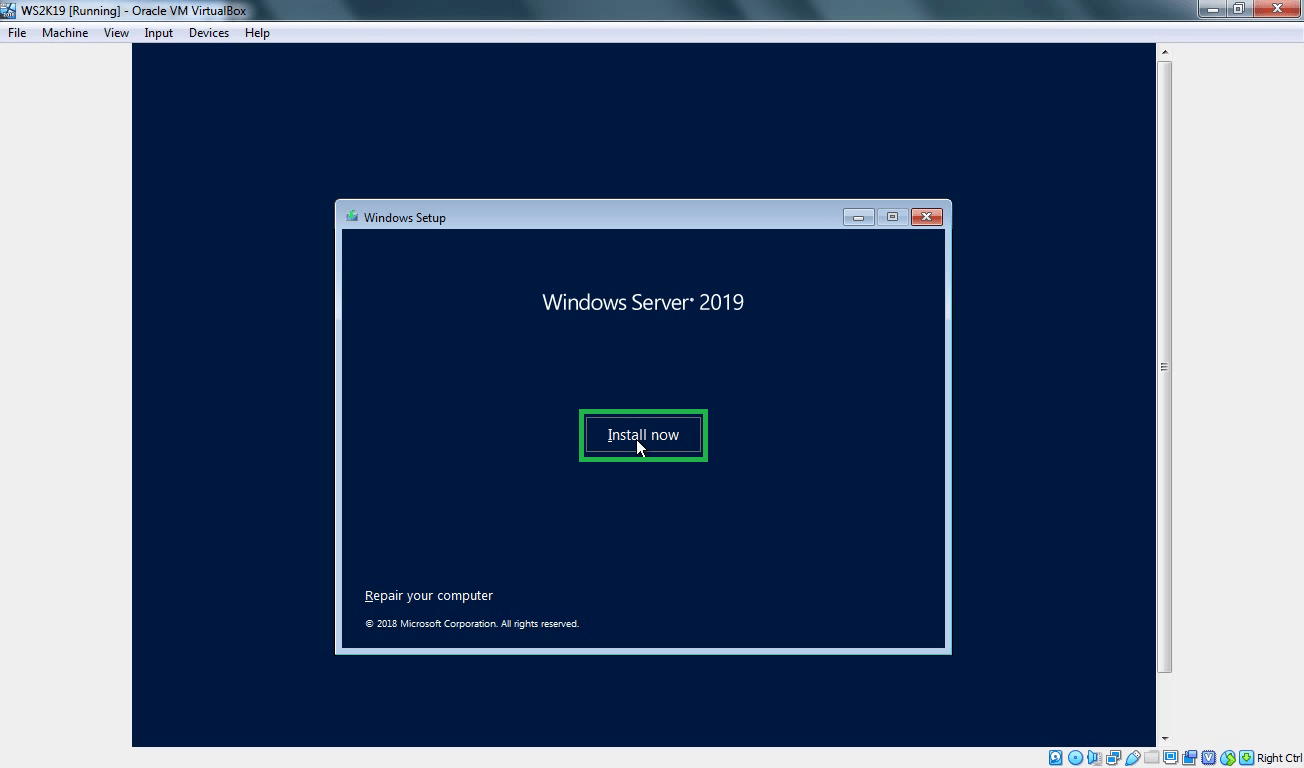
Step:2 Click on Install now to start the installation process.
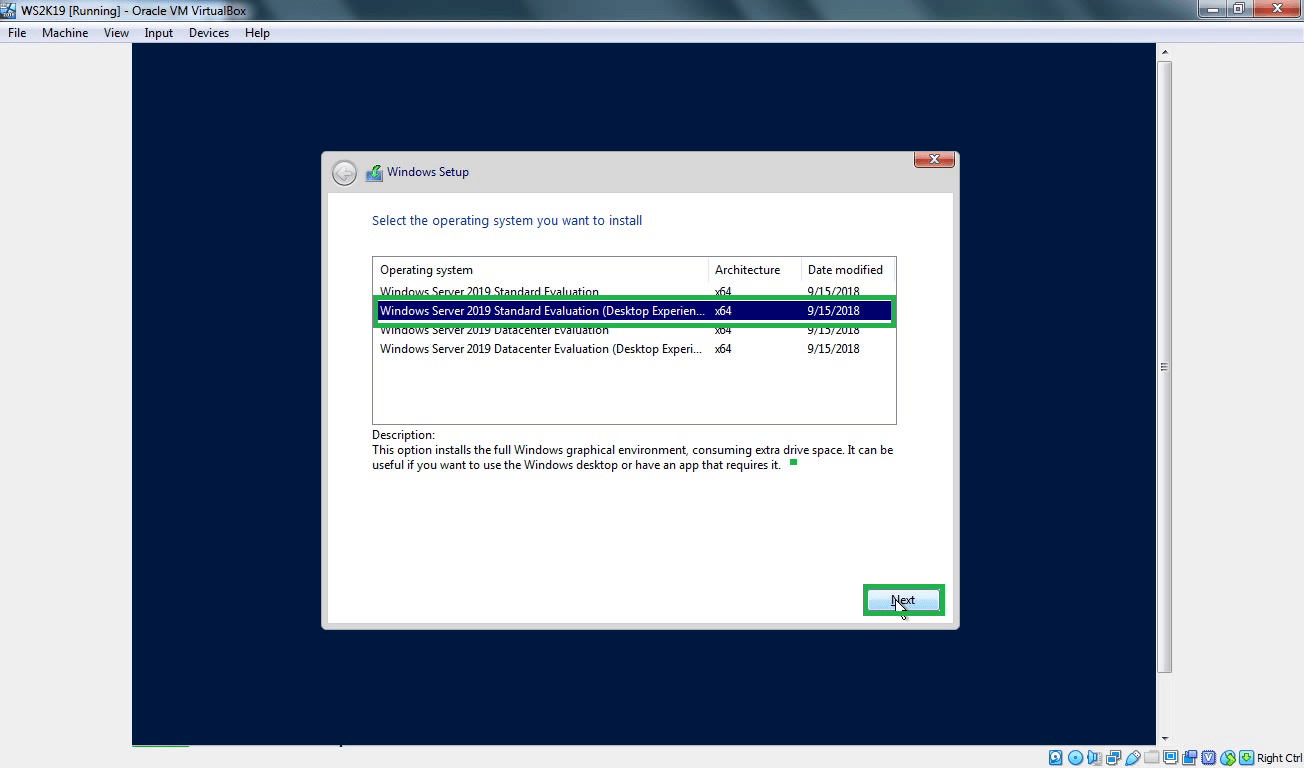
Step:3 Select the operating system which you want to install. (First option will install windows server without a graphical user interface.)
If you want GUI to manage server select second option i.e. Windows Server 2019 Standard Evaluation (Desktop Experience).
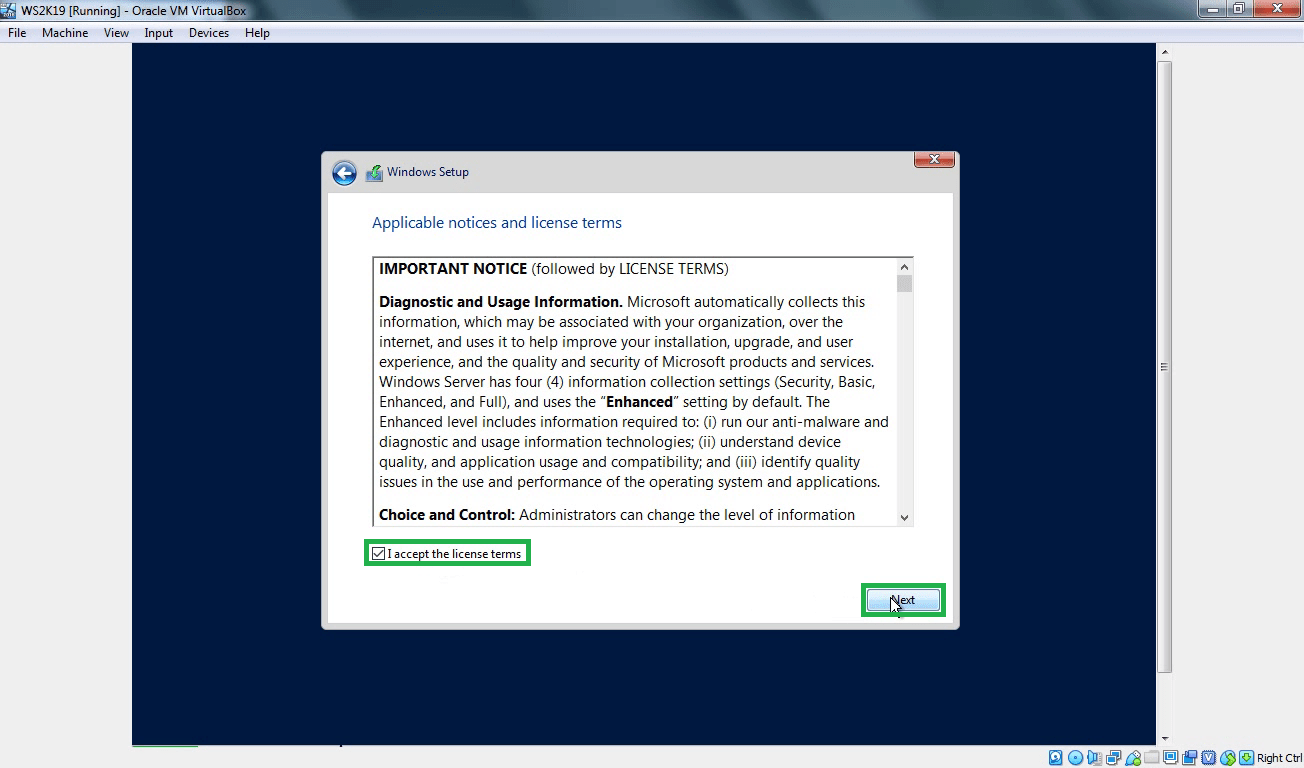
Step:4 Select Accept the license terms and click on next.
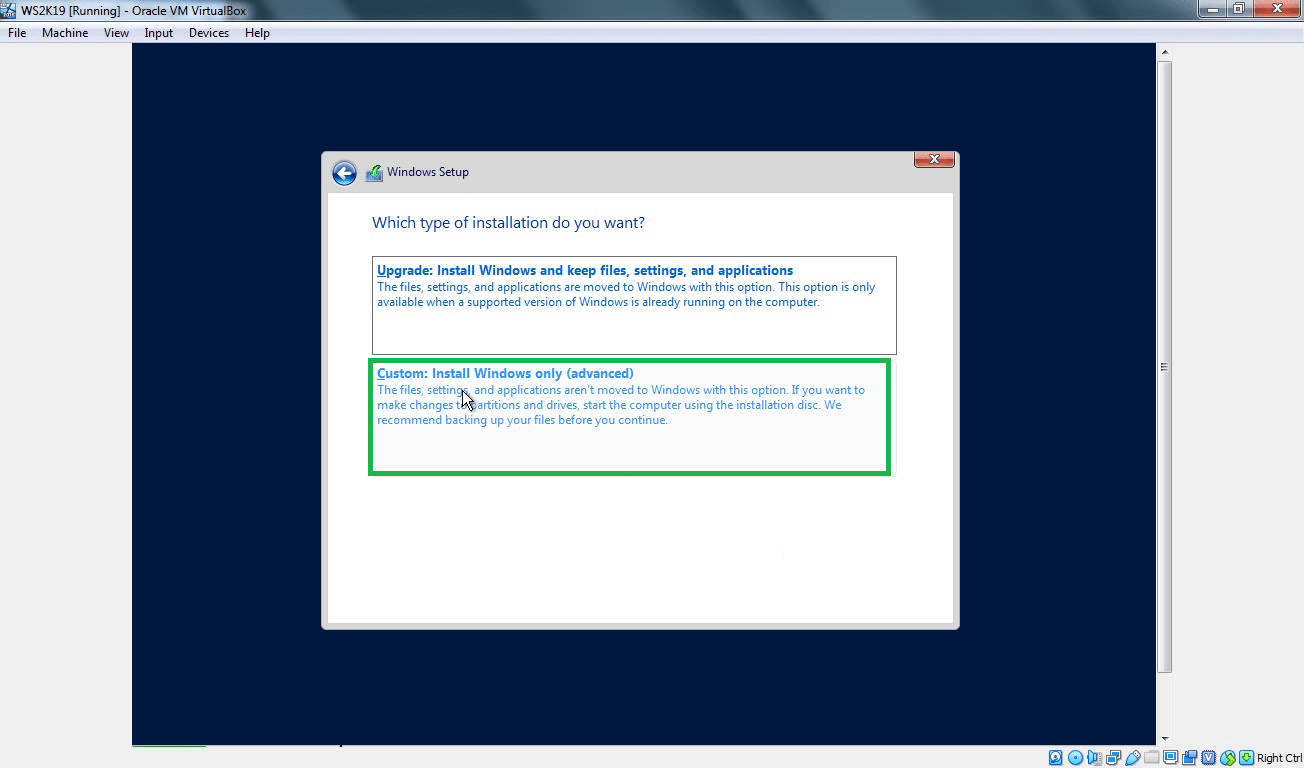
Step:5 For a fresh installation of server 2019 we need to select the second option, Custom: Install Windows Only and then click on next.
Step:6 Select your virtual hard disk and click on New to create a new partition to install server 2019.
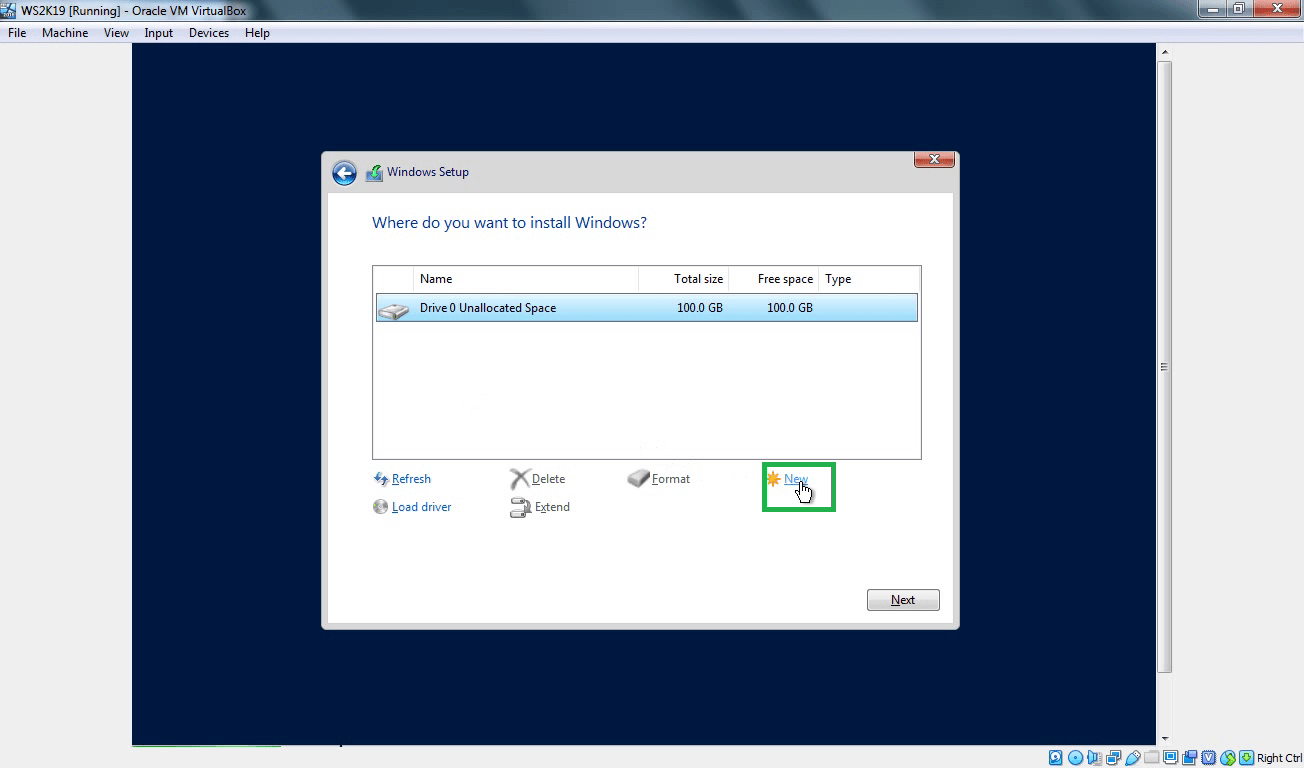
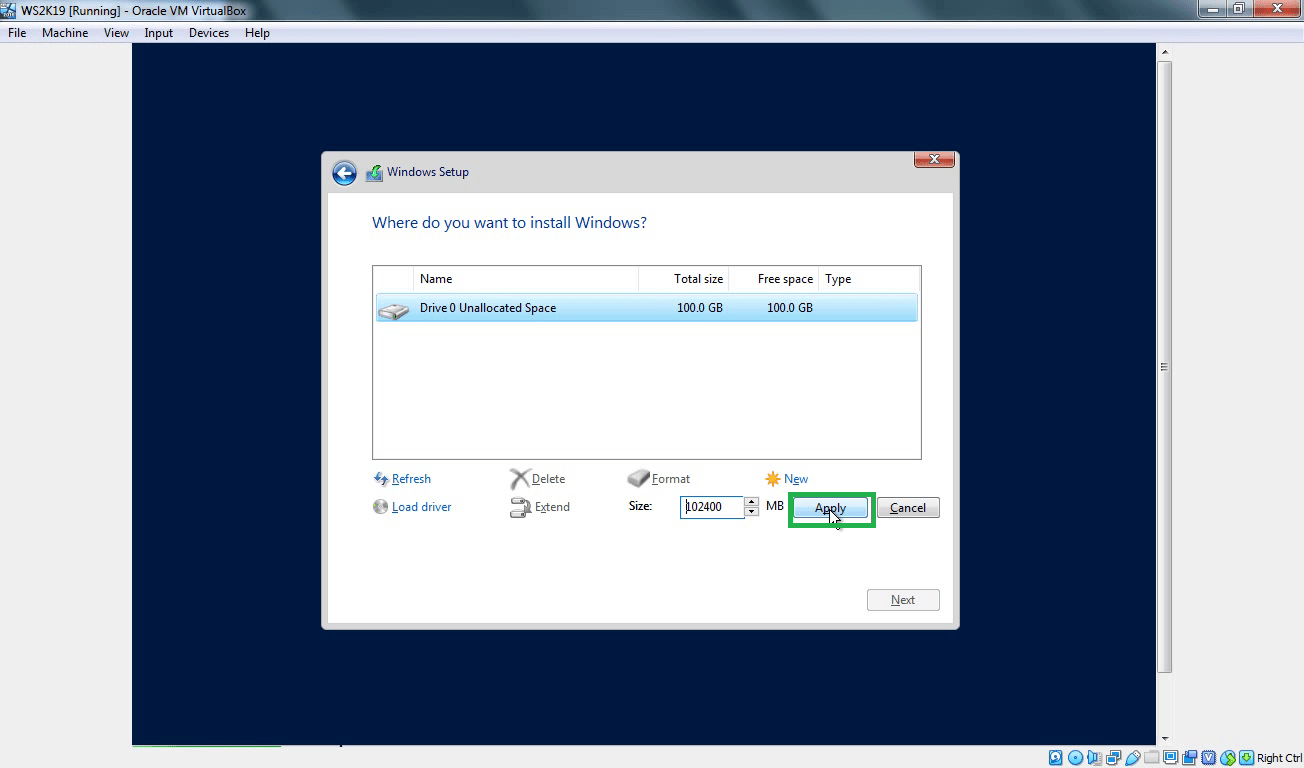
Step:7 For this demo, I am creating only one partition of 100 GB in size.
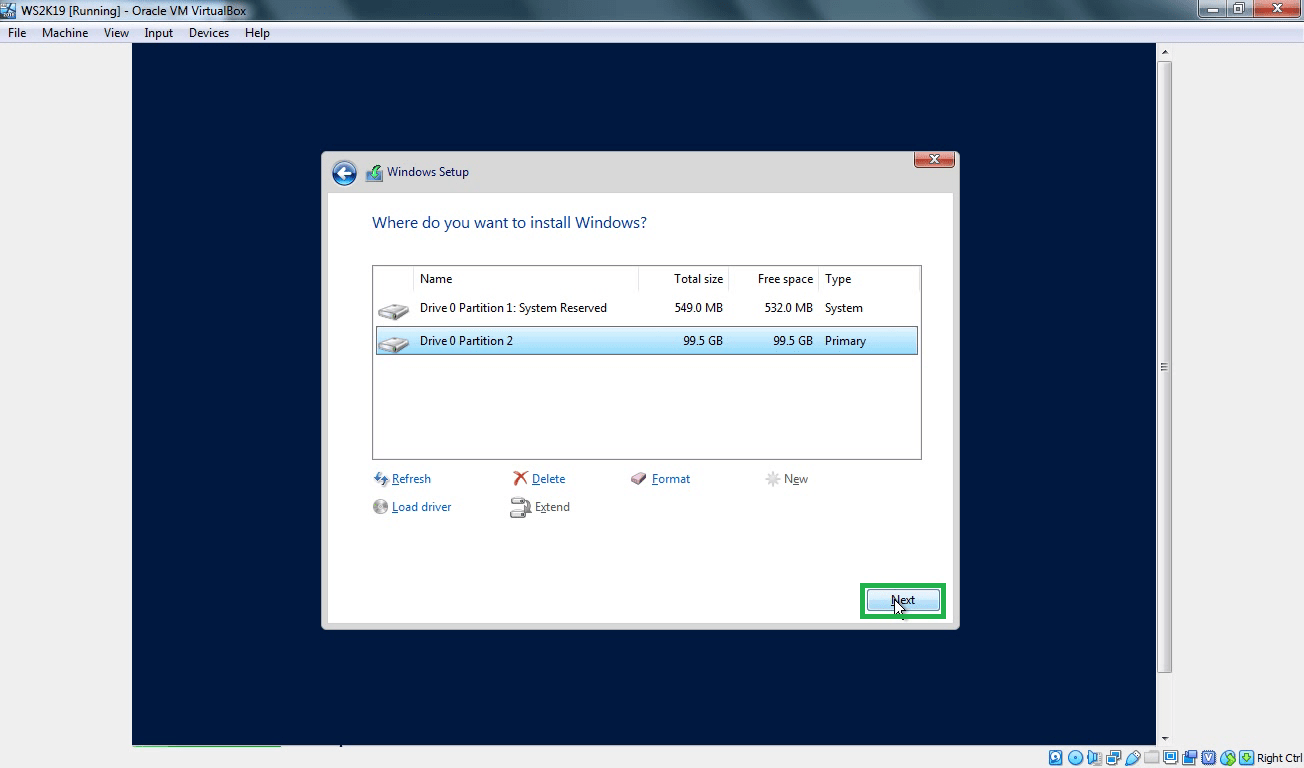
Step:8 After creating a partition, Click on Next to continue.
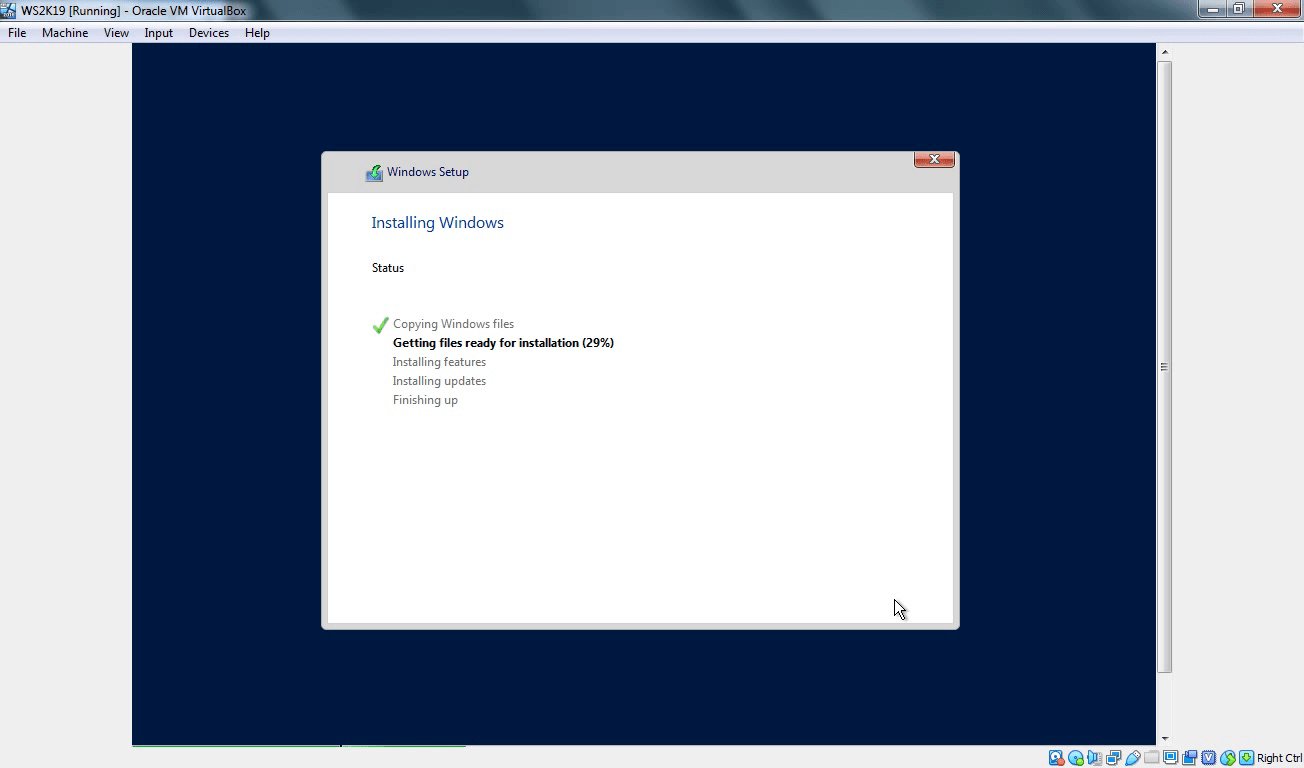
The installation process will take some time to complete the process. Once installation completes server will restart automatically.
At next boot, you will see below screen asking to set Administrator account password for windows server 2019.
Step:9 Specify the password of your choice to protect Administrator account of Windows Server 2019.
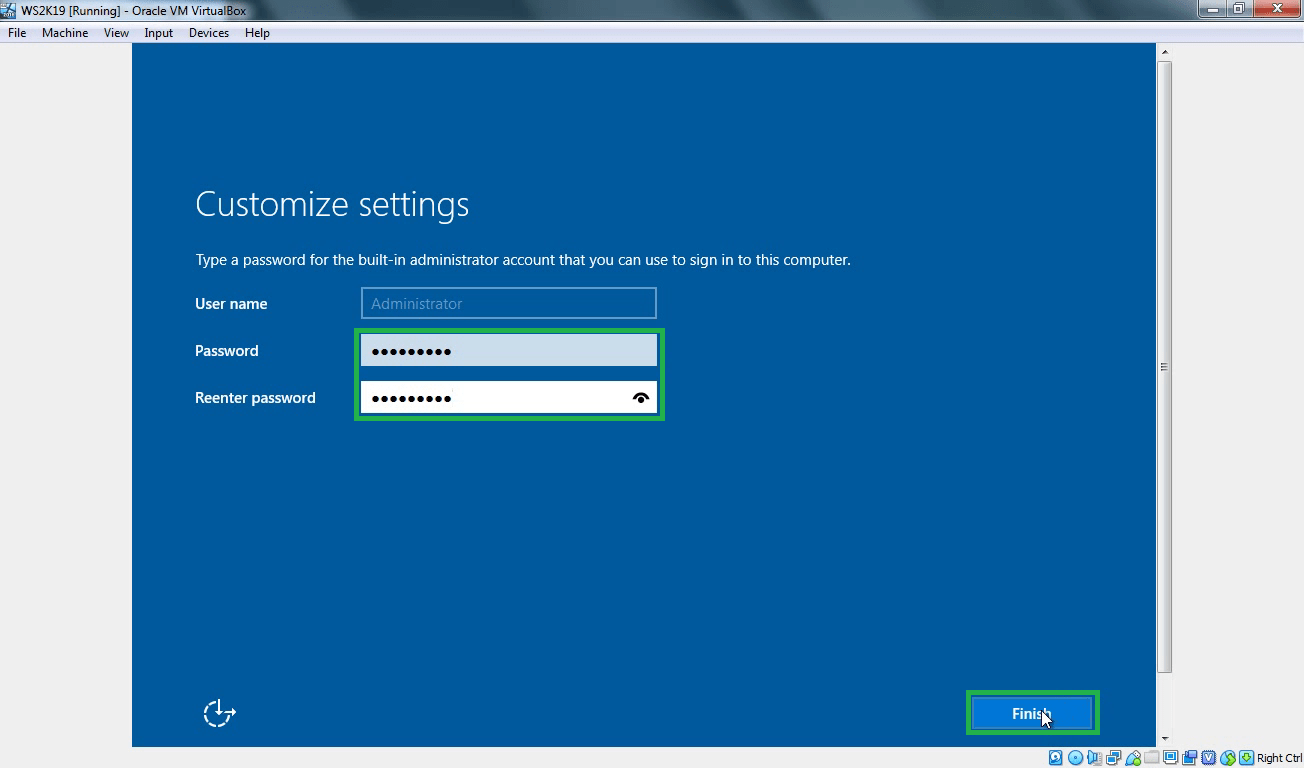
Congratulations! Now you are ready to log in first time on your newly installed Windows Server 2019.
Now press CTRL + ALT + Delete key combination.
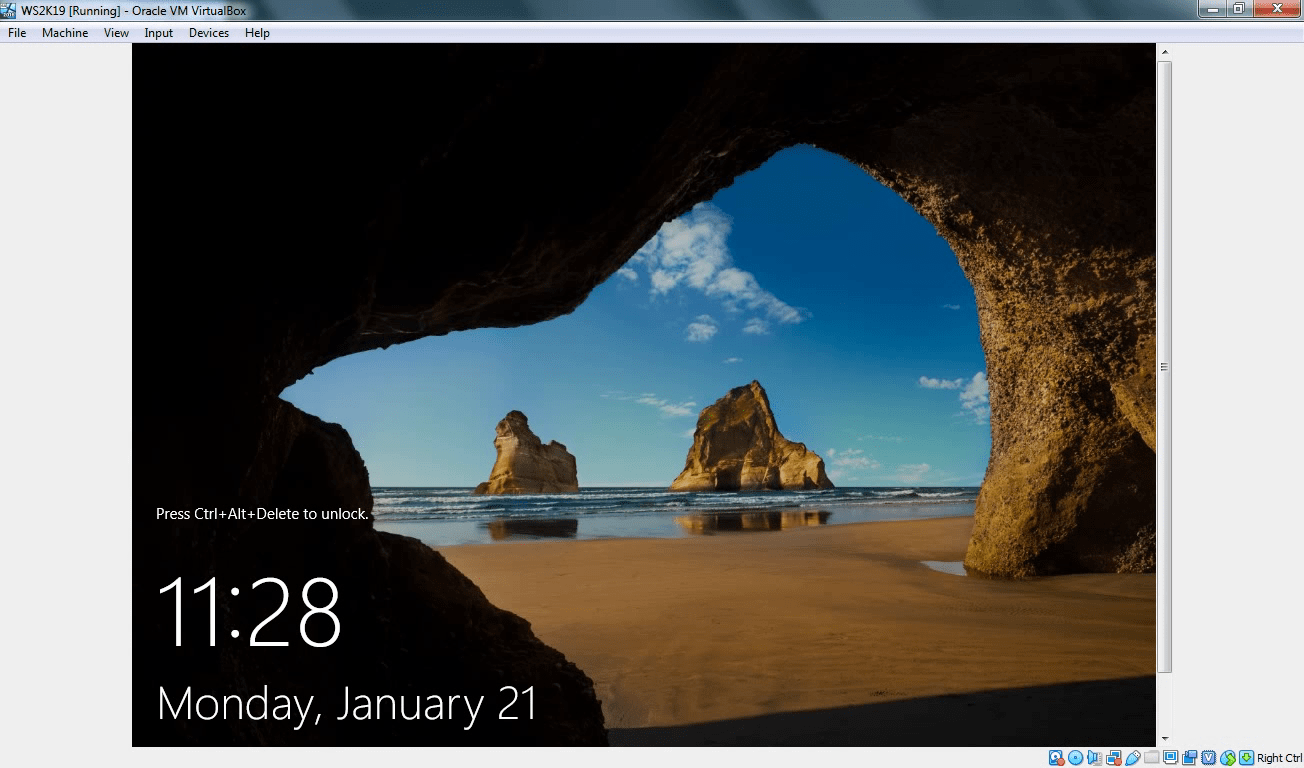
Specify the administrator account password and hit the enter key to login to Windows Server 2019.
How to Setup Active Directory Domain With VirtualBox and Join Computers – Part 1
In this step by step, I will teach you how to setup active directory directory services with a domain using VirtualBox. The demos are based on Windows Server 2019 and Windows 10.
We’ll cover the following in this part
1. Install VirtualBox and add Virtual Machines
Step 1 – Download and install VirtualBox VM. Get it free from here.
Step 2 – Download Windows Server 2019 and Windows 10 Enterprise. I’m using the 90 days trial version. I think this is enough time to get used to it.
Make sure the download the ISO files. Save them in a folder
Step 3 – Open the VirtualBox and click on the New button
Step 4 – Enter the name. Then choose the type and version as shown below.

Creating New Virtual Machine in VirtualBox
Step 5 – Set the Memory Size to 2048 MB
Step 6 – Ensure the ‘Create a virtual hard disk now‘ is selected under disk. Click Create.
Step 7 – Choose VDI(VirtualBox Disk Image) in the ‘Hard disk file type’ and also select ‘Dynamically allocated’
Step 8 – Set the Hard disk size to 30GB
2. Install Windows Server 2019 on the new Virtual Machine
Now we would use the ISO file we downloaded to install Windows Server 2019 in the new virtual machine we created. Follow the steps
Step 1 – Start the new Virtual Machine (Right-click > Start)
Step 2 – Select the ISO file you downloaded and click Start

Selecting the disk image
Step 3 – Follow the onscreen prompt to install windows. Ensure to choose ‘Windows Server 2019 Standard Evaluation(Desktop Experience)”
Also ensure to choose Custom Install from the next screen. Then wait for the installation to complete
Step 4 – Choose an Admin password in the Customize setting window as shown. Click next to complete the installation
Step 5 – Now you can log on to Windows. The Server Manager Dashboard opens up as shown below.
Step 6 – First install ‘Virtual Box Guest Additions’. This would allow you to set the VM screen to full screen. See the video.

Server Manager Dashboard
3. Configure the Active Directory Directory Services(AD DS)
Now we would set up this computer as a domain controller. We do this by installing the AD DS role to the server.
Step 1 – Click on Add Role and Features in the Dashboard. This opens the Add Roles and Features Wizard.

Add Roles and Features Wizard
Step 2 – Click on Next > Next until you have a list of Features
Step 3 – In the list, check Active Directory Directory Services as shown below
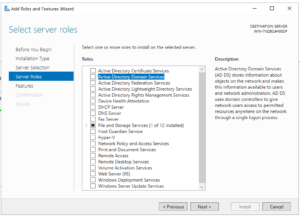
Step 4 – Then complete the installation by clicking on Next > Next until the installation completes.
4. Create a Domain and Configure the Domain Controller
To complete the process of creating a domain, we need to promote the sever to a domain controller. Follow the steps below to do that.
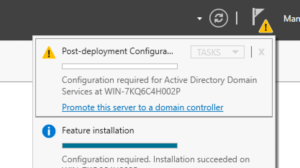
Step 1 – Click on the yellow triangle at the upper right and click ‘Promote this server to domain controller’. The ‘Active Directory Domain Services Configuration Wizard’ opens up as shown below
Step 2 – Click on ‘Add a new forest’ and enter a name for the domain and add .local suffix. For this example, I’m using KTG.local
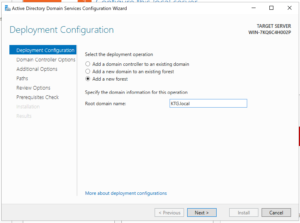
Creating a new Forest
Step 3 – Click on next and then enter a password. Click Next
Don’t worry about DNS because it would choose it’s own
Step 4 – Allow the default Netbios domain name which is the same same but without .local suffix.
Click on Next to complete the installation. Allow the system to restart.
Step 5 – You can now login with KTG\Adminstrator. Enter the password you set.
At this point, you have created a domain as well as a domain controller. Congrats!
But we are not done yet. We’ll proceed to Part 2 where we would then create user, set up the network and join computers to the domain.


kindsonthegenius
Kindson Munonye is currently completing his doctoral program in Software Engineering in Budapest University of Technology and Economics