Plt xticks python что это
Matplotlib is a library in Python and it is numerical – mathematical extension for NumPy library. Pyplot is a state-based interface to a Matplotlib module which provides a MATLAB-like interface.
matplotlib.pyplot.xticks() Function
The annotate() function in pyplot module of matplotlib library is used to get and set the current tick locations and labels of the x-axis.
Syntax:
Parameters: This method accept the following parameters that are described below:
Matplotlib xticks() in Python With Examples
In this article, we will discuss the Matplotlib xticks() in Python. Matplotlib library in Python is a numerical – mathematical extension for NumPy library. The Pyplot function of this Matplotlib module provides a MATLAB-like interface. The matplotlib.pyplot.xticks() function is used to get or set the current tick locations and labels of the x-axis. It passes no arguments to return the current values without modifying them. Before we look into various implementations of Matplotlib xticks(), let me brief you with the syntax and return the same.
Syntax of Matplotlib xticks()
Parameters:
- ticks: array-like containing the list of xtick locations. Passing an empty list removes all xticks. (Optional)
- labels: array-like containing the labels to place at the given ticks locations. This argument can only be passed if ticks are passed as well. (Optional)
- **kwargs: text properties that can be used to control the appearance of the labels.
Return Type
The Matplotlib xticks() function returns:
locs: The list of xtick locations.
labels: The list of xlabel text objects.
Example of Matplotlib xticks() in Python
Output:
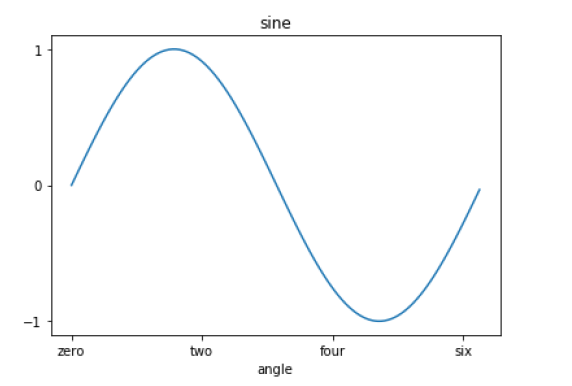
Explanation:
In the above example, an array is defined containing the xticks locations, i.e., [0, 2, 4, 6]. And that array is passed as argument to the ax.set_xticks() function. Another array is defined containing the labels to place at the tick locations i.e., [‘zero’, ‘two’, ‘four’, ‘six’]. This array is then passed as an argument to the ax.set_xticklabels() function. Thus these two matplotlib xticks() functions as a list of xtick locations and a list of xlabel text objects.
Matplotlib xticks() Spacing
Output:
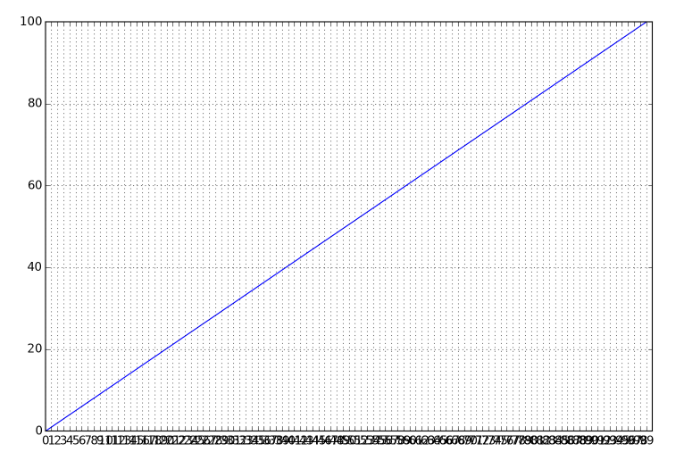
Explanation:
Firstly, in the above example, the ‘N’ is 100 and range(N) is an argument to the plt.xticks(). As a result, the output is a list of xticks locations, and labels with very little space between them or overlapped. Thus to adjust the constant spacing, the xticks label the figure size increased by the figsize() function. Or you have to set the tick_spacing to a constant value as desired.
Axis level xticks frequency
Output:
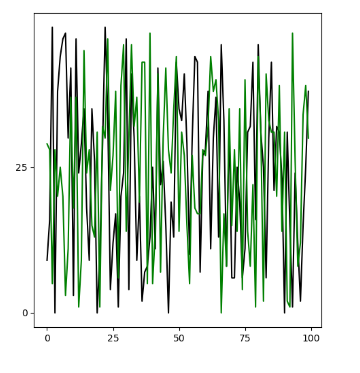
Explanation:
Firstly, in the above example, the xticks frequency is as per our choice. And to do so, ‘np.arange(0, len(x)+1, 25)’ is an argument to the ax.set_xticks() function. This sets the frequency of of xticks labels to 25 i.e., the labels appear as 0, 25, 50, etc. Thus returning a list of xticks labels along the x-axis appearing at an interval of 25.
Rotation of Matplotlib xticks() in Python
Output:
Explanation:
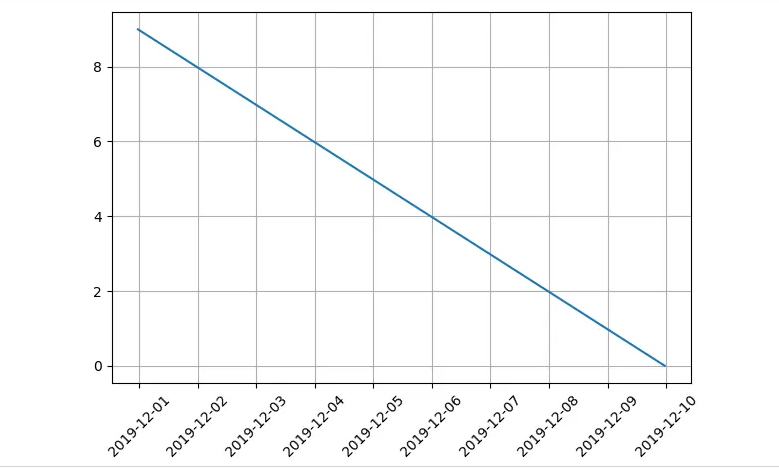
In the above example, a ‘date’ array is defined containing the list of dates, which are the xticks labels for the plot. The plt.xticks() gets or sets the properties of tick locations and labels of the x-axis. ‘Rotation = 45’ is passed as an argument to the plt.xticks() function. Rotation is the counter-clockwise rotation angle of x-axis label text. As a result, the output is given as the xticks labels rotated by an angle o 45 degrees.
Matplotlib xticks Angle
We can rotate the angle of the x axis label with the help of xticks function.
Here, n means the number by which you want to rotate. It can be 25,50, etc.
Matplotlib xticks Bold
To make xticks bold, use fontweight as bold. For example,
This will make the xticks bold.
Matplotlib xticks Color
We use xticks() function to alter the colour of xticks on your plot.
We can use any colour of our choice.
How to set xticks every 10 difference?
You can set your own range using the arange function of numpy library. It supports float values too. Your frequency will change with this.
This sets the data points in matplotlib.
ax.set_xticks([2,4,6])
These data points will be marked on the plot now.
The xticks() and yticks() specify where the data points will be marked on plot.
Must Read
Conclusion
In this article, we discussed various ways of implementing Matplotlib xticks() in Python programs. We learned how to set xticks labels frequency and spacing between them. And also how to rotate the xticks labels through the desired measure. We can also keep the xticks off by not passing any argument to the matplotlib xticks() function. Refer to this article for any queries related to the xticks() function.
However, if you have any doubts or questions, do let me know in the comment section below. I will try to help you as soon as possible.
Introduction to matplotlib.pyplot
In this blog, I will talk about some basic elements for creating a graph/graphsby package matplotlib.pyplot.Figures & Axes & AxisThe figure can be seen as the canvas, on which all drawing c.
In this blog, I will talk about some basic elements for creating a graph/graphs by package matplotlib.pyplot .
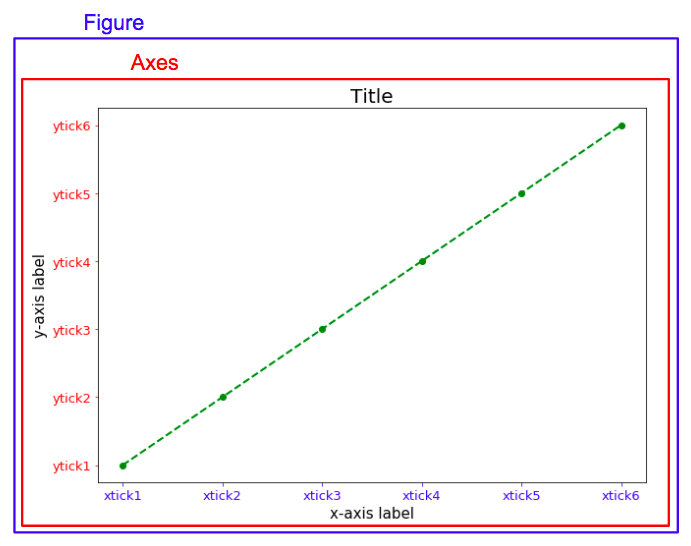
Figures & Axes & Axis
The figure can be seen as the canvas, on which all drawing components are plotted. The figure consists of axes, which are subdivisions of the figure. Each of the axes consists of one or more axis (horizontal (x-axis), vertical (y-axis) or even depth (z-axis))[source].
Detail
Parameter figsize in function plt.figure() places a tuple of integers (width, height in inches)
Function plt.plot() creates a figure, data shows the horizontal/vertical coordinates of the data points, marker and linestyle specify the marker style for each point and line style between each two points.
plt.title() helps us to add a title for the figure, and put it on the left, middle or right by loc parameter, fontdict is a dictionary controlling the appearance of the title text.
plt.xticks() and plt.yticks() get or set the current tick locations and labels of the x-axis/y-axis. The first parameter locs is a list of positions at which ticks should be placed, the second parameter labels, which is optional, is a list of explicit labels to place at the given locs. If your data is in a pandas dataframe, you can use df.index to specify locs and use df.col1 to specify labels.
plt.tick_params() changes the appearance of ticks, tick labels, and gridlines. Parameter axis specifies which axis to apply the parameters to, labelsize changes tick label font size in points or as a string (e.g., ‘large’), colors changes the tick color and the label color to the same value: mpl color spec.
plt.xlabel() and plt.ylabel() set the x-axis/y-axis label of the current axes. First parameter label describe label of x-axis or y-axis, fontdict is a dictionary controlling the appearance of the label, here I set the label font size to be 15.
Subplots
A figure can contain a set of subplots.
Detail
Function plt.subplots() creates a figure and a set of subplots, this utility wrapper makes it convenient to create common layouts of subplots, including the enclosing figure object, in a single call.
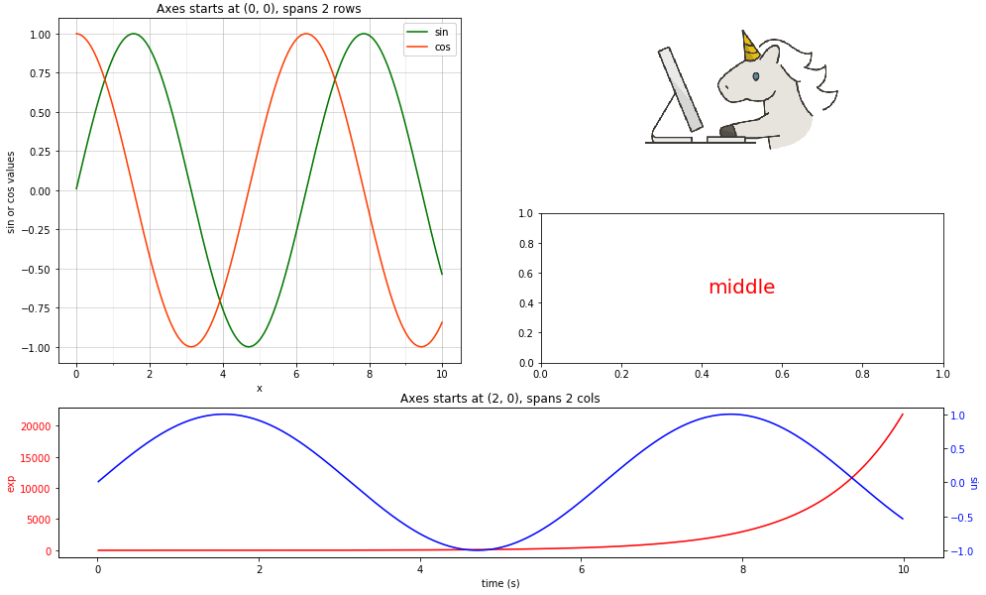
subplot2grid() creates an axis at specific location inside a regular grid, the first subplot on the left spans 2 rows and the subplot at the bottom spans 2 columns. First parameter shape is a sequence of 2 integers, it is the shape of grid in which to place axis, first entry is number of rows, second entry is number of columns. loc is also a sequence of 2 ints, which describes location to place axis within grid, first entry is row number, second entry is column number. rowspan and colspan is a integer, they are the number of rows/columns for the axis to span to the right/downwards.
set_xticks() helps to set the x ticks with list of ticks for a subplot, similar as plt.xticks() , first parameter ticks is a list of x-axis tick locations; if minor=False sets major ticks, if True sets minor ticks.
plt.grid() sets the axes grids on or off, which can be ‘major’ (default), ‘minor’, or ‘both’ to control whether major tick grids, minor tick grids, or both are affected, alpha specifies the transparency of the grid (float, 0.0 transparent through 1.0 opaque). You can also fill parameter axis to control which set of gridlines are drawn.
legend() places a legend on the axes. When you do not pass in any extra arguments, the elements to be added to the legend are automatically determined. To make a legend for lines which already exist on the axes, simply call this function with an iterable of strings, one for each legend item. For full control of which artists have a legend entry, you can pass an iterable of legend artists followed by an iterable of legend labels respectively.
You might find that in the bottom plot, there are two different axes that share the same x axis (more details). Function axes.twinx() helps us to make a second axes that shares the x-axis. The new axes will overlay ax (or the current axes if ax is None). The ticks for ax2 will be placed on the right, and the ax2 instance is returned.
If we don’t need to span rows/columns, like the plot on the right side, we only need to specify the location of the graph with [row, column], so here with axarr[1, 1] .
Ticks in Matplotlib
Matplotlib provides the libraries and functions to modify tick labels on a figure. When we plot data on a graph, tick labels are generated by default. Still, sometimes there is some need for customization, like tick labels are not scaled according to the graph, color is not appropriate, labels overlapping with each other, etc. Tick labels can be customized according to the need of the user, like font size, color, rotation, visibility, etc. There are many ways to customize the tick labels like matplotlib.pyplot.xticks() , ax.set_xticklabels() , matplotlib.pyplot.setp() and ax.tick_params() . We will discuss all the functions to understand better the concept and which function to use according to the scenario.
Scope
- In this article, we will discuss tick labels in matplotlib.
- We will discuss the properties of the tick labels in matplotlib like color, font size, rotation, visibility, and font-weight.
- We can customize the properties of tick labels using these functions matplotlib.pyplot.xticks() , ax.set_xticklabels() , matplotlib.pyplot.setp() and ax.tick_params() .
- Finally, we shall discuss some examples to understand the topic better.
Ticks in Matplotlib
Ticks are the value on the axis to show the coordinates on the graph. It is the value on the axes by which we can visualize where will a specific coordinate lie on a graph. Whenever we plot a graph, ticks values are adjusted according to the data, which is sufficient in common situations, but it is not ideal whenever we plot data on a graph. So we will discuss the ticks in matplotlib and how we can customize it.
How to Add Ticks in Matplotlib?
By default, ticks are generated automatically when plotting data in matplotlib. First, we discuss the parameter and syntax of the function related to ticks.
Syntax:
- matplotlib.pyplot.xticks(ticks=None, labels=None, **kwargs)
- Axes.set_xticklabels(labels, *, fontdict=None, minor=False, **kwargs)
- Axes.tick_params(axis='both', **kwargs)
Parameters:
matplotlib.pyplot.xticks()
- ticks (optional parameter): The list of tick location
- label (optional parameter): The labels to place at a given ticks location.
- **kwargs: Text properties can be used to control the appearance of the labels.
Axes.set_xticklabels()
- label (optional parameter): The labels to place at a given ticks location.
- fontdict (optional parameter): A dictionary controls the appearance of the tick labels.
- minor (optional parameter): Whether to set the minor tick labels rather than the major ones.
- kwargs: Text properties can be used to control the appearance of the labels.
Axes.tick_params()
- axis: The axis to which parameters are applied
- kwargs: Text properties can be used to control the appearance of the labels.
How to Customize Axis Tick Labels in Matplotlib?
Sometimes we need to change the properties of the tick labels on the axis to make it more readable and clear, like we can change color, font size, etc.
Font Size of Tick Labels
We can change the font size of the tick labels by using these functions.
- matplotlib.pyplot.xticks(fontsize= )
- ax.set_xticklabels(xlabels, Fontsize= )
- matplotlib.pyplot.setp(ax.get_xticklabels(), Fontsize=)
- ax.tick_params(axis='x', Labelsize= )
Example1: Changing tick labels fontsize using xticks()
Output:
Example2: Changing tick labels fontsize using set_xticklabels()
Output:
Example3: Changing tick labels font size using setp()
Output:
Example4: Changing tick labels fontsize using tick_params()
Output:
Color of Tick Labels
We can also change the color of the tick labels. There are three ways to do it.
- matplotlib.pyplot.xticks(color= )
- ax.set_xticklabels(xlabels, color= )
- ax.tick_params(axis='x', colors= )
Example1: Changing color of tick labels using sticks()
Output:
Example2: Changing tick labels color using set_xticklabels()
Output:
Example3: Changing tick labels color using tick_params()
Output:
Controlling Tick Spacing
Ticks are generated automatically when we plot data in matplotlib, but we can also change the frequency of the tick labels using the functions xticks() and yticks() .
Example:
Output:
Controlling Tick Labeling
We can also label the ticks. Here is an example.
Output:
Rotation of Tick Labels
Sometimes tick labels overlap, so we can rotate them to make them more readable. There are three functions to do it.
- matplotlib.pyplot.xticks() and matplotlib.pyplot.yticks()
- matplotlib.pyplot.subplot().set_xticklabels() and matplotlib.pyplot.subplot().set_yticklabels()
- matplotlib.pyplot.tick_params()
Example1: Rotating the tick labels using xticks() and yticks()
Output:
Example 2: Rotating the tick labels using set_xticklabels()
Output:
Example3: Rotating the tick labels using tick_params
Output:
Dates as Tick Labels
We can also use the date as a tick label on x-axis. matplotlib.pyplot.plot_date() is the function to plot date on graph. The autofmt xdate() is used to format the date on x-axis.
Example:
Output:
Labelpad of Tick Labels
By adding the pad parameter, we can change the spacing between the axis and the tick labels using the tick_params() function. Example:
Output:
Setting Visibility of Tick Labels
We can change the visibility of tick and axis labels in the graph. There are three ways to do it.
- Using NullLocator() function
- Using set_visibile() function
- Passing empty list in xtick() and yticks() function
Example1: Using NullLocator() function
Output:
Example2: Using set_visibile() function This function also removes grid and axis labels along with tick labels
Output:
Example3: Passing empty list in xtick() and yticks() function
Output:
Making the Tick Labels Bold
We can be also bold the tick labels. There are two ways to do it.
- By using xticks() and yticks() functions.
- By using set_xticklabels() and set_yticklabels() functions.
Example1: By using xticks() and yticks() functions
Output:
Example2: By using xticklabels() and yticklabels() functions.
Output:
Overlapping in Tick Labels
When we plot data in a graph, sometimes the label of the x or y-axis overlaps. To make the graph look neat, we have to format the labels. We can use setp() function to rotate and align the labels to avoid overlapping.
Example1: Before using the function:
Output:
Example 2: Using the function setp() to adjust the x-axis labels
Output:
How to Set the Number of Ticks?
We can also specify the number of ticks on the axis. There is a function in pyplot by which we can change the number of ticks.