numpy.hstack#
This is equivalent to concatenation along the second axis, except for 1-D arrays where it concatenates along the first axis. Rebuilds arrays divided by hsplit .
This function makes most sense for arrays with up to 3 dimensions. For instance, for pixel-data with a height (first axis), width (second axis), and r/g/b channels (third axis). The functions concatenate , stack and block provide more general stacking and concatenation operations.
Parameters : tup sequence of ndarrays
The arrays must have the same shape along all but the second axis, except 1-D arrays which can be any length.
dtype str or dtype
If provided, the destination array will have this dtype. Cannot be provided together with out.
.. versionadded:: 1.24 casting <‘no’, ‘equiv’, ‘safe’, ‘same_kind’, ‘unsafe’>, optional
Controls what kind of data casting may occur. Defaults to ‘same_kind’.
.. versionadded:: 1.24 Returns : stacked ndarray
Python NumPy Stack with Examples
In this Python tutorial, we will learn how to stack Numpy array by using Python. Also, we will cover these topics on Python NumPy Stack.
- Python Numpy stack 2d array
- Python NumPy save images
- Python NumPy stack axis
- Python NumPy stack rows
- Python NumPy stack matrix
- Python NumPy stack columns
- Python NumPy horizontal stack
- Python stack list into numpy array
- Python numpy vstack hstack
- Python numpy column_stack
Table of Contents
Python NumPy stack
- In this section, we will discuss how to use stack() function in NumPy Python.
- To perform this particular task we are going to use the stack() method. In Python, the stack() method is used to combine a sequence of numpy arrays along with a given axis.
Syntax:
Here is the Syntax of numpy.stack() method
- It consists of few parameters
- arrays: This is an input array and the sequence of array must be same shape.
- axis: This parameter signifies the index of the axis in the dimension of the result.
Example:
Let’s take an example and check how to use the stack() function in Python
Source Code:
Here is the Screenshot of the following given code

Python Numpy stack 2d array
- In this Program, we will discuss how to combine 2d arrays by using stack() method in Python.
- To perform this particular task we are going to use the np.stack() method. In Python, this function is used to combine a sequence of NumPy arrays along with a specified axis.
Let’s take an example and understand how to use the stack() function in Python
Source Code:
In the above code first, we will import a numpy library and then create a numpy array by using the np.array() method.
Now declare a variable ‘b’ and assign np.stack() function to it. Once you will print ‘b’ then the output will display the joining of given arrays with the same shape.
Here is the output of the following given code

How to join 2d arrays in NumPy Python
In Python, the append() function is used to add an element to the end of the array or we can say to combine two existing arrays and it will return a new array.
Syntax:
Here is the Syntax of np.append() function
Example:
Here is the implementation of the following given code

As you can see in the Screenshot the output displays the new array
Combine 2d array in Python NumPy
By using the np.tile() method we can do this task. In Python, the np.tile() method is used to repeat the number of items available in an array.
For example, we have an array that contains 3 elements [7,8,9] then use the np.tile() method and pass the input array which you want to operate along with the number that represents the number of times to repeat the array.
Syntax:
Here is the Syntax of np.tile() method
Example:
Here is the output of the following given code

Python NumPy save images
- Here we can see how to save images in NumPy Python.
- To do this task we are going to use the matplotlib library and this module provides a function imsave() and this method is used to save the numpy array as an image file.
Syntax:
Here is the Syntax of matplotlib.pyplot.imsave()
Here is the Screenshot of the following given code


Python NumPy stack axis
- In this section we will discuss how to use the axis in stack NumPy stack() function by using Python.
- In this example, the axis parameter signifies the index of the new axis. In the np.stack() function if axis=0 then it will represent the first dimension and if we want to check the last dimension then we are going to set the axis parameter =-1.
- By default, it is an optional parameter and indicates the axis in the resultant array.
Source Code:
In the above code first, we have imported a numpy library and then create an array by using the np.array() method.
Now set the axis=0,1 in np.stack() method for joining the array. Once you will print ‘new_output’ and ‘new_result’ then the output will display the new 2-dimension array.
You can refer to the below Screenshot

Python NumPy stack rows
- In this Program, we will discuss how to stack rows in NumPy Python.
- In Python, the vstack() function is used to join the sequence of arrays (row-wise). In this method, it takes the array as an input parameter in the form of a tuple along with a vertical axis.
Syntax:
Here is the Syntax of vstack() method
Let’s take an example and check the implementation of the NumPy vstack() method
Source Code:
In the above code, we stacked two arrays rows-wise. To do this task first we imported the numpy library and then initialize two numpy arrays in variable ‘array1’ and ‘array2’. After that, we have applied the np.vstack() method and it will make a new numpy array.
Here is the Screenshot of the following given code

Combine row-wise elements in NumPy Python
By using the np.row_stack() method we can perform this particular task and this function is used to stack the array row-wise by using Python.
Syntax:
Here is the Syntax of numpy.row_stack() method
Example:
You can refer to the below Screenshot

Python NumPy stack matrix
- Let us see how to combine a matrix element in NumPy Python.
- In this example we will create an array by using the np.array() method and then apply the np.stack() method in it. Once you will print ‘z’ then the output will display a new numpy matrix.
Example:
Here is the execution of the following given code

Python NumPy stack columns
- In this section, we will discuss how to stack array column-wise by using NumPy Python.
- To perform this particular task we are going to use the np.hstack() method and this function is used to join the sequence of arrays column-wise or we can say horizontally.
- In this method inside of the parenthesis, we can easily provide the arrays that we want to combine together. For example, suppose you have two arrays ‘new_arr’ and ‘new_arr2’. Now you want to combine horizontally then you can easily use the np.hstack() function.
Syntax:
Here is the Syntax of hstack() function
- It consists of only one parameters
- tup: This parameter indicates the collection of numpy arrays and it is provide as an input.
Example:
Let’s take an example and understand the working of the hstack() function
Source Code:
In the above code, we stacked three input arrays column-wise. To do this task first we import the numpy library and then initialize three numpy arrays ‘new_arr1’, ‘new_arr2’ and ‘new_arr3’. After that, we are going to use the np.hstack() function and get the result with the same shape.
Here is the Screenshot of the following given code

Stack array horizontally by using NumPy Python
By using numpy.column_stack() function we can solve this problem. In Python, this function is used to stack the arrays horizontally.
Example:
Here is the output of the following given code

Python NumPy horizontal stack
- In this Program, we will discuss how to use the np.hstack() function in Python.
- In Python, the hstack() function is used to join the sequences of numpy arrays column-wise or horizontally and it will return a single dimension array that contains all the elements from given input arrays.
Syntax:
Here is the Syntax of np.hstack() method
Example:
Let’s take an example and understand the working of horizontally stack numpy arrays
Source Code:
In the above code first, we imported a numpy array and then initialize an array by using the np.array() function.
Now declare a variable ‘new_output’ and assign np.column_stack() function. Once you will print ‘new_output’ then the result will display a new array.
You can refer to the below Screenshot

Python stack list into numpy array
- Let us see how to convert the list into a numpy array by using Python.
- To perform this particular task we are going to apply the np.asarray() function. In Python, this function is used to convert the data into a numpy array and the data can be in the form of lists.
- This function is available in the NumPy module package and always returns a ndarray.
Syntax:
Here is the Syntax of numpy.asarray() method
- It consists of a few parameters
- a: This parameter indicates the input data that we want to convert into a numpy array.
- dtype: By default it takes none value and it indicates the data type of each element of the array.
- order: This is also a optional parameter and indicate the memory representation that is by-default ‘C’.
Example:
Let’s take an example and understand the working of np.asarray() function.
In the above code, we imported a numpy library and then initialize a list []. Now we converted the list with a numpy array by using the np.asarray() method.
Once you will print the ‘result’ and ‘output’ then the output will display the numpy array. After that, we used the np.stack() method and pass ‘result’ and ‘output’ as an argument.
Here is the Screenshot of the following given code

As you can see in the Screenshot the output displays the new numpy array
Python numpy vstack hstack
- In this section, we will discuss the combination of vstack and hstack functions by using NumPy Python.
- These functions are available in the numpy module package and it will help the user to combine numpy arrays horizontally and vertically both along with the axis.
Example:
In the above code we have imported a numpy library and then initialize an array by using np.array() method .
Now use the ‘np.hstack’ and ‘np.vstack’ method for combining the elements vertically and horizontally in NumPy array.
You can refer to the below Screenshot

Python numpy column_stack
- In this Program, we will discuss how to use np.column_stack() function in NumPy Python.
- In Python, this function is used to merge the column elements or horizontally in the NumPy array. It always takes a sequence of the 1-dimensional array and joins them as columns to create a single 2-dimensional array.
Syntax:
Here is the Syntax of np.column_stack() function
Example:
Let’s take an example and understand the working of numpy.column_stack() function
Source Code:
Here is the execution of the following given code

You may also like the following Python NumPy tutorials:
In this Python tutorial, we will learn how to stack Numpy array by using Python. Also, we will cover these topics.
- Python Numpy stack 2d array
- Python NumPy save images
- Python NumPy stack axis
- Python NumPy stack rows
- Python NumPy stack matrix
- Python NumPy stack columns
- Python NumPy horizontal stack
- Python stack list into numpy array
- Python numpy vstack hstack
- Python numpy column_stack

I am Bijay Kumar, a Microsoft MVP in SharePoint. Apart from SharePoint, I started working on Python, Machine learning, and artificial intelligence for the last 5 years. During this time I got expertise in various Python libraries also like Tkinter, Pandas, NumPy, Turtle, Django, Matplotlib, Tensorflow, Scipy, Scikit-Learn, etc… for various clients in the United States, Canada, the United Kingdom, Australia, New Zealand, etc. Check out my profile.
How To Concatenate Arrays in NumPy?

Often you may have two or more NumPY arrays and want to concatenate/join/merge them into a single array. Python offers multiple options to join/concatenate NumPy arrays.
Common operations include given two 2d-arrays, how can we concatenate them row wise or column wise. NumPy’s concatenate function allows you to concatenate two arrays either by rows or by columns. Let us see a couple of examples of NumPy’s concatenate function.
Let us first import the NumPy package.
Let us create a NumPy array using arange function in NumPy. The 1d-array starts at 0 and ends at 8
We can use NumPy’s reshape function to convert the 1d-array to 2d-array of dimension 3×3, 3 rows and 3 columns. NumPy’s reshape function takes a tuple as input.
Let us create second 2d-array by using arange and reshape functions. The second 2d-array starts at 10 and ends at 18
NumPy concatenate
NumPy’s concatenate function can be used to concatenate two arrays either row-wise or column-wise. Concatenate function can take two or more arrays of the same shape and by default it concatenates row-wise i.e. axis=0. The resulting array after row-wise concatenation is of the shape 6 x 3, i.e. 6 rows and 3 columns.
How To Concatenate 2 NumPy Arrays Row-wise?
How To Concatenate 2 NumPy Arrays Column-wise?
We can also concatenate 2 NumPy arrays by column-wise by specifying axis=1. Now the resulting array is a wide matrix with more columns than rows; in this example, 3 rows and 6 columns.
How To Concatenate more than 2 NumPy Arrays Row-wise?
NumPy’s concatenate function can be used with more than 2 arrays. Here is an example of concatenating 3 NumPy arrays row-wise. We specify the three arrays that we want to concatenate as a tuple.
In addition to the concatenate function, NumPy also offers two convenient functions hstack and vstack to stack/combine arrays horizontally or vertically.
Both hstack and vstack, under the hood calls on concatenate with axis =1 and axis=0 options.
Here are the examples of using hstack and vstack.
NumPy vstack example
NumPy’s vstack stacks arrays in sequence vertically i.e. row wise. And the result is the same as using concatenate with axis=0.
Another common use of Numpy’s hstack is to use it to combine two 1d-numpy arrays to one 2d-numpy array. For example, if we have two one-dimensional arrays,
We can use Numpy’s vstack to create 2d-array of size 2×4
Similarly, with transpose we get 2d-array of 4×2 using vstack.
NumPy hstack example
NumPy’s hstack stacks arrays horizontally i.e. column wise. And the result is the same as using concatenate with axis=1.
How to Concatenate Multiple 1d-Arrays?
NumPy’s concatenate function can also be used to concatenate more than two numpy arrays. Here is an example, where we have three 1d-numpy arrays and we concatenate the three arrays in to a single 1d-array.
Reshape and stack multi-dimensional arrays in Python numpy
Get source code for this RMarkdown script here. Download the cheatsheet here.
This tutorial is also available on Medium, Towards Data Science.
Consider being a patron and supporting my work?
Donate and become a patron: If you find value in what I do and have learned something from my site, please consider becoming a patron. It takes me many hours to research, learn, and put together tutorials. Your support really matters.
How does the numpy reshape() method reshape arrays? Have you struggled understanding how it works or have you ever been confused? This tutorial will walk you through reshaping in numpy.
Use reticulate R package to run Python in R
Create a Python numpy array
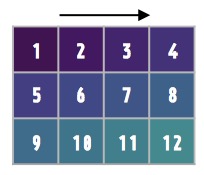
Use np.arange() to generate a numpy array containing a sequence of numbers from 1 to 12. See documentation here.
 1D numpy array
Reshape with reshape() method
Use reshape() method to reshape our a1 array to a 3 by 4 dimensional array. Let’s use 3_4 to refer to it dimensions: 3 is the 0th dimension (axis) and 4 is the 1st dimension (axis) (note that Python indexing begins at 0). See documentation here.
 reshaping
If you want numpy to automatically determine what size/length a particular dimension should be, specify the dimension as -1 for that dimension.
Reshape along different dimensions
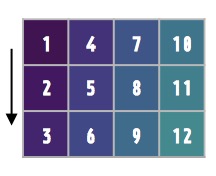
By default, reshape() reshapes the array along the 0th dimension (row). This behavior can be changed via the order=’C’ parameter (default value is ‘C’ ). See documentation for more information.
We can reshape along the 1st dimension (column) by specifying order=’F’ . For those familiar with MATLAB, MATLAB uses order=’F’ .
 reshaping
Test: a1 is a 1D array—it has only 1 dimension, even though you might think it’s dimension should be 1_12 (1 row by 12 columns). To convert to a 1_12 array, use reshape.
Flatten/ravel to 1D arrays with ravel()
The ravel() method lets you convert multi-dimensional arrays to 1D arrays (see docs here). Our 2D array (3_4) will be flattened or raveled such that they become a 1D array with 12 elements.
If you don’t specify any parameters, ravel() will flatten/ravel our 2D array along the rows (0th dimension/axis). That is, row 0 [1, 2, 3, 4] + row 1 [5, 6, 7, 8] + row 2 [9, 10, 11, 12].
If you want to flatten/ravel along the columns (1st dimension), use the order parameter.
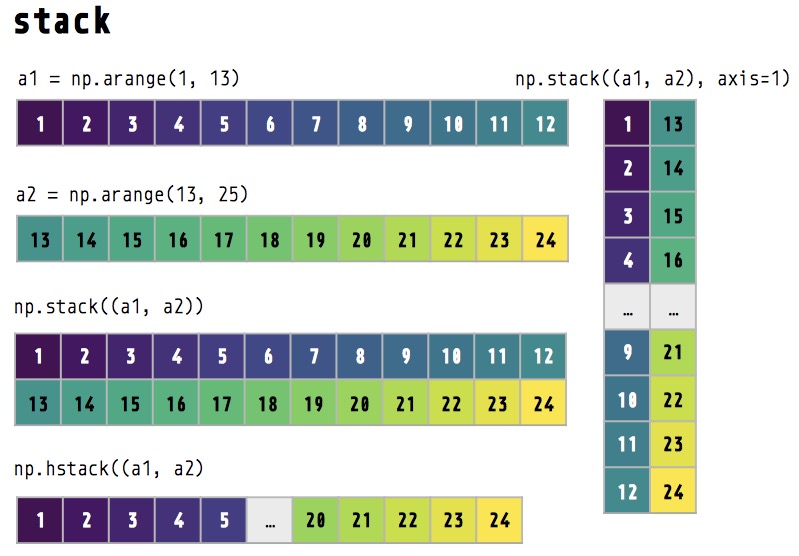
Concatenate/stack arrays with np.stack() and np.hstack()
 staclomg
Create two 1D arrays
Use np.stack() to concatenate/stack arrays
By default, np.stack() stacks arrays along the 0th dimension (rows) (parameter axis=0 ). See docs for more info.
Stack along the 1st dimension ( axis=1 )
Concatenate as a long 1D array with np.hstack() (stack horizontally)
Create multi-dimensional array (3D)
Create two different 3 by 4 arrays.
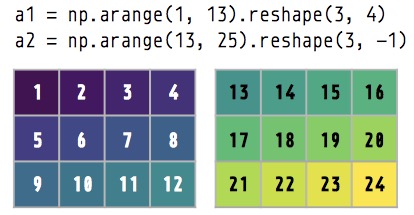 Two 2D arrays
Create a 3D array by stacking the arrays along different axes/dimensions
Inspect the 3D arrays. Note the three 3D arrays have different shapes.
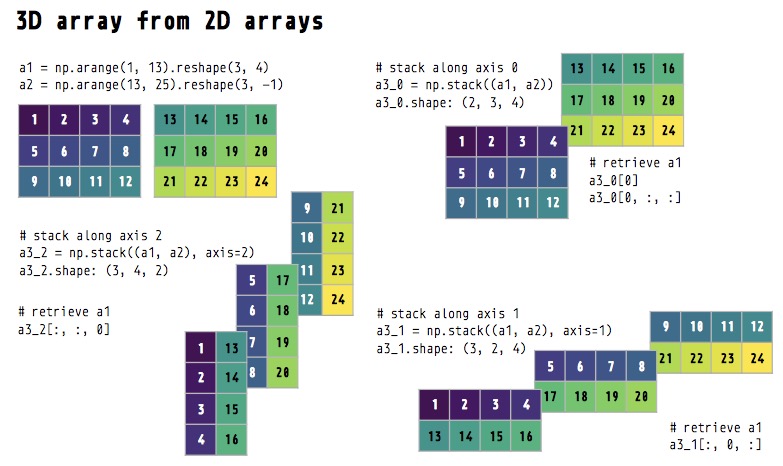 Create 3D array from 2D arrays
Because the three 3D arrays have been created by stacking two arrays along different dimensions, if we want to retrieve the original two arrays from these 3D arrays, we’ll have to subset along the correct dimension/axis.
Reminder of what a1 array looks like before we retrieve it from our 3D arrays.
Retrieve a1 from 0th dimension. Note the
Retrieve a1 from 1st dimension
Retrieve a1 from 2nd dimension
Flatten multidimensional arrays
We can also flatten multi-dimensional arrays with ravel() .
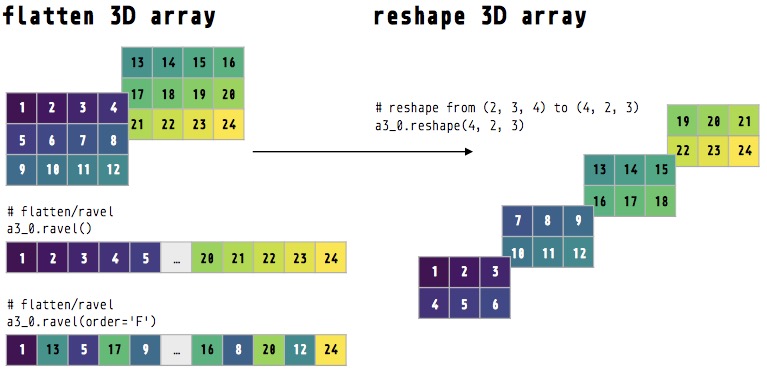 Flatten and ravel multidimensional arrays
Ravel row by row (default order=’C’ ) to 1D array
Ravel column by column ( order=’F’ ) to 1D array
Reshape multidimensional arrays
We can also use reshape() to reshape multi-dimensional arrays.
Reshape row by row (default order=’C’ ) to 2D array
Reshape row by row ( order=F ) to 2D array
Reshape row by row (default order=’C’ ) to 3D array
Support my work
Comment on this article Share:
Corrections
If you see mistakes or want to suggest changes, please create an issue on the source repository.