Ввод и вывод данных
Переменная — это именованный контейнер для заданного значения.
# Пример создания переменных
age = 19
name = ‘Ivan’
isActive = True
name = ‘Petr’
Name = ‘Ivan’
# name и Name — это разные переменные
# Имена переменных не могут начинаться с цифры!
В Python есть 4 примитивных типа данных:
# int (целые числа)
age = 18
# float (дробные числа)
fraction = 2.5
# str (строки)
fruit = ‘apple’
# bool (правда или ложь)
isReady = True # всего два значения: True и False
Мы можем преобразовывать один тип данных в другой с помощью одноименных функций. Например, число может стать строкой, строка — числом, дробное число — целым.
age = ’22’ # str -> ’22’
age = int (age) # int -> 22
age = float (age) # float -> 22.0
age = bool (age) # bool -> True
Функция print() выводит данные на экран.
name = ‘Alexey’
# В скобках записываются переданные в функцию параметры
print (name)
Функция print() может принимать несколько входных параметров.
Каждый print() выводит данные на новой строке. По умолчанию завершающий символ строки равен символу новой строки (\n).
print ( ‘Hello’ )
print ( ‘world’ )
# Вывод
>> Hello
>> world
Завершающий символ строки в функции print() можно изменять.
print ( ‘Hello’ , end = ‘ ‘ )
print ( ‘world’ )
# Вывод
>> Hello world
Функция input() принимает пользовательский ввод данных.
name = input ()
print ( ‘Hello ‘ + name)
# После запуска скрипта Python будет ожидать ввода данных
Функция input может принимать всего лишь один аргумент — строку, которая выведется перед входной строкой.
name = input ( ‘Enter your name: ‘ )
print ( ‘Hello, ‘ + name)
Данные, полученные с помощью функции input(), имеют строковый тип данных (str).
Строки можно складывать друг с другом, такое сложение называется их конкатенацией или объединением.
# Сумма двух строчных чисел
number1 = input ( ‘Введите число: ‘ )
number2 = input ( ‘Введите число: ‘ )
print (number1 + number2)
Преобразуем строковый тип в целое число (str -> int).
# Исправленная сумма двух чисел
number1 = int ( input ( ‘Введите число: ‘ ))
number2 = int ( input ( ‘Введите число: ‘ ))
print (number1 + number2)
Примеры
# Произведение двух введенных чисел
a = int ( input ( ‘Введите число: ‘ ))
b = int ( input ( ‘Введите число: ‘ ))
print (a * b)
# Приветствие пользователя по его имени
firstname = input ( ‘Введите свое имя: ‘ ) # здесь приводить к типу int не нужно
lastname = input ( ‘Введите свою фамилию: ‘ )
print ( ‘Здравствуйте, ‘ + firstname + ‘ ‘ + lastname) # не забудьте про пробел между словами
# Ввод:
>> Иван
>> Иванов
# Вывод:
>> Здравствуйте, Иван Иванов
# Операция % позволяет получить остаток от деления
print ( 10 % 2 ) # 0, так как 10 делится на 2 нацело
print ( 10 % 3 ) # 1, остаток равен 1
print ( 10 % 4 ) # 2, остаток равен 2
4. Деление нацело
# Операция // позволяет получить целую часть от деления
print ( 10 // 2 ) # 5
print ( 10 // 3 ) # 3
print ( 10 // 4 ) # 2
Решение задач
Посчитайте сумму трех введенных целых чисел
Пользователь вводит стороны прямоугольника, выведите его площадь
Пользователь вводит стороны прямоугольника, выведите его периметр
4. Площадь круга
Пользователь вводит радиус круга, выведите площадь круга
5. Сумма дробных
Посчитайте сумму трех введенных дробных чисел.
6. Школьники и яблоки
n школьников делят k яблок поровну, неделящийся остаток остается в корзинке. Сколько яблок достанется каждому школьнику? Сколько яблок останется в корзинке?
# Ввод:
>> 10
>> 3
# Вывод:
>> 3 # каждому
>> 1 # останется
Name input python что делает
Для вывода информации на консоль предназначена встроенная функция print() . При вызове этой функции ей в скобках передается выводимое значение:
Данный код выведет нам на консоль строку «Hello METANIT.COM».
Отличительной особенностью этой функции является то, что по умолчанию она выводит значение на отдельной строке. Например:
Здесь три вызова функции print() выводят некоторое сообщение. Причем при выводе на консоль каждое сообщение будет размещаться на отдельной строке:
Такое поведение не всегда удобно. Например, мы хотим, чтобы все значения выводились на одной строке. Для этого нам надо настроить поведение функции с помощью параметра end . Этот параметр задает символы, которые добавляются в конце к выводимой строке и . При применении параметра end вызов функции print() выглядит следующим образом:
По умолчанию end равен символу «\n» , который задает перевод на следующую строку. Собственно поэтому функция print по умолчанию выводит передаваемое ей значение на отдельной строке.
Теперь определим, чтобы функция не делала перевод на следующую строку, а выводила значение на той же строке:
То есть теперь выводимые значения будут разделяться пробелом:
Причем это может быть не один символ, а набор символов:
В данном случае выводимые сообщения будут отделяться символами » and » :
Консольный ввод
Наряду с выводом на консоль мы можем получать ввод пользователя с консоли, получать вводимые данные. Для этого в Python определена функция input() . В эту функцию передается приглашение к вводу. А результат ввода мы можем сохранить в переменную. Например, определим код для ввода пользователем имени:
В данном случае в функцию input() передается приглашение к вводу в виде строки «Введите свое имя: «. Результат функции — результат ввода пользователя передается в переменную name . Затем мы можем вывести значение этой переменной на консоль с помощью функции print() . Пример работы кода:
Еще пример с вводом нескольких значений:
Пример работы программы:
Стоит учитывать, что все введенные значения рассматриваются как значения типа str , то есть строки. И даже если мы вводим число, как в втором случае в коде выше, то Python все равно будет рассматривать введенное значение как строку, а не как число.
Введение: объекты, переменные, основы ввода и вывода данных
Интерпретатор
Программа, реализующая построчный анализ, обработку и выполнение исходного кода программы.
IDLE (читается — айдл)
(Integrated Development and Learning Environment) — это интегрированная среда разработки и обучения на языке Python.
Данные в языке Python представлены в форме объектов.
Каждый объект имеет идентификатор, тип и значение.
Литерал
Форма записи для «фиксированного» представления значения объекта. Примеры литералов: 42 , 4.2 , "Hello, World!" .
Идентификатор
Однозначно идентифицирует объект. Его можно считать адресом области в памяти компьютера, где хранится объект.
Тип данных
Тип определяет возможные значения и их смысл, операции, а также способы хранения значений типа.
Переменная
Именованная ссылка на конкретный объект.
Оператор присваивания связывает переменную и объект. Пример:
Первую привязку переменной к объекту в программе называем определением и инициализацией переменной.
Базовые конструкции языка
Вывод на экран: print
Функция print позволяет вывести любое сообщение на экран. Для этого нужно в скобках указать сообщение или переменную с данными:
В результате будет выведено 2 приветствия мира на разных языка
Также можно передавать несколько параметров, чтобы вевести их друг за другом в одной строке:
Переменные
Переменные позволяют записывать в себя значение, чтобы после этого им можно было пользоваться в любом месте программы:
Полезным свойством является возможность изменения значения в одном месте, чтобы изменить поведение всей программы
Ввод данных: input
Функция input используется для получения данных от пользователя:
Чтобы пользователь знал, что его просят ввести, можно предоставить строку приглашения:
Если хотим работать с данными как с числами, нужно использовать функцию int :
Арифметические действия
В питоне можно производить арифметические вычисления:
Цикл for
Цикл позволяет многократно повторять какое-либо действие:
В данном случае мы просим 4 раза вывести первое сообщение на экран и после этого вевести второе сообщение. Результат будет следующим:
Turtle
Черепашья графика впервые появилась вместе с языком Logo (1967 г.) и являлась его частью. Суть заключается в наличие исполнителя черепашки, который может передвигаться в разных направлениях и оставлять за собой след
Пример рисования треугольника:
Для создания сложных фигур можно использовать циклы:
Перемещение черепашки
forward ( n ) ¶ fd ( n ) 
Перемещеает черепашку на n пикселей вперёд
backward ( n ) ¶ bk ( n ) 
Перемещеает черепашку на n пикселей назад
right ( n ) ¶ rt ( n ) 
Поворачивает черепашку на n градусов вправо
left ( n ) ¶ lt ( n ) 
Поворачивает черепашку на n градусов влево
done ( ) 
Говорит не закрывать окно после завершения рисования
Управление пером
down ( ) 
Опускает перо, чтобы черепашка при передвижении оставляла след
up ( ) 
Поднимает перо
width ( n ) 
Устанавливает ширину следа от пера
Настройка цветов
color ( pen_color ) 
Устанавливает цвет следа пера в соответсвии с pen_color
bgcolor ( s ) 
Устанавливает цвет полотна (фона)
Задачи
Напишите программу, которая будет говорить, сколько вам будет лет в следующем году. Она должна получить на вход ваш текущий возраст
Написать алгоритм для черепашки, который будет рисовать правильный многоугольник. На вход программа должна принимать сколько сторон должно быть у фигуры.
Написать программу для рисования круга
Домашнее задание
Установить Python на домашний ПК. Официальный сайт: https://www.python.org/
Реализовать приложение для вычисления периметра и площади прямоугольника. Приложение запрашивает у пользователя два целых числа — длины сторон прямоугольника. Пример работы приложения:
Python Input: Take Input from User
In Python, Using the input() function, we take input from a user, and using the print() function, we display output on the screen. Using the input() function, users can give any information to the application in the strings or numbers format.
After reading this article, you will learn:
- Input and output in Python
- How to get input from the user, files, and display output on the screen, console, or write it into the file.
- Take integer, float, character, and string input from a user.
- Convert the user input to a different data type.
- Command-line input
- How to format output.
Also, Solve
Table of contents
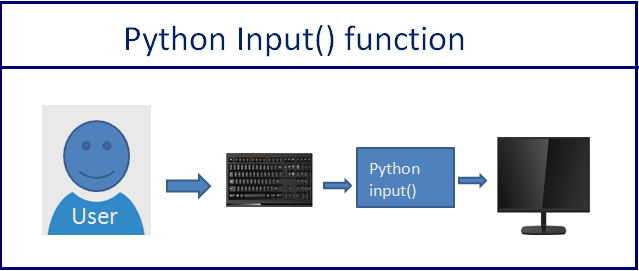
Python Input() function
In Python 3, we have the following two built-in functions to handle input from a user and system.
- input(prompt) : To accept input from a user.
- print() : To display output on the console/screen.
In Python 2,we can use the following two functions:
- input([prompt])
- raw_input([prompt])
The input() function reads a line entered on a console or screen by an input device such as a keyboard, converts it into a string. As a new developer, It is essential to understand what is input in Python.
What is the input?
The input is a value provided by the system or user. For example, suppose you want to calculate the addition of two numbers on the calculator, you need to provide two numbers to the calculator. In that case, those two number is nothing but an input provided by the user to a calculator program.
There are different types of input devices we can use to provide data to application. For example: –
- Stems from the keyboard: User entered some value using a keyboard.
- Using mouse click or movement: The user clicked on the radio button or some drop-down list and chosen an option from it using mouse.
In Python, there are various ways for reading input from the user from the command line environment or through the user interface. In both cases, the user is sending information using the keyboard or mouse.
Python Example to Accept Input From a User
Let see how to accept employee information from a user.
- First, ask employee name, salary, and company name from the user
- Next, we will assign the input provided by the user to the variables
- Finally, we will use the print() function to display those variables on the screen.
Output:
How input() Function Works
syntax
- The prompt argument is optional. The prompt argument is used to display a message to the user. For example, the prompt is, “Please enter your name.”
- When the input() function executes, the program waits until a user enters some value.
- Next, the user enters some value on the screen using a keyboard.
- Finally, The input() function reads a value from the screen, converts it into a string, and returns it to the calling program.
Note: If you enter an integer or float number, still, it will convert it into a string. If you want to number input or input in other data types, you need to perform type conversion on the input value.
Let’s understand this with an example.
Example to check data type of input value
Output:
As you know whatever you enter as input, the input() function always converts it into a string.
Take an Integer Number as input from User
Let’s see how to accept an integer value from a user in Python. We need to convert an input string value into an integer using an int() function.
Example:
Output:
Note: As you can see, we explicitly added a cast of an integer type to an input function to convert an input value to the integer type.
Now if you print the type of first_number you should get integer type. type(first_number ) will return <class ‘int’>
Take Float Number as a Input from User
Same as integer, we need to convert user input to the float number using the float() function
Output:
Practice Problem
Accept one integer and one float number from the user and calculate the multiplication of both the numbers.
Get Multiple inputs From a User in One Line
In Python, It is possible to get multiple values from the user in one line. We can accept two or three values from the user.
For example, in a single execution of the input() function, we can ask the user his/her name, age, and phone number and store it in three different variables.
Let’ see how to do this.
- Take each input separated by space
- Split input string using split() get the value of individual input
Output:
Also, you can take the list as input from the user to get and store multiple values at a time.
Accept Multiline input From a User
As you know, the input() function does not allow the user to provide values separated by a new line.
If the user tries to enter multiline input, it reads only the first line. Because whenever the user presses the enter key, the input function reads information provided by the user and stops execution.
Let’s see how to gets multiple line input.
We can use a loop. In each iteration of the loop, we can get input strings from the user and join them. You can also concatenate each input string using the + operator separated by newline ( \n ).
Example:
Output:
Python Input() vs raw_input()
- The input() function works differently between Python 3 and Python 2.
- In Python 2, we can use both the input() and raw_input() function to accept user input.
- In Python 3, the raw_input() function of Python 2 is renamed to input() and the original input() function is removed.
The difference between the input() and raw_input() functions is relevant only when using Python 2.
- The main difference between those two functions is input() function automatically converts user input to the appropriate type. i.e., If a user-entered string input() function converts it into a string, and if a user entered a number, it converts to an integer.
- The raw_input() convert every user input to a string.
Let’s see how to use raw_input() in Python 2.
Example 1: Python 2 raw_input() function to take input from a user
Output:
Note: As you can see, raw_input() converted all user values to string type.
Example 2: Python 2 input() function to take input from a user
Output:
Note: As you can see, input() converted all user values to appropriate data type.
Note: To get the this behavior of input() in Python 3, use eval(input(‘Enter Value’))
Command Line input
A command line interface (CLI) is a command screen or text interface called a shell that allows users to interact with a program.
For example, On windows, we use the Command Prompt and Bash on Linux. command line or command-line interface is a text-based application for viewing, handling, and manipulating files on our computer. The command line also called cmd, CLI, prompt, console, or terminal.
On command-line, we execute program or command by providing input/arguments to it. Also, output and error are displayed A command line.
We can run Python programs on the command line. The command line input is an argument that we pass to the program at runtime.
Python provides following modules to work with command-line arguments.
- sys module
- getopt m odule
- argsparse module
- fire module
- docotp module
Python sys module
The Python sys module is the basic module that implements command-line arguments in a simple list structure named sys.argv .
- sys.argv[0] : The first argument is always the program/script name.
- sys.argv : Returns the list of command line arguments.
- len(sys.argv) : Count of command line arguments.
Steps:
Write the below code in a file and save it as a sample.py
Run the below command on the command line
Output
Here 10, 20, 30 are command-line arguments passed to the program. Each input represents a single argument.
- The first argument, i.e., sys.argv[0] , always represents the Python program name ( .py ) file
- The other list elements i.e., sys.argv[1] to sys.argv[n] are command-line arguments. Space is used to separate each argument.
Note: argv is not an array. It is a list. This is a straightforward way to read command-line arguments as a string. See the following example to check the type of argv
Example
Now let’s see another example where we display all command-line arguments passed to the program.
Example : To Display command line argumnets
Run the below command on the command line
Output
Note : The space is separator between command line arguments.
In Python, by default, command-line arguments are available in string format. Based on our requirement, we can convert it into the corresponding type by using the typecasting method.
See the following example where we change the data type of arguments using the int() method.
Example
Output
If we try to access arguments with out of the range index on the command line, we will get an error.
Output
Output in Python
Python has a built-in print() function to display output to the standard output device like screen and console.
Example 1: Display output on screen
Output:
Example 2: Display Output by separating each value
Output:
Output Formatting
Most of the time, we need to format output instead of merely printing space-separated values. For example, we want to display the string left-justified or in the center. We want to show the number in various formats.
You can display output in various styles and formats using the following functions.
- str.format()
- repr()
- str.rjust() , str.ljust() , and str.center() .
- str.zfill()
- The % operator can also use for output formatting
Now, Let see each one by one.
str.format() to format output
- The str is the string on which the format method is called. It can contain text or replacement fields delimited by braces <>.
- Each replacement field contains either the numeric index of a positional argument present in the format method or the name of a keyword argument.
- The format method returns a formatted string as an output. Each replacement field gets replaced with the actual string value of the corresponding argument present in the format method. i.e., args.
Let see this with an example:
Note: Here <0>and <1>is the numeric index of a positional argument present in the format method. i.e., <0>= Ault and <1>= Kelly. Anything that not enclosed in braces <> is considered a plain literal text.
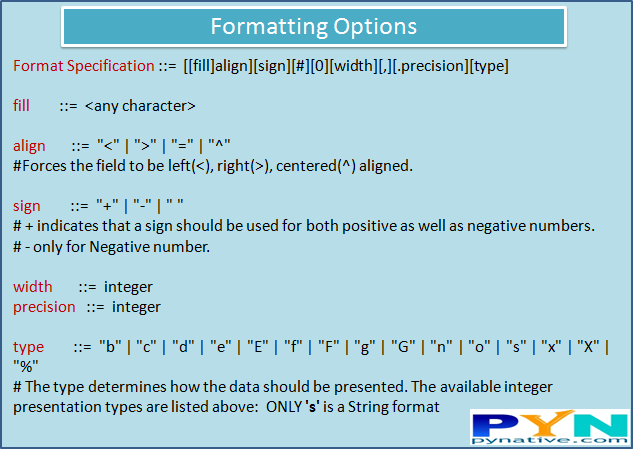
Python output formatting options
Let see different ways to display output using a format() method. You can find various Formatting options here.
Format Output String by its positions
Output:
Accessing Output String Arguments by name
Output:
Output Alignment by Specifying a Width
Output:
Specifying a Sign While Displaying Output Numbers
Output:
Display Output Number in Various Format
Output:
Display Numbers as a float type
Output:
Output String Alignment
Let’s see how to use str.rjust() , str.ljust() and str.center() to justify text output on screen and console.
Output:
Next Steps
To practice what you learned in this article, I have created a Quiz and Exercise.
References:
Did you find this page helpful? Let others know about it. Sharing helps me continue to create free Python resources.
About Vishal
Founder of PYnative.com I am a Python developer and I love to write articles to help developers. Follow me on Twitter. All the best for your future Python endeavors!
Related Tutorial Topics:
Python Exercises and Quizzes
Free coding exercises and quizzes cover Python basics, data structure, data analytics, and more.