Name already in use
visualstudio-docs / docs / python / installing-python-support-in-visual-studio.md
- Go to file T
- Go to line L
- Copy path
- Copy permalink
- Open with Desktop
- View raw
- Copy raw contents Copy raw contents
Copy raw contents
Copy raw contents
How to install Python support in Visual Studio on Windows
To install Python support for Visual Studio (also known as Python Tools for Visual Studio or PTVS), follow the instructions in the section that matches your version of Visual Studio: . moniker range=»>=vs-2022″
-Visual Studio 2022 . moniker-end . moniker range=»vs-2019″
-
. moniker-end
To quickly test Python support after following the installation steps, open the Python Interactive window by pressing Alt+I and entering 2+2 . If you don’t see the output of 4 , recheck your steps.
[!Tip] The Python workload includes the helpful Cookiecutter extension that provides a graphical user interface to discover templates, input template options, and create projects and files. For details, see Use Cookiecutter.
[!Note] Python support isn’t presently available in Visual Studio for Mac, but is available on Mac and Linux through Visual Studio Code. See questions and answers.
Visual Studio 2022
. moniker-end . Moniker range=»vs-2019″
Visual Studio 2019
Download and run the latest Visual Studio installer. If you have Visual Studio installed already, run the Visual Studio Installer, select the Modify option (see Modify Visual Studio) and go to step 2.
[!Tip] The Community edition is for individual developers, classroom learning, academic research, and open source development. For other users, install Visual Studio 2022 Professional or Visual Studio 2022 Enterprise
. moniker-end . moniker range=»vs-2019″
[!Tip] The Community edition is for individual developers, classroom learning, academic research, and open source development. For other uses, install Visual Studio 2019 Professional or Visual Studio 2019 Enterprise.
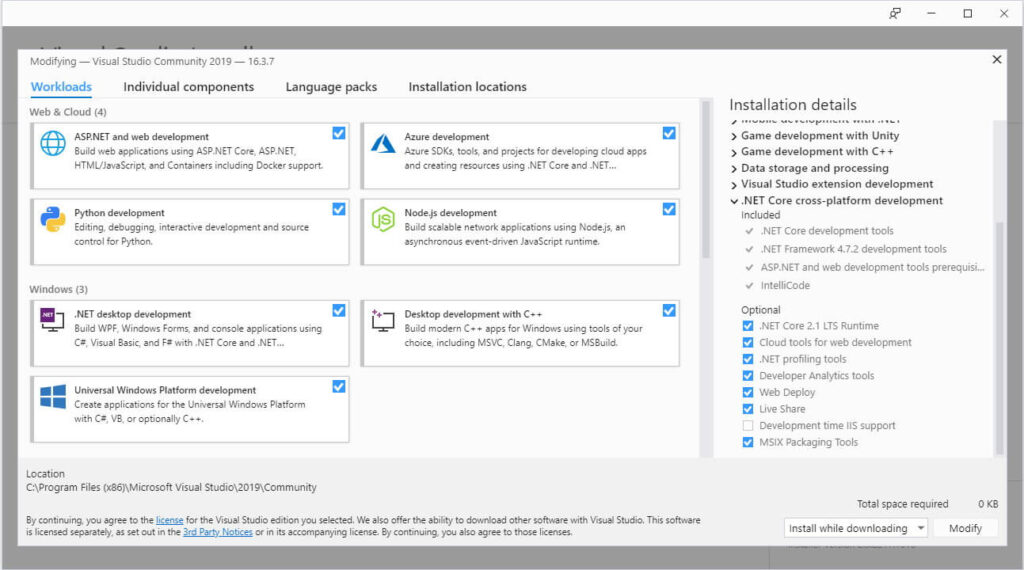
The Visual Studio installer provides you a list of workloads that are groups of related options for specific development areas. For Python, select the Python development workload.
Optional: if you’re working with data science, also consider the Data science and analytical applications workload. This workload includes support for the Python, R, and F# languages. For more information, see Data science and analytical applications workload.
On the right side of the installer, choose other options if you want. Skip this step to accept the default options. . moniker range=»>=vs-2022″


After installation, the installer provides options to modify, launch, repair, or uninstall Visual Studio. The Modify button changes to Update when updates to Visual Studio are available for any installed components. (The Modify option is then available on the drop-down menu.) You can also launch Visual Studio and the installer from the Windows Start menu by searching on «Visual Studio».

. moniker-end . moniker range=»vs-2019″

To fix problems while installing or running Python in Visual Studio, try the following steps:
- Determine whether the same error occurs using the Python CLI, that is, running python.exe from a command prompt.
- Use the Repair option in the Visual Studio installer.
- Repair or reinstall Python through Settings > Apps & features in Windows.
Example error: Failed to start interactive process: System.ComponentModel.Win32Exception (0x80004005): Unknown error (0xc0000135) at Microsoft.PythonTools.Repl.PythonInteractiveEvaluator.d__43.MoveNext().
You may see errors when attempting to install or update Python itself, such as PackageId:CPython39.Exe.x64;PackageAction:DownloadPackage;ReturnCode:0x80070193 . These errors occur when the download or install of Python from https://python.org fails. This could be due to network timeouts, corporate firewall policy, VPN configuration, anti-virus, or other problems. See if a retry helps, and if not, see if you can download the Python runtime directly from https://python.org and install it manually.
By default, the Python support installs for all users on a computer.
For Visual Studio 2022, the Python workload installs in %ProgramFiles%\Microsoft Visual Studio\<VS_version>\<VS_edition>Common7\IDE\Extensions\Microsoft\Python where <VS_version> is 2022 and <VS_edition> is Community, Professional, or Enterprise.
. moniker-end . moniker range=»<=vs-2019″
By default, the Python support installs for all users on a computer.
For Visual Studio 2019 and Visual Studio 2017, the Python workload installs in %ProgramFiles(x86)%\Microsoft Visual Studio\<VS_version>\<VS_edition>Common7\IDE\Extensions\Microsoft\Python where <VS_version> is 2019 or 2017 and <VS_edition> is Community, Professional, or Enterprise.
Python Developer Tools от Microsoft. Начало работы
Последние несколько лет специалисты Microsoft трудились над тем, чтобы добавить поддержку инструментов разработчика Python в одни из наших самых популярных продуктов: Visual Studio Code и Visual Studio. В этом году все заработало. В статье мы познакомимся с инструментами разработчика Python в Visual Studio, Visual Studio Code, Azure и т. д. Заглядывайте под кат!

Python — один из самых быстро развивающихся языков программирования, к которому обращаются как начинающие, так и опытные разработчики. Его популярность обусловлена легкой в освоении семантикой и широким спектром применения, начиная от написания скриптов и заканчивая созданием веб-сервисов и моделей машинного обучения.
Дополнительную информацию и последние новости о Python в Microsoft вы можете найти в блоге Python at Microsoft.
Visual Studio Code
Расширение Python для Visual Studio Code с открытым исходным кодом включает в себя другие общедоступные пакеты Python, чтобы предоставить разработчикам широкие возможности для редактирования, отладки и тестирования кода. Python — самый быстроразвивающийся язык в Visual Studio Code, а соответствующее расширение является одним из самых популярных в разделе Marketplace, посвященном Visual Studio Code!
Чтобы начать работу с расширением, необходимо сначала скачать Visual Studio Code, а затем, следуя нашему руководству Начало работы с Python, установить расширение и настроить основные функции. Рассмотрим некоторые из них.
Прежде всего необходимо убедиться, что Visual Studio Code использует правильный интерпретатор Python. Чтобы сменить интерпретатор, достаточно выбрать нужную версию Python в строке состояния:

Селектор поддерживает множество разных интерпретаторов и сред Python: Python 2, 3, virtualenv, Anaconda, Pipenv и pyenv. После выбора интерпретатора расширение начнет использовать его для функции IntelliSense, рефакторинга, анализа, выполнения и отладки кода.
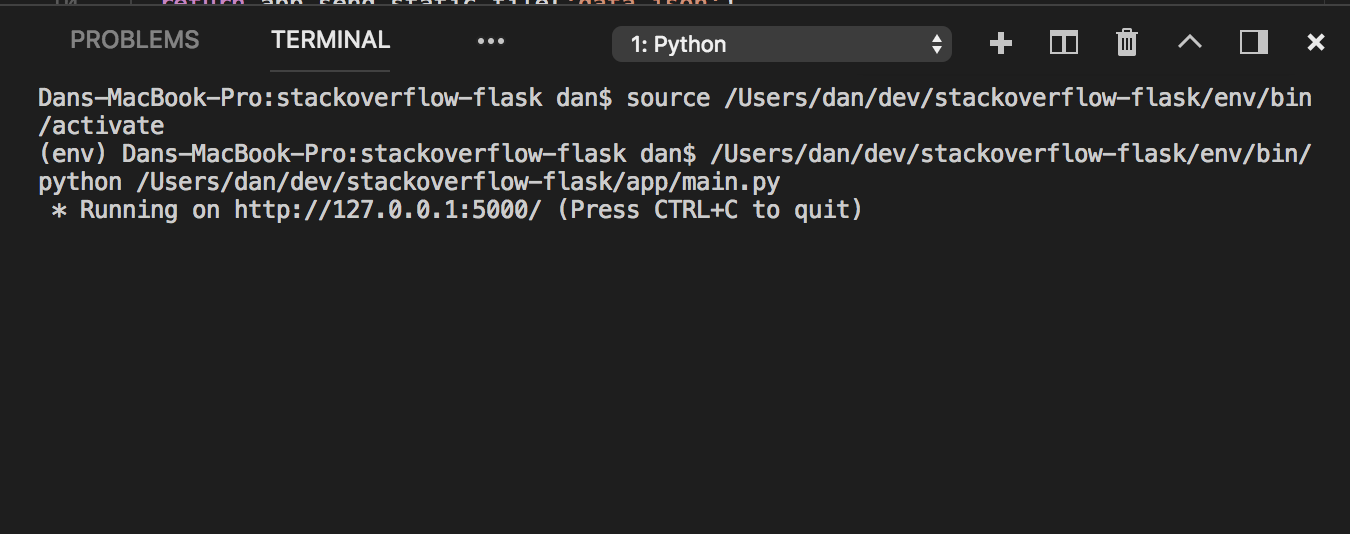
Чтобы локально запустить скрипт Python, можно воспользоваться командой «Python: Create Terminal» («Python: создать терминал») для создания терминала с активированной средой. Нажмите CTRL + Shift + P (или CMD + Shift + P на Mac), чтобы открыть командную строку. Чтобы выполнить файл Python, достаточно щелкнуть на нем правой кнопкой мыши и выбрать пункт «Run Python File in Terminal» («Запустить файл Python в терминале»):

Эта команда запустит выбранный интерпретатор Python, в данном случае виртуальную среду Python 3.6, для выполнения файла:
Расширение Python также включает шаблоны отладки для многих популярных типов приложений. Перейдите на вкладку «Debug» («Отладка») и выберите «Add Configuration…» («Добавить конфигурацию. ») в выпадающем меню конфигурации отладки:

Вы увидите готовые конфигурации для отладки текущего файла, подключающегося к удаленному серверу отладки или соответствующему приложению Flask, Django, Pyramid, PySpark или Scrapy. Для запуска отладки нужно выбрать конфигурацию и нажать зеленую кнопку Play (или клавишу F5 на клавиатуре, FN + F5 на Mac).
Расширение Python поддерживает различные анализаторы кода, для которых можно настроить запуск после сохранения файла Python. PyLint включен по умолчанию, а другой анализатор можно выбрать с помощью команды «Python: Select Linter» («Python: выбрать анализатор кода»):

Это еще не все: предусмотрена поддержка рефакторинга, а также модульного тестирования с помощью unittest, pytest и nose. К тому же вы можете использовать Visual Studio Live Share для удаленной работы над кодом Python вместе с другими разработчиками!
Python в Visual Studio
Visual Studio поддерживает большую часть функций Visual Studio Code, но также предлагает все полезные возможности интегрированной среды разработки, что позволяет совершать больше операций без использования командной строки. Visual Studio также предоставляет не имеющие равных возможности для работы с гибридными проектами Python и C# или C++.
Чтобы включить поддержку Python в Visual Studio на Windows, необходимо выбрать рабочую нагрузку «Разработка на Python» и (или) рабочую нагрузку «Приложения для обработки и анализа данных и аналитические приложения» в установщике Visual Studio:
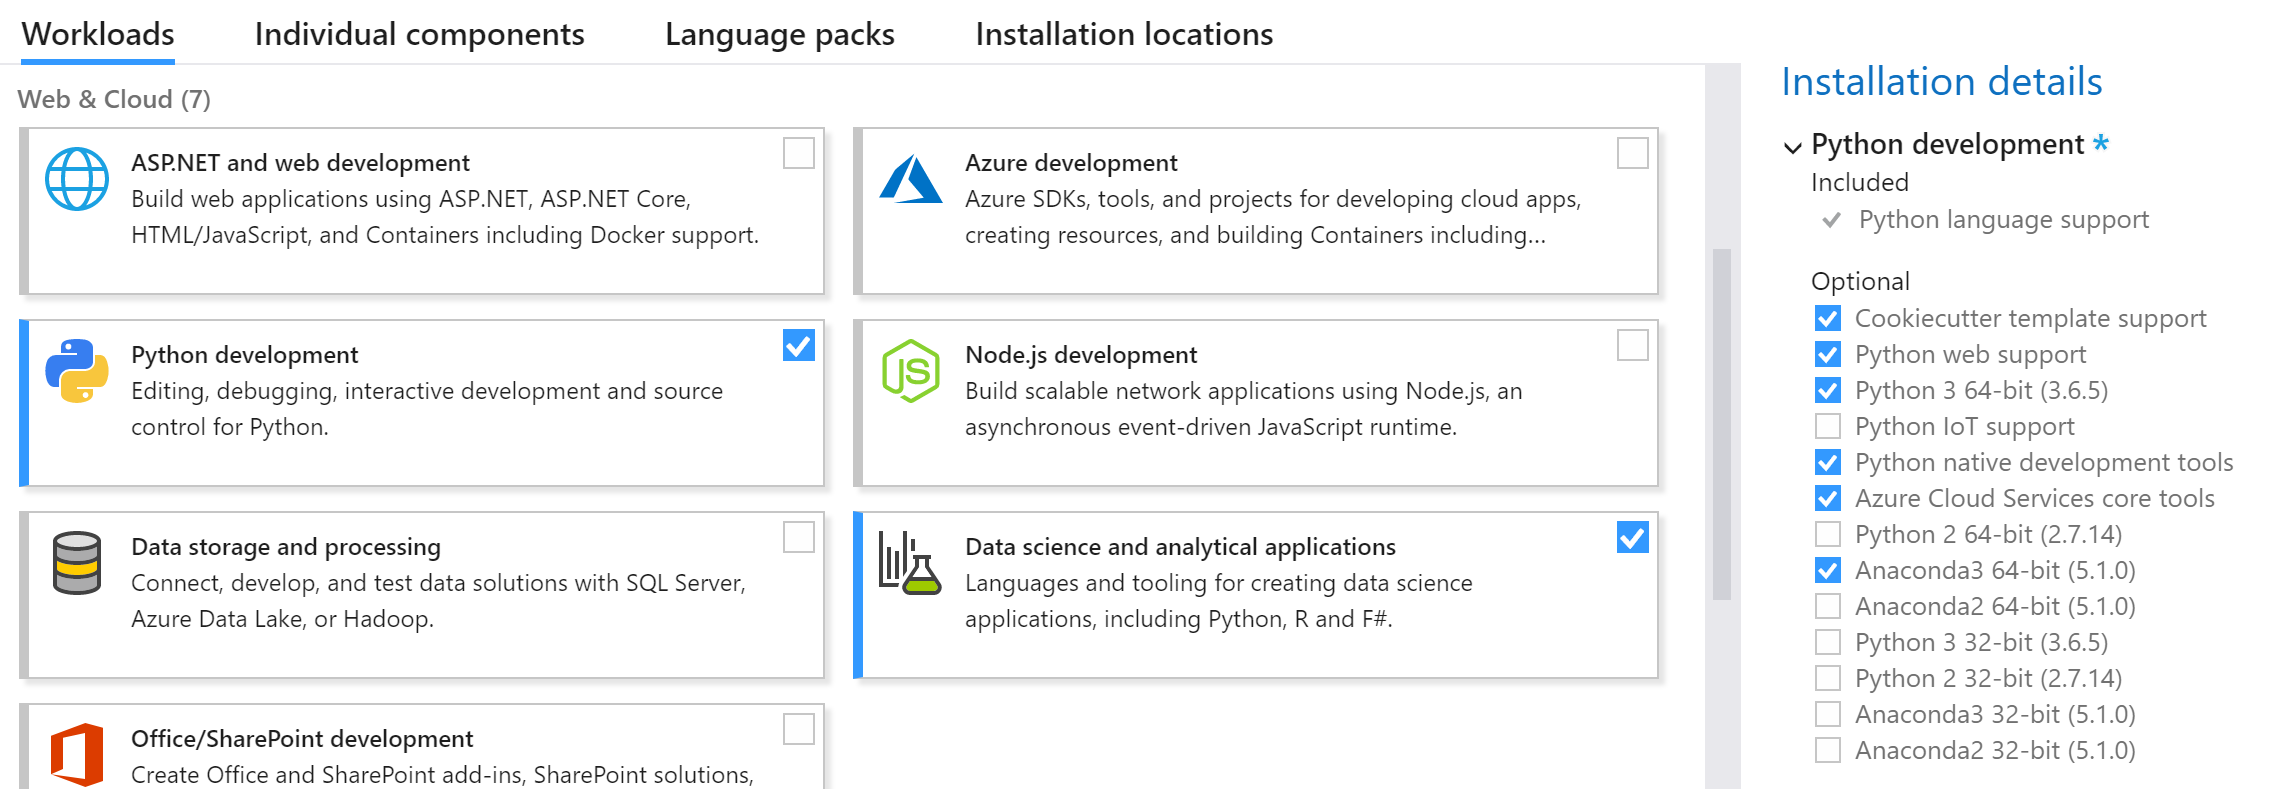
Можно установить различные версии Python и Anaconda, выбрав их в меню дополнительных компонентов (см. правую часть скриншота выше).
После установки рабочей нагрузки Python, можно начать работу, создав проект Python в разделе с помощью меню «Файл -> Новый проект» (в списке установленных компонентов выберите Python):
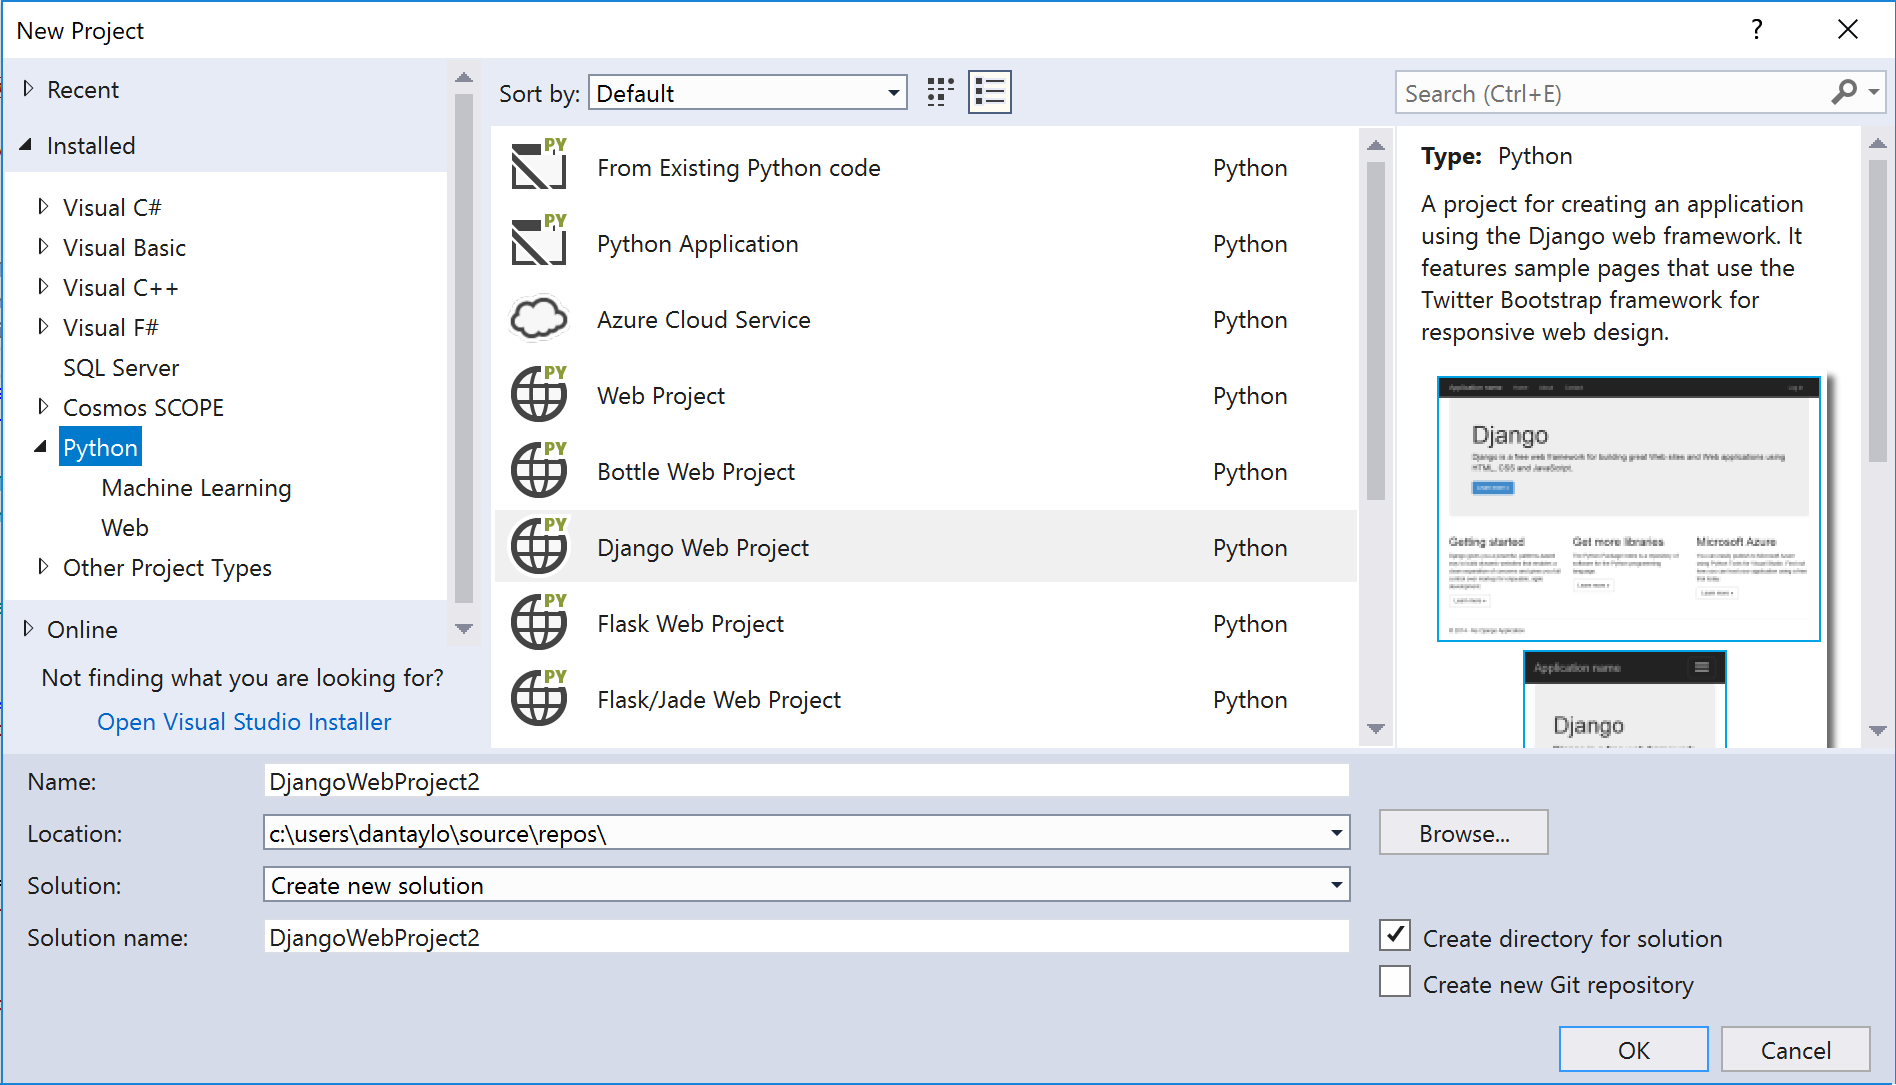
Чтобы создать приложение с нуля, откройте шаблон приложения Python и приступайте к написанию кода. Также можно создать проект, взяв за основу существующий код Python или используя веб-шаблоны для Flask, Django и Bottle. Ознакомьтесь с нашим Руководством по Flask и Руководством по Django, чтобы получить подробную информацию по разработке веб-приложений с помощью этих платформ и Visual Studio.
Если установлена рабочая нагрузка по обработке и анализу данных, также можно использовать шаблоны для проектов по машинному обучению с использованием Tensorflow и CNTK.
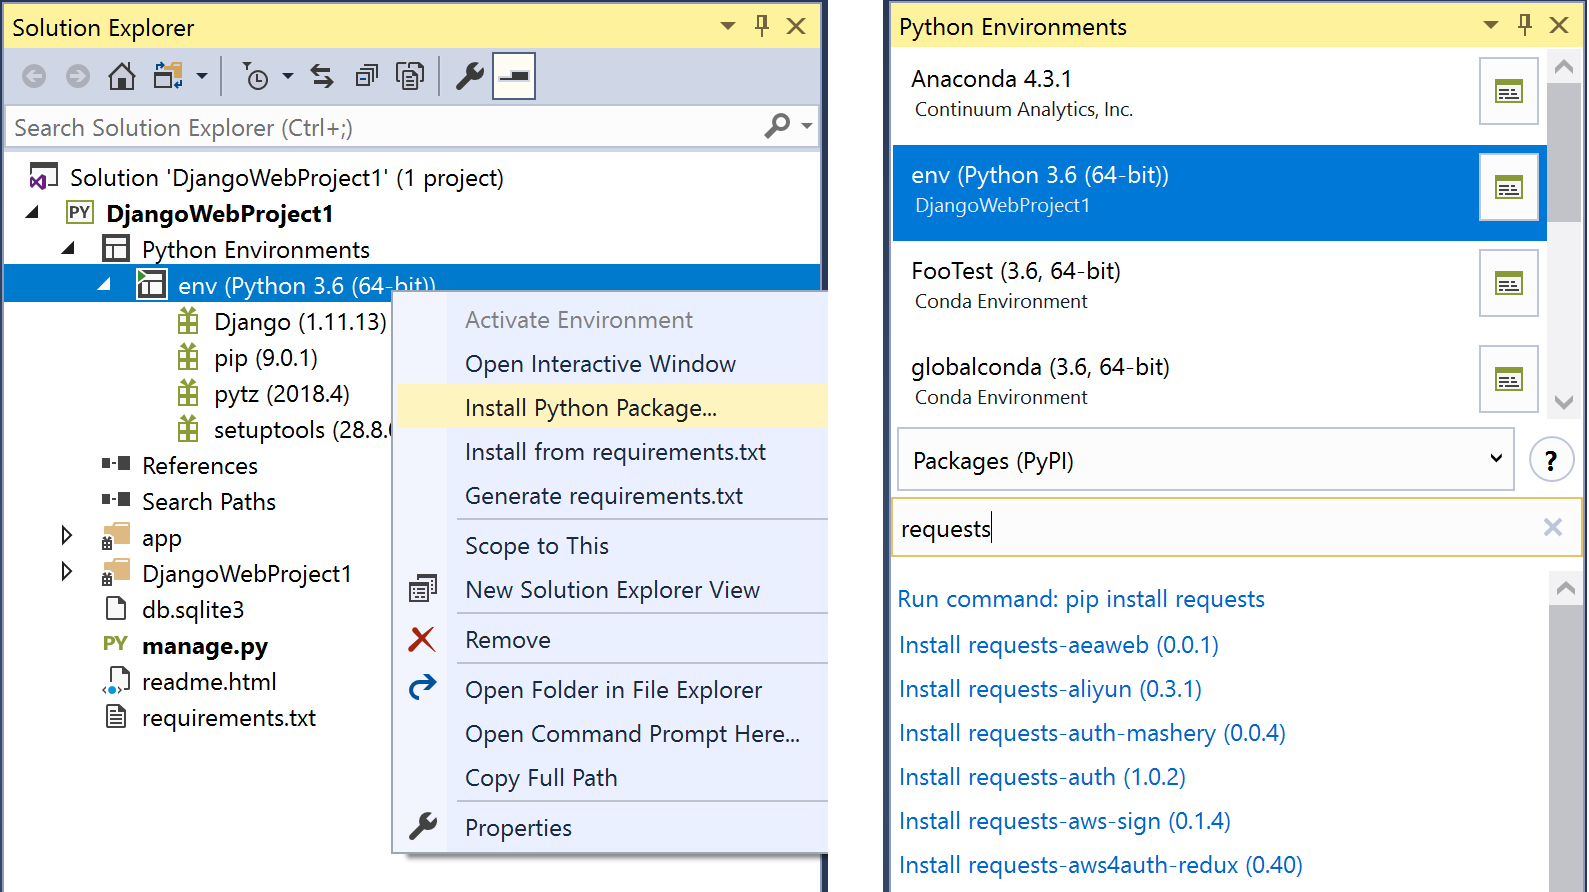
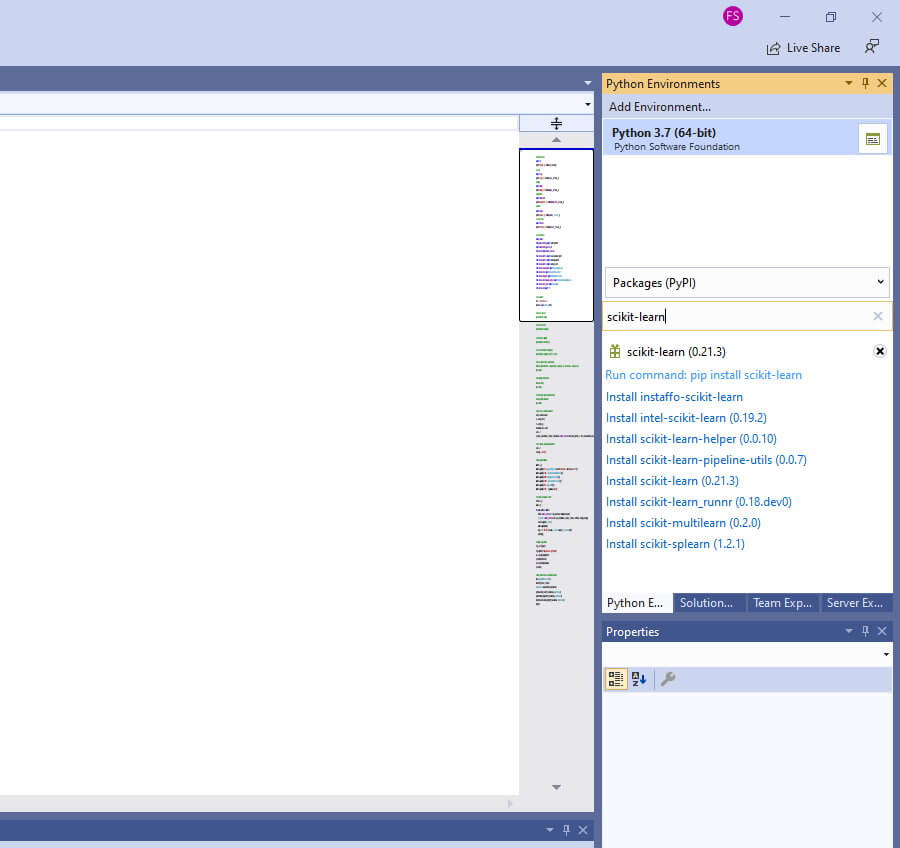
После того как проект создан, управлять виртуальными средами и средами conda можно с помощью узла «Python Environments» («Среды Python») в обозревателе решений и окне среды Python. Щелкнув правой кнопкой мыши по активной среде Python и выбрав соответствующий пункт меню, можно установить дополнительные пакеты:
Visual Studio по-настоящему демонстрирует свои возможности при использовании Python с другими языками. Можно объединять проекты Python и C++ для создания решения или даже встраивать файлы .py в проекты C++ или C#!
Можно даже проводить отладку кода на обоих языках в рамках одного сеанса, например, переключившись с типа отладки C++ на Python/Native:

Ознакомиться с подробной информацией о вставке Python в приложения C++ можно в публикации Вставка Python в проект C++ в блоге Python.
Кроме того, Visual Studio включает профилировщик Python и поддерживает модульное тестирование Python в Обозревателе тестов.
Python в Azure
Пакет Azure SDK для Python позволяет создавать службы в Azure, управлять ими и взаимодействовать с ними. Командная строка Azure CLI написана на Python, поэтому почти все, что она позволяет сделать, вы можете также выполнить на программном уровне с помощью пакета Python SDK.
Можно устанавливать отдельные библиотеки, например для установки пакета SDK для взаимодействия с Azure Storage воспользуйтесь командой:
Рекомендуется устанавливать только нужные вам пакеты, но для удобства вы можете установить весь набор пакетов Azure SDK, выполнив следующую команду:
После установки пакета SDK вы получаете доступ ко множеству полезных служб, начиная от использования API машинного обучения с помощью Azure Cognitive Services и заканчивая размещением глобально распределенных данных с помощью Azure Cosmos DB.
Веб-приложения можно развернуть с помощью функции Azure «Веб-приложение для контейнеров». Ознакомьтесь с видео From Zero to Azure with Python and Visual Studio Code (В Azure с нуля с помощью Python и Visual Studio Code), предоставляющим всю необходимую информацию по развертыванию приложений Flask с использованием Visual Studio Code. Также обратите внимание на краткое пособие по развертыванию приложения Flask с использованием командной строки.
Кроме того, на Azure можно запускать свободно размещенные блокноты Jupyter, поэтому локальная установка Jupyter не потребуется. К блокнотам Jupyter можно открывать доступ для их совместного использования. Например, вы можете просмотреть находящийся в общем доступе блокнот для создания рукописного текста с помощью машинного обучения:

Войдите в учетную запись на notebooks.azure.com, чтобы опробовать клонирование и запуск блокнотов Jupyter!
Полезные материалы по теме
Мини-книга «Создавайте более качественные приложения и быстро используйте данные там, где это нужно»
Читайте электронную книгу Создание современных приложений на основе больших данных в глобальном масштабе, чтобы узнать, как готовая к использованию глобально распределенная служба баз данных Azure Cosmos DB меняет подходы к управлению данными. Обеспечивайте доступность, согласованность и защиту данных, используя передовые отраслевые технологии корпоративного класса для соблюдения нормативных требований и обеспечения безопасности. Начните разработку лучших приложений для своих пользователей на базе одной из пяти четко определенных моделей согласованности.
Семинар «Как выбрать правильную инфраструктуру для выполнения ваших рабочих нагрузок в Azure»
В этом семинаре присоединитесь к рассказу регионального директора Microsoft Эрику Бойду, MVP Azure, о том, как выбрать правильные виртуальные машины, хранилища и сети для приложений и рабочих нагрузок в Azure.
Руководство по архитектуре облачных приложений
Используйте структурированный подход к разработке облачных приложений. В этой 300-страничной электронной книге об архитектуре облачных вычислений рассматриваются рекомендации по архитектуре, разработке и внедрению, которые применяются независимо от выбранной облачной платформы. В это руководство включены шаги по:
Getting Started with Python in VS Code
In this tutorial, you will use Python 3 to create a simple Python "Hello World" application in Visual Studio Code. By using the Python extension, you turn VS Code into a great, lightweight Python editor.
This tutorial introduces you to VS Code for Python development — primarily how to edit, run, and debug code through the following tasks:
- Write, run, and debug a Python "Hello World" Application
- Learn how to install packages by creating Python virtual environments
- Write a simple Python script to plot figures within VS Code
This tutorial is not intended to teach you Python itself. Once you are familiar with the basics of VS Code, you can then follow any of the programming tutorials on python.org within the context of VS Code for an introduction to the language.
If you have any problems, you can search for answers or ask a question on the Python extension Discussions Q&A.
Prerequisites
To successfully complete this tutorial, you need to first setup your Python development environment. Specifically, this tutorial requires:
- Python 3
- VS Code
Install Visual Studio Code and the Python extension
If you have not already done so, install VS Code.
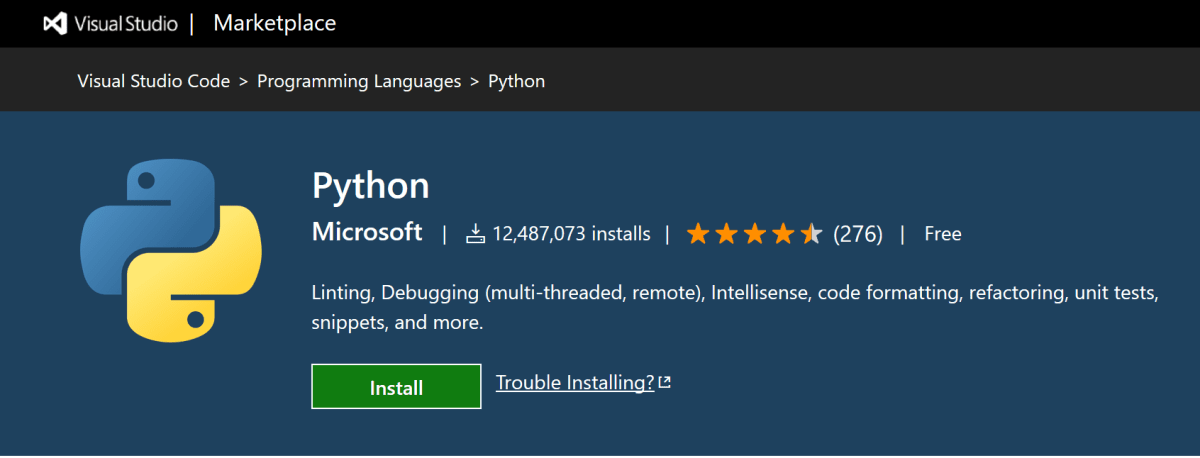
Next, install the Python extension for VS Code from the Visual Studio Marketplace. For additional details on installing extensions, see Extension Marketplace. The Python extension is named Python and it’s published by Microsoft.
Install a Python interpreter
Along with the Python extension, you need to install a Python interpreter. Which interpreter you use is dependent on your specific needs, but some guidance is provided below.
Windows
Install Python from python.org. You can typically use the Download Python button that appears first on the page to download the latest version.
Note: If you don’t have admin access, an additional option for installing Python on Windows is to use the Microsoft Store. The Microsoft Store provides installs of supported Python versions.
For additional information about using Python on Windows, see Using Python on Windows at Python.org
macOS
The system install of Python on macOS is not supported. Instead, a package management system like Homebrew is recommended. To install Python using Homebrew on macOS use brew install python3 at the Terminal prompt.
Note On macOS, make sure the location of your VS Code installation is included in your PATH environment variable. See these setup instructions for more information.
Linux
The built-in Python 3 installation on Linux works well, but to install other Python packages you must install pip with get-pip.py.
Other options
Data Science: If your primary purpose for using Python is Data Science, then you might consider a download from Anaconda. Anaconda provides not just a Python interpreter, but many useful libraries and tools for data science.
Windows Subsystem for Linux: If you are working on Windows and want a Linux environment for working with Python, the Windows Subsystem for Linux (WSL) is an option for you. If you choose this option, you’ll also want to install the WSL extension. For more information about using WSL with VS Code, see VS Code Remote Development or try the Working in WSL tutorial, which will walk you through setting up WSL, installing Python, and creating a Hello World application running in WSL.
Verify the Python installation
To verify that you’ve installed Python successfully on your machine, run one of the following commands (depending on your operating system):
Linux/macOS: open a Terminal Window and type the following command:
Windows: open a command prompt and run the following command:
If the installation was successful, the output window should show the version of Python that you installed.
Note You can use the py -0 command in the VS Code integrated terminal to view the versions of python installed on your machine. The default interpreter is identified by an asterisk (*).
Start VS Code in a workspace folder
By starting VS Code in a folder, that folder becomes your "workspace". VS Code stores settings that are specific to that workspace in .vscode/settings.json , which are separate from user settings that are stored globally.
Using a command prompt or terminal, create an empty folder called "hello", navigate into it, and open VS Code ( code ) in that folder ( . ) by entering the following commands:
Note: If you’re using an Anaconda distribution, be sure to use an Anaconda command prompt.
Alternately, you can run VS Code through the operating system UI, then use File > Open Folder to open the project folder.
Select a Python interpreter
Python is an interpreted language. Thus, in order to run Python code and get Python IntelliSense, you must tell VS Code which interpreter to use.
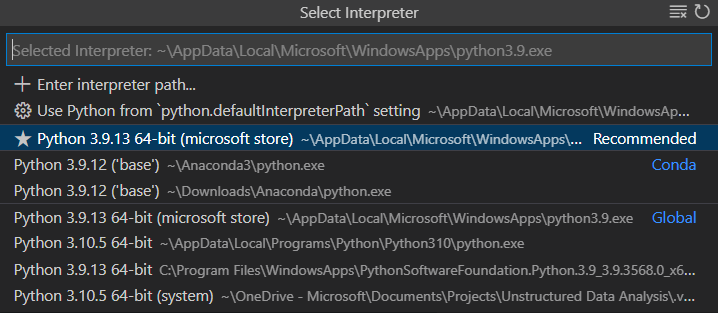
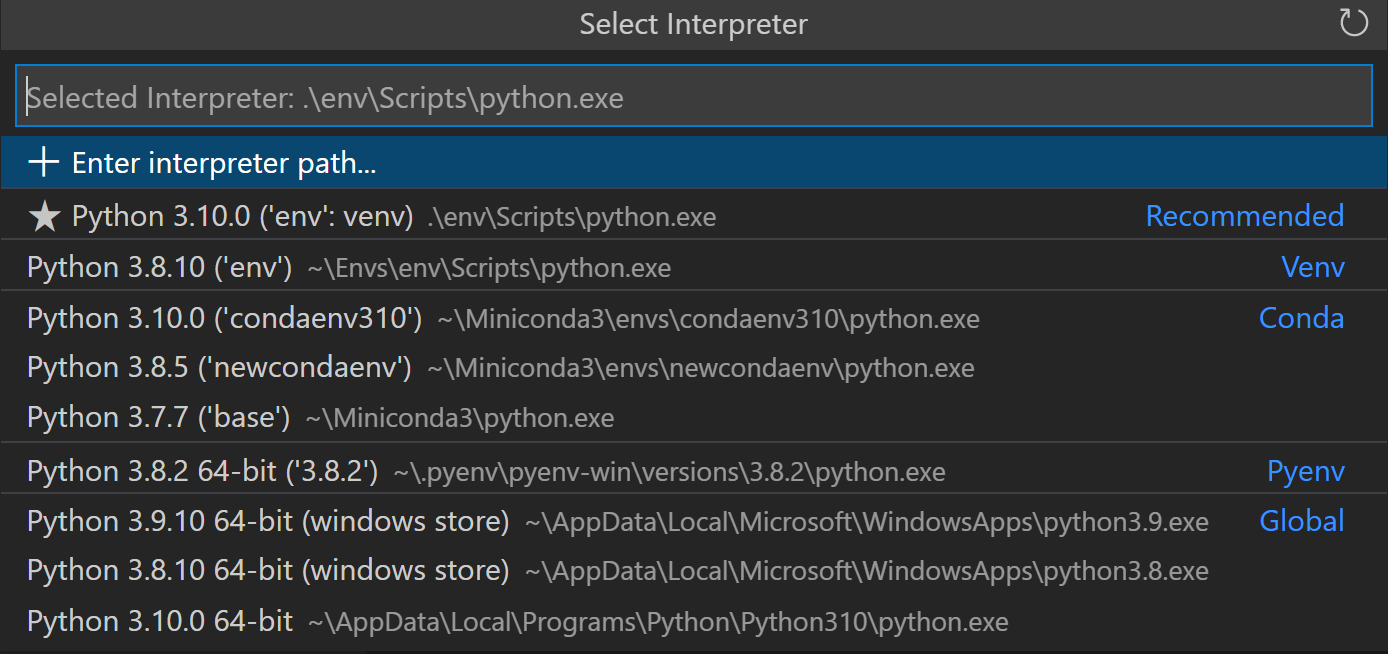
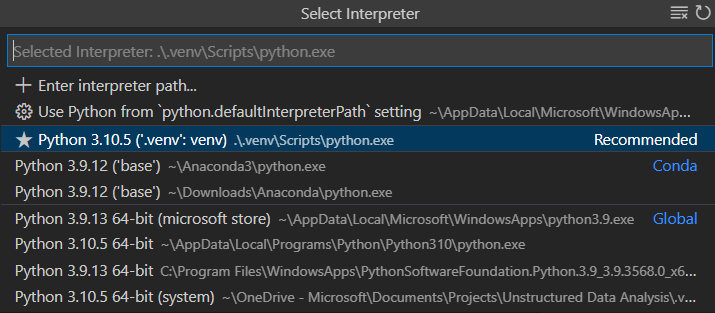
From within VS Code, select a Python 3 interpreter by opening the Command Palette ( ⇧⌘P (Windows, Linux Ctrl+Shift+P ) ), start typing the Python: Select Interpreter command to search, then select the command. You can also use the Select Python Environment option on the Status Bar if available (it may already show a selected interpreter, too):

The command presents a list of available interpreters that VS Code can find automatically, including virtual environments. If you don’t see the desired interpreter, see Configuring Python environments.
Note: When using an Anaconda distribution, the correct interpreter should have the suffix (‘base’:conda) , for example Python 3.7.3 64-bit (‘base’:conda) .
Selecting an interpreter sets which interpreter will be used by the Python extension for that workspace.
Note: If you select an interpreter without a workspace folder open, VS Code sets python.defaultInterpreterPath in User scope instead, which sets the default interpreter for VS Code in general. The user setting makes sure you always have a default interpreter for Python projects. The workspace settings lets you override the user setting.
Create a Python Hello World source code file
From the File Explorer toolbar, select the New File button on the hello folder:
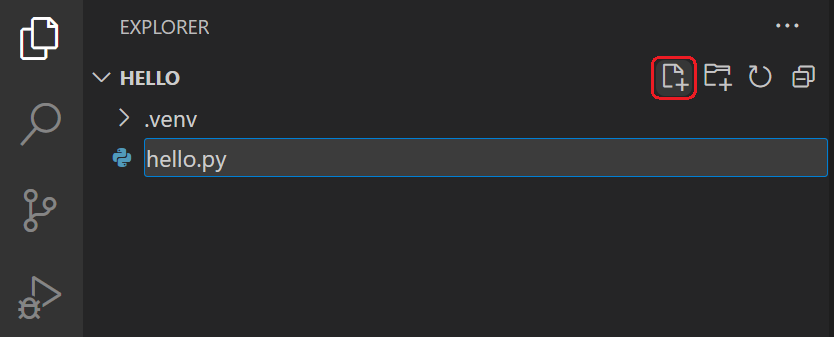
Name the file hello.py , and it automatically opens in the editor:
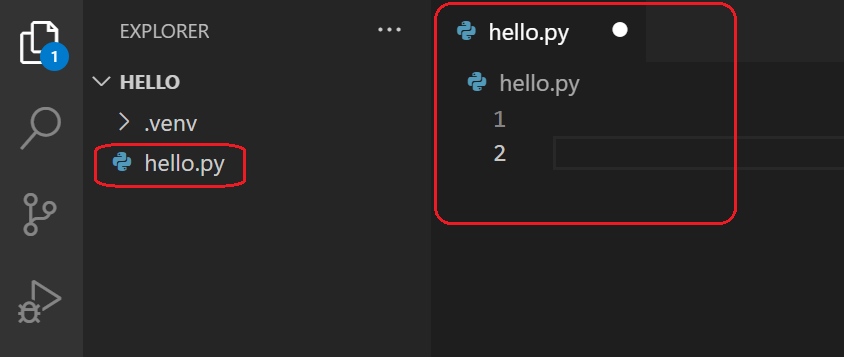
By using the .py file extension, you tell VS Code to interpret this file as a Python program, so that it evaluates the contents with the Python extension and the selected interpreter.
Note: The File Explorer toolbar also allows you to create folders within your workspace to better organize your code. You can use the New folder button to quickly create a folder.
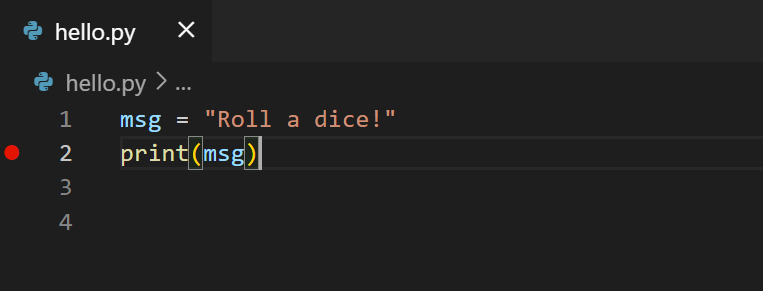
Now that you have a code file in your Workspace, enter the following source code in hello.py :
When you start typing print , notice how IntelliSense presents auto-completion options.
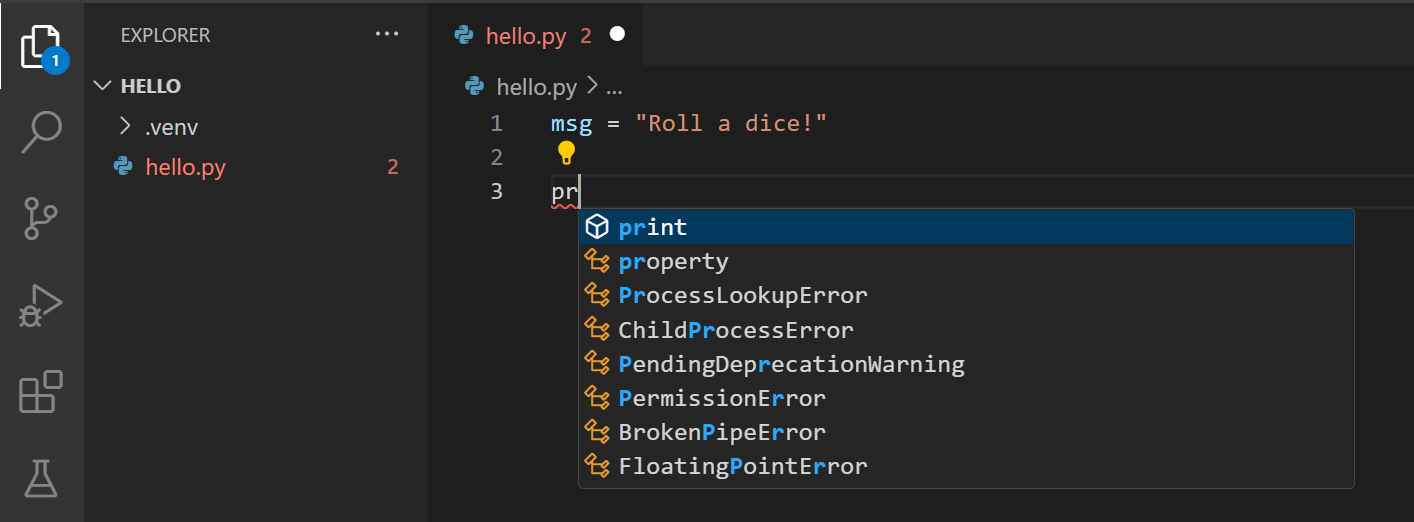
IntelliSense and auto-completions work for standard Python modules as well as other packages you’ve installed into the environment of the selected Python interpreter. It also provides completions for methods available on object types. For example, because the msg variable contains a string, IntelliSense provides string methods when you type msg. :
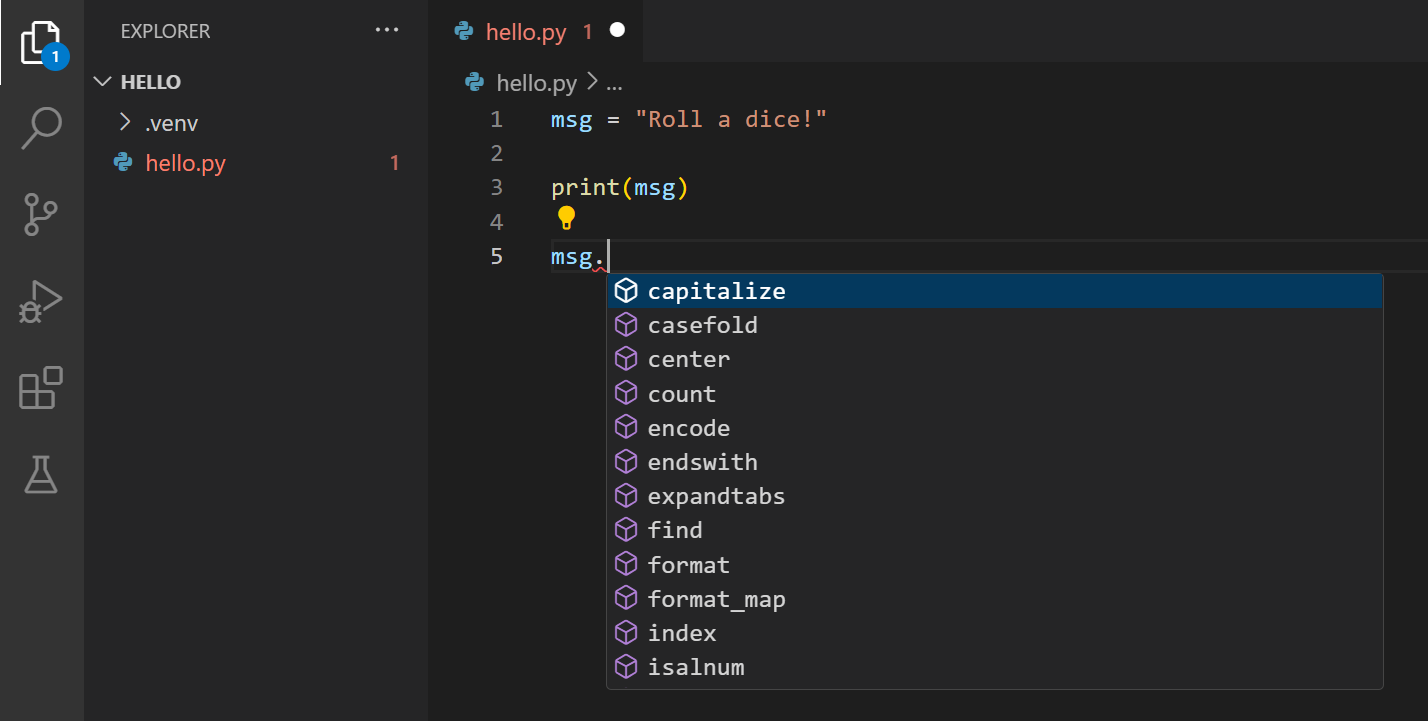
Feel free to experiment with IntelliSense some more, but then revert your changes so you have only the msg variable and the print call, and save the file ( ⌘S (Windows, Linux Ctrl+S ) ).
For full details on editing, formatting, and refactoring, see Editing code. The Python extension also has full support for Linting.
Run Hello World
It’s simple to run hello.py with Python. Just click the Run Python File in Terminal play button in the top-right side of the editor.
The button opens a terminal panel in which your Python interpreter is automatically activated, then runs python3 hello.py (macOS/Linux) or python hello.py (Windows):

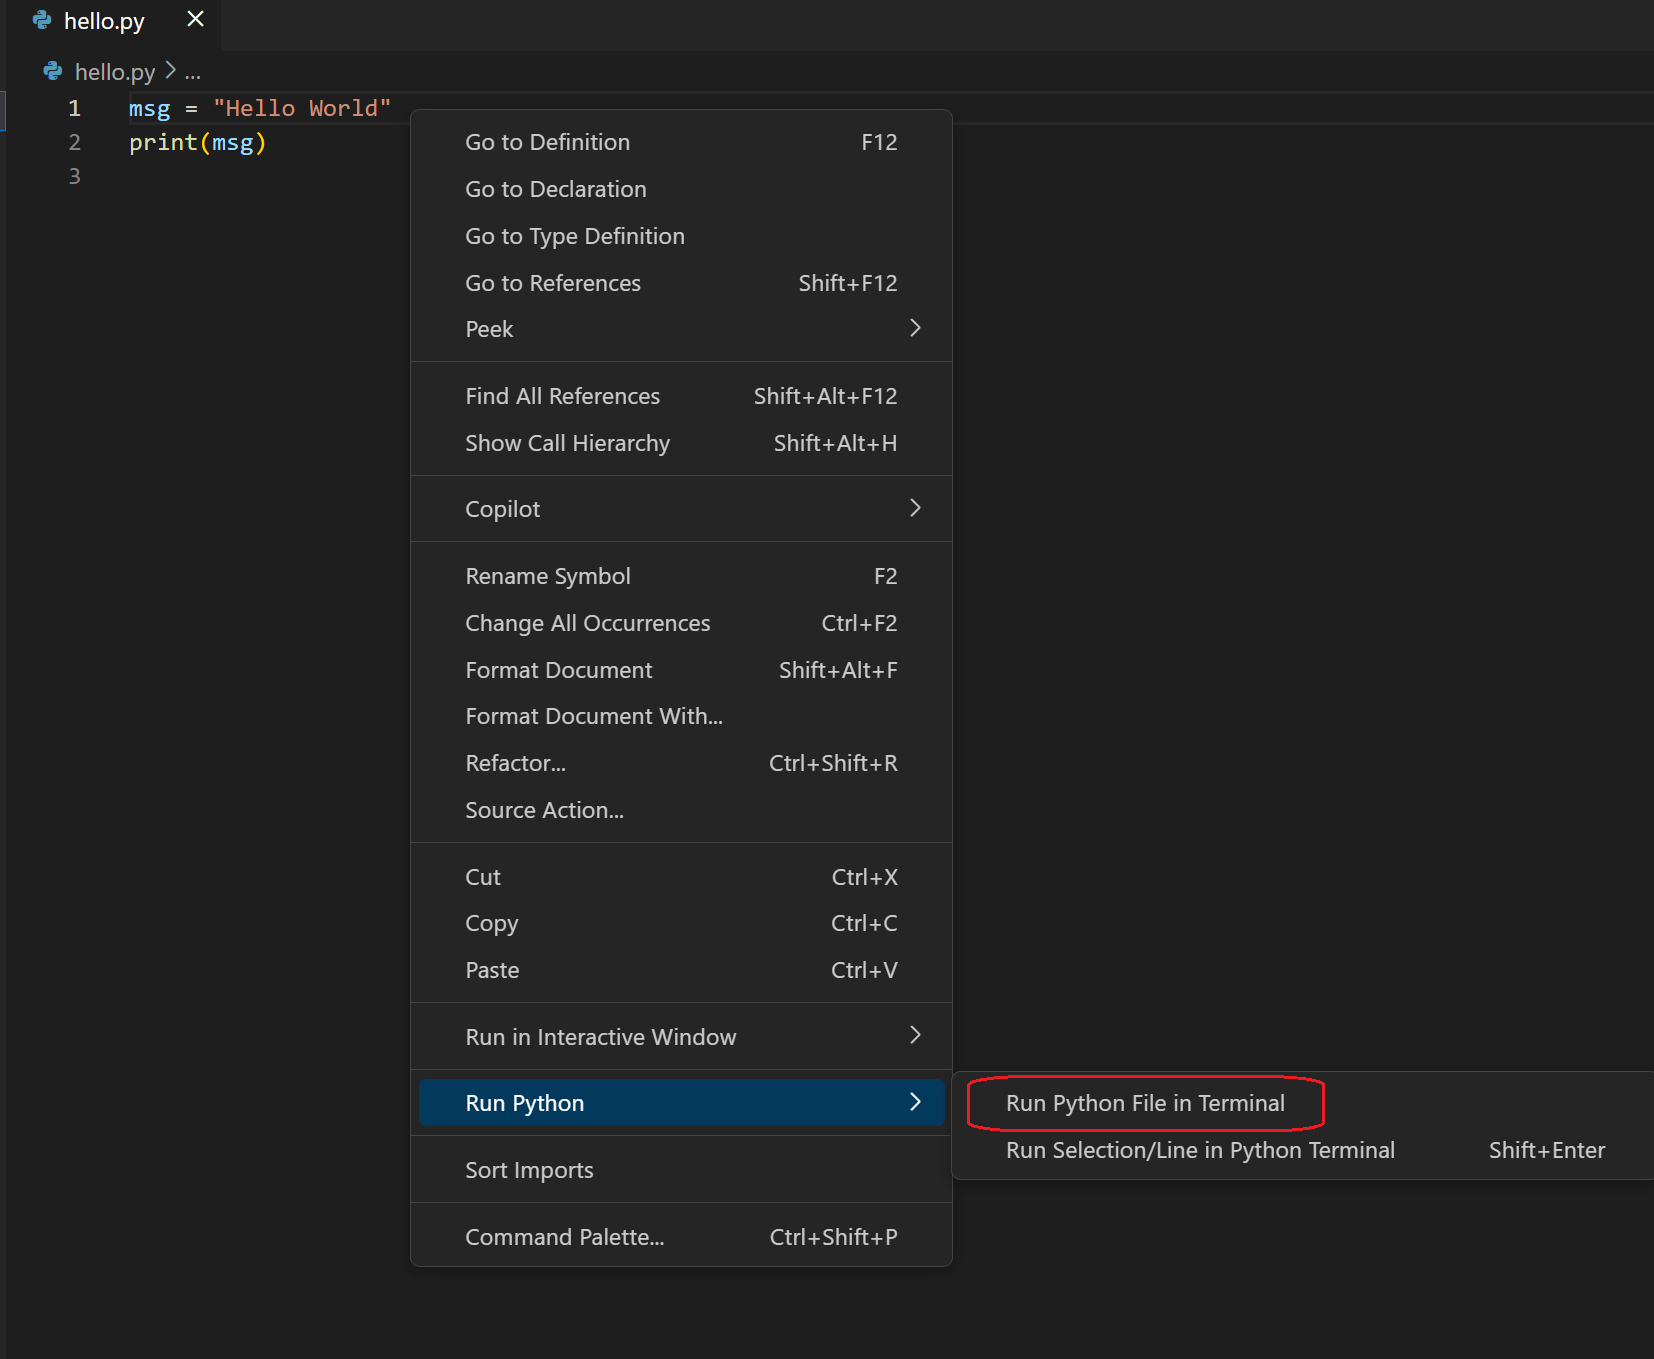
There are three other ways you can run Python code within VS Code:
Right-click anywhere in the editor window and select Run Python File in Terminal (which saves the file automatically):
Select one or more lines, then press Shift+Enter or right-click and select Run Selection/Line in Python Terminal. This command is convenient for testing just a part of a file.
From the Command Palette ( ⇧⌘P (Windows, Linux Ctrl+Shift+P ) ), select the Python: Start REPL command to open a REPL terminal for the currently selected Python interpreter. In the REPL, you can then enter and run lines of code one at a time.
Configure and run the debugger
Let’s now try debugging our simple Hello World program.
First, set a breakpoint on line 2 of hello.py by placing the cursor on the print call and pressing F9 . Alternately, just click in the editor’s left gutter, next to the line numbers. When you set a breakpoint, a red circle appears in the gutter.
Next, to initialize the debugger, press F5 . Since this is your first time debugging this file, a configuration menu will open from the Command Palette allowing you to select the type of debug configuration you would like for the opened file.

Note: VS Code uses JSON files for all of its various configurations; launch.json is the standard name for a file containing debugging configurations.
These different configurations are fully explained in Debugging configurations; for now, just select Python File, which is the configuration that runs the current file shown in the editor using the currently selected Python interpreter.
You can also start the debugger by clicking on the down-arrow next to the run button on the editor, and selecting Debug Python File in Terminal.
The debugger will stop at the first line of the file breakpoint. The current line is indicated with a yellow arrow in the left margin. If you examine the Local variables window at this point, you will see now defined msg variable appears in the Local pane.
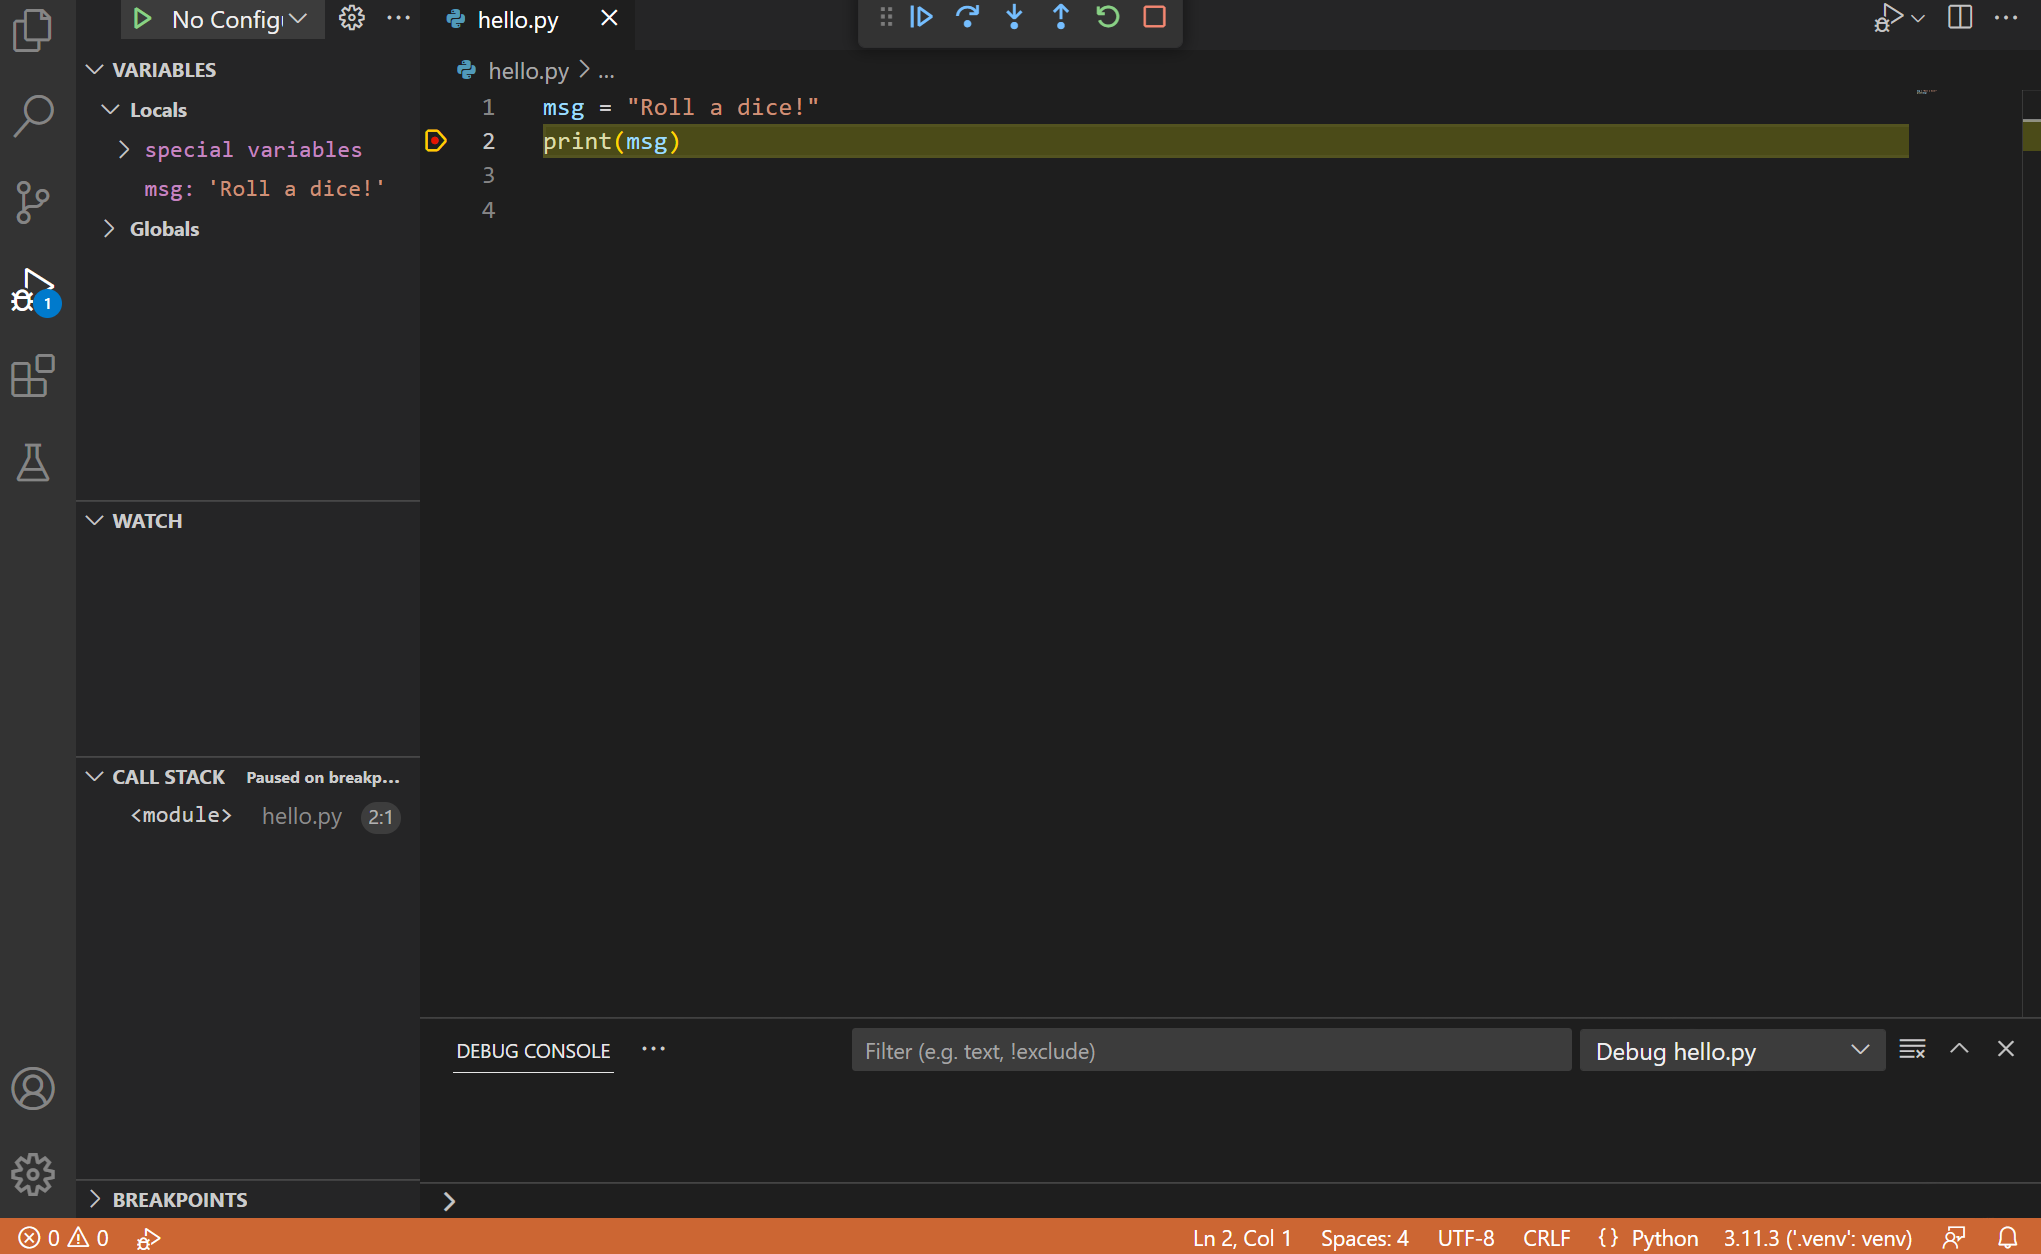
A debug toolbar appears along the top with the following commands from left to right: continue ( F5 ), step over ( F10 ), step into ( F11 ), step out ( ⇧F11 (Windows, Linux Shift+F11 ) ), restart ( ⇧⌘F5 (Windows, Linux Ctrl+Shift+F5 ) ), and stop ( ⇧F5 (Windows, Linux Shift+F5 ) ).

The Status Bar also changes color (orange in many themes) to indicate that you’re in debug mode. The Python Debug Console also appears automatically in the lower right panel to show the commands being run, along with the program output.
To continue running the program, select the continue command on the debug toolbar ( F5 ). The debugger runs the program to the end.
Tip Debugging information can also be seen by hovering over code, such as variables. In the case of msg , hovering over the variable will display the string Hello world in a box above the variable.
You can also work with variables in the Debug Console (If you don’t see it, select Debug Console in the lower right area of VS Code, or select it from the . menu.) Then try entering the following lines, one by one, at the > prompt at the bottom of the console:

Select the blue Continue button on the toolbar again (or press F5) to run the program to completion. "Hello World" appears in the Python Debug Console if you switch back to it, and VS Code exits debugging mode once the program is complete.
If you restart the debugger, the debugger again stops on the first breakpoint.
To stop running a program before it’s complete, use the red square stop button on the debug toolbar ( ⇧F5 (Windows, Linux Shift+F5 ) ), or use the Run > Stop debugging menu command.
For full details, see Debugging configurations, which includes notes on how to use a specific Python interpreter for debugging.
Tip: Use Logpoints instead of print statements: Developers often litter source code with print statements to quickly inspect variables without necessarily stepping through each line of code in a debugger. In VS Code, you can instead use Logpoints. A Logpoint is like a breakpoint except that it logs a message to the console and doesn’t stop the program. For more information, see Logpoints in the main VS Code debugging article.
Install and use packages
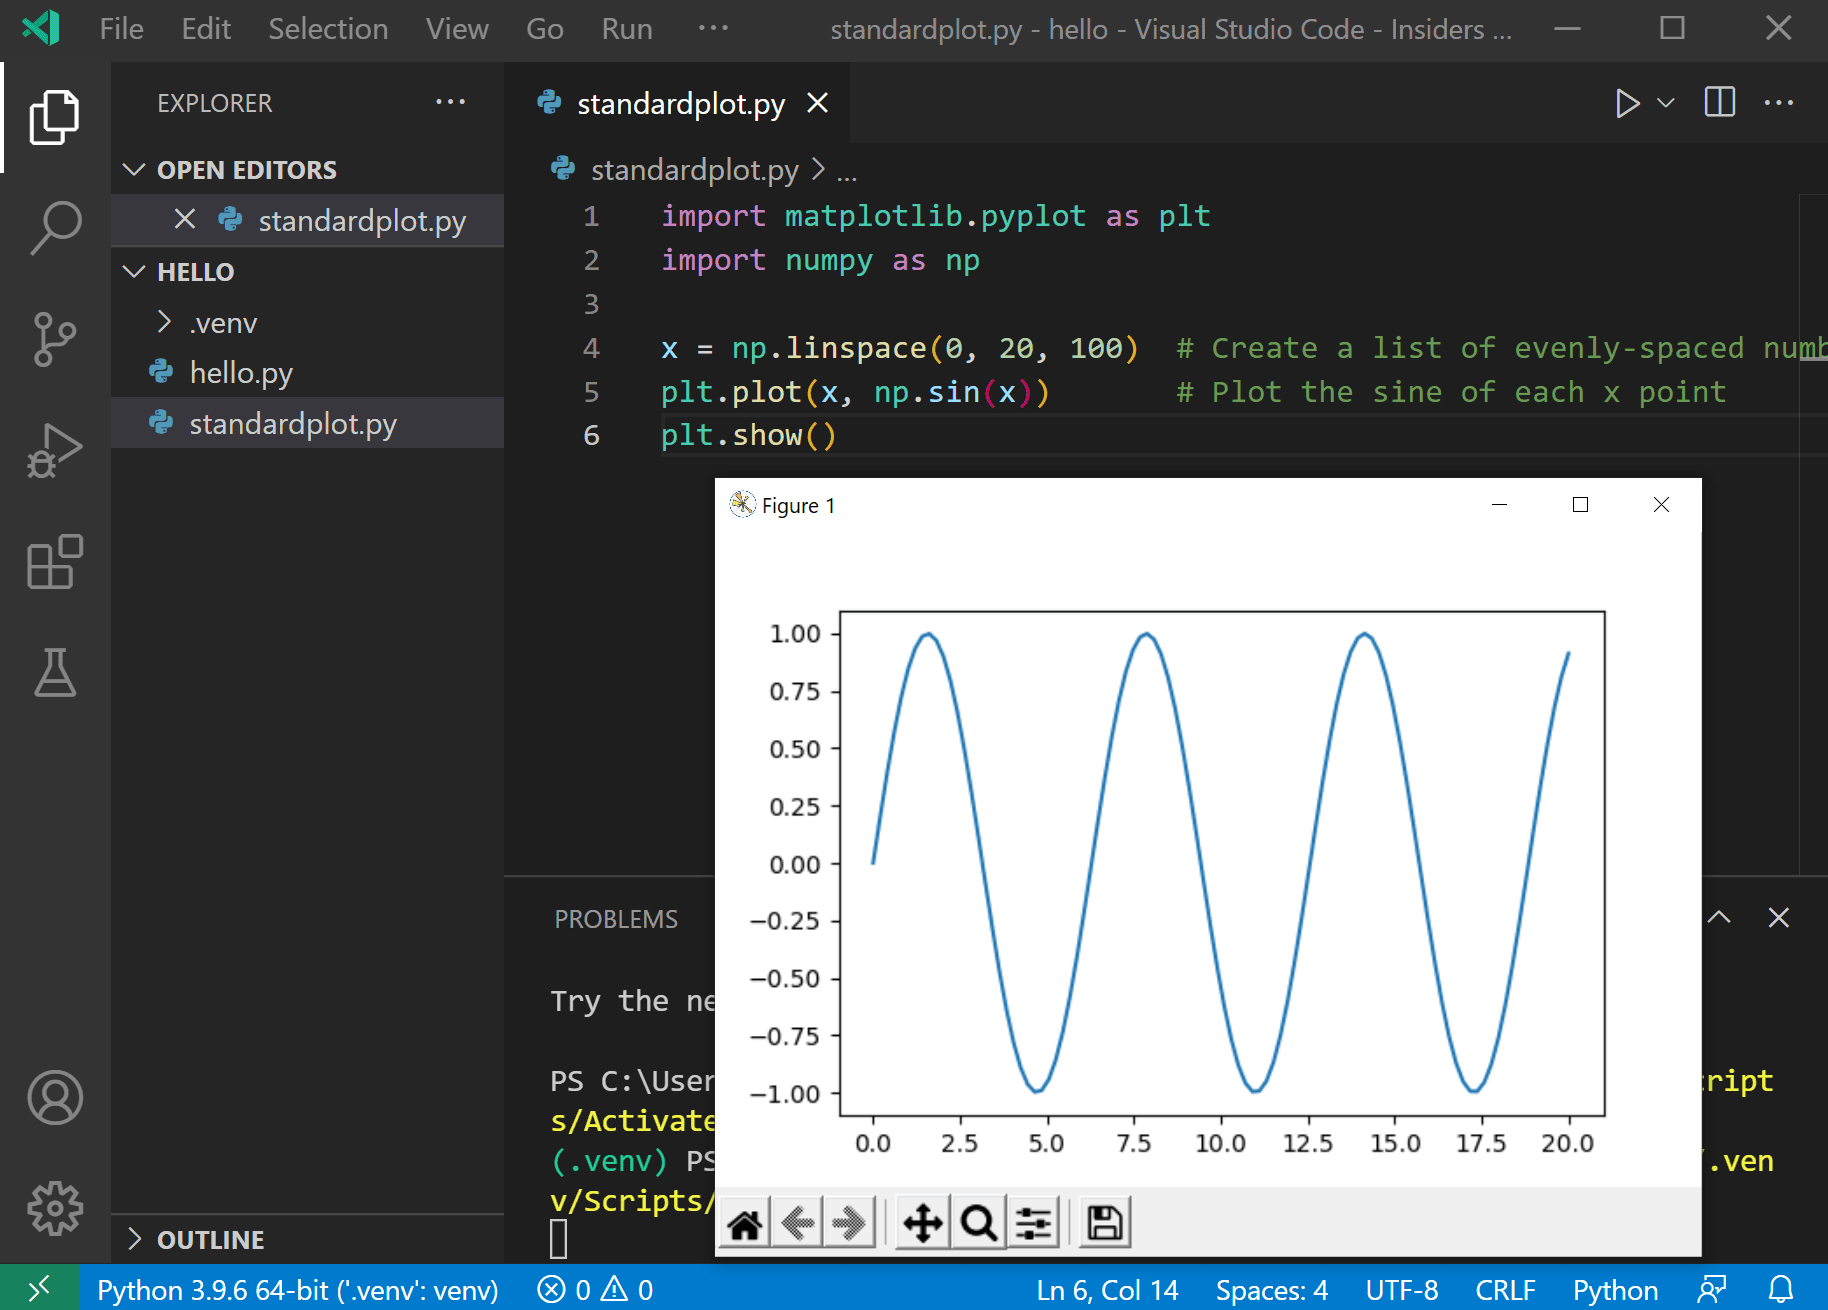
Let’s now run an example that’s a little more interesting. In Python, packages are how you obtain any number of useful code libraries, typically from PyPI. For this example, you use the matplotlib and numpy packages to create a graphical plot as is commonly done with data science. (Note that matplotlib cannot show graphs when running in the Windows Subsystem for Linux as it lacks the necessary UI support.)
Return to the Explorer view (the top-most icon on the left side, which shows files), create a new file called standardplot.py , and paste in the following source code:
Tip: If you enter the above code by hand, you may find that auto-completions change the names after the as keywords when you press Enter at the end of a line. To avoid this, type a space, then Enter .
Next, try running the file in the debugger using the "Python: Current file" configuration as described in the last section.
Unless you’re using an Anaconda distribution or have previously installed the matplotlib package, you should see the message, "ModuleNotFoundError: No module named ‘matplotlib’". Such a message indicates that the required package isn’t available in your system.
To install the matplotlib package (which also installs numpy as a dependency), stop the debugger and use the Command Palette to run Terminal: Create New Terminal ( ⌃⇧` (Windows, Linux Ctrl+Shift+` ) ). This command opens a command prompt for your selected interpreter.
A best practice among Python developers is to avoid installing packages into a global interpreter environment. You instead use a project-specific virtual environment that contains a copy of a global interpreter. Once you activate that environment, any packages you then install are isolated from other environments. Such isolation reduces many complications that can arise from conflicting package versions. To create a virtual environment and install the required packages, enter the following commands as appropriate for your operating system:
Note: For additional information about virtual environments, see Environments.
Create a virtual environment using the Create Environment command
From within VS Code, you can create non-global environments, using Venv or Anaconda, by opening the Command Palette ( ⇧⌘P (Windows, Linux Ctrl+Shift+P ) ), start typing the Python: Create Environment command to search, and then select the command. You can also trigger the Python: Create Environment command through the Getting Started with Python page.
The command presents a list of environment types, Venv or Conda. For this example, select Venv.

The command then presents a list of interpreters that can be used for your project.
After selecting the desired interpreter, a notification will show the progress of the environment creation and the environment folder will appear in your workspace.

The command will also install necessary packages outlined in a requirements/dependencies file, such as requirements.txt , pyproject.toml , or environment.yml , located in the project folder.
Note: If you want to create an environment manually, or run into error in the environment creation process, visit the Environments page.
Ensure your new environment is selected by using the Python: Select Interpreter command from the Command Palette.
Install the packages
Rerun the program now (with or without the debugger) and after a few moments a plot window appears with the output:
Once you are finished, type deactivate in the terminal window to deactivate the virtual environment.
For additional examples of creating and activating a virtual environment and installing packages, see the Django tutorial and the Flask tutorial.
Next steps
You can configure VS Code to use any Python environment you have installed, including virtual and conda environments. You can also use a separate environment for debugging. For full details, see Environments.
To learn more about the Python language, follow any of the programming tutorials listed on python.org within the context of VS Code.
To learn to build web apps with the Django and Flask frameworks, see the following tutorials:
Install Python and libraries with Visual Studio
This tutorial explains how to install Python and libraries with Visual Studio. I will also show how to install libraries in the command prompt (CMD). Python is a very powerful language for machine learning as it has many libraries that can be used to help you develop great models for prediction.
Visual Studio Installer
Use Visual Studio Installer to install Python with Visual Studio. Modify your Visual Studio Version, check Python development and click on the Modify button. Python will be installed to “C:\Program Files (x86)\Microsoft Visual Studio\Shared”.
Add to path environment variable
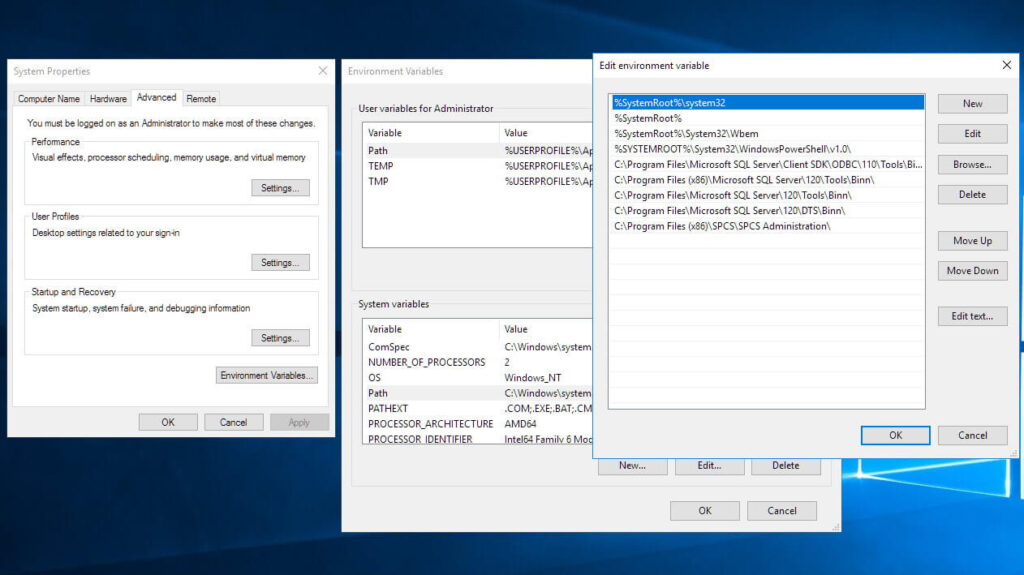
You need to add the path to the Python folder and to the Scripts folder in environment variables, if you want to be able to use Python and Pip (install libraries) from anywhere in the Command Prompt. It is also useful to add paths to directories as environment variables if other programs references these programs in code.
Search for environment variables and click on the Edit environment variables result. Add the Python directory (C:\Program Files (x86)\Microsoft Visual Studio\Shared\Python37_64) and the Scripts directory (C:\Program Files (x86)\Microsoft Visual Studio\Shared\Python37_64\Scripts) as new rows in the Path variable.
You will need to browse to the Python folder in the Command Prompt to be able to execute python scripts if you don’t have added paths to environment variables.
Install libraries
You will need some libraries to be able to work with machine learning. You can install libraries with Pip from the command prompt or in Visual Studio. Some useful libraries is joblib, numpy, pandas, matplotlib, pytesseract, scipy, statsmodels, scikit-learn, tensorflow and Keras. You need to know that names of libraries is case sensitive. To use pytesseract you will also need to install Tesseract OCR and unpack poppler, you will also need to add the path to poppler and Tesseract OCR as environment variables.
Open the Command Prompt (CMD) as an administrator to install libraries with Pip. You can install specific versions of a library and uninstall libraries with Pip.
You can also install, uninstall and upgrade Python libraries in Visual Studio. This is done inside Python Environments. Select Packages (PyPI) in the dropdown (Overview).
Test if libraries is installed
Create a new Python project in Visual Studio and add an Empty Python File to the project. Right click the new file and set it as Startup File. Add the following contents and run the script.