OpenCV в Python. Часть 1
Привет, Хабр! Запускаю цикл статей по библиотеке OpenCV в Python. Кому интересно, добро пожаловать под кат!
Введение
OpenCV — это open source библиотека компьютерного зрения, которая предназначена для анализа, классификации и обработки изображений. Широко используется в таких языках как C, C++, Python и Java.
Установка
Будем считать, что Python и библиотека OpenCV у вас уже установлены, если нет, то вот инструкция для установки python на windows и на ubuntu, установка OpenCV на windows и на ubuntu.
Немного про пиксели и цветовые пространства
Перед тем как перейти к практике, нам нужно разобраться немного с теорией. Каждое изображение состоит из набора пикселей. Пиксель — это строительный блок изображения. Если представить изображение в виде сетки, то каждый квадрат в сетке содержит один пиксель, где точке с координатой ( 0, 0 ) соответствует верхний левый угол изображения. К примеру, представим, что у нас есть изображение с разрешением 400×300 пикселей. Это означает, что наша сетка состоит из 400 строк и 300 столбцов. В совокупности в нашем изображении есть 400*300 = 120000 пикселей.
В большинстве изображений пиксели представлены двумя способами: в оттенках серого и в цветовом пространстве RGB. В изображениях в оттенках серого каждый пиксель имеет значение между 0 и 255, где 0 соответствует чёрному, а 255 соответствует белому. А значения между 0 и 255 принимают различные оттенки серого, где значения ближе к 0 более тёмные, а значения ближе к 255 более светлые:

Цветные пиксели обычно представлены в цветовом пространстве RGB(red, green, blue — красный, зелёный, синий), где одно значение для красной компоненты, одно для зелёной и одно для синей. Каждая из трёх компонент представлена целым числом в диапазоне от 0 до 255 включительно, которое указывает как «много» цвета содержится. Исходя из того, что каждая компонента представлена в диапазоне [0,255], то для того, чтобы представить насыщенность каждого цвета, нам будет достаточно 8-битного целого беззнакового числа. Затем мы объединяем значения всех трёх компонент в кортеж вида (красный, зеленый, синий). К примеру, чтобы получить белый цвет, каждая из компонент должна равняться 255: (255, 255, 255). Тогда, чтобы получить чёрный цвет, каждая из компонент должна быть равной 0: (0, 0, 0). Ниже приведены распространённые цвета, представленные в виде RGB кортежей: 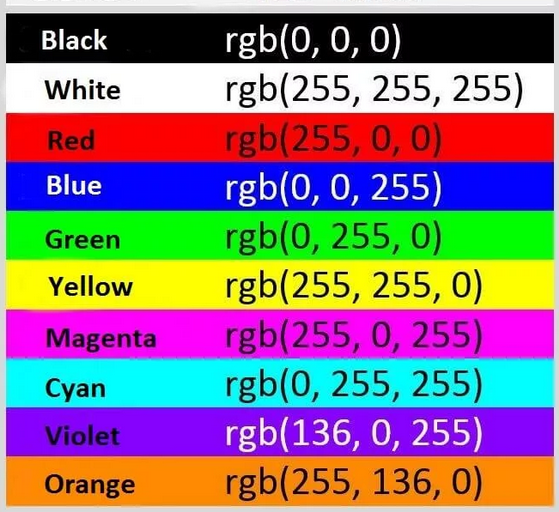
Импорт библиотеки OpenCV
Теперь перейдём к практической части. Первое, что нам необходимо сделать — это импортировать библиотеку. Есть несколько путей импорта, самый распространённый — это использовать выражение:
Также можно встретить следующую конструкцию для импорта данной библиотеки:
Загрузка, отображение и сохранение изображения
Для загрузки изображения мы используем функцию cv2.imread(), где первым аргументом указывается путь к изображению, а вторым аргументом, который является необязательным, мы указываем, в каком цветовом пространстве мы хотим считать наше изображение. Чтобы считать изображение в RGB — cv2.IMREAD_COLOR, в оттенках серого — cv2.IMREAD_GRAYSCALE. По умолчанию данный аргумент принимает значение cv2.IMREAD_COLOR. Данная функция возвращает 2D (для изображения в оттенках серого) либо 3D (для цветного изображения) массив NumPy. Форма массива для цветного изображения: высота x ширина x 3, где 3 — это байты, по одному байту на каждую из компонент. В изображениях в оттенках серого всё немного проще: высота x ширина.
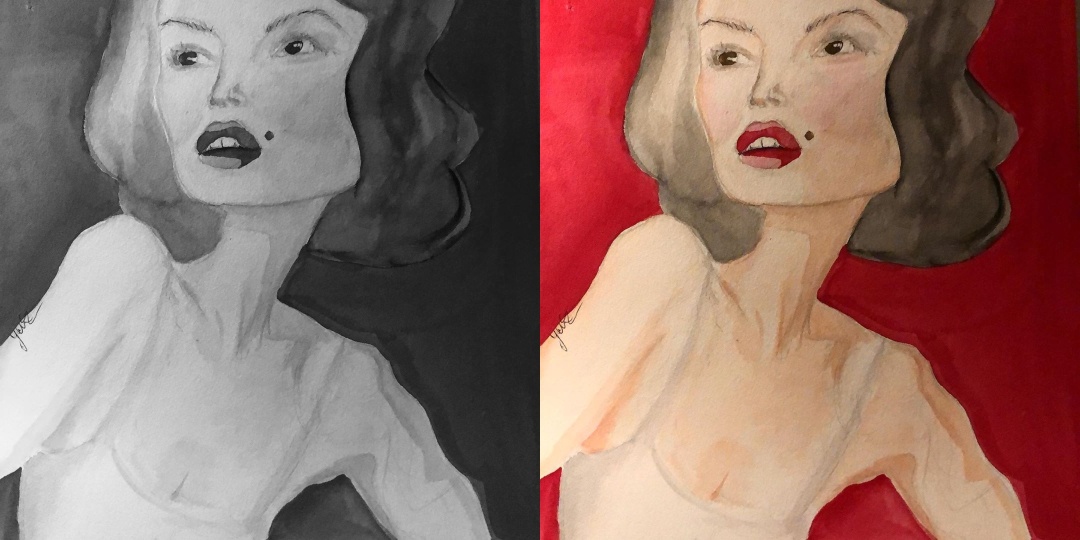
С помощью функции cv2.imshow() мы отображаем изображение на нашем экране. В качестве первого аргумента мы передаём функции название нашего окна, а вторым аргументом изображение, которое мы загрузили с диска, однако, если мы далее не укажем функцию cv2.waitKey(), то изображение моментально закроется. Данная функция останавливает выполнение программы до нажатия клавиши, которую нужно передать первым аргументом. Для того, чтобы любая клавиша была засчитана передаётся 0. Слева представлено изображение в оттенках серого, а справа в формате RGB:
И, наконец, с помощью функции cv2.imwrite() записываем изображение в файл в формате jpg(данная библиотека поддерживает все популярные форматы изображений:png, tiff,jpeg,bmp и т. д., поэтому можно было сохранить наше изображение в любом из этих форматов), где первым аргументом передаётся непосредственно само название и расширение, а следующим параметром изображение, которое мы хотим сохранить.
Доступ к пикселям и манипулирование ими
Для того, чтобы узнать высоту, ширину и количество каналов у изображения можно использовать атрибут shape:
Важно помнить, что у изображений в оттенках серого img.shape[2] будет недоступно, так как данные изображения представлены в виде 2D массива.
Чтобы получить доступ к значению пикселя, нам просто нужно указать координаты x и y пикселя, который нас интересует. Также важно помнить, что библиотека OpenCV хранит каналы формата RGB в обратном порядке, в то время как мы думаем в терминах красного, зеленого и синего, то OpenCV хранит их в порядке синего, зеленого и красного цветов:
Cначала мы берём пиксель, который расположен в точке (0,0). Данный пиксель, да и любой другой пиксель, представлены в виде кортежа. Заметьте, что название переменных расположены в порядке b, g и r. В следующей строке выводим значение каждого канала на экран. Как можно увидеть, доступ к значениям пикселей довольно прост, также просто можно и манипулировать значениями пикселей:
В первой строке мы устанавливаем значение пикселя (0, 0) равным (255, 0, 0), затем мы снова берём значение данного пикселя и выводим его на экран, в результате мне на консоль вывелось следующее:
На этом у нас конец первой части. Если вдруг кому-то нужен исходный код и картинка, то вот ссылка на github. Всем спасибо за внимание!
Install OpenCV-Python in Windows
Below Python packages are to be downloaded and installed to their default locations.
1.1. Python-2.7.x.
1.2. Numpy.
1.3. Matplotlib (Matplotlib is optional, but recommended since we use it a lot in our tutorials).
Install all packages into their default locations. Python will be installed to C:/Python27/.
After installation, open Python IDLE. Enter import numpy and make sure Numpy is working fine.
Download latest OpenCV release from sourceforge site and double-click to extract it.
Goto opencv/build/python/2.7 folder.
Copy cv2.pyd to C:/Python27/lib/site-packeges.
Open Python IDLE and type following codes in Python terminal.
If the results are printed out without any errors, congratulations . You have installed OpenCV-Python successfully.
Building OpenCV from source
Download and install Visual Studio and CMake.
Download and install necessary Python packages to their default locations
2.1. Python 2.7.x
2.2. Numpy
2.3. Matplotlib (Matplotlib is optional, but recommended since we use it a lot in our tutorials.)
In this case, we are using 32-bit binaries of Python packages. But if you want to use OpenCV for x64, 64-bit binaries of Python packages are to be installed. Problem is that, there is no official 64-bit binaries of Numpy. You have to build it on your own. For that, you have to use the same compiler used to build Python. When you start Python IDLE, it shows the compiler details. You can get more information here. So your system must have the same Visual Studio version and build Numpy from source.
Another method to have 64-bit Python packages is to use ready-made Python distributions from third-parties like Anaconda, Enthought etc. It will be bigger in size, but will have everything you need. Everything in a single shell. You can also download 32-bit versions also.
Make sure Python and Numpy are working fine.
Download OpenCV source. It can be from Sourceforge (for official release version) or from Github (for latest source).
Extract it to a folder, opencv and create a new folder build in it.
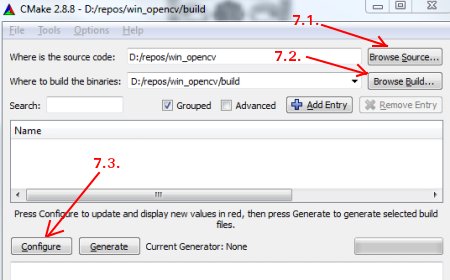
Open CMake-gui (Start > All Programs > CMake-gui)
Fill the fields as follows (see the image below):
7.1. Click on Browse Source. and locate the opencv folder.
7.2. Click on Browse Build. and locate the build folder we created.
7.3. Click on Configure.
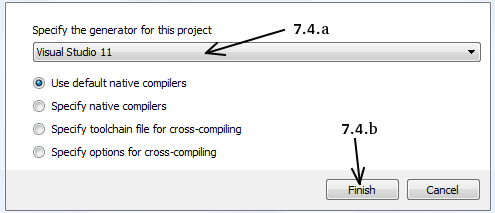
7.4. It will open a new window to select the compiler. Choose appropriate compiler (here, Visual Studio 11) and click Finish.
7.5. Wait until analysis is finished.
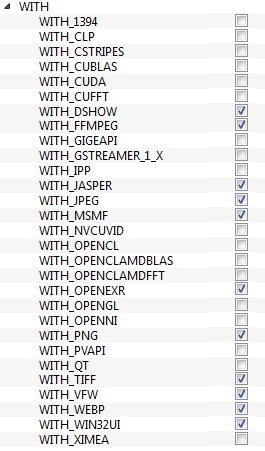
You will see all the fields are marked in red. Click on the WITH field to expand it. It decides what extra features you need. So mark appropriate fields. See the below image:
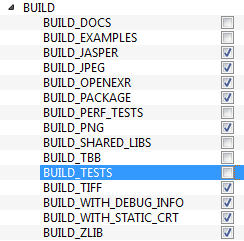
Now click on BUILD field to expand it. First few fields configure the build method. See the below image:
Remaining fields specify what modules are to be built. Since GPU modules are not yet supported by OpenCV-Python, you can completely avoid it to save time (But if you work with them, keep it there). See the image below:
Now click on ENABLE field to expand it. Make sure ENABLE_SOLUTION_FOLDERS is unchecked (Solution folders are not supported by Visual Studio Express edition). See the image below:
Also make sure that in the PYTHON field, everything is filled. (Ignore PYTHON_DEBUG_LIBRARY). See image below:
Finally click the Generate button.
Now go to our opencv/build folder. There you will find OpenCV.sln file. Open it with Visual Studio.
Check build mode as Release instead of Debug.
In the solution explorer, right-click on the Solution (or ALL_BUILD) and build it. It will take some time to finish.
Again, right-click on INSTALL and build it. Now OpenCV-Python will be installed.
Open Python IDLE and enter import cv2 . If no error, it is installed correctly.
We have installed with no other support like TBB, Eigen, Qt, Documentation etc. It would be difficult to explain it here. A more detailed video will be added soon or you can just hack around.
5 Simple and Easy steps for Installation of OPENCV
![]()
Setting up the system can sometimes seem a little complicated. For the same reason I decided to share a small tutorial on Installation of OpenCV. In this tutorial we will learn to setup OpenCV-Python in Ubuntu System. Below steps are tested for Ubuntu 16.04 (64-bit) and Ubuntu 14.04 (32-bit). Let’s get started!
OpenCV — Python can be installed in Ubuntu in two ways:
1.Compile from the source.
2.Install from pre-built binaries available in Ubuntu repositories.
1. Building OpenCV From Source
Required build Dependencies
First of all we need CMake to configure the installation, GCC for compilation, Python-devel and Numpy for building Python bindings etc. Here are the commands you need to run.
Next we need GTK support for GUI features, Camera support (libv4l), Media Support (ffmpeg, gstreamer) etc.
2. Optional Dependencies
Above dependencies are sufficient to install OpenCV in your Ubuntu machine. But depending upon your requirements, you may need some extra dependencies. A list of such optional dependencies are given below. You can either leave it or install it, your call 🙂
OpenCV comes with supporting files for image formats like PNG, JPEG, JPEG2000, TIFF, WebP etc. But it may be a little old. If you want to get latest libraries, you can install development files for system libraries of these formats.
3. Downloading OpenCV
To download the latest source from OpenCV’s GitHub Repository.
It will create a folder “opencv” in current directory.
After then Now open a terminal window and navigate to the downloaded “opencv” folder. Create a new “build” folder and navigate to it.
4. Configuring and Installing
Now we have all the required dependencies, let’s install OpenCV.
You should see these lines in your CMake output (they mean that Python is properly found):
Now you build the files using “make” command and install it using “make install” command.
5. Installation is over
All files are installed in “/usr/local/” folder. Open a terminal and try import “cv2”.
Thank you for reading. Please Clap and Follow for More, Easy and Interesting Articles.
Как установить модуль cv2 python
Prerequisite: Python Language Introduction OpenCV is the huge open-source library for computer vision, machine learning, and image processing and now it plays a major role in real-time operation which is very important in today’s systems. By using it, one can process images and videos to identify objects, faces, or even the handwriting of a human. When it integrated with various libraries, such as Numpy, python is capable of processing the OpenCV array structure for analysis. To Identify image patterns and its various features we use vector space and perform mathematical operations on these features. To install OpenCV, one must have Python and PIP, preinstalled on their system. To check if your system already contains Python, go through the following instructions: Open the Command line(search for cmd in the Run dialog( + R). Now run the following command:
If Python is already installed, it will generate a message with the Python version available.  If Python is not present, go through How to install Python on Windows? and follow the instructions provided. PIP is a package management system used to install and manage software packages/libraries written in Python. These files are stored in a large “on-line repository” termed as Python Package Index (PyPI). To check if PIP is already installed on your system, just go to the command line and execute the following command:
 If PIP is not present, go through How to install PIP on Windows? and follow the instructions provided.
Downloading and Installing OpenCV:
OpenCV can be directly downloaded and installed with the use of pip (package manager). To install OpenCV, just go to the command-line and type the following command:
Beginning with the installation:
- Type the command in the Terminal and proceed:

- Collecting Information and downloading data:

- Installing Packages:

- Finished Installation:

To check if OpenCV is correctly installed, just run the following commands to perform a version check: