А вы знаете о том, что в Python есть встроенная СУБД?
Если вы — программист, то я полагаю, что вы, наверняка, знаете о существовании чрезвычайно компактной и нетребовательной к ресурсам СУБД SQLite, или даже пользовались ей. Эта система обладает практически всеми возможностями, которых можно ожидать от реляционной СУБД, но при этом всё хранится в единственном файле. Вот некоторые сценарии использования SQLite, упомянутые на официальном сайте этой системы:
- Встраиваемые устройства и IoT.
- Анализ данных.
- Перенос данных из одной системы в другую.
- Архивирование данных и (или) упаковка данных в контейнеры.
- Хранение данных во внешней или временной БД.
- Заменитель корпоративной БД, используемый в демонстрационных или испытательных целях.
- Обучение, освоение начинающими практических приёмов работы с БД.
- Прототипирование и исследование экспериментальных расширений языка SQL.
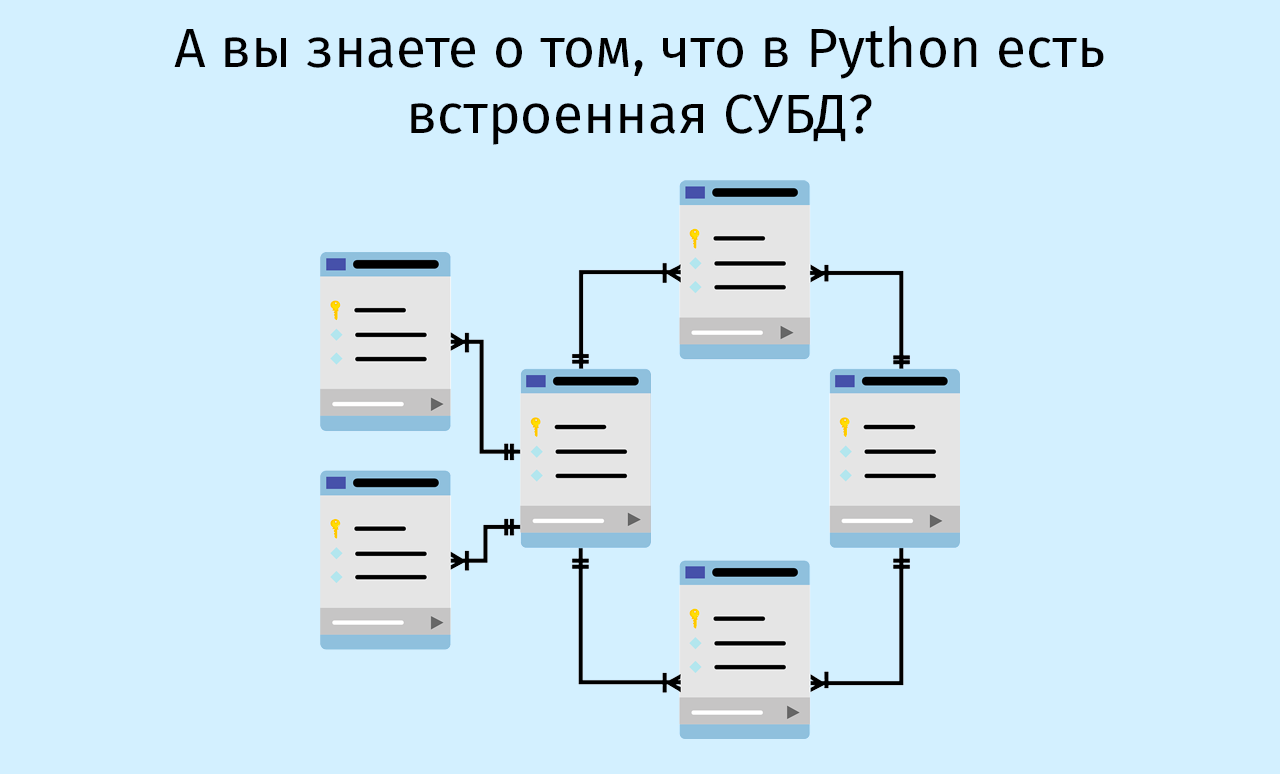
Данный материал посвящён использованию SQLite в Python-разработке. Поэтому для нас особенно важно то, что эта СУБД, представленная модулем sqlite3 , входит в стандартную библиотеку языка. То есть оказывается, что для работы с SQLite из Python-кода не нужно устанавливать некое клиент-серверное ПО, не нужно поддерживать работу какого-то сервиса, отвечающего за работу с СУБД. Достаточно лишь импортировать модуль sqlite3 и приступить к его использованию в программе, получив в своё распоряжение систему управления реляционными базами данных.
Импорт модуля
Выше я говорил о том, что SQLite — это СУБД, встроенная в Python. Это значит, что для того чтобы приступить к работе с ней, достаточно импортировать соответствующий модуль, не выполняя предварительно его установку с помощью команды вроде pip install . Команда импорта SQLite выглядит так:
Создание подключения к БД
Для организации подключения к базе данных SQLite не нужно беспокоиться об установке драйверов, о подготовке строк подключения и о прочих подобных вещах. Создать базу данных и получить в своё распоряжение объект подключения к ней можно очень просто и быстро:
Выполнив эту строку кода, мы создадим базу данных и подключимся к ней. Дело тут в том, что база данных, к которой мы подключаемся, пока не существует, поэтому система автоматически создаёт новую пустую БД. Если же база данных уже создана (предположим, это my-test.db из предыдущего примера), для того чтобы к ней подключиться, достаточно воспользоваться точно таким же кодом.

Файл только что созданной базы данных
Создание таблицы
Теперь давайте создадим таблицу в нашей новой БД:
Тут описано добавление в БД таблицы USER с тремя столбцами. Как видите, SQLite — это и правда очень простая в работе СУБД, но она обладает всеми основными возможностями, наличия которых можно ожидать от обычной системы управления реляционными базами данных. Речь идёт о поддержке типов данных, в том числе — типов, допускающих значение null , о поддержке первичного ключа и автоинкремента.
Если этот код функционирует так, как ожидается (вышеприведённая команда, правда, ничего не возвращает), в нашем распоряжении окажется таблица, готовая к дальнейшей работе с ней.
Вставка записей в таблицу
Вставим несколько записей в таблицу USER , которую мы только что создали. Это, кроме прочего, даст нам доказательство того, что таблица, и правда, была создана вышеприведённой командой.
Представим, что нам нужно добавить в таблицу несколько записей одной командой. В SQLite сделать это очень просто:
Здесь нам нужно определить SQL-выражение со знаками вопроса ( ? ) в виде местозаполнителей. Учитывая то, что в нашем распоряжении есть объект подключения к базе данных, мы, подготовив выражение и данные, можем вставить записи в таблицу:
Сообщений об ошибках после выполнения этого кода не поступает, а это значит, что данные успешно добавлены в таблицу.
Выполнение запросов к базе данных
Теперь пришло время узнать о том, правильно ли отработали команды, которые мы только что выполняли. Давайте выполним запрос к БД и попробуем получить из таблицы USER какие-то данные. Например — получим записи, относящиеся к пользователям, возраст которых не превышает 22 года:
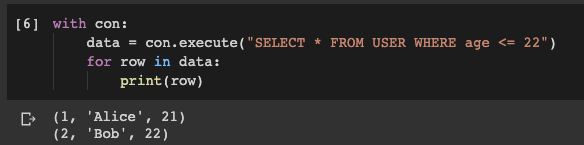
Результат выполнения запроса к БД
Как видите, то, что было нужно, получить удалось. И сделать это было очень просто.
Кроме того, даже хотя SQLite — простая СУБД, она отличается крайне широкой поддержкой. Поэтому с ней можно работать, используя большинство SQL-клиентов.
Я пользуюсь DBeaver. Предлагаю взглянуть на то, как это выглядит.
Подключение к базе данных SQLite из SQL-клиента (DBeaver)
Я пользуюсь облачным сервисом Google Colab и хочу загрузить файл my-test.db на свой компьютер. Если же вы экспериментируете с SQLite на компьютере, то это значит, что вы, без необходимости скачивать откуда-то файл базы данных, можете подключиться к ней, используя SQL-клиент.
В случае с DBeaver для подключения к БД SQLite нужно создать новое подключение и выбрать, в качества типа базы данных, SQLite.
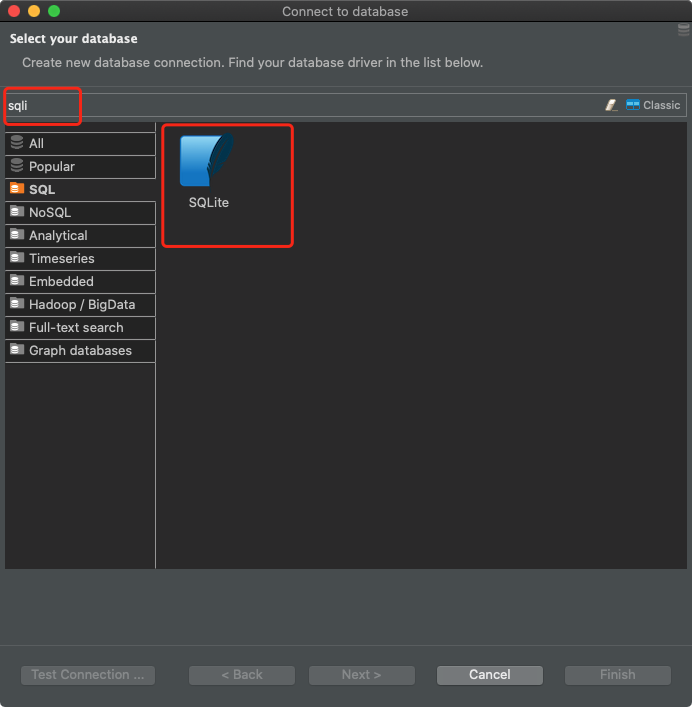
Подготовка подключения в DBeaver
Затем надо найти файл базы данных.
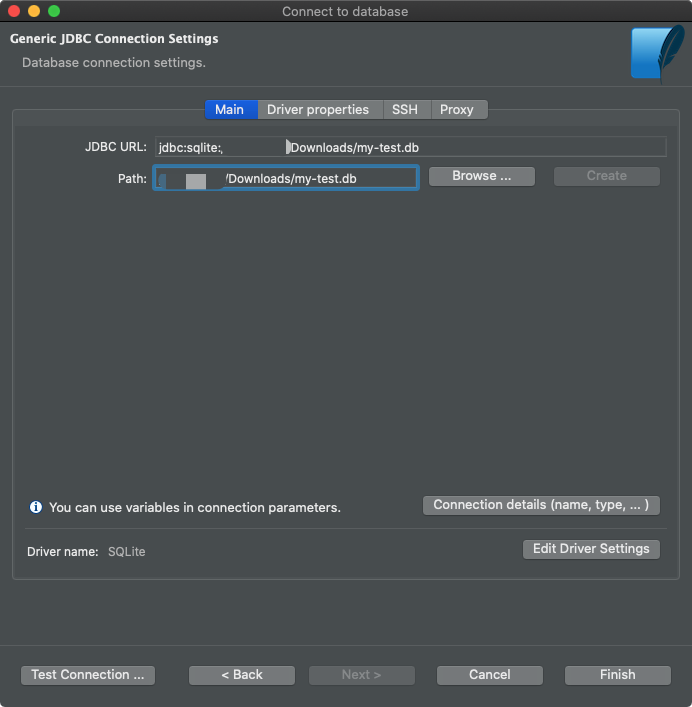
Подключение файла базы данных
После этого можно выполнять SQL-запросы к базе данных. Тут нет ничего особенного, отличающегося от работы с обычными реляционными БД.
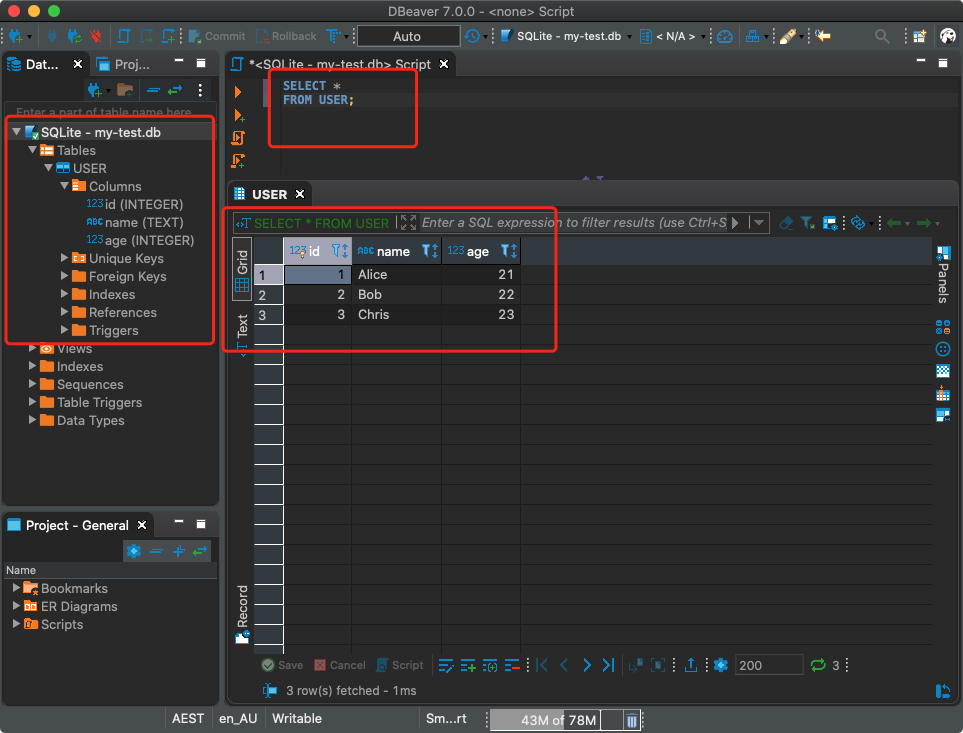
Выполнение запросов к базе данных
Интеграция с pandas
Думаете, на этом мы завершим разговор о поддержке SQLite в Python? Нет, нам ещё есть о чём поговорить. А именно, так как SQLite — это стандартный Python-модуль, эта СУБД легко интегрируется с дата-фреймами pandas.
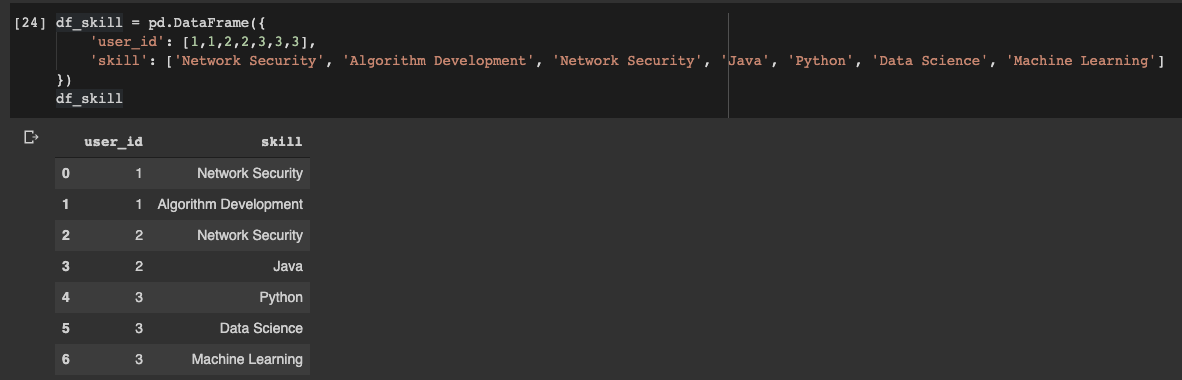
Датафрейм pandas
Для сохранения датафрейма в БД можно просто воспользоваться его методом to_sql() :
Вот и всё! Нам даже не нужно заранее создавать таблицу. Типы данных и характеристики полей будут настроены автоматически, на основании характеристик датафрейма. Конечно, вы, если надо, можете настроить всё самостоятельно.
Теперь, предположим, нам нужно получить объединение таблиц USER и SKILL и записать полученные данные в датафрейм pandas. Это тоже очень просто:
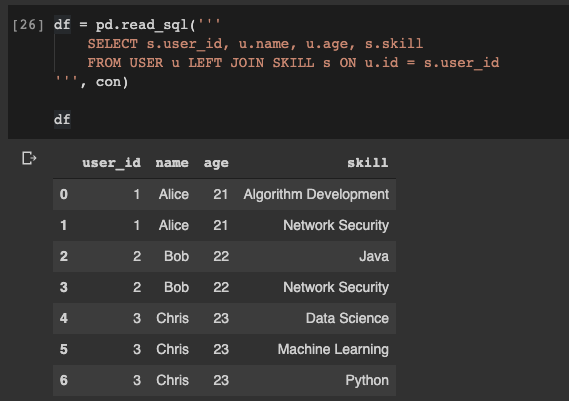
Чтение данных из БД в датафрейм pandas
Замечательно! А теперь давайте запишем то, что у нас получилось, в новую таблицу с именем USER_SKILL :
С этой таблицей, конечно, можно работать и пользуясь SQL-клиентом.
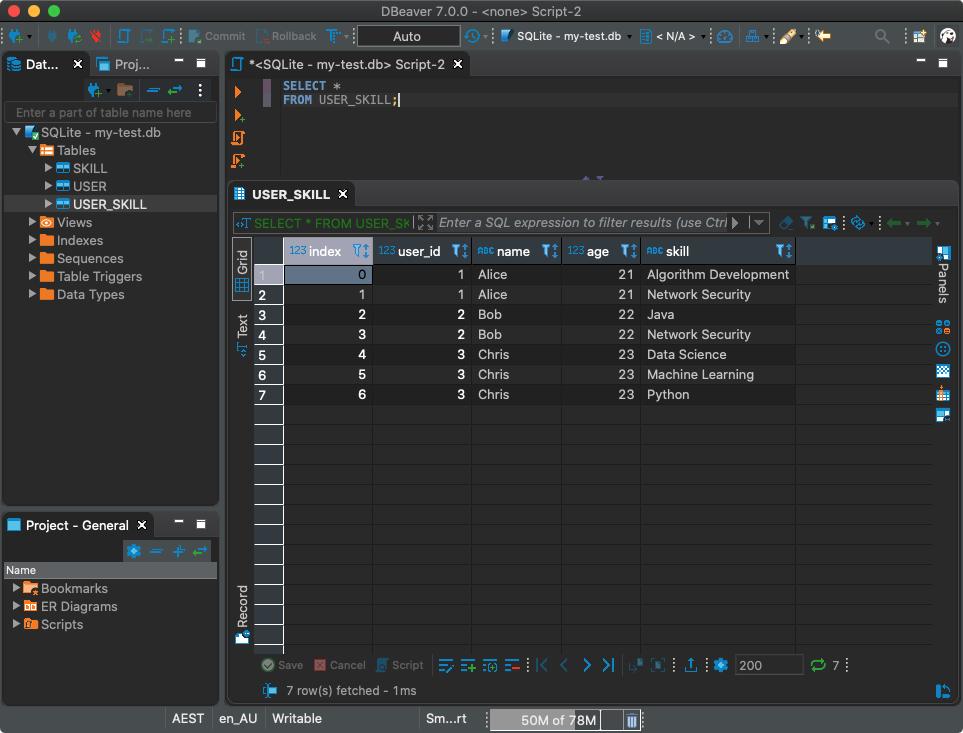
Применение SQL-клиента для работы с базой данных
Итоги
В Python, безусловно, есть много приятных неожиданностей, которые, если специально их не искать, можно и не заметить. Специально подобные возможности никто не прятал, но из-за того, что в Python встроено очень много всего, на некоторые из таких возможностей можно просто не обратить внимания, или, откуда-то о них узнав, просто о них забыть.
Здесь я рассказал о том, как использовать встроенную в Python библиотеку sqlite3 для создания баз данных и для работы с ними. Конечно, такие БД поддерживают не только операцию добавления данных, но и операции изменения и удаления информации. Полагаю, вы, узнав о sqlite3 , испытаете всё это сами.
Очень важно то, что SQLite отлично стыкуется с pandas. Данные из БД очень легко считывать, помещая в датафреймы. Не менее проста и операция по сохранению содержимого датафреймов в базу данных. Это ещё сильнее упрощает использование SQLite.
Предлагаю всем, кто дочитал до этого места, заняться собственными исследованиями в поиске интересных возможностей Python!
Install SQLite in Python

SQLite is an RDBMS that is based on PostgreSQL syntax. It is not a client-server system and offers a variety of features to its users. It is faster than an SQL server and is serverless, portable, and self-contained. The only downside is that it provides only one writer at a time.
Please enable JavaScript
We can access SQLite databases with Python. Python provides support to work with such databases and manipulate them. The support for this is included in the standard Python library.
The sqlite3 package provides different functionalities to work with the SQLite databases. As discussed, this is included by default in the standard library.
However, if one faces an issue with this, we can very easily install it using the pip command. The pip allows us to download and manage different packages in Python.
Install Sqlite3 on Python Version 2.7 Using Pip
We will be using pip to install the SQLite package in this case. Type the below command in the cmd to install the SQLite package on your system.
The above package would be successfully installed using the above approach.
Install Sqlite3 Using Conda
Now, let us use the anaconda library to install the same package. Typing the below command will do the job for us.
The required package will be successfully installed using the command.
Install Sqlite3 on Python Version 3 Using Pip
Let us now install the SQLite package on Python version 3. To perform this, we run the below command.
In the abovementioned ways, we can install sqlite3 using various packages in various Python versions.
Manav is a IT Professional who has a lot of experience as a core developer in many live projects. He is an avid learner who enjoys learning new things and sharing his findings whenever possible.
How can I add the sqlite3 module to Python?
Can someone tell me how to install the sqlite3 module alongside the most recent version of Python? I am using a Macbook, and on the command line, I tried:
but an error pops up.

6 Answers 6
You don’t need to install sqlite3 module. It is included in the standard library (since Python 2.5).
For Python version 3:
I have python 2.7.3 and this solved my problem:

Normally, it is included. However, as @ngn999 said, if your python has been built from source manually, you’ll have to add it.
Here is an example of a script that will setup an encapsulated version (virtual environment) of Python3 in your user directory with an encapsulated version of sqlite3.
Why do this? You might want a modular python environment that you can completely destroy and rebuild without affecting your managed package installation. This would give you an independent development environment. In this case, the solution is to install sqlite3 modularly too.
sqlite3 — DB-API 2.0 interface for SQLite databases
SQLite is a C library that provides a lightweight disk-based database that doesn’t require a separate server process and allows accessing the database using a nonstandard variant of the SQL query language. Some applications can use SQLite for internal data storage. It’s also possible to prototype an application using SQLite and then port the code to a larger database such as PostgreSQL or Oracle.
The sqlite3 module was written by Gerhard Häring. It provides an SQL interface compliant with the DB-API 2.0 specification described by PEP 249, and requires SQLite 3.7.15 or newer.
This document includes four main sections:
Tutorial teaches how to use the sqlite3 module.
Reference describes the classes and functions this module defines.
How-to guides details how to handle specific tasks.
Explanation provides in-depth background on transaction control.
The SQLite web page; the documentation describes the syntax and the available data types for the supported SQL dialect.
Tutorial, reference and examples for learning SQL syntax.
PEP 249 — Database API Specification 2.0
PEP written by Marc-André Lemburg.
Tutorial
In this tutorial, you will create a database of Monty Python movies using basic sqlite3 functionality. It assumes a fundamental understanding of database concepts, including cursors and transactions.
First, we need to create a new database and open a database connection to allow sqlite3 to work with it. Call sqlite3.connect() to create a connection to the database tutorial.db in the current working directory, implicitly creating it if it does not exist:
The returned Connection object con represents the connection to the on-disk database.
In order to execute SQL statements and fetch results from SQL queries, we will need to use a database cursor. Call con.cursor() to create the Cursor :
Now that we’ve got a database connection and a cursor, we can create a database table movie with columns for title, release year, and review score. For simplicity, we can just use column names in the table declaration – thanks to the flexible typing feature of SQLite, specifying the data types is optional. Execute the CREATE TABLE statement by calling cur.execute(. ) :
We can verify that the new table has been created by querying the sqlite_master table built-in to SQLite, which should now contain an entry for the movie table definition (see The Schema Table for details). Execute that query by calling cur.execute(. ) , assign the result to res , and call res.fetchone() to fetch the resulting row:
We can see that the table has been created, as the query returns a tuple containing the table’s name. If we query sqlite_master for a non-existent table spam , res.fetchone() will return None :
Now, add two rows of data supplied as SQL literals by executing an INSERT statement, once again by calling cur.execute(. ) :
The INSERT statement implicitly opens a transaction, which needs to be committed before changes are saved in the database (see Transaction control for details). Call con.commit() on the connection object to commit the transaction:
We can verify that the data was inserted correctly by executing a SELECT query. Use the now-familiar cur.execute(. ) to assign the result to res , and call res.fetchall() to return all resulting rows:
The result is a list of two tuple s, one per row, each containing that row’s score value.
Now, insert three more rows by calling cur.executemany(. ) :
Notice that ? placeholders are used to bind data to the query. Always use placeholders instead of string formatting to bind Python values to SQL statements, to avoid SQL injection attacks (see How to use placeholders to bind values in SQL queries for more details).
We can verify that the new rows were inserted by executing a SELECT query, this time iterating over the results of the query:
Each row is a two-item tuple of (year, title) , matching the columns selected in the query.
Finally, verify that the database has been written to disk by calling con.close() to close the existing connection, opening a new one, creating a new cursor, then querying the database:
You’ve now created an SQLite database using the sqlite3 module, inserted data and retrieved values from it in multiple ways.
How-to guides for further reading:
-
How to use placeholders to bind values in SQL queries
-
How to adapt custom Python types to SQLite values
-
How to convert SQLite values to custom Python types
-
How to use the connection context manager
-
How to create and use row factories
Explanation for in-depth background on transaction control.
Reference
Module functions
Open a connection to an SQLite database.
database ( path-like object ) – The path to the database file to be opened. Pass ":memory:" to open a connection to a database that is in RAM instead of on disk.
timeout (float) – How many seconds the connection should wait before raising an OperationalError when a table is locked. If another connection opens a transaction to modify a table, that table will be locked until the transaction is committed. Default five seconds.
detect_types (int) – Control whether and how data types not natively supported by SQLite are looked up to be converted to Python types, using the converters registered with register_converter() . Set it to any combination (using | , bitwise or) of PARSE_DECLTYPES and PARSE_COLNAMES to enable this. Column names takes precedence over declared types if both flags are set. Types cannot be detected for generated fields (for example max(data) ), even when the detect_types parameter is set; str will be returned instead. By default ( 0 ), type detection is disabled.
isolation_level (str | None) – The isolation_level of the connection, controlling whether and how transactions are implicitly opened. Can be "DEFERRED" (default), "EXCLUSIVE" or "IMMEDIATE" ; or None to disable opening transactions implicitly. See Transaction control for more.
check_same_thread (bool) – If True (default), ProgrammingError will be raised if the database connection is used by a thread other than the one that created it. If False , the connection may be accessed in multiple threads; write operations may need to be serialized by the user to avoid data corruption. See threadsafety for more information.
factory (Connection) – A custom subclass of Connection to create the connection with, if not the default Connection class.
cached_statements (int) – The number of statements that sqlite3 should internally cache for this connection, to avoid parsing overhead. By default, 128 statements.
Raises an auditing event sqlite3.connect with argument database .
Raises an auditing event sqlite3.connect/handle with argument connection_handle .
New in version 3.4: The uri parameter.
Changed in version 3.7: database can now also be a path-like object , not only a string.
New in version 3.10: The sqlite3.connect/handle auditing event.
Return True if the string statement appears to contain one or more complete SQL statements. No syntactic verification or parsing of any kind is performed, other than checking that there are no unclosed string literals and the statement is terminated by a semicolon.
This function may be useful during command-line input to determine if the entered text seems to form a complete SQL statement, or if additional input is needed before calling execute() .
sqlite3. enable_callback_tracebacks ( flag , / ) 
Enable or disable callback tracebacks. By default you will not get any tracebacks in user-defined functions, aggregates, converters, authorizer callbacks etc. If you want to debug them, you can call this function with flag set to True . Afterwards, you will get tracebacks from callbacks on sys.stderr . Use False to disable the feature again.
Register an unraisable hook handler for an improved debug experience:
Register an adapter callable to adapt the Python type type into an SQLite type. The adapter is called with a Python object of type type as its sole argument, and must return a value of a type that SQLite natively understands .
sqlite3. register_converter ( typename , converter , / ) 
Register the converter callable to convert SQLite objects of type typename into a Python object of a specific type. The converter is invoked for all SQLite values of type typename; it is passed a bytes object and should return an object of the desired Python type. Consult the parameter detect_types of connect() for information regarding how type detection works.
Note: typename and the name of the type in your query are matched case-insensitively.
Module constants
Pass this flag value to the detect_types parameter of connect() to look up a converter function by using the type name, parsed from the query column name, as the converter dictionary key. The type name must be wrapped in square brackets ( [] ).
This flag may be combined with PARSE_DECLTYPES using the | (bitwise or) operator.
Pass this flag value to the detect_types parameter of connect() to look up a converter function using the declared types for each column. The types are declared when the database table is created. sqlite3 will look up a converter function using the first word of the declared type as the converter dictionary key. For example:
This flag may be combined with PARSE_COLNAMES using the | (bitwise or) operator.
sqlite3. SQLITE_OK ¶ sqlite3. SQLITE_DENY ¶ sqlite3. SQLITE_IGNORE 
Flags that should be returned by the authorizer_callback callable passed to Connection.set_authorizer() , to indicate whether:
Access is allowed ( SQLITE_OK ),
The SQL statement should be aborted with an error ( SQLITE_DENY )
The column should be treated as a NULL value ( SQLITE_IGNORE )
String constant stating the supported DB-API level. Required by the DB-API. Hard-coded to "2.0" .
String constant stating the type of parameter marker formatting expected by the sqlite3 module. Required by the DB-API. Hard-coded to "qmark" .
The named DB-API parameter style is also supported.
Version number of the runtime SQLite library as a string .
Version number of the runtime SQLite library as a tuple of integers .
Integer constant required by the DB-API 2.0, stating the level of thread safety the sqlite3 module supports. This attribute is set based on the default threading mode the underlying SQLite library is compiled with. The SQLite threading modes are:
-
Single-thread: In this mode, all mutexes are disabled and SQLite is unsafe to use in more than a single thread at once.
-
Multi-thread: In this mode, SQLite can be safely used by multiple threads provided that no single database connection is used simultaneously in two or more threads.
-
Serialized: In serialized mode, SQLite can be safely used by multiple threads with no restriction.
The mappings from SQLite threading modes to DB-API 2.0 threadsafety levels are as follows: