MVC pattern in Python: Introduction and BasicModel
If you have ever worked with Graphical User Interfaces or web frameworks (e.g. Django), chances are that you heard about the Model-View-Controller pattern.
Since I wanted to understand and implement in Python the most popular patterns, I decided I had to implement a basic MVC from scratch.
This is the first article of a series of blog posts related to the MVC pattern. Here are the links to the other articles in the series:
All code was written in Python 3.5. If you are using Python 2.7 you should be able to run it with a few minor changes.
Table of contents
Introduction
- the Model manages the data and defines rules and behaviors. It represents the business logic of the application. The data can be stored in the Model itself or in a database (only the Model has access to the database).
- the View presents the data to the user. A View can be any kind of output representation: a HTML page, a chart, a table, or even a simple text output. A View should never call its own methods; only a Controller should do it.
- the Controller accepts user’s inputs and delegates data representation to a View and data handling to a Model.
Since Model, View and Controller are decoupled, each one of the three can be extended, modified and replaced without having to rewrite the other two.
A word of caution: according to Wikipedia, create, read, update, and delete are the four basic functions of persistent storage. A persistance layer can be implemented with a database table, a XML file, a JSON, or even a CSV. However, in this first post I want to keep things as simple as possible, so I will create a MVC application that doesn’t have any persistent storage. You could argue that this is not really a CRUD application, but I hope that you will be satisfied with the next article, where I will implement the persistance layer with a SQLite database.
Let’s think about the inventory of a small grocery store. A typical product list would look like this:
| Name | Price | Quantity |
|---|---|---|
| Bread | 0.5 | 20 |
| Milk | 1.0 | 10 |
| Wine | 10.0 | 5 |
In Python you can think about these items as a list of dictionaries.
The list of items can be changed any time you perform one of the following operations:
- create new items
- update existing items
- delete existing items
The read operation does not modify anything in the list of items.
Instead of jumping straight into creating classes for Model, View and Controller, let’s try to implement each CRUD functionality in the simplest way possible. Keep in mind that we have to use a global variable to store the list of items because its state must be shared across all operations.
Create a python script and call it basic_backend.py .
Let’s start with the Create functionality.
As you can see, Create operations don’t return anything. They just append new data to the global items list.
Let’s add a Read functionality.
Actually there are already a couple of problems with this implementation:
- if you create the same element twice, you get a duplicate in the items list;
- if you try to read a non-existing item, you get an IndexError exception.
These issues are very easy to fix, but I think it’s important to pause for a moment and think about why they are a problem for your application, and how you want to handle these exceptions.
- duplicate item -> you don’t want duplicates in the list of items. As soon as the user tries to append an item that already exists, you want to prevent this operation and return her a message that the item was already stored.
- non-existing item -> obviously you can’t read an item which is not currently available, so you want to tell the user that the item is not stored.
It’s important to think about these issues right now because we want to create specific exceptions for these situations.
In this example items is just a list, but if it were a table in a SQLite database, these conditions would trigger different exceptions (e.g. adding a duplicate could raise an IntegrityError exception). You want to create exceptions that are at a higher level of abstraction, and implement the exception handling for each persistance layer. If this sounds confusing right now, just bear with me and I hope it will make more sense in the next article.
Let’s create these exceptions in a new file and call it mvc_exceptions.py .
Let’s update the code in basic_backend.py .
Now, if you try to create an item that already exists, you get a ItemAlreadyStored exception, and if you try to read an item that is not stored, you get a ItemNotStored exception.
Let’s now add the Update and Delete functionalities.
Basically these operations represent the business logic of the application. Let’s test them!
Model
Controller
Test Run
Create some items and instantiate a Controller .
Show all items. The bullet_points parameter controls which view to display. When you call c.show_items() you get this:
and when you call c.show_items(bullet_points=True) you get this:
When you call c.show_item(‘chocolate’) , but there is no ‘chocolate’ , you get this message:
Instead, when you call c.show_item(‘bread’) , a different method of the View class is called, so you see a different output.
You are prevented from inserting the same item a second time (e.g. you type c.insert_item(‘bread’, price=1.0, quantity=5) ).
But obviously you can add an item which was is not currently stored, for example with: c.insert_item(‘chocolate’, price=2.0, quantity=10) .
So now you can call c.show_item(‘chocolate’)
When you update an existing item, for example with c.update_item(‘milk’, price=1.2, quantity=20) , you get:
And when you try to update some item which is not stored you get a warning. For example, c.update_item(‘ice cream’, price=3.5, quantity=20) will result in the following message:
You get a warning also when you try to delete some item which is not stored.
Finally, when you delete some item which is currently available, for example with c.delete_item(‘bread’) , you get this:
Conclusion
- design patterns
- Python
��️ Let’s have a chat!
Each week, I carve out some time for anyone to contact me. Feel free to reach out to me. I’ll do my best to help you with whatever you need.
Building a Flask Web Application (Flask Part 2)
Last time we started our web application adventure by learning how to generate dynamic HTML webpages from data stored in MongoDB using MongoEngine and Jinja2. In this post, we will leverage the Flask microframework to serve the webpages we render to our users.
Specifically we will explore the Flask library, learn about the Model-View-Controller (MVC) design pattern, and discuss how Flask fits into MVC by building our first Flask web application to display scraped data stored in MongoDB.
What You Need to Follow Along
Development Tools (Stack)
We can checkout the code from the git repository as follows:
Or we can use GitZip to download the tagged commit by URL.
Introduction to Web Frameworks
What is a web framework? When should we use one?
A web framework is a library that allows us to «write web applications or services without having to handle low-level details such as protocols, sockets or process/thread management». The majority of Python web frameworks are «exclusively server-side technologies» (i.e. render pages on the server before sending to users), but they are increasingly supporting client-side technologies (like Ajax — think Google Maps) to provide users with rich, interactive experiences in the browser (Source).
Some common tasks that web frameworks can handle include:
- URL routing
- HTML, XML, JSON, and other output format templating
- Database manipulation
- Security against Cross-site request forgery (CSRF) and other attacks
- Session storage and retrieval
There are no shortage of Python web frameworks for us to use; their functionality falls on the spectrum of «executing a single use case to providing every known feature» to developers (the batteries included approach) (Source). O’Reilly released a short, but detailed, e-book that examines the entire Python web framework ecosystem and provides detailed analysis of the 6 most widely used libraries: Django, Flask, Tornado, Bottle, Pyramid, and CherryPy.
For our use case, we will be creating and deploying a Flask web application.
Additional Resources
-
— Coding Dojo — WakaTime Blog — StackOverflow (Praise Be)
- Synopsis: Start with Flask, switch to Django if we need to scale
- Check out the Flask Extension Registry to see a list of ready-made features we can hook into our web app.
- Extensions such as Flask-Diamond can turn Flask into a batteries-included web framework. This extension provides scaffolding for features such as: account management, administrative access, databases, email, testing, documentation, deployment, and more. This library was featured in Episode 98 of the Talk Python to Me podcast. I will be using Flask-Diamond for a work project in the next couple of months and will blog about my experience once the application is in production. is batteries-included library based on the Bootstrap template. is an online resource detailing best practices and patterns for developing web applications with Flask.
- The model stores data that is retrieved according to commands from the controller
- The view generates output for the user based on changes in the model
- The controller acts on both model and view; it sends commands to the model to update its state and to the view to change information presented to users
- We are using the Flask-MongoEngine library instead of the MongoEngine library. This Flask specific library adds support for forms (via WTForms), error handling (i.e. 404 support), results pagination, and the use of MongoDB as a session store.
- The Flask API docs provide information on the first parameter we pass into the flask.Flask() function (i.e. __name__ ).
- We will be leveraging Flask’s Debug Mode to help us find bugs in our code as we are developing.
- URL routes can include variables in their definitions allowing us to customize our queries to get the exact information requested.
- We use MongoEngine to query our database to get the recordset defined by our various routes.
- Flask supports all HTTP request methods.
- Controllers pass data into view templates and then render HTML using Jinja2. We will cover this topic in the View section.
- The url_for() method can generate URL endpoints
- We changed the paths to the files in the static folder to match our new web application directory structure.
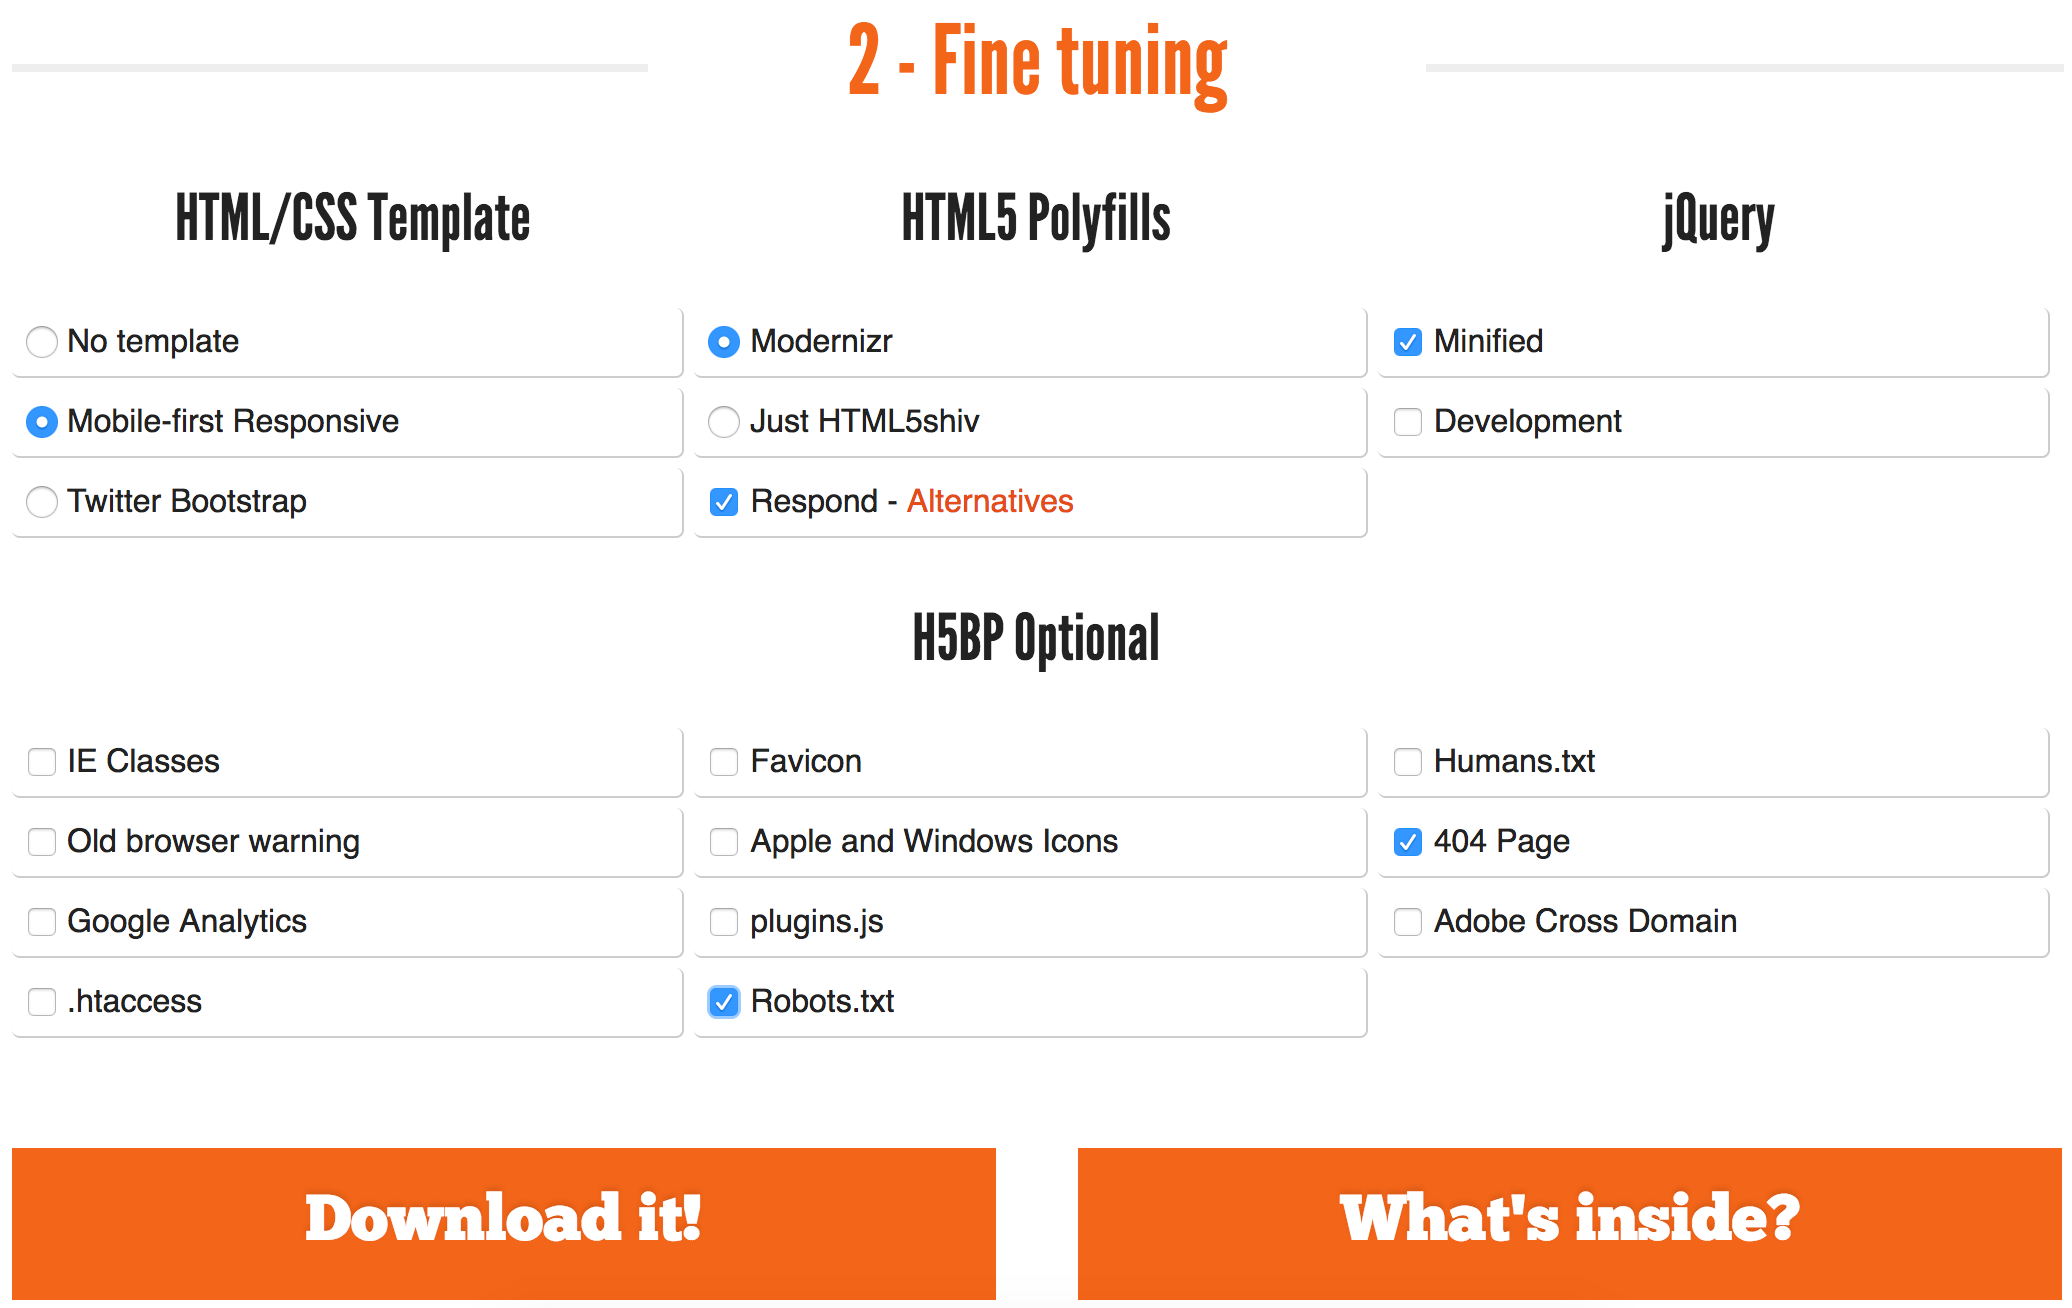
- In the CSS, I changed the color of the Responsive template from orange to blue as I will be using this template for a few work projects.
- The email setter validates the email before assigning it to the __email attribute. If the email is not valid, it’ll raise a ValueError .
- The save() method writes the email into a simple text file. In real-world applications, you may want to save it into a database.
- First, create the widgets in the __init__() method.
- Second, define the set_controller() method to set a controller.
- Third, call the save() method of the controller in the click event handler of the save button.
- Finally, define the show_error() , show_success() , and hide_message() methods to show/hide the message.
- First, assign the model and view in the __init__() method
- Second, define the save() method that saves the model into the text file. If the model is saved successfully, show a success message. Otherwise, display an error message.
- Python 3.2
- PyQt 4.9.1
- IDE (я использовал PyCharm 2.0.2)
Flask
In the previous post, we briefly mentioned that Flask is the best Python web framework for our use case. What does this mean? In this section, we will introduce Flask and discuss the features that make it so popular.
As the name implies, the Flask microframework is a lightweight web framework that we can extend to get the functionality we require.
Flask aims to keep the core simple but extensible. Flask won’t make many decisions for you, such as what database to use. Those decisions that it does make, such as what templating engine to use, are easy to change. Everything else is up to you, so that Flask can be everything you need and nothing you don’t.
Taking a build-your-own framework approach to web development allows us to get projects off the ground quickly; we only use the extensions we require for our specific use case. With just a few lines of code, we can create a website with:
The Flask documentation has great advice on how to grow and become big with Flask. We can also leverage the list of common design patterns to ensure we are following best practices as outline by the project contributors.
Notes
Model-View-Controller
Model–View–Controller (MVC) is an architectural pattern for implementing user interfaces. It divides an application into three interconnected parts: the Model, the View, and the Controller. Separating the «internal representations of information from the ways that information is presented to and accepted from the user» allows us to increase modularity for simultaneous development and code reuse (Source).
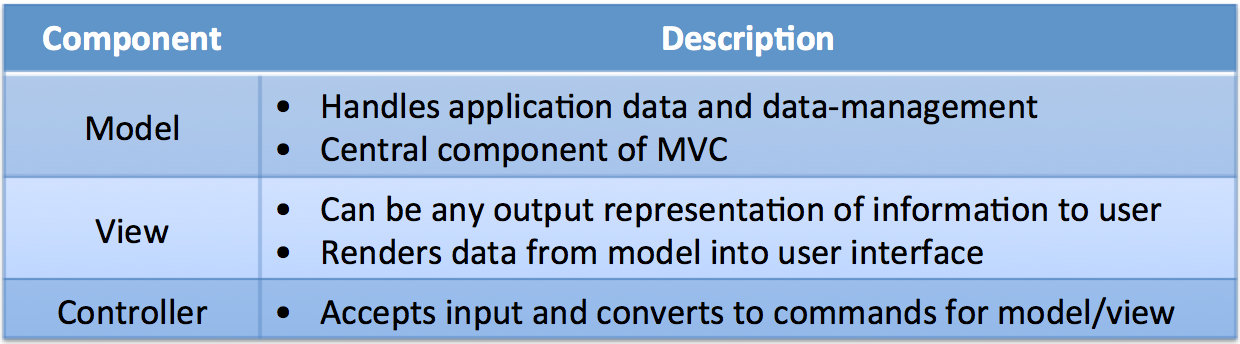
Each of the components is defined as follows:
Interactions Betweeen Components
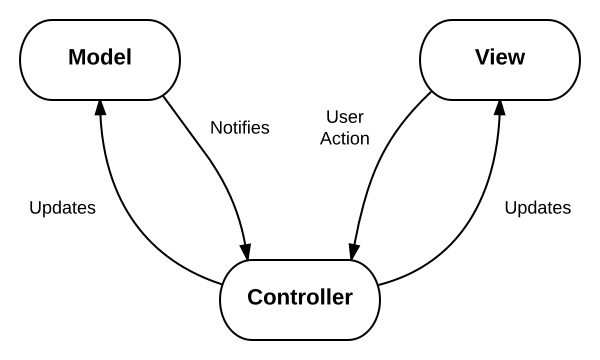
The MVC design pattern also defines interactions between components, as we can see in the following diagram from Wikipedia:
In the next section, we will examine how Flask fits into the MVC framework by building our first web application.
Additional Resources
-
— Wikipedia — StackOverflow (Praise Be) — Real Python — Tom Dalling — Tutorials Point
Building Reddit Top Post Web App
Using the Flask Quickstart and Tutorial as reference, let’s open up our favorite text editor and start coding!
Model
In the previous post, we utilized the MongoEngine ORM library to pull data out of MongoDB. We modify our code to get the following:
Controller
The code for the controller can be split into three sections: initialization, routing, and execution.
Initialization
After creating a Flask instance, we set our configuration options and connect our database to the current instance.
Since Flask is instance based, we create an instance and configure the settings for that instance. This allows us to have multiple processes, each with a different configuration.
Notes
Routing
Flask requires us to define URL routes for our web application so it knows which pages to display/render when users access specific URLs.
Each route is associated with a controller – more specifically, a certain function within a controller, known as a controller action. So when you enter a URL, the application attempts to find a matching route, and, if it’s successful, it calls that route’s associated controller action.
Within the controller action, two main things typically occur: the models are used to retrieve all of the necessary data from a database; and that data is passed to a view, which renders the requested page. The data retrieved via the models is generally added to a data structure (like a list or dictionary), and that structure is what’s sent to the view.
We use decorators to define URL routes in our application instance. What’s a decorator? Great question! Check out this primer on function decorators in Python.
Notes
Execution
To run our Flask application, we can add the following code to our app.py module to ensure it executes when it’s run as a script.
As we mentioned before, the view is the user interface (UI) of our web application which renders data from the model as defined by our template. If this sounds familiar, it’s because it is. We have already used the Jinja2 Templating Engine to generate HTML webpages. In this section, we will build upon our previous work and leverage the concept of Jinja template inheritance to create complex applications using an inheritance hierarchy.
Let’s start off by acknowledging that as programmers, we aren’t designers, but this shouldn’t limit our ability to produce web app with attractive UIs. Like everything else in development, we can stand on the shoulders of giants and use templates created by those who came before us. The HTML5 Boilerplate is a popular front-end template we can use to kickstart our project.
Using this post on how to use the HTML5 Boilerplate as a reference, let’s get our hands dirty and create templates for our Reddit Top Posts website. Download and extract a copy of the Responsive Template (docs) from initializr.com:
Since Flask looks for Jinja2 files in the templates folder and javascript/css files in the static folder, we will structure our application folder as follows:
Base Template
Using the concepts of Jinja2 template inheritence to create our hierarchy of views, we create our base template as follows:
Notes
-
can replace the default content of items in between <% block %>and <% endblock %>tags.
Child Templates
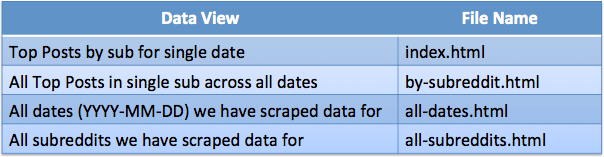
Each of our child templates will display a different view of our data. We will design our views as follows:
That’s it. We can now run our web app.
Running Flask Application
Let’s run the app:

We’ll open the page in a browser:
Notes
Conclusion
In this post, we looked at different ways of getting data out of MongoDB and into the hands of our user. We covered Python web frameworks, explored the Flask microframework, learned about the Model-View-Controller design pattern, and created our first Flask web application.
Next Steps
The next post in this series on Flask will delve into testing; specifically, unit testing in Flask using the unittest module from the Python Standard Library. Unit testing will allow us to create tests which can ensure our program functionality does not change as we implement additional features to this project.
Tkinter MVC
Summary: in this tutorial, you’ll learn how to structure a Tkinter application using the model-view-controller (MVC) pattern.
Introduction to Tkinter MVC
As your application grows, its complexity also increases. To make the application more manageable, you can use the model-view-controller design pattern.
The MVC design pattern allows you to divide the application into three main components: model, view, and controller. This structure helps you focus on the logic of each part and make it more maintainable, especially when the application grows.
The following diagram illustrates the MVC design pattern:
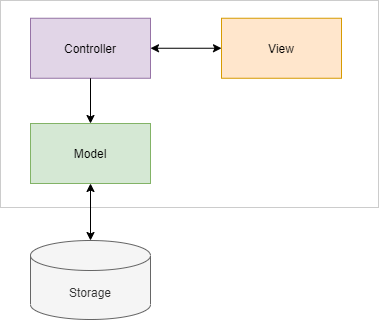
Model
A model in MVC represents the data. A model deals with getting data from or writing data into storage such as a database or file. The model may also contain the logic to validate the data to ensure data integrity.
The model must not depend on the view and controller. In other words, you can reuse the model in other non-Tkinter applications such as web and mobile apps.
A view is the user interface that represents the data in the model. The view doesn’t directly communicate with the model. Ideally, a view should have very little logic to display data.
The view communicates with the controller directly. In Tinker applications, the view is the root window that consists of widgets.
Controller
A controller acts as the intermediary between the views and models. The controller routes data between the views and models.
For example, if users click the save button on the view, the controller routes the “save” action to the model to save the data into a database and notify the view to display a message.
Tkinter MVC example
We’ll take a simple example to illustrate how to apply the MVC design pattern in a Tkinter application:
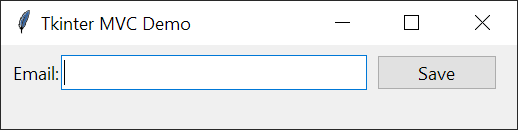
The application that you’ll build contains an entry for entering an email. When you click the save button, the controller calls the model to validate the email.
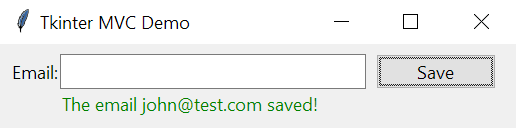
If the email is valid, the model saves the email into a text file and the view shows a success message:
If the email is not valid, the view shows an error message:
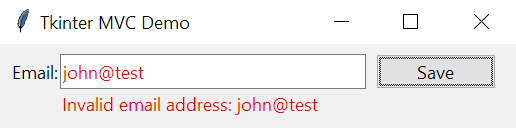
We’ll hide the message after 3 seconds.
Model class
The following defines the Model class that has an email property:
The following defines the view that shows a form to input an email:
Controller
The following defines a controller:
How the controller works.
Application
The following defines the App class that uses the Model, View, and Controller classes:
Реализация паттерна MVC для PyQt
Всем доброго времени суток!
В статье описывается реализация паттерна проектирования MVC для приложений использующих PyQt, на примере программы сложения двух чисел. Помимо описания реализации паттерна приводится описание процесса создания приложения.
0 Введение
MVC – паттерн проектирования позволяющий эффективно разделить модель данных, представление и обработку действий. В состав MVC входят три паттерна проектирования: наблюдатель, стратегия и компоновщик. В статье рассматривается классическая схема MVC с активной моделью, описанная в книге Эрика Фримена «Паттерны проектирования».
1 Структура проекта
Назовём проект SimpleMVC. Чтобы задача не казалась такой тривиальной, будем складывать не A и B, а C и D. Проект состоит из четырёх модулей. Модули Model, Controller и View представляют реализацию модели, контроллера и представления, соответственно. В модуле Utility собраны вспомогательные классы. Файл main.pyw предназначен для запуска приложения.
2 Создание модели
Модель (в первую очередь!) отвечает за логику приложения. Задача CplusDModel – сложение двух чисел. Файл CplusDModel.py:
Модель реализует паттерн наблюдатель. Это означает, что класс должен поддерживать функции добавления, удаления и оповещения наблюдателей. При этом модель полностью не зависит от контроллеров и представлений.
Важно чтобы все зарегистрированные наблюдатели реализовывали определённый метод, который будет вызываться моделью при их оповещении (в данном случае, это метод modelIsChanged()). Для этого наблюдатели должны быть потомками абстрактного класса, наследуя который, метод modelIsChanged() обязательно необходимо переопределить. Файл CplusDObserver.py:
Безусловно, «очень гибкий питон» позволяет обходиться совсем без абстрактного суперкласса или использовать хитрое исключение NotImplementedError(). На мой взгляд, это может негативно отразиться на архитектуре приложения.
Хотелось бы отметить, что используя PyQt, можно было бы задействовать слот-сигнальную модель. В таком случае, при изменении состояния, моделью будет высылаться сигнал, который смогут получать все присоединённые наблюдатели. Такой подход представляется менее универсальным – возможно в будущем вы захотите использовать другую библиотеку.
В более сложных системах, функционал, реализующий паттерн наблюдатель (регистрацию, удаление и оповещение наблюдателей) можно выделять в отдельный абстрактный класс. В зависимости от архитектуры класс может и не быть абстрактным.
3 Создание представления
Представление является комбинацией графических компонентов и реализует паттерн компоновщик. Для создания представления воспользуемся визуальным редактором Designer, входящим в комплект PyQt. Создадим форму на основе MainWindow. Структура формы:
Внешний вид формы:

Для предварительного просмотра формы используйте Ctrl+R. Сохраните файл в каталоге View под именем MainWindow.ui. Теперь сгенерируем на его основе файл MainWindow.py. Для этого необходимо воспользоваться pyuic4.bat (…\Python32\Lib\site-packages\PyQt4). Выполните:
Вместо «…» необходимо добавить путь к каталогу с проектом. Например, полный путь может выглядеть так:
Если в проекте присутствует файл ресурсов, то для его преобразования, нужно воспользоваться pyrcc4.exe (…\Python32\Lib\site-packages\PyQt4). Для Python 3.x необходимо передавать флаг -py3:
Обратите внимание на «_rc». Дело в том, что если бы к нашей форме будет подключён файл ресурсов, то pyuic4.bat автоматически добавит в конце файла: