Python Timer Functions: Three Ways to Monitor Your Code
While many developers recognize Python as an effective programming language, pure Python programs may run more slowly than their counterparts in compiled languages like C, Rust, and Java. In this tutorial, you’ll learn how to use a Python timer to monitor how quickly your programs are running.
In this tutorial, you’ll learn how to use:
- time.perf_counter() to measure time in Python
- Classes to keep state
- Context managers to work with a block of code
- Decorators to customize a function
You’ll also gain background knowledge into how classes, context managers, and decorators work. As you explore examples of each concept, you’ll be inspired to use one or several of them in your code, for timing code execution, as well as in other applications. Each method has its advantages, and you’ll learn which to use depending on the situation. Plus, you’ll have a working Python timer that you can use to monitor your programs!
Decorators Q&A Transcript: Click here to get access to a 25-page chat log from our Python decorators Q&A session in the Real Python Community Slack where we discussed common decorator questions.
Python Timers
First, you’ll take a look at some example code that you’ll use throughout the tutorial. Later, you’ll add a Python timer to this code to monitor its performance. You’ll also learn some of the simplest ways to measure the running time of this example.
Python Timer Functions
If you check out the built-in time module in Python, then you’ll notice several functions that can measure time:
Python 3.7 introduced several new functions, like thread_time() , as well as nanosecond versions of all the functions above, named with an _ns suffix. For example, perf_counter_ns() is the nanosecond version of perf_counter() . You’ll learn more about these functions later. For now, note what the documentation has to say about perf_counter() :
Return the value (in fractional seconds) of a performance counter, i.e. a clock with the highest available resolution to measure a short duration. (Source)
First, you’ll use perf_counter() to create a Python timer. Later, you’ll compare this with other Python timer functions and learn why perf_counter() is usually the best choice.
Example: Download Tutorials
To better compare the different ways that you can add a Python timer to your code, you’ll apply different Python timer functions to the same code example throughout this tutorial. If you already have code that you’d like to measure, then feel free to follow the examples with that instead.
The example that you’ll use in this tutorial is a short function that uses the realpython-reader package to download the latest tutorials available here on Real Python. To learn more about the Real Python Reader and how it works, check out How to Publish an Open-Source Python Package to PyPI. You can install realpython-reader on your system with pip :
Then, you can import the package as reader .
You’ll store the example in a file named latest_tutorial.py . The code consists of one function that downloads and prints the latest tutorial from Real Python:
realpython-reader handles most of the hard work:
- Line 3 imports feed from realpython-reader . This module contains functionality for downloading tutorials from the Real Python feed.
- Line 7 downloads the latest tutorial from Real Python. The number 0 is an offset, where 0 means the most recent tutorial, 1 is the previous tutorial, and so on.
- Line 8 prints the tutorial to the console.
- Line 11 calls main() when you run the script.
When you run this example, your output will typically look something like this:
The code may take a little while to run depending on your network, so you might want to use a Python timer to monitor the performance of the script.
Your First Python Timer
Now you’ll add a bare-bones Python timer to the example with time.perf_counter() . Again, this is a performance counter that’s well-suited for timing parts of your code.
perf_counter() measures the time in seconds from some unspecified moment in time, which means that the return value of a single call to the function isn’t useful. However, when you look at the difference between two calls to perf_counter() , you can figure out how many seconds passed between the two calls:
In this example, you made two calls to perf_counter() almost 4 seconds apart. You can confirm this by calculating the difference between the two outputs: 32315.26 — 32311.49 = 3.77.
You can now add a Python timer to the example code:
Note that you call perf_counter() both before and after downloading the tutorial. You then print the time it took to download the tutorial by calculating the difference between the two calls.
Note: In line 11, the f before the string indicates that this is an f-string, which is a convenient way to format a text string. :0.4f is a format specifier that says the number, toc — tic , should be printed as a decimal number with four decimals.
Now, when you run the example, you’ll see the elapsed time before the tutorial:
That’s it! You’ve covered the basics of timing your own Python code. In the rest of the tutorial, you’ll learn how you can wrap a Python timer into a class, a context manager, and a decorator to make it more consistent and convenient to use.
A Python Timer Class
Look back at how you added the Python timer to the example above. Note that you need at least one variable ( tic ) to store the state of the Python timer before you download the tutorial. After studying the code a little, you might also note that the three highlighted lines are added only for timing purposes! Now, you’ll create a class that does the same as your manual calls to perf_counter() , but in a more readable and consistent manner.
Throughout this tutorial, you’ll create and update Timer , a class that you can use to time your code in several different ways. The final code with some additional features is also available on PyPI under the name codetiming . You can install this on your system like so:
You can find more information about codetiming later on in this tutorial, in the section named The Python Timer Code.
Understanding Classes in Python
Classes are the main building blocks of object-oriented programming. A class is essentially a template that you can use to create objects. While Python doesn’t force you to program in an object-oriented manner, classes are everywhere in the language. For quick proof, investigate the time module:
type() returns the type of an object. Here you can see that modules are, in fact, objects created from a module class. You can use the special attribute .__class__ to get access to the class that defines an object. In fact, almost everything in Python is a class:
In Python, classes are great when you need to model something that needs to keep track of a particular state. In general, a class is a collection of properties, called attributes, and behaviors, called methods. For more background on classes and object-oriented programming, check out Object-Oriented Programming (OOP) in Python 3 or the official docs.
Creating a Python Timer Class
Classes are good for tracking state. In a Timer class, you want to keep track of when a timer starts and how much time has passed since then. For the first implementation of Timer , you’ll add a ._start_time attribute, as well as .start() and .stop() methods. Add the following code to a file named timer.py :
A few different things are happening here, so take a moment to walk through the code step by step.
In line 5, you define a TimerError class. The (Exception) notation means that TimerError inherits from another class called Exception . Python uses this built-in class for error handling. You don’t need to add any attributes or methods to TimerError , but having a custom error will give you more flexibility to handle problems inside Timer . For more information, check out Python Exceptions: An Introduction.
The definition of Timer itself starts on line 8. When you first create or instantiate an object from a class, your code calls the special method .__init__() . In this first version of Timer , you only initialize the ._start_time attribute, which you’ll use to track the state of your Python timer. It has the value None when the timer isn’t running. Once the timer is running, ._start_time keeps track of when the timer started.
Note: The underscore ( _ ) prefix of ._start_time is a Python convention. It signals that ._start_time is an internal attribute that users of the Timer class shouldn’t manipulate.
When you call .start() to start a new Python timer, you first check that the timer isn’t already running. Then you store the current value of perf_counter() in ._start_time .
On the other hand, when you call .stop() , you first check that the Python timer is running. If it is, then you calculate the elapsed time as the difference between the current value of perf_counter() and the one that you stored in ._start_time . Finally, you reset ._start_time so that the timer can be restarted, and print the elapsed time.
Here’s how you use Timer :
Compare this to the earlier example where you used perf_counter() directly. The structure of the code is fairly similar, but now the code is clearer, and this is one of the benefits of using classes. By carefully choosing your class, method, and attribute names, you can make your code very descriptive!
Using the Python Timer Class
Now apply Timer to latest_tutorial.py . You only need to make a few changes to your previous code:
Notice that the code is very similar to what you used earlier. In addition to making the code more readable, Timer takes care of printing the elapsed time to the console, which makes the logging of time spent more consistent. When you run the code, you’ll get pretty much the same output:
Printing the elapsed time from Timer may be consistent, but it seems that this approach is not very flexible. In the next section, you’ll see how to customize your class.
Adding More Convenience and Flexibility
So far, you’ve learned that classes are suitable for when you want to encapsulate state and ensure consistent behavior in your code. In this section, you’ll add more convenience and flexibility to your Python timer:
- Use adaptable text and formatting when reporting the time spent
- Apply flexible logging, either to the screen, to a log file, or other parts of your program
- Create a Python timer that can accumulate over several invocations
- Build an informative representation of a Python timer
First, see how you can customize the text used to report the time spent. In the previous code, the text f»Elapsed time:
To add .text as a Timer instance variable, you’ll do something like this in timer.py :
Note that the default text, «Elapsed time: <:0.4f>seconds» , is given as a regular string, not as an f-string. You can’t use an f-string here because f-strings evaluate immediately, and when you instantiate Timer , your code hasn’t yet calculated the elapsed time.
Note: If you want to use an f-string to specify .text , then you need to use double curly braces to escape the curly braces that the actual elapsed time will replace.
One example would be f»Finished
In .stop() , you use .text as a template and .format() to populate the template:
After this update to timer.py , you can change the text as follows:
Next, assume that you don’t just want to print a message to the console. Maybe you want to save your time measurements so that you can store them in a database. You can do this by returning the value of elapsed_time from .stop() . Then, the calling code can choose to either ignore that return value or save it for later processing.
Perhaps you want to integrate Timer into your logging routines. To support logging or other outputs from Timer , you need to change the call to print() so that the user can supply their own logging function. This can be done similarly to how you customized the text earlier:
Instead of using print() directly, you create another instance variable in line 13, self.logger , that should refer to a function that takes a string as an argument. In addition to print() , you can use functions like logging.info() or .write() on file objects. Also note the if test in line 25, which allows you to turn off printing completely by passing logger=None .
Here are two examples that show the new functionality in action:
When you run these examples in an interactive shell, Python prints the return value automatically.
The third improvement that you’ll add is the ability to accumulate time measurements. You may want to do this, for example, when you’re calling a slow function in a loop. You’ll add a bit more functionality in the form of named timers with a dictionary that keeps track of every Python timer in your code.
Assume that you’re expanding latest_tutorial.py to a latest_tutorials.py script that downloads and prints the ten latest tutorials from Real Python. The following is one possible implementation:
The code loops over the numbers from 0 to 9 and uses those as offset arguments to feed.get_article() . When you run the script, you’ll print a lot of information to your console:
One subtle issue with this code is that you’re measuring not only the time it takes to download the tutorials, but also the time Python spends printing the tutorials to your screen. This might not be that important because the time spent printing should be negligible compared to the time spent downloading. Still, it would be good to have a way to precisely time what you’re after in these kinds of situations.
Note: The time spent downloading ten tutorials is about the same as the time spent downloading one tutorial. This isn’t a bug in your code! Instead, reader caches the Real Python feed the first time get_article() is called, and reuses the information on later invocations.
There are several ways that you can work around this without changing the current implementation of Timer. However, supporting this use case will be quite useful, and you can do it with just a few lines of code.
First, you’ll introduce a dictionary called .timers as a class variable on Timer , which means that all instances of Timer will share it. You implement it by defining it outside any methods:
Class variables can be accessed either directly on the class or through an instance of the class:
In both cases, the code returns the same empty class dictionary.
Next, you’ll add optional names to your Python timer. You can use the name for two different purposes:
- Looking up the elapsed time later in your code
- Accumulating timers with the same name
To add names to your Python timer, you need to make two more changes to timer.py . First, Timer should accept name as a parameter. Second, the elapsed time should be added to .timers when a timer stops:
Note that you use .setdefault() when adding the new Python timer to .timers . This is a great feature that only sets the value if name isn’t already defined in the dictionary. If name is already used in .timers , then the value is left untouched. This allows you to accumulate several timers:
You can now revisit latest_tutorials.py and make sure only the time spent on downloading the tutorials is measured:
Rerunning the script will give output similar to earlier, although now you’re only timing the actual download of the tutorials:
The final improvement that you’ll make to Timer is to make it more informative when you’re working with it interactively. Try the following:
That last line is the default way that Python represents objects. While you can glean some information from it, it’s usually not very useful. Instead, it would be nice to see information like the name of Timer , or how it’ll report on the timings.
In Python 3.7, data classes were added to the standard library. These provide several conveniences to your classes, including a more informative representation string.
Note: Data classes are included in Python only for version 3.7 and later. However, there’s a backport available on PyPI for Python 3.6.
You can install it using pip :
You convert your Python timer to a data class using the @dataclass decorator. You’ll learn more about decorators later in this tutorial. For now, you can think of this as a notation that tells Python that Timer is a data class:
This code replaces your earlier .__init__() method. Note how data classes use syntax that looks similar to the class variable syntax that you saw earlier for defining all variables. In fact, .__init__() is created automatically for data classes, based on annotated variables in the definition of the class.
You need to annotate your variables to use a data class. You can use this annotation to add type hints to your code. If you don’t want to use type hints, then you can instead annotate all variables with Any , just like you did above. You’ll soon learn how to add actual type hints to your data class.
Here are a few notes about the Timer data class:
Line 9: The @dataclass decorator defines Timer as a data class.
Line 11: The special ClassVar annotation is necessary for data classes to specify that .timers is a class variable.
Lines 12 to 14: .name , .text , and .logger will be defined as attributes on Timer , whose values can be specified when creating Timer instances. They all have the given default values.
Line 15: Recall that ._start_time is a special attribute that’s used to keep track of the state of the Python timer, but it should be hidden from the user. Using dataclasses.field() , you say that ._start_time should be removed from .__init__() and the representation of Timer .
Lines 17 to 20: You can use the special .__post_init__() method for any initialization that you need to do apart from setting the instance attributes. Here, you use it to add named timers to .timers .
Your new Timer data class works just like your previous regular class, except that it now has a nice representation:
Now you have a pretty neat version of Timer that’s consistent, flexible, convenient, and informative! You can apply many of the improvements that you’ve made in this section to other types of classes in your projects as well.
Before ending this section, revisit the complete source code of Timer as it currently stands. You’ll notice the addition of type hints to the code for extra documentation:
Using a class to create a Python timer has several benefits:
- Readability: Your code will read more naturally if you carefully choose class and method names.
- Consistency: Your code will be easier to use if you encapsulate properties and behaviors into attributes and methods.
- Flexibility: Your code will be reusable if you use attributes with default values instead of hard-coded values.
This class is very flexible, and you can use it in almost any situation where you want to monitor the time it takes for code to run. However, in the next sections, you’ll learn about using context managers and decorators, which will be more convenient for timing code blocks and functions.
A Python Timer Context Manager
Your Python Timer class has come a long way! Compared with the first Python timer you created, your code has gotten quite powerful. However, there’s still a bit of boilerplate code necessary to use your Timer :
- First, instantiate the class.
- Call .start() before the code block that you want to time.
- Call .stop() after the code block.
Luckily, Python has a unique construct for calling functions before and after a block of code: the context manager. In this section, you’ll learn what context managers and Python’s with statement are, and how you can create your own. Then you’ll expand Timer so that it can work as a context manager as well. Finally, you’ll see how using Timer as a context manager can simplify your code.
Understanding Context Managers in Python
Context managers have been a part of Python for a long time. They were introduced by PEP 343 in 2005, and first implemented in Python 2.5. You can recognize context managers in code by the use of the with keyword:
EXPRESSION is some Python expression that returns a context manager. The context manager is optionally bound to the name VARIABLE . Finally, BLOCK is any regular Python code block. The context manager will guarantee that your program calls some code before BLOCK and some other code after BLOCK executes. The latter will happen, even if BLOCK raises an exception.
The most common use of context managers is probably handling different resources, like files, locks, and database connections. The context manager is then used to free and clean up the resource after you’ve used it. The following example reveals the fundamental structure of timer.py by only printing lines that contain a colon. More importantly, it shows the common idiom for opening a file in Python:
Note that fp , the file pointer, is never explicitly closed because you used open() as a context manager. You can confirm that fp has closed automatically:
In this example, open(«timer.py») is an expression that returns a context manager. That context manager is bound to the name fp . The context manager is in effect during the execution of print() . This one-line code block executes in the context of fp .
What does it mean that fp is a context manager? Technically, it means that fp implements the context manager protocol. There are many different protocols underlying the Python language. You can think of a protocol as a contract that states what specific methods your code must implement.
The context manager protocol consists of two methods:
- Call .__enter__() when entering the context related to the context manager.
- Call .__exit__() when exiting the context related to the context manager.
In other words, to create a context manager yourself, you need to write a class that implements .__enter__() and .__exit__() . No more, no less. Try a Hello, World! context manager example:
Greeter is a context manager because it implements the context manager protocol. You can use it like this:
First, note how .__enter__() is called before you’re doing stuff, while .__exit__() is called after. In this simplified example, you’re not referencing the context manager. In such cases, you don’t need to give the context manager a name with as .
Next, notice how .__enter__() returns self . The return value of .__enter__() is bound by as . You usually want to return self from .__enter__() when creating context managers. You can use that return value as follows:
Finally, .__exit__() takes three arguments: exc_type , exc_value , and exc_tb . These are used for error handling within the context manager, and they mirror the return values of sys.exc_info() .
If an exception happens while the block is being executed, then your code calls .__exit__() with the type of the exception, an exception instance, and a traceback object. Often, you can ignore these in your context manager, in which case .__exit__() is called before the exception is reraised:
You can see that «See you later, Rascal» is printed, even though there is an error in the code.
Now you know what context managers are and how you can create your own. If you want to dive deeper, then check out contextlib in the standard library. It includes convenient ways for defining new context managers, as well as ready-made context managers that you can use to close objects, suppress errors, or even do nothing! For even more information, check out Context Managers and Python’s with Statement.
Creating a Python Timer Context Manager
You’ve seen how context managers work in general, but how can they help with timing code? If you can run certain functions before and after a block of code, then you can simplify how your Python timer works. So far, you’ve needed to call .start() and .stop() explicitly when timing your code, but a context manager can do this automatically.
Again, for Timer to work as a context manager, it needs to adhere to the context manager protocol. In other words, it must implement .__enter__() and .__exit__() to start and stop the Python timer. All the necessary functionality is already available, so there’s not much new code you need to write. Just add the following methods to your Timer class:
Timer is now a context manager. The important part of the implementation is that .__enter__() calls .start() to start a Python timer when the context is entered, and .__exit__() uses .stop() to stop the Python timer when the code leaves the context. Try it out:
You should also note two more subtle details:
.__enter__() returns self , the Timer instance, which allows the user to bind the Timer instance to a variable using as . For example, with Timer() as t: will create the variable t pointing to the Timer object.
.__exit__() expects three arguments with information about any exception that occurred during the execution of the context. In your code, these arguments are packed into a tuple called exc_info and then ignored, which means that Timer won’t attempt any exception handling.
.__exit__() doesn’t do any error handling in this case. Still, one of the great features of context managers is that they’re guaranteed to call .__exit__() , no matter how the context exits. In the following example, you purposely create an error by dividing by zero:
Note that Timer prints out the elapsed time, even though the code crashed. It’s possible to inspect and suppress errors in .__exit__() . See the documentation for more information.
Using the Python Timer Context Manager
Now you’ll learn how to use the Timer context manager to time the download of Real Python tutorials. Recall how you used Timer earlier:
You’re timing the call to feed.get_article() . You can use the context manager to make the code shorter, simpler, and more readable:
This code does virtually the same as the code above. The main difference is that you don’t define the extraneous variable t , which keeps your namespace cleaner.
Running the script should give a familiar result:
There are a few advantages to adding context manager capabilities to your Python timer class:
- Low effort: You only need one extra line of code to time the execution of a block of code.
- Readability: Invoking the context manager is readable, and you can more clearly visualize the code block that you’re timing.
Using Timer as a context manager is almost as flexible as using .start() and .stop() directly, while it has less boilerplate code. In the next section, you’ll learn how you can use Timer as a decorator as well. This will make it easier to monitor the runtime of complete functions.
A Python Timer Decorator
Your Timer class is now very versatile. However, there’s one use case where you could streamline it even further. Say that you want to track the time spent inside one given function in your codebase. Using a context manager, you have essentially two different options:
Use Timer every time you call the function:
If you call do_something() in many places, then this will become cumbersome and hard to maintain.
Wrap the code in your function inside a context manager:
The Timer only needs to be added in one place, but this adds a level of indentation to the whole definition of do_something() .
A better solution is to use Timer as a decorator. Decorators are powerful constructs that you use to modify the behavior of functions and classes. In this section, you’ll learn a little about how decorators work, how you can extend Timer to be a decorator, and how that will simplify timing functions. For a more in-depth explanation of decorators, see Primer on Python Decorators.
Understanding Decorators in Python
A decorator is a function that wraps another function to modify its behavior. This technique is possible because functions are first-class objects in Python. In other words, functions can be assigned to variables and used as arguments to other functions, just like any other object. This gives you a lot of flexibility and is the basis for several of Python’s most powerful features.
As a first example, you’ll create a decorator that does nothing:
First, note that turn_off() is just a regular function. What makes this a decorator is that it takes a function as its only argument and returns a function. You can use turn_off() to modify other functions, like this:
The line print = turn_off(print) decorates the print statement with the turn_off() decorator. Effectively, it replaces print() with lambda *args, **kwargs: None returned by turn_off() . The lambda statement represents an anonymous function that does nothing except return None .
To define more interesting decorators, you need to know about inner functions. An inner function is a function that’s defined inside another function. One common use of inner functions is to create function factories:
multiplier() is an inner function, defined inside create_multiplier() . Note that you have access to factor inside multiplier() , while multiplier() isn’t defined outside create_multiplier() :
Instead you use create_multiplier() to create new multiplier functions, each based on a different factor:
Similarly, you can use inner functions to create decorators. Remember, a decorator is a function that returns a function:
triple() is a decorator, because it’s a function that expects a function, func() , as its only argument and returns another function, wrapper_triple() . Note the structure of triple() itself:
- Line 1 starts the definition of triple() and expects a function as an argument.
- Lines 2 to 5 define the inner function wrapper_triple() .
- Line 6 returns wrapper_triple() .
This pattern is prevalent for defining decorators. The interesting parts are those happening inside the inner function:
- Line 2 starts the definition of wrapper_triple() . This function will replace whichever function triple() decorates. The parameters are *args and **kwargs , which collect whichever positional and keyword arguments you pass to the function. This gives you the flexibility to use triple() on any function.
- Line 3 prints out the name of the decorated function and notes that triple() has been applied to it.
- Line 4 calls func() , the function that triple() has decorated. It passes on all arguments passed to wrapper_triple() .
- Line 5 triples the return value of func() and returns it.
Try it out! knock() is a function that returns the word Penny . See what happens if it’s tripled:
Multiplying a text string by a number is a form of repetition, so Penny repeats three times. The decoration happens at knock = triple(knock) .
It feels a bit clunky to keep repeating knock . Instead, PEP 318 introduced a more convenient syntax for applying decorators. The following definition of knock() does the same as the one above:
The @ symbol is used to apply decorators. In this case, @triple means that triple() is applied to the function defined just after it.
One of the few decorators defined in the standard library is @functools.wraps . This one is quite helpful when defining your own decorators. Because decorators effectively replace one function with another, they create a subtle issue with your functions:
@triple decorates knock() , which is then replaced by the wrapper_triple() inner function, as the output above confirms. This will also replace the name, docstring, and other metadata. Often, this won’t have much effect, but it can make introspection difficult.
Sometimes, decorated functions must have correct metadata. @functools.wraps fixes exactly this issue:
With this new definition of @triple , metadata is preserved:
Note that knock() now keeps its proper name, even after being decorated. It’s good form to use @functools.wraps whenever you define a decorator. A blueprint that you can use for most of your decorators is the following:
To see more examples of how to define decorators, check out the examples listed in Primer on Python Decorators.
Creating a Python Timer Decorator
In this section, you’ll learn how to extend your Python timer so that you can use it as a decorator as well. However, as a first exercise, you’ll create a Python timer decorator from scratch.
Based on the blueprint above, you only need to decide what to do before and after you call the decorated function. This is similar to the considerations about what to do when entering and exiting the context manager. You want to start a Python timer before calling the decorated function, and stop the Python timer after the call finishes. You can define a @timer decorator as follows:
Note how much wrapper_timer() resembles the earlier pattern that you established for timing Python code. You can apply @timer as follows:
Recall that you can also apply a decorator to a previously defined function:
Because @ applies when functions are defined, you need to use the more basic form in these cases. One advantage of using a decorator is that you only need to apply it once, and it’ll time the function every time:
@timer does the job. However, in a sense, you’re back to square one, since @timer doesn’t have any of the flexibility or convenience of Timer . Can you also make your Timer class act like a decorator?
So far, you’ve used decorators as functions applied to other functions, but that’s not entirely correct. Decorators must be callables. There are many callable types in Python. You can make your own objects callable by defining the special .__call__() method in their class. The following function and class behave similarly:
Here, square is an instance that is callable and can square numbers, just like the square() function in the first example.
This gives you a way of adding decorator capabilities to the existing Timer class:
.__call__() uses the fact that Timer is already a context manager to take advantage of the conveniences that you’ve already defined there. Make sure you also import functools at the top of timer.py .
You can now use Timer as a decorator:
Before rounding out this section, know that there’s a more straightforward way of turning your Python timer into a decorator. You’ve already seen some of the similarities between context managers and decorators. They’re both typically used to do something before and after executing some given code.
Based on these similarities, there’s a mixin class defined in the standard library called ContextDecorator . You can add decorator abilities to your context manager classes simply by inheriting ContextDecorator :
When you use ContextDecorator this way, there’s no need to implement .__call__() yourself, so you can safely delete it from the Timer class.
Using the Python Timer Decorator
Next up, you’ll redo the latest_tutorial.py example one last time, using the Python timer as a decorator:
If you compare this implementation with the original implementation without any timing, then you’ll notice that the only differences are the import of Timer on line 3 and the application of @Timer() on line 6. A significant advantage of using decorators is that they’re usually straightforward to apply, as you see here.
However, the decorator still applies to the whole function. This means that your code is taking into account the time it takes to print the tutorial, in addition to the time it takes to download. Run the script one final time:
The location of the elapsed time output is a telltale sign that your code is considering the time it takes to print as well. As you see here, your code prints the elapsed time after the tutorial.
When you use Timer as a decorator, you’ll see similar advantages as you did with context managers:
- Low effort: You only need one extra line of code to time the execution of a function.
- Readability: When you add the decorator, you can note more clearly that your code will time the function.
- Consistency: You only need to add the decorator when the function is defined. Your code will consistently time it every time it’s called.
However, decorators are not as flexible as context managers. You can only apply them to complete functions. It’s possible to add decorators to already defined functions, but this is a bit clunky and less common.
The Python Timer Code
You can expand the code block below to view the final source code for your Python timer:
Full source code of timer.py Show/Hide
The code is also available in the codetiming repository on GitHub.
You can use the code yourself by saving it to a file named timer.py and importing it into your program:
Timer is also available on PyPI, so an even easier option is to install it using pip :
Note that the package name on PyPI is codetiming . You’ll need to use this name both when you install the package and when you import Timer :
Apart from the name and some additional features, codetiming.Timer works exactly as timer.Timer . To summarize, you can use Timer in three different ways:
As a class:
As a context manager:
As a decorator:
This kind of Python timer is mainly useful for monitoring the time that your code spends at individual key code blocks or functions. In the next section, you’ll get a quick overview of alternatives that you can use if you want optimize your code.
Other Python Timer Functions
There are many options for timing your code with Python. In this tutorial, you’ve learned how to create a flexible and convenient class that you can use in several different ways. A quick search on PyPI shows that there are already many projects available that offer Python timer solutions.
In this section, you’ll first learn more about the different functions available in the standard library for measuring time, including why perf_counter() is preferable. Then, you’ll explore alternatives for optimizing your code, for which Timer is not well-suited.
Using Alternative Python Timer Functions
You’ve been using perf_counter() throughout this tutorial to do the actual time measurements, but Python’s time library comes with several other functions that also measure time. Here are some alternatives:
One reason for having several functions is that Python represents time as a float . Floating-point numbers are inaccurate by nature. You may have seen results like these before:
Python’s float follows the IEEE 754 Standard for Floating-Point Arithmetic, which tries to represent all floating-point numbers in 64 bits. Because there are infinitely many floating-point numbers, you can’t express them all with a finite number of bits.
IEEE 754 prescribes a system where the density of numbers that you can represent varies. The closer you are to one, the more numbers you can represent. For larger numbers, there’s more space between the numbers that you can express. This has some consequences when you use a float to represent time.
Consider time() . The main purpose of this function is to represent the actual time right now. It does this as the number of seconds since a given point in time, called the epoch. The number returned by time() is quite big, which means that there are fewer numbers available, and the resolution suffers. Specifically, time() is not able to measure nanosecond differences:
A nanosecond is one-billionth of a second. Note that adding a nanosecond to t doesn’t affect the result. perf_counter() , on the other hand, uses some undefined point in time as its epoch, allowing it to work with smaller numbers and therefore obtain a better resolution:
Here, you notice that adding a nanosecond to p actually affects the outcome. For more information about how to work with time() , see A Beginner’s Guide to the Python time Module.
The challenges with representing time as a float are well known, so Python 3.7 introduced a new option. Each time measurement function now has a corresponding _ns function that returns the number of nanoseconds as an int instead of the number of seconds as a float . For instance, time() now has a nanosecond counterpart called time_ns() :
Integers are unbounded in Python, so this allows time_ns() to give nanosecond resolution for all eternity. Similarly, perf_counter_ns() is a nanosecond variant of perf_counter() :
Because perf_counter() already provides nanosecond resolution, there are fewer advantages to using perf_counter_ns() .
Note: perf_counter_ns() is only available in Python 3.7 and later. In this tutorial, you’ve used perf_counter() in your Timer class. That way, you can use Timer on older Python versions as well.
For more information about the _ns functions in time , check out Cool New Features in Python 3.7.
There are two functions in time that do not measure the time spent sleeping. These are process_time() and thread_time() , which are useful in some settings. However, for Timer , you typically want to measure the full time spent. The final function in the list above is monotonic() . The name alludes to this function being a monotonic timer, which is a Python timer that can never move backward.
All these functions are monotonic except time() , which can go backward if the system time is adjusted. On some systems, monotonic() is the same function as perf_counter() , and you can use them interchangeably. However, this is not always the case. You can use time.get_clock_info() to get more information about a Python timer function:
The results could be different on your system.
PEP 418 describes some of the rationale behind introducing these functions. It includes the following short descriptions:
- time.monotonic() : timeout and scheduling, not affected by system clock updates
- time.perf_counter() : benchmarking, most precise clock for short period
- time.process_time() : profiling, CPU time of the process (Source)
As you can tell, perf_counter() is usually the best choice for your Python timer.
Estimating Running Time With timeit
Say you’re trying to squeeze the last bit of performance out of your code, and you’re wondering about the most effective way to convert a list to a set. You want to compare using set() and the set literal, <. >. You can use your Python timer for this:
This test seems to indicate that the set literal might be slightly faster. However, these results are quite uncertain, and if you rerun the code, you might get wildly different results. That’s because you’re only trying the code once. You could, for instance, get unlucky and run the script just as your computer is becoming busy with other tasks.
A better way is to use the timeit standard library. It’s designed precisely to measure the execution time of small code snippets. While you can import and call timeit.timeit() from Python as a regular function, it’s usually more convenient to use the command-line interface. You can time the two variants as follows:
timeit automatically calls your code many times to average out noisy measurements. The results from timeit confirm that the set literal is faster than set() .
Note: Be careful when you’re using timeit on code that can download files or access databases. Since timeit automatically calls your program several times, you could unintentionally end up spamming the server with requests!
Finally, the IPython interactive shell and the Jupyter Notebook have extra support for this functionality with the %timeit magic command:
Again, the measurements indicate that using a set literal is faster. In Jupyter Notebooks, you can also use the %%timeit cell-magic to measure the time of running a whole cell.
Finding Bottlenecks in Your Code With Profilers
timeit is excellent for benchmarking a particular snippet of code. However, it would be very cumbersome to use it to check all parts of your program and locate which sections take the most time. Instead, you can use a profiler.
cProfile is a profiler that you can access at any time from the standard library. You can use it in several ways, although it’s usually most straightforward to use it as a command-line tool:
This command runs latest_tutorial.py with profiling turned on. You save the output from cProfile in latest_tutorial.prof , as specified by the -o option. The output data is in a binary format that needs a dedicated program to make sense of it. Again, Python has an option right in the standard library! Running the pstats module on your .prof file opens an interactive profile statistics browser:
To use pstats , you type commands at the prompt. Here you can see the integrated help system. Typically you’ll use the sort and stats commands. To get a cleaner output, strip can be useful:
This output shows that the total runtime was 0.586 seconds. It also lists the ten functions where your code spent most of its time. Here you’ve sorted by cumulative time ( cumtime ), which means that your code counts time when the given function has called another function.
You can see that your code spends virtually all its time inside the latest_tutorial module, and in particular, inside read_latest_tutorial() . While this might be useful confirmation of what you already know, it’s often more interesting to find where your code actually spends time.
The total time ( tottime ) column indicates how much time your code spent inside a function, excluding time in sub-functions. You can see that none of the functions above really spend any time doing this. To find where the code spent most of its time, issue another sort command:
You can now see that latest_tutorial.py actually spends most of its time working with sockets or handling data inside feedparser . The latter is one of the dependencies of the Real Python Reader that’s used to parse the tutorial feed.
You can use pstats to get some idea of where your code is spending most of its time and then try to optimize any bottlenecks you find. You can also use the tool to understand the structure of your code better. For instance, the commands callees and callers will show you which functions call and are called by a given function.
You can also investigate certain functions. Check how much overhead Timer causes by filtering the results with the phrase timer :
Luckily, Timer causes only minimal overhead. Use quit to leave the pstats browser when you’re done investigating.
For a more powerful interface into profile data, check out KCacheGrind. It uses its own data format, but you can convert data from cProfile using pyprof2calltree :
This command will convert latest_tutorial.prof and open KCacheGrind to analyze the data.
The last option that you’ll try here for timing your code is line_profiler . cProfile can tell you which functions your code spends the most time in, but it won’t give you insights into which lines inside that function are the slowest. That’s where line_profiler can help you.
Note: You can also profile the memory consumption of your code. This falls outside the scope of this tutorial. However, you can check out memory-profiler if you need to monitor the memory consumption of your programs.
Note that line profiling takes time and adds a fair bit of overhead to your runtime. A normal workflow is first to use cProfile to identify which functions to investigate and then run line_profiler on those functions. line_profiler isn’t part of the standard library, so you should first follow the installation instructions to set it up.
Before you run the profiler, you need to tell it which functions to profile. You do this by adding a @profile decorator inside your source code. For example, to profile Timer.stop() , you add the following inside timer.py :
Note that you don’t import profile anywhere. Instead, it’s automatically added to the global namespace when you run the profiler. You need to delete the line when you’re done profiling, though. Otherwise, you’ll get a NameError .
Next, run the profiler using kernprof , which is part of the line_profiler package:
This command automatically saves the profiler data in a file called latest_tutorial.py.lprof . You can see those results using line_profiler :
First, note that the time unit in this report is microseconds ( 1e-06 s ). Usually, the most accessible number to look at is %Time , which tells you the percentage of the total time your code spends inside a function at each line. In this example, you can see that your code spends almost 70 percent of the time on line 47, which is the line that formats and prints the result of the timer.
Conclusion
In this tutorial, you’ve tried several different approaches to adding a Python timer to your code:
You used a class to keep state and add a user-friendly interface. Classes are very flexible, and using Timer directly gives you full control over how and when to invoke the timer.
You used a context manager to add features to a block of code and, if necessary, to clean up afterward. Context managers are straightforward to use, and adding with Timer() can help you more clearly distinguish your code visually.
You used a decorator to add behavior to a function. Decorators are concise and compelling, and using @Timer() is a quick way to monitor your code’s runtime.
You’ve also learned why you should prefer time.perf_counter() over time.time() when benchmarking code, as well as what other alternatives are useful when you’re optimizing your code.
Now you can add Python timer functions to your own code! Keeping track of how fast your program runs in your logs will help you monitor your scripts. Do you have ideas for other use cases where classes, context managers, and decorators play well together? Leave a comment down below!
Resources
For a deeper dive into Python timer functions, check out these resources:
- codetiming is the Python timer available on PyPI.
- time.perf_counter() is a performance counter for precise timings.
- timeit is a tool for comparing the runtimes of code snippets.
- cProfile is a profiler for finding bottlenecks in scripts and programs.
- pstats is a command-line tool for looking at profiler data.
- KCachegrind is a GUI for looking at profiler data.
- line_profiler is a profiler for measuring individual lines of code.
- memory-profiler is a profiler for monitoring memory usage.
Get a short & sweet Python Trick delivered to your inbox every couple of days. No spam ever. Unsubscribe any time. Curated by the Real Python team.

About Geir Arne Hjelle
Geir Arne is an avid Pythonista and a member of the Real Python tutorial team.
Each tutorial at Real Python is created by a team of developers so that it meets our high quality standards. The team members who worked on this tutorial are:
Тайминг в Python
Python – язык программирования, который можно отнести к общему назначению. С его помощью пишут как бизнес-софт, так и развлекательный (игровой) контент. Это отличное решение для новичков в разработке. Относится к объектно-ориентированному типу.
В данной статье будет рассказано о том, что собой представляет задержка в Python, как использовать time (таймер), для чего все это нужно. Информация пригодится даже опытным разработчикам, которые планируют работу со временем в будущей утилите.
Ключевые термины
Пытаясь освоить Python, программеру потребуется выучить немало теории. Вот базовые термины, без которых время и остальные компоненты кодификаций применять на деле не получится:
- Ключевое слово – зарезервированное системой слово или фраза. Обозначает действие, операцию, функцию. Ключевики не могут выступать в виде имен переменных.
- Переменная – именованная ячейка памяти, которую можно изменять, сохранять и считывать.
- Алгоритм – последовательность действий, набор правил, помогающих решать те или иные задачи.
- Класс – набор связанных между собой объектов, которые имеют общие свойства.
- Объект – комбинация переменных, констант и иных структурных единиц. Они выбираются совместно и аналогичным образом проходят обработку.
- Константа – значение, которое не будет меняться на протяжении всего выполнения утилиты.
- Тип данных – классификация информации определенного вида.
- Массив – множество данных. Они предварительно группируются.
Огромную роль в Python играют ключевые слова. Их необходимо либо запоминать, либо заучивать, либо держать где-то поблизости справочник с соответствующими данными. Иначе при объявлении переменных не исключены проблемы.
Задержка – это…
Задержка – термин, который применим ко времени. Он встречается и в обыденной жизни. Это – ситуация, когда что-то происходит или должно осуществиться не сразу. Пример – после наступления каких-то обстоятельств.
В программировании задержка «откладывает» выполнение кода на определенное время. Часто такая потребность возникает тогда, когда нужно дождаться завершения иного процесса, чтобы задействовать далее полученный результат.
При рассмотрении многопоточных утилит, использовать таймер (timer) и время (time) нужно, чтобы дождаться завершения операции и функций из других потоков.
Класс Timer
Класс Timer () в Python отвечает за время и работу с ним «от начала по конца». Модуль, метод, используемый для задержки и всего, что с ней связано. Перед использованием оного требуется произвести импорт компонента.
Для этого подойдет запись типа import time в Python. Класс относится к модулю threading. Он создает таймер, который запускает функцию с аргументами и ключевыми значениями (kwargs). Происходит это за счет time, установленного как interval. Этот параметр указывается в секундах.
Программеру предстоит запомнить следующее:
- Запись функции с классом, отвечающего за таймаут (timeout) –
- Если args равен None (этот показатель устанавливается изначально), Python использует пустой список.
- Когда ключевое слово kwargs равен None, применяется пустой словарь.
- Класс «Таймер» представлен действием, которое нужно запускать только по прошествии конкретного промежутка времени.
- Таймер выступает в виде подкласса threading.Thread().
Все это требуется запомнить. А еще – учесть, что в процессе коддинга предстоит использовать суперкласс (super class), а также мета данные.
Функции
Рассматривая methods time, программисту требуется изучить разнообразные функции, связанные со временем. Это поможет лучше разобраться в потоках и задержках. Не стоит забывать, что при тестинге важно использовать print. Эта операция выводит результат на экран.
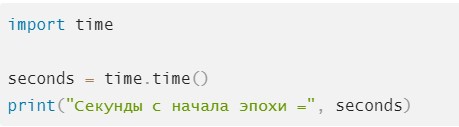
Time.Time
Функция Time() будет возвращать число секунд, которые прошли с начала эпохи. Для Unix-систем это – 1.01.1970. Отсчет с 12 часов ночи ровно.
Ctime()
Компонент, который будет в виде аргумента в Python принимать количество секунд, прошедших с самого начала эпохи. Результат – возврат строки по местному time.
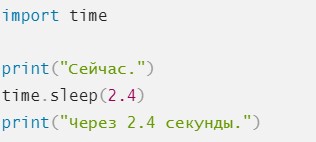
Sleep
Отвечает за непосредственную задержку. Откладывает исполнение нынешнего потока на заданное количество секунд.
Класс struct_time
Изучая, какой метод подойдет для работы с таймерами и super class, стоит обратить внимание на struct_time. Этот объект может быть принят некоторыми функциями в упомянутом ранее модуле. При обработке оного происходит возврат.
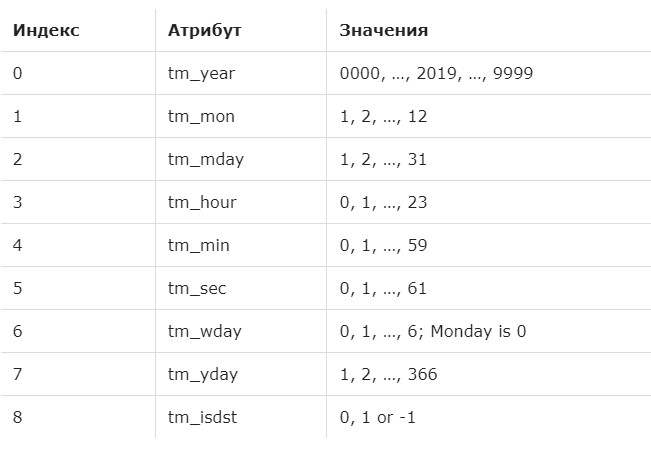
Выше – наглядный пример.
Реализация Sleep
Когда нужный метод для работы с задержкой изучен, можно рассмотреть то, как сделать таймаут. Для этого используют super class, а также sleep. Он проходит реализацию несколькими способами:
- Через time.sleep(). Это – встроенная возможность Python. Отвечает за таймаут через модуль time. Откладывает выполнение потока на установленное количество секунд.
- Вызов с декораторами. Активируют, когда одно неудачно выполненное действие требуется запустить снова.
- В потоках. Такие ситуации требуют, чтобы приложение избегало простоя. Для этого применяют или time.sleep(), или Event.wait() из модуля threading.
- Из Async IO. Асинхронные возможности появились в Питоне, начиная с 3.4 версии. Это – тип параллельного программирования.
- В Tkinter и wxPython. Отсрочки возможны при создании пользовательских интерфейсов. При применении sleep() внутри GUI кода блокируется цикл обработки событий.
- After(). Это – метод, который погружает в сон для Tkinter. Часть стандартной библиотеки.
- CallLater. Метод для wxPython. Имеет больше виджетов и хорошо годится для нативной разработки.
А вот видео, где можно наглядно увидеть работу с таймером в Python. Лучше разобраться с этой темой, как и с языком программирования, помогут дистанционные компьютерные курсы. Программы рассчитаны на срок до года. В конце будет выдан электронный сертификат. В процессе пользователи получат не только хорошо поданный учебный материал, но и новые полезные связи. А еще – соберут портфолио для трудоустройства.
How to make a timer program in Python
Here is my goal: To make a small program (text based) that will start with a greeting, print out a timer for how long it has been since the last event, and then a timer for the event. I have used this code to start out with trying to figure out a timer, but my first problem is that the timer keeps repeating on a new line with each new second. How do I get that to stop? Also, this timer seems to lag behind actual seconds on the clock.
12 Answers 12
I would go with something like this:
Here I am relying on actual time module rather than just sleep incrementer since sleep won’t be exactly 1 second.
Also, you can probably use print instead of sys.stdout.write , but you will almost certainly need sys.stdout.flush still.
Note the trailing comma so a new line is not printed.
![]()
This is my version. It’s great for beginners.
Ok, I’ll start with why your timer is lagging.
What happens in your program is that the time.sleep() call «sleeps» the program’s operation for 1 second, once that second has elapsed your program begins execution again. But your program still needs time to execute all the other commands you’ve told it to do, so it takes 1s + Xs to actually perform all the operations. Although this is a very basic explanation, it’s fundamentally why your timer isn’t synchronous.
As for why you’re constantly printing on a new line, the print() function has a pre-defined end of line character that it appends to any string it is given.
You can overwrite this with anything by putting end=»YourThing» in your print statement like so
The above example appends an empty string to the end of the line, so the output of the loop would be
As for solving your timer problem, you should use something similar to
![]()
I based my timer on user5556486’s version. You can set the duration, and it will beep after said duration ended, similar to Force Fighter’s version
On my PC (Windows 7) when run in a cmd window, this program works almost exactly as you say it should. If the timer is repeating on a new line with each second, that suggests to me that os.system (‘cls’) is not working for you — perhaps because you’re running on an OS other than Windows?
The statement while s<=60: appears to be incorrect because s will never be equal to 60 in that test — anytime it gets to 60, it is reset to 0 and m is incremented. Perhaps the test should be while m<60: ?
Создайте таймер обратного отсчета в Python
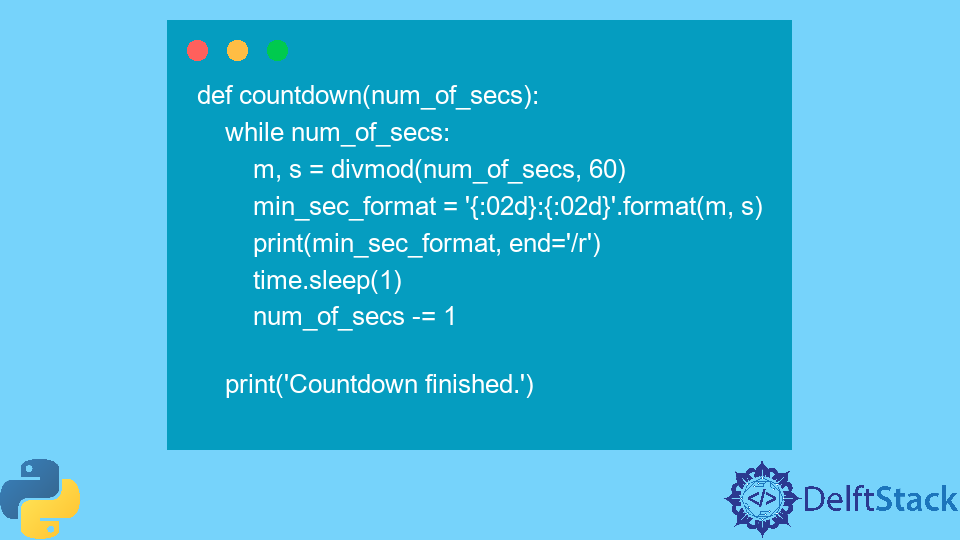
В этом руководстве рассказывается, как создать таймер обратного отсчета в Python.
Код принимает ввод того, как долго должен быть обратный отсчет, и начинает обратный отсчет сразу после ввода ввода.
Использование модуля time и функции sleep() для создания таймера обратного отсчета в Python
Модуль time — это общий модуль Python, содержащий вспомогательные функции и переменные, связанные со временем. Основная функция, используемая в этом руководстве, — это функция sleep() , которая представляет собой асинхронную функцию, которая приостанавливает выполнение одного потока на n секунд.
Если ваша программа однопоточная, как в этом руководстве, то функция sleep() остановит выполнение всей программы до тех пор, пока не будет достигнуто заданное время. Благодаря этому, наряду с подтвержденным пользовательским вводом, мы можем создать простой таймер обратного отсчета в Python.
Первое, что нужно сделать, это импортировать модуль time для использования функции sleep() .
Затем объявите функцию, которая будет работать как таймер обратного отсчета. Назовем эту функцию countdown() . Функция принимает единственный параметр: количество секунд ( num_of_secs ), до которого будет отсчитывать таймер.
Переменная num_of_secs будет непрерывно уменьшаться в цикле, пока не достигнет 0 (что переводится в False и завершает цикл без каких-либо дополнительных условий).
Внутри цикла отформатируйте входную переменную num_of_secs в формат MM:SS и распечатайте ее каждый раз, когда она уменьшается. Для этого используйте встроенную функцию Python divmod() , которая принимает два числа и возвращает произведение и остаток от двух чисел соответственно. Затем отформатируйте результат кортежа divmod() в формат MM:SS с помощью встроенной строковой функции format() .
<:02d>форматирует аргумент в 2-значное целое число (из-за символа 02d ). Если целое число меньше двух цифр, к нему добавляются ведущие 0 .
Затем при каждой итерации цикла вызывайте time.sleep(1) , что означает, что каждая итерация откладывается на 1 секунду и будет продолжаться по истечении.
Перед вызовом функции sleep() распечатайте отформатированную строку, напоминающую формат MM:SS текущего значения входной переменной num_of_secs .
Кроме того, добавьте еще один аргумент в функцию print() со свойством end и значением /r , который представляет собой новую строку для имитации поведения реального таймера. Этот аргумент перезаписывает предыдущий вывод print() каждый раз при выполнении цикла, перезаписывая все до того, как возврат каретки обозначен символом /r .
После этого уменьшите входную переменную min_sec_format на 1 после выполнения всех предыдущих строк.
Наконец, распечатайте заключительный оператор вне цикла, который означает, что таймер завершил выполнение. Он завершает метод countdown() и будет работать как таймер обратного отсчета.
Следующее, что нужно сделать, — предоставить пользователю возможность ввести количество секунд для запуска обратного отсчета. Для этого мы можем использовать встроенную функцию input() для приема пользовательского ввода.