How to install dlib for Python with Visual Studio 2017 on Windows 10 (2018)
![]()
This tutorial will cover the installation of dlib on Python with the Visual Studio 2017. For those of you that don’t know what Dlib is, I’ve provided the definition of its creators from their page dlib.net.
Dlib is a modern C++ toolkit containing machine learning algorithms and tools for creating complex software in C++ to solve real world problems.
Most often dlib is partnered with OpenCV. So this tutorial will be helpful for people who want to install dlib for their Computer Vision projects and use Python.
To get started, first you need to have Python installed in your computer. Since we are using the Visual Studio 2017 we have an option there to have Python included in the installation which integrates it immediately with Visual Studio. So you may or may not install Python independently.
If you want an independent installation and just want to use some features of Visual Studio 2017 you can follow this section below if not feel free to skip it and just include Python in the Visual Studio 2017 installation.
I would strongly suggest using Python version 3.6.x for now.
Download link: https://www.python.org/downloads/release/python-367/
**Note: For convenience, always select or check ADD TO PATH, and customize your installation path to C:\ or C:\Program Files for convenience.
Second, you need to install CMake which is
an extensible, open-source system that manages the build process in an operating system and in a compiler-independent manner.
CMake will be the one to create the build files from the C++ dlib library using the native Visual Studio build tools.
The approach that will be used here is using an installation of Visual Studio 2017 Community edition, which is the setup I have on this computer.
Download link: https://visualstudio.microsoft.com/downloads/
**Note: Make sure to select the Community edition.
After downloading, open the Visual Studio Installer and just run through the process until you are taken to this screen.
This is where you choose which features of Visual Studio 2017 you would like to download and install. Selections may vary for your specific use of the Studio but make sure to have the Visual C++ build tools selected and you would want to have the 4 items on the right to be checked which are: Windows 10 SDK, Visual C++ build tools for CMake, Testing tools core features — Build tools, and VC ++ 2015.3 v 14.00 toolset for desktop.
Then proceed with the installation. It will be a long installation as the file size of the download is in GB. After installation press the Windows key and type Edit the System Environment variables. A window will pop-up, select environment variables at the bottom right.
In the new window, select New, then add VCTargetsPath as the variable name and
C:\Program Files (x86)\Microsoft Visual Studio\2017\BuildTools\Common7\IDE\VC\VCTargets as the variable value.
Make sure to follow this step.
You can make it a system variable if there are more users you would like to share dlib with. After select ok and close the windows.
Assuming you have added Python successfully to your PATH environment variable. Open your terminal (cmd) and type
As of 2018, the library should automatically be fetched downloaded and installed for you without having to do a lot of extra work other than setup of CMake and Visual Studio Build tools.
My dlib was already downloaded and cached I just needed to install, but for yours it may indicate a download progress bar on the cmd.
If you’ve found this tutorial helpful please like my blog and share it. If you have any questions let me know in the comments below.
Problems you might encounter (or have encountered before reading through this tutorial)
One problem that you might encounter is
This was really my problem for a couple of days and what it really means is that it’s looking for your build tools and its unable to locate it. Creating the environment variable will solve this problem.
Another error you might encounter
C:\Program Files (x86)\MSBuild\Microsoft.Cpp\v4.0\V110\Microsoft.Cpp.Platform.targets (44): The builds tools for v140 (Platform Toolset = ‘v140’) cannot be found. To build using the v140 build tools, either click the Project menu or right-click the solution, and then select “Update VC++ Projects…”. Install v140 to build using the v140 build tools.
This is solved by installing the following below especially
VC++ 2015.3 v14.00 (v140) toolset for desktop
**Note: I cannot stress over this enough, as I’ve been figuring these errors out for the past couple of days on Microsoft forums and on Stackoverflow.
Following the steps above in the tutorial, would most certainly help you in installing Dlib using Visual Studio 2017.
Name already in use
visualstudio-docs / docs / python / tutorial-working-with-python-in-visual-studio-step-05-installing-packages.md
- Go to file T
- Go to line L
- Copy path
- Copy permalink
- Open with Desktop
- View raw
- Copy raw contents Copy raw contents
Copy raw contents
Copy raw contents
Step 5: Install packages in your Python environment
The Python developer community has produced thousands of useful packages that you can incorporate into your own projects. Visual Studio provides a UI to manage packages in your Python environments.
Select the View > Other Windows > Python Environments menu command. The Python Environments window opens as a peer to Solution Explorer and shows the different environments available to you. The list shows both environments that you installed using the Visual Studio installer and environments you installed separately. That includes global, virtual, and conda environments. The environment in bold is the default environment that’s used for new projects. For more information about working with environments, see How to create and manage Python environments in Visual Studio environments.

. moniker range=»>=vs-2022″ . moniker-end

. moniker range=»<=vs-2019″ . moniker-end
[!NOTE] You can also use the Ctrl+K, Ctrl+` keyboard shortcut to open the Python Environments window from the Solution Explorer window. If the shortcut doesn’t work and you can’t find the Python Environments window in the menu, it’s possible that you haven’t installed the Python workload. See How to install Python support in Visual Studio on Windows for guidance about how to install Python.
With a Python project open, you can open the Python Environments window from Solution Explorer. Right-click Python Environments and select View All Python Environments.

. moniker range=»vs-2022″ . moniker-end

. moniker range=»<=vs-2019″ . moniker-end
Now, create a new project with File > New > Project, selecting the Python Application template.
In the code file that appears, paste the following code, which creates a cosine wave like the previous tutorial steps, only this time plotted graphically. You can also use the project you previously created and replace the code.

In the editor window, hover over the numpy and matplotlib import statements. You’ll notice that they aren’t resolved. To resolve the import statements, install the packages to the default global environment. . moniker range=»>=vs-2022″ . moniker-end

. moniker range=»<=vs-2019″ . moniker-end
When you look at the editor window, notice that when you hover over the numpy and matplotlib import statements that they aren’t resolved. The reason is the packages haven’t been installed to the default global environment.
For example, select Open interactive window and an Interactive window for that specific environment appears in Visual Studio.
Use the drop-down list below the list of environments to switch to the Packages tab.The Packages tab lists all packages that are currently installed in the environment.
Install packages using the Python Environments window
From the Python Environments window, select the default environment for new Python projects and choose the Packages tab. You’ll then see a list of packages that are currently installed in the environment.
Install matplotlib by entering its name into the search field and then selecting the Run command: pip install matplotlib option. Running the command will install matplotlib , and any packages it depends on (in this case that includes numpy ).
Choose the Packages tab.
Consent to elevation if prompted to do so.
After the package is installed, it appears in the Python Environments window. The X to the right of the package uninstalls it.
. moniker range=»vs-2022″  . moniker-end . moniker range=»<=vs-2019″
  . moniker-end
Consent to elevation if prompted to do so.
After the package installs, it appears in the Python Environments window. The X to the right of the package uninstalls it.

. moniker range=»vs-2022″ . moniker-end

. moniker range=»<=vs-2019″ . moniker-end
[!NOTE] A small progress bar might appear underneath the environment to indicate that Visual Studio is building its IntelliSense database for the newly-installed package. The IntelliSense tab also shows more detailed information. Be aware that until that database is complete, IntelliSense features like auto-completion and syntax checking won’t be active in the editor for that package.
Visual Studio 2017 version 15.6 and later uses a different and faster method for working with IntelliSense, and displays a message to that effect on the IntelliSense tab.
Run the program
Now that matplotlib is installed, run the program with (F5) or without the debugger (Ctrl+F5) to see the output:
Как добавить библиотеку в visual studio python
Although Visual Studio 2019 comes with a complete basic Python installation, there are many third-party packages that you may wish to use, so it’s useful to know how to install these. Here we’ll give a couple of examples. First, we’ll show how to install matplotlib, which is a package that shows plots of mathematical functions.
Installing a new Python package
Create a new Python project in Visual Studio. Enter the following code into the main code window (usually at the upper left):
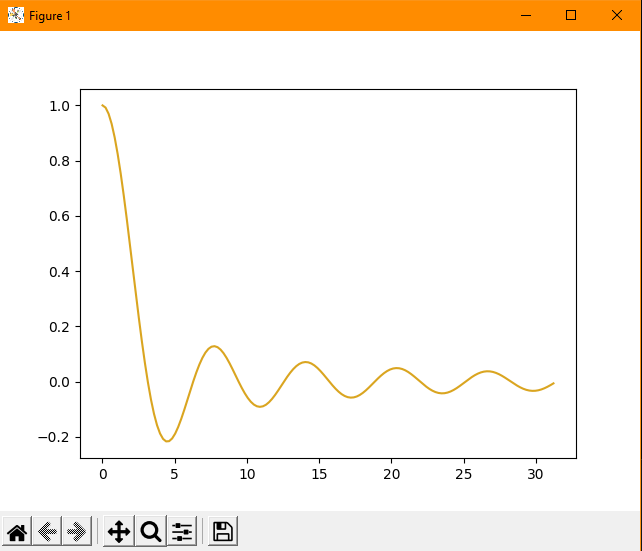
Don’t worry about the details of the code for now; we’ll cover this in future posts. This code should show a plot of the function  for
for  between 0.01 (to avoid dividing by zero) up to 1800 degrees, with a spacing between plot points of 12 degrees . The final argument in the np.arange() function specifies the colour of the plot, using one of the standard HTML colour names.
If you don’t have matplotlib installed, the editor will underline the terms numpy, matplotlib and pyplot in lines 2 and 3 and complain that they are unknown. To install them, follow these steps:
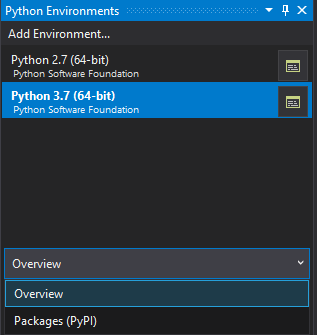
In Visual Studio’s View menu, select View>Other windows>Python environments. This should open a panel on the right that looks like this:

Don’t worry if your panel doesn’t look exactly like this; the Python environments listed depend on how many you have installed. If you installed Visual Studio with just the default Python environment, you’ll probably have only Python 3.7 installed.
Next, click on the drop down menu labelled Overview. You should see an option called ‘Packages’, as shown:
Select this, and you should then get a box with the text ‘Search PyPl and installed packages’. Type ‘matplotlib’ into this box and you should see a list of options containing this term. Click on ‘Install matplotlib’. You should then see the Package Manager Console giving reports of progress in the installation process (which might take a couple of minutes so be patient).
When it’s done, you can then run the above program and, hopefully, see this output:
Installing a different version of Python
One of the annoying things about Python is that different versions support different features and, sometimes, actually break code that was written in an earlier version. If you want to test your code in a different version than the one in which it was written, you can install a different version of Python in Visual Studio.
To do this, click on ‘Add Environment…’ in the Python Environments panel shown above. In the dialog box that appears, select ‘Python installation’ on the left, and you’ll see a list of available Python versions that you can install, along with those that are already installed. Select one or more of these versions and then click the ‘Install’ button at the lower right. You’ll need administrator privileges to do this.
Let’s say you’ve decided to install Python version 2.7 alongside the default Python 3.7 and you want to test your program using 2.7. On Visual Studio’s Project menu, select Project>[Project name] properties, where [Project name] is whatever you’ve called your project. You’ll then get window with tabs named ‘General’, ‘Debug’, ‘Publish’ and ‘Test’ on the left. On the General tab, select the Python interpreter you want from the drop down menu at the bottom. Make sure you save the change before running your program. (Click Ctrl+S or the Save icon in the toolbar.) You can then run your project to see what happens.
If you try this on the plotting program above, you’ll probably get an error complaining that matplotlib doesn’t exist. This is because installing a Python package applies only to one version of Python, so above we installed matplotlib for Python 3.7 but not for 2.7. If you want your program to work with 2.7, you’ll need to repeat the above steps to install matplotlib for 2.7 as well.
Installing a Python Library in Visual Studio Code — Windows
In this quick blogpost, I will share the steps that you can follow in order to install a Python library using pip through either the Terminal or a Jupyter Notebook in Visual Studio Code (VSCode) on a Windows computer.
Pre-requisites
In order to complete the steps of this blogpost, you need to install the following in your windows computer:
- Visual Studio Code : you can find the steps to install it here.
- Python Extension for Visual Studio Code : you can find the steps to install it here.
- Python Interpreter : you can find the steps to install it here.
Installing a Python Library Using the Terminal in VSCode
1) Accessing Visual Studio Code Terminal
- Open VSCode application

- Go to the Terminal menu and select New Terminal .

- A new terminal (PowerShell based) window is opened.

2) Importing a Python Library
- Run the following command to validate that pip is installed in your computer.

- Let us say that you want to install Pandas Python library.
- Run the following command

- Pandas library is now ready to be imported by any python application. You can repeat this process for any Python library.
Installing a Python Library Using a Jupyter Notebook in VSCode
1) Creating a Jupyter Notebook in VSCode
- Create a Jupyter Notebook following the steps of My First Jupyter Notebook on Visual Studio Code (Python kernel)

2) Importing a Python Library
- Run the following command to validate that pip is installed in your computer.

- Let us say that you want to install Pandas Python library.
- Run the following command.