Что такое wp-config, как его настроить и где он находится.
Веб-сайты на базе WordPress широко используются во всем мире. Чтобы обеспечить правильную работу и настройку вашего WordPress-сайта, существует файл с конфигурацией, известный как «wp-config». В этой статье мы рассмотрим, что такое wp-config, как его настроить и где он находится.
2. Что такое wp-config
Файл wp-config.php является одним из самых важных файлов в вашей установке WordPress. Он содержит информацию о подключении к базе данных, настройках безопасности и других ключевых параметрах, которые помогают вашему сайту работать должным образом.
2.1. Содержимое wp-config
Файл wp-config содержит различные определения и настройки, которые влияют на функционирование вашего сайта. Некоторые из основных параметров включают:
- Имя базы данных
- Имя пользователя базы данных
- Пароль пользователя базы данных
- Префикс таблиц базы данных
- Секретные ключи
3. Настройка wp-config
Чтобы настроить ваш файл wp-config, вам потребуется доступ к файловой системе вашего хостинга. Вы можете отредактировать файл с помощью текстового редактора или использовать FTP-клиент для загрузки и загрузки файла.
3.1. Пример wp-config
Ниже приведен пример основных определений, которые обычно находятся в файле wp-config:
4. Местонахождение wp-config
Файл wp-config.php находится в корневой директории вашей установки WordPress. Когда вы устанавливаете WordPress, обычно он создает файл wp-config.php на основе предоставленной вами информации.
4.1. Путь к wp-config
Путь к файлу wp-config.php может выглядеть следующим образом:
5. Заключение
Файл wp-config является ключевым компонентом вашей установки WordPress. Он содержит важную информацию о подключении к базе данных и других настройках. Надлежащая настройка wp-config помогает обеспечить безопасность и эффективную работу вашего сайта.
WordPress Configuration Tips & Tricks
![]()
The main file used in WordPress to get access to the database and keep your setup secure and working is wp-config.php.
Not only does this file contain the user connection configurations but there are a number of other features that can be adjusted, turned on/off via this file.
Here’s a screenshot of wp-config.php (aka the WordPress configuration file) for those who may not yet be familiar:
The wp-config.php file contains the information required for WordPress to connect to the database
Database Credentials *
This set of four configurational definitions are required for WordPress to connect to the database:
Database name, username, and password should be readily available to you during database creation, but the DB_HOST value may be more difficult to acquire. Most commonly, this value is simply “ localhost ”, but if that doesn’t work, here are a few other values to try:
- 1and1 Hosting — db12345678
- DreamHost — mysql.example.com
- GoDaddy — h41mysql52.secureserver.net
- ICDSoft — localhost:/tmp/mysql5.sock
- MediaTemple (GS) — internal-db.s44441.gridserver.com
- Pair Networks — dbnnnx.pair.com
- Yahoo — mysql
You can even specify an alternate port for your database server. Here are two examples:
Another cool trick is to detect the database server value automatically:
If all of these fail, or if you are still having problems, consult your hosting provider for assistance.
Database Character Set and Collation *
As of WordPress version 2.2, you may specify a character set for your MySQL database tables. Generally, there is no reason to change the default character-set value of UTF-8, which is usually perfect because it supports all languages. Here is the default (and recommended) setting:
WordPress version 2.2 also enables you to specify the collation, which is the sort order of your database character set. Setting the collation is generally handled automatically by MySQL according to the character set, which is enabled by leaving the collation value blank as done in the default setting for this definition. Here is the default (and recommended) setting:
Note: only use these two definitions if they already exist in your wp-config.php file.
Security Keys *
As of WordPress 2.7, there are four security keys available that are designed to insure better cookie encryption. These keys work silently in the background and should be as random and complicated as possible (no, you will never need to remember them). The easiest way to generate these keys is to do it automatically at the WordPress.org secret-key service. Simply visit that link and copy/paste the results into your wp-config.php file. Note that these keys may be changed anytime, and doing so will invalidate all of your users’ existing cookies so that they will have to re-login to your site.
Database Prefix *
The database prefix setting is particularly useful for increasing the security of your site and for housing multiple WordPress installations in a single database. By changing the default value of “ wp_ ” to something randomly unique, you mitigate commonly targeted attack vectors and improve the overall security of your site. Here is the default setting:
There are tons of crackers out there probing sites for this default database prefix. Changing it to something like “x777_” is a good way to avoid these types of targeted attacks.
You can also use this setting to install multiple instances of WordPress using the same database. Simply specify a unique database prefix for each installation:
Language Settings *
WordPress makes it possible to specify a language-translation file and its associated directory. The language translation file is assumed to be of the “ .mo ” variety, and its default location (if no explicit path is specified) is assumed to be wp-content/languages (first) and then wp-includes/languages (second). Here is the default setting:
Directory Settings *
Technically not something that you should need to mess with, the default wp-config.php file contains a few lines that specify the absolute path and include the settings file. I include them here for the sake of completeness:
Blog Address and Site Address
Now we’re getting to some of the cool stuff. By default, these two configurational definitions are not included in the wp-config.php file, but they should be added to improve performance. These two settings were introduced in WordPress version 2.2 and override the database value without actually changing them.
Adding these two definitions in your site’s wp-config.php file reduces the number of database queries and thus improves site performance. These settings should match those specified in your WordPress Admin. Here is an example (note that you should not include a trailing slash at the end of either URL):
A cool trick is to set these values dynamically by grabbing the global server variable:
Probably best to escape those values if using on a public site.
Template Path and Stylesheet Path
As with the predefined constants for blog address and site address (see previous section), you can also boost performance by eliminating database queries for the template path and stylesheet path for your site. Here are the default values for these two definitions:
As is, these two definitions are still querying the database, but we can eliminate these extraneous queries by hardcoding the values into place:
Disable Cache and Cache Expiration
These two options apply to older versions of WordPress that are still using the default object-based caching mechanism. The first definition enables you to enable or disable the cache, while the second definition enables you to specify the cache expiration time.
Enable the cache
Disable the cache
Specify Cookie Domain
There are several reasons why you want to specify a cookie domain for your site. A common example involves preventing cookies from being sent with requests for static content on subdomains. In this case, you would use this definition to tell WordPress to send cookies only to your non-static domain. This could be a significant performance boost. Here are some examples of setting various cookie path and cookie domain information:
Override File Permissions
If your web host’s default file permissions are too restrictive, adding these definitions to your WordPress configuration file may help resolve the issue. Note that you don’t need the quotes around the permission values. For example:
View All Defined Constants
Need to view all predefined constants? Good news, this PHP function will return an array of all currently defined constants:
Custom User and Usermeta Tables
What about custom user and usermeta tables? Yep, you can do that too, with the following definitions:
FTP/SSH Constants
This set of configurational definitions is designed to help users locate and utilize FTP/SSH connections. Here is a example set of predefined constants for FTP/SSH updates:
Moving Your wp-content directory
As of WordPress version 2.6, you may change the default location of the wp-content directory. There are several good reasons for doing this, including enhancement of site security and facilitation of FTP updates. Some examples:
You may also further specify a custom path for your plugins directory. This may help with compatibility issues with certain plugins:
Dealing with Post Revisions
Recent versions of WordPress provides a post-revisioning system that enables users to save different versions of their blog posts and even revert to previously saved versions if necessary. Regardless of how much you do or do not despise this amazingly awesome feature, here are a couple of configurational definitions that may prove useful for you ��
Limit the number of saved revisions
Disable the post-revisioning feature
Specify the Autosave Interval
In a similar vein as the post-revisioning feature is WordPress’ actually useful Autosave functionality. By default, WordPress saves your work every 60 seconds, but you can totally modify this setting to whatever you want. Don’t get too crazy though, unless you want to stress-out your server ��
Debugging WordPress
Since WordPress version 2.3.1, users have been able to display certain errors and warnings to help with the debugging of their site. As of WordPress version 2.5, enabling error reporting raises the reporting level to E_ALL and activates warnings for deprecated functions. By default (i.e., if no definition is specified in the wp-config.php file), error reporting is disabled.
Error Log Configuration
Here is an easy way to enable basic error logging for your WordPress-powered site. Create a file called “ php_error.log ”, make it server-writable, and place it in the directory of your choice. Then edit the path in the third line of the following code and place into your wp-config.php file:
Increase PHP Memory
If you are receiving error messages telling you that your “Allowed memory size of xxx bytes exhausted,” this setting may help resolve the issue. AS of WordPress version 2.5, the WP_MEMORY_LIMIT definition enables you to specify the maximum amount of memory that may be used by PHP. By default, WordPress will automatically attempt to increase PHP memory up to 32MB, so this setting is only needed for values higher than 32MB. Note that some web hosts disable your ability to increase PHP memory, so you may need to beg for them to do it. Here are some examples:
Everything You Need to Know About wp-config.php
The wp-config.php file is a significant part of a WordPress installation. Created during the WordPress installation process, the file contains database configuration items. In short, it allows WordPress to establish a connection with the database.
That said, a webmaster should know how to manage it properly to ensure the site’s security. Without it, your WordPress site wouldn’t be able to store and retrieve data from its database.
This article will explore the functionality of the wp-config.php file and how to locate it in your WordPress site’s directory. We will also show you how to edit the wp-config.php file and implement custom settings on your website.
What Is the wp-config.php File
The wp-config.php file is a configuration file created during the WordPress installation process. It stores database information such as the database name, username, password, and host.
In addition to establishing a connection between your WordPress site and its database, WordPress also uses the wp-config.php file to implement advanced settings on the site.
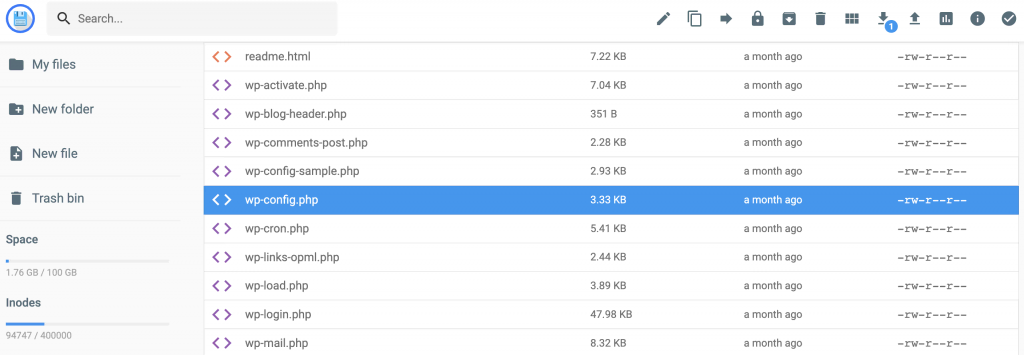
This configuration file is stored within the root folder of your website. Access the wp-config.php file via an FTP client like FileZilla or your web host’s File Manager. The following example shows the wp-config.php file in the /public_html directory:
In case you need to create the wp-config.php file manually, WordPress provides a sample file called the wp-config-sample.php file within the root folder.
It contains all the necessary information, ideal for WordPress beginners who aren’t familiar with the file yet. Keep in mind not to change the order of the code as it may cause errors on the site.
Here’s the content of the wp-config.php sample file:
WordPress uses PHP constants, which are identifiers for values that cannot be modified when executing a PHP script. These identifiers define the database settings within the wp-config.php file. Each setting comes with instructions, making it easier to use the code template.
Where Is the wp-config.php File in WordPress
To locate the PHP file within your WordPress site’s root directory, either use the File Manager provided by your web hosting provider or an FTP client. The following section will show you how to find the wp-config.php file in Hostinger’s hPanel, cPanel, and via FTP.
Locating the wp-config.php File in the hPanel
Hostinger’s File Manager provides access to all WordPress files, including wp-config.php. This method requires login credentials to your hosting dashboard. Here’s how to locate the wp-config.php file in hPanel:
- Navigate to File Manager under the Files section of your hPanel.
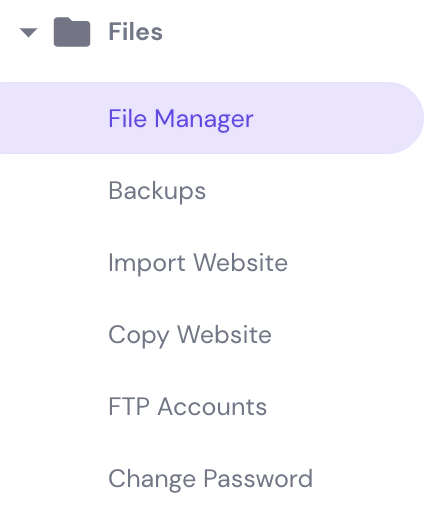
- Click on the public_html folder located in the sidebar.
- Scroll down until you find the wp-config.php file.
Locating the wp-config.php File in cPanel
cPanel also comes with a File Manager. Follow these steps to locate the wp-config.php file in cPanel:
- Navigate to File Manager under the Files section of your cPanel.
- Access the public_html → wp folder from the sidebar.
- Scroll down until you locate the wp-config.php file.
Locating the wp-config.php File via FTP
You may also use an FTP client to find the wp-config.php file. If you need help, we have a tutorial on how to configure FileZilla.
Here’s how to locate the wp-config.php file via an FTP client:
- Collect your FTP credentials from your hosting provider. If your website is running on Hostinger’s WordPress or any other type of hosting services, this information is available in FTP Accounts, under the Files section of your hPanel. Alternatively, send an information request to your hosting provider.
- Open FileZilla and enter your FTP credentials. Click Quickconnect.
- Navigate to the root directory of your site (public_html). The wp-config file should be there.
Relocating the wp-config.php File
Since your WordPress website configuration file is stored within the root folder, the file becomes susceptible to malware attacks.
In addition to configuring file permissions, we recommend relocating the file from its default location to harden your WordPress website security.
Follow these steps to relocate the WordPress wp-config.php file using the File Manager:
- Locate your wp-config.php file in the root directory of your WordPress website.
- Copy and paste the wp-config.php file to another directory of your choice. In this example, we will put it inside /public_html/wp-admin/user.
- Change the name of the new wp-config file. The goal is to disguise it as an unimportant file so hackers won’t recognize it.
- Navigate back to the original wp-config file and replace its entire content with the following code:
Make sure to replace the directory with the file’s new location, new-wp-config.php with your new file name, and add your own domain.
- That’s it. The original wp-config file will now serve as a shortcut that redirects your server to the actual wp-config file.
The wp-config.php File Sections
As mentioned earlier, the WordPress wp-config-sample.php file can be modified to create a custom configuration for your WordPress website. Therefore, it’s important to know the purpose of each section and how to change it.
This section will provide a breakdown of the sections within the wp-config file and code snippets to add for advanced WordPress website customization.
MySQL Settings for wp-config.php
The MySQL settings section consists of your WordPress database configuration ‒ MySQL hostname, database name, username, and password. We recommend changing this section if your hosting provider uses an alternate port number or you’re moving to a different web server.
Here’s a snippet of the MySQL settings section taken from the wp-config-sample.php file:
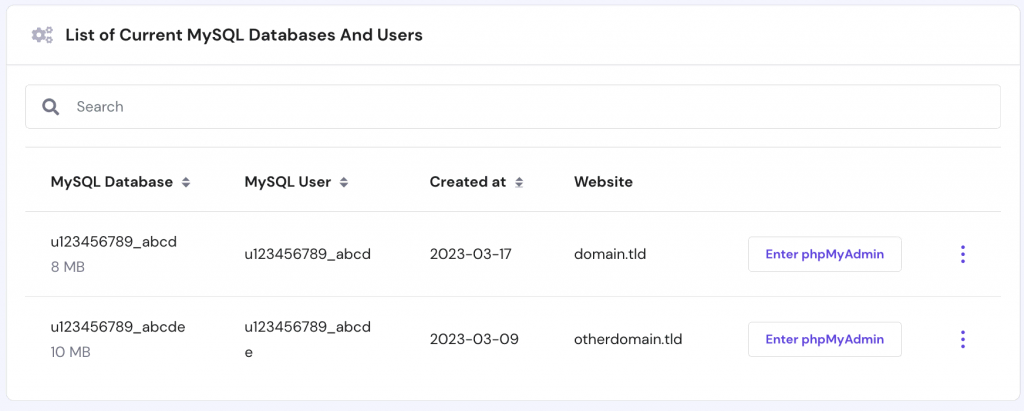
All the information required by this section is available in your hosting control panel. For example, Hostinger displays the user’s database information in MySQL Databases under the Databases section of the hPanel.
WordPress puts the name of your database within the DB_NAME variable upon installation.
Database Character Sets
WordPress configures the database character set and database collation values in the configuration file. Its purpose is to define database tables with the appropriate charset settings, such as:
By default, WordPress assigns UTF8 as the default charset as it supports all internet-friendly languages, making it ideal for modern data.
Meanwhile, the value of the database collation mostly depends on the charset because it determines how the WordPress database sorts and compares your data.
MySQL automatically assigns the database collation value based on the assigned character set, hence the blank default value. If your WordPress database uses UTF8, then the default collation value is utf8_general_ci.
However, it’s possible to manually assign a collation value if the language character set isn’t the same as the ones being displayed, such as the Japanese language.
We recommend not modifying this section unless you have an excellent understanding of SQL, MySQL, and MariaDB. Using the wrong combination of charset and collation values will cause various database errors in WordPress.
Security Keys
Your wp-config file stores a set of authentication keys and WordPress salts, providing an extra layer of security for your website against brute force attacks. These random strings of data contain eight variables, all of which encrypt the login information kept by the cookies upon logging in to the WordPress website.
Considering their purpose, changing your authentication keys and salts periodically is one of many ways to improve WordPress security. We recommend using a password generator or testing the ones you’ve created with a password checker to ensure its durability against password-guessing attacks.
Alternatively, install a WordPress security plugin like Salt Shaker to automatically generate the salt keys for you.
Once you have your passwords, paste them one by one inside the apostrophe to replace the value “put your unique phrase here”.
After implementing the new security keys and WordPress salts, WordPress will log out all users and make current cookies invalid. Users will need to make another login attempt to access your site, consequently flushing out those with malicious intent.
Database Table Prefix
WordPress sets a predefined wp_ database prefix in the wp-config file. Similar to your security keys, we recommend changing your database prefix at the earliest opportunity. Doing so will improve your database security against SQL injection attacks.
The following code snippet is the section within the wp-config file that stores your database prefix:
As mentioned above, WordPress accepts a custom database prefix consisting of underscores, letters, and numbers. Make sure that it’s unique enough that other users cannot guess it easily. For example:
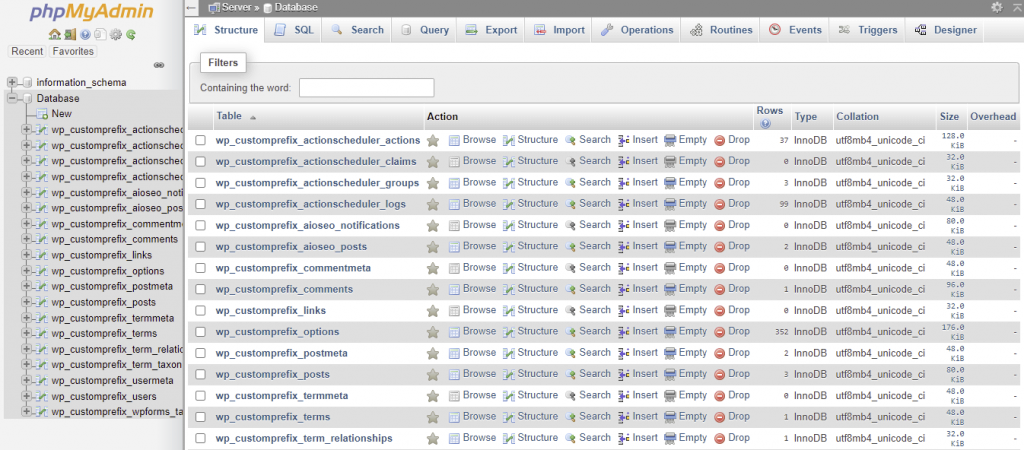
Verify whether you have successfully changed the table prefix by checking your WordPress database via phpMyAdmin. If you access your database structure, the tables’ names should start with your assigned prefix. Here, we replace the default table prefix with wp_customprefix_.
Debugging Mode
If you’re a WordPress developer, you’ll find this wp-config setting useful. The debug mode is responsible for notifying you whenever the WordPress site executes PHP code, allowing you to check if there’s a bug in your code.
The following code snippet is the section within the WordPress wp-config file that stores your debug mode preference:
WordPress turns off its debug mode by default. To turn this mode on, replace the false value with true.
Keep in mind that enabling the debug mode will make your WordPress website display all PHP errors and warnings instead of showing a white screen of death for fatal errors only.
Absolute Path
The absolute path section states the location of a folder or a file within a computer. It determines the relationship between folders and files as well as the foundation of your site URL.
That said, you shouldn’t change the information within the following code snippet:
WordPress URL
Changing your WordPress URL is a necessary step if you want to move the site to another server or domain. It can be done via the Settings → General menu on your WordPress dashboard.
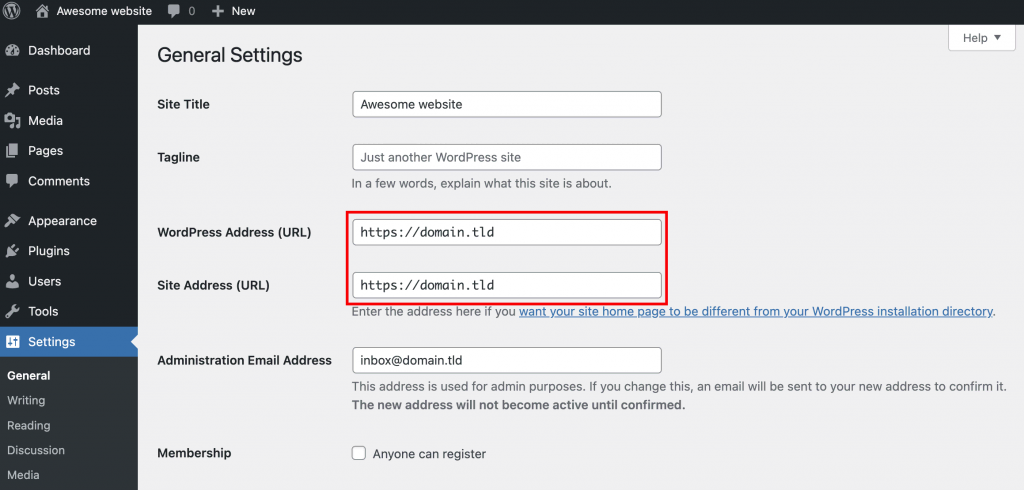
Sometimes, you may be unable to edit these WordPress address and site address values due to the ERR_TOO_MANY_REDIRECTS error. In that case, you can change your WordPress URL by adding the following code snippet to your wp-config.php file.
Make sure to replace the http://example.com value with your domain name and place the code above the line /* That’s all, stop editing! Happy publishing. */.
Include the www version of your website if you’re using a www URL.
Memory Size Limit
WordPress requires PHP memory to execute scripts. The amount of memory you get depends on your web hosting. For instance, Hostinger allocates 512 MB of maximum memory limit for Shared Web Hosting plans.
If there’s not enough memory for WordPress to use, it will display the memory exhausted error message. To solve this problem, set your own PHP memory limit value by adding the following code snippet to your wp-config file before the line /* That’s all, stop editing! Happy publishing. */.
In this example, we’ll increase the memory allocation amount to 256 MB per PHP script.
We recommend setting the PHP memory limit value based on your needs while enforcing the maximum memory limit per script. WordPress will enforce this memory limit only if the script requires more memory than the allocated one.
Pro Tip
Don’t go overboard with the memory limit value, as having excessive PHP memory increases the possibility of having rogue PHP scripts consuming the server’s RAM.
Upload Directory
WordPress redirects all your media uploads to the /wp-content/uploads/ directory. To improve your files’ security, you may redefine the upload path on your WordPress site.
Add the following code snippet below the WP_DEBUG code of your wp-config.php file:
This code will make WordPress store all media uploads in the new media directory within the wp-content folder. Feel free to change the new directory’s name as desired.
If you want WordPress to store your media files in a directory outside wp-content, use the following code snippet to define the upload path.
Keep in mind that both code snippets only work for defining a new uploads folder inside the root directory or the absolute path (ABSPATH).
Pro Tip
Make sure to move the uploads folder content and change each upload file’s URL in your WordPress database tables to avoid having broken links on your site.
wp-content Directory
Besides media files, WordPress also stores your plugin and theme files in the wp-content folder. Since this folder path is a default WordPress setting, it’s highly prone to malware injection attacks. Therefore, it’s best to change the location of your wp-content folder.
Edit the wp-config.php file by adding custom code after the following line:
You need to define WP_CONTENT_DIR and change the location of your wp-content folder. Here’s how you can do it:
To change the location of the wp-content URL, there is another variable you need to define:
Don’t forget to replace yourdomain.com with your own URL.
Plugins Directory
If moving the WordPress content folder seems like a hassle, consider relocating the plugin folder instead. To do so, you need to define the WordPress constant variable wp_plugin_dir by adding the following code snippet below the wp-settings section:
Make sure to change the plugin folder’s URL within the variable wp_plugin_url by adding the following code:
Some plugin developers use the variable plugindir to run their programs. Don’t forget to change it as well to avoid plugin conflicts within your WordPress site. Here’s the code you need to add to the wp-config.php file:
Theme Directory
We don’t recommend moving your themes folder as doing so may cause plugin conflicts. If you need an additional theme directory, create one by using the register_theme_directory function:
Keep in mind that the new theme directory has to be within the root directory. This is because your server needs to have access to the website’s theme files for them to work.
Error Logging
Turning on the debug mode in WordPress only flags errors on the back-end and front-end of your site. To log the errors, you need to add its companion code below the line define(‘WP_DEBUG’, true);.
If you want to save the errors in a file, use this code instead:
To turn off the error output, meaning that your browser won’t display any information during the debugging process, use this code:
WordPress Auto Updates
WordPress provides the option to enable the auto-update feature during the installation process, saving you the time from having to do it manually. However, it can backfire if you install a custom theme since there’s no telling which update may affect your website’s look.
To disable the auto-update feature, above the line /* That’s all, stop editing! Happy publishing. */ add the following code:
Replace the value true with false or delete this code if you want to re-enable auto-updates in the future.
WordPress Core Updates
WordPress version 3.7 and higher comes with automatic background updates for minor core releases and translation files to ensure optimal performance. In some cases, the updates may include theme and plugin development files.
As this feature keeps your site up to date and secure, we recommend leaving it as default.
To blanket-enable development, minor, and major core updates, add the following code above the line /* That’s all, stop editing! Happy publishing. */:
Change the constant value to false to disable development, minor, and major core updates:
Alternatively, enable auto-updates for minor releases only by changing the constant value to minor:
Custom User Table
By default, WordPress provides you with a wp_users table to store user data. In case you need a custom user table post-installation, add the following code to your wp-config.php file:
Usually, developers use this code to share user tables between WordPress installations, which is useful for maintaining the same userbase across multiple websites.
Custom User Meta Table
If you decide to create a custom user table, you have to create another one to store your user metadata. The following code lets you create a custom user meta table:
A custom user meta table is useful for collecting and sharing user information across multiple WordPress installations. Membership plugins also use custom user meta tables to store membership information.
Language and Language Directory
The default language for WordPress installation is U.S. English. WordPress version 4.0 and higher lets users change it on Settings → General in their admin dashboard. It’s also possible to change the default language during the installation process.
If you want to switch to a different language, add the following code to the wp-config file:
The first line of code states which .mo language file to install, while the second one defines the language directory where the language file is stored.
The naming convention of the language files is based on the language code followed by the country code. For example, de_DE refers to the German language. Look up your desired language and country code on the GNU gettext utilities page.
If you enter the wrong combination of country and language code, WordPress will default to using U.S. English.
File Permissions
Configuring file permissions is another essential step to secure your website. The setting determines which users can view, modify, and execute core files and folders within your site.
Most hosting providers let you change file and folder permissions through the File Manager. Here’s what the setting popup window looks like on Hostinger:
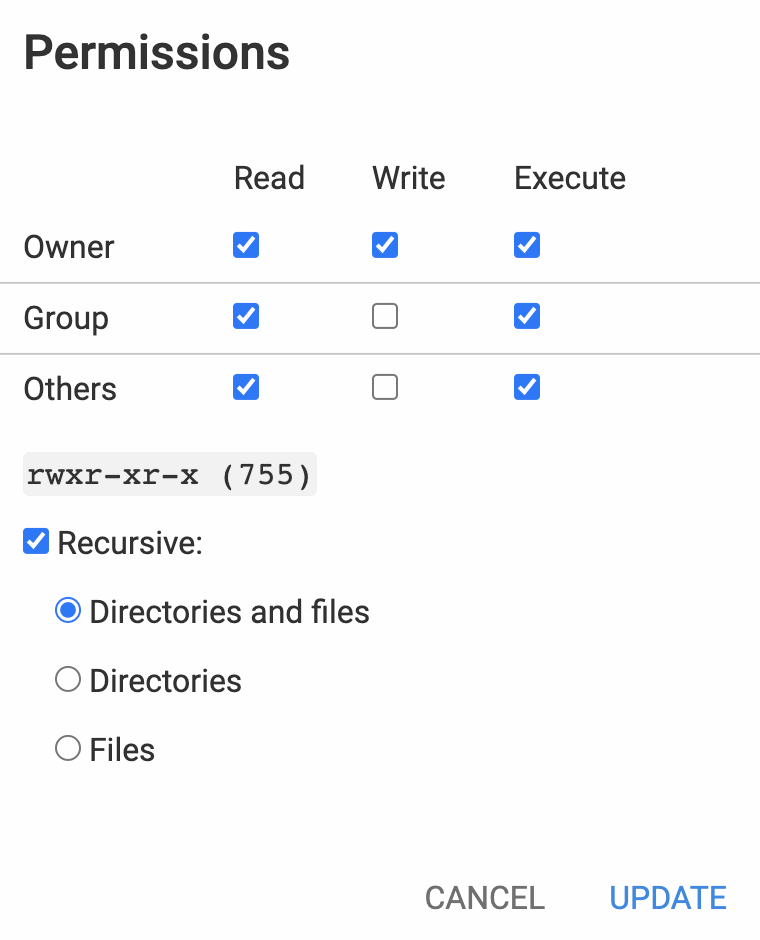
Each permission level for the corresponding user is represented by a three-digit code consisting of:
- 0 ‒ no access
- 1 ‒ execute
- 2 ‒ write
- 4 ‒ read
- 3 (a combination of 2 and 1) ‒ write and execute
- 5 (a combination of 4 and 1) ‒ read and execute
- 6 (a combination of 4 and 2) ‒ read and write
- 7 (a combination of 2 and 3) ‒ read, write, and execute
If you cannot access the File Manager to change your file permissions, modify the wp-config file using a combination of the code above. Add the following code above the line /* That’s all, stop editing! Happy publishing. */:
The 644 file permissions for wp-config, .htaccess, and other files make them visible to all users but are only modifiable by their owner. Meanwhile, the 755 file permissions for WordPress directories and subdirectories mean that everyone can read and execute them, but only the owner can make changes.
Warning! Never set your file permissions to 777, as it will give everyone access to read, write, and execute your files. On the other hand, 000 and 444 file permissions will break your website as they prevent WordPress from editing and executing theme and plugins files.
Editing the wp-config.php File
If you want to edit the WordPress configuration file, it’s best to back it up first. Keeping an extra copy of the information helps you fix any misconfigurations that may break your website.
The next step is to decide the tool you want to use. Developers usually use a text editor or an HTML editor program. This method requires downloading the WordPress configuration file and then re-uploading it to the same directory once you make the changes.
Alternatively, use the code editor that your web hosting’s File Manager provides. Here’s how to edit the wp-config.php file via Hostinger’s File Manager.
- Navigate to File Manager from your hPanel.
- Click on the public_html folder in the sidebar.
- Double click the wp-config file and make the necessary changes.
- Once you’re done, click Save.
Conclusion
Wp-config.php is a core WordPress file created during the website installation process. It establishes a connection between your WordPress website and its database as well as implements advanced settings on both.
You can find it within the root folder of your website using an FTP client or your hosting provider’s File Manager.
The WordPress configuration file consists of several sections:
- MySQL settings ‒ WordPress database configuration.
- Database character sets ‒ used for defining tables with the appropriate charset settings.
- Security keys ‒ responsible for encrypting user information.
- WordPress database table prefix ‒ set the table prefix for better security.
- Debugging mode ‒ helpful in tracking PHP errors.
- Absolute path ‒ states the location of a folder or a file within a computer.
While WordPress wp-config.php is editable using a text editor, make sure to back up the file before making any changes. Even the smallest misconfiguration can disrupt the connection between the database and your WordPress website.
Jordana is a digital marketing and web development enthusiast. She loves spending her time in front of her laptop, working on new projects and learning new things. When she’s not busy with work, you can find her traveling the world in search of the best sushi!
wp-config.php
One of the most important files in your WordPress installation is the wp-config.php file. This file is located in the root of your WordPress file directory and contains your website’s base configuration details, such as database connection information.
Configure Database Settings
Important: Never use a word processor like Microsoft Word for editing WordPress files!
Locate the file wp-config-sample.php in the base directory of your WordPress directory and open in a text editor.
Default wp-config-sample.php
Note: This is an example of a default wp-config-sample.php. The values here are examples to show you what to do.
Note: Text inside /* */ are comments, for information purposes only.
Set Database Name
Replace ‘database_name_here’, with the name of your database, e.g. MyDatabaseName.
Set Database User
Replace ‘username_here’, with the name of your username e.g. MyUserName.
Set Database Password
Replace ‘password_here’, with the your password, e.g. MyPassWord.
Set Database Host
Replace ‘localhost’, with the name of your database host, e.g. MyDatabaseHost. A port number or Unix socket file path may be needed as well.
Note: There is a good chance you will NOT have to change it. If you are unsure, try installing with the default value of ‘localhost’ and see if it works. If the install fails, contact your web hosting provider.
MySQL Alternate Port
If your host uses an alternate port number for your database you’ll need to change the DB_HOST value in the wp-config.php file to reflect the alternate port provided by your host.
For specified server:
Replace 3307 with whatever port number your host gives you.
MySQL Sockets or Pipes
If your host uses Unix sockets or pipes, adjust the DB_HOST value in the wp-config.php file accordingly.
Replace /var/run/mysqld/mysqld.sock with the socket or pipe information provided by your host.
Database character set
DB_CHARSET was made available to allow designation of the database character set (e.g. tis620 for TIS620 Thai) to be used when defining the MySQL database tables.
The default value of utf8 (Unicode UTF-8) is almost always the best option. UTF-8 supports any language, so you typically want to leave DB_CHARSET at utf8 and use the DB_COLLATE value for your language instead.
This example shows utf8 which is considered the WordPress default value:
There usually should be no reason to change the default value of DB_CHARSET. If your blog needs a different character set, please read Character Sets and Collations MySQL Supports for valid DB_CHARSET values. WARNING: Those performing upgrades.
If DB_CHARSET and DB_COLLATE do not exist in your wp-config.php file, DO NOT add either definition to your wp-config.php file unless you read and understand Converting Database Character Sets. Adding DB_CHARSET and DB_COLLATE to the wp-config.php file, for an existing blog, can cause major problems.
Database collation
DB_COLLATE was made available to allow designation of the database collation (i.e. the sort order of the character set). In most cases, this value should be left blank (null) so the database collation will be automatically assigned by MySQL based on the database character set specified by DB_CHARSET. An example of when you may need to set ”’DB_COLLATE”’ to one of the UTF-8 values defined in UTF-8 character sets for most Western European languages would be when a different language in which the characters that you entered are not the same as what is being displayed. (See also Unicode Character Sets in SQL Manual)
The WordPress default DB_COLLATE value:
UTF-8 Unicode General collation
UTF-8 Unicode Turkish collation
There usually should be no reason to change the default value of DB_COLLATE. Leaving the value blank (null) will insure the collation is automatically assigned by MySQL when the database tables are created. WARNING: Those performing upgrades
If DB_COLLATE and DB_CHARSET do not exist in your wp-config.php file, DO NOT add either definition to your wp-config.php file unless you read and understand Converting Database Character Sets. And you may be in need of a WordPress upgrade.
Security Keys
You don’t have to remember the keys, just make them long, random and complicated — or better yet, use the online generator. You can change these at any point in time to invalidate all existing cookies. This does mean that all users will have to login again.
Example (don’t use these!):
A secret key makes your site harder to successfully attack by adding random elements to the password.
In simple terms, a secret key is a password with elements that make it harder to generate enough options to break through your security barriers. A password like “password” or “test” is simple and easily broken. A random, long password which uses no dictionary words, such as “88a7da62429ba6ad3cb3c76a09641fc” would take a brute force attacker millions of hours to crack. A ‘salt is used to further enhance the security of the generated result.
The four keys are required for the enhanced security. The four salts are recommended, but are not required, because WordPress will generate salts for you if none are provided. They are included in wp-config.php by default for inclusiveness.
For more information on the technical background and breakdown of secret keys and secure passwords, see:
Advanced Options
The following sections may contain advanced information and some changes might result in unforeseen issues. Please make sure you practice regular backups and know how to restore them before modifying these settings.
table_prefix
The $table_prefix is the value placed in the front of your database tables. Change the value if you want to use something other than wp_ for your database prefix. Typically this is changed if you are installing multiple WordPress blogs in the same database, as is done with the multisite feature.
It is possible to have multiple installations in one database if you give each a unique prefix. Keep security in mind if you choose to do this.
WP_SITEURL
WP_SITEURL allows the WordPress address (URL) to be defined. The value defined is the address where your WordPress core files reside. It should include the http:// part too. Do not put a slash “/” at the end. Setting this value in wp-config.php overrides the wp_options table value for siteurl. Adding this in can reduce the number of database calls when loading your site. Note: This will not change the database stored value. The URL will revert to the old database value if this line is ever removed from wp-config . Use the RELOCATE constant to change the siteurl value in the database.
If WordPress is installed into a directory called “wordpress” for the domain example.com, define WP_SITEURL like this:
Dynamically set WP_SITEURL based on $_SERVER[‘HTTP_HOST’]
Note: HTTP_HOST is created dynamically by PHP based on the value of the HTTP HOST Header in the request, thus possibly allowing for file inclusion vulnerabilities. SERVER_NAME may also be created dynamically. However, when Apache is configured as UseCanonicalName “on”, SERVER_NAME is set by the server configuration, instead of dynamically. In that case, it is safer to user SERVER_NAME than HTTP_HOST.
Dynamically set WP_SITEURL based on $_SERVER[‘SERVER_NAME’]
Blog address (URL)
Similar to WP_SITEURL, WP_HOME overrides the wp_options table value for home but does not change it in the database. home is the address you want people to type in their browser to reach your WordPress blog. It should include the http:// part and should not have a slash “/” at the end. Adding this in can reduce the number of database calls when loading your site.
If you are using the technique described in Giving WordPress Its Own Directory then follow the example below. Remember, you will also be placing an index.php in your web-root directory if you use a setting like this.
Dynamically set WP_HOME based on $_SERVER[‘HTTP_HOST’]
Moving wp-content folder
You can move the wp-content directory, which holds your themes, plugins, and uploads, outside of the WordPress application directory.
Set WP_CONTENT_DIR to the full local path of this directory (no trailing slash), e.g.
Set WP_CONTENT_URL to the full URL of this directory (no trailing slash), e.g.
Moving plugin folder
Set WP_PLUGIN_DIR to the full local path of this directory (no trailing slash), e.g.
Set WP_PLUGIN_URL to the full URI of this directory (no trailing slash), e.g.
If you have compability issues with plugins Set PLUGINDIR to the full local path of this directory (no trailing slash), e.g.
Moving themes folder
You cannot move the themes folder because its path is hardcoded relative to the wp-content folder:
$theme_root = WP_CONTENT_DIR . ‘/themes’;
However, you can register additional theme directories using register_theme_directory.
See how to move the wp-content folder. For more details how the themes folder is determined, see wp-includes/theme.php .
Moving uploads folder
This path can not be absolute. It is always relative to ABSPATH, therefore does not require a leading slash.
Modify AutoSave Interval
When editing a post, WordPress uses Ajax to auto-save revisions to the post as you edit. You may want to increase this setting for longer delays in between auto-saves, or decrease the setting to make sure you never lose changes. The default is 60 seconds.
Post Revisions
WordPress, by default, will save copies of each edit made to a post or page, allowing the possibility of reverting to a previous version of that post or page. The saving of revisions can be disabled, or a maximum number of revisions per post or page can be specified.
Disable Post Revisions
If you do not set this value, WordPress defaults WP_POST_REVISIONS to true (enable post revisions). If you want to disable the awesome revisions feature, use this setting:
Note: Some users could not get this to function until moving the command to the first line under the initial block comment in wp-config.php .
Specify the Number of Post Revisions
If you want to specify a maximum number of revisions that WordPress stores, change false to an integer/number (e.g., 3 or 12).
Note: Some users could not get this to function until moving the command to the first line under the initial block comment in wp-config.php .
Set Cookie Domain
The domain set in the cookies for WordPress can be specified for those with unusual domain setups. For example, if subdomains are used to serve static content, you can set the cookie domain to only your non-static domain to prevent WordPress cookies from being sent with each request to static content on your subdomain .
Enable Multisite / Network Ability
WP_ALLOW_MULTISITE is a feature enable multisite functionality. If this setting is absent from wp-config.php it defaults to false.
Redirect Nonexistent Blogs
NOBLOGREDIRECT can be used to redirect the browser if the visitor tries to access a nonexistent subdomain or a subfolder.
Fatal Error Handler
WordPress 5.2 introduced Recovery Mode which displays error message instead of white screen when plugins causes fatal error.
The site is experiencing technical difficulties. Please check your site admin email inbox for instructions.
White screens and PHP error messages are not displayed to users any more. But in a development environment, if you want to enable WP_DEBUG_DISPLAY, you have to disable recovery mode by set true to WP_DISABLE_FATAL_ERROR_HANDLER.
WP_DEBUG
The WP_DEBUG option controls the reporting of some errors and warnings and enables use of the WP_DEBUG_DISPLAY and WP_DEBUG_LOG settings. The default boolean value is false.
Setting WP_DEBUG to true also raises the error reporting level to E_ALL and activates warnings when deprecated functions or files are used; otherwise, WordPress sets the error reporting level to E_ALL ^ E_NOTICE ^ E_USER_NOTICE.
WP_ENVIRONMENT_TYPE
The WP_ENVIRONMENT_TYPE option controls the environment type for a site: local , development , staging , and production .
The values of environment types are processed in the following order with each sequential method overriding any previous values: the WP_ENVIRONMENT_TYPE PHP environment variable and the WP_ENVIRONMENT_TYPE constant.
For both methods, if the value of an environment type provided is not in the list of allowed environment types, the default production value will be returned.
The simplest way to set the value is probably through defining the constant:
Note: When development is returned by wp_get_environment_type() , WP_DEBUG will be set to true if it is not defined in the wp-config.php file of the site.
SCRIPT_DEBUG
SCRIPT_DEBUG is a related constant that will force WordPress to use the “dev” versions of scripts and stylesheets in wp-includes/js , wp-includes/css , wp-admin/js , and wp-admin/css will be loaded instead of the .min.css and .min.js versions.. If you are planning on modifying some of WordPress’ built-in JavaScript or Cascading Style Sheets, you should add the following code to your config file:
Disable Javascript Concatenation
To result in faster administration screens, all JavaScript files are concatenated into one URL. If JavaScript is failing to work in an administration screen, you can try disabling this feature:
Configure Error Logging
Configuring error logging can be a bit tricky. First of all, default PHP error log and display settings are set in the php.ini file, which you may or may not have access to. If you do, they should be set to the desired settings for live PHP pages served to the public. It’s strongly recommended that no error messages are displayed to the public and instead routed to an error log. Further more, error logs should not be located in the publicly accessible portion of your server. Sample recommended php.ini error settings:
About Error Reporting 4339 This is a custom value that only logs issues that affect the functioning of your site, and ignores things like notices that may not even be errors. See PHP Error Constants for the meaning of each binary position for 1000011110011, which is the binary number equal to 4339. The far left 1 means report any E_RECOVERABLE_ERROR. The next 0 means do not report E_STRICT, (which is thrown when sloppy but functional coding is used) and so on. Feel free to determine your own custom error reporting number to use in place of 4339.
Obviously, you will want different settings for your development environment. If your staging copy is on the same server, or you don’t have access to php.ini , you will need to override the default settings at run time. It’s a matter of personal preference whether you prefer errors to go to a log file, or you prefer to be notified immediately of any error, or perhaps both. Here’s an example that reports all errors immediately that you could insert into your wp-config.php file:
Because wp-config.php is loaded for every page view not loaded from a cache file, it is an excellent location to set php.ini settings that control your PHP installation. This is useful if you don’t have access to a php.ini file, or if you just want to change some settings on the fly. One exception is ‘error_reporting’. When WP_DEBUG is defined as true, ‘error_reporting’ will be set to E_ALL by WordPress regardless of anything you try to set in wp-config.php. If you really have a need to set ‘error_reporting’ to something else, it must be done after wp-settings.php is loaded, such as in a plugin file.
If you turn on error logging, remember to delete the file afterwards, as it will often be in a publicly accessible location, where anyone could gain access to your log.
Here is an example that turns PHP error_logging on and logs them to a specific file. If WP_DEBUG is defined to true, the errors will also be saved to this file. Just place this above any require_once or include commands.
Another example of logging errors, as suggested by Mike Little on the wp-hackers email list:
A refined version from Mike Little on the Manchester WordPress User Group:
Confusing the issue is that WordPress has three (3) constants that look like they could do the same thing. First off, remember that if WP_DEBUG is false, it and the other two WordPress DEBUG constants do not do anything. The PHP directives, whatever they are, will prevail. Except for ‘error_reporting’, WordPress will set this to 4983 if WP_DEBUG is defined as false. Second, even if WP_DEBUG is true, the other constants only do something if they too are set to true. If they are set to false, the PHP directives remain unchanged. For example, if your php.ini file has the directive (‘display_errors’ = ‘On’); but you have the statement define( ‘WP_DEBUG_DISPLAY’, false ); in your wp-config.php file, errors will still be displayed on screen even though you tried to prevent it by setting WP_DEBUG_DISPLAY to false because that is the PHP configured behavior. This is why it’s very important to set the PHP directives to what you need in case any of the related WP constants are set to false. To be safe, explicitly set/define both types. More detailed descriptions of the WP constants is available at Debugging in WordPress.
For your public, production WordPress installation, you might consider placing the following in your wp-config.php file, even though it may be partly redundant:
The default debug log file is /wp-content/debug.log . Placing error logs in publicly accessible locations is a security risk. Ideally, your log files should be placed above you site’s public root directory. If you can’t do this, at the very least, set the log file permissions to 600 and add this entry to the .htaccess file in the root directory of your WordPress installation:
This prevents anyone from accessing the file via HTTP. You can always view the log file by retrieving it from your server via FTP.
Increasing memory allocated to PHP
WP_MEMORY_LIMIT option allows you to specify the maximum amount of memory that can be consumed by PHP. This setting may be necessary in the event you receive a message such as “Allowed memory size of xxxxxx bytes exhausted”.
This setting increases PHP Memory only for WordPress, not other applications. By default, WordPress will attempt to increase memory allocated to PHP to 40MB (code is at the beginning of /wp-includes/default-constants.php ) for single site and 64MB for multisite, so the setting in wp-config.php should reflect something higher than 40MB or 64MB depending on your setup.
WordPress will automatically check if PHP has been allocated less memory than the entered value before utilizing this function. For example, if PHP has been allocated 64MB, there is no need to set this value to 64M as WordPress will automatically use all 64MB if need be.
Note: Some hosts do not allow for increasing the PHP memory limit automatically. In that event, contact your host to increase the PHP memory limit. Also, many hosts set the PHP limit at 8MB.
Adjusting the WordPress memory limit potentially creates problems as well. You might end up hiding the root of the issue for it to happen later down the line as you add in more plugins or functionalities.
If you are facing Out of Memory issues even with an elevated memory limit, you should properly debug your installation. Chances are you have too many memory intensive functions tied to a specific action and should move these functions to a cronjob.
Increase PHP Memory to 64MB
Increase PHP Memory to 96MB
Administration tasks require may require memory than usual operation. When in the administration area, the memory can be increased or decreased from the WP_MEMORY_LIMIT by defining WP_MAX_MEMORY_LIMIT.
Note: this has to be put before wp-settings.php inclusion.
Cache
The WP_CACHE setting, if true, includes the wp-content/advanced-cache.php script, when executing wp-settings.php .
Custom User and Usermeta Tables
CUSTOM_USER_TABLE and CUSTOM_USER_META_TABLE are used to designate that the user and usermeta tables normally utilized by WordPress are not used, instead these values/tables are used to store your user information.
Note: Even if ‘CUSTOM_USER_META_TABLE’ is manually set, a usermeta table is still created for each database with the corresponding permissions for each instance. By default, the WordPress installer will add permissions for the first user (ID #1). You also need to manage permissions to each of the site via a plugin or custom function. If this isn’t setup you will experience permission errors and log-in issues.
CUSTOM_USER_TABLE is easiest to adopt during initial Setup your first instance of WordPress. The define statements of the wp-config.php on the first instance point to where wp_users data will be stored by default. After the first site setup, copying the working wp-config.php to your next instance will only require a change the $table_prefix variable. Do not use an e-mail address that is already in use by your original install. Once you have finished the setup process log in with the auto generated admin account and password. Next, promote your normal account to the administrator level and Log out of admin. Log back in as yourself, delete the admin account and promote the other user accounts as is needed.
Language and Language Directory
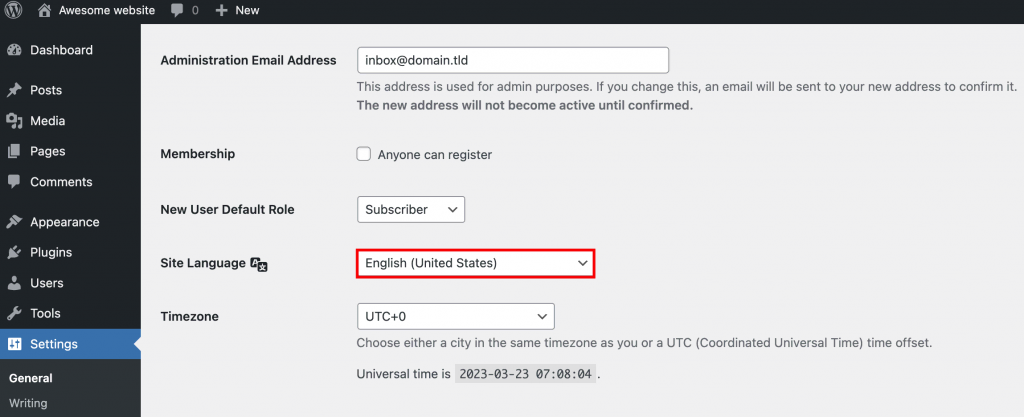
WordPress Version 4.0 allows you to change the language in your WordPress Administration Screens. To change the language in the admin settings screen. Go to Settings > General and select Site Language.
WordPress v3.9.6 and below
WPLANG defines the name of the language translation (.mo) file. WP_LANG_DIR defines what directory the WPLANG .mo file resides. If WP_LANG_DIR is not defined WordPress looks first to wp-content/languages and then wp-includes/languages for the .mo defined by WPLANG file.
To find out the WPLANG language code, please refer here. The code in WP Local column is what you need.
Save queries for analysis
The SAVEQUERIES definition saves the database queries to an array and that array can be displayed to help analyze those queries. The information saves each query, what function called it, and how long that query took to execute. Note: This will have a performance impact on your site, so make sure to turn this off when you aren’t debugging.
First, add this to the wp-config.php file:
Then in the footer of your theme put this:
Alternatively, consider using Query Monitor
Override of default file permissions
The FS_CHMOD_DIR and FS_CHMOD_FILE define statements allow override of default file permissions. These two variables were developed in response to the problem of the core update function failing with hosts running under suexec. If a host uses restrictive file permissions (e.g. 400) for all user files, and refuses to access files which have group or world permissions set, these definitions could solve the problem.
Example to provide setgid:
Note: ‘0755′ and ‘02755‘ are octal values. Octal values must be prefixed with a 0 and are not delineated with single quotes (‘). See Also: Changing File Permissions
WordPress Upgrade Constants
Note: Define as few of the below constants as needed to correct your update issues.
The most common causes of needing to define these are:
Host running with a special installation setup involving symlinks. You may need to define the path-related constants (FTP_BASE, FTP_CONTENT_DIR, and FTP_PLUGIN_DIR). Often defining simply the base will be enough.
Certain PHP installations shipped with a PHP FTP extension which is incompatible with certain FTP servers. Under these rare situations, you may need to define FS_METHOD to “ftpsockets”.
The following are valid constants for WordPress updates:
- FS_METHOD forces the filesystem method. It should only be “direct”, “ssh2”, “ftpext”, or “ftpsockets”. Generally, you should only change this if you are experiencing update problems. If you change it and it doesn’t help, change it back/remove it. Under most circumstances, setting it to ‘ftpsockets’ will work if the automatically chosen method does not.
- (Primary Preference) “direct” forces it to use Direct File I/O requests from within PHP, this is fraught with opening up security issues on poorly configured hosts, This is chosen automatically when appropriate.
- (Secondary Preference) “ssh2” is to force the usage of the SSH PHP Extension if installed
- (3rd Preference) “ftpext” is to force the usage of the FTP PHP Extension for FTP Access, and finally
- (4th Preference) “ftpsockets” utilises the PHP Sockets Class for FTP Access.
Some configurations should set FTP_HOST to localhost to avoid 503 problems when trying to update plugins or WP itself.
Enabling SSH Upgrade Access
There are two ways to upgrade using SSH2.
The first is to use the SSH SFTP Updater Support plugin. The second is to use the built-in SSH2 upgrader, which requires the pecl SSH2 extension be installed.
To install the pecl SSH2 extension you will need to issue a command similar to the following or talk to your web hosting provider to get this installed:
After installing the pecl ssh2 extension you will need to modify your PHP configuration to automatically load this extension.
pecl is provided by the pear package in most linux distributions. To install pecl in Redhat/Fedora/CentOS:
To install pecl in Debian/Ubuntu:
It is recommended to use a private key that is not pass-phrase protected. There have been numerous reports that pass phrase protected private keys do not work properly. If you decide to try a pass phrase protected private key you will need to enter the pass phrase for the private key as FTP_PASS, or entering it in the “Password” field in the presented credential field when installing updates.
Alternative Cron
There might be reason to use an alternative Cron with WP. Most commonly this is done if scheduled posts are not getting published as predicted. This alternative method uses a redirection approach. The users’ browser get a redirect when the cron needs to run, so that they come back to the site immediately while cron continues to run in the connection they just dropped. This method has certain risks, since it depends on a non-native WordPress service.
Disable Cron and Cron Timeout
Disable cron entirely by setting DISABLE_WP_CRON to true.
Make sure a cron process cannot run more than once every WP_CRON_LOCK_TIMEOUT seconds.
Additional Defined Constants
Here are additional constants that can be defined. These probably shouldn’t be set unless other methodologies have been attempted first. The Cookie definitions can be particularly useful if you have an unusual domain setup.
Empty Trash
This constant controls the number of days before WordPress permanently deletes posts, pages, attachments, and comments, from the trash bin. The default is 30 days:
To disable trash set the number of days to zero.
Note: WordPress will not ask for confirmation when someone clicks on “Delete Permanently” using this setting.
Automatic Database Optimizing
There is automatic database repair support, which you can enable by adding the following define to your wp-config.php file.
Note: This should only be enabled if needed and disabled once the issue is solved. When enabled, a user does not need to be logged in to access the functionality, since its main intent is to repair a corrupted database and users can often not login when the database is corrupt.
The script can be found at <$your_site>/wp-admin/maint/repair.php .
DO_NOT_UPGRADE_GLOBAL_TABLES
A DO_NOT_UPGRADE_GLOBAL_TABLES define prevents dbDelta() and the upgrade functions from doing expensive queries against global tables.
Sites that have large global tables (particularly users and usermeta), as well as sites that share user tables with bbPress and other WordPress installs, can prevent the upgrade from changing those tables during upgrade by defining DO_NOT_UPGRADE_GLOBAL_TABLES to true. Since an ALTER, or an unbounded DELETE or UPDATE, can take a long time to complete, large sites usually want to avoid these being run as part of the upgrade so they can handle it themselves. Further, if installations are sharing user tables between multiple bbPress and WordPress installs you may to want one site to be the upgrade master.
View All Defined Constants
PHP has a function that returns an array of all the currently defined constants with their values.
Disable the Plugin and Theme File Editor
Occasionally you may wish to disable the plugin or theme file editor to prevent overzealous users from being able to edit sensitive files and potentially crash the site. Disabling these also provides an additional layer of security if a hacker gains access to a well-privileged user account.
Note: The functionality of some plugins may be affected by the use of current_user_can(‘edit_plugins’) in their code. Plugin authors should avoid checking for this capability, or at least check if this constant is set and display an appropriate error message. Be aware that if a plugin is not working this may be the cause.
Disable Plugin and Theme Update and Installation
This will block users being able to use the plugin and theme installation/update functionality from the WordPress admin area. Setting this constant also disables the Plugin and Theme File editor (i.e. you don’t need to set DISALLOW_FILE_MODS and DISALLOW_FILE_EDIT, as on its own DISALLOW_FILE_MODS will have the same effect).
Require SSL for Admin and Logins
Note: WordPress Version 4.0 deprecated FORCE_SSL_LOGIN. Please use FORCE_SSL_ADMIN.
FORCE_SSL_ADMIN is for when you want to secure logins and the admin area so that both passwords and cookies are never sent in the clear. See also Administration_Over_SSL for more details.
Block External URL Requests
Block external URL requests by defining WP_HTTP_BLOCK_EXTERNAL as true and this will only allow localhost and your blog to make requests. The constant WP_ACCESSIBLE_HOSTS will allow additional hosts to go through for requests. The format of the WP_ACCESSIBLE_HOSTS constant is a comma separated list of hostnames to allow, wildcard domains are supported, eg *.wordpress.org will allow for all subdomains of wordpress.org to be contacted.
Disable WordPress Auto Updates
There might be reason for a site to not auto-update, such as customizations or host supplied updates. It can also be done before a major release to allow time for testing on a development or staging environment before allowing the update on a production site.
Disable WordPress Core Updates
The easiest way to manipulate core updates is with the WP_AUTO_UPDATE_CORE constant:
Cleanup Image Edits
By default, WordPress creates a new set of images every time you edit an image and when you restore the original, it leaves all the edits on the server. Defining IMAGE_EDIT_OVERWRITE as true changes this behaviour. Only one set of image edits are ever created and when you restore the original, the edits are removed from the server.
Double Check Before Saving
Be sure to check for leading and/or trailing spaces around any of the above values you entered, and DON’T delete the single quotes!
Before you save the file, be sure to double-check that you have not accidentally deleted any of the single quotes around the parameter values. Be sure there is nothing after the closing PHP tag in the file. The last thing in the file should be ?> and nothing else. No spaces.