Что такое Metasploit? Руководство для начинающих

Тестирование на проникновение позволяет ответить на вопрос, как кто-то со злым умыслом может вмешаться в вашу сеть. Используя инструменты пентеста, «белые хакеры» и профессионалы в области безопасности могут на любом этапе разработки или развертывания исследовать сети и приложения на предмет недостатков и уязвимостей путем взлома системы.
Одним из таких средств пентеста является проект Metasploit. Этот фреймворк с открытым исходным кодом, созданный на Ruby, позволяет проводить тестирование с помощью командной строки или графического интерфейса. Его можно расширить, создавая собственные надстройки с поддержкой нескольких языков.
Что такое Metasploit Framework и как он используется?
Metasploit Framework — это мощнейший инструмент, который могут использовать как киберпреступники, так и «белые хакеры» и специалисты по проникновению для исследования уязвимостей в сетях и на серверах. Поскольку это фреймворк с открытым исходным кодом, его можно легко настроить и использовать на большинстве операционных систем.
С помощью Metasploit пентестеры могут использовать готовый или создать пользовательский код и вводить его в сеть для поиска слабых мест. В качестве еще одного способа поиска угроз, после идентификации и документирования недостатков, эту информацию можно использовать для устранения системных недостатков и определения приоритетности решений.
Краткая история Metasploit
Проект Metasploit был создан на языке Perl в 2003 году Эйч Ди Муром (H.D. Moore) при содействии основного разработчика Мэтта Миллера для использования в качестве портативного сетевого инструмента. Он был полностью переведен на язык Ruby к 2007 году, а в 2009 году лицензию приобрела Rapid7, и теперь этот инструмент остается частью ассортимента этой бостонской компании, специализирующейся на разработке систем обнаружения вторжений и инструментов эксплуатации уязвимостей систем удаленного доступа.
Части этих других инструментов находятся в среде Metasploit, которая встроена в ОС Kali Linux. Компания Rapid7 также разработала два запатентованных инструмента OpenCore: Metasploit Pro и Metasploit Express.
Этот фреймворк стал основным инструментом разработки эксплойтов и устранения уязвимостей. До Metasploit пентестерам приходилось выполнять все проверки вручную, используя различные инструменты, которые могли поддерживать или не поддерживать тестируемую платформу, а также вручную писать собственный код и внедрять его в сети. Дистанционное тестирование было чем-то экстраординарным, и это ограничивало работу специалиста по безопасности собственным регионом и местными компаниями, а организациям приходилось тратить целые состояния на собственных ИТ-консультантов или специалистов по безопасности.
Кто использует Metasploit?
Благодаря широкому спектру применений и доступному открытому исходному коду Metasploit используется самыми разными людьми, от профессионалов кибербезопасности до хакеров. Metasploit полезен для всех, кому нужен простой в установке и надежный инструмент, выполняющий свою работу независимо от платформы или языка. Это программное обеспечение пользуется популярностью у хакеров и широко доступно, что мотивирует специалистов по безопасности изучать платформу Metasploit, даже если сами они ей не пользуются.
Современная версия Metasploit содержит свыше 1677 эксплойтов для более 25 платформ, включая Android, PHP, Python, Java, Cisco и другие. Фреймворк также содержит около 500 единиц информационного наполнения («пейлоад»), среди которых вы найдёте:
- Пейлоады для командной оболочки — позволяют пользователям запускать сценарии или случайные команды на хосте.
- Динамические пейлады — позволяют тестировщикам генерировать уникальные пейлоады для обхода антивирусного программного обеспечения.
- Пейлоады Meterpreter — позволяют пользователям перехватывать управление монитором устройства с помощью контроллера видеопамяти, захватывать сеансы, а также скачивать или загружать файлы.
- Статические пейлоады — позволяют устанавливать переадресацию портов и обмен данными между сетями.
Сфера применения и преимущества Metasploit

Все, что вам нужно для использования Metasploit после его установки, — это получить информацию о цели либо путем сканирования портов, либо путем получения цифрового отпечатка операционной системы, либо с помощью сканера уязвимостей, чтобы найти способ проникнуть в сеть. Затем остается просто выбрать эксплойт и полезную нагрузку. В этом контексте эксплойт — это средство для выявления слабости в вашей сети или системе и использования этой уязвимости для получения доступа.
Платформа состоит из различных моделей и интерфейсов, которые включают: msfconsole на базе библиотеки curses, msfcli для всех функций msf из терминала или командной строки, Armitag — инструмент с графическим интерфейсом на Java, который используется для интеграции с MSF, а также веб-интерфейс сообщества Metasploit, поддерживающий удаленный пентест.
«Белые хакеры» и специалисты по пентесту, пытающиеся определить уязвимости или извлечь уроки из атак киберпреступников, должны понимать, что последние не афишируют своих действий. Киберпреступники отличаются скрытностью и любят работать через VPN-туннели, таким образом маскируя свой IP-адрес, а многие из них используют выделенный виртуальный сервер, чтобы избежать прерываний, которыми обычно страдают многие провайдеры виртуального хостинга. Эти два инструмента конфиденциальности также будут полезны для «белых хакеров», которые намереваются вступить в мир эксплойтов и пентеста с помощью Metasploit.
Как упоминалось выше, Metasploit предоставляет вам эксплойты, пейлоады, вспомогательные функции, кодировщики, перехватчики, шелл-код, а также послеэксплойтный код и NOP.
Вы можете получить сертификат специалиста Metasploit Pro онлайн, чтобы стать сертифицированным пентестером. Проходной балл для получения сертификата — 80%, а экзамен занимает около двух часов и разрешается пользоваться справочной литературой. Его стоимость составляет 195$, и после успешного прохождения вы сможете распечатать свой сертификат.
Перед экзаменом рекомендуется пройти учебный курс Metasploit и иметь профессиональные или рабочие знания в следующих областях:
- ОС Windows и Linux;
- сетевые протоколы;
- системы управления уязвимостями;
- основные концепции пентеста.
Как установить Metasploit
Metasploit доступен в виде программы установки с открытым исходным кодом, которую можно скачать с сайта Rapid7. Минимальные системные требования включают наличие последней версии браузера Chrome, Firefox или Explorer, а также
Операционная система:
- Ubuntu Linux 14.04 или 16.04 LTS (рекомендуется) ;
- Windows Server 2008 или 2012 R2;
- Windows 7 SP1+, 8.1 или 10;
- Red Hat Enterprise Linux Server 5.10, 6.5, 7.1 или новее.
Оборудование
- процессор 2 ГГц;
- минимум 4 ГБ ОЗУ (рекомендуется 8ГБ);
- минимум 1 ГБ дискового пространства (рекомендуется 50ГБ).
После установки при запуске вы столкнетесь со следующими вариантами:
- создание базы данных в /Users/joesmith/.msf4/db;
- запуск Postgresql;
- создание пользователей базы данных;
- создание исходной схемы базы данных.
Учимся использовать Metasploit: советы
Легкость изучения Metasploit зависит от вашего знания Ruby. Однако, если вы знакомы с другими скриптовыми языками и языками программирования, например Python, перейти к работе с Metasploit не составит большого труда. В остальном это интуитивно понятный язык, который легко выучить на практике.
Поскольку этот инструмент требует от вас отключения вашей собственной системы защиты и позволяет генерировать вредоносный код, вы должны знать о потенциальных рисках. Если возможно, установите эту программу в отдельной системе, а не на вашем личном устройстве или компьютере, содержащем потенциально конфиденциальную информацию или имеющем доступ к такой информации. При пентесте с Metasploit вам следует использовать отдельное рабочее устройство.
Зачем нужно изучать Metasploit
Эта платформа необходима всем аналитикам безопасности или пентестерам. Это важное средство для обнаружения скрытых уязвимостей с помощью различных инструментов и утилит. Metasploit позволяет поставить себя на место хакера и использовать те же методы для разведки и проникновения в сети и серверы.
Вот схема типичной архитектуры Metasploit:

Пошаговая инструкция по Metasploit
Мы начнем краткое руководство по эксплойтам, предполагая, что ваша система и ОС соответствуют базовым требованиям. Чтобы настроить среду тестирования, понадобится скачать и установить Virtualbox , Kali и Metasploitable для создания виртуализированной хакерской машины. Вы можете загрузить и установить Windows XP или выше, чтобы создать третью виртуальную машину для этого эксплойта.
После установки инструментов для тестирования откройте консоль Metasploit. Она выглядит так:

Проще всего ввести в консоли команду help, чтобы отобразился список команд Metasploit и их описания. Это выглядит так:

Первый мощный и полезный инструмент, который вам нужен, — это графический интерфейс Armitage, который позволяет визуализировать цели и рекомендовать наиболее подходящие эксплойты для доступа к ним. Этот инструмент также показывает расширенные функции для более глубокого проникновения и дальнейшего тестирования после того, как было выполнено начальное проникновение с помощью эксплойта. Чтобы выбрать его в консоли, перейдите в Applications — Exploit Tools — Armitage («Приложения» — «Инструменты для эксплойтов» — Armitage).
После того, как на экране появится поле формы, введите хост, номер порта, идентификатор пользователя и пароль. Нажмите Enter после заполнения всех полей, и вы будете готовы к запуску эксплойта.
Ресурсы для изучения Metasploit
Одно из основных достоинств сообщества программного обеспечения с открытым кодом заключается в объединении ресурсов и обмене информацией. Это современное воплощение того, почему был создан интернет. Это средство, способствующее гибкости и дающее безграничные возможности для сотрудничества.
В связи с этим мы предлагаем список ресурсов, которые позволят вам в полной мере реализовать потенциал Matspoit.
Один из лучших ресурсов и первое место, которое вам следует посетить, — это собственная обширная база знаний Metasploit. Там вы найдете руководства для начинающих, метамодули, эксплойты, а также обнаруженные уязвимости и исправления для них. Вы также сможете узнать о различных типах сертификатов Metasploit и о том, как их получить.
Еще один полезный ресурс — Varonis Cyber Workshop. Он предлагает ряд учебных пособий и занятий с экспертами в области кибербезопасности.
Инструменты Kali Linux
Список инструментов для тестирования на проникновение и их описание
Metasploit
Описание Metasploit
Metasploit – это платформа для тестирования на проникновение, с которой вы можете находить, эксплуатировать и подтверждать уязвимости.
Автор: Rapid7, Inc.
Справка по Metasploit
Руководство по Metasploit
Страница man отсутствует.
Примеры запуска Metasploit
Установка Metasploit
Программа предустановлена в Kali Linux.
Установка в BlackArch
Программа предустановлена в BlackArch.
Подробности о запуске Metasploit в BlackArch смотрите здесь.
Информация об установке в другие операционные системы будет добавлена позже.
Metasploit Tutorial on Kali Linux [Step-by-Step]
In this post, we are going to dive into the most popular penetration testing framework — Metasploit. We will look at ‘What is the Metasploit framework,’ ‘the Installation process,’ and how to use it in ethical hacking. Let’s get started.
What is the Metasploit Framework?
The Metasploit framework is the leading exploitation framework used by Penetration testers, Ethical hackers, and even hackers to probe and exploit vulnerabilities on systems, networks, and servers. It is an open-source utility developed by Rapid7 software company, which has also designed other security tools, including the Nexpose vulnerability scanner. For anybody aspiring to get in the security field, you need to master the Metasploit framework to prosper.
Metasploit Framework Interfaces
Metasploit is available in four (4) interfaces:
- msfcli: Commonly written as ‘MSFcli.’ It is a single command-line interface for the Metasploit framework.
- msfconsole: It is the most popular Metasploit interface for the Metasploit framework. It gives you an interactive shell where you can execute commands and run exploits.
- msfweb: It is the web interface of Metasploit that allows you to set up projects and carry out penetration testing tasks.
- Armitage: It is the Graphical User Interface (GUI) front-end for Metasploit developed in Java.
The msfconsole is the most popular interface for Metasploit, and it’s also the interface we will be using in this post.
Why Learn and Use Metasploit?
Before tools like Metasploit came along, penetration testers had to carry out all tasks manually using various tools, some not even supported by the target system. They had to code their tools and scripts from scratch before deploying them manually on the target system or network. A term like ‘Remote testing’ used today was uncommon. However, that has changed with Metasploit.
This framework comes with more than 1677 exploits (regularly updated) for over 25 platforms. That includes Android, Windows, Linux, PHP, Java, Cisco, etc. It also comes with more than 500 payloads which include:
- Dynamic payloads that enable users to generate payloads and scripts that are undetectable by antiviruses.
- Command shell payloads that enable users to gain access and execute commands/ scripts on the target machine.
- Meterpreter payloads provide users with an interactive command-line shell that you can use to explore and exploit the target machine.
Minimum System Requirements for Metasploit
Metasploit is available for various platforms (thanks to open-source installers available on the Rapid7 website). The framework supports Debian-based systems, RHEL-based systems, Windows Server 2008 or 2012 R2, Windows 7 SP1+, 8.1, or 10, and more. You can also run Metasploit on Android using applications like Termux.
The minimum hardware requirements for running Metasploit are:
- 512 MB RAM if you are using a system without GUI. The higher, the better.
- 2 GB RAM if you are using a Graphical system. The higher, the better.
- 1 GB Disk space
Getting Started With the Metasploit Framework
In this post, we will run Metasploit on Kali Linux. Kali Linux is the leading penetration testing distribution and ships with more than 600 security tools. You can checkout our step-by-step guide on installing Kali Linux on VirtualBox.
1. Start the PostgreSQL Database Service
To get started Metasploit framework, you need to start the PostgreSQL database. That enables Metasploit to carry out faster searches and store information when scanning or performing an exploit. Launch the Terminal and execute the command below.
![Metasploit Tutorial on Kali Linux [Step-by-Step]](https://www.golinuxcloud.com/wp-content/uploads/Start-Postgresql.png)
2. Launch Metasploit
As discussed above, there are four interfaces available for use with the Metasploit framework. We will use the msfconsole in this post. Now, there are two ways you can use to launch msfconsole on Kali Linux.
- Command-line method
- Graphical Method
With the command-line method, execute the command below on your Terminal.
![Metasploit Tutorial on Kali Linux [Step-by-Step]](https://www.golinuxcloud.com/wp-content/uploads/msfconsole.png)
Alternatively, you can start msfconsole from the Kali GUI by clicking on the Menu button -> Exploitation tools -> Metasploit framework.
![Metasploit Tutorial on Kali Linux [Step-by-Step]](https://www.golinuxcloud.com/wp-content/uploads/Launch-msfconsole-from-GUI.png)
That will open the Terminal, and you will be prompted to enter the user password before launching the msfconsole command-line shell.
Metasploit Tutorial
After successfully launching msfconsole , you will see a Terminal prompt with the format msf[metasploit_version] . For example, in our case, we are getting a msf5 > prompt, as shown below. That means we are running Metasploit version 5. If you are using a newer version, say Metasploit version 6, you will see a msf6 > prompt.
![Metasploit Tutorial on Kali Linux [Step-by-Step]](https://www.golinuxcloud.com/wp-content/uploads/msfconsole-prompt.png)
1. help command
The first and the most basic command you should execute is the help command. If you are lost and don’t know which command to use, you can always refer to this documentation. It shows you all the commands you can run and a description of what they do.
![Metasploit Tutorial on Kali Linux [Step-by-Step]](https://www.golinuxcloud.com/wp-content/uploads/Msfconsole-help.png)
2. search command
The other very useful command is search . It allows you to search for a particular module among the hundreds of modules available in Metasploit. This command can take three parameters:
- type
- platform
- name
For example, I will use the syntax below to search for a common Unix exploit for VSFTPD version 2.3.4.
![Metasploit Tutorial on Kali Linux [Step-by-Step]](https://www.golinuxcloud.com/wp-content/uploads/Search-command.png)
3. use command
The other most helpful command is the use command. It allows you to load a module that you want to use to attack or penetrate a system. These modules include exploits, payloads, auxiliaries, encoders, evasions, nops, and posts.
As a demonstration, we will use a module to exploit an existing vulnerability on VSFTPD version 2.3.4. On the msfconsole, run the use command below to load our vsftpd_234_backdoor exploit.
![Metasploit Tutorial on Kali Linux [Step-by-Step]](https://www.golinuxcloud.com/wp-content/uploads/Load-vsftpd-exploit.png)
If the module were successfully loaded, the prompt would change, as shown in the image above. It appends the path of the module in a different color (mostly red). If you see a similar message like «No payload configured, defaulting to. « don’t worry. It means Metasploit could not automatically load the payload, and you will need to do it manually. In simple terms, a Payload is the code/ script executed through the said exploit.
4. show options command
After successfully loading a module, the following command you need to execute is the show options command.
![Metasploit Tutorial on Kali Linux [Step-by-Step]](https://www.golinuxcloud.com/wp-content/uploads/show-options-command.png)
This command shows you the different options you can change with the module. For example, in the image above, we see this module requires us to set the RHOST and RPORT.
- RHOST: That is the IP address of the remote system that you want to exploit.
- RPORT: That is the target port you wish to use on the target system.
5. set command
The other helpful command is set . This one allows you to set the various value displayed using the show options command. For example, if you wish to assign values to RHOST and RPORT we would use the syntax below.
![Metasploit Tutorial on Kali Linux [Step-by-Step]](https://www.golinuxcloud.com/wp-content/uploads/set-options.png)
If you rerun the show options command, you will notice there is a difference. The options RHOSTS and RPORT now have values assigned to them.
![Metasploit Tutorial on Kali Linux [Step-by-Step]](https://www.golinuxcloud.com/wp-content/uploads/options-1.png)
6. show payloads command
The other command you need to run after this step is show payloads . This command lists all the payloads compatible with this module.
![Metasploit Tutorial on Kali Linux [Step-by-Step]](https://www.golinuxcloud.com/wp-content/uploads/show-payloads.png)
Running this command on our module only gave us one compatible payload. However, some modules will have more than ten compatible modules to choose from.
7. set payload command
To load a particular payload, use the set command as shown below.
![Metasploit Tutorial on Kali Linux [Step-by-Step]](https://www.golinuxcloud.com/wp-content/uploads/set-payload.png)
8. run command
After successfully loading the payload, you are now ready to run this exploit against an existing vulnerability on the target system. Execute the command below.
![Metasploit Tutorial on Kali Linux [Step-by-Step]](https://www.golinuxcloud.com/wp-content/uploads/Run-exploit.png)
From the image above, you can see we successfully ran the exploit against a target system and obtained a command shell session. That means we are now inside the system, and we can now run any Linux commands from our msfconsole, and they will execute on our target system.
Conclusion
That’s it! I believe you now have a good understanding of the Metasploit framework and how to get started. If you are setting foot in the security field, please check out our post on Setting Up a Hacking Lab with Metasploitable. That is an intentionally vulnerable machine that helps you learn Metasploit at an in-depth level, as there are so many vulnerabilities in this system that you can exploit.
Didn’t find what you were looking for? Perform a quick search across GoLinuxCloud
If my articles on GoLinuxCloud has helped you, kindly consider buying me a coffee as a token of appreciation.

For any other feedbacks or questions you can either use the comments section or contact me form.
Metasploit Tutorial for Beginners – Basics to Advanced
Metasploit, one of the most widely used penetration testing tools, is a very powerful all-in-one tool for performing different steps of a penetration test.
If you ever tried to exploit some vulnerable systems, chances are you have used Metasploit, or at least, are familiar with the name. It allows you to find information about system vulnerabilities, use existing exploits to penetrate the system, helps create your own exploits, and much more.
In this tutorial, we’ll be covering the basics of Metasploit Framework in detail and show you real examples of how to use this powerful tool to the fullest.
Table of Contents
Installing Metasploit
Metasploit is available for Windows and Linux OS, and you can download the source files from the official repository of the tool in Github. If you are running any OS designed for penetration testing, e.g., Kali Linux, it will be pre-installed in your system. We’ll be covering how to use Metasploit Framework version 6 on Kali Linux. However, the basics will remain the same wherever you’re using Metasploit.
Installing Metasploit on Linux
To install Metasploit in Linux you have to get the package metasploit-framework. On Debian and Ubuntu based Linux distros, you can use the apt utility:
On CentOS/Redhat you can the yum utility to do the same:
Find out the version of Metasploit and updating
If you’re not sure if you have Metasploit or not, you can confirm by typing msfconsole in your terminal:
Metasploit Tip: Start commands with a space to avoid saving them to history
As you can see my machine already has Metasploit Framework installed.
Metasploit changes its greeting messages every time you fire up the Metasploit Framework with the msfconsole command, so you might see a different greeting message when you run it.
You can also find out which version is installed once the program loads. Type in version and hit enter to get the answer:
I am using version 6. If you haven’t updated your Metasploit anytime soon, it’s a good idea to update it before starting to use it. This is because if the tool is old then the updated exploits will not get added to the database of your Metasploit Framework. You can update the program by the msfupdate command:
msfupdate is no longer supported when Metasploit is part of the operating
system. Please use ‘apt update; apt install metasploit-framework’
As you can see the msfupdate command is not supported. This happened because Metasploit is already a part of the operating system in the Kali Linux updated versions. If you’re using older versions of the Kali Linux, this command will work fine for your system.
Now that you know how to install and update the Metasploit framework, let’s begin learning some of the basics related to Metasploit.
Basics of Penetration testing
Before we begin, let’s familiarize ourselves with some of the steps of a penetration test briefly. If you’re already familiar with the concept then you can just skip ahead to the good part. Let’s list some of the fundamental steps in penetration testing:
- Information Gathering / Reconnaissance
- Vulnerability Analysis
- Exploitation
- Post Exploitation
- Report
1. Information gathering / Reconnaissance
At the very beginning of any penetration testing, information gathering is done. The more information you can gather about the target, the better it will be for you to know the target system and use the information later in the process. Information may include crucial information like the open ports, running services, or general information such as the domain name registration information. Various techniques and tools are used for gathering information about the target such as – nmap, zenmap, whois, nslookup, dig, maltego, etc.
One of the most used tools for information gathering and scanning is the nmap or Network Mapper utility. For a comprehensive tutorial for information gathering and nmap which you can check out from here .
2. Vulnerability Analysis
In this step, the potential vulnerabilities of the target are analyzed for further actions. Not all the vulnerabilities are of the same level. Some vulnerabilities may give you entire access to the system once exploited while some may only give you some normal information about the system. The vulnerabilities that might lead to some major results are the ones to go forward with from here. This is the step where Metasploit gives you a useful database to work with.
3. Exploitation
After the identified vulnerabilities have been analyzed, this is the step to take advantage of the vulnerabilities.
In this step, specific programs/exploits are used to attack the machine with the vulnerabilities.
You might wonder, where do these exploits come from ?
Exploits come from many sources. One of the primary source is the vulnerability and exploit researchers. People do it because there is a lot at stake here i.e., there may be huge sums of money involved as a bounty.
Now, you may ask if the vulnerabilities are discovered, aren’t those application already fixed? The answer is yes, they are. But the fix comes around in the next update of the application.
Those who are already using the outdated version might not get the update and remains vulnerable to the exploits. The Metasploit Framework is the most suitable tool for this step. It gives you the option to choose from thousands of exploits and use them directly from the Metasploit console. New exploits are updated and incorporated in Metasploit regularly. You may also add some other exploits from online exploit databases like Exploit-DB .
Further, not all the exploits are ready-made for you to use. Sometimes you might have to craft your own exploit to evade security systems and intrusion detection systems. Metasploit also has different options for you to explore on this regard.
4. Post Exploitation
This is the step after you’ve already completed exploiting the target system. You’ve got access to the system and this is where you will decide what to do with the system. You may have got access to a low privilege user. You will try to escalate your privilege in this step. You may also keep a backdoor the victim machine to allow yourself to enter the system later whenever you want. Metasploit has numerous functionalities to help you in this step as well.
5. Report
This is the step that many penetration testers will have to complete. After carrying out their testing, the company or the organization will require them to write a detailed report about the testing and improvement to be done.
Now, after the long wait, let’s get into the basics of the actual program – Metasploit Framework.
Basics of Metasploit Framework
In this section, we’ll learn all the basics related to Metasploit Framework. This will help us understand the terminologies related to the program and use the basic commands to navigate through.
Modules of Metasploit Framework
As discussed earlier, Metasploit can be used in most of the penetration testing steps. The core functionalities that Metasploit provides can be summarized by some of the modules:
- Exploits
- Payloads
- Auxiliaries
- Encoders
Now we’ll discuss each of them and explain what they mean.
1. Exploits
Exploit is the program that is used to attack the vulnerabilities of the target. There is a large database for exploits on Metasploit Framework. You can search the database for the exploits and see the information about how they work, the time they were discovered, how effective they are, and so on.
2. Payloads
Payloads perform some tasks after the exploit runs. There are different types of payloads that you can use. For example, you could use the reverse shell payload, which basically generates a shell/terminal/cmd in the victim machine and connects back to the attacking machine.
Another example of a payload would be the bind shell. This type of shell creates a listening port on the victim machine, to which the attacker machine then connects. The advantage of a reverse shell over the bind shell is that the majority of the system firewalls generally do not block the outgoing connections as much as they block the incoming ones.
Metasploit Framework has a lot of options for payloads. Some of the most used ones are the reverse shell, bind shell, meterpreter, etc.
3. Auxiliaries
These are the programs that do not directly exploit a system. Rather they are built for providing custom functionalities in Metasploit. Some auxiliaries are sniffers, port scanners, etc. These may help you scan the victim machine for information gathering purposes. For example, if you see a victim machine is running ssh service, but you could not find out what version of ssh it is using – you could scan the port and get the version of ssh using auxiliary modules.
4. Encoders
Metasploit also provides you with the option to use encoders that will encrypt the codes in such a way that it becomes obscure for the threat detection programs to interpret. They will self decrypt and become original codes when executed. However, the encoders are limited and the anti-virus has many signatures of them already in their databases. So, simply using an encoder will not guarantee anti-virus evasion. You might get past some of the anti-viruses simply using encoders though. You will have to get creative and experiment changing the payload so it does not get detected.
Components of Metasploit Framework
Metasploit is open-source and it is written in Ruby. It is an extensible framework, and you can build custom features of your likings using Ruby. You can also add different plugins. At the core of the Metaslpoit framework, there are some key components:
- msfconsole
- msfdb
- msfvenom
- meterpreter
Let’s talk about each of these components.
1. msfconsole
This is the command line interface that is used by the Metasploit Framework. It enables you to navigate through all the Metasploit databases at ease and use the required modules. This is the command that you entered before to get the Metasploit console.
2. msfdb
Managing all the data can become a hurdle real quick, which is why Metasploit Framework gives you the option to use PostgreSQL database to store and access your data quickly and efficiently. For example, you may store and organize your scan results in the database to access them later. You can take a look at this tutorial to learn more about this tool – https://null-byte.wonderhowto.com/how-to/use-metasploits-database-stay-organized-store-information-while-hacking-0192643/
3. msfvenom
This is the tool that mimics its name and helps you create your own payloads (venoms to inject in your victim machine). This is important since your payload might get detected as a threat and get deleted by threat detection software such as anti-viruses or anti-malware.
This happens because the threat detection systems already has stored fingerprints of many malicious payloads. There are some ways you can evade detection. We’ll discuss this in the later section dedicated to msfvenom .
4. meterpreter
meterpreter is an advanced payload that has a lot of functionalities built into it. It communicates using encrypted packets. Furthermore, meterpreter is quite difficult to trace and locate once in the system. It can capture screenshots, dump password hashes, and many more.
Metasploit location on the drive
Metasploit Framework is located in /usr/share/metasploit-framework/ directory. You can find out all about its components and look at the exploit and payload codes. You can also add your own exploits here to access it from the Metasploit console.
Let’s browse through the Metasploit directory:
Type in ls to see the contents of the directory:
As you can see, there is a directory called modules, which should contain the exploits, payloads, auxiliaries, encoders, as discussed before. Let’s get into it:
All the modules discussed are present here. However, evasion , nops , and post are the additional entries. The evasion module is a new entry to the Metasploit Framework, which helps create payloads that evade anti-virus (AV) detection. Nop stands for no operation, which means the CPU will just move to the next operation. Nops help create randomness in the payload – as adding them does not change the functionality of the program.
Finally, the post module contains some programs that you might require post-exploitation. For example, you might want to discover if the host you exploited is a Virtual Machine or a Physical Computer. You can do this with the checkvm module found in the post category. Now you can browse all the exploits, payloads, or others and take a look at their codes. Let’s navigate to the exploits directory and select an exploit. Then we’ll take a look at the codes of that exploit.
What you’re seeing now are the categories of the exploits. For example, the linux directory contains all the exploits that are available for Linux systems.
Let’s take a look at the exploits for ssh.
As you can see, all the exploits are written in Ruby, and thus, the extension of the files is .rb . Now let’s look at the code of a specific exploit using the cat command, which outputs the content directly on the terminal:
You can see the code for the exploit is shown here. The green marked section is the description of the exploit and the yellow marked portion is the options that can be set for this exploit.
The description reveals what function this exploit will perform. As you can see, it exploits a known vulnerability of Cisco UCS Director. The vulnerability is the default password of the machine, which, if unchanged, may be used to gain access to the system. If you are someone who knows Ruby and has a good grasp of how the vulnerability works, you can modify the code and create your own version of the exploit. That’s the power of the Metasploit Framework.
In this way, you can also find out what payloads are there in your Metasploit Framework, add your own in the directory, and modify the existing ones.
Basic commands of Metasploit Framework
Now let’s move on to the fun stuff. In this section, we’ll talk about some of the basic Metasploit commands that you’re going to need all the time.
Fire up the Metasploit console by typing in msfconsole . Now you will see msf6 > indicating you’re in the interactive mode.
I have the msf6 shown here, where 6 represents the version of the framework and console. You can execute regular terminal commands from here as well, which means you don’t have to exit out of Metasploit Framework to perform some other tasks, making it super convenient. Here’s an example – msf6 > ls
The ls command works as it is intended to. You can use the help command to get a list of commands and their functions. Metasploit has very convenient help descriptions. They are divided into categories and easy to follow.
Now, let’s take a look at some important commands.
Show command
If you want to see the modules you currently have in your Metasploit Framework, you can use the show command. Show command will show you specific modules or all the modules. Show command requires an argument to be passed with it. Type in “show -h” to find out what argument the command takes:
For example, you can see all the exploits by using the command in the following way:
This will list all the existing exploits, which will be a long list, needless to say. Let’s look at how many encoders are there:
Show command can be used inside of any modules to get specific modules that are compatible. You’ll understand this better in the later sections.
Search anything within Metasploit
Let’s imagine you found a service running on an open port on the target machine. If you also know which version of the service that machine is using – you might want to look for already known vulnerabilities of that service.
How do you find out if that service has any vulnerability which has ready-made exploits on Metasploit?
You guessed it – you must use the search utility of Metasploit.
It doesn’t even have to be the exploits, you can also find out payloads, auxiliaries, etc., and you can search the descriptions as well.
Let’s imagine I wanted to find out if Metasploit has anything related to Samba . Samba is an useful cross platform tool that uses the SMB (Server Message Block) protocol. It allows file and other resource sharing between Windows and Unix based-host. Let’s use the search command:
You can also notice the date and description of the exploit. There is also a metric called rank telling you how good the exploit is. The name is actually also the path of where the module is inside the /usr/share/metasploit-framework/
There is some useful information for the exploits written in the Rank, Check, and Disclosure columns. The rank of an exploit indicates how reliable the exploit is. The check functionality for an exploit lets you check whether the exploit will work or not before actually running it on a host. The disclosure date is the date a particular exploit became publicly available. This is a good indicator of how many systems will be affected by it.
A relatively new exploit will affect many of the machines running the service since they might not have updated the vulnerable application in the short time period.
The use command
After you’ve chosen the module you want to use, you can select the module by the use command followed by the name or the id of the module. Let’s use the first one we got from the search result:
You can also specify the number for the module:
Get the description of the module with the info command
If you’re not sure about a module you can always get the description and see what it does. As we showed you earlier, you could get the description by looking at the original code of the module. However, we’re going to show you a much faster and efficient way. For this, you have to use the command info after you’ve entered the use command to select an exploit:
As you can see, the info command shows a detailed description of the module. You can see the description of what it does and what options to use, including explanations for everything. You can also use the show info command to get the same result.
See the options you need to specify for the modules
For the modules, you will have to set some of the options. Some options will already be set. You will need to specify options like your target machine IP address, port, and things like this. The options will change according to what module you are using. You can see the options using the options or show options command. Let’s see this in action:
You can see the options for this specific exploit(unix/webapp/citrix_access_gateway_exec) . You can also see the options for the default Payload ( cmd/unix/reverse_netcat ) for this exploit.
I have marked all the fields with different colors. The names are marked in green color. The current setting for each option is marked in pink. All of the fields are not required for the exploit to function. Some of them are optional. The mandatory ones will be listed as yes in the Required field marked in teal. Many of the options will be already filled out by default. You can either change them or keep them unchanged.
In this example, you can see the RHOSTS option does not have a current setting field value in it. This is where you will have to specify the target IP address. You will learn how to set it with the next command.
Use the set command to set a value to a variable
Set is one of the core commands of the Metasploit console. You can use this command to set context-specific values to a variable. For example, let’s try to set the target IP address for the above RHOSTS option field. Type in set RHOSTS [target IP] :
Now we’ve successfully set up the value of the RHOSTS variable with the set command. Let’s check if it worked or not. Type in show options :
The output shows the RHOSTS variable or option has the target machine IP address that we specified using the set command.
Choose the Payload
After we’ve specified the required options for our exploit, we have to set up the payload that we’ll be sending after the exploit successfully completes. There are a lot of payloads in all of Metasploit database. However, after selecting the exploit, you will get the only payloads that are compatible with the exploit. Here, you can use the show command usefully to see the available payloads:
Now you can choose any of the payloads that are listed. They are all compatible with the exploit. Let’s choose a different one rather than the default one. Here, we’ll use the set command to set the value of the payload variable to the name of the specific payload:
The output shows that the payload is set to ( cmd/unix/reverse_ssh ). Let’s set up the payload. Type in show options :
The option for the payload shows that the selected payload is now changed to our desired one ( cmd/unix/reverse_ssh ). You can set the payload options with the set command as well:
Here, we’ve set the local port for listening to 5000 from the default 4444 . Let’s see our changes in the options.
Now that you’ve set up the exploit and the payload – you can start the fun. Let’s move on to the exploit commands.
Check if the exploit will work or not
Before going forward with the exploit, you might wonder if it is actually going to work or not. Let’s try to find out. We’ll have to use the “check” command to see the target host is vulnerable to the exploit we’ve set up –
As you can see, the target we’re attacking is not vulnerable to this exploit. So there’s no point in continuing this line of attacking. In reality, you’ll mostly know if the machine has the vulnerability to the exploit you’re running beforehand. This is just an example to illustrate what is possible.
We’ll show you an example of an exploitable machine in the next section. Keep on reading!
A penetration test walkthrough
In this section, I’ll demonstrate how penetration testing is done. I will be using the intentionally vulnerable Linux machine – Metasploitable 2. This machine is created to have its port open and running vulnerable applications. You can get Metasploitable on rapid7’s website.
Go to this link and fill up the form to download. After downloading Metasploitable, you can set it up in a VirtualBox or a VMware or any software virtualization apps. If you’re using VMware workstation player, you can just load it up by double clicking the Metasploitable configuration file from the downloaded files.
Before we begin, a word of caution – Always remember that infiltrating any system without permission would be illegal. It’s better to create your own systems and practice hacking into them rather than learning to do it in real systems that might be illegal.
Target identification and Host discovery
Now we’ll be performing the first step in any penetration testing – gathering information about the target host. I’ve created the Metasploitable system inside my local area network. So, I already know the IP address of the target machine. You might want to find out IP address of the target host in your case. You can use DNS enumeration for that case. DNS enumeration is the way to find out the DNS records for a host. You can use nslookup , dig , or host command to perform DNS enumeration and get the IP address associated with a domain. If you have access to the machine, you can just find out the IP address of the machine. For checking if the host is up, you can just use the ping command or use nmap for host discovery.
In my case, I ran ifconfig command on my Metasploitable machine, and got the IP address to be 192.168.74.129 . Let’s see if our attack machine can ping the victim machine:
It’s clear that our attack machine can reach the victim machine. Let’s move on to the next step.
Port scanning & Service detection
This is the next step in the information gathering phase. Now we’ll find out what ports are open and which services are running in our victim machine. We’ll use nmap to run the service discovery:
As we can see, it’s party time for any penetration tester or hacker. There are too many ports open. The more open ports – the better the chance for one of the applications to be vulnerable. If you don’t know what we’re talking about, don’t worry. We’ve covered the scanning technique from the basics in a nmap tutorial that you can find here .
Vulnerability Analysis
Now that we’ve performed the service detection step, we know what versions of applications our victim is running. We just have to find out which one of them might be vulnerable. You can find out vulnerabilities just by googling about them, or you can also search them in your Metasploit database. Let’s do the latter, and search in Metasploit. Fire up your Metasploit console with the msfconsole command.
Let’s find out if the first application in the list, vsftpd 2.3.4 (which is an ftp service running on port 21) that we found in our service detection phase, has any exploits associated with it. Search for vsftpd in your Metasploit console:
Whoa! The first one is already a hit. As you can see, the exploit rank is excellent and you can execute backdoor commands with this exploit. However, you must remember that this is metasploitable you’re attacking. In real systems, you will not find a lot of backdated applications with vulnerabilities. Let’s move on and check if the other applications are vulnerable or not. Try to see if the openssh has any vulnerabilities:
However, this result is not so much promising. Still, we probably can brute force the system to get the login credentials. Let’s find out some more vulnerabilities before we start exploiting them. The ftp application ProFTPD 1.3.1 looks promising. Let’s search if anything is in the Metasploit database:
Seems like there is no specific mention of version 1.3.1 for the ProFTPD application. However, the other versions might still work. We’ll find that out very soon.
You can research each of the open port applications and find out what vulnerabilities might be associated with them. You can definitely use google and other exploit databases as well instead of only Metasploit.
Exploiting Vulnerabilities
This is the most anticipated step of the penetration test. In this step, we’ll exploit the victim machine in all its glory. Let’s begin with the most straightforward vulnerability to exploit that we found in the previous step. It is the VSFTPD 2.3.4 backdoor command execution exploit.
Exploiting the VSFTPD vulnerability
Let’s use the exploit ( exploit/unix/ftp/vsftpd_234_backdoor ):
After entering this command, you’ll see your command line will look like this:
This means you are using this exploit now. Let’s see the options for the exploit:
Let’s set up the RHOSTS as the target machine’s IP address (192.168.74.129 in my case):
See the options again:
Now you have to specify a payload as well. Let’s see what are our options:
Voila! We’ve successfully exploited the machine. We got the shell access. I ran the whoami command and got the reply as root . So, we have full access to the Metasploitable machine. We can do whatever the root can – everything!
Now before we show what to do after exploitation, let’s see some other methods of exploitation as well.
Keeping the sessions in the background
First, let’s keep the session we got in the background:
Type in background within the terminal, then type y and hit enter:
You can access this session anytime using the sessions command:
You can get back to the session by using the “-i” flag and specifying the ID. Do the following –
Exploiting samba smb
Did you notice that the netbios-ssn service was running on Samba in our victim machine’s port 139 and 445 ? There might be an exploit that we could use. But before that, there was no particular version written for the samba application. However, we have an auxiliary module in Metasploit that can find out the version for us. Let’s see this in action:
Now choose the smb scanner:
Now let’s see the options we have to set up:
We can set up the RHOSTS and THREADS here. The RHOSTS will be our target and the THREADS determine how fast will the program run. Let’s set them up:
The output gives us the version of the Samba – 3.0.20. Now we can find out the vulnerabilities associated with it. Let’s try google. A simple google search reveals this version is vulnerable to username map script command execution.
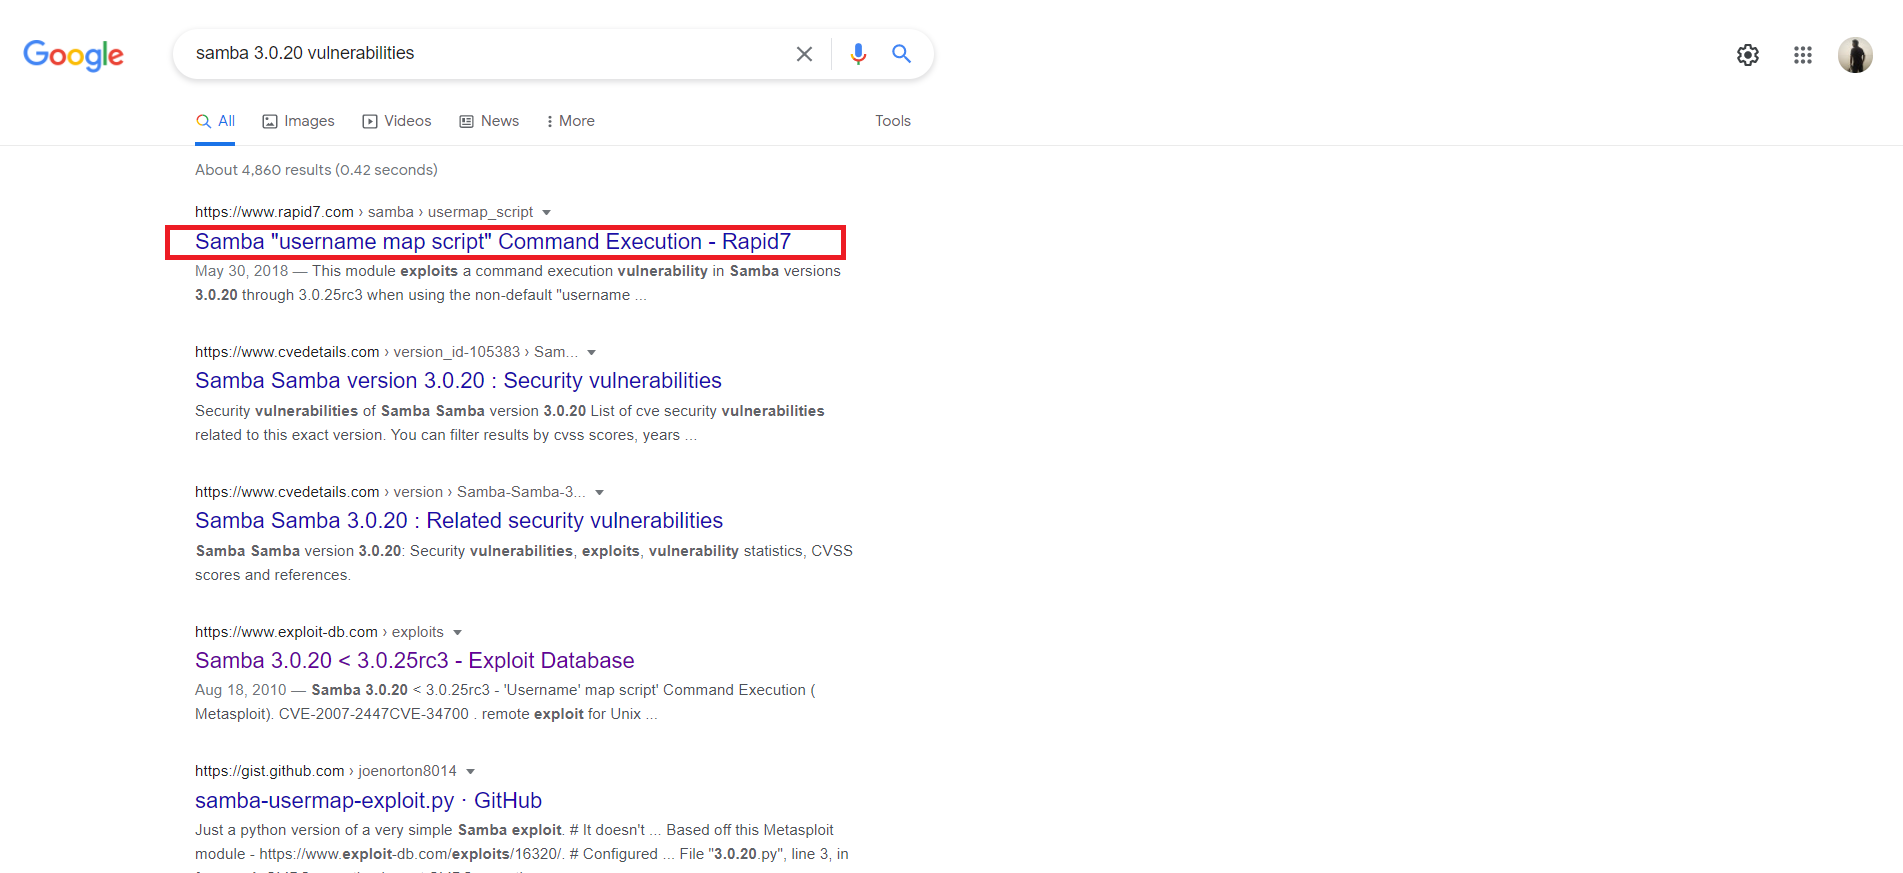
This is also available in Metasploit. Let’s perform a search:
As you can see, there is an exploit for this vulnerability with an excellent rank. Let’s use this one and try to gain access to the metasploitable machine:
We can see that the Payload options are already set up. I will not change it. You can change the LHOST to your attack machine’s IP address. We only need to set up the RHOSTS option:
Now let’s exploit:
As you can see the exploit sets up a reverse TCP handler to accept the incoming connection from the Victim machine. Then the exploit completes and opens a session. We can also see that the access level is root. Now let’s move on to another exploit keeping this session in the background.
Exploiting VNC
Now let’s try to exploit the VNC service running on our victim machine. If you search in Metasploit database, you will find no matching exploit for this one. This means you have to think of some other ways to get into this service. Let’s try to brute force the VNC login. We’ll be using the auxiliary scanner for vnc login :
We’ll be needing the VNC Authentication Scanner (3). Let’s select it:
We do not know what this auxiliary module does yet. Let’s find out. Remember the info command?
We can see the options this module will take. The description is also there. From the description, it becomes clear that this is a module that will try brute-forcing. Another conspicuous fact is that this module supports RFB protocol version 3.3 , which is written in our discovered VNC service (protocol 3.3) . If you’re wondering why this is related – VNC service uses RFB protocol. So this module is compatible with the VNC service in our victim machine. Let’s move forward with this.
We’ve already seen the options this module will take from the “info” command. The options marked in yellow are the important ones. Not all of them are required though. We can see the default password file ( PASS_FILE ) for the brute force will be ( /usr/share/Metasploit-framework/data/wordlists/vnc_passwords.txt ). We’ll not be changing this file. You might want to change this one if you’re doing real world tests that are not Metasploitable. We have to define RHOSTS . Let’s turn on STOP_ON_SUCCESS as well, which will stop the attack once the correct credentials are found. We’ll also increase the THREADS for faster operation, and set USER_AS_PASS to true , which will use the same username and password as well. Let’s set these up:
Now you can start running the brute force:
The brute force attempt was successful. We can see the username:password pair as well. There is no username set up here, and the password is just password . In real systems, most of the time the password will not be this simple. However, now you know how you can brute force the VNC authentication.
Now let’s try to login to the VNC with our cracked credentials. I’ll use the vncviewer command followed by the IP address of the victim machine:
At this point, you’ll have to provide the password. Type in password and you’ll get in:
Do you want to see the GUI version of the Metasploitable that we cracked just now? Here’s the view from the TightVNC application.
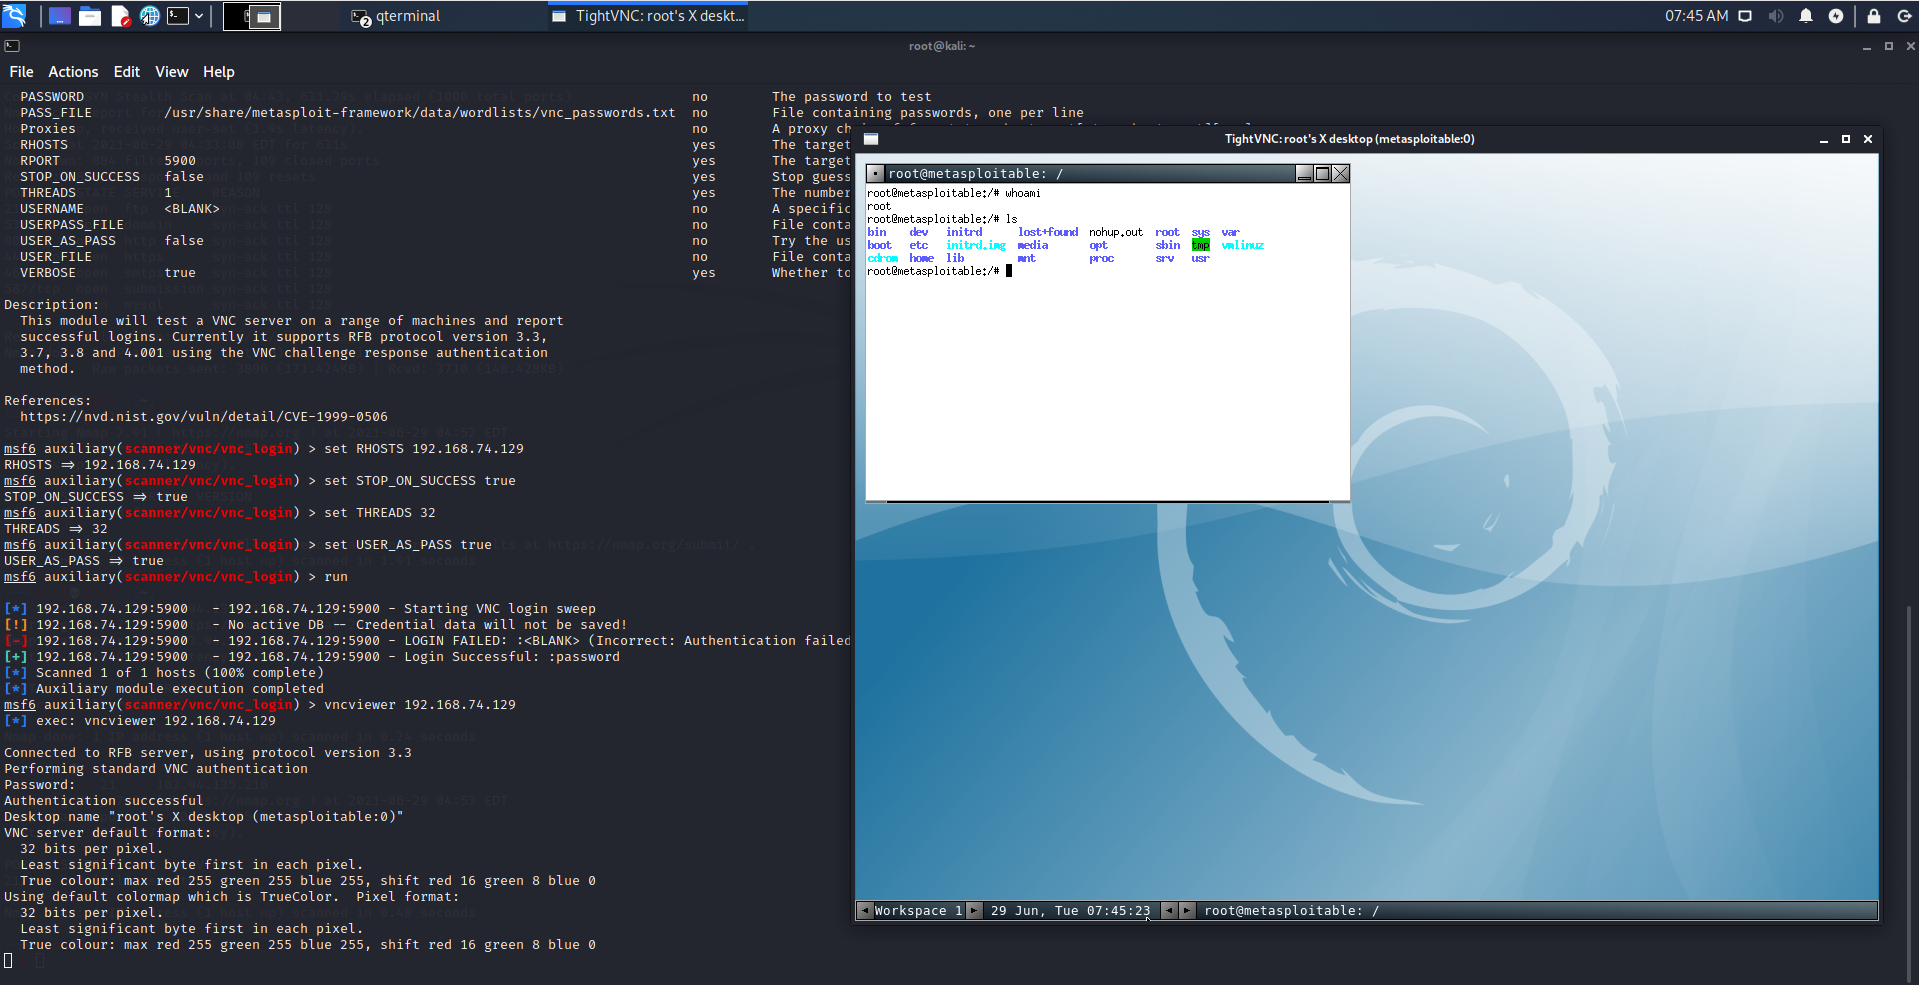
This is beautiful. Now you can pretty much do anything you desire. Now that we’ve shown you 3 ways you can exploit the Metasploitable with the Metasploit Framework, it’s time to show you the things you might have to do once you’ve gained access.
Post Exploitation tasks with Metasploit & Meterpreter
One of the tasks you might do after exploiting is keeping the session in the background while you work on the Metasploit Framework. We’ve already shown you how to do that in the previous section. However, if you exit from the session then that opened session will be gone.
You will need to exploit the machine once again to get another session. The same thing will happen if the victim chooses to reboot the machine. In this section, we’ll show you how to keep your access even if the victim reboots his/her machine.
One of the most useful tools after exploiting a target is the Meterpreter shell. It has many custom functionalities built into it that you don’t need to make a program or install any software to do.
What is Meterpreter?
Meterpreter is a Metasploit payload that gives an interactive shell that attackers may use and execute code on the victim system. It uses in-memory DLL injection to deploy. This allows Meterpreter to be fully deployed in the memory and it does not write anything to the disk. There are no new processes as Meterpreter gets injected into the affected process. It may also move to other operating processes. The forensic footprint of Meterpreter is therefore very small.
Upgrade to a meterpreter from shell
Meterpreter is an advanced payload for Metasploit that offers lots of functions after exploiting a system. But if you noticed, we didn’t get any meterpreter sessions from the exploits.
In fact, the exploits did not have an option to set meterpreter as a payload. Let’s learn how to upgrade to meterpreter from a shell. Let’s see the sessions we have at first using the sessions command:
As you can see, we have two sessions now with id 2 and 4. Both of these sessions are of unix cmd shell type. Now let’s try to upgrade to meterpreter. For this purpose, we’ll be using the shell to meterpreter exploit:
Let’s use the first one:
Now we have to specify the options. Remember the IDs of the sessions? Let’s try to upgrade the session ID 4:
This exploit might not work properly the first time. Keep on trying again until it works. Now let’s look at the sessions again:
There is also another option to upgrade your shell session to meterpreter using the sessions command:
This is a much easier way. You can kill any sessions with the “sessions” command using the “-k” flag followed by the session ID. You can interact with any of the sessions using the “-i” flag with the sessions command. Let’s open session 3 that we just got –
As you can see, now we’re in meterpreter. There’s a lot a meterpreter console can do. You can type help to get a list of commands meterpreter supports. Let’s find out some of the functionalities that meterpreter can do.
Meterpreter functionalities
Meterpreter gives you loads of options for you to explore. You can get the commands by typing in “help” in meterpreter console. You can navigate the victim machine using the basic navigational commands of Linux. You can also download or upload some files into the victim system. There is a search option to search the victim machine with your desired keywords:
You can search for a file with the search command with -f flag:
Downloding any file is super straightforward as well:
You can enter the shell of the system anytime you like with the shell command:
Furthermore, there are some networking commands such as – arp , ifconfig , netstat , etc.
You can list the process running in the victim machine with the ps command. There is an option to see the PID of the process that has hosted the meterpreter:
In Windows systems, you may be able to migrate your meterpreter onto another process using the migrate command. You could also get keystrokes by using the keyscan_start and keyscan_dump depending on the system. On our victim machine, these commands are not supported:
You can always find out the capabilities from the help command. Always keep in mind, as long as you have the command execution abilities, you can just upload a script to the victim machine that will do the job for you.
Staying persistently on the exploited machine
As we told you earlier, if the victim system reboots, you will lose your active sessions. You might need to exploit the system once again or start the whole procedure from the very beginning – which might not be possible. If your victim machine runs Windows, there is an option called persistence in Metasploit, which will keep your access persistent. To do it you’ll have to use:
As you can see, this command does not work in our victim system. This is because it’s running on Linux. There is, however, an alternate option for keeping your access persistent on Linux machines as well.
For that purpose, you can use the crontab to do this. Cron is the task scheduler for Linux. If you’re not familiar with cron command in Linux, we suggest you follow an article that covers this topic in detail here .
Create custom payloads with msfvenom
msfvenom is a tool that comes with the Metasploit Framework.
With this tool, you can create custom payloads tailored to specific targets and requirements. Furthermore, you can attach payloads with other files that make your payload less suspicious. You can also edit the codes of your payloads and change them to evade detection by the threat detection systems. You can see all the options available for msfvenom by typing in msfvenom -h .
Check all options for creating your payload
To see all the options for creating the payload, you can list the modules by using the -l flag followed by the module type – which will be payload in our case.
You’ll get a long list of payloads in the output. You can use grep command to narrow the result down to your liking. Let’s say I wanted to create payloads for Android. I’ll use the following to list the payloads:
Now, imagine I wanted to use the marked payload ( android/meterpreter/reverse_tcp ). I will need to know what options I have to set. To see the options for the payload, you’ll have to use the -p flag to specify the payload and the —list-options flag as below:
There are loads of options for this exploit, as you can see. The options are divided into two categories. Basic options and Advanced options. You can create a payload just by setting up the basic options. However, advanced options are very important as well. They offer customization as well as play a crucial role to evade threat detection systems.
You can modify them and check how many anti-viruses detect it as a threat. Many online websites allow you to check your payloads. Keep in mind, however, that these systems might store your data and add them to the anti-virus database, rendering your payloads to be detected more often.
VirusTotal is a website that allows you to upload a file and check for viruses. There are online virus checkers for almost all the anti-virus packages (avast, avg, eset, etc.). At the end of this article, you’ll see me testing our payload on these websites.
Encoding your payload to evade detection
Before we create the payload, remember encoders? Encoders are the modules that encrypt the code so it becomes harder for the threat detection systems to detect it as a threat. Let’s see how to encode our payload. At first, list the encoder options available. I’ll use the ruby based encoders by grepping ruby :
Let’s set up the basic options and create a basic payload now:
Here, the LHOST is our IP address and LPORT is the port for the connection. You should change the default port to evade easy detection. Now, before we send this payload, we need to set up the handler for the incoming connection. Handler is just a program that will listen on a port for incoming connections, since the victim will connect to us . To do that, we’ll fire up msfconsole and search multi/handler:
As you can see, number 5 is our manual and Generic Payload Handler. Use this one and we must set our payload matching to the one we just used (/android/meterpreter/reverse_tcp) –
In the output, we can see that the default payload for exploit (multi/handler) was ( generic/shell_reverse_tcp ). So we set the payload to our desired one ( android/meterpreter/reverse_tcp ). Now let’s set up the LHOST to 192.168.74.128 (attack machine’s IP) and LPORT to 8080 just like we did when we created the payload:
Now you can run this exploit to start listening in for connections –
The meterpreter session will start as soon as the Android device installs the apk file. This concludes how you can create payloads with the msfvenom tool. You can send this apk out and ask the victims to install it by social engineering or go install it yourself if you have physical access. Bear in mind that violation of privacy and system penetration without permission is illegal and we suggest you use these techniques ethically for learning purposes only.
Checking if your payload can evade anti-virus programs
We’ve already told you how you might try to evade the anti-virus software. Let’s have some fun now. We’ll check how many viruses can detect our apk payload that we just created.
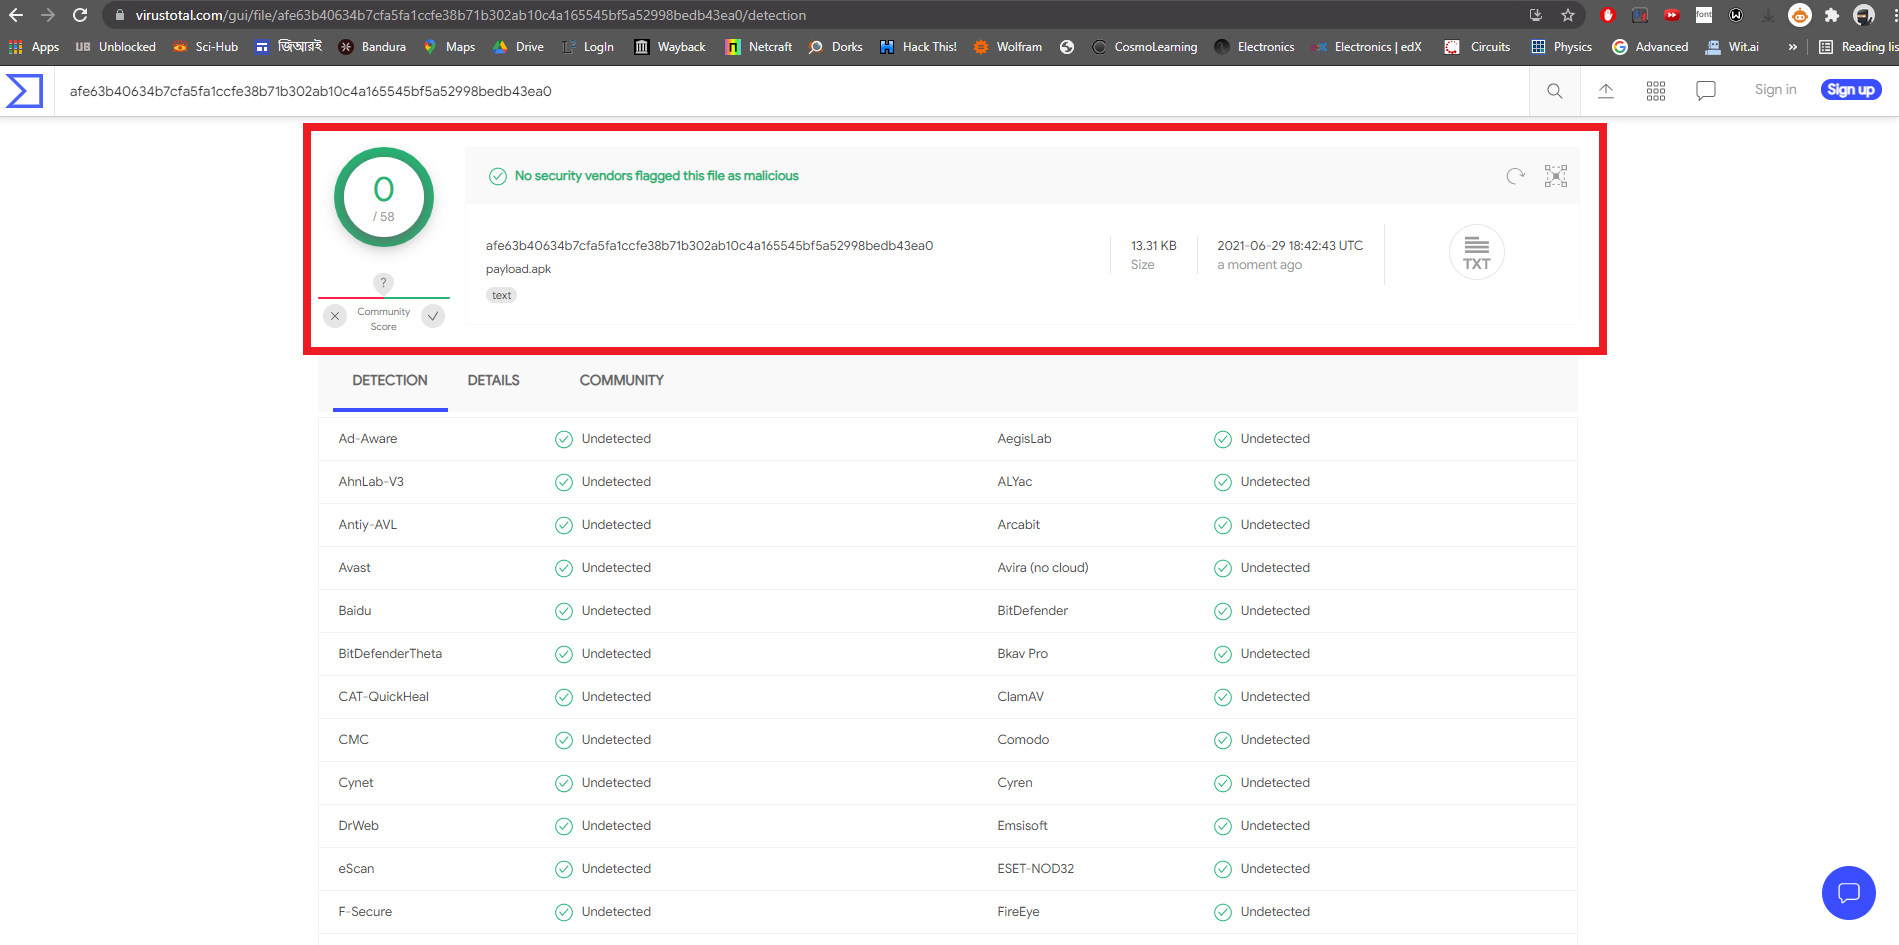
The result is phenomenal. Or, there might be something wrong here! The VirusTotal website might not properly work for the APK files. Whatever it may be, you now know how to create custom payloads for penetration testing.
Conclusion
In this tutorial, you learned about Metasploit Framework from the basics to the advanced level. You can experiment and practice to learn more on your own.
We showed you how to use Metasploit on an intentionally vulnerable machine Metasploitable 2. In reality, these types of backdated and vulnerable machines might not be present nowadays. However, there are so many vectors from where an attack might be possible. Keep on learning.
Remember to use your knowledge for the good. We hope you liked our tutorial. If you have something you’d like to ask, feel free to leave a comment. We’ll get back to you as soon as possible.