Настраиваем окружение Qt6+QtC без VPN
Как известно, с недавних пор сервера qt.io запрещают загрузку любых архивов с российских IP. Если первое время проверка шла только на получение метаинформации, теперь любая загрузка файла обрывается сервером.
Обычные советы, как это обойти, включают:
Используй платный безлимитный VPN;
Используй дистрибутив Linux и его бинарные сборки;
Собирай сам из исходинков.
Все это рабочие советы, но не очень дружелюбны к начинающим разработчикам, которые только hello world начинают собирать. Я расскажу, как можно быстро настроить окружение используя зеркала Yandex и github.
Часть 1, установка Qt библиотек
Для начала определимся с желаемой версией установки (пусть будет Qt 6.4.1) и целевой директорией (пусть будет D:/Qt — если память не изменяет, с юникодными символами в директории могут быть проблемы).
Помещаем их в директорию D:/Qt , и распаковывем 7-zip в тещую директорию (т.о все они распакаются в одно место — 6.4.1 и содержимое объединится).
Можно также порыскать по соседним директориям, если вам нужны какие-то модули не из стандартной поставки, например:
В общем-то, на этом установка самого фреймворка завершена, если у вас уже стоит Qt Creator, просто укажите путь к qmake6.exe для добавления версии Qt.
(D:\Qt\6.4.1\msvc2019_64\bin\qmake6.exe)
Часть 2, установка Qt Creator
Можно также найти QtC на зеркале Yandex, но я предпочитаю релизы с Github.
Скачиваем архивы qtcreator-Windows-MSVC-3703462836.7z и qtcreatorcdbext-Windows-MSVC-3703462836.7z ( в зависимости от версии, набор цифр будет отличаться)
Распаковываем первый в любой удобный вам путь, например, D:/Qt/qt-creator-9.0.0
Распаковываем второй таким образом, чтобы его содержимое (dll) оказалось в D:/Qt/qtcreator-9.0.0/lib/qtcreatorcdbext64
Про настройку CDB отладчика, Kit-ов и прочего писать уже не буду, инструкций по настройке IDE и так предостаточно.
Install Qt 5 on Ubuntu
This is a tutorial for installation of Qt 5.7.0 to Ubuntu 12.10. It may be used for some newer versions of Qt and Ubuntu. As a counterexample, Ubuntu 16.04 LTS uses an independent system for controlling the Qt version. Following these directions for Ubuntu 16.04 results in an error where a file can’t be found in a qt4 directory, even though you’re installing qt5 not 4. Another difference for OpenGL has been found and added as a note below.
Installation Guide (Ubuntu package)
Open a terminal. Type the following command and hit Enter: sudo apt-get install qt5-default
Qt 5.x will be installed.
Installation Guide (Qt download page)
- Download
Visit Qt downloads page an download a 32-bit or 64-bit Linux installation depending your version of Ubuntu. The installation file can be also downloaded through the command line using wget.
This is valid until 5.14.2 due to policy change, distributing Open Source Qt linux package is discontinue from 5.15.0. You need to build your own package starting from 5.15.0.
- Install
Adjust permission, run the installer and follow the instruction to complete the installation.
chmod +x qt-opensource-linux-x64-5.7.0.run ./qt-opensource-linux-x64-5.7.0.run
- Install g++
Open a terminal and execute the following command to install g++: sudo apt-get install build-essential
- Install generic font configuration library — runtime
Open a terminal and execute the following command to install the full runtime files for the generic font configuration library: sudo apt-get install libfontconfig1
- Configure a compiler
Launch Qt Creator. Go to Tools > Options. Click Build & Run and select tab Kit. Configure a compiler if it is not automatically detected.
- Install OpenGL libraries
Execute the following command to install OpenGL libraries: sudo apt-get install mesa-common-dev
Note: Just installing the above-mentioned mesa-common-dev kit is not sufficient for more recent Ubuntu versions. Based on a comment in the Qt forum [1] an additional package needs installation. Execute following command: sudo apt-get install libglu1-mesa-dev -y Tested with Qt5.3.1 and Ubuntu 14.04 and it solved the problem with missing -lGL.
- Set file association with pro files
When installing from the on-line source the file association is not done automatically. It also not show up when you try to associate it with file explorer. Create a file named “Qt-Creator.desktop” and fill the file with the following.
[Desktop Entry] Version=1.0 Encoding=UTF-8 Type=Application Name=QtCreator Comment=QtCreator NoDsiplay=true Exec=(Install folder of QT)/Tools/QtCreator/bin/qtcreator %f Icon=(Install folder of QT)/5.4/Src/qtdoc/doc/images/landing/icon_QtCreator_78x78px.png Name[en_US]=Qt-Creator
Place this file in home .local/share/applications .
Edit a file named “defaults.list” in the same directory . Add the following line.
open file mimeapps.list and check if the following line is present.
if not add it under [added Associations].
Run the following command.
sudo update-mime-database /usr/share/mime
now Qt has been added to the list of file associations.
Troubleshooting
- Qt Creator needs a compiler set up to build
Follow the instruction from the previous section to configure compiler for Qt Creator.
- error: g++: Command not found
Solution: sudo apt-get install build-essential
- error: GL/gl.h: No such file or directory
Solution: sudo apt-get install mesa-common-dev
References
- ↑Qt 5.5.0 problem running examples [SOLVED]. 2015-09-22. Archived from the original on 2016-08-01. Retrieved 2016-08-01.
Execute the following command to install OpenGL libraries: sudo apt-get install mesa-common-dev Note: Just installing the above-mentioned mesa-common-dev kit is not sufficient for more recent Ubuntu versions. Based on this comment in the forum an additional package needs installation. Execute following command: sudo apt-get install libglu1-mesa-dev -y Tested with Qt5.3.1 and Ubuntu 14.04 and it solved the problem with missing -lGL.
Устанавливаем Qt для Linux
Фреймворк является основой для создания графической среды KDE в операционных системах семейства Linux. По умолчанию он не инсталлирован в системе.
Данная статья расскажет о том, как установить Qt в Linux. В качестве тестовой ОС берем Ubuntu 18.04.3.
Что такое Qt
Qt представляет собой набор компонентов и библиотек для создания программного обеспечения под любую ОС. Его создали в 1996 году.
Qt нельзя назвать языком программирования в полном смысле этого слова. Его библиотеки разработаны на языке С++, в то время как графической оболочкой для программирования является QtCreator.
Доступны аналогичные решения для других продуктов: QtRuby разработан для языка программирования Ruby, PyQt соответственно для Python и т.д.
Примеры программ, которые созданы при помощи Qt: мобильная версия 2ГИС, Opera, VirtualBox, VLC Player и другие.
Qt работает с мета-объектами, которые используются для компиляции программ. Преимущество данного подхода в том, что сборка ПО осуществляется в любой программной среде, независимо от платформы.
Также для пользователя доступны виджеты. Они воздействуют как на внешний вид разрабатываемого программного обеспечения, так и на функционал Qt.
Установка Qt из репозитория
Инсталляция продукта производится силами стандартного установщика. Решение доступно в официальном репозитории.
Важно! На официальных каналах доступна только пятая версия продукта.
Открываем терминал, набираем команду:
sudo apt-get install qt5-default
Дополнительно установим графическую оболочку QtCreator.
sudo apt-get install qtcreator
Если требуется ознакомиться с практическими вариантами, то проинсталлируем тестовые программы. Они созданы на Qt и также доступны в официальных репозиториях.
sudo apt install qtbase5-examples qtdeclarative5-examples
Приложение запускается как через ярлык, так и через терминал.
Установка Qt с официального сайта
Как говорилось выше, в репозиториях последний релиз Qt – пятая версия. На официальном сайте доступны более актуальные варианты. Загрузим дистрибутив, используя терминал.
wget http://download.qt.io/official_releases/online_installers/qt-unified-linux-x64-online.run
для 32-битных систем:
wget http://download.qt.io/official_releases/online_installers/qt-unified-linux-x86-online.run
По умолчанию Wget сохраняет скачанное в папку «Загрузка». По окончании загрузки переходим в нее. Далее необходимо разрешить инсталлятор вносить изменения в операционную систему.
chmod u+x qt-unified-linux-x64-3.1.1-online
Следующим этапом запускаем дистрибутив и следуем подсказкам мастера.
Состав Qt
Рассмотрим перечень доступных компонентов фреймворка.
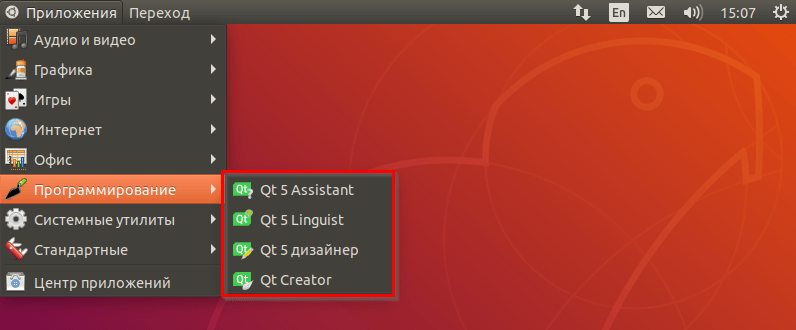
- Qt5 Assistant – это встроенный помощник. При возникновении проблем пользователь обращается к Assistant. Ассистент используется как средство разработки собственного справочника для новых программ.
- Qt5 Linguist переводит строки кода на любой язык, доступный в приложении. Qt5 Designer отвечает за интерфейс разрабатываемых продуктов. Если необходимо придумать собственный внешний вид для приложения, используем данный элемент. Для создания интерфейса на мобильных устройствах использует компонент QtQuick.
- Qt5 Creator представляет собой графическую оболочку для среды разработки Qt. Доступны разные инструменты для программирования: всплывающие подсказки, подсвеченный синтаксис, загрузка плагинов и т.д.
Преимущество программного решения в том, что оно кроссплатформенное. Работает в среде Windows, Linux и MacOS.
Заключение
Публикация рассказала, что такое Qt и для чего он необходим. Также рассмотрены два варианта инсталляции фреймворка.
How To Install Qt Creator On Linux?
Qt Creator is a cross-platform C++, JavaScript, and QML integrated environment which simplifies GUI application development. It is currently available for Windows, macOS, and Linux. It is part of the SDK for the Qt GUI application development framework and uses the Qt API, which encapsulates host OS GUI function calls. It includes a visual debugger and an integrated WYSIWYG GUI layout and forms designer. The editor has features such as syntax highlighting and autocompletion. Below are the steps to install Qt Creator in a Linux distribution.
Install Prerequisites
The Qt installers for Linux assume that a C++ compiler, debugger, make, and other development tools are provided by the host operating system. If the tools are not present in your distribution, run the following commands in your terminal based on your distro.
Debian/Ubuntu/Linux Mint
sudo apt-get install build-essential libgl1-mesa-dev
Fedora/RHEL/CentOS
sudo yum groupinstall “C Development Tools and Libraries”
sudo yum install mesa-libGL-devel

openSUSE
sudo zypper install -t pattern devel_basis
Download the Qt installer
You can download the Qt installer for Linux from its official download site: https://www.qt.io/download. The site will automatically detect your operating system and will recommend the correct version for your system based on the architecture of the computer.
Run the Qt installer
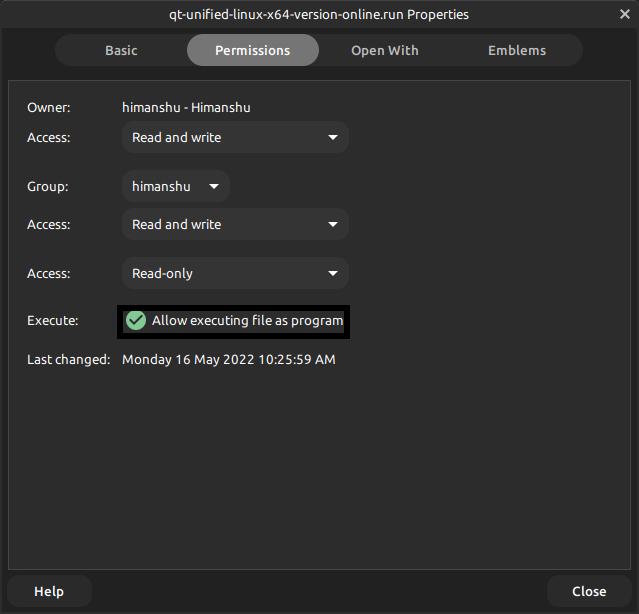
The downloaded file will be named something like qt-unified-Linux-x64-version-online.run. This file would not run directly in the Linux distribution, so the user must turn it into an executable file by changing its permissions. The permissions can be changed through the terminal or by using the file manager.
Using Terminal (all distributions), Locate the file in your system and change the directory accordingly in the terminal using the cd command.

This will change the turn the file into an executable. One can also give the full name of the file in place of qt*.run. Run the file with the following command

Using file manager (Debian-based distributions)
- Locate the file in the system and right-click on it
- Go to Properties.
- Under the Permissions tab, enable Allow executing file as a program.
- Run the file by right-clicking on it.
The installer window will show up. Install the application based on your preferences. Make sure any file starting with the same initials as the Qt installer does not exist in the same directory.