How to configure network basics on Linux with ifconfig
![]()
As a DevOps Engineer, we use mainly Linux environment and we need to know network configuration on Linux. In this article, I will show some basic Linux commands related to network configurations on my virtual Ubuntu 20.04 LTS.
In order to identify available interfaces, we use ifconfig command. You can find IPv4, IPv6, network mask, broadcast address, MAC address, and other information after executing this command.
In order to disable or enable our network interface, we use the below command.
if we would like to change our interface ip address, then we execute followed command. I have changed my ip address from 10.0.2.15 to 10.0.2.20 with that command.
We can also change our network mask address with following command. I have changed my netmask from 255.0.0.0 to 255.255.255.0 with that command.
In order to change out the maximum transmission unit (mtu), we could use the following command. I have changed this value from 1500 to 4000.
Now we will learn how to enable and disable promiscuous mode on Linux. Promiscuous mode or promisc mode is a feature that makes the ethernet card pass all traffic it received to the kernel. You can learn more about promisc mode here.
This code can enable the promisc mode.
Here you can disable promisc mode with that code.
Finally, we will learn how to change our MAC address temporarily. A media access control address (MAC address) is a unique identifier assigned to a network interface controller (NIC) for use as a network address in communications within a network segment. You can learn about MAC here.
Normally my MAC address 08:00:27:10:53:05. But I want to change it temporarily.
If you would like to learn more about ifconfig command, you can visit this website.
Sorry, you have been blocked
This website is using a security service to protect itself from online attacks. The action you just performed triggered the security solution. There are several actions that could trigger this block including submitting a certain word or phrase, a SQL command or malformed data.
What can I do to resolve this?
You can email the site owner to let them know you were blocked. Please include what you were doing when this page came up and the Cloudflare Ray ID found at the bottom of this page.
Cloudflare Ray ID: 7d99c4c32b31c311 • Your IP: Click to reveal 138.199.34.39 • Performance & security by Cloudflare
Ubuntu Enable and Disable the Network Interface
We will talk about how to enable and disable the network interfaces using various methods in Ubuntu distribution. We have executed all commands on the latest available Ubuntu distribution Ubuntu 20.04 LTS. Let’s start with the details!
Methods to Enable and Disable the Network Interface in Ubuntu 20.04
There are the following different methods are available that can be used to enable and disable your network interface in Ubuntu:
- ifconfig command
- nmcli command
- systemctl command
- nmtui command
- Ip command
- ifdown/ifup
First, you must know about network interface information on your system. The “ip command” can be used for this task. This command shows the network interface card information that is used on your Linux system. To get the information about the network interface card on your Ubuntu system, open the terminal by pressing ‘Ctrl+Alt+t’ and then type the following command on it:
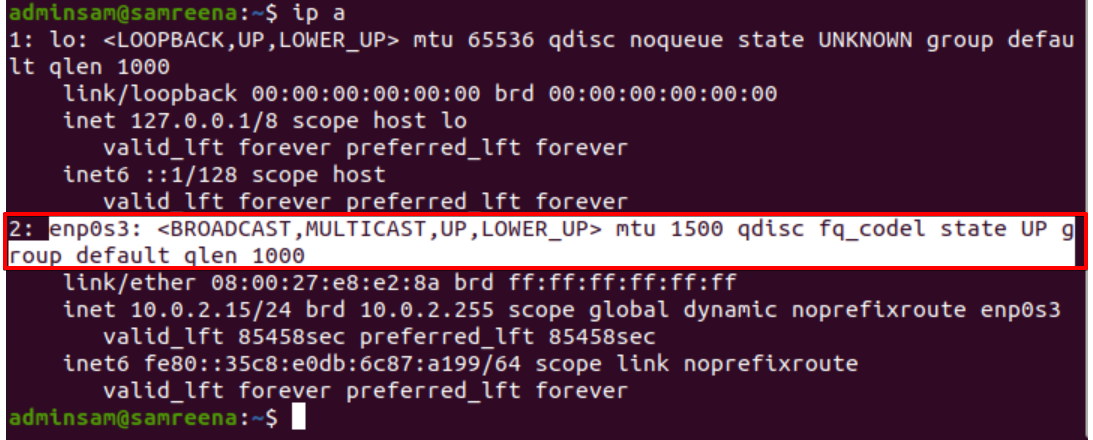
According to the above-displayed output, one network interface ‘enp0s3’ is enabled (up) and working on this system.
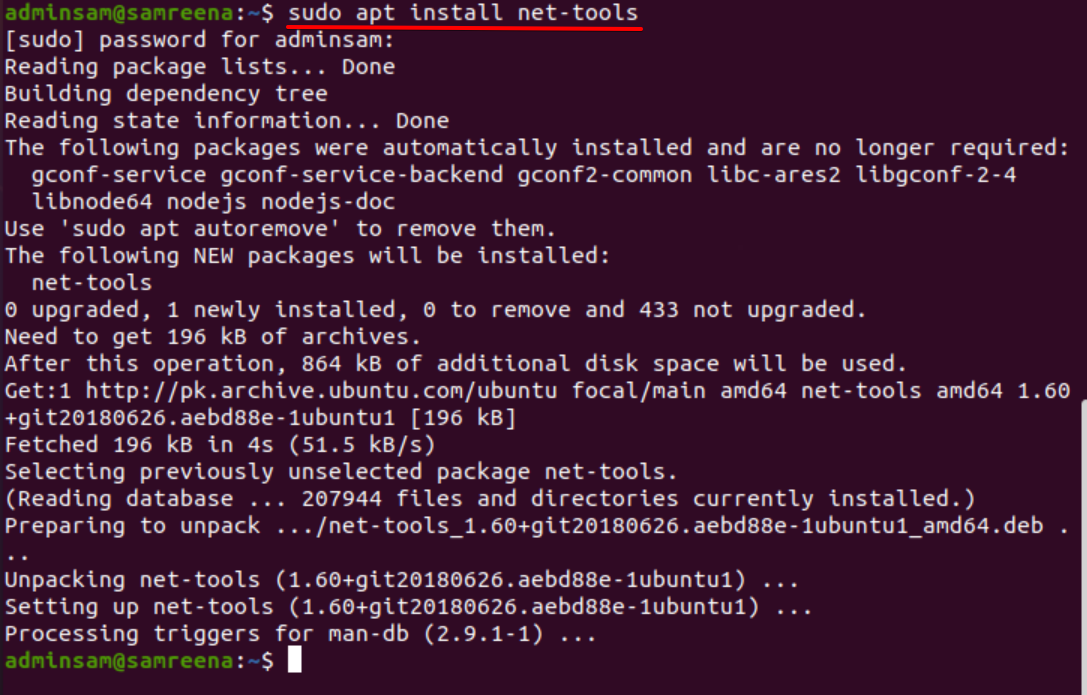
Method 01: Enabling/Disabling the Network Interfaces through the ifconfig Command
To run the ifconfig command-line utility, you need to install some required “net-tools” on your Ubuntu system. Therefore, install the following required tools by executing the command given below:
Now, you can execute the ifconfig command on your Ubuntu system. To disable or down the running network interface, mention the network interface, as shown in the following example:
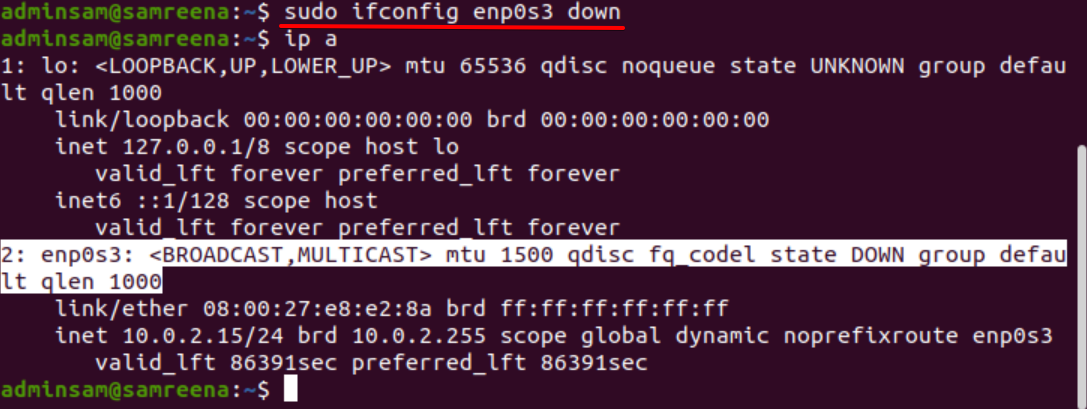
Now, check the status of the network interface by typing the below-given command:
To enable or activate the specified network interface through the ifconfig utility, use the following command:
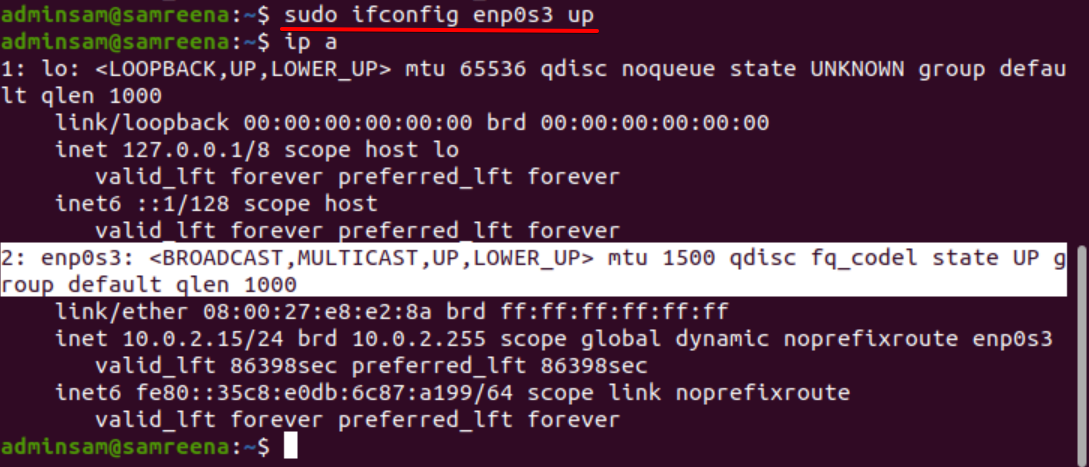
Verify the bring up the status of “enp0s3” by executing the following command:
Method 2: Enable/Disable Network Interface Using the nmcli Command
The nmcli is a command-line utility that is used as a replacement for other graphical clients or nm-applet. Using the nmcli utility, you can display, create, update, remove, activate, and deactivate your system network connections. Through this command, you can also display and control the status of all network devices.
The nmcli command displays the “profile name” instead of the device name. So to show the network interface card information, execute the below-mentioned command on the terminal:

Bring Down or Disable the Network Interface Through the nmcli Command
To bring down the displayed network interface, just type the profile name as follows:
The following output appears on the terminal:

Using the following nmcli command, you can also display the current status network interface device:

As you can see from the above-displayed result, “Wired connection 1” is deactivated on this system.
Enable or Bring Up the Network Interface Through the nmcli Command
To reactivate or enable the network interface “enp0s3”, type the below-given command:

Display the status by running the following command:

Now, the “Wired connection 1” is enabled and running on this system.
Method 3: Enable/Disable Network Interface Using the systemctl Command
The “systemctl” command uses the network manager to set the new configuration for your network to enable and disable the Network Interface Cards. Therefore, if you want to disable or bring down the “enp0s3” interface on your system using the network manager service, you can do so by doing as follows:

To re-enable it, run the below-mentioned command:

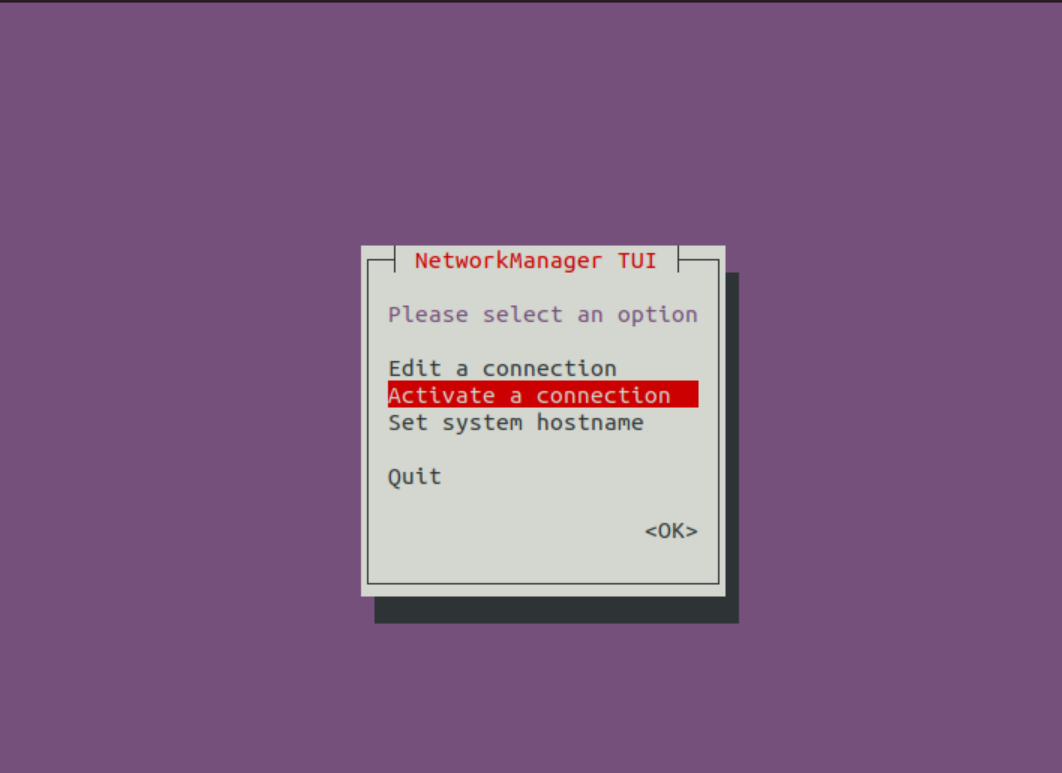
Method 4: Enable/Disable the Network Interface Using the nmtui Command
The nmtui is a text-based user interface mainly used to interact with the Network Manager services. It allows you to configure the network interfaces using the simple text user interface environment.
To display the interface of nmtui, type the following terminal command:

The following window appears in the terminal through which you can easily manage the network interface configurations. If the network connection is not enabled on your system, then select the following option to activate a connection:
Select the “deactivate” and then choose “OK” to disable the ‘Wired connection 1’ interface on your system.
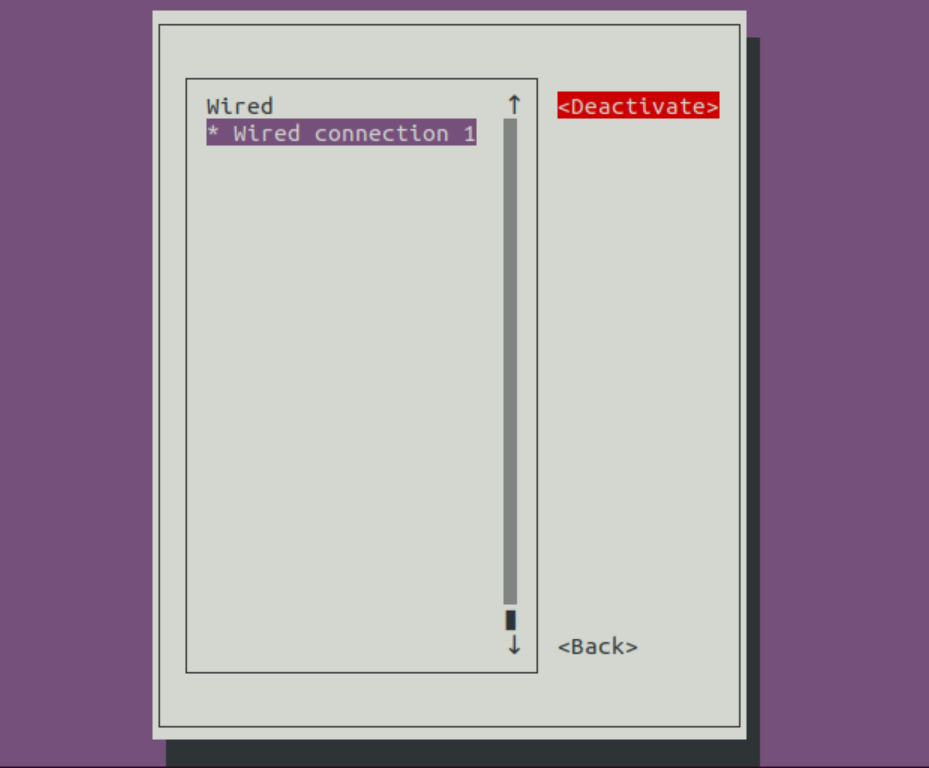
To enable the network interface, select “Activate” and then “OK”.
Method 5: Bring Up / Down the Network Interface Through the IP Command
Using the IP command, the network interface can be enabled or disabled on your system. To disable or bring down the network interface, execute the below-given command:

To enable or reactivate it, use the following command:

Method 6: Enable/Disable Network Interface Using ifdown and ifup Command
The ifdown and ifup command does not support the new network interface devices. But if you want to use it for older network devices, then use the following command to bring up and down the network interface device, respectively.
To disable or bring down the network interface status, use the command which is given below:
To enable the network interface, use the following command:
Conclusion
We have seen in this tutorial how to enable and disable the network interfaces on your Ubuntu Linux system using different methods. Use one of the above methods from all based on your need.
About the author
Samreena Aslam
Samreena Aslam holds a master’s degree in Software Engineering. Currently, she’s working as a Freelancer & Technical writer. She’s a Linux enthusiast and has written various articles on Computer programming, different Linux flavors including Ubuntu, Debian, CentOS, and Mint.
Настройка сети в Linux
Далее настройка зависит от версии Linux, которую Вы используете.
На новых версиях Debian . Например, на Debian 9 используется Iproute2
Если Вам нужно настроить сеть на старой версии Debian с помощью утилит ifconfig пролистайте страницу вниз или перейдите по ссылке
Настройка сети с помощью Iproute2
Актуально для Debian 9 и выше.
Чтобы получить список интерфейсов нужно воспользоваться командой
На выходе будет что-то похожее на
1: lo : <LOOPBACK,UP,LOWER_UP> mtu 65536 qdisc noqueue state UNKNOWN group default qlen 1000 link/loopback 00:00:00:00:00:00 brd 00:00:00:00:00:00 inet 127.0.0.1/8 scope host lo valid_lft forever preferred_lft forever inet6 ::1/128 scope host valid_lft forever preferred_lft forever 2: enp3s0 : <BROADCAST,MULTICAST,UP,LOWER_UP> mtu 1500 qdisc pfifo_fast state UP group default qlen 1000 link/ether 30:f9:ed:d9:ea:d3 brd ff:ff:ff:ff:ff:ff inet 192.0.2.131/24 brd 192.0.2.255 scope global enp3s0 valid_lft forever preferred_lft forever inet6 fe80::32f9:edff:fed9:ead3/64 scope link valid_lft forever preferred_lft forever 3: wlp1s0 : <BROADCAST,MULTICAST,UP,LOWER_UP> mtu 1500 qdisc noqueue state UP group default qlen 1000 link/ether b8:76:3f:f5:c4:1f brd ff:ff:ff:ff:ff:ff inet 192.168.43.4/24 brd 192.168.43.255 scope global dynamic noprefixroute wlp1s0 valid_lft 2800sec preferred_lft 2800sec inet6 fe80::ba76:3fff:fef5:c41f/64 scope link noprefixroute valid_lft forever preferred_lft forever
1: Первый интерфейс это lo он направлен на локальную машину и имеет IP 127.0.0.1/8
2: Второй интерфейс enp3s0 это моё поключение к по Ethernet к другому ПК.
В этом примере компьютер с Debian (1) соединён с компьютером с Windows (2) напрямую через Ethernet кабель
Через это подключение я захожу на комп номер 1 по SSH.
IP компьютера с Debian вы видите выше 192.0.2.131/24 , а у компа с Windows IP 192.0.2.130/24 его здесь, естественно не видно.
Как настроить этот IP читайте дальше
3: Третий интефейс wlp1s0 это подключение к местному Wi-Fi от мобильного телефона. IP получен динамически 192.168.43.4/24
Раньше интерфейсы назывались eth0 , eth1 и так далее, сейчас у них более разнообразные названия.
enp0s31f6: flags=4099<UP,BROADCAST,MULTICAST> mtu 1500 ether 54:05:db:cd:b2:af txqueuelen 1000 (Ethernet) RX packets 0 bytes 0 (0.0 B) RX errors 0 dropped 0 overruns 0 frame 0 TX packets 0 bytes 0 (0.0 B) TX errors 0 dropped 0 overruns 0 carrier 0 collisions 0 device interrupt 16 memory 0xef380000-ef3a0000 lo: flags=73<UP,LOOPBACK,RUNNING> mtu 65536 inet 127.0.0.1 netmask 255.0.0.0 inet6 ::1 prefixlen 128 scopeid 0x10<host> loop txqueuelen 1000 (Local Loopback) RX packets 2465 bytes 795656 (795.6 KB) RX errors 0 dropped 0 overruns 0 frame 0 TX packets 2465 bytes 795656 (795.6 KB) TX errors 0 dropped 0 overruns 0 carrier 0 collisions 0 vboxnet0: flags=4163<UP,BROADCAST,RUNNING,MULTICAST> mtu 1500 inet 192.168.56.1 netmask 255.255.255.0 broadcast 192.168.56.255 inet6 fe80::800:27ff:fe00:0 prefixlen 64 scopeid 0x20<link> ether 0a:00:27:00:00:00 txqueuelen 1000 (Ethernet) RX packets 0 bytes 0 (0.0 B) RX errors 0 dropped 0 overruns 0 frame 0 TX packets 678 bytes 51442 (51.4 KB) TX errors 0 dropped 0 overruns 0 carrier 0 collisions 0 wlp0s20f3: flags=4163<UP,BROADCAST,RUNNING,MULTICAST> mtu 1500 inet 10.1.70.158 netmask 255.255.240.0 broadcast 10.1.79.255 inet6 fe80::9708:9f80:20b5:4777 prefixlen 64 scopeid 0x20<link> ether 8c:8d:28:c5:a2:2e txqueuelen 1000 (Ethernet) RX packets 1103516 bytes 1061399166 (1.0 GB) RX errors 0 dropped 0 overruns 0 frame 0 TX packets 320242 bytes 110222925 (110.2 MB) TX errors 0 dropped 0 overruns 0 carrier 0 collisions 0
Как установить статический IP
Чтобы подлкючиться к другому компьютеру через Ethernet нужно в Windows выставить параметры адаптера через контольную панель. То же самое нужно было сделать и в Linux.
Для этого нужно выполнить команду
sudo vi /etc/network/interfaces
И добавить туда
auto enp3s0 iface enp3s0 inet static address 192.0.2.131 netmask 255.255.255.0 dns-nameservers 8.8.8.8,8.8.4.4 auto wlp1s0 iface wlp1s0 inet dhcp
Обратите внимание, что gateway не указан.
И перезапустить сеть
sudo service networking restart
Второй вариант проще запомнить, но, чтобы он заработал нужно наличие service
Теперь если у Вас установлен SSH можно зайти на компьютер с Linux по ssh с помощью Putty или MobaXterm
Если нужно установить SSH выполните
sudo apt install openssh-server
sudo apt-get install openssh-client
Включить / Выключить сетевой интерфейс
ВКЛЮЧИТЬ интерфейс enp0s25:
ip link set dev enp0s25 up
ВЫКЛЮЧИТЬ интерфейс enp0s25:
ip link set dev enp0s25 down
Изменить Gateway
Удаление старого gateway
route delete default
Добавление нового gateway
route add default gw IP_Address
Если старых gateway много, то нужно указать какой конкретно IP с какого интерфейса удалить
route delete default gw 10.0.0.1 eth0
Для создания тоже можно указать конкретные данные
route add default gw 192.168.0.1 eth0
Изменить netmask
Что такое netmask или маска подсети вы можете узнать в статье «Компьютерные сети»
Узнать свою маску
default via 10.6.0.1 dev eth0
10.6.0.0/8 dev eth0 src 10.6.1.68
ip address del 10.6.1.100/8 dev eth0
ip address add 10.6.1.68/22 dev eth0
Прослушиваемые порты
Утилита lsof позволяет посмотреть все открытые в системе соединения.
Чтобы изучить именно сетевые соединения воспользуйтесь опцией i
Чтобы отображались именно порты, а не названия сетевых служб примените опцию P
На вопрос как посмотреть список открытых портов также может ответить утилита ss
Если нужно проверить используется ли определённый порт, например 5000
ss -na | grep :5000
Если вывод пуст, значит порт не используется
Чтобы узнать какая программа слушает определённый порт нужно предварительно установить один из инструментов:
netstat, fuser или lsof
Начнём с netstat
Netstat
sudo apt install net-tools
С помощью команды netstat можно посмотреть список активных соединений по сети
Обычно netstat используют с набором опций tulpn который и позволяет понять какая программа слушает какой порт.
(Not all processes could be identified, non-owned process info will not be shown, you would have to be root to see it all.) Active Internet connections (only servers) Proto Recv-Q Send-Q Local Address Foreign Address State PID/Program name tcp 0 0 0.0.0.0:22 0.0.0.0:* LISTEN — tcp 0 0 127.0.0.1:631 0.0.0.0:* LISTEN — tcp 0 0 127.0.0.1:6010 0.0.0.0:* LISTEN — tcp 0 0 127.0.0.1:6011 0.0.0.0:* LISTEN — tcp6 0 0 . 22 . * LISTEN — tcp6 0 0 ::1:631 . * LISTEN — tcp6 0 0 ::1:6010 . * LISTEN — tcp6 0 0 ::1:6011 . * LISTEN — tcp6 0 0 . 80 . * LISTEN — udp 0 0 0.0.0.0:52756 0.0.0.0:* — udp 0 0 0.0.0.0:68 0.0.0.0:* — udp 0 0 0.0.0.0:631 0.0.0.0:* — udp 0 0 0.0.0.0:5353 0.0.0.0:* — udp6 0 0 . 45815 . * — udp6 0 0 . 5353 . * —

Настройка сети с помощью ifconfig
Получить информацию об имеющихся интерфейсах на старых версиях Debian можно с помощью команды
Изучите вывод этой команды и посмотрите какой интерфейс Вам доступен. Обычно это eth0. , если нужно получать ip автоматически
iface eth0 inet dhcp
Если нужно задать статический ip
iface eth0 inet static
address 192.168.1.1
netmask 255.255.255.0
Чтобы изменения пришли в силу нужно выполнить
ifconfig wlan0 down
ifconfig eth0 up/down
Перезапустить/остановить/запустить сетевые службы
Настроить DNS можно через файл /etc/resolv.conf
При установке нужно было запомнить какие сетевые интерфейсы вам предлагает сконфигурировать Debian.
В старых версиях Dbian это было просто, они назывались eth0, eth1 и так далее.
Поэтому для включения сетевого интерфейса, в приведённой выше команде нужно менять 0 на 1 и т.д.
В новых версиях Debian и в других Unix-подобных дистрибутивах, например OpenBSD сетевые интерфейсы называются более разнообразно (msk0, sk0 и др.)
Для того, чтобы с этим не возникало сложностей — полезно записывать то, что предлагается сконфигурировать при установке дистрибутива.
Включить автоматическое получение ip
Выключить автоматическое получение ip можно вытащив сетевой шнур и вставив обратно. Говорят, что должно сброситься.
и изучить вывод.
iftop
Мониторить объём входящего и исходящего траффика на определённом интерфейсе можно командой