Setting up Burpsuite for HTTPS on Kali linux 2019.01
How to install a Burp SSL certification to chrome.
I have done this more than 5 times but still I forget so took this memo.
Solution
1. SSL Error
Without any settings, if we use Burp with https, browser shows this certification error. 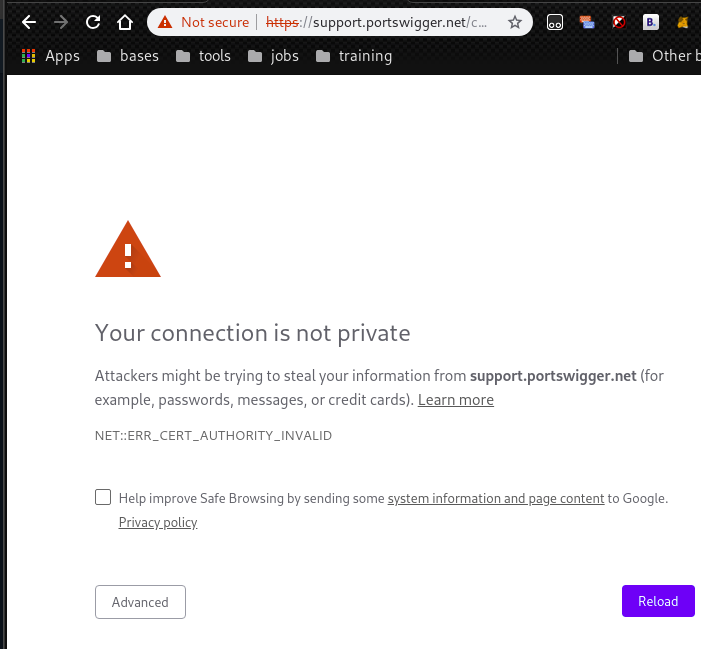
2. Download SSL cert
By accessing the Burp page on localhost, we can download the certificate “cacert.der”.
We have to click on the button “CA Certificate”. 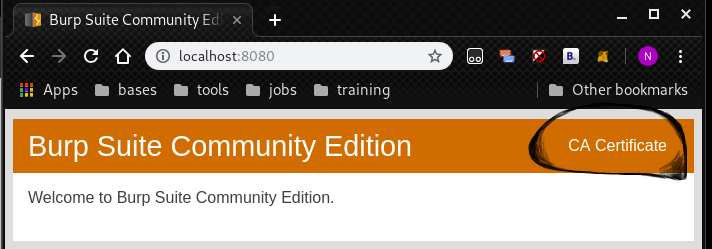
3. Register the cert on google chrome
Go to settings and click “Advanced”. There is a menu “Manage certificates”. 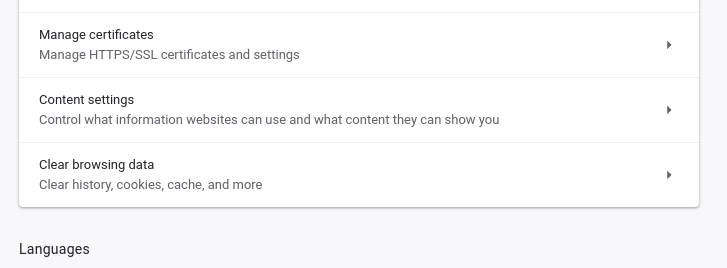
Click “Authorities”, then “Import”.
After selected “cacert.der” downloaded, it shows some options. 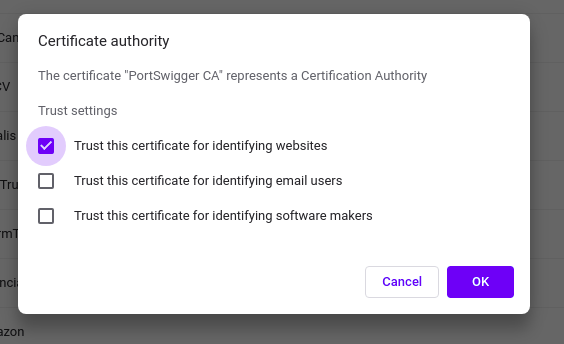
Only choosing the first one “Trust this certificate for identifying websites” is enough.
4. Restart
Then, restart the chrome and it would be fine.
5. If still had a same error?
In this case, we can confirm the validity of certification on “Manage certificates”.
Click on “org-PortSwigger” and that certificate would be “untrusted”. 
HackWare.ru
Этичный хакинг и тестирование на проникновение, информационная безопасность
Установка и запуск Burp Suite
Что такое и для чего используется Burp Suite
Burp Suite – это интегрированная платформа для выполнения тестирования безопасности веб-приложений. Это не инструмент «навёл и нажал», он предназначен для использования тестерами в ручном режиме для поддержки процесса тестирования. Приложив немного усилий, любой сможет начать использовать ключевые функции Burp для тестирования безопасности их приложений. Некоторые продвинутые возможности Burp потребуют дальнейшего изучения и опыт освоения. Все эти инвестиции в освоение стоят затраченного времени – управляемый пользователем рабочий процесс Burp намного эффективнее для выполнения тестирования веб-безопасности и даст вам гораздо больше возможностей чем любой условный «навёл и кликнул» сканер. Burp является интуитивным и дружественным к пользователю и лучшим способом начать с ним знакомство является действие.
Существуют две редакции: Burp Suite Free Edition и Burp Suite Professional. Как следует из названия, Burp Suite Free Edition является бесплатной. Она позволяет в полной мере анализировать передаваемый трафик и выполнять ручные проверки уязвимостей. В профессиональной версии встроен автоматизированный сканер уязвимостей и дополнительные возможности. Для целей обучения достаточно бесплатной версии.
Burp Suite – это приложение, написанное на Java. Для его работы требуется виртуальная машина Java.
Для запуска Burp начнём с проверки, установлена ли Java:
- Откройте приглашение командной строки:
- На Windows нажмите Win+x, там выберите «Командная строка»
- На Mac OS X в системном доке кликните на Приложения, затем Утилиты, затем Terminal.app.
- На Linux поищите среди своих приложений то, которое называется "консоль" или "терминал".
- В окне командной строки наберите: java -version
- Если Java установлена, то вы увидите сообщение вроде java version "1.8.0_121". Для запуска Burp вам нужна версия Java 1.6 или более поздняя.
- Если Java не установлена, загрузите последнюю Java Runtime Environment (JRE), запустите установщик, после окончания откройте терминал и попробуйте снова.

Скачать Burp Suite
Для загрузки программы перейдите на официальный сайт. Выберите файл, соответствующий вашей ОС. Файл JAR является универсальным и может быть запущен на любой операционной системе с Java.
В некоторых операционных системах, например, Kali Linux и BlackArch, Burp Suite уже предустановлен. Вы можете открыть программу через меню или набрав в окне терминала:
Запуск Burp Suite
Файл .jar можно использовать в качестве портативной версии без необходимости устанавливать программу. На некоторых платформах с установленной Java вы можете запустить Burp двойным кликом по JAR файлу Burp. Тем не менее, предпочтительным является запуск Burp из командной строки, поскольку это даёт вам больше контроля за его выполнением, в частности количеством памяти, которое ваш компьютер назначает Burp. Чтобы это сделать в командной строке наберите что-то вроде:
где 1024 это количество памяти (в Mb), которое вы хотите назначить Burp, и /путь/до/burp.jar это расположение файла Burp JAR на вашем компьютере.
Мой файл под названием burpsuite_free_v1.7.21.jar расположен в папке C:\Users\Alex\Downloads\, тогда моя команда запуска такая:
Если всё работает, вы увидите экран заставки и затем должно появиться главное окно мастера:
Burp Suite Guide
Burp Suite is a graphical (GUI) application that is primarily used for testing web applications. Burp Suite is also written and abbreviated as “Burp” or “BurpSuite” and is developed by PortSwigger Security.

What is burp suite?
Burp Suite consists of multiple applications such as a scanner, proxy, spider etc.
But Burp Suite also comes in 2 variants, namely a free (community) and a paid (professional) variant. The community edition of Burp Suite only has the basic functionalities compared to the professional edition. In this post we deal with the community version which is already installed by default in Kali Linux.
The community edition is especially interesting for mapping the web application. You can use the following Burp tools in the community edition, among others:
- Advanced application-aware crawler
- Detailed scope-based configuration so that you can work accurately and precisely
- Custom “not-found” web responses detective with which false positives can be prevented
- Tree-based display in which all found content is displayed.
- Burp Suite (Man-in-the-middle) proxy that allows you to intercept all browsing traffic
- A number of “manual” test tools such as the http message editor, session token analysis, sitemap compare tool and much more.
- BApp Store where you can find ready-made Burp Suite extensions developed by the Burp Suite community
- Burp Suit API so that Burp Suite can work together with other tools
The professional version of Burp Suite costs around 330 euros per year, but you will get a lot of extras for that, such as:
- Automatically crawl and scan over 100 common web vulnerabilities
- Support for various attack insertion points with requests such as parameters, cookies, headers etc.
- Advanced manual scan options
- Advanced scan logic and processing such as analysis of static code, out-of-band techniques, IAST and support of the newest techniques such as JSON, REST, AJAX etc.
- Vulnerabilities sitemap, vulnerability advise etc.
- Burp Intruder for the automation of custom attacks that increase the speed and effectiveness of manual tests such as placing payloads, applying “fuzzing”, using internal word lists, etc.
- Even more “manual testing” tools
- The ability to create HTML reports or to export found vulnerabilities to XML
The biggest difference between the community and professional edition is that the professional edition of Burp Suite gives the user more access to perform automatic testing. The community edition lacks a lot of functionality and focuses primarily on “manual” tests. As far as I’m concerned, the community version is therefore more a demo for the professional version. But yes, everyone has to earn money right?
Comment by stackcrash:Just one thing to point out. The biggest difference between community and pro isn’t the automated scanning it’s the extensions. Only pro will allow extensions to creat custom issues which is how quite a few of the quality extensions work. The automated scanning is nice but from a bug bounty perspective it’s not really used.
Below I describe the Burp Suite tools with which the community version is (sometimes partially) equipped. The professional edition is also equipped with the Burp Intruder which makes it possible to automatically attack web applications and the Burp Scanner which can automatically scan for common web application vulnerabilities. Also take into account that the professional variant has the option to save and restore projects, search within projects, can plan tasks and receive periodic updates.
But enough about all the extras of the professional version. Now we continue with the community version. These are all Burp Suite components that you have access to in this community edition:
- Burp Proxy The Burp Proxy allows you to start a proxy server through which all traffic between points A and B goes through the proxy and can therefore be analyzed in detail. Burp Suite makes it possible to modify a received message before it is forwarded again.
- Burp Spider The Burp Spider crawls the website and maps each page and each sub-component. The spider is often used as an addition to the manual mapping process.
- Burp Repeater The Burp Repeater makes it possible to perform stress tests. Web applications can be sensitive to stress tests. It may be that during large applications they have to process so much that they are compromised or that the security is compromised, so that during a stress test you enter the web application via a method that is normally captured.
- Burp Sequencer The Burp Sequencer is a tool for analyzing the quality of randomness in a sample of data. It can be used to test session tokens or other important data items that should actually be “unpredictable.” Think of anti-CSRF tokens, password recovery tokens, etc.
- Burp Decoder The Burp Decoder is a tool for transforming encrypted data (in its canonical form), or for transforming raw data into various encrypted and hashed forms. The Burp Decoder is able to intelligently recognize different coding formats with the help of heuristic techniques.
- Burp Comparer The Burp Comparer is a tool to compare 2 types of data.
A nice thing about Burp Suite is the integration of all tools. All Burp tools work together seamlessly. This way you can send data from one tool to another to use it again. In addition, the functionality can be considerably expanded through the BApp Store extensions and the Burp API.
Due to the many functionalities of Burp Suite it is not an easy tool. If you know exactly what you are doing like experienced WebApp testers, then Burp Suite is a breeze. If you are just starting out, it is important to empathize and to view and test options at every step. There is also a lot of information on the Burp Suite website which I recommend to read.
As already mentioned, Burp Suite (community edition) is present by default within Kali Linux. However, Burp Suite is also available as a Windows (x64) binary or as a JAR file.
Burp Suite is written in Java and therefore very easy to install. Make sure Java is installed (“java version” command in the Windows command prompt) and double-click the JAR file. You can also call up the JAR file via the command line, which has several advantages. You have more control over the execution of the application via the command line. For example, you can specify how much memory you want to allocate to running Burp Suite. To allocate 2GB you use for example -mx flag.
where 2 is the amount of memory (in Gb) that you want to assign to Burp, and /path/to/burp.jar is the location of the Burp JAR file on your computer.
On Windows and OSX you can also use the EXE that is created. On Linux there is no EXE and you must first execute a .sh file to create .exe:
Now you can always easily start Burp Suite. by typing burpsuite in your terminal
Burpsuite interface
When you start Burp Suite for the first time you must of course agree to a legal disclaimer / license agreement. If there are updates, Burp Suite will report this. It is advisable to always work with the most recent version. Updating a new Burp Suite version is identical to a new installation. The application does not update itself.

When starting Burp Suite you will be asked if you want to save the project or not. If you choose a “Temporary Project” then all data will be stored in memory. This data is gone as soon as Burp Suite is closed. You can also create a project to save all data and of course you can also choose to open an existing project. Note: the community version only gives you the option to create a temporary project. So you cannot save any data on the disk here.

You can then load a configuration file or start BurpSuite with the default configuration.

When all this is done, Burp Suite starts. The interface looks like this:

We can roughly divide the interface into 7 parts, namely:

- The main menu The main menu gives you access to the Burp Suite options. So here you can configure the layout of Burp Suite and you can set how Burp Suite should work.
- The toolbar The toolbar gives you quick access to all Burp Suite tools such as the Proxy, Spider and Repeater. You also have access to all “professional” tools, but these will not work or only partially work. There are also tabs for the “target” where the most results are shown, for options, project options and for alerts. You have quick access to most tools via the toolbar.
- Workplace switcher The workplace switcher is not present on all tabs, but it does apply to many tools and overviews. The workplace switcher ensures that the main screen (main window) where all results can be seen is switched to another view. The workplace switcher will often help you switch between various tool-specific settings.
- Tree-based sitemap Within the target tool, site map section, the left column is the “sitemap” which is represented as a tree structure. You navigate through all found assets via this column.
- Detail window The detail window shows more information and possibilities about the assets that are selected in the left sitemap.
- Response / Request switcher This switcher is only present on the “target” tab, but there are other tabs with similar switchers. These switchers give you the option to switch parts of the main window to another view. This switcher therefore switches between the details of the request (request) and the feedback (response) of the asset selected in the “detail window”.
- Response / Request details This view provides insight into the details of the requests (requests) and feedbacks (responses).
Burpsuite Settings
As already mentioned, each tab (every tool) has its own layout and settings. Before we start working with Burp Suite, it is good to already set a number of settings correctly and save them as a configuration file so that these settings can be read in according to a project. The configuration file prevents us from having to re-optimize all settings every time.
I would already set the following settings correctly: First, let’s take a look at the display settings. These settings determine what the results will look like on the screen. The display settings can be found under the “User Options” tab and then the “Display” tab. Here we can adjust the font type and size of the letters.
I can also adjust this for the “HTTP Message” displays. Then we can set which character sets should be used and whether HTML rendering (so that HTML is reconstructed) should be on. I usually don’t change much here. These are my settings:

Next, under “Project Options” – “Sessions”, how Burp Suite updates the so-called “Cookie Jar” is set. By default, the Cookie Jar is updated by monitoring the Proxy and Spider tool. I always like to add the “Scanner” tool to this:

Next we find the “logging” options under the “Misc” tab. I always switch this on for the Proxy (depending on the project sometimes for more or for all tools):

To begin with, this is all. The other options are fine for me and so we are now “good-to-go”.
Do you want to make more options yourself and save them in a configuration file. You can save this configuration file and read it back later via the main menu – Burp – User Options / Project Options – Save User / Project Options.

How to use burp suite
Then everything comes down to using the tool. Burp Suite can be used for countless tests and many types of “attacks”. It is essential to know what you are doing and what a certain attack is and what options you can set and use for this.
Burp Suite Example
In this example we will use the Burp Suite Proxy. The proxy listener is already started when you start Burp Suite. The proxy listens by default on port 8080. The IP address of the Burp Suite proxy is 192.168.178.170. Now let’s first set the browser (Google Chrome) of the host to use the proxy. Go to options – System – Open proxy settings. Google Chome uses the Internet Explorer settings. Now click on LAN Settings and enter the proxy server:

However, the proxy only listens to its local address (127.0.0.1) but must also listen at 192.168.178.170. To set this up, we add a Proxy Listener via the Proxy – Options tab to listen to the correct interface:

The proxy is now active and functions for HTTP requests. Let’s make sure it also works for HTTPS requests.
To do this we navigate on the host to the Burp Suite host http://192.168.178.170:8080 where we can download the certificate:

If we have downloaded the certificate (this can also be done in Burp Suite via the Proxy options – Import / Export CA certificate) then we can read it. We read this at the “Trusted Root CA” store or in Dutch, the “Trusted Basic Certification Authorities”.

After the certificate has been imported, we can also access great HTTPS sites without any nasty notifications via the Burp Suite proxy.
You may need additional steps to make all browsers work immediately. In Firefox the certificate will have to be imported into the certificate manager of Firefox because it does not work together with the Windows CA store.
Note: if it does not work, check if “Intercept” is off. If this setting is still on, you can edit any action before you send it again. The browser then pauses because it is waiting for an action. If you are not going to take this action, keep a white browser screen that will continue to load.

Now that the proxy is working, we can start hacking a login authentication form. We hack this authentication form by firing a number of payloads.
We try this in my test environment where we try to exploit a WordPress authentication form.
First let’s open the WordPress backend and then enable the “Intercept” option under the Burp Suite proxy settings so that we can see and modify any request.

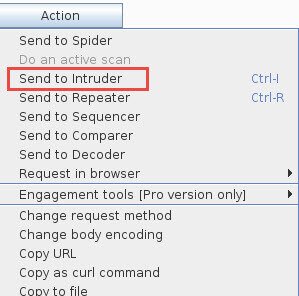
If we look closely we can see the login request. Now that we have the login request, we send it from Intercept to the Burp Intruder.
The Burp Intruder will retrieve the IP address and port number from the Intercept data. If Burp Intruder has collected the data error you can always adjust it.

On the “Positions” tab we will select fields that we need for cracking. Burp Intruder will make a proposal itself, but since we want to determine the positions ourselves, we use the “clear” button and select the username and password.

An important next step is to select the right attack type. We can choose the following types of attack types:
- Sniper – A single set of payloads where every payload is applied to every position.
- Cluster Bomb – Multiple payload sets. Different payload sets can be configured for each position.
- Pitch Fork – Multiple payload sets where different payload sets can be configured per position. Burp Suite will run through every payload set at the same time.
- Battering Ram – A single set of payloads that is performed at any position.
We opt for the convenience of the “cluster bomb” and then select the username and password field (with the “Add” button).

Now we have to select a payload set for each position (“Payloads” tab). We have 2 positions and therefore have to make 2 payloads sets. With payload set number 1, let’s add a word list (simple list) containing frequently used user names such as: admin, administrator, administrator, guest, guest, temp, sysadmin, sys, root, login and logon.

With the 2nd payload set we select a list of passwords. You can choose a default password list here or you can compile one yourself. The Kali glossary can be found in “/usr/share/wordlist/rockyou.txt”.

As you can see in the image above, 157,788,312 combinations will be tried. This entire process will therefore take a long time. For this post I have only used 9 passwords which results in 99 possibilities.
Finally we go to the “options” tab where we must check that under “Attack Results” the options “store requests” and “store responses” are checked so that we can compare the statuses of the different login attempts.

We are ready to carry out the attack. In the main menu we go to “intruder” and choose “Start attack”.

When the attack is complete we can compare the results. We must keep a close eye on 1 column, namely the “Length” column. All errors will return the same message and therefore they are all the same size. The “succesfull login” return message will contain different content and therefore have a different format. The image below shows that the combination “sysadmin” with the password “hello” was the correct combination.

CONCLUSION
Hopefully I could show you in this post that Burp Suite is a very powerful application for testing web applications. In this post we showed the edge of the iceberg, but the possibilities with Burp Suite are countless. It is not for nothing that Burp Suite is one of the most used applications for testing WebApp security. The only drawback is that the full potential of the application only really comes into its own in the professional version and that version is pretty expensive every year and in fact only sufficient for the security tester who regularly tests web app security.
Later we will certainly look at other functionalities of Burp Suite. For now I hope you have found this post interesting enough to give me a like or to share this post. I like writing but I like it a lot more if you also show that you like my posts.
Comments
Great ? I should definitely pronounce, impressed with your
web site. I had no trouble navigating through all the tabs as well
as related info ended up being truly easy to do to access.
I recently found what I hoped for before you know it in the least.
Reasonably unusual. Is likely to appreciate it for those who add forums or
something, site theme . a tones way for your client to communicate.
Aw, this was an incredibly nice post. Taking
a few minutes and actual effort to make a great article…
but what can I say… I put things off a whole lot and never manage to
get nearly anything done.
Use Burp Suite Proxy to Intercept Network Traffic [Step-by-Step]
This tutorial covers step by step instructions to configure Burp Suite in Kali Linux. Additionally we will also intercept client-side request using Burp Suite.
Manual Testing is largely dependent on two factors: the skills of the tester and the tool used for testing. A tool like Burp Suite significantly aids in fulfilling the needs of manual testing from a tooling perspective. It provides a powerful and flexible platform where the tester can efficiently find and exploit potential vulnerabilities
Burp Suite has undoubtedly become a tool of choice for web application security testing. Also it has evolved in a way that it can now be used to find vulnerabilities in API’s and Mobile Apps as well.
Burp Proxy intercepts and modifies GET and POST requests from the browser (client-side) and Web Server (Server Side). We will use a proxy called Burp Proxy, which is part of a popular penetration testing tool kit.
Pre-requisites
This article assume that you have following environment and tools already installed
Lab Environment
I have brought up two virtual machines required to setup a proper hacking lab. One of these VMs have Kali Linux installed while the other one is with Metasploitable. We will use the metasploitable web address to demonstrate the usage of burp suite prozy to intercept the network traffic.
Kali Linux has IP Address: 192.168.0.188
Metasploitable has IP Address: 192.168.0.160
Steps to Intercept Client-Side Request using Burp Suite Proxy
Step 1: Open Burp suite
Burp suite is installed by default with Kali Linux so you need not install it manually. Search for burpsuite as shown below and open the toolbar:
![Use Burp Suite Proxy to Intercept Network Traffic [Step-by-Step]](https://www.golinuxcloud.com/wp-content/uploads/burp-1.jpg)
You can find Burp here on the left, in the dark or under the applications menu. Once you start it, you will ask if you want to run a temporary project or run from an existing one. Initiate the Temporary project.
![Use Burp Suite Proxy to Intercept Network Traffic [Step-by-Step]](https://www.golinuxcloud.com/wp-content/uploads/burp-2.jpg)
If you’re using the custom image, you’ll see it will load by default with this configuration file. We’re going to keep it the same. Click on Start Burp, and you’re going to get the default window of Burp
![Use Burp Suite Proxy to Intercept Network Traffic [Step-by-Step]](https://www.golinuxcloud.com/wp-content/uploads/burp-3.jpg)
As you can see, this is an extensive tool kit that can use to do several things, but what we’re interested in, in this tutorial is the burp suite proxy part of it to intercept the network traffic. Here you can see that the interceptor is on, meaning all the requests sent to this Proxy will be intercepted and, therefore, will be able to analyze them and modify them if we want to.
![Use Burp Suite Proxy to Intercept Network Traffic [Step-by-Step]](https://www.golinuxcloud.com/wp-content/uploads/burp-4-1.jpg)
Now we’re going to click on Open Browser to open the built-in browser that comes with burb, and you’ll notice that this is simply a standard Web browser that you can use to load any website.
But when the interceptor is on, you’ll see that it will intercept any request that this browser sends by burp before being forwarded to the actual destination.
Step 2: Export Certificate from Burp Suite Proxy
Open the Options bar and click Import/Export CA Certificates,
![Use Burp Suite Proxy to Intercept Network Traffic [Step-by-Step]](https://www.golinuxcloud.com/wp-content/uploads/burp-5.jpg)
Select Certificate in DER format under Export and click on Next
![Use Burp Suite Proxy to Intercept Network Traffic [Step-by-Step]](https://www.golinuxcloud.com/wp-content/uploads/burp-10.jpg)
Select a path to save the certificate and give a name to the certificate. I will use cert and save it in the Desktop.
![Use Burp Suite Proxy to Intercept Network Traffic [Step-by-Step]](https://www.golinuxcloud.com/wp-content/uploads/burp-11.jpg)
Click on Close once the certificate is successfully exported.
![Use Burp Suite Proxy to Intercept Network Traffic [Step-by-Step]](https://www.golinuxcloud.com/wp-content/uploads/burp-12.jpg)
Step 3: Import Certificates to Firefox Browser
Open Firefox Browser and Select the MENU icon and select Preferences Select Privacy and Security. Next click on Security and scroll down to manage Certificates and choose View Certificates.
![Use Burp Suite Proxy to Intercept Network Traffic [Step-by-Step]](https://www.golinuxcloud.com/wp-content/uploads/burp-13.jpg)
![Use Burp Suite Proxy to Intercept Network Traffic [Step-by-Step]](https://www.golinuxcloud.com/wp-content/uploads/burp-14.jpg)
Import PortSwinger Certificate which we had exported in the previous step. Once successfully imported, search for the certificate and once found you can click OK to close the toolbar.
Step 4: Configure Foxyproxy addon for firefox browser
Download Firefox proxy extension https://addons.mozilla.org/en-US/firefox/addon/foxyproxy-standard/. Next click on Add to add the addon to the firefox browser:
![Use Burp Suite Proxy to Intercept Network Traffic [Step-by-Step]](https://www.golinuxcloud.com/wp-content/uploads/burp-15.jpg)
Next configure the proxy inside the add-on. Select the add-on and click on Options as shown below:
![Use Burp Suite Proxy to Intercept Network Traffic [Step-by-Step]](https://www.golinuxcloud.com/wp-content/uploads/burp-16.jpg)
Click on Add to add a new proxy and fill out the details as shown below:
![Use Burp Suite Proxy to Intercept Network Traffic [Step-by-Step]](https://www.golinuxcloud.com/wp-content/uploads/burp-17.jpg)
Step 5: Configure Network Settings of Firefox Browser
Next let’s configure proxy in the firefox browser. From the Settings Options, Select General Settings. Scroll Down to Network Settings and Double click settings.
![Use Burp Suite Proxy to Intercept Network Traffic [Step-by-Step]](https://www.golinuxcloud.com/wp-content/uploads/burp-18.jpg)
Set the proxy configuration to manual proxy configuration. Set the Host address to Burps Proxy address.
![Use Burp Suite Proxy to Intercept Network Traffic [Step-by-Step]](https://www.golinuxcloud.com/wp-content/uploads/burp-19.jpg)
Step 6: Launch DVWA website from Metasploitable
We had set up a Metasploitable machine earlier. Power on that VM (if not done already), and now we will access the Metsploitable GUI using the IP of that VM i.e. 192.168.0.160 on our Kali Linux VM using Firefox browser.
First, we’re going to turn off the interceptor, and now this browser will work as a regular Web browser.
Open Metasploitable web server GUI by typing the IP address of the machine. So let’s go to our target, which is 192.168.0.160 . Select DVWA site, which redirects you to the login page.
![Use Burp Suite Proxy to Intercept Network Traffic [Step-by-Step]](https://www.golinuxcloud.com/wp-content/uploads/meta-8.jpg)
Select DVWA which will take you to the DVWA board. The default login credential is admin: password.
![Use Burp Suite Proxy to Intercept Network Traffic [Step-by-Step]](https://www.golinuxcloud.com/wp-content/uploads/burp-20.jpg)
Once you have logged in, And now, if I turn on the interceptor on Burp Suite proxy and click on any link on this DVWA page, for example, let’s click on the File inclusion, you’ll notice that the website will continue loading, but nothing will load. The reason for this is that Burp intercepted the request.
On the Burp Suite proxy section under Intercept you can see the browser request getting displayed. So here you can view and edit the request.
![Use Burp Suite Proxy to Intercept Network Traffic [Step-by-Step]](https://www.golinuxcloud.com/wp-content/uploads/burp-21.jpg)
Step 7: Intercepting GET and POST requests
What happens when I click on a link in here, and we can see that the website is, first of all, trying to send a post request to this particular path, and we can see the content of this request.
So we can see the headers. We can see that this is going into Google. We can see the contents of it.
And if we click on Forward, we will forward this to its destination, and then we see the following request sent.
![Use Burp Suite Proxy to Intercept Network Traffic [Step-by-Step]](https://www.golinuxcloud.com/wp-content/uploads/5-GET.PNG.png)
So we can see we have another GET request. This time, the request goes to this particular domain, which is the path it’s being sent to.
Again, if we click on Forward, Burp will forward this, and now we have another request. This time it’s a GET request, and this one is sent to our target domain.
![Use Burp Suite Proxy to Intercept Network Traffic [Step-by-Step]](https://www.golinuxcloud.com/wp-content/uploads/6-RAW.PNG.png)
So it’s the same domain as we have here. And this time, it’s asking for this particular path. It’s given a parameter called page, and the value sent is included.
You can also see the rest of the values that are sent. And all of this is simply a text box.
So you can modify any part here. Click on forward, and Burp will send this request with the modifications that we made here.
Step 8: Modifying GET and POST requests
So anyway, I’m keeping this the same, and the next thing that I want to show you is the inspector in here on the right. If I click on that to expand it, you can see that all of the values sent here are categorized here in excellent categories.
So if we click on the Query parameter, we can see the page parameter. We can see it here, and its value is included.
And if we double click on this again, we’ll get text boxes where we can modify any of these parameters and values as we wish.
Click on Apply changes and forwarded.
Whatever modifications we make to this request will be forwarded to the Web server. Burp suite proxy allows us to, first of all, bypass client-side checks and security implementations.
![Use Burp Suite Proxy to Intercept Network Traffic [Step-by-Step]](https://www.golinuxcloud.com/wp-content/uploads/burp-22.jpg)
And it also allows us to see what is being sent us post requests and other types of parameters sent to the Web server without being displayed here in the URL box.
We should test all of these parameters for all vulnerabilities, and it expands our attack surface.
So anyway, as you can see, this page still has imploded while I click because I clicked on file inclusion, and I still haven’t got that because I haven’t forwarded this request yet.
So, again, we’re going to click on forward and keep clicking on forward to forward everything.
And once we do that, as you can see, we finally got the page we requested, which is file inclusion.
So the whole idea and the whole point of using this Proxy is to intercept all of the requests that the page will send to the Web server to see these requests, modify them and hopefully use them to discover vulnerabilities.
Step 9: File Inclusion Vulnerability
Lt’s try to upload a file and intercept it using Burp Suite proxy. We will click on Upload on the DVWA page and select an image to upload. Browse and select your image.
![Use Burp Suite Proxy to Intercept Network Traffic [Step-by-Step]](https://www.golinuxcloud.com/wp-content/uploads/burp-23.jpg)
Next turn on the interceptor on the Burp Suite proxy section and click on upload. You’ll see that we’re going to get stuck because the request is being intercepted in here with burb. We can see this time it is a post request.
Therefore, we don’t see anything here in the URL bar, and we can see that this is being sent to this path here i.e. POST /dvwa/vulnerabilities/upload/ HTTP/1.1 , DVWA vulnerability’s upload.
And if we scroll down, we can see the file name right here.
![Use Burp Suite Proxy to Intercept Network Traffic [Step-by-Step]](https://www.golinuxcloud.com/wp-content/uploads/burp-24.jpg)
We can see the content type, and we can see the actual content of the image. A display of the actual binary content of the image itself is shown.
So again, you can modify this binary content. You can change the content type and picture name. And we can also see the post parameters that are being sent in here under the body parameters.
As mentioned, nothing is displayed in the URL because a post request is sent. Nothing is said to request. But clicking on the budget parameters here, we’re going to see the maximum file size allowed, the content of the image and another parameter called uploading.
We can also see the requested cookies here, and we can see the request headers. All of it can be modified by double click on it and then forward the request.
![Use Burp Suite Proxy to Intercept Network Traffic [Step-by-Step]](https://www.golinuxcloud.com/wp-content/uploads/burp-25.jpg)
So, again, if we click on forward and forward, the rest of the requests, you will see that the picture will get uploaded successfully, and there are no more requests sent to the Web server.
Summary
Burp works hand in hand with another browser to intercept Network traffic. The following setup can be implemented;
- Burp’s embedded browser. Select the Proxy/ Intercept option and click Open Browser. The browser session is opened, and with this setup, there is no need to install the Burp CA certificate.
- Use an external browser. This option requires you to install Port Swinger Certificates as shown above to tunnel all traffic through Burp.
Didn’t find what you were looking for? Perform a quick search across GoLinuxCloud
If my articles on GoLinuxCloud has helped you, kindly consider buying me a coffee as a token of appreciation.

For any other feedbacks or questions you can either use the comments section or contact me form.