Как сделать общую сетевую папку в Linux (настройка SMB в Linux)
Начните с установки пакетов samba и smbclient.
В Debian, Linux Mint, Ubuntu, Kali Linux и их производных для установки samba выполните команду:
В Arch Linux, BlackArch и их производных выполните команду:
Следующая команда не сработает, если отсутствует файл /etc/samba/smb.conf. Если у вас тоже нет этого файла, то создаёте его заглушку — к настройке самого файла smb.conf мы вернёмся позже:
Теперь нужно добавить пароль для пользователя Samba. Действует следующее правило: имя пользователя должно быть таким же, как у вашего текущего пользователя, а пароль можно установить иной, отличный от вашего системного пароля.
Для установки пароля Samba, выполните следующую команду:
Если вы хотите, чтобы у пользователя не было пароля, то укажите опцию -n.
Создайте папку, которая станет совместно используемой:
Узнаем абсолютный путь до папки
Откройте для редактирования файл /etc/samba/smb.conf:
Добавьте туда строки вида:
Обратите внимание, что все пробелы в строках выше являются обязательными.
Для моих данных это строки:
Теперь запустим службу SMB:
Для добавления службы в автозагрузку выполните:
Для подключения к этой общей сетевой папке на Linux нужно использовать IP адреса компьютера Linux.
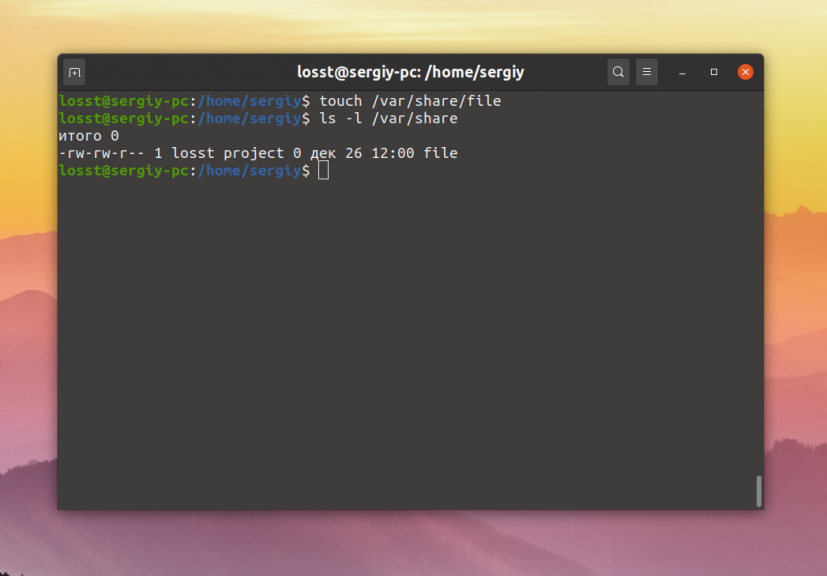
Создадим файл, чтобы сетевая папка не была пустой:
Посмотрите локальный IP адрес компьютера, на котором запущена Linux:
У меня этим IP является 192.168.0.89, а папку, как мы помним, я создал с именем linuxshare, тогда в Windows я перехожу в проводнике во вкладку «Сеть» и подключаюсь к этой папке следующим образом:
Вводим учётные данные (которые мы установили командой smbpasswd):
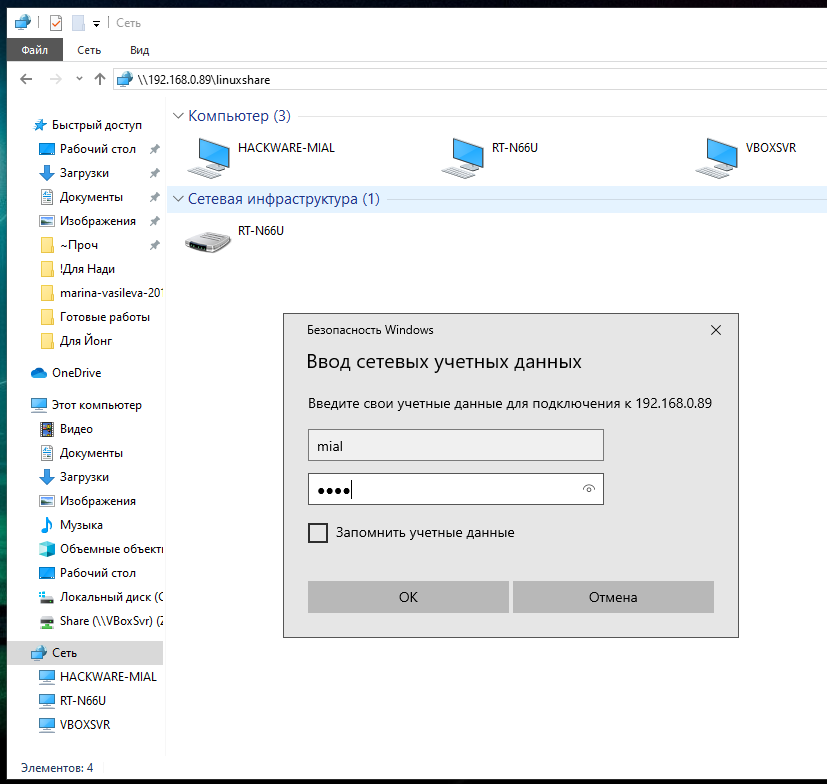
Видим содержимое совместно используемой папки, размещённой на Linux с помощью SMB:

Для подключения к сетевой папке из консоли Linux, запустите команду вида:
Общие папки Linux
Если вы администрируете какой-либо сервер, у вас может возникнуть необходимость создать общую папку, к которой будут иметь доступ все пользователи на сервере. Например, необходимо, чтобы они имели возможность создавать в ней файлы и все эти файлы были доступны всем пользователям на сервере.
В этой небольшой статье мы рассмотрим как настраиваются общие папки Linux с помощью стандартной системы полномочий Linux.
Общие папки в Linux
Как вы знаете, в Linux есть своя система полномочий для файлов и папок, в которой можно разрешить чтение, запись и выполнение для пользователя владельца, определённой группы пользователей и всех остальных. Если вы забыли как это работает ознакомьтесь со статьей Права доступа к файлам и Группы пользователей Linux.
Сначала давайте создадим саму папку:
sudo mkdir /var/share
Если надо разрешить доступ к папке всем, то достаточно установить такие права:
sudo chmod ugo+rw -R /var/share
sudo chmod 766 -R /var/share
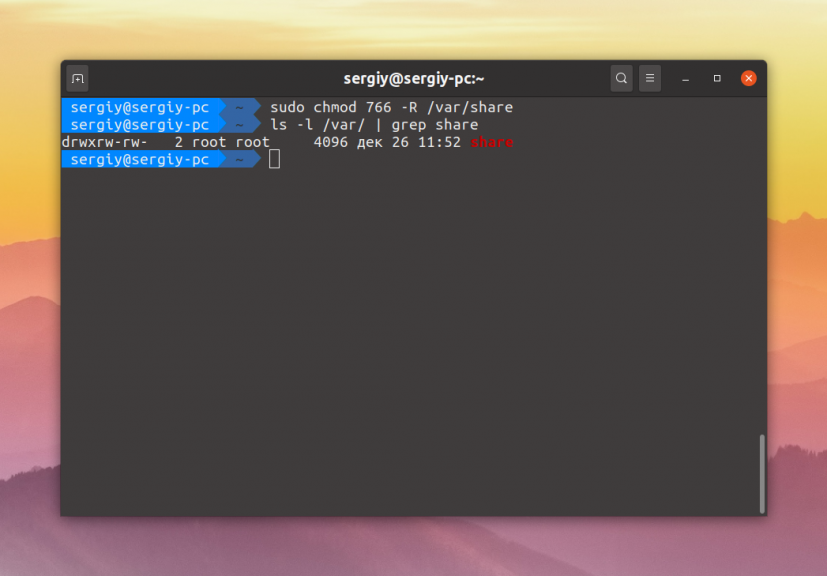
Эти две команды аналогичны. Они включают для владельца файла полный доступ к нему, а для группы и всех остальных — только чтение и запись. Опция -R позволяет применить изменения рекурсивно ко всем подпапкам и файлам в этом каталоге. Для того чтобы разрешить вообще всё используйте маску прав 777:
sudo chmod 777 -R /var/share
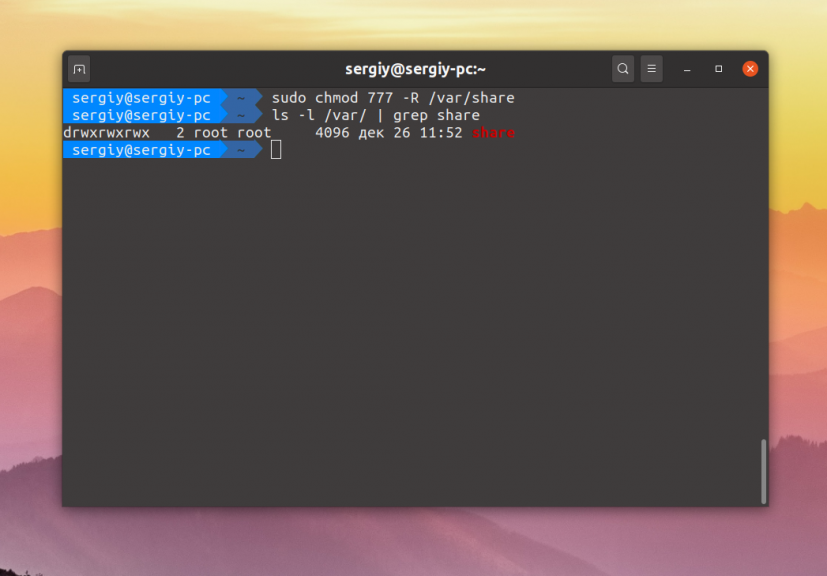
Теперь все пользователи смогут не только создавать и читать файлы в этой папке, но и выполнять их.
Если же надо чтобы папка была доступна только нескольким пользователям, надо объединить их в группу. Например, в группу project. Если такой группы не существует, создайте её:
sudo groupadd project
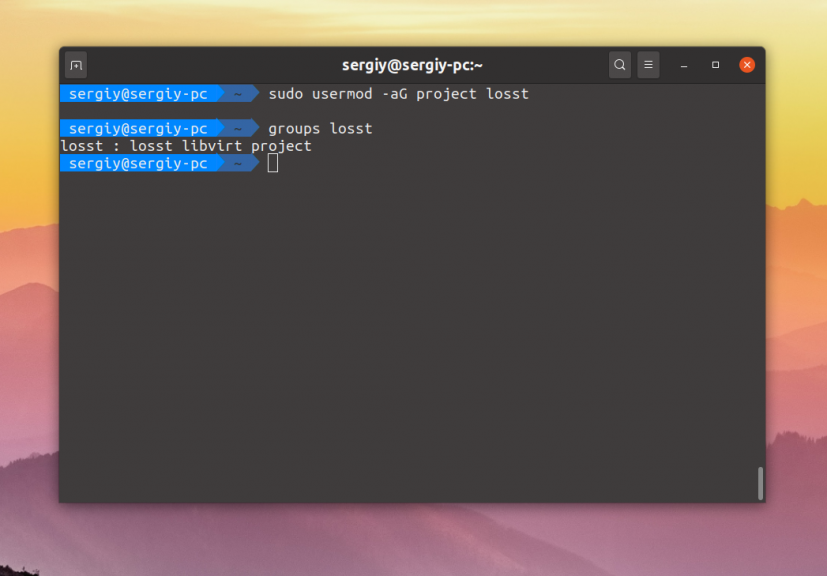
Для добавления пользователя в группу используется команда usermod. Например, для пользователей losst и losst1 команды будут выглядеть так:
usermod -aG project losst
usermod -aG project losst1
Затем группу папки надо изменить на project. Для этого можно воспользоваться командой chgrp:
sudo chgrp project -R /var/share
Осталось сделать права для этой папки. Кроме стандартных прав, которые разрешают чтение, запись и выполнение файлов для группы project нам необходимо установить SGID бит. Если этот флаг устанавливается для файла, то он позволяет выполнять этот файл с правами группы файла, но если он устанавливается для папки, то все файлы и папки, создаваемые в ней будут получать ту же группу что и у этой папки. Это как раз то, что нам надо:
sudo chmod ug+rwx -R /var/share
sudo chmod +s -R /var/share
sudo chmod 2774 /var/share
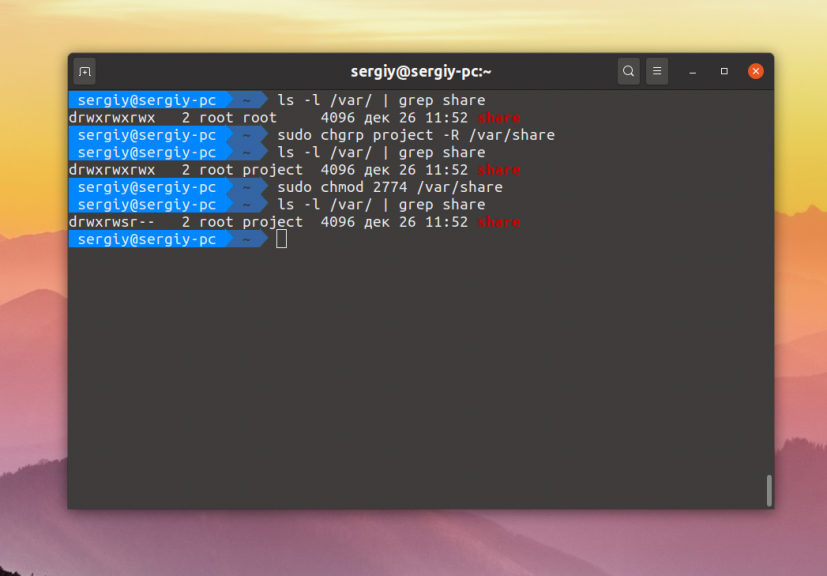
Маска прав 774 разрешает всё группе и владельцу, и разрешает только чтение всем остальным. Можно запретить им и чтение заменив 4 на 0, получится 770. После этого оба пользователя losst и losst1 смогут создавать файлы в этой папке, а также оба получат доступ к созданным файлам.
Как видите всё очень просто. А если вам надо создать общую папку, доступную по сети посмотрите на статью про настройку NFS или Samba.
Обнаружили ошибку в тексте? Сообщите мне об этом. Выделите текст с ошибкой и нажмите Ctrl+Enter.
Общая папка в Ubuntu: зачем нужна и как создать
Основная цель такой папки — возможность обмена файлами в локальной сети между Linux и Windows-машинами. Специфической привязки к 1С-направлению здесь нет, но такая папка поможет разработчикам хранить файлы конфигураций 1С, а также выгрузки документации по разработке и отчеты для обеспечения оперативного доступа при отсутствии ответственного сотрудника на месте.
В целом Ubuntu поставляется с общей папкой в домашнем каталоге. Она недоступна по умолчанию, но настраивается несколько различных типов обмена файлами в локальной сети компании. Изначальное предназначение папки — инструмент личного обмена файлами.
Главное стартовое условие — компьютеры, между которыми предполагается организовать обмен, должны быть локальной сети.
Устанавливаем сервер Samba
В качестве предпочтительного способа мы выбрали сервер Samba — есть и другие способы, но они требуют наличие Интернета. Samba — проверенное годами решение для ситуаций, когда файлы нужно хранить на сервере Linux.
Samba — Linux, Windows или Mac OS совместимый пакет программного обеспечения, позволяющий обмениваться файлами, документами и принтерами по сети.
Установка
apt install samba samba-common
Для тестирования настроек устанавливаем клиент Samba.
apt install smbclient
apt install samba-common-bin
Настройки
Скопируем шаблонный файл настроек на случай возврата в исходное состояние.
cp /etc/samba/smb.conf /etc/samba/smb.conf.backup
Удаляем все закомментированные строки из файла настроек.
bash -c ‘grep -v -E «^#|^;» /etc/samba/smb.conf.backup | grep . > /etc/samba/smb.conf’
Создаем отдельного системного пользователя
useradd -m -c «Name_User» -s /bin/bash usersamba
smbpasswd -a usersamba
Создаем общую папку Samba, доступную для всех
mkdir -p /home/usersamba/smb/
Настраиваем права доступа к папке:
chown -R nobody:nogroup /home/usersamba/smb/
chmod ug+rwx /home/usersamba/smb/
chmod -R 0775 /home/usersamba/smb/
Для доменной сети:
chown root:»пользователи домена» /home/usersamba/smb/
Редактируем настройки
sudo gedit /etc/samba/smb.conf
Добавляем в конец файла /etc/samba/smb.conf следующие строки: usersamba заменяем на имя пользователя компьютера с Samba.

Папка будет открыта для чтения и записи.
comment = Samba Share
force user = usersamba
force group = usersamba
Перезапуск Samba
systemctl restart smbd.service
service smbd restart
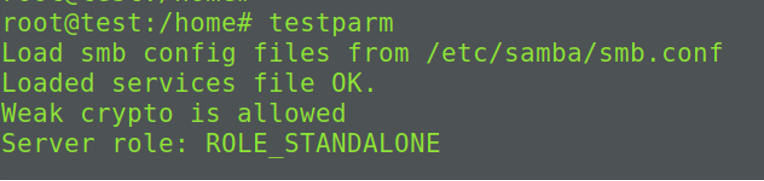
Проверка правильности конфигурации Samba
Защищенная папка Samba, доступная только по паролю
Для того, чтобы защитить открытую папку паролем, достаточно изменить параметр guest ok на no.
Чтобы скрыть в обзоре сети папку, можно изменить параметр browsable на no.
Samba Server Configuration — Simple
Note: There is another Network Share via Samba Tutorial at the following community wiki page: How to Create a Network Share Via Samba Via CLI (Command-line interface/Linux Terminal) — A Differing Procedure. That tutorial focuses on using the CLI and its procedure differs from the procedure documented in this wiki page.
Note: For Ubuntu 8.04 (Hardy) and later, shared directories are created directly from the directory. Browse to the location of the directory you would like to share, right-click the directory, and choose Sharing Options. Click the "Share this folder".
The shares are defined in the background using the "net usershare" command and the definitions are saved in /var/lib/samba/usershares/ . Therefore, shares defined with this method are not visible in smb.conf.
- Shares are Public (browsable in Network Places)
- A password is not set for shares (they can be mounted by anyone).
However, remember that this is less secure.
Be warned you are installing a service (server) and you may wish to install a Firewall management utility to help prevent undesired access. See also the manual configuration sections below to learn how to "hide" your shares from browsing and set a password for access.
Ubuntu Server
This section enables Ubuntu as a samba file server.
Sharing a directory
To share a directory you must have permission to access the directory. Go to your home directory ( Places → Home directory). Right click on the "Documents" directory and in the pop up menu select "Share Folder".
If samba is not installed, you will get a pop-up menu "Sharing services are not installed". Select "Install Windows networks support (SMB)" and deselect "Install Unix networks support (NFS)" → then click "Install services".
If you get an error message that the samba .deb could not be found, open a terminal and update apt-get.
Try again and Ubuntu will download and install samba. Right click on the "Documents" directory and in the pop-up menu select "Share Folder". You will get a pop up menu "Share Folder". Select "Windows networks (SMB)" in the pull down menu and give your share a name in the "Name" box. Unselect the "Read only" check box if you want read/write access to the share. Click the "Share" button.
Windows XP Server
This section enables Windows XP as a samba file server.
Sharing a directory
1. On the Windows server, browse in explorer ("My Computer") to the location of the directory you wish to share (C:\Documents and Settings for example). Next right click on the directory to share and select "Sharing and Security. ". In the pop-up dialog box click the "Sharing" tab. Click the " Network Setup Wizard " to configure your network to allow shares. Work your way through the wizard. Note the default workgroup is MSHOME. You may change this value if you like but all your computers should be in the same workgroup. Eventually you will be given the option to "Turn on file and printer sharing". This is the option you want, continue with the network wizard. You will have to restart your computer for the settings to take effect -> Restart Windows.
2. After rebooting, again open explorer ("My Computer") and navigate to the directory you wish to share. Again right click on the directory and select "Sharing and Security. ". In the pop-up dialog box click the "Sharing" tab. In the "Network sharing and security" box, tic (select with the mouse) the "Share this folder on the network" box. Give the directory a share name. This will give read only access to Ubuntu computers via samba. To allow read/write access tic (select with the mouse) the "Allow network users to change my files" box. Click the "Apply" button and close the dialog box.
Samba Server Configuration by GUI
There are a few graphical tools available that offer more flexibility than the "Sharing Options" in the Nautilus context menu.
A fairly comprehensive graphical Samba configuration tool is available for KDE, by installing the "kdenetwork-filesharing" package. After install, you can find it by launching the KDE Control Center. (Alt-F2 and then type kcontrol). Browse to Internet & Network > Samba.
For Gnome, the package system-config-samba is convenient. Once installed, launch System — Administration — Samba. (Shares created using the "Sharing options" context menu will not be visible in this tool.)
A less friendly but also graphical tool is Swat, a web-based interface.
Samba Server Configuration in terminal
Configuration is performed by reading and editing /etc/samba/smb.conf, the configuration file for the samba server.
The following tips show how to do some basic things without installing additional software, using the command line. It is not difficult, just be careful with typos.
First open a terminal: Applications > System Tools > Terminal and open the file smb.conf
How to Save: To save in nano use "CTRL-O", then "CTRL-X".
Tip: Replacing sudo nano with gksudo gedit gives you a nice graphical editor.
The file *smb.conf* is divided in several sections:
Comments may start with either a # or a ;
Global Settings
Let’s start with Global Settings. Here you will see several lines, which you can also see in the graphical networktool like workgroup and wins server. If you changed everything to your liking already then you can skip this section, if not change to what you need. If you do not know what items mean, leave them be and read the relevant part in the real Samba-howto instead of randomly changing them. It will save you trouble-shooting later.
File Sharing (Basics)
The important part for us is File sharing. Samba shares are named in brackets, [ ], and configured by adding options in the lines that follow. Most options are boolean (yes / no).
We need to change:
This describes your /home directory. Usually you want to share this directory in a home environment, because these are the files you want to share. To do so, make the following changes:
This finishes sharing your /home directory. The last thing we need to do is fixing a user.
Add users who can access your shares with the ‘smbpasswd’ command.
NOTE: the username used here should be a real user setup on your PC/Server. Reload Samba for every change to users/passwords or ‘smb.conf’
NOTE : If the above command doesn’t work for you, try:
File Sharing (Advanced)
We started with the base of Samba file-sharing. The above-mentioned items should be enough to get you started. Next we will add details that you might or might not need.
If you have more than one network card
If you have more than one network card (or interface) then you have to define where you want Samba to run. In smb.conf under the [global] section, add:
The first address (127.0.0.1), is a loopback network connection (it’s your own machine). The second address (192.168.0.31), is the address of the card you want Samba to run on, the second number (24) is the subnet default for a CLASS-C network. It may vary depending on your network.
With "bind interfaces only" you limit which interfaces on a machine will serve SMB requests.
You can limit which IP address can connect to your Samba server adding these lines:
The loopback address must be present in the first line. The second line deny access from all IP address not in the first line.
Private and public shares in same config
First you’ll want to set this up in the [global] section of your smb.conf
security = user restricts logins to users on your server. encrypt passwords = true is necessary for most modern versions of Windows to login to your shares. map to guest = bad user will map login attempts with bad user names to the guest account you specify with guest account = nobody. That is, if you attempt to login to the share with a user name not set up with smbpasswd the you will be logged in as the user nobody.
Next the private share
If browseable is set to no the share will not show up on graphical browsers such a "My Network Places" on Windows or Places -> Network on Ubuntu.
path is the path to the directory that you want to share out. browseable = no will have the share not show up when users browse the network. read only = no will let you, as an authenticated user, write to the share.
Finally, the public share
Again, path is the path to the directory that you want to share out. read only = no will allow users to write to this share. guest only = yes and guest ok = yes will allow guest logins and also force users to login as guests. The user you specified with guest account in the [global] section must have write permissions on /path/to/share/point in order to write files to the share.
Note: When Windows attempts to access a SMB share it will use the current Windows user name and password. The map to guest = bad user trick above allows access to the public share only if you give Samba an incorrect user name. If you give it a valid user name, but a bad password, the login will fail and Windows will give you a password prompt when you try to access the share. If you have the same user name for your Windows machine and your Ubuntu machine, you could be unwittingly giving the Samba server a valid user name, but invalid password. To resolve this you will either have to change the Windows user name, or to remove that user name from the Samba password file with sudo smbpasswd -x [username].
Note: The above uses security = user. To access the private shares you will have to make sure the user exists in smbpasswd. These users must also already exist as normal users on your machine. You add users to smbpasswd simply by running sudo smbpasswd -a [username] and giving a password.
Setting permissions
To set permissions of newly created documents / files edit /etc/samba/smb.conf and in the [global] section add :
Samba/SambaServerGuide (последним исправлял пользователь foka 2014-11-19 00:01:16)
The material on this wiki is available under a free license, see Copyright / License for details
You can contribute to this wiki, see Wiki Guide for details