Packages and Binaries:
DirBuster is a multi threaded java application designed to brute force directories and files names on web/application servers. Often is the case now of what looks like a web server in a state of default installation is actually not, and has pages and applications hidden within. DirBuster attempts to find these.
However tools of this nature are often as only good as the directory and file list they come with. A different approach was taken to generating this. The list was generated from scratch, by crawling the Internet and collecting the directory and files that are actually used by developers! DirBuster comes a total of 9 different lists, this makes DirBuster extremely effective at finding those hidden files and directories. And if that was not enough DirBuster also has the option to perform a pure brute force, which leaves the hidden directories and files nowhere to hide.
Installed size: 10.75 MB
How to install: sudo apt install dirbuster
Pentest tools — Dirbuster
Dirbuster is a multithreaded Java application that tries to find hidden files and directories on a target web application by brute forcing their names. Dirbuster comes with 9 lists of common file and directory names that were crawled from the internet, but you can choose to use your own. Pure brute forcing is also available, but due to the time constraints, the filelist option is by far the most commonly used
As an aside, you might have probably noticed that lately I’ve been writing less writeups and have been focusing more on tools and system administration fundamentals. I thought that in the long run, this approach would yield better and faster results, both in CTF challenges and in real-life hacking (bug bounties, I’m looking at you). While I haven’t used Dirbuster so much, I was inspired to write a post for it after reading this blog post on how it helped in acquiring a nice bounty
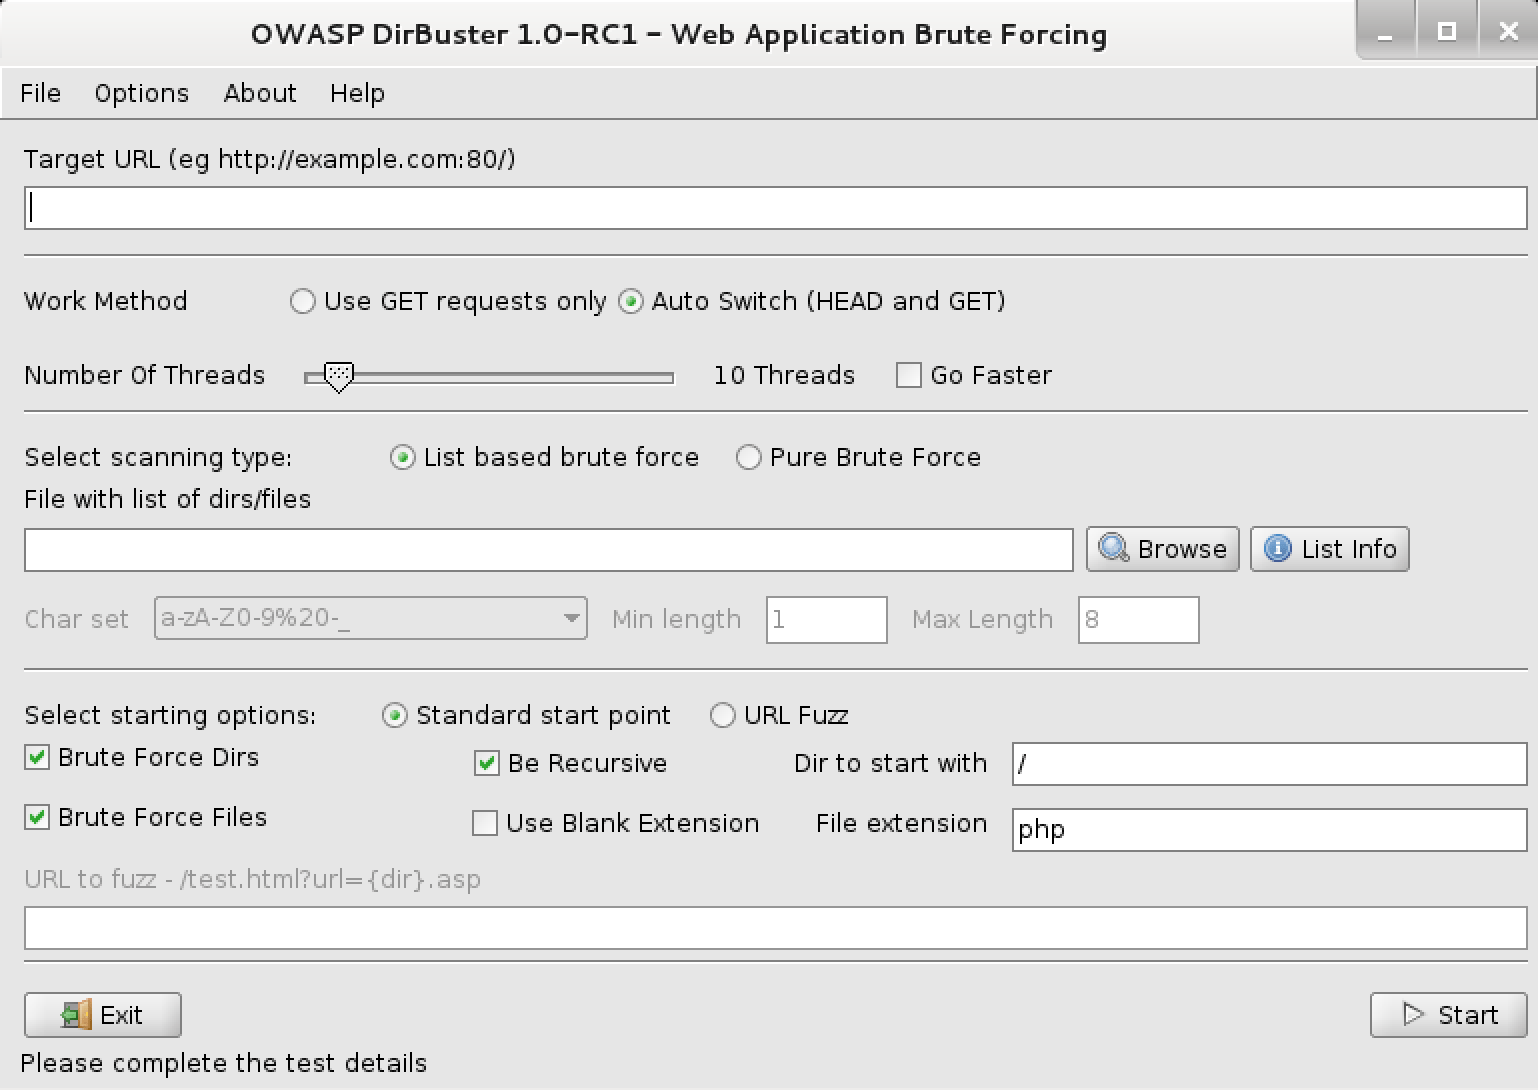
With that said, let’s take a look at Dirbuster’s interface:

This tool is not complicated to use, nor does it have tons of other functionality besides discovering hidden resources. However, from my (limited) experience with it, the default settings might not work in the majority of cases (causing crashes and so on). A bit of fine tuning is required to get the most of your dirbusting experience, and is this that I will be covering here.
Dirbuster configuration
The first thing you will do when starting Dirbuster is to select a wordlist to use. The lists that come with Dirbuster are located in /usr/share/dirbuster/wordlists/ on a Kali machine.
Work method – leave the Auto Switch selected for fastest results. Dirbuster will try a HEAD request first, saving more bandwidth and latency than it would with a straight on GET request.
Number of threads – the default is 10, but in my own testing, I found this excessive, so I am now starting with 3-5 threads. Since the Go Faster option allows you to jump over 100 threads, you might think the faster the better, but I noticed that Dirbuster has a really thin line between slow but working and fast but crashed. Maybe it’s the local vulnerable installations I tested against, but it seems logical to treat a live target with more caution than a lab..you don’t want to DOS your target in your search for goodies.
In your choice of wordlist, take a second to review the target and see if it uses case sensitive resources (for instance, try seeing if admin returns the same as Admin, use lowecase lists if target is a IIS web server etc.). This will help you decide what list is most appropriate for the job, and save you precious time.
Under the starting options, you will tweak things as needed, because there is no one-size-fits-all approach to these checkboxes. The standard start point considers directories as ending with a / slash, and files ending with the specified extension. It’s best not to run with all the options checked at the same time, as this will take significant time and it may potentially crash the target. I separate the Brute Force Directories and Brute Force Files + Use Blank Extension. As always, the target dictates the weapon, so time constraints and the sensitivity of the target should also be taken into consideration for the Be Recursive option, which I toggle as necessary.
The URL fuzz option allows you to enter the words in the lists directly in the URL, in a template like manner. An example offered by Dirbuster is test.html?url=
Dirbuster Options
In the Options tab, you can further tweak your Dirbuster installation.
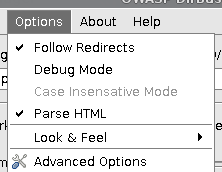
Follow redirects – I check this, but it does come with an overhead increase, you might want to leave it unchecked and manually navigate to interesting places that were found
Parse HTML is on by default, and it lets Dirbuster read the HTML and look there for other files and folders that it won’t have to guess
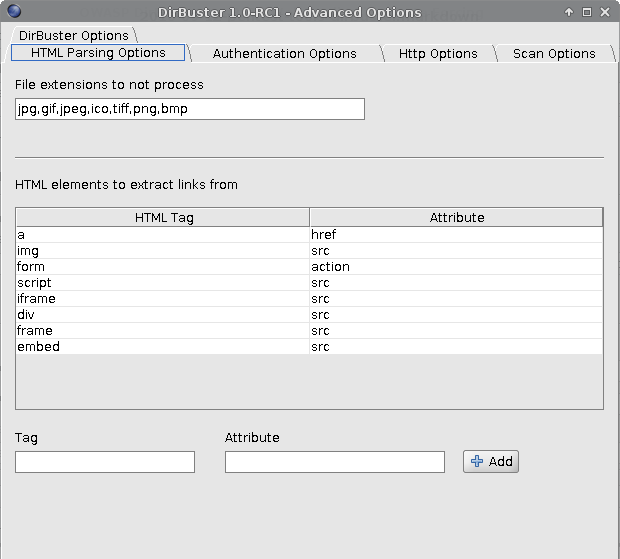
In the Advanced options, there a few more tabs you can configure. The Dirbuster Options tab allows you to set some default values so you don’t have to change them each time you start the application.
In the HTML Parsing tab you can configure which HTML elements to extract links from, along with file extensions that should not be processed.
The Authentication tabs covers authentication options for Basic, Digest and NTLM authentication. In the HTTP Options tab you might want to spend a few moments to change the blatantly conspicuous user agent. Also, note the Run through a proxy option, which is available if you want to..well, run Dirbuster through a proxy. It’s also possible to add custom headers, maybe you want to add a cookie to use Dirbuster as an authenticated user. That might be risky if your user privileges allow you to perform certain actions on the target, so you might want to restrict other options in this case (maybe you don’t want to follow all the links in case one of them does something you really wouldn’t want to, and so on).

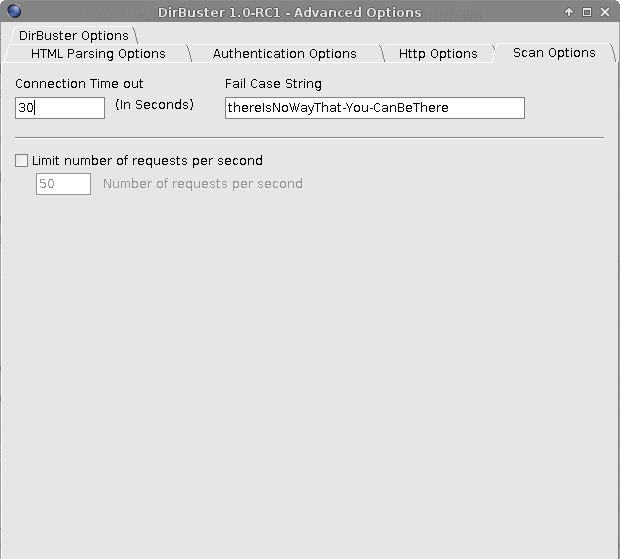
Finally, there’s the Scan options tab. I chose to decrease the default Connection Timeout value from 30 to 10 seconds and to limit the number of requests per second. You can also see the failcase string that Dirbuster uses to determine if a resource is actually there or not.
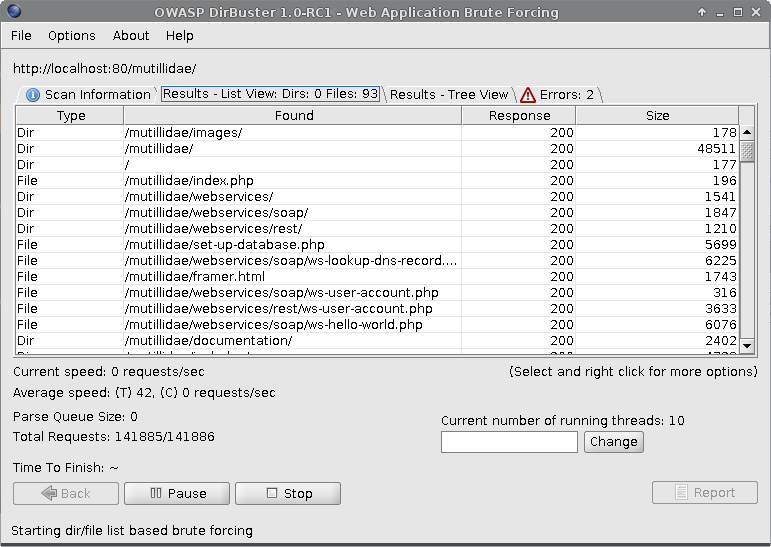
After running a scan, you can see the results found, including the HTTP response code and the size. I ran a test scan against Mutillidae with threads blazing for the demo:
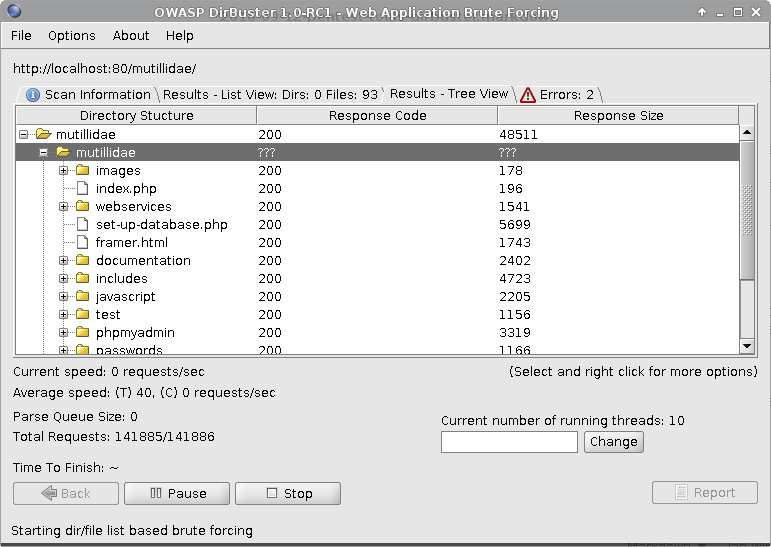
You can also see the results in a tree view, for better readability:
This concludes the post on Dirbuster. Despite being unmaintained (not sure if that’s a word), it’s still the go-to application for files and folders discovery. Use it early in the recon process (after you took a look at the target to know which settings to apply) for best results!
Posted by chousensha Sep 12 th , 2016 penetration testing, tools
Comments
whoami
switch (interests) <
case INFORMATION SECURITY:
Mostly offensive security, but trying to be well-rounded in everything;
case PYTHON:
Mainly security and sysadmin related scripting;
case LINUX:
Greetings from /dev/null;
case JAPANESE:
Language, anime, samurai;
case MARTIAL ARTS:
If it’s fighting I like it;
case MILITARY SCIENCE:
Ancient, medieval, modern;
default: GAMING;>
Инструменты Kali Linux
Список инструментов для тестирования на проникновение и их описание
DirBuster
Описание DirBuster
DirBuster — это многопотоковое Java приложение, предназначенное для брутфорса имён директорий и файлов веб-приложений и веб-серверов. DirBuster пытается найти скрытые каталоги и файлы.
Тем не менее, подобные инструменты в немалой степени ценны своими списками директорий и файлов. С этой программой поставляется несколько словарей, которые были собраны из реальных названий файлов и директорий. Всего в DirBuster имеется 9 словарей, их описание будет дано ниже. Но если и этого мало, то DirBuster умеет делать чистый брутфорс, от которого ничего не способно скрыться! Конечно, если у вас есть время ��
Справка и руководство по DirBuster
Страница man отсутствует.
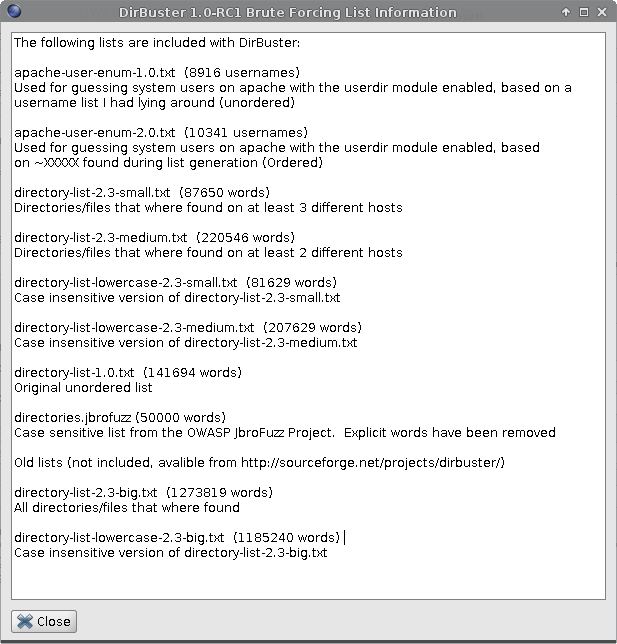
Описание словарей, поставляемых с программой DirBuster.
Эти словари уже присутствуют в Kali Linux. Словари можно скачать отдельно по ссылке.
- directory-list-2.3-small.txt — (87650 слов) — Директории/файлы которые были найдены как минимум на трёх разных хостах
- directory-list-2.3-medium.txt — (220546 слов) — Директории/файлы которые были найдены как минимум на двух разных хостах
- directory-list-2.3-big.txt — (1273819 слов) — Все директории/файлы которые были найдены
- directory-list-lowercase-2.3-small.txt — (81629 слов) — Версия не чувствительная к регистру для directory-list-2.3-small.txt
- directory-list-lowercase-2.3-medium.txt — (207629 слов) — Версия не чувствительная к регистру для directory-list-2.3-medium.txt
- directory-list-lowercase-2.3-big.txt — (1185240 слов) — Версия не чувствительная к регистру для directory-list-2.3-big.txt
- directory-list-1.0.txt — (141694 слов) — Оригинальный список без изменения порядка
- apache-user-enum-1.0.txt — (8916 имён пользователей) — Используется для предположения имён пользователей apache на котором включён модуль userdir, основывается на набранных именах пользователей (неупорядоченный)
- apache-user-enum-2.0.txt — (10341 имён пользователей) — Используется для предположения имён пользователей apache на котором включён модуль userdir, основывается на
В Kali Linux словари располагаются в директории /usr/share/wordlists/dirbuster/.
Взламываем сайты с помощью SQLMAP на Kali Linux
В этой статье, исключительно в ознакомительных целях, я опишу основные моменты поиска, и эксплуатации sql-инъекции на сайтах. В процессе прочтения этого материала, мы получим полноценный доступ к случайному сайту.
P.S.: в ходе создания материала, ни один сайт не пострадал.
Для этого нам понадобятся всего четыре утилиты: собственно sqlmap, dirbuster, и tor с privoxy.
Первые две программы входят в дистрибутив kali по умолчанию. Устанавливаем и запускаем сервис тора:
Аналогично устанавливаем и privoxy, но пока не будем его запускать, он нам может и не пригодиться:
Поиск уязвимых скриптов. Google dorks.
Очередь за гугл-дорками. Для тех, кто не в курсе — некоторыми запросами в гугл, можно облегчить поиск уязвимого ресурса. Это называется “дорк”. Для примера, возьмём запрос:
Открываем любезно выданные гуглом линки потенциально уязвимых сайтов, и в адресной строке браузера, после цифр, ставим одинарную ковычку:
И ищем сайт, скрипт на котором выдаст ошибку подобного вида:
Конечно, можно обойтись и без этого, sqlmap анализирует далеко не только подобные уязвимости в скриптах, но этот шаг многократно увеличивает наши шансы на успех.
Получение структуры баз данных сайтов. SQLMAP.
Переходим непосредственно к процессу эксплуатации инъекции на обнаруженном нами сайте. В работе с sqlmap есть достаточно много различных ньансов, и разберём мы базовые. Открываем терминал. Внимание, у вас должен быть активен сервис тора. Либо во втором терминале, либо через запуск приложения.
где -u задаёт целевой адрес (вводится обязательно с протоколом http/https);
— dbs параметр для получения имён баз данных, найденных в случае успешной эксплуатации;
— tor запустит соединение через тор, — check-tor отобразит успешность подключения к сети тор;
— random-agent позволит утилите использовать случайный http-заголовок для передачи серверу, что не даст идентифицировать sqlmap;
ключ -o задействует оптимизацию процесса, что наверняка пригодится во многих случаях — например, при слепой инъекции.
Sqlmap отдал нам две таблицы на выбор. В базе information_schema нет ничего интересного, это стандартная база mysql, поэтому мы перейдём к анализу “z108098_main”:
Тут мы исключили параметр — dbs, и вместо него используем — tables. Так же, добавился новый ключ -D, который задаёт имя сканируемой базы. Этот запрос выдаст нам все таблицы базы “z108098_main”. В итоге мы получаем:
И сразу же мы наблюдаем таблицу “_admins”. Очевидно, что нам необходимо получить её. Получаем названия столбцов базы:
Добавился ключ -T, который задаёт имя сканируемой таблицы. Вместо параметра — tables, теперь используется параметр — columns. Результат не заставил себя долго ждать, хоть инъекция и была слепой в моём случае — в этом мне помог ключ -o, который использовал 10 потоков для перебора вариаций:
Теперь читаем данные из таблицы, и сохраняем её на свой жёсткий диск:
Параметр — columns мы заменили на — dump, который выдаст все строки таблицы, а так же сохранит оную на наш жёсткий диск. В итоге, получаем заветный логин и хеш пароля, для админки сайта:
Полученный хеш вы можете просто загуглить, в большинстве случаев он уже расшифрован, и выдастся первой же строкой. Если же это не сработает, придётся делать брутфорс хеша, но это уже отдельная тема, которую разбирать в рамках этой статьи мы не станем.
Поиск админки сайта: CMS, интуиция, или dirbuster?
Зачастую, поиск админки сайта создаёт проблему. Пока выполняются запросы от sqlmap, можно заняться этим.
В первую очередь, мы идём на 2ip.ru/cms, вводим имя сайта, и ожидаем завершения сканирования на популярные cms.
Если сканером обнаруживается cms, то гуглим расположение админки в них, и пробуем зайти по дефолтным адресам.
Но иногда хитрые админы либо меняют дефолтный адрес, либо используют собственную cms, как и произошло в моём случае.
Если так оно и есть, то попробуем посмотреть файл robots.txt, иногда админку можно выловить тут:
Если файл отсутствует, или там ничего нужного нам нет, то пробуем стандартные варианты вручную.
И тут успех, на втором же линке я получил форму авторизации:
Но этот способ может и не сработать и, вероятнее всего, не сработает. Для таких случаев есть мощное оружие — durbuster, который перебором по словарю выявит всевозможные скрипты сайта.
Наша первая задача — пропустить трафик от durbuster’a через tor. Для этих целей нам понадобится запустить privoxy.
Предварительно, настроим конфиг privoxy, что бы весь трафик пропускался через тор:
Добавляем строку в конец конфига. Внимание, точка в конце обязательна!
Сохраняем изменения, закрываем файл, и запускаем, собственно, privoxy:
Теперь открываем dirbuster — либо через терминал, либо выбираем его из списка Приложения > 03 — Web Application Analysis > Web Crawlers & Directory Bruteforce > dirbuster.
В самой программе, переходим в Options > Advanced Options > Http Options, и приводим настройки в соответствии со скриншотом:
Нажимаем ок, и переходим к самой программе. Необходимо выбрать словарик для брутфорса. По умолчанию, в комплекте с программой в kali есть словари. Расположены они по адресу /usr/share/dirbuster/wordlists. Лично я предпочитаю использовать маленький словарик directory-list-2.3-small.txt.
В "Target URL" сверху вписываем адрес нашего сайта, и нажимаем старт. Процесс пошёл.
Итоги. Черное на белом.
В процессе написания статьи, я понял несколько вещей. Конечно, все то же самое можно сделать не только из-под kali, да и не только под линуксом (piton as example). Но не хочу повышать порог вхождения в тему. Именно поэтому, кейс сформирован под kali linux.
Использовать любую уязвимость можно в различных целях. Я бы хотел предостеречь тебя, читатель, от поспешных и рискованных выводов и затей, в т.ч. от использования этого материала в незаконных целях. И да, за легальные пентесты весьма неплохо платят. 😉