How to Enable SSH on Ubuntu 20.04
![]()
Safe Shell (SSH) is a community protocol used for a safe connection between a shopper and a server. Every interplay between the server and a shopper is encrypted.
This tutorial explains the way to allow SSH on an Ubuntu machine.
Enabling SSH will permit you to connect with your system remotely and carry out administrative duties. You’ll additionally be capable to securely switch information through scp and sftp .
Enabling SSH on Ubuntu #
By default, when Ubuntu is first put in, distant entry through SSH isn’t allowed. Enabling SSH on Ubuntu is pretty simple.
Carry out the next steps as root or person with sudo privileges to put in and allow SSH in your Ubuntu system:
Open the terminal with Ctrl+Alt+T and set up the openssh-server bundle:
When prompted, enter your password and press Enter to proceed with the set up.
As soon as the set up is full, the SSH service will begin mechanically. You’ll be able to confirm that SSH is working by typing:
The output ought to let you know that the service is working and enabled to start out on system boot:
Press q to get again to the command line immediate.
Ubuntu ships with a firewall configuration software known as UFW. If the firewall is enabled in your system, be certain that to open the SSH port:
That’s it! Now you can connect with your Ubuntu system through SSH from any distant machine. Linux and macOS programs have SSH purchasers put in by default. To attach from a Home windows machine, use an SSH shopper akin to PuTTY.
Connecting to the SSH Server #
To hook up with your Ubuntu machine over LAN invoke the ssh command adopted by the username and the IP handle within the following format:
Be sure to change username with the precise person title and ip_address with the IP Handle of the Ubuntu machine the place you put in SSH.
In the event you don’t know your IP handle you’ll be able to simply discover it utilizing the ip command:
As you’ll be able to see from the output, the system IP handle is 10.0.2.15 .
When you’ve discovered the IP handle, log in to distant machine by working the next ssh command:
While you join the primary time, you will notice a message like this:
When you enter the password, you’ll be greeted with the default Ubuntu message:
You are actually logged in to your Ubuntu machine.
Connecting to SSH behind NAT #
To hook up with your own home Ubuntu machine over the Web you will have to know your public IP Handle and to configure your router to simply accept knowledge on port 22 and ship it to the Ubuntu system the place the SSH is working.
To find out the general public IP handle of the machine you’re making an attempt to SSH to, merely go to the next URL: https://api.ipify.org .
On the subject of establishing port forwarding, every router has a unique solution to setup port forwarding. You must seek the advice of your router documentation about the way to arrange port forwarding. In brief, you might want to enter the port quantity the place requests might be made (Default SSH port is 22) and the non-public IP handle you discovered earlier (utilizing the ip a command) of the machine the place the SSH is working.
When you’ve discovered the IP handle, and configured your router you’ll be able to log in by typing:
In case you are exposing your machine to the Web it’s a good suggestion to implement some safety measures. Essentially the most primary one is to configure your router to simply accept SSH visitors on a non-standard port and to ahead it to port 22 on the machine working the SSH service.
You can even arrange an SSH key-based authentication and connect with your Ubuntu machine with out coming into a password.
Disabling SSH on Ubuntu #
To disable the SSH server in your Ubuntu system, merely cease the SSH service by working:
Later, to re-enable it, sort:
Conclusion #
We’ve proven you the way to set up and allow SSH in your Ubuntu 20.04. Now you can login to your machine and carry out on a regular basis sysadmin duties via the command immediate.
In case you are managing a number of programs, you’ll be able to simplify your workflow by defining your entire connections within the SSH config file. Altering the default SSH port provides an additional layer of safety to your system, by decreasing the danger of automated assaults.
For extra details about the way to configure your SSH server, learn the Ubuntu’s SSH/OpenSSH/Configuring information and the official SSH manual web page.
We hope the How to Enable SSH on Ubuntu 20.04 help you. If you have any query regarding How to Enable SSH on Ubuntu 20.04 drop a comment below and we will get back to you at the earliest.
We hope this post helped you to find out Best Cloud Hosting . You may also want to see — How to Install Git on Ubuntu 20.04
Logging in from other computers
Although SSH has many uses, its main job is to provide access to a command-line over a network. Even if you are installing SSH for completely different reasons, it’s best to get command-line access before you try anything more complicated.
From Unix-like systems (including Mac OS X)
Using the command-line
All modern Unix-like systems (Linux, OS X, BSDs, and others) include a command-line ssh client. To login to your computer from a Unix-like machine, go to a command-line and type:
You should get the usual password prompt (or be told you can’t log in, if passwords are disabled).
See ssh keys if you want to authenticate using keys instead of passwords.
From Windows
Using PuTTY
PuTTY is a popular graphical SSH client. You can download the Windows client from here, or the Linux version by installing the following package: putty. Note that you may need to add the Universe repository before installing PuTTY in Ubuntu.

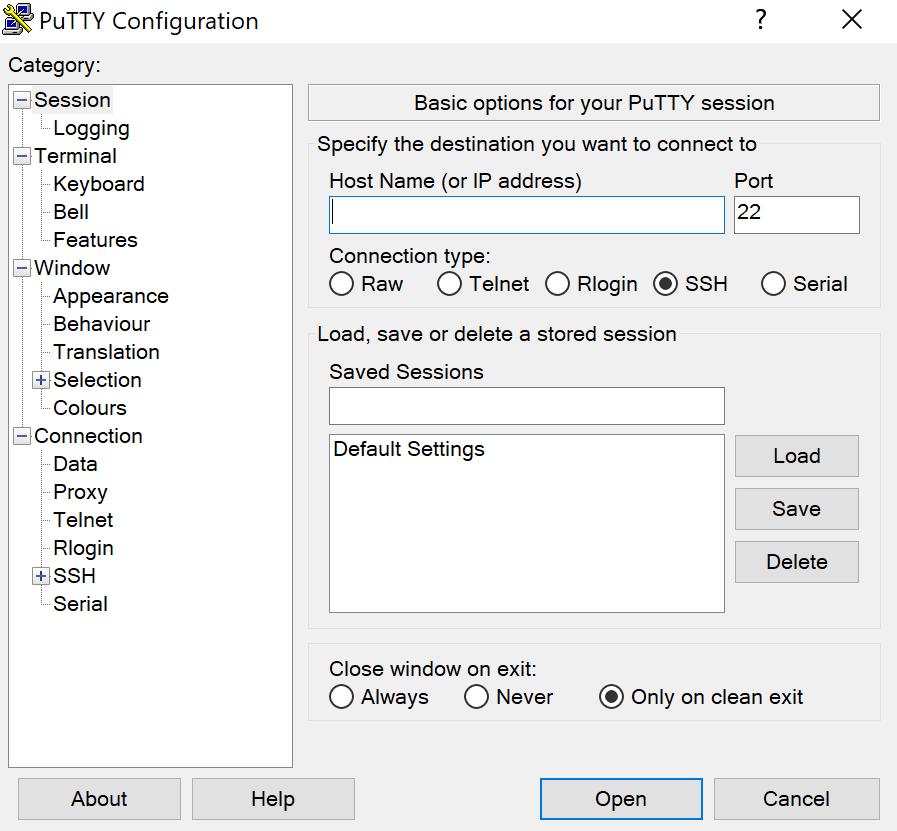
To log in to your computer, type your computer’s name or IP address into the "Host Name (or IP address)" box, click on the "SSH" radio button, then click "Open". You will be asked for your username and password, then you’ll get a command-line on your Linux computer.
Tip: Keep alive
Your PuTTY (ssh) session will automatically log out if it is idle. To keep the connection active (alive), before you make the connection, select "Connection" on the left of the PuTTY Configuration window, and type 120 in the "Seconds between keepalives (0 to turn off)" box.
Using Cygwin
Cygwin is a unix-like environment for Windows. You can download it here: Cygwin
To install it, run the Setup.exe and choose a server.
To use ssh, you need to install the OpenSSH package (which includes BOTH a server and client). It is located under "Net" and is called openssh.

Then you can launch Cygwin as a .bat file and get a Terminal Interface:

Now follow the earlier instructions for using the command-line on a Unix-like OS.
SSH/OpenSSH/ConnectingTo (последним исправлял пользователь host86-163-0-151 2013-02-22 14:54:17)
The material on this wiki is available under a free license, see Copyright / License for details
You can contribute to this wiki, see Wiki Guide for details
How to Use PuTTY (SSH Terminal)
SSH, or Secure Shell, is a secure protocol for connecting to a remote server. To establish an SSH connection, you will need an SSH client app like PuTTY.
In this guide, you will learn how to use PuTTY SSH terminal to connect to your hosting account or to a virtual private server. That way, you can access and manage your remote machine by executing various commands.
How to Manage Your Files via SSH – Video Tutorial
This advanced method of managing your files will unlock even more possibilities for you! Watch to find out more.

Linux
Most people use the preinstalled OpenSSH on Linux, however, PuTTY on Linux is used more for debugging, connecting to serial ports, and to raw sockets.
On Debian, use the following command:
Followed by the tools installation command:
MacOS
Like Linux, the macOS comes with a command-line SSH client already installed. But to download PuTTY, open the terminal window and use the commands below.
To install PuTTY for mac:
Requirements For Set Up
Next, you will need a bit of information before you can begin using PuTTY. You will need:
- Server IP Address
- SSH username
- SSH password
If you are Hostinger user, there are two ways to find this information, depending on your hosting plan:
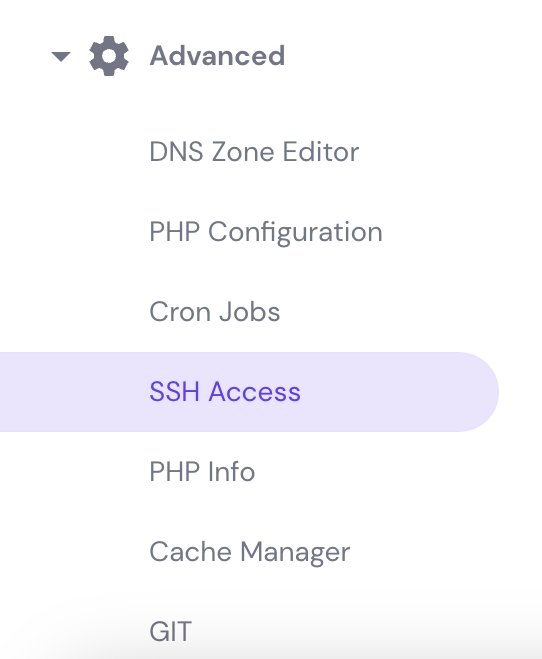
- Shared web hosting — go to the SSH Access menu under the Advanced category. Here you will see all the login details that you need. If you forgot your password, easily reset it via the FTP Accounts menu.
- VPS plan — the credentials are located in the Server tab of hPanel, under SSH Details. In case you don’t know what your password is, scroll down to the Root Password section, and create a new one.

How to Connect PuTTY
- Launch the PuTTY SSH client, then enter your server’s SSH IP and SSH Port. Click the Open button to proceed.
- A login as: message will pop-up and asks you to enter your SSH username. For VPS users, this is usually root. However, for shared hosting users, you will need to enter a predefined username like u721233450. After entering your username, press Enter.
- Type your SSH password and press Enter again. For security reasons, the screen won’t show the password but will register what you type.

Congratulations! You have successfully connected to your account using the PuTTY SSH client. You can list all available SSH commands by executing help via the terminal.
How to Use PuTTYgen
PuTTYgen is a tool that creates public and private key pairs. PuTTY stores these key authentications in its .ppk format files. With Windows, you will use the PuTTYgen.exe graphical tool, while with Linux you will use the command line.
To begin, locate PuTTY and open PuTTYgen.
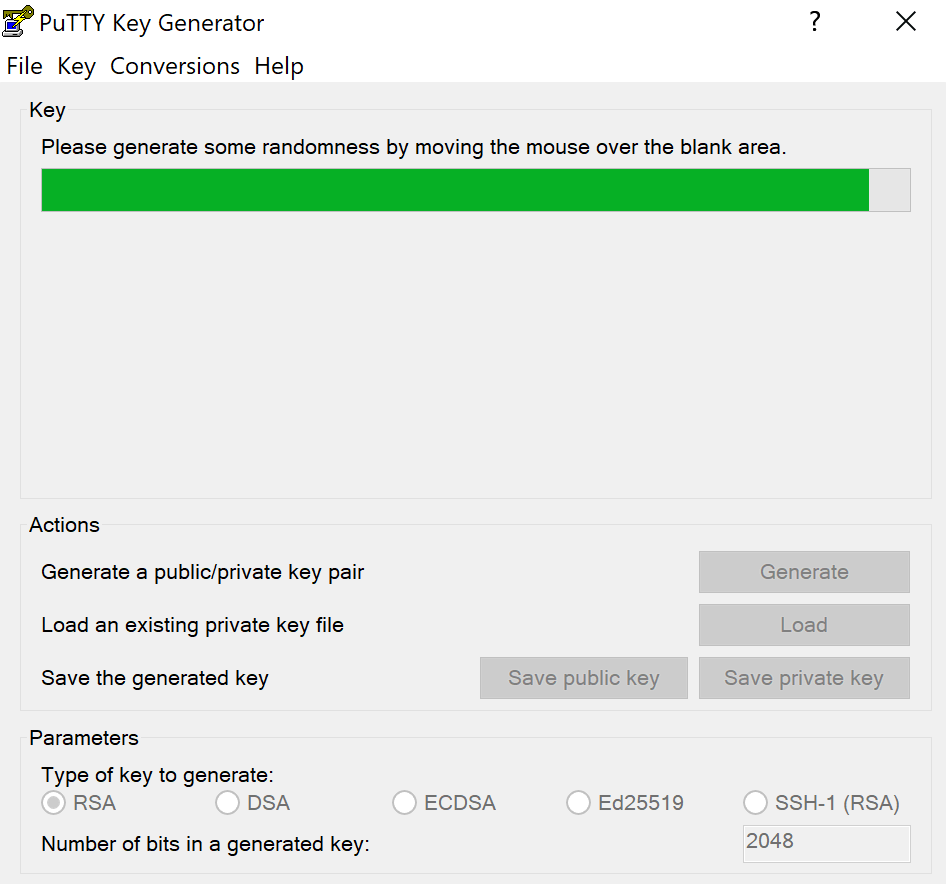
To create a new key pair, click the Generate button near the bottom and begin to move your mouse around within the window. Continue moving your mouse until the green progress bar is full.
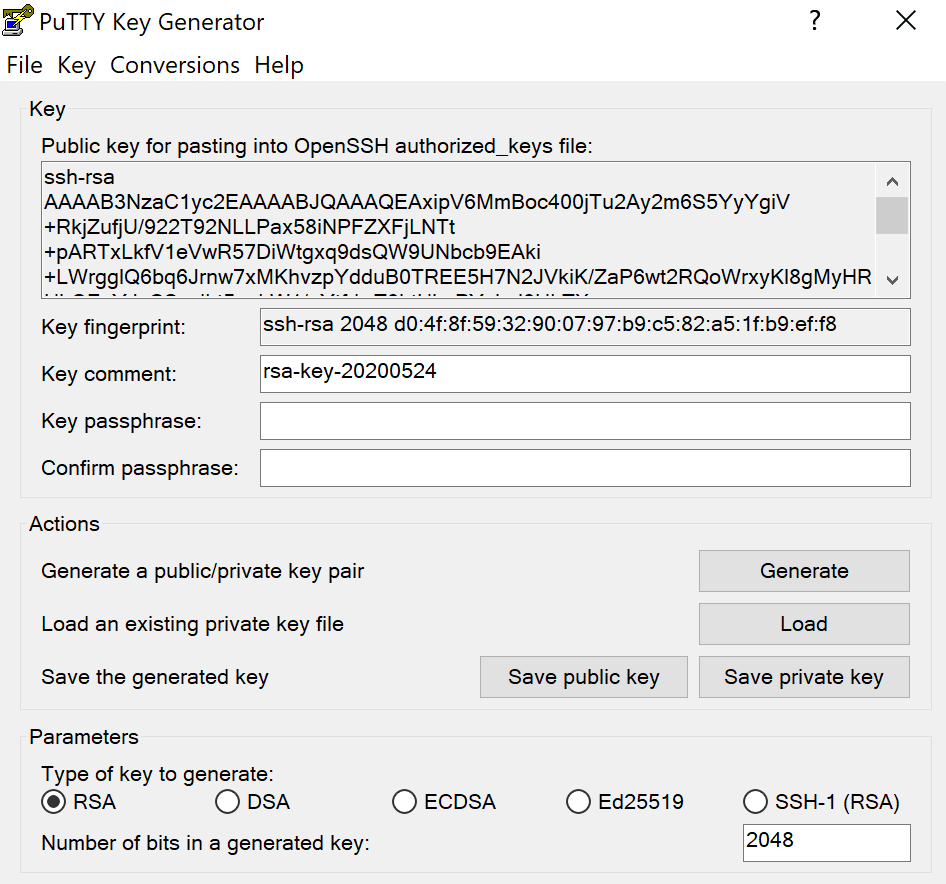
After it is complete, your public key will appear in the window.
It is recommended to use a passphrase as well as saving your private key.
Install Public Key on Server
To grant access to an account, you will need to add the new public key to the file named
First, install the public key. Then, log into your server and locate the authorized_keys file. Edit the file and insert the new public key into the file. Save the file and test to see if the login works.
Conclusion
We hope this article helps you to use the PuTTY client to connect to your hosting account. If you want to learn more about SSH, we have several articles that can help you out:
Feel free to comment if you have any questions.
Linas started as a customer success agent and is now a full-stack web developer and Technical Team Lead at Hostinger. He is passionate about presenting people with top-notch technical solutions, but as much as he enjoys coding, he secretly dreams of becoming a rock star.
Как подключиться к серверу по SSH протоколу
SSH – это защищенный сетевой протокол передачи данных. Текущая версия была выпущена еще в 1996 году и с тех пор не претерпела значительных изменений. Большинство используют бесплатную версию SSH с открытым исходным кодом (OpenSSH), хотя вообще протокол — коммерческий проект.
SSH ценится пользователями за простоту, универсальность и надежную защиту. Протокол шифрует все передаваемые данные (есть возможность использовать разные типы шифрования), так что перехватить передачу или подключиться к сессии практически невозможно.
Внутри SSH можно "завернуть" любой другой тип протокола, поэтому он позволяет передавать даже файлы большого объема, аудио, видео и т. д.
Подключение к удаленному серверу по SSH
Именно по SSH чаще всего удаленно управляют сервером – это безопасно, быстро и удобно в любой ОС. Можно создавать и удалять файлы и директории, загружать и скачивать файлы, архивировать данные.
SSH работает как клиент-серверное приложение. Серверная часть обычно по умолчанию включена в любую серверную ОС, а на устройстве пользователя отдельно устанавливается программа-клиент SSH. Для коннекта по протоколу SSH стандартно используется 22-й порт, но есть возможность его поменять.
При создании соединения протокол SSH идентифицирует пользователя клиентского приложения; это может быть:
- проверка с помощью логина и пароля (причем пароли также передаются в зашифрованном виде). Самый распространенный метод аутентификации;
- идентификация с помощью ключа – считается наиболее надежным способом;
- проверка по IP – ненадежный метод.
Подключение по SSH из ОС семейства Linux
В операционных системах Linux есть встроенный терминал, с помощью которого можно подключиться по SSH к серверу. Для его вызова нужно нажать сочетание клавиш Ctrl+Alt+T.
Далее наберите в терминале строку вида
- user_login – ваш логин на сервере;
- 111.222.333.444 – IP-адрес сервера.
После этого в окне терминала появится запрос подтверждения подключения (наберите yes) и запрос пароля – наберите пароль и нажмите Enter.
Если все введено корректно, откроется соединение по SSH.
Подключение из Windows
Для создания соединения с сервером по SSH в Windows используется утилита PuTTY. Это простой исполняемый файл, который не требует установки.
- Скачайте и запустите PuTTY.
- В основных настройках программы укажите IP-адрес сервера в поле Host Name.
- Проверьте, чтобы было выставлено соединение по SSH и правильный номер порта.
- Нажмите Open.
- По запросу программы ведите свой логин, а потом пароль. Ввод пароля не отображается – это нормально.
- Если все введено правильно, откроется подключение по SSH.
Можно ли зарегистрировать для подключения по SSH еще один логин?
Зайти на сервер по SSH можно, только используя ваш логин и пароль доступа к аккаунту хостинга. Дополнительного пользователя создать нельзя.
Можно ли запретить доступ по SSH
Отключение доступа проводится через техподдержку хостинга. Напишите в техподдержку и попросите отключить доступ по SSH.
Архивация и разархивация файлов (папок) по SSH
Архив может быть создан в наиболее распространенных форматах для ОС семейства Линукс (tar.gz) или же Windows (zip).
Чтобы заархивировать папку или файл по SSH в формате tar.gz,
подключитесь к серверу по SSH и вызовите утилиту tar с параметрами архивирования:
tar -czvf имя.tar.gz путь/папка/
- czvf – опции архивирования ( в данном случае c – команда создать архив, z – указание на архивирование со сжатием с помощью qzip, v – указание визуализировать процесс архивации, и f – функция архивации;
- имя – это имя вашего будущего архива;
- tar.gz – расширение файла архива
- путь/папка/ – путь к папке, которая будет заархивирована
Чтобы разархивировать полученный файл, пропишите команду
tar -xzvf имя.tar.gz
- x в опциях архивации – команда разархивировать;
- имя.tar.gz – имя файла архива, который будет разархивирован.
Чтобы создать архив формата zip по SSH,
потребуется запустить программу zip с параметрами:
zip -r name.zip /path/folder/
- -r – команда на архивацию всей папки;
- name.zip – имя вашего будущего архива;
- /path/folder/ – путь к папке, которую будем архивировать.
Обратный процесс в SSH запускается с помощью строки
где name.zip – имя файла архива, который будем разархивировать.
Создание новых директорий и удаление папок по SSH
После установления соединения по SSH с сервером наберите в терминале SSH:
- mkdir – команда создания папки;
- новая-папка – имя, которое вы присваиваете новой папке.
Папка будет создана в той директории, где вы сейчас находитесь. Чтобы перейти в нужную директорию перед созданием папки, используйте команду SSH – cd.
Удаление папки в SSH задается командой:
rm -r folder-name
Параметр -r в команде задается для того, чтобы папка была удалена вместе со всеми вложенными папками и файлами.
Как менять права на файлы и папки по SSH
Напомним, что права доступа к файлам и папкам на сервере через SSH удобнее всего задавать в виде числового сочетания XYZ, где X – права доступа владельца папки (файла), Y – права доступа группы пользователей, Z – права всех остальных.
Права задаются цифрами: например, 0 означает никаких прав, 5 – только чтение и исполнение, 7- полные права и т. д.
Команда изменения прав в SSH для отдельного файла выглядит так:
chmod 750 /var/www/file
- chmod – собственно команда смены прав;
- 750 – числовое кодирование прав. В данном случае вы даете полные права владельцу (7), право только на чтение и исполнение для группы (5) и никаких прав всем остальным (0);
- /var/www/ – полный путь к вашему файлу;
- file – имя файла.
Если вы устанавливаете по SSH права для папки, то команда аналогична. При этом, если вы хотите установить такие же права не только для самой папки, но и для файлов и вложенных директорий в ней, к команде нужно добавить ключ -r:
chmod -r 750 /var/www/folder
Как задать права доступа ко всем файлам и папкам одновременно
Менять права на каждую директорию долго и неудобно. Поэтому права для всех папок и файлов в SSH можно задать двумя командами:
-
- find /root-folder -type d -exec chmod 750 <> \
- find /root-folder -type f -exec chmod 644 <> \
Первая строка ищет (команда SSH – find) в корневой директории (на месте /root-folder указываете свою корневую директорию) все папки (для поиска указан type d – директория), после чего меняет у всех найденных папок права на 750.
Вторая строка аналогично ищет все файлы (указан -type f ) и меняет у них права на 644 (чтение и запись у владельца, у групп и остальных – только чтение).