Easy steps to open a port in Linux RHEL/CentOS 7/8
In this article I will share examples to check port status and open a port in Linux. This article was written while using CentOS 8, so it is safe to say that it also fully covers CentOS/RHEL 7/8, Fedora, Oracle Enterprise Linux and generally the whole Red Hat family of operating systems and possibly Novell’s SLES and OpenSUSE.
Before we jump into the examples to open a port in Linux, we must understand the requirement clearly. The very basic question which comes to my mind
- Do you need to open a port for a service? Such as a custom port 5555 for apache service?
- Do you mean the port is already listening but blocked by firewall so you want to open a port in firewall?
- Open a port for custom temporary task such as transfer and receive files using this port and then close the port.
We will cover all these scenarios in this article
Check port status
To check the list of existing ports which are open we will use nmap to check port status:
Currently we see only two ports are open on my CentOS 8 node.
Check list of listening ports
We will use netstat to list the TCP ports which are in listening state. The total number of ports are higher compared to the nmap output.
Open a port for some service
If this is your requirement then you are looking for the wrong question. Basically it is other way round i.e. a service will open a port. For example when you start SSHD service, by default it will start port 22 and not the other way round i.e. if you open port 22, it will not automatically start SSHD service.
Let us observe this in example, we know that port 22 is open on my CentOS 8 node. If I stop the sshd service
You can see that port 22 is not open anymore.
You must use respective service’s configuration file to change the default port. Once done you can restart the service and that should automatically open the respective port on your Linux node.
This covers the first scenario.
firewalld open port
It is also possible that your ports are disabled in firewall. If your port is not listed in nmap then it is most likely blocked by firewall.
We will use firewalld to open a port as this is the most used interface today in RHEL/CentOS 7 and 8. Determine which zone the system’s network interfaces are in. In the following example, the eth0 and eth1 interface is in the ‘public’ zone:
To permanently firewalld open port in a zone use the —add-port option. The example below permanently opens TCP port 1234 in the ‘public‘ zone. Note that permanent changes do not take effect until the firewalld service is reloaded.
Once firewalld open port, next use netstat to check port status:
We still don’t see port 1234 here. This is because currently port 1234 is not bind to any service . So our port is OPEN but NOT LISTENING. As soon as a request or service tries to use port 1234, we will get this in LISTEN state.
Use nc or ncat to open a port in Linux
Let us verify this theory Use nc or ncat to open a port in Linux nc or ncat is delivered as part of nmap-ncat rpm in RHEL/CentOS which you can install using yum or dnf. Use —listen with —port to open a port using nc command. In the below example we open port 1234
Open another terminal of this server and check port status
As you see port 1234 is listening for both IPv4 and IPv6. To only use IPv4 use -4 with the above command
Next on another terminal you can check port status for port 1234
Use nc or ncat to open a port and transfer files
We can also use nc to transfer file from one host to another host. Here I will transfer my » inputfile » from centos-8 to rhel-8 On the client we will open a random port, here we will use 9899. I have enabled verbose so you can see more details on the screen
Next to start the transfer, use the below command
If you face any issues you can check the firewall between your server and client. It is possible that the respective port is blocked and you must use firewalld open port
Lastly I hope the steps from the article to open a port and check port status on Linux was helpful. So, let me know your suggestions and feedback using the comment section.
Didn’t find what you were looking for? Perform a quick search across GoLinuxCloud
If my articles on GoLinuxCloud has helped you, kindly consider buying me a coffee as a token of appreciation.

For any other feedbacks or questions you can either use the comments section or contact me form.
Thank You for your support!!
5 thoughts on “Easy steps to open a port in Linux RHEL/CentOS 7/8”
A very thorough and helpful post. I was trying to allow ssh on a secondary port and could not get it to work using the usual advice (w/CentOS8.)
The recommendation you provided to add the port using the firewall-cmd was the missing ingredient:
Thanks for this!
Hi
I did below steps and reloaded firewall but still when I do netstat -ntlp port 1234 not showing open
I did explained this part in the article
We still don’t see port 1234 here. This is because currently port 1234 is not bind to any service. So our port is OPEN but NOT LISTENING. As soon as a request or service tries to use port 1234, we will get this in LISTEN state.
Hi,
I did the below steps and it worked.
When I use scan port (http://ports.my-addr.com/ip-range-port-scanner-tool.php), the first time the result is open, but the second time the result is closed (port is open but not listening).
How to make the port always listen?
I assume you are asking about nc command. By default nc will close the connection after current connection is completed. To keep it active use -k along with -l
Открытие портов в CentOS 7

Практически все пользователи дистрибутива CentOS 7 устанавливают в систему различные средства, для корректной работы которых необходимо открывать порты определенных номеров. Это требуется для обеспечения нормального соединения с узлами и безопасного обмена информацией. Осуществляется поставленная задача путем изменения правил межсетевого экрана. Конечно, каждый юзер может использовать самые разнообразные брандмауэры, однако стандартным является iptables. Именно на его примере мы и предлагаем открыть порты, следуя приведенным далее инструкциям.
Открываем порты в CentOS 7
Открытие портов — задача несложная, ведь для этого придется ввести всего несколько команд в консоль. Однако если вы изначально не производили дополнительных настроек с межсетевым экраном или используете стороннее средство, придется дополнительно изменить важные параметры. Поэтому мы разделили нашу статью на этапы, чтобы начинающим юзерам было проще разобраться с каждым шагом, а сейчас начнем с непосредственной инсталляции iptables в CentOS 7.
Шаг 1: Инсталляция или обновление iptables
Как уже было сказано выше, iptables в CentOS 7 выступает в качестве межсетевого экрана по умолчанию. Если вручную не было произведено никаких изменений, можно смело пропускать данный шаг, выполнив только последний этап с инсталляцией утилит брандмауэра. В случае необходимости проверки обновлений или повторной установки данного инструмента советуем воспользоваться следующим руководством.
-
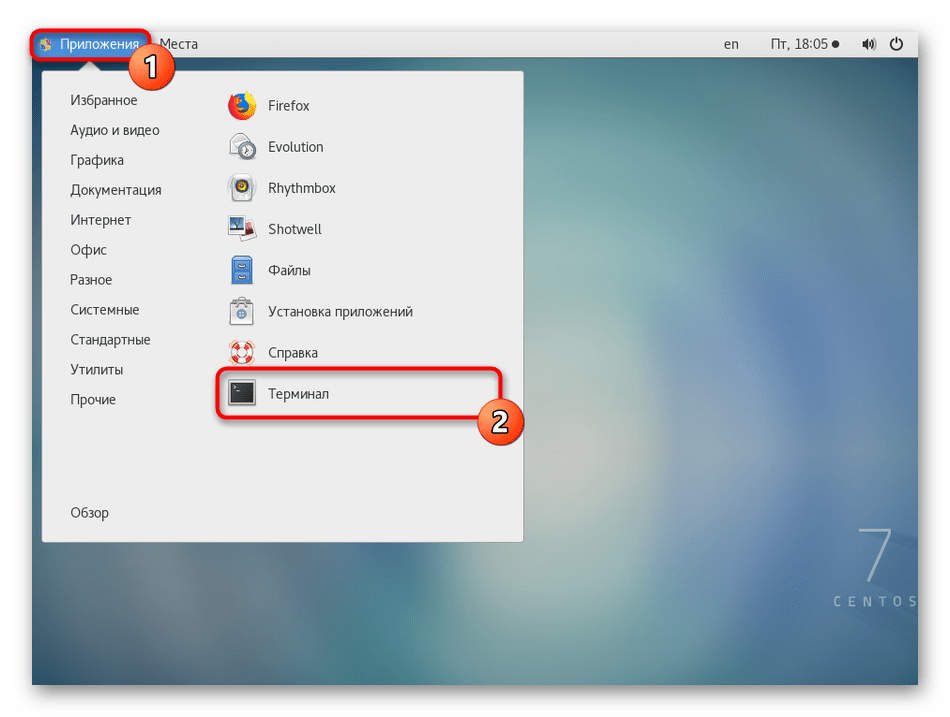
Все действия, описываемые сегодня, будут производиться в «Терминале», поэтому все начинается с его запуска. Используйте для этого горячую клавишу Ctrl + Alt + T или значок, добавленный в раздел «Избранное» в меню приложений.
Шаг 2: Сброс стандартных правил брандмауэра
Если ранее системным администратором или пользователем не производилась настройка iptables, стандартные настройки следует сбросить, чтобы в будущем не возникло проблем с совместимостью правил. Дополнительно потребуется указать и стандартные правила, обеспечив корректность выполнения входящих и исходящих соединений. Все это происходит так:
- Введите в консоли команду iptables -L -v -n , чтобы просмотреть список текущих параметров.
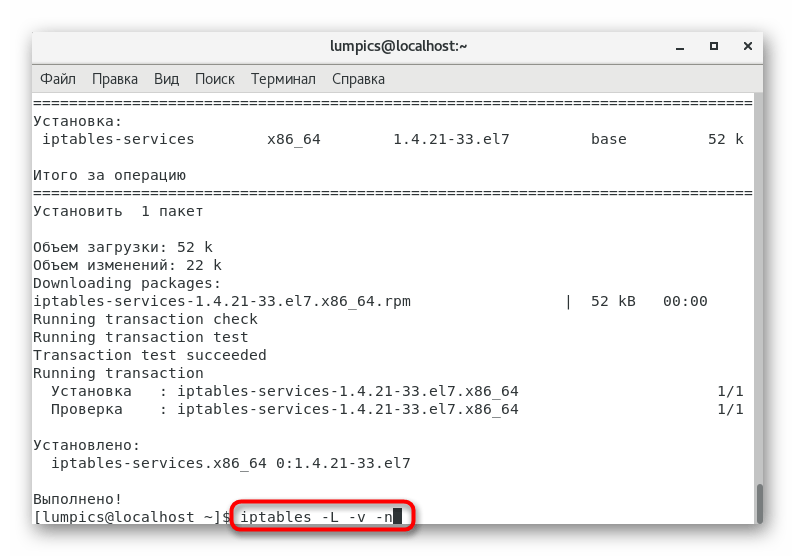
- Если они вас не устраивают, значит придется осуществлять сброс и ручную конфигурацию.

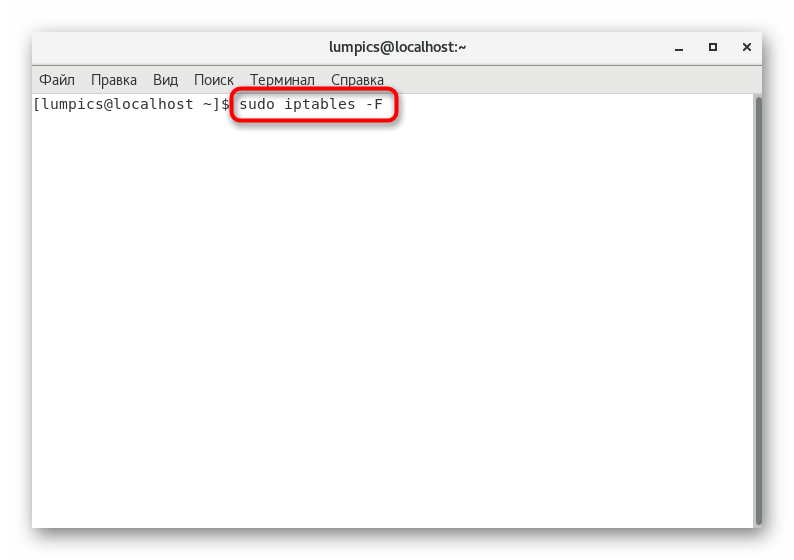
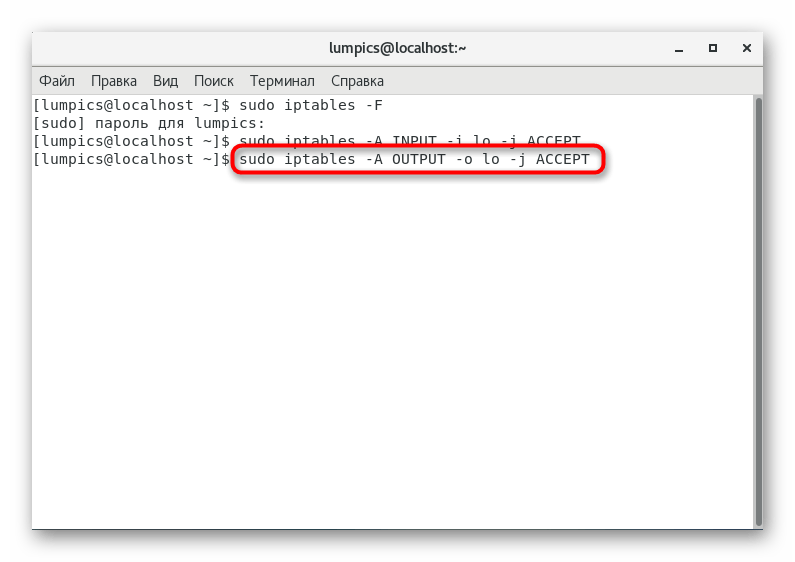
- Удаление существующих правил выполняется с помощью всего одной строки sudo iptables -F .
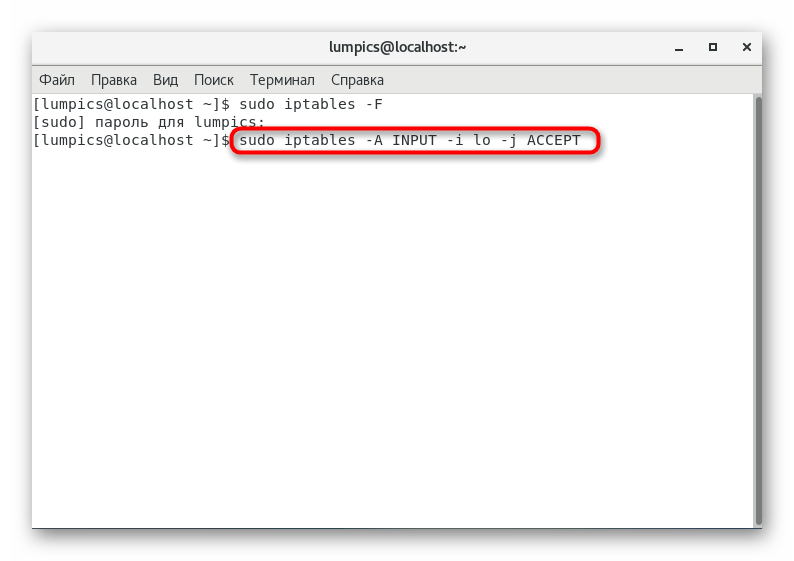
- Далее разрешите все вводимые данные сервера, вставив sudo iptables -A INPUT -i lo -j ACCEPT .
- Для исходящих соединений применима практически такая же команда: sudo iptables -A OUTPUT -o lo -j ACCEPT .
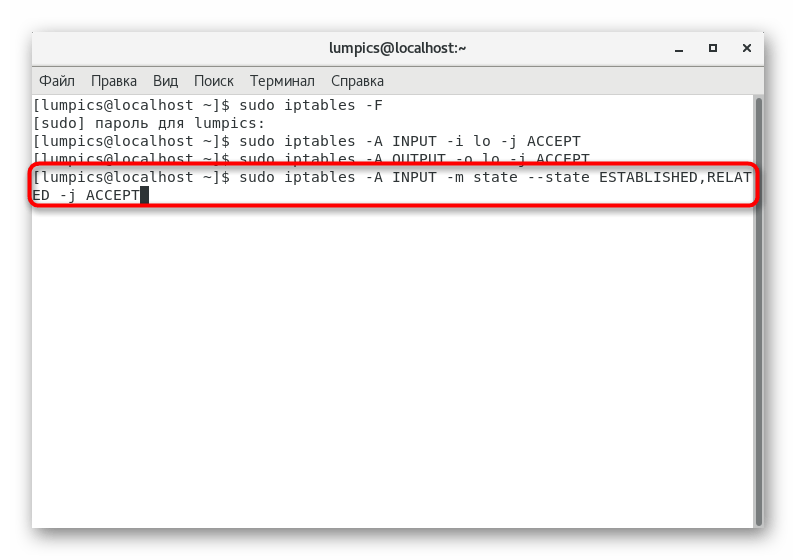
- Рекомендуется ограничить новые соединения и разрешить уже существующие, чтобы обеспечить безопасность и наладить работу указанных ранее правил. Происходит это через sudo iptables -A INPUT -m state —state ESTABLISHED,RELATED -j ACCEPT .
Все дальнейшие настройки рассмотренной утилиты осуществляются пользователем вручную, включая и открытие портов. О последней теме мы поговорим в следующих шагах, а расширенная конфигурация не входит в рамки сегодняшнего материала. Вместо этого рекомендуем ознакомиться со специальным обучающим материалом по данной теме, воспользовавшись расположенной ниже ссылкой.
Шаг 3: Отключение FirewallD
К этому шагу следует присмотреться тем пользователям, кто ранее устанавливал FirewallD или он был добавлен автоматически. При настройке портов через iptables данный инструмент может мешать корректному выполнению правил, поэтому его потребуется деактивировать.
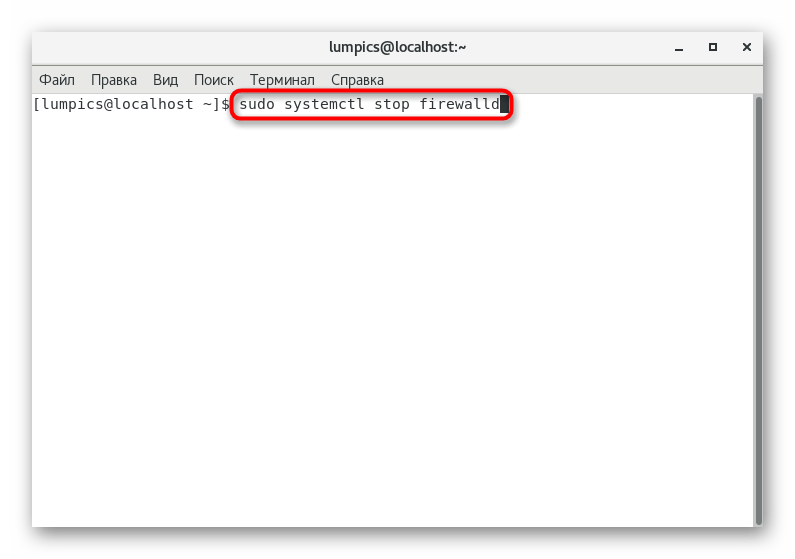
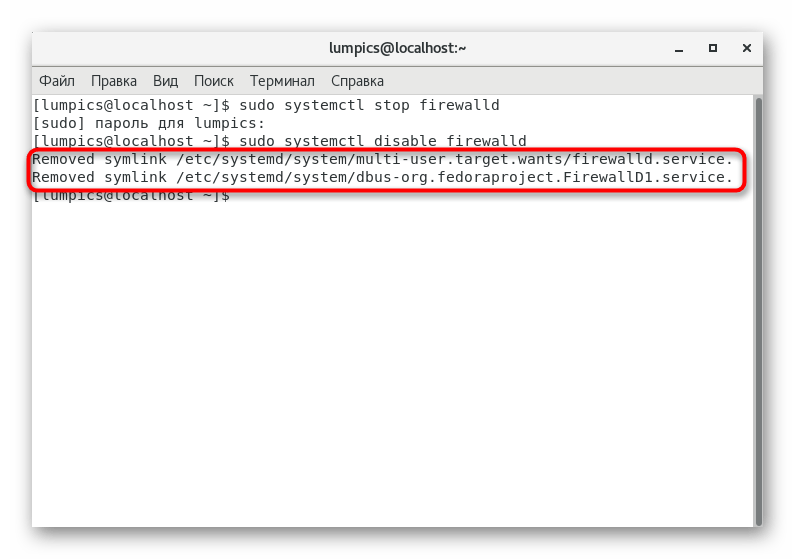
- Для начала остановите выполнение службы через sudo systemctl stop firewalld .
- Далее произведите полное отключение, воспользовавшись командой sudo systemctl disable firewalld .
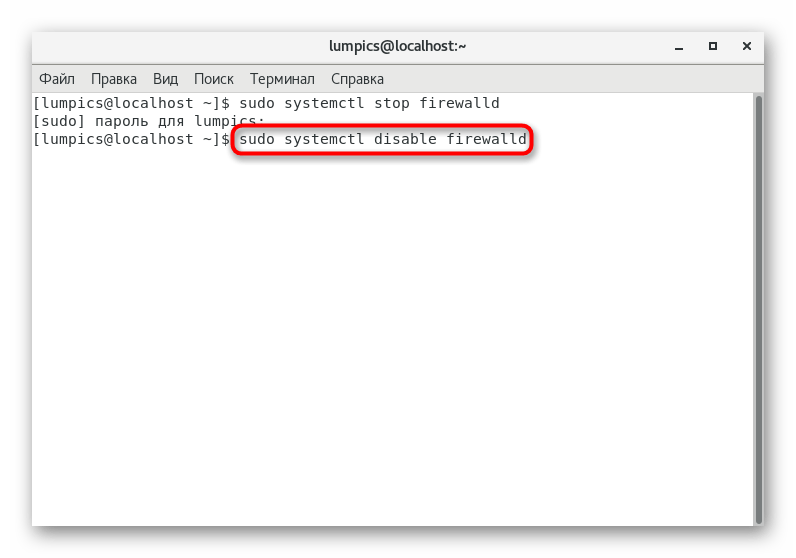
- Вы получите информацию о том, что символические ссылки были удалены, следовательно, FirewallD с этого момента не работает.
Если вы хотите вручную удалить папки, хранящие в себе настройки FirewallD, пропустив перечисленные выше команды, вставьте в «Терминал» по очереди указанные ниже строки и активируйте их.
rm ‘/etc/systemd/system/dbus-org.fedoraproject.FirewallD1.service’
rm ‘/etc/systemd/system/basic.target.wants/firewalld.service’
В будущем любому пользователю может потребоваться активация и дальнейшая настройка FirewallD, особенно когда приходится работать с различными веб-серверами и утилитами. Мы предлагаем сделать это, используя приведенное далее руководство.
Шаг 4: Открытие портов через iptables
Пришло время произвести основное действие, чему и посвящена сегодняшняя статья. Выше мы выполнили абсолютно все подготовительные работы, чтобы сейчас открыть порты в CentOS 7. Теперь с этим не должно возникнуть никаких проблем, поэтому можно вводить следующие команды.
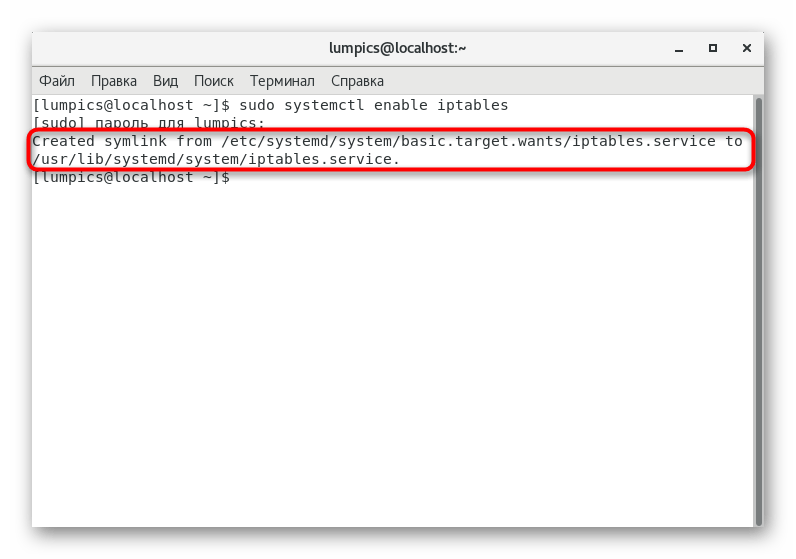
- В обязательном порядке добавьте межсетевой экран в автозагрузку, чтобы не запускать его постоянно вручную. В этом поможет команда sudo systemctl enable iptables .

- Вы будете уведомлены о создании символической ссылки.
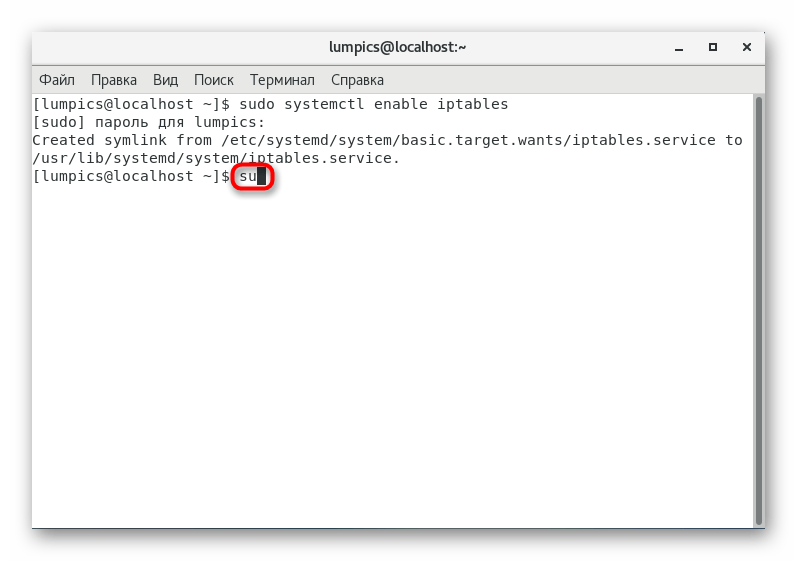
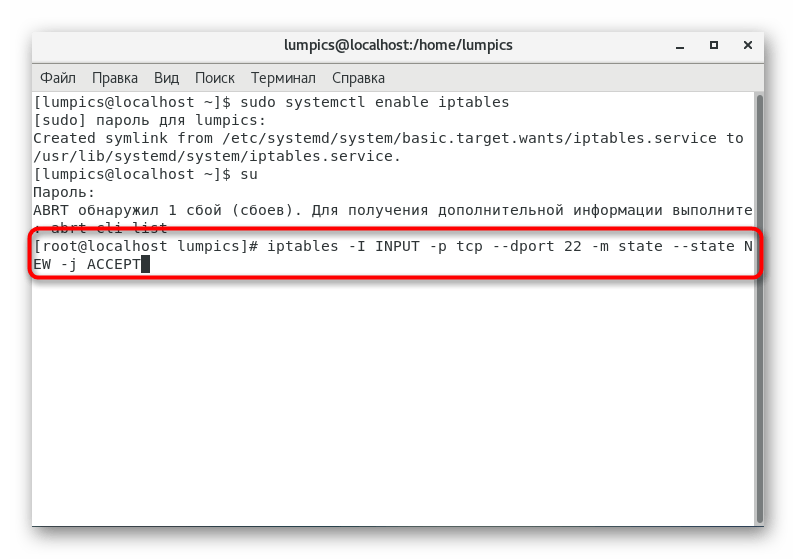
- Активируйте постоянные права суперпользователя, введя su , чтобы для каждой команды этой терминальной сессии не нужно было приписывать sudo.
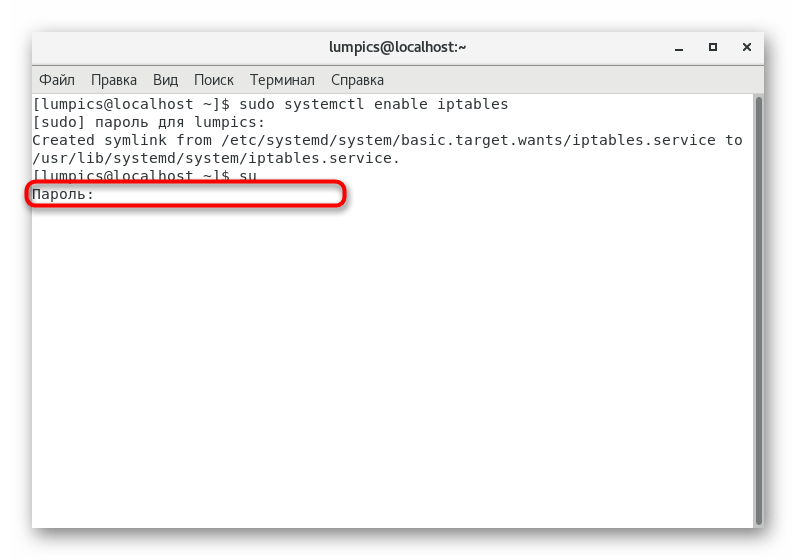
- Подтвердите это действие, написав свой пароль.
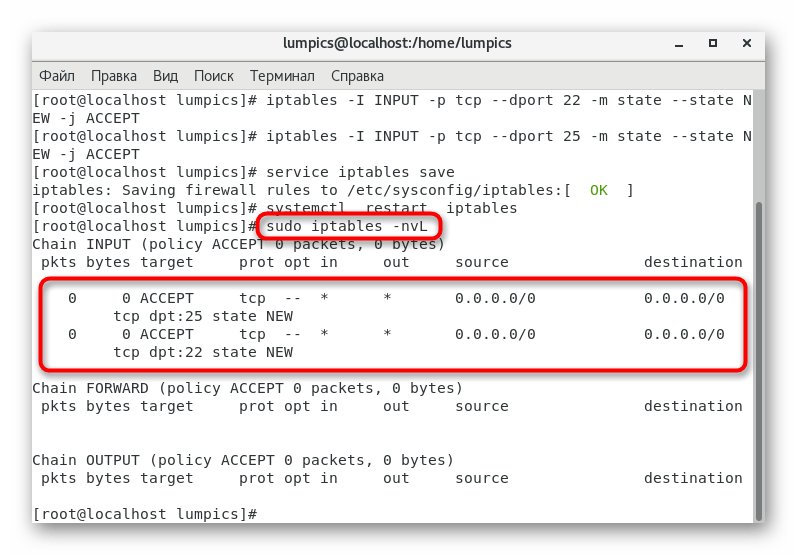
- Откройте порт через команду iptables -I INPUT -p tcp —dport 22 -m state —state NEW -j ACCEPT , где 22 замените на необходимое число.
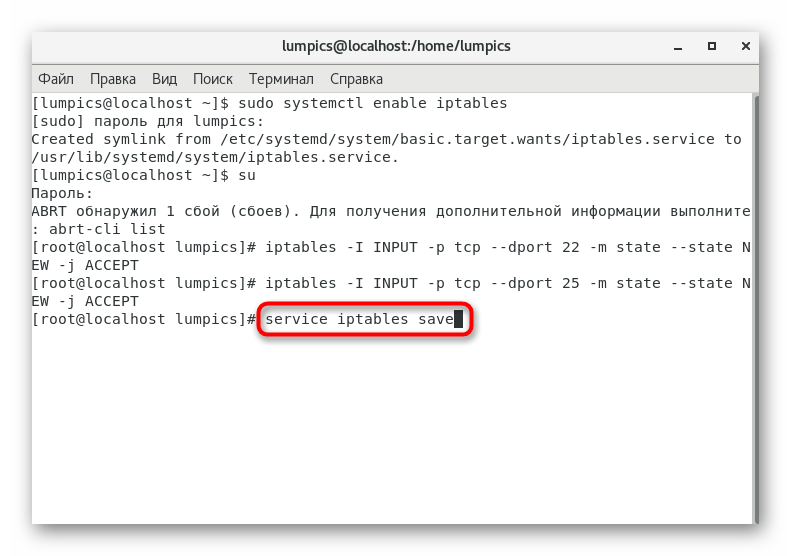
- Сразу же можно открыть и следующий порт, например, под номером 25 (SMTP-сервер). Для этого введите iptables -I INPUT -p tcp —dport 25 -m state —state NEW -j ACCEPT .

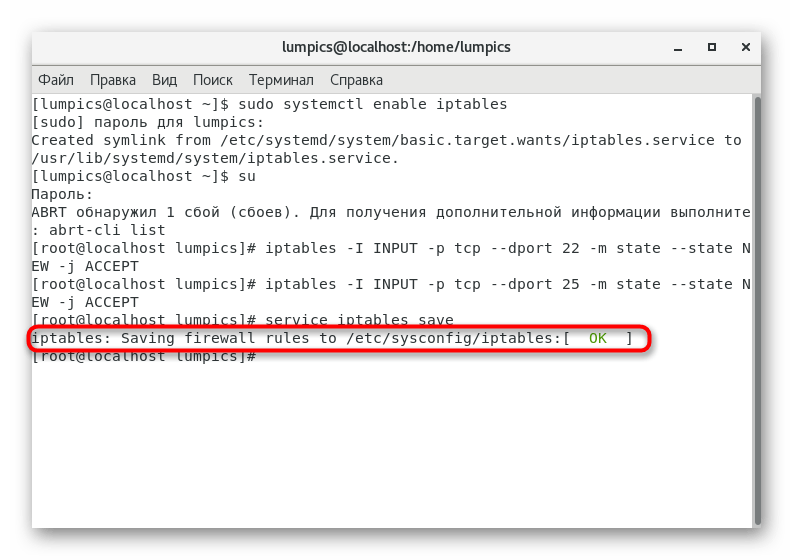
- Сохраните все изменения, вставив строку service iptables save .
- Вы будете уведомлены о том, что конфигурация успешно применена.
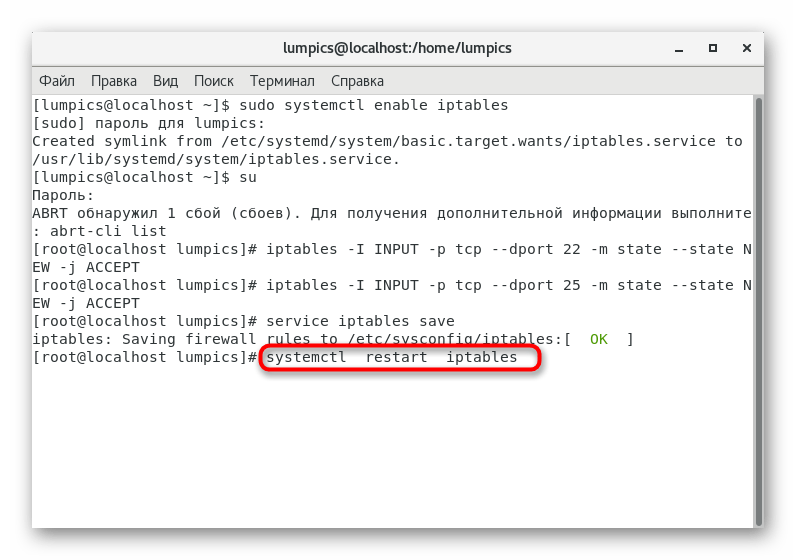
- Перезагрузите межсетевой экран, чтобы все изменения вступили в силу. Осуществляется это через команду systemctl restart iptables .
- В конце мы предлагаем использовать sudo iptables -nvL , чтобы изучить все открытые порты.
В этой статье вы узнали все об открытии портов в CentOS 7. Как видите, это не займет много времени, а все изменения будут применены сразу же после перезагрузки сервисов. Используйте рассмотренные выше команды, изменяя только номера портов, чтобы все прошло успешно.
Managing Your Firewall on Centos 7 with Firewalld
![]()
Most systems are currently connected to the Internet, which expose them to outsiders users who may try to gain unauthorized access directly by setting up illegal connections, intercepting remote communications or by pretending to be a valid user. There are some ways of protecting against such attacks, such as firewalls, encryption, and authentication procedures.
A firewall is a layer of protection configured based on pre-defined rules between a private and a public network to segregate traffic. Inbound and outbound data packets are intercepted and inspected by the firewall, allowing only non-threatening packets to pass through. There are two powerful firewalls in Linux systems which are firewalld and iptables. The Linux kernel implements firewalling via the netfilter framework to inspect each packet. To configure which packets are allowed and which are not, firewalld is the default solution on RedHat based systems such as Centos 7
Understanding How Firewalld Works
Centos administrators can manage their environment by setting the packets rules with firewalld. FirewallD for Firewall Daemon was developed as a complete new solution for managing Linux firewalls through systemd using the firewalld.service unit file where the runtime configuration is read from /etc/sysconfig/firewalld .
The firewalld service stores the firewall rules in XML file format at two different locations: the system-defined rules in the /usr/lib/firewalld directory and the user-defined rules in /etc/firewalld . Normally, instead of loading rules offline from file, you add them directly to the FirewallD daemon. The files at the former location can be used as templates for adding or modifying new rules. We simply need to copy the required file to the /etc/firewalld/services directory and make necessary updates. The firewalld service reads the files located in /etc/firewalld and applies the rules defined in them.
You need to make sure that the firewalld service is running, if not start it and enable it for boot start
Then check its state
Firewalld gives more flexibility with its concept of network zones and service names. The firewall-cmd command is the powerful command line tool that is used to create, modify, manage, and remove rules that allow or deny traffic by service or port through the firewalld service.
The Purpose of Zones in Firewalld
The first point is the firewalld zones that define the level of trust for different kinds of network connections and can be divided in two types: mutable where the modification to its definition is allowed and immutable where its definition cannot be changed. Every packet that comes into the system is analyzed for its source address, and based on that source address, firewalld analyzes to see if the packet belongs to a specific zone. Each zone can have several connection, but a connection can belong only to one zone.
The use of zones is particularly important on servers with multiple interfaces because it allows administrators to easily assign a specific set of rules. The custom zone configuration files are located in /etc/firewalld/zones and there is a default zone set in the /etc/firewalld.conf configuration file which is predefined as public zone. Firewalld works with some default zones defined as below:
- trusted immutable: allow all network connections
- drop immutable: all incoming packets are dropped and there is no reply but ongoing packets are accepted
- block immutable: all incoming packets are rejected with ICMP host-prohibited messages to the sender
- public mutable: it’s the default zone for all the newly created network interface. It represents a public area for untrusted network where only limited connections are accepted. It means to don’t trust the other computers
- external mutable: for external networks with NAT masquerading enabled where only selected incoming packets are accepted, protecting a local network.
- dmz mutable: for computers in a demilitarized zone publicly accessible, here only selected incoming packets are accepted. The computer have limited access to the internal network.
- home mutable: for trusted home networks with only selected incoming packets accepted. Most computers on the same network are trusted
- work mutable: for trusted work networks with only selected incoming connections accepted.
- internal mutable: for internal networks with a restriction on incoming connections.
The zone files are stored in the /usr/lib/firewalld/zones/ or /etc/firewalld/zones directories saved with .xml extensions
You can have a look on the content of a zone
For a given zone you can configure services, ports, masquerading, port forwarding, and ICMP filter.
Manage the Zones with firewall-cmd
You manage the zones with the firewall-cmd command by using some parameters:
- — get-zones: displays all the zones in your environment
- — get-default-zone: shows the actual default zone
- — list-all: lists the configuration (services) of the default zone only
- — list-all-zones: lists the configuration (services) of all the zones presents at once
- — get-active-zones: shows all the actives zones. You can have more than one zone.
and you can list the zones with the —get-zones parameter
You can check the default zone with the —get-default-zone
Each zone has a specific configuration that you can also check as with the default zone like below
You can see that the default zone is also the active zone. With that, we can imagine that we can check the active zone. It’s possible with the —get-active-zones
You can list the configurations of all the zones
You can choose a specific zone to see its configurations with the —zone= parameter
Edit a Zone
You can decide to change the default zone to set another one
You can see that the change took effect. You can check it with the —get-default-zone
A zone can be assigned to a server interface. It means that if a server has multiples interfaces, you can associate a zone on each interface to implement your network strategy. This can be done by the combination of —zone= and —change-interface= parameters
By assigning a new zone to an interface, that zone is automatically activated
You can also check if a specific interface belongs to a zone with the —query-interface= parameter as below
You can see that the interface ens34 is not configured for the work zone.
It is possible to add, remove, and query zones for masquerading with the —masquerade option
And you can check the result
You remove the masquerade with the —remove-masquerade option.
Firewalld Services
The second point is firewalld service which is not the same as a service in systemd. Some default services are defined in firewalld allowing administrators to easily accept or deny access to
specific ports on a server. A service can be seen as network protocols or ports as well as a list of firewall helper modules automatically loaded if a service is enabled. If you want to run a service such as a Web server, an FTP server, or SSH encrypted connections, you must specify them in the firewalld services during the configuration.
There is a configuration file behind each service explaining which UDP or TCP ports are involved, and if so required, which kernel modules must be loaded. The use of predefined services makes it easier for the user to enable and disable access to a service. The services are stored in the /usr/lib/firewalld/services or etc/firewalld/services
You can check the content of the content of a service
Manage Services with Firewalld
The services are still managed with the firewall-cmd command followed by the —get-services parameter which shows a list of names used by firewalld to identify some network services:
You can list only the services currently in use in the default zone
It’s possible to list only the open ports of a zone. The result will be empty if there is no port
If you don’t specify a zone, the ports of the default zone will be listed.
Add and Remove Services and Ports
When you add (open) or remove (close) a service or a port on firewalld, you don’t need to restart the entire firewalld service itself but just to reload it. Adding a service is done with the —add-service= option. You can choose a specific zone. When you don't specify a zone, the default zone is considered.
You can add a service by specifying the network protocol to use
You can instead add a port and need to indicate either TCP or UDP
The services and ports added are not persistent. If you restart the server or the firewalld service, you will lose the configuration. To make the configuration always permanent, you need to use the —permanent option and then, reload firewalld to take effect with —reload option
Now reload. For each configuration of firewalld, make sure to reload the service on your side. We will not show the reload command everytime.
It is possible to add a range of ports
You can remove a service with the —remove-service= option. You can also specify a zone (or not) for the default zone. Don't forget to reload after a modification
You can remove a port with the remove-port= for a specific zone if you want
You can also check if a service is enabled on a zone with the query-service= option
The same can be done with a port with the query-port=
Add and Remove a Source
A source in firewalld represents an ip address to be used in order to filter packets through a zone. You can add a source with the —add-source= option
You can display only all the sources of a zone
Now you can remove a source
Configure Port Forwarding
In the network policy, you can need to forward inboud packets from one port to another customized one for a zone. To do this in firewalld, you need to enable the masquerading for the zone. The masquerading is form of address translation where an address of a private network is mapped behind a public address. This is generally done for external network.
Check if masquerading is already enabled
if it’s not in your case, then do it. You can make the change permanent
Let us assume that we will forward the packets for port 143/tcp to port 4545/tcp at a new address.
After the reload, you can check by listing the zone information. You can delete the forwarding with
Allow and Block ICMP Packets
Normally to secure a server, it’s recommended to block the icmp packets. There are some types of ICMP paquets such as echo reply and echo request. It’s interesting to know the type to block and it’s possible with the —get-icmptypes option
Now you can choose the type of packet to block with the —add-icmp-block= option
Then reload and check the zone to see the result
Add and Remove Multiple Ports and Services at Once
Normally with firewalld you can not manage multiples services or ports in one command. But we can see how it’s possible to do it with a script bash. The idea is to create a loop into which we will list the ports or services to be added in the firewalld command. You can decide if you want the —permanent option for the configuration
Don’t forget to reload in the script. Then change the permission
Now you can run the script
If you want to remove multiple ports, just change the option with —remove-port . If you want to add or remove multiple services, just edit the script file by changing the list of ports to the list of services and the required option —add-service or —remove-service
Now you understand how firewalld works and some options to properly secure your server. With Firewalld, based on which zones and services you configure, you can increase the network security by controlling the traffic to allow or disallow. Service can be convenient to use around ports. Firewalld offers a graphical interface which can be used with firewall-config.
Как открыть и закрыть порты с помощью IPTables?
IPtables — это брандмауэр по умолчанию, используемый в системах CentOS и RHEL. На наших VPS или Выделенных серверах, брандмауэр активен, тогда как, все порты открыты. Мы делаем это для того, чтобы все пользователи могли подключаться к сервисам, которые они устанавливают, например, cPanel или Plesk. Вы можете использовать правила приведенные ниже для того, чтобы закрыть или открыть некоторые порты на вашем сервере.
Список текущих правил брандмауэра
iptables—L
Эта команда перечисляет все текущие правила брандмауэра, загруженные в IPtables.
Открыть порт в IPtables — CentOS 6
Открыть порт в IPtables — CentOS 7
В CentOS 7 вам следует использовать флаг –permanent, чтобы открыть порт. Как и в CentOS 6, просто замените номер 80 на нужный порт и выполните команду –reload
Эта команда открывает запрошенный порт. В нашем примере это порт 80. Замените 80 на номер порта, который вы хотите открыть. Запустите команду service iptables save, чтобы сохранить правила в конфигурации брандмауэра.
Закрыть порт в IPtables — CentOS 6
Эта команда закроет порт 80 на вашем сервере, и никто не сможет подключиться через этот порт. Замените цифру 80 на требуемый номер порта, а затем запустите команду service iptables save, чтобы сохранить ее в конфигурации IPtables. Вы также можете использовать команду DROP вместо REJECT.
Закрыть порт в IPtables — CentOS 7
Измените число 80 на номер порта, который вы хотите закрыть, затем выполните остальную часть команды, чтобы зафиксировать это в конфигурации брандмауэра.
Домен | Com домены на сайте Hostimul.com
Домен — означает имя веб-сайта, которое позволяет пользователям Интернета получать доступ к своему веб-сайту. Доступ к веб-сайту, не имеющему этого им..
Купить домен | Дешевые цены на домены в Hostimul.com
Купить домен — Нет необходимости тратить время на поиск надежной и прибыльной компании для покупки домена. Как команда Hostimul.com, мы предлагаем вам..
Дешевый Vps в Европе
Дешевый Vps в Европе в Hostimul.com — это виртуальный частный сервер. Вы можете купить это на Hostimul.com, где мы предоставляем виртуальные серверы с..
Vps в Европе
Наш Vps в Европе будет для вас отличным решением, если вы переросли среду общего хостинга и задаетесь вопросом, что делать дальше. Наши специалисты по..
Недорогой выделенный сервер
Недорогой выделенный сервер – это выделенный виртуальный сервер, услуга хостинга, при которой клиент полностью получает в личное пользование виртуальн..
Хостинг с большим дисковым пространством ✅
Хостинг с большим дисковым пространством предоставляет пользователям все преимущества безлимитной услуги. Хостинги предлагают клиентам разные услуги. ..
Быстрый виртуальный хостинг✅
Ищете быстрый виртуальный хостинг ? В Hostimul вы найдете все, что вам нужно. Давайте уточним что такое виртуальный хостинг? Когда придет время выбрат..
Выделенный Сервер в Европе ✔️
Выделенный сервер в Европе, предлагаемый Hostimul.com станет для вас уникальной возможностью получить доступный и надежный сервер для вашего проекта. ..
Купить Хостинг Дешево
Хотите купить хостинг дешево для вашего сайта ? Добро пожаловать в Hostimul.com, где найдете только выгодные тарифы. На рынке доступно несколько веб-х..
Облачный хостинг
Решение выбрать облачный хостинг может быть продиктовано желанием иметь собственный сервер, и не платить за избыточную емкость жесткого диска, которой..
Хостинг недорогой
Ищете хостинг недорогой ? Hostimul.com будет для вас лучшим спутником по обеспечению вашего проекта наилучшей хостинговой услугой. В поисках самого де..
Сервер для сайта
Надежный сервер для сайта необходим каждому, кто желает безопасный “ Дом ” для своего проекта-сайта. Крупному сайту, который интенсивно наполняется но..
Сервер Аренда
Сервер аренда — это услуга, которая нужна особенно тем, кто имеет большой проект или сайт для безопасной и безотказной работы. Основные причины, по ко..
Виртуальный хостинг сайтов ✔️
Ищете виртуальный хостинг сайтов ? Hostimul будет для вас верным спутником по организации вашего проекта онлайн. Увеличьте скорость с помощью веб-хост..
Хостинг для wordpress Украина✔️
Услуга » Хостинг для wordpress Украина » в Hostimul является наиболее востребованной в силу своей надежности и качества обслуживания. Управляемые сайт..
Надежный Хостинг ✔️
Надежный хостинг доступен по адресу Hostimul.com по самым выгодным тарифам ! Владывая значительные средства в создание актуального и интересного сайта..
Хостинг выделенный сервер
Выбрать хостинг выделенный сервер для бизнеса не так просто, как кажется на первый взгляд. Одним из актуальных вариантов является выделенный сервер – ..
Хостинг пробный период✅
Хостинг пробный период доступен в Hostimul.com на целый месяц с бесплатным доменом. Получите удобные услуги управления доменом вместе с учетной запись..
Купить Хостинг Для Сайта ✅
Решили купить хостинг для сайта ? Вы пришли определенно по верному адресу ! Скорость сайта может сильно повлиять как на видимость вашей поисковой сист..
Хостинг для интернет магазина
Ищете хостинг для интернет магазина ? Hostimul будет для вас наиболее лучшим вариантом для безопасной и отказоустойчивой деятельности вашего проекта, ..
Хостинг бесплатный ✔️
Выберите хостинг бесплатный для оптимизации вашего бизнеса. Наши хостинговые услуги также распространяют свои услуги на таких администраторов веб-сайт..
Vps в Сша ☑️
Хотитн продвижения бизнеса онлайн ? Будем рады предложить вам лучшие серверные опции, которые выведут возможности бизнеса на новый уровень. Vps ..
Vps в Украине ☑️
Vps в Украине стал самым популярным среди всех. Технология виртуализации используется службой хостинга, которая предоставляет частные выдел..
Vps в Германи ✅
Vps Германи с использованием Hostimul.com означает, что вы можете быть уверены, что сможете использовать дополнительные ресурсы хостинга ил..
Лучший хостинг ☑️
Хотите продвижение вашего проекта онлайн ? Для этого необходим лучший хостинг, которого вы найдете на Hostimul.com, являющийся лидеро..
Аренда виртуального сервера ☑️
Перед тем, как решитесь аренда виртуального сервера вам необходимо решить какой трафик ваш нужен. Виртуальный сервер это — хост..
Выделенный сервер ☑️
Выделенный сервер идеально подходит для высоконагруженных сайтов, в особенности для игровых порталов, для больших интернет магазинов с высокой посещае..
Купить хостинг ☑️
Купить хостинг — это процесс не самый легкий и требует учет определенных аспектов. Очевидно, чтобы ваш сайт был скоростным и без проблем обслуживал св..
Виртуальный Сервер ☑️
Виртуальный сервер — это сервер, который совместно использует аппаратные и программные ресурсы с другими операционными системами (ОС) по..