How to undo rm in Linux? [100% Working]
Linux distributions are managed with both GUI(Graphical User Interface) and CLI(Command Line Interface). The CLI is at the forefront in the use of the server operating system. So, can the work done in an operating system with the GUI be done on the systems used with the CLI? For example, can you undo the rm operation?
How to undo rm in Linux?
We will describe 2 methods and 3 suggestions to answer this question. You can search for deleted data on disk with Foremost and Scalpel applications. With the Trash command you have a bin in the CLI just like you would in a GUI system. You can alias the rm command to the mv command and provide a workaround. Finally, you can add an alias to the rm command and add a check step again before deleting it. Let’s exemplify them.
Method-1: Recover data using Foremost
Foremost is a data recovery program for Linux used to recover files using their headers, footers and data structures through a process known as file carving. It is available for free and can be used as a general data recovery tool.
According to the Linux distribution you are using, you can find the installation step below:
For Debian Based OS(Ubuntu, Mint, Pardus etc):
For Arch Based OS(Archman Linux, Arch Linux, Manjaro etc):
For Redhat-based OS(Centos, Fedora, AlmaLinux, Rocky Linux etc), the forensics repository is added first, then the package is installed:
The default usage of the foremost command is:
You can search by giving the file(jpg, gif, png, exe, mov,pdf, doc, zip, rar, htm, mp4 etc) parameter with the -t parameter. The -i parameter is used as the file input file. If no input file is specified or the input file cannot be read, stdin is used.Files recovered with the -o parameter are written to the specified directory. If no value is entered, the output is taken to the «output» directory.
An example for foremost:
The output directory and the pdf files found are as follows:
All formats are searched by giving the value «all» to the -t parameter:
The file formats found are in their named directory. This way undo rm is done with the «previous» command.
Method-2: Recover data using Scalpel
Scalpel is a fast file carver that reads a database of header and footer definitions and extracts matching files from a set of image files or raw device files. Scalpel is independent on used file-system and will carve files from FATx, NTFS, ext2/3, or raw partitions. It is useful for both digital forensics investigation and file recovery.
Follow the steps below to install on your system. For Debian Based OS(Ubuntu, Mint, Pardus etc):
For Arch Based OS(Archman Linux, Arch Linux, Manjaro etc):
For Redhat based operating systems (Centos, Fedora, AlmaLinux, Rocky Linux etc.), the EPEL repository is added first and the «tre» package is installed:
Then the forensics repository is added, then the «scalpel» package is installed:
The scalpel configuration file is located(«/etc/scalpel/scalpel.conf» for Debian based OS) at /etc/scalpel.conf. File formats are in this file, a new file type definition or wanted/unwanted formats are defined in this file:
You must prefix the file format you want to exclude with a # character. Then start a sample search:
When the search is complete, you can access the data in the directory specified with the -o parameter:
Before starting the scan, make sure that the directory you specify with -o has enough space. Otherwise, you may encounter an insufficient disk space warning.
Protect Linux system from accidental rm command execution
Suggestion-1: Using Trash Command
In this suggestion we will use trash on the CLI. Let’s examine how you can install the «trash-cli» application to Linux distributions:
After installation, you can delete files with the trash command:
The file was deleted with the trash command, you can give the -d parameter for the directory:
You can list the deleted files and directory with the trash-list command:
The trash-restore command is used to get the deleted file/folder back from the trash box:
Clears all trash with the trash-empty command:
These works fine, so how do we use them in the rm command use? The answer to this question is to define «alias». When the rm command runs, the «trash» command runs so the undo can be done after deletion.
Open the user’s «.bashrc» file with a text editor and type the following line:
Then get this change to the user:
Now when you run the rm command, the trash command actually works:
Suggestion-2: Sort of Hack Solution for undo rm
This time, the » mv » command can be given as alias to the rm command. For this, the » .Trash » directory is created in the user’s home directory:
Then the mv command Alias is defined:
Then get this change to the user:
Then run the rm command:
If you use RM in this way, you will have a limited «undo rm» feature.
Suggestion-3: Use interactive rm command
Again, a alias is needed. This time we will define the rm command with its own parameter. Some Linux distribution do this by default. They set the » -i » paramter to the rm command default. In this way, the user requests approval before the deletion process.
Edit the «.bashrc» file:
Then get this change to the user:
And try deleting files:
You will now receive a warning before deleting. There is no undo process, but you will have time before the deletion process.
Summary
Data deletion on servers is risky. Care should be taken when assigning authorization to users. Above are some undo methods and precautions you can take in the system.
For more information, you can get help from the application’s manual pages:
References
Didn’t find what you were looking for? Perform a quick search across GoLinuxCloud
If my articles on GoLinuxCloud has helped you, kindly consider buying me a coffee as a token of appreciation.

For any other feedbacks or questions you can either use the comments section or contact me form.
Восстановление удаленных файлов Linux
Иногда случается, что мы случайно удаляем еще нужные нам файлы. Особенно это опасно в терминале Linux, поскольку здесь файлы удаляются не в корзину, а стираются с диска сразу и навсегда.
Понятно, что нужно аккуратно обращаться с командами удаления файлов, но что делать если уже все удалено, а файлы были важные и их нужно срочно восстановить? В некоторых случаях это возможно. В нашей сегодняшней статье мы рассмотрим восстановление удаленных файлов linux.
Немного теории
Каждый файл занимает определенное пространство на жестком диске, но файловая система для предоставления доступа к файлу дает нам ссылки на его начало, по которым любая программа может получить уже содержимое всего файла. Было бы неэффективно, если бы удаление файла приводило к полному перезаписыванию его области на диске.
Вместо этого, файловая система просто удаляет ссылку на эту область со своей базы, а затем помечает пространство, где находился файл, неразменным. Но на самом деле там еще остались все ваши файлы. Из этого делаем вывод, что если после удаления файловую систему очень быстро переключить в режим только для чтения, то все удаленные файлы могут быть восстановлены.
Если же вы работали с этой файловой системой и данные на диске были перезаписаны другими, то вы уже ничего сами не спасете. Возможно, вы слышали, что спецслужбы могут восстанавливать несколько раз перезаписанные данные по остаточному магнитному следу на диске. Это действительно так. Но для решения такой задачи нужно специальное оборудование, здесь недостаточно нескольких программ, нужен специальный лазер, который может считать магнитный след по краям дорожки и другая аппаратура. Так что про этот метод для себя можете забыть.
Ну а мы остановимся на программном восстановлении, когда данные были формально удалены, но физически еще находятся на диске в целостности и сохранности. Дальше рассмотрим несколько утилит, которые помогут восстановить удаленные файлы Linux.
1. Safecopy
Safecopy — это довольно простой инструмент для восстановления данных, который просто копирует данные из одного места в другое. Утилита, как таковая, не восстанавливает отдельные файлы. Она просто позволяет скопировать данные из поврежденного устройства на нормальное.
Разница между этой утилитой и другими программами копирования в том, что Safecopy не завершается при обнаружении каких-либо ошибок, будь то плохая операция чтения или поврежденный сектор. У нее есть множество дополнительных опций для настройки, а также возможность создания образа файловой системы из поврежденного носителя. Данные восстанавливаются тщательно и быстро, насколько это возможно.
Утилиту можно установить из официальных репозиториев вашего дистрибутива. Пользователи Ubuntu могут воспользоваться такой командой:
sudo apt install safecopy
Здесь вы не восстановите удаленные файлы, но вы можете скопировать поврежденные данные. Например, для видео несколько повреждений не играют большой роли. Для запуска восстановления файлов в linux с раздела /dev/sda1 выполните:
sudo safecopy /dev/sda1 /home/files/
Все файлы, которые удастся скопировать будут в /home/files/.
2. TestDisk
TestDisk — это очень мощный инструмент для восстановления данных. Он не пытается скопировать данные из поврежденного устройства, а позволяет исправить ошибки и проблемы на уровне разделов, которые могут мешать работе с вашими данными.
Утилита может восстанавливать потерянные разделы, исправлять таблицу разделов GPT и MBR, делать резервные копии дисков, восстанавливать загрузочные записи, а главное восстанавливать удаленные файлы с файловых систем NTFS, FAT, exFAT и файловых систем семейства Ext. Также вы можете копировать файлы даже с удаленных разделов для тех же файловых систем.
Способ работы утилиты очень сильно отличается в зависимости от нужного действия. Здесь вас ждет псевдографический мастер, который проведет вас через все шаги. Установить testdisk можно ещё и из официальных репозиториев. В Ubuntu используйте для этого команду:
sudo apt install testdisk
Поскольку тема нашей статьи — восстановление файлов linux, рассмотрим как это делается с помощью этой утилиты. Запустите программу:
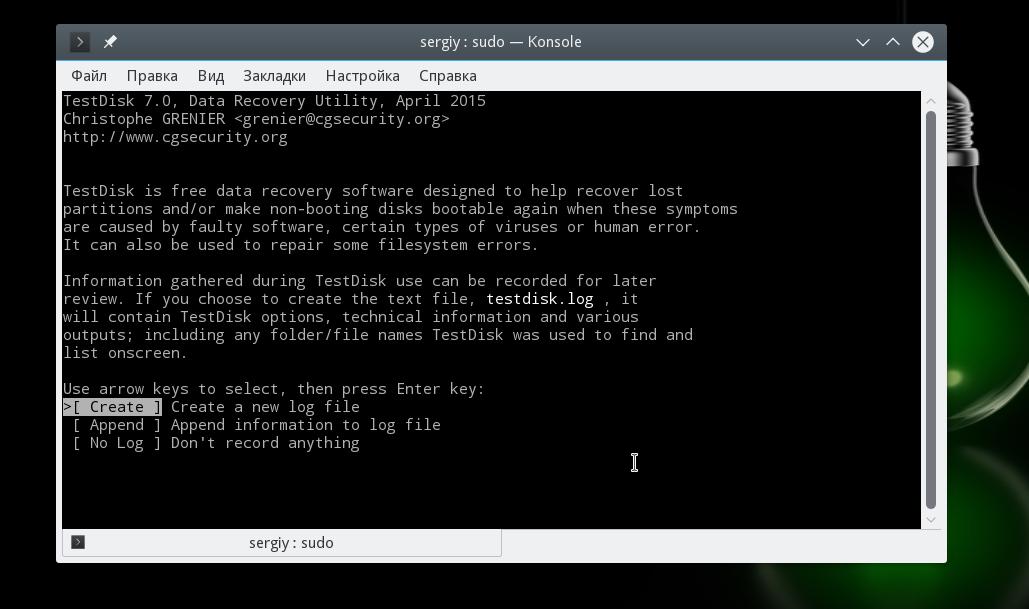
На первом шаге мастера выберите Create New Log:
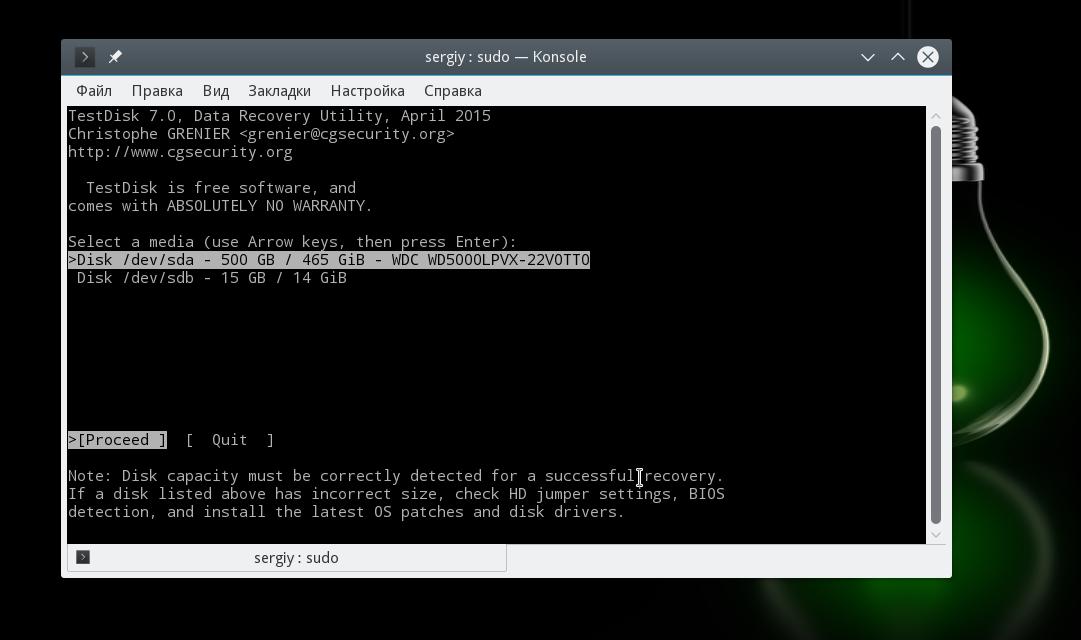
Дальше выберите диск, с которым будем работать:
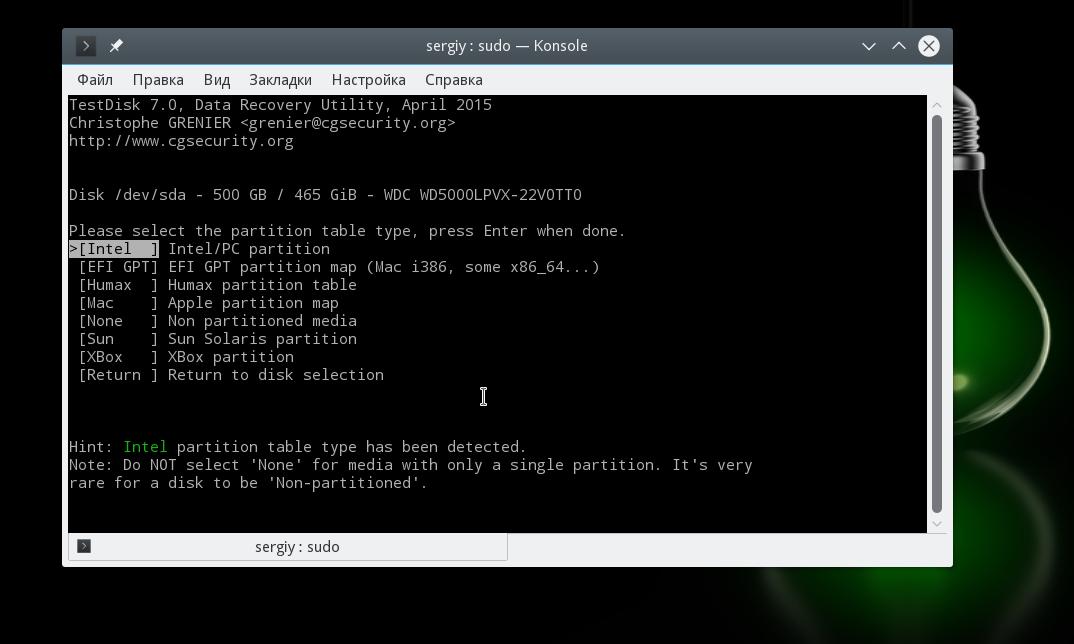
Выберите таблицу разделов на диске:
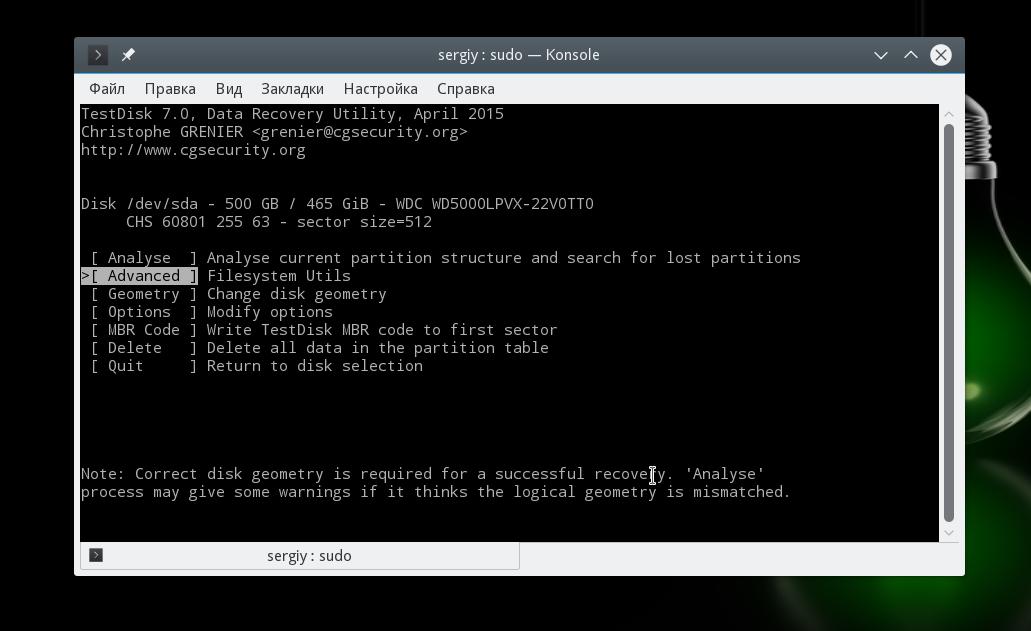
Для работы с файловой системой выберите пункт Advanced:
Далее выберите раздел, затем команду list:
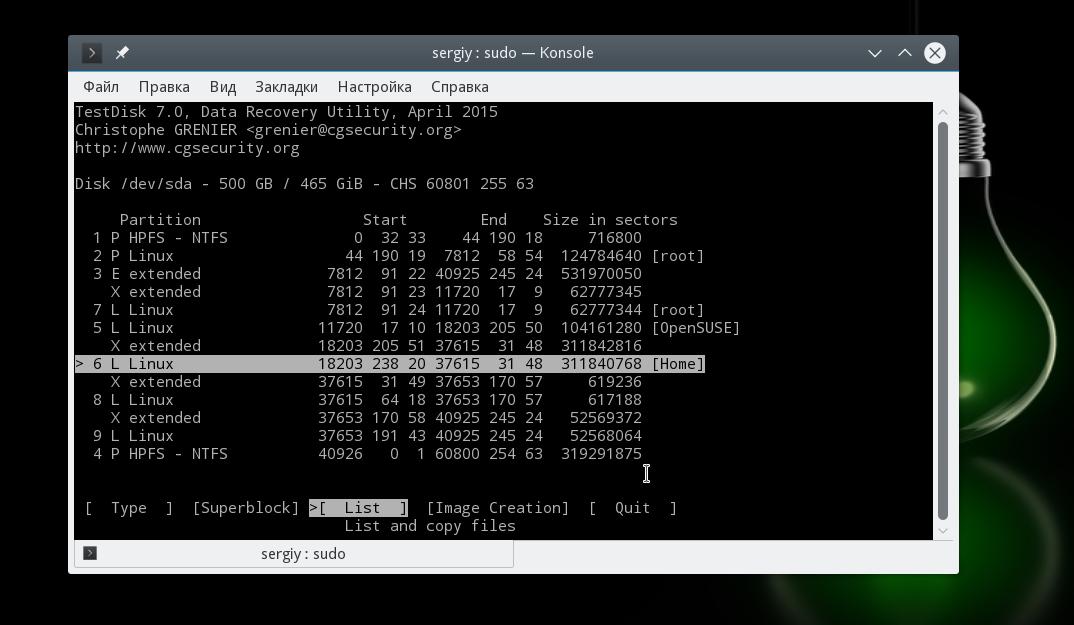
Тут вы увидите все файлы, которые есть на этом разделе. Удаленные, но подлежащие восстановлению файлы будут помечены красным.
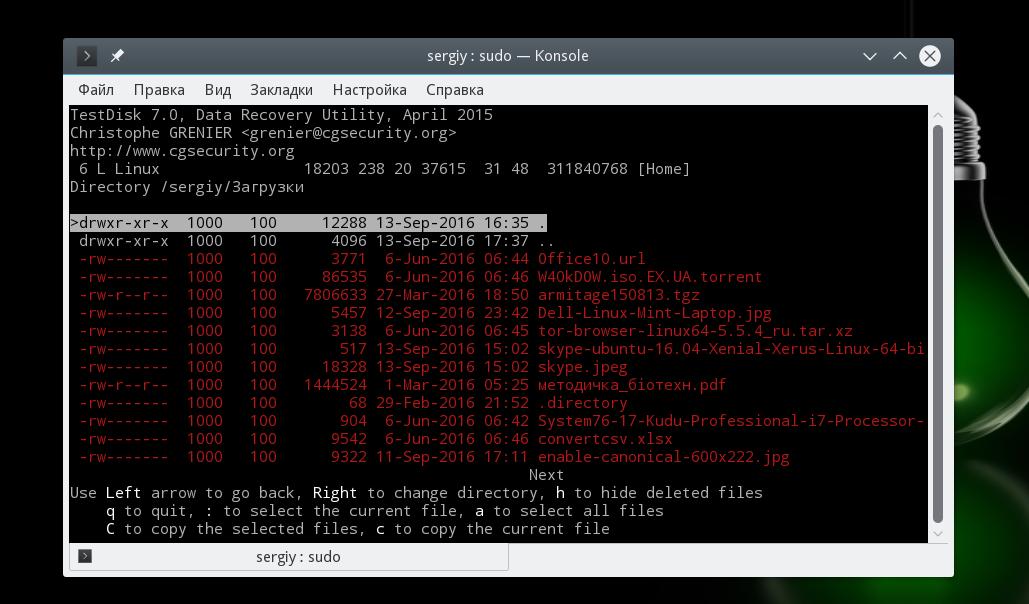
Работать с этой утилитой удобнее, чем с Photorec, потому что здесь вы можете выбрать только один нужный файл, а не восстанавливать сразу кучу мусора. Чтобы скопировать файл просто выберите его, нажмите c и выберите папку для сохранения. Правда, вы же понимаете, что для восстановления нужно, чтобы файлы были не перезаписаны, где-то чуть перезапишется и все.
3. PhotoRec
Наша последняя программа ориентирована в первую очередь на поиск и восстановление удаленных видео, фото, документов и архивов. Можно сказать, что это программа восстановления удаленных файлов linux. Преимущество PhotoRec заключается в том, что она полностью игнорирует файловую систему и смотрит на сырые данные, а это значит, что она все равно будет работать, даже если файловая система повреждена или переформатирована, но только в быстром режиме, там где стираются лишь заголовки.
Во избежание каких-либо проблем, здесь используется доступ только для чтения, этого вполне достаточно для восстановления данных. Но как я говорил раньше, вам нужно остановить все операции записи, как только вы поняли, что нужно восстановить файл. В противном случае нужные данные могут быть перезаписаны чем-то новым и вы уже не сможете их восстановить.
В утилиты есть несколько настроек. Вы можете указать расширения файлов, которые нужно найти, размер, дату изменения и так далее. Установить программу можно так же как и TestDisk — из официальных репозиториев.
Например, в Ubuntu выполните:
sudo apt install photorec
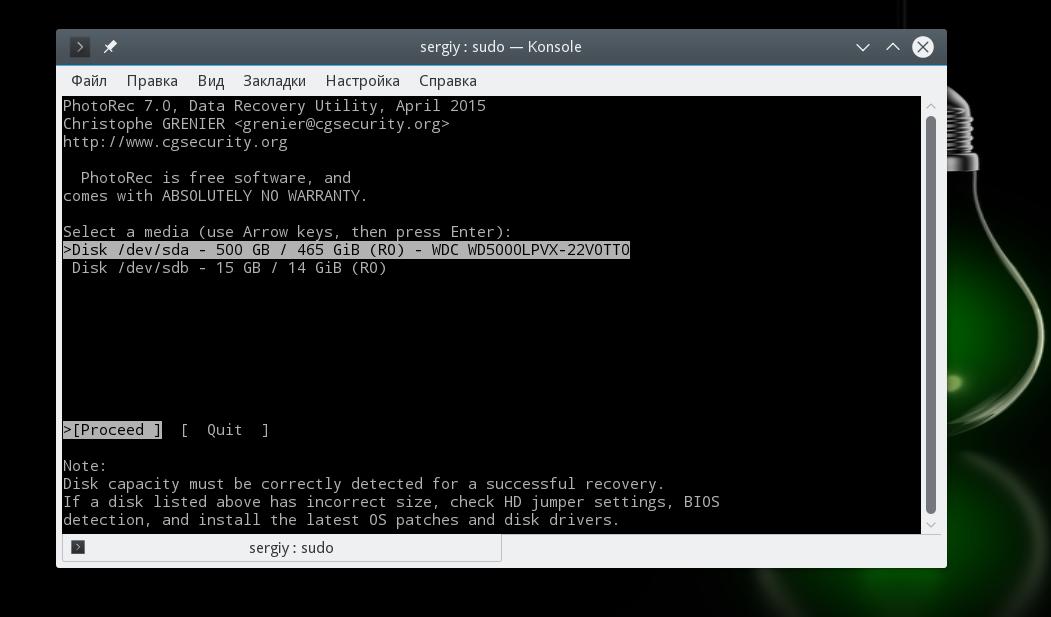
Что касается использования, то тут похожий на testdisk интерактивный интерфейс. Запустите утилиту командой:
Выберите диск, с которым нужно работать:
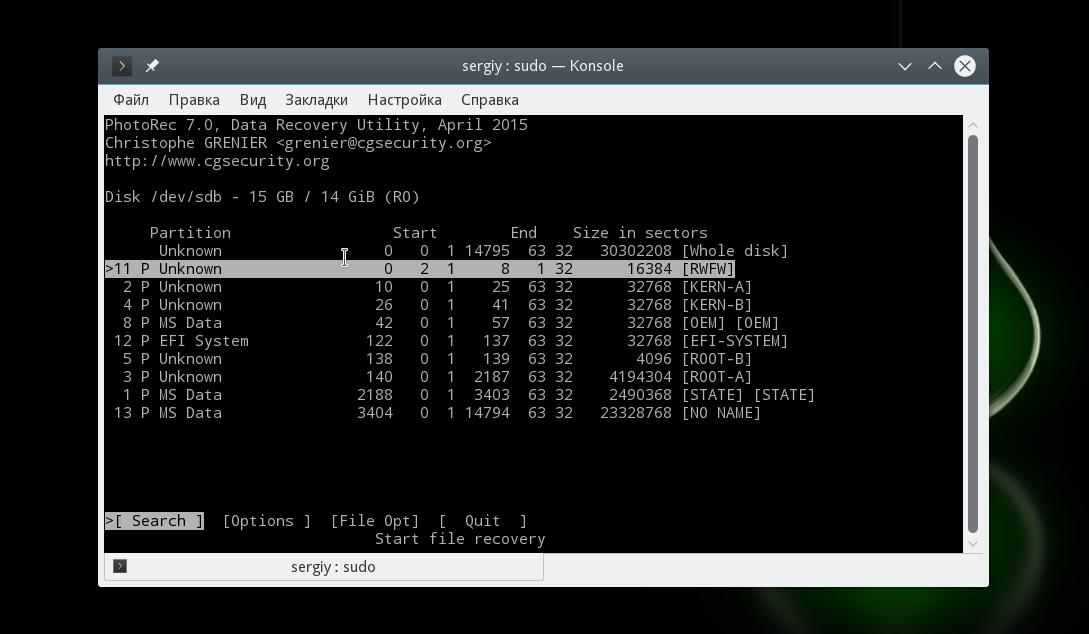
Выберите файловую систему:

Выберите способ сканирования (неразмеченное пространство/весь раздел) Затем выберите папку для сохранения результата:
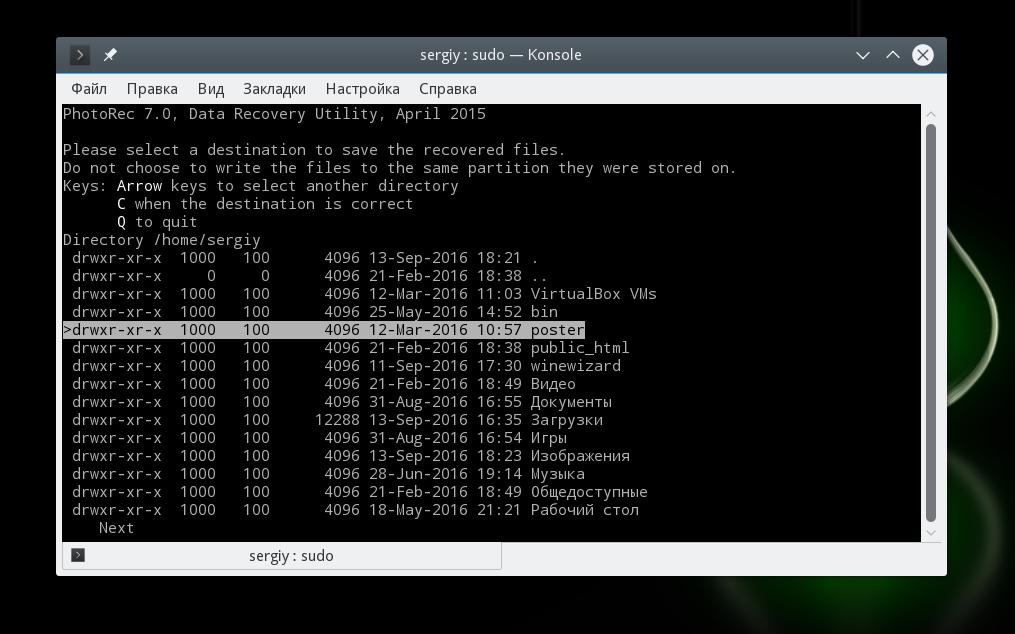
Дождитесь завершения процесса:

Программа восстановит много файлов, и скорее всего больше чем вам нужно. Причем главная ее проблема в том, что имена файлов не сохраняются и вам придется еще поискать, чтобы найти есть ли там то что нужно.
Выводы
Эти три инструмента охватывают широкий спектр задач по восстановлению файлов Linux. Здесь вы сможете выполнить не только восстановление удаленных файлов Linux из ext4, но и исправить жесткий диск или скопировать файлы с поврежденных носителей.
А какие ваши любимые утилиты для восстановления данных? Какими вы пользуетесь? Напишите в комментариях!
На десерт видео от Discovery о том, как работает жесткий диск:
Обнаружили ошибку в тексте? Сообщите мне об этом. Выделите текст с ошибкой и нажмите Ctrl+Enter.
How to cancel a rm command?
And I need to confirm for each one of them. Instead of manually confirming «y/n»:
Can I set «yes» to the remainder while being asked for y/n for the n’th file? (equivalent to «Yes to All» tickbox on Windows) (I know the yes | rm trick before starting)
Can I abort the operation while being asked for y/n for the n’th file? (except for shutting down the machine :))
![]()
4 Answers 4
To accomplish request 1 you will need to use a more sophisticated program than yes to send y N number of times and then pass keyboard input through beyond that. You can’t do it with rm except to always ask ( rm -i ) or to never ask ( rm -f ).
You can always abort rm by
- pressing Control-C to interrupt it (sends SIGINT),
- pressing Control-Z to stop it (sends SIGSTOP) and then killing it,
- sending a SIGTERM ( kill ), or
- sending it a SIGKILL ( kill -9 ).
This won’t undo any file operations rm has already performed, but they will prevent it from performing any further file operations. If the rm process is currently prompting for user input it is not actively unlinking any files so killing it will merely prevent it from continuing.
How to recover the deleted files using "rm -R" command in linux server? [closed]
This question does not appear to be about a specific programming problem, a software algorithm, or software tools primarily used by programmers. If you believe the question would be on-topic on another Stack Exchange site, you can leave a comment to explain where the question may be able to be answered.
Closed 7 years ago .
I have unfortunately deleted some important files and folders using ‘rm -R ‘ command in Linux server.
Is there any way to recover?
![]()
3 Answers 3
since answers are disappointing I would like suggest a way in which I got deleted stuff back.
I use an ide to code and accidently I used rm -rf from terminal to remove complete folder. Thanks to ide I recoved it back by reverting the change from ide’s local history.
(my ide is intelliJ but all ide’s support history backup)
![]()
Short answer: You can’t. rm removes files blindly, with no concept of ‘trash’.
Some Unix and Linux systems try to limit its destructive ability by aliasing it to rm -i by default, but not all do.
Long answer: Depending on your filesystem, disk activity, and how long ago the deletion occured, you may be able to recover some or all of what you deleted. If you’re using an EXT3 or EXT4 formatted drive, you can check out extundelete .
In the future, use rm with caution. Either create a del alias that provides interactivity, or use a file manager.