[Ноутбук] Как включить или отключить технологию AMD Virtualization (AMD-V™)?
Отсканируйте QR-код, чтобы открыть эту страницу на вашем смартфоне.
[Ноутбук] Как включить или отключить технологию AMD Virtualization (AMD-V™)?
Технология AMD Virtualization (AMD-V™) — это набор встроенных функций, которые помогут вам лучше использовать и повысить производительность ваших ресурсов виртуализации.
В BIOS он называется режимом SVM (Secure Virtual Machine), вы можете выбрать включить или отключить его, как показано ниже. (По умолчанию этот элемент включен в BIOS)
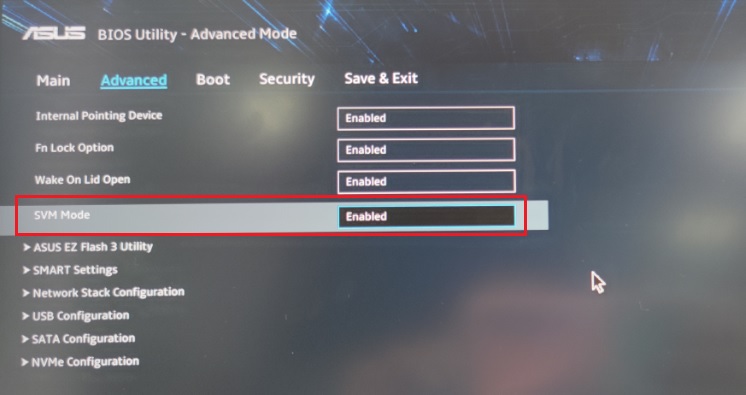
Узнать, как войти в BIOS можно по ссылке .
Эта информация была полезной?
Что мы можем сделать, чтобы улучшить эту статью?
- Приведенная выше информация может быть частично или полностью процитирована с внешних веб-сайтов или источников. Пожалуйста, обратитесь к информации на основе источника, который мы отметили. Пожалуйста, свяжитесь напрямую или спросите у источников, если есть какие-либо дополнительные вопросы, и обратите внимание, что ASUS не имеет отношения к данному контенту / услуге и не несет ответственности за него.
- Эта информация может не подходить для всех продуктов из той же категории / серии. Некоторые снимки экрана и операции могут отличаться от версий программного обеспечения.
- ASUS предоставляет вышеуказанную информацию только для справки. Если у вас есть какие-либо вопросы о содержании, пожалуйста, свяжитесь напрямую с поставщиком вышеуказанного продукта. Обратите внимание, что ASUS не несет ответственности за контент или услуги, предоставляемые вышеуказанным поставщиком продукта.
- Support
Продукты и информация
- Ноутбуки
- Сетевое оборудование
- Материнские платы
- Видеокарты
- Смартфоны
- Мониторы
- Показать все продукты
-
Item_other —>
- Моноблоки (All-in-One)
- Планшеты
- Business Networking
- Серия ROG
- AIoT и промышленные решения
- Блоки питания
- Проекторы
- VivoWatch
- Настольные ПК
- Компактные ПК
- Внешние накопители и оптические приводы
- Звуковые карты
- Игровое сетевое оборудование
- Одноплатный компьютер
- Корпуса
- Компьютер-брелок
- Наушники и гарнитуры
- Охлаждение
- Chrome-устройства
- Коммерческие
SVM Mode: Unleash the Power of Hardware-Assisted Virtualization
Have you ever wondered what SVM mode means or what it does in your computer’s BIOS settings? You’re not alone! In this article, we’ll explore the ins and outs of SVM mode, including its meaning, benefits, and how to enable it in BIOS. This guide will give you a comprehensive understanding of Secure Virtual Machine mode.
SVM mode, or AMD Secure Virtual Machine technology, plays a significant role in modern computing. By the end of this article, you’ll know the answer to questions like “what is SVM mode in BIOS?” and “should I have SVM mode on or off?”. So, let’s dive into the fascinating world of SVM mode and unlock the full potential of your computer’s hardware!
Basics of BIOS and SVM
Before diving into the world of SVM mode, it’s essential to understand some basic concepts, such as BIOS and virtualization. In this section, we’ll define these key terms and explore the role of SVM in BIOS.
Understanding BIOS
BIOS, or Basic Input/Output System, is the firmware that initializes your computer’s hardware components during the boot process. It acts as a bridge between your computer’s hardware and the operating system, ensuring that all components work together seamlessly. BIOS also provides a settings interface where you can configure various hardware options, including enabling or disabling features like SVM mode.
Virtualization: A Brief Overview
Virtualization is a technology that allows multiple operating systems or applications to run simultaneously on a single physical machine. This is achieved by creating virtual environments, known as virtual machines (VMs), which act as isolated containers for software. Virtualization has become increasingly important in modern computing, enabling more efficient use of resources, improved security, and easier management of multiple systems.
Hardware-Assisted Virtualization: AMD-V and Intel VT-x
While virtualization can be achieved through software alone, hardware-assisted virtualization technologies, such as AMD-V (AMD Virtualization) and Intel VT-x (Intel Virtualization Technology), can significantly improve performance and security. These technologies are built into modern AMD and Intel processors and can be enabled or disabled through BIOS settings.
| Feature | AMD-V | Intel VT-x |
|---|---|---|
| Hardware-assisted virtualization | Yes | Yes |
| Memory protection | Rapid Virtualization Indexing (RVI) | Extended Page Tables (EPT) |
| Input/output memory management | AMD-Vi | Intel VT-d |
| Nested virtualization support | Yes | Yes (depending on processor model) |
| Virtual processor identification | Tagged TLB | VPID |
| Secure virtual machine mode | Yes (SVM mode) | Yes |
Comparison of AMD-V and Intel VT-x
SVM mode, which stands for Secure Virtual Machine mode, is a BIOS setting that enables AMD-V technology on AMD processors. Similarly, Intel processors have a corresponding setting called VT-x. By enabling SVM mode or VT-x in BIOS, you’re allowing your system to take advantage of hardware-assisted virtualization, providing a more efficient and secure virtualization experience.
Benefits of Enabling SVM Mode
Now that we’ve explored the basics of BIOS, virtualization, and SVM mode, it’s time to delve into the advantages of enabling SVM mode in your computer’s BIOS settings. In this section, we’ll discuss the key benefits of hardware-assisted virtualization and how they can enhance your computing experience:
- Improved Performance: One of the most significant benefits of enabling SVM mode is the performance boost it provides to virtual machines. By utilizing the hardware capabilities of your processor, SVM mode allows for faster execution of virtualized tasks, resulting in smoother operation and reduced overhead. This is especially noticeable when running multiple virtual machines simultaneously, as hardware-assisted virtualization can efficiently manage and allocate resources.
- Enhanced Security: Security is a major concern in the world of virtualization, and SVM mode helps address this issue by providing hardware-level isolation between virtual machines and the host system. This isolation makes it difficult for malicious software to compromise the host or other guest operating systems, ensuring a safer virtual environment. Additionally, some security features, such as Intel’s Trusted Execution Technology (TXT), require hardware-assisted virtualization to be enabled in the BIOS.
- Increased Stability: Enabling SVM mode also contributes to better system stability. By leveraging hardware capabilities, SVM mode can help prevent software conflicts, resource contention, and other issues that might arise when running multiple virtual machines. This is particularly important for businesses and IT professionals who rely on virtualization for their day-to-day operations, as it minimizes downtime and ensures a more reliable computing environment.
- Nested Virtualization: Another exciting feature enabled by SVM mode is nested virtualization, which allows you to run virtual machines within other virtual machines. This capability is particularly useful for developers, researchers, and IT professionals who need to test and experiment with multiple levels of virtualization. Without hardware-assisted virtualization enabled in the BIOS, nested virtualization would be impractical due to the significant performance overhead.
In summary, enabling SVM mode in your computer’s BIOS settings can lead to a range of benefits, including improved performance, enhanced security, increased stability, and support for nested virtualization. These advantages make SVM mode a valuable addition for users who rely on virtualization technologies.
How to Access and Enable SVM Mode in BIOS
Now that you understand the benefits of enabling SVM mode, you might be eager to activate it on your own system. In this section, we’ll provide a step-by-step guide on how to access your computer’s BIOS settings and enable SVM mode, keeping in mind that the process may vary slightly depending on your motherboard manufacturer and BIOS version.
Accessing BIOS Settings
- Power on or restart your computer.
- During the initial boot process, watch for a message that says something like Press [key] to enter setup or Press [key] to access BIOS. The specific key varies between systems, but common keys include Delete , F2 , F10 , or F12 .
- Press the appropriate key repeatedly until you enter the BIOS settings interface. The interface may differ depending on the motherboard manufacturer, but most BIOS menus share a similar structure and layout.
Enabling SVM Mode
- In the BIOS settings interface, navigate to the Advanced or CPU Configuration section. The exact name and location may vary, so consult your user manual if you’re having trouble finding it.
- Look for an option called SVM Mode, AMD-V, Virtualization, or something similar. If you have an Intel processor, search for Intel VT-x or Virtualization Technology instead.
- Select the option and change its value to Enabled or On.
- Save your changes and exit the BIOS settings. Your computer will restart, and the SVM mode (or Intel VT-x) will now be enabled.
Keep in mind that the exact steps for accessing and enabling SVM mode may differ depending on your motherboard and BIOS version. Consult your user manual or the manufacturer’s website for specific instructions tailored to your system.
Once SVM mode is enabled, your computer will be able to take full advantage of hardware-assisted virtualization, leading to improved performance, security, and stability when running virtual machines.
How do I check if virtualization is enabled?
To check if virtualization is enabled on your computer, follow the steps below.
For Windows
- Press Ctrl + Shift + Esc to open the Task Manager.
- Click on the Performance tab.
- Select CPU on the left side of the window.
- In the lower right corner, under the Virtualization section, you’ll see whether it is enabled or disabled.
For macOS
- Open the Terminal app (you can find it in the Utilities folder within the Applications folder).
- Type the following command and press Enter : sysctl -a | grep -E —color 'machdep.cpu.features|VMX'
- If you see VMX in the list of features, your Mac supports Intel VT-x virtualization. However, macOS doesn’t display whether it is enabled or disabled. Typically, virtualization is enabled by default on Mac systems.
For Linux
- Open the Terminal app.
- Type the following command and press Enter : grep -E —color 'vmx|svm' /proc/cpuinfo
- If you see vmx (for Intel processors) or svm (for AMD processors) in the output, your system supports virtualization. To check if it’s enabled, look for flags like vmx (for Intel) or svm (for AMD) with no additional characters attached to them. If you find these flags, virtualization is enabled.
If virtualization is disabled and you want to enable it, go back to the previous chapter.
Common Issues and Troubleshooting
While enabling SVM mode can provide significant benefits, you may encounter some issues or challenges during the process. In this section, we’ll discuss common problems and offer solutions to help you enable SVM mode without a hitch.
Troubleshooting should be done with caution to avoid any hardware or software damage. Always follow the manufacturer’s guidelines and recommendations, and consult professional assistance if you’re unsure about any steps or procedures.
Unable to Access BIOS Settings
If you’re having trouble accessing your computer’s BIOS settings, consider the following tips:
- Make sure you’re pressing the correct key during the boot process. The specific key varies between systems, so consult your user manual or the manufacturer’s website for information.
- Press the key repeatedly as soon as your computer begins to boot. If you wait too long, you may miss the window to enter the BIOS settings.
- Try using a different keyboard, as some wireless or specialized keyboards may not work during the boot process.
SVM Mode Option Not Found
If you can’t find the SVM mode option in your BIOS settings, consider the following:
- Make sure your processor supports hardware-assisted virtualization. Check your processor’s specifications on the manufacturer’s website to confirm that it supports AMD-V (for AMD processors) or Intel VT-x (for Intel processors).
- Update your BIOS to the latest version. Some older BIOS versions may not include the option to enable SVM mode or may have it hidden. Consult your motherboard manufacturer’s website for instructions on updating your BIOS.
Virtualization Software Still Not Working
If you’ve enabled SVM mode but your virtualization software is still not functioning correctly, try the following steps:
- Ensure your virtualization software is up to date. Check the software’s website or documentation for the latest version and update instructions.
- Check the software’s documentation for specific requirements or settings related to hardware-assisted virtualization. Some programs may require additional configuration or settings adjustments to function correctly with SVM mode enabled.
- Ensure your operating system supports hardware-assisted virtualization. Some older operating systems may not be compatible with SVM mode or Intel VT-x, so you may need to upgrade your OS or use a different virtualization solution.
- Verify that any required BIOS settings related to virtualization, such as IOMMU or SR-IOV, are also enabled. Check your motherboard’s user manual or the manufacturer’s website for information on these settings and how to enable them.
System Instability After Enabling SVM Mode
If you encounter system instability or crashes after enabling SVM mode, consider the following troubleshooting tips:
- Ensure that your computer’s hardware, such as the CPU and RAM, meets the minimum requirements for running virtual machines. Running virtual machines can be resource-intensive, and insufficient hardware may cause instability.
- Disable any unnecessary background processes or applications that may be consuming resources, as they could cause conflicts or resource contention when running virtual machines.
- Update your system’s drivers and firmware to the latest versions, as outdated drivers can cause compatibility issues and instability.
- If the instability persists, consider disabling SVM mode and testing your system to determine if the issue is related to hardware-assisted virtualization or an unrelated problem.
Troubleshooting issues related to SVM mode can be challenging, but by following these tips and exercising caution, you can resolve most problems and take full advantage of hardware-assisted virtualization on your computer.
Compatibility with Different Motherboards and Processors
In this section, we’ll discuss the compatibility of SVM mode with various motherboards and processors. Although hardware-assisted virtualization is a common feature in modern computing, it’s essential to ensure that your specific hardware components support this technology before attempting to enable SVM mode.
Processor Compatibility
As previously mentioned, SVM mode is specific to AMD processors that support AMD-V technology. For Intel processors, a similar technology called Intel VT-x is used instead. When researching your processor’s compatibility with hardware-assisted virtualization, ensure you’re checking the appropriate technology for your specific processor type.
Most modern AMD and Intel processors support hardware-assisted virtualization, but it’s crucial to verify this by checking your processor’s specifications on the manufacturer’s website. Be aware that some low-end or older processors may lack support for AMD-V or Intel VT-x.
Motherboard Compatibility
Enabling SVM mode or Intel VT-x requires access to your computer’s BIOS settings, which are managed by your motherboard. Most modern motherboards support these settings, but there can be variations in the specific options and configuration steps depending on the manufacturer and BIOS version.
Some common motherboard manufacturers that support SVM mode and Intel VT-x include:
- ASUS
- Gigabyte
- MSI
- ASRock
- Biostar
When determining your motherboard’s compatibility with SVM mode or Intel VT-x, it’s essential to consult your user manual or the manufacturer’s website for specific instructions and information. In some cases, updating your BIOS to the latest version may be necessary to access or enable these settings.
In summary, compatibility with SVM mode or Intel VT-x depends on both your processor and motherboard. Ensure that your hardware components support the appropriate virtualization technology and follow the manufacturer’s guidelines to enable this feature successfully.
Use Cases for SVM Mode
Having explored the ins and outs of SVM mode, it’s essential to understand its practical applications and use cases. In this section, we’ll discuss several scenarios where enabling SVM mode can be advantageous, highlighting the versatility and benefits of hardware-assisted virtualization:
- Software Development and Testing: Developers often rely on virtualization to create and test software in isolated environments. By enabling SVM mode, developers can take advantage of improved performance and security when running multiple virtual machines, allowing them to test their applications more efficiently and effectively. Moreover, nested virtualization is a valuable feature for developers who need to test complex software configurations that involve multiple layers of virtualization.
- IT Infrastructure Management: IT professionals frequently use virtualization to manage servers, data centers, and other infrastructure components. By enabling SVM mode, they can achieve better performance, stability, and security when running virtual machines, leading to more reliable and efficient management of IT resources. This is especially critical for businesses that depend on virtualization for their daily operations.
- Cybersecurity and Forensics: Hardware-assisted virtualization is also useful in the field of cybersecurity, where researchers often employ virtual machines to analyze malware and perform other security tasks. SVM mode offers enhanced isolation between virtual machines, helping to prevent the spread of malware and protect the host system. This added layer of security is vital when working with potentially harmful software.
- Education and Training: Virtualization is a powerful tool in education and training, allowing students and trainees to learn and practice in controlled environments without affecting the host system. By enabling SVM mode, educators can provide a more stable and high-performing virtual environment, ensuring that learners can focus on their studies without worrying about technical issues.
- Personal Use and Gaming: For personal use, SVM mode can be advantageous for users who want to run multiple operating systems on their computers or experiment with different software configurations. Additionally, virtualization has become increasingly popular in the gaming community, with users creating virtual machines to play older games or utilize specific hardware configurations that may not be supported by their primary operating system.
In conclusion, SVM mode has a wide range of applications and use cases, from software development and IT management to education and personal computing. By enabling SVM mode on compatible hardware, users can harness the full potential of hardware-assisted virtualization to improve performance, security, and stability in various scenarios.
Conclusion
In conclusion, SVM mode is an essential feature in BIOS that enables hardware-assisted virtualization, offering numerous benefits such as improved performance, enhanced security, and better stability. We’ve demystified the meaning of SVM mode and provided insights into enabling it in your BIOS settings, like on ASUS SVM mode, Gigabyte SVM mode, and MSI SVM mode.
Now that you understand the importance of SVM mode in modern computing, you can make informed decisions about whether to enable it on your system. If you’re using virtualization software, work with virtual machines, or simply want to experiment with the technology, enabling SVM support in BIOS can be a valuable addition to your computing experience. Remember, though, that the process may vary slightly depending on your motherboard manufacturer and BIOS version, so be sure to consult your user manual for specific instructions. Happy computing!
Как включить виртуализацию на компьютере или ноутбуке с Windows 10, 8.1 или Windows 7

Включение технологии виртуализации вам может потребоваться при необходимости использовать Android эмулятор или виртуальные машины, а, возможно, и для других задач, но не каждый начинающий пользователь знает, как именно это сделать.
В этой инструкции подробно о том, как включить виртуализацию в БИОС/UEFI и о возможных проблемах, которые могут возникнуть при её включении на компьютерах и ноутбуках с Windows 10, 8.1 или Windows 7.
Включение виртуализации в БИОС/UEFI компьютера или ноутбука
Основное действие для включения виртуализации — включить соответствующую опцию в БИОС/UEFI. Эта опция может носить название Virtualization, Intel Virtualization Technology, Intel VT-x, AMD-v и находиться в слегка разных разделах настроек БИОС, но логика действия всегда будет одной и той же:
- Зайдите в БИОС компьютера или ноутбука. Обычно на ПК это делается нажатием клавиши Del, на ноутбуке — F2 или F10 (иногда в сочетании с клавишей Fn). В Windows 10 простой вход может не получиться, тогда можно использовать способ входа в UEFI через особые варианты загрузки, подробнее: Как зайти в БИОС/UEFI Windows 10.
- После входа найдите, где включается опция виртуализации (далее будут показаны некоторые примеры), включите её (установите значение в Enabled).
- Сохраните настройки БИОС (обычно можно выбрать Save&Exit на вкладке Exit).
А теперь несколько примеров, где именно может находиться включение виртуализации на разных марках материнских плат и ноутбуков. По аналогии вы, вероятнее всего, сможете найти и у себя:
- Материнская плата Gigabyte — вкладка BIOS Features, опция Intel Virtualization Technology (еще одну опцию — VT-d тоже лучше включить).

- InsydeH2O на ноутбуках — вкладка Configuration (но, по-моему, встречал и иные варианты в этом же БИОС).

- Материнская плата Asus — раздел Advanced, либо Advanced — CPU Configuration.

- Некоторые ноутбуки Dell — раздел Virtualization support.

- Многие другие варианты БИОС — просто на вкладке Advanced Configuration, иногда далее нужно пройти в подраздел CPU Feature или CPU Configuration.

Логика расположения необходимого пункта для включения виртуализации у всех производителей похожа и, зная обычные пути включения опции, вы найдете нужный пункт даже на материнской плате другого производителя.
Проблемы при включении виртуализации
Самые распространенные проблемы, когда вы хотите включить виртуализацию на своем компьютере:
- Пункт включения Virtualization Technology не активен в БИОС
- В БИОС/UEFI нет пункта для включения виртуализации
- Виртуализация включена в БИОС/UEFI, но эмулятор или виртуальная машина в Windows 10 или 8.1 пишет, что отключена.
В первых двух случаях проблема может крыться в том, что ваш процессор не поддерживает виртуализацию. Поищите официальные спецификации вашего процессора в Интернете, обычно там есть и информация о поддержке виртуализации. Также, на некоторых ноутбуках процессор может поддерживать технологию виртуализации, но она отключена и в БИОС не предусмотрено опции для её включения — в этом случае, к сожалению, предложить не могу ничего, но можно попробовать обновить БИОС (теоретически, опцию могут добавить).
Во втором случае причина обычно заключается в том, что в Windows 10 или 8.1 включена виртуальная машина Hyper-V или Песочница. Отключите её в компонентах:
- Откройте панель управления, перейдите в «Программы и компоненты».
- Откройте слева пункт «Включение и отключение компонентов Windows».
- Отключите компоненты Hyper-V и «Песочница» (если есть).
- Примените настройки и обязательно перезагрузите компьютер.
Если указанные действия не помогли, попробуйте такой вариант: запустите командную строку от имени администратора, в ней введите команду (нажав Enter после неё)
Закройте командную строку и перезагрузите компьютер.
Как включить виртуализацию — видео инструкция
Если в вашем случае не сработало, опишите в комментариях, что именно не получается, какая программа или Android эмулятор сообщают, что виртуализация не включена и что уже было сделано: возможно, решение найдется.
SVM Mode: What It Is and How to Enable It
SVM Mode is a virtualization security layer available within BIOS/UEFI for motherboards with AMD CPUs. Virtualization is a powerful technology for improving the efficiency of your computer and allowing you to run multiple instances of a virtual computer from a single hardware setup. You can run outdated programs or other operating systems using virtualization.
SVM mode won’t affect the performance of your computer to any noticeable degree unless you are trying to run multiple virtual computers simultaneously. Continue reading if you’d like to learn more about SVM and how to enable SVM for multiple motherboard manufacturers.
BIOS
BIOS is a bit of code stored in a chip on your motherboard. The BIOS software is the first software that runs during active startup. BIOS identifies your hardware and helps it interact with your operating system.
While BIOS is the term still widely used today, most modern computers now use UEFI firmware. BIOS stands for basic input/output system, and UEFI stands for unified extensible firmware interface. Many system settings are only available from within the BIOS, including:
- SATA settings
- Boot Order
- Overclocking
- Secure Boot
- SMV Mode
What is SVM Mode?
SVM stands for Secure Virtual Machine. SVM Mode is an option found within the BIOS of AMD motherboards. When enabled, SVM is a virtualization mode that allows you to set up a virtual machine environment on your computer. The SVM security layer can split resources across multiple programs using hardware virtualization. For most AMD motherboards, SVM mode is enabled by default. But some motherboards require you to manually enable AMD’s SVM mode.
What are Virtual Machines?
Virtualization is a technology for running the virtual instance of a computer. You can run multiple operating systems on a single hardware system simultaneously with it. Each VMs runs on its own operating system while running on only a portion of the actual computer hardware. Virtualization is the backbone of cloud computing.
Virtual machines are not as powerful as a standard operating system, and you can expect a 5% drop in CPU and memory performance for VMs. Virtual machines can run operating systems and programs just as a regular computer. They increase the overall efficiency of a computer by allowing computer resources to be distributed among multiple VMs as needed.
You may want to use a VM to run an operating system or program that you can’t normally run on your computer. You can also run older or incompatible software with a virtual machine that’s set to Windows XP or some other outdated operating system. Developers often use VMs to develop an application across multiple platforms to ensure everything works as intended.
Virtual machines are also a safe way to engage in riskier computer activities like surfing the dark web or using torrents.
4 Things You Can Do with Virtualization
1. Backup Your Operating System
You can easily back up your entire operating system, just like you’d create a backup of other kinds of files. This is a great option to protect your entire OS from a cyberattack. Don’t create a copy of a licensed operating system, like Windows, to distribute to friends or family, though.
2. Browse Without Risk
If you want to protect your personal information and computer from cyberattacks, you can use a virtual machine to prevent the corruption of your actual OS. Some cyberattacks, like ransomware, can be devastating. Ransomware usually encrypts your system files and demands a ransom to be paid to have your files decrypted. But if a security attack compromises a VM, it can be shut down immediately without impacting your system.
3. Run Linux or macOS
If you are running Windows operating system but want to use macOS or Linux operating systems, you can do that with a virtual machine. Mac and Linux users have been doing this very thing for years to use Windows-only programs. Ubuntu is a popular Linux distro where Windows users started experimenting with VMs.
4. Test Your Software
If you are developing a software application, you can use virtual machines to test and check that the application is working correctly on other operating systems before deploying.
Does Intel have SVM Mode?
Intel does not use the term SVM Mode. Instead, Intel’s comparable feature is called Intel VT or Intel Virtualization. Intel’s virtualization technology offers the same features as AMDs SVM mode.
How does SVM Mode Impact Performance?
Virtualization only affects performance when a virtual machine is running. This means that enabling SVM won’t affect your computer’s everyday performance. Virtual machines may tax the CPU, but the effects are usually marginal. You shouldn’t experience a drop in framerates when gaming or any interference with other applications. If you enable Hyper-V Windows in conjunction with SVM, you might experience slight performance degradation.
How to Check if Your PC Supports SVM Mode
If you’re uncertain if your computer supports virtualization, follow these steps to find out:
- Use Windows Search to search for System Information and click Open.
- Within the System Information window, scroll down to find Hyper-V Virtualization Enabled in Firmware. If this option says Yes, then your device supports virtualization.
How to Check if Virtualization is Already Enabled
Before hassling with your motherboard’s BIOS and enabling SVM Mode, you can check if virtualization is already enabled using the Task Manager:
- Open Task Manager by searching for Task Manager using Windows Search or pressing Ctrl + Alt + Del and selecting Task Manager from the menu.
- Click on the Performance tab and then select CPU on the left-hand side.
- Underneath the CPU % Utilization graph, find Virtualization and check if it’s Disabled or Enabled. If Enabled, you can start using virtualization.
How to Enable SVM Mode?
If you’d like to enable SVM mode to take advantage of the benefits of virtualization, you will need to access the BIOS. For your motherboard to have SVM mode, you must have a motherboard running an AMD Ryzen CPU.
ASUS Motherboard
- After powering on the computer, press Del or F2 on the first loading screen, you’ll need to react quickly here. But if you miss the small window of opportunity to enter the BIOS, you can shut down your computer and try again.
- Press F7 to enter the Advanced Mode to access advanced features and settings. There’s no need to press F7 for ROG series motherboards because the advanced features are available by default.
- Click the Advanced tab and then select CPU configuration from the options.
- At the bottom of the CPU Configuration page, you’ll find SVM Mode. Click Disabled to expand the drop-down menu and then select Enabled.
MSI Motherboards
- After powering on the computer, press Del on the first loading screen. You only have a short window to enter BIOS from this point, so you’ll need to react quickly. In case you miss it and your computer has already booted, you can shut it down and try again.
- Select OC or Overclocking Settings.
- Scroll down through the options to find and click CPU Features. If you can’t locate CPU Features within your BIOS, select Advanced CPU Configurations instead.
- From the CPU Features page (or Advanced CPU Configurations), locate SVM Mode.
- Click Disabled and select Enabled from the pop-up window.
- Now select the X in the top-right-hand corner and click Yes to the prompt ‘Save configuration and exit?’
- After enabling SVM Mode, restart your PC to ensure these new features are fully applied.
NOTE: If you’re still having issues locating SVM Mode, try clicking on the Search icon in the top-right corner to search for SVM Mode.
Gigabyte Motherboards
- After powering on the computer, press Del on the first loading screen. Just like in other motherboards, your reaction should be on point. Once your computer has booted you won’t be able to access BIOS anymore. In case you missed the window of opportunity, you can shut down your PC and try again.
- On BIOS, select the M.I.T. tab.
- Within the M.I.T page, click Advanced Frequency Settings.
- Now select Advanced CPU Core Settings and find SVM Mode from the list.
- Click Disabled to switch SVM Mode to Enabled.
- Press F10 to Save and exit BIOS, then restart your PC.
ASRock Motherboard
- After powering on the computer, press Del on the first loading screen.
- Within the BIOS interface, find and select the Advanced tab.
- Then click on CPU Configuration and toggle SVM to Enabled.
- Now click Exit and save the changes. Be sure to restart your computer so the settings are fully applied.
SVM Mode In a Nutshell
Virtualization technology made major strides in recent years and is widely used in software development. Most modern computers have virtualization features that can be enabled via the BIOS/UEFI.
Motherboards with AMD Ryzen chips use a virtualization feature called SVM Mode. The feature is specifically available only with AMD CPUs, as Intel CPUs have their own version called Intel VT or Intel Virtualization. SVM Mode allows you to run a virtual computer (or multiple VMs) from a single hardware setup, so you can run different operating systems, browse safely, or use outdated software.
If you’d like to start experimenting with virtual machines, it’s super easy! Just enable the SVM Mode in your AMD-powered PC. Find your motherboard manufacturer above (Asus, MSI, Gigabyte, or ASRock) and follow the steps to enter your BIOS and toggle on SVM mode.