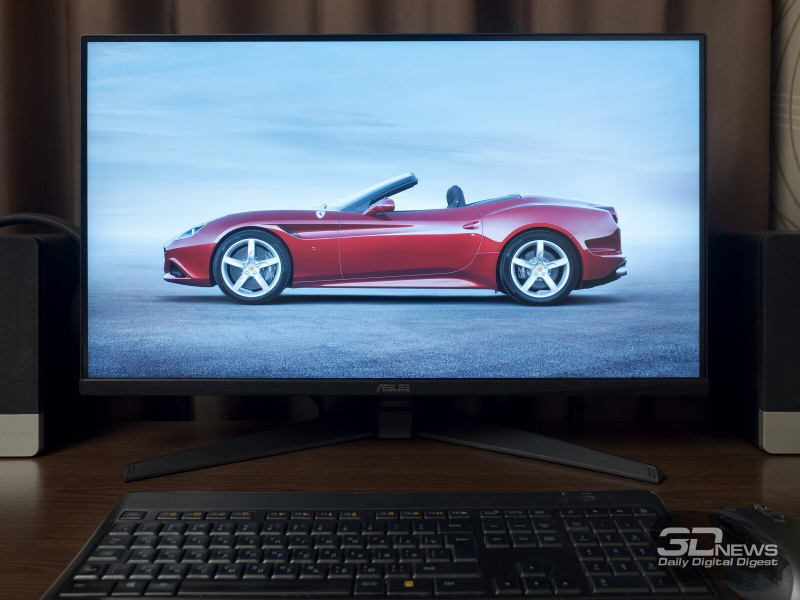
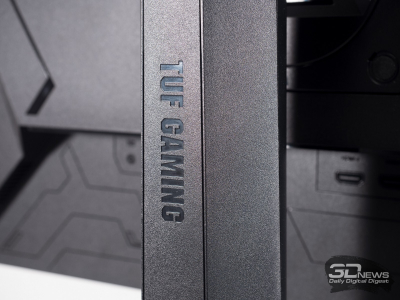
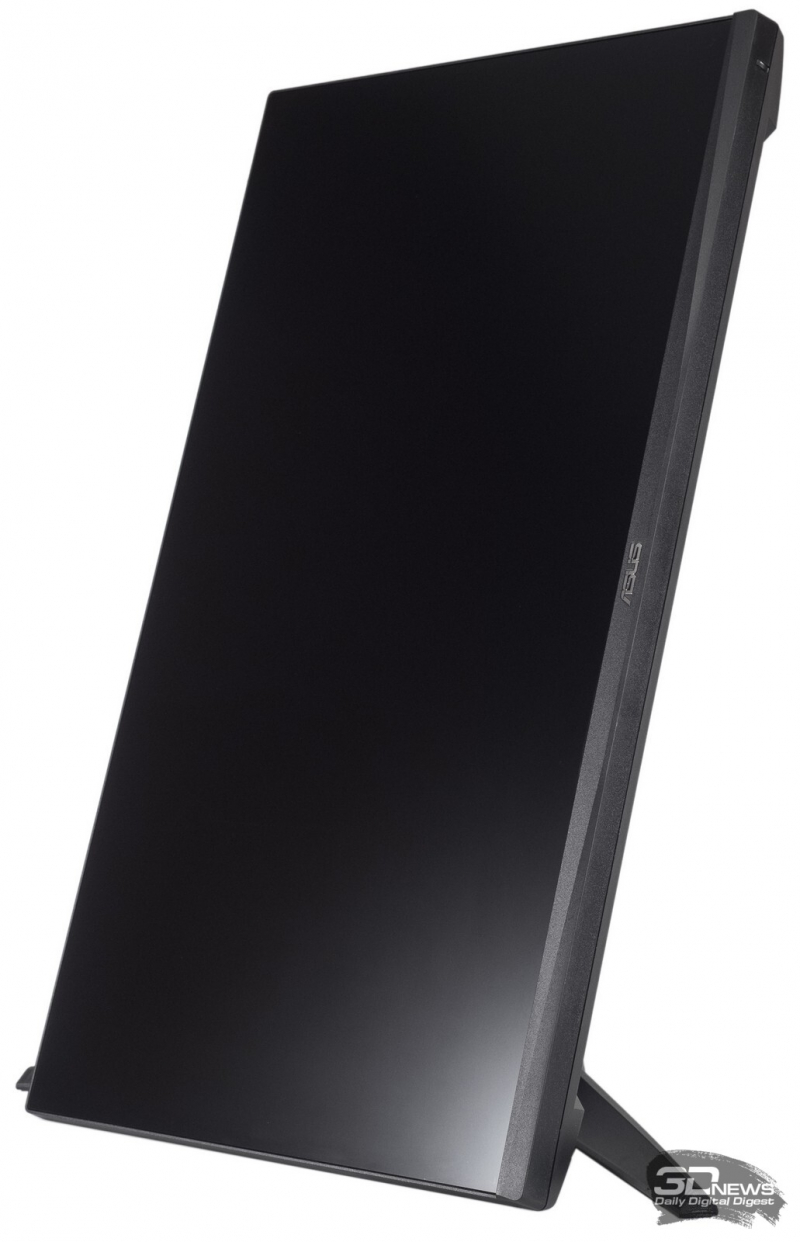
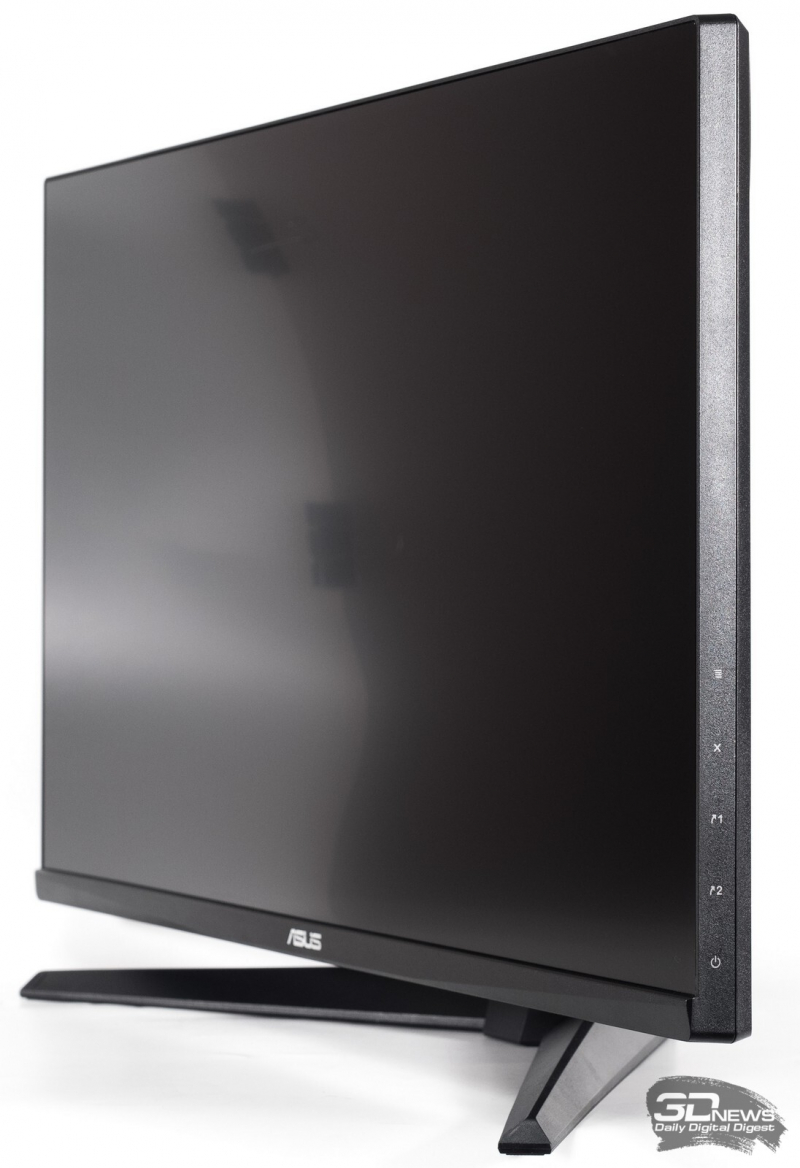
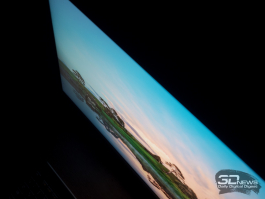
VG279Q
ASUS VG279Q – это 27-дюймовый монитор формата Full-HD с IPS-панелью, низким временем отклика (1 мс MPRT) и высокой частотой обновления экрана (144 Гц), который создан для любителей компьютерных игр. В нем реализованы различные геймерские функции и технологии, в том числе адаптивная синхронизация FreeSync и предустановленные режимы изображения GameVisual.
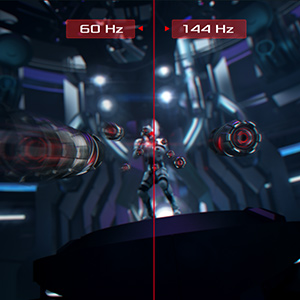
Частота обновления экрана – 144 Гц
VG279Q превосходно отображает динамичные игровые сцены благодаря высокой частоте обновления – 144 Гц.
Низкое время отклика – 1 мс
Низкое время отклика позволяет устранить визуальные артефакты за движущимися объектами.
Технология FreeSync
Повышение качества изображения за счет устранения эффекта «разрыва кадра».
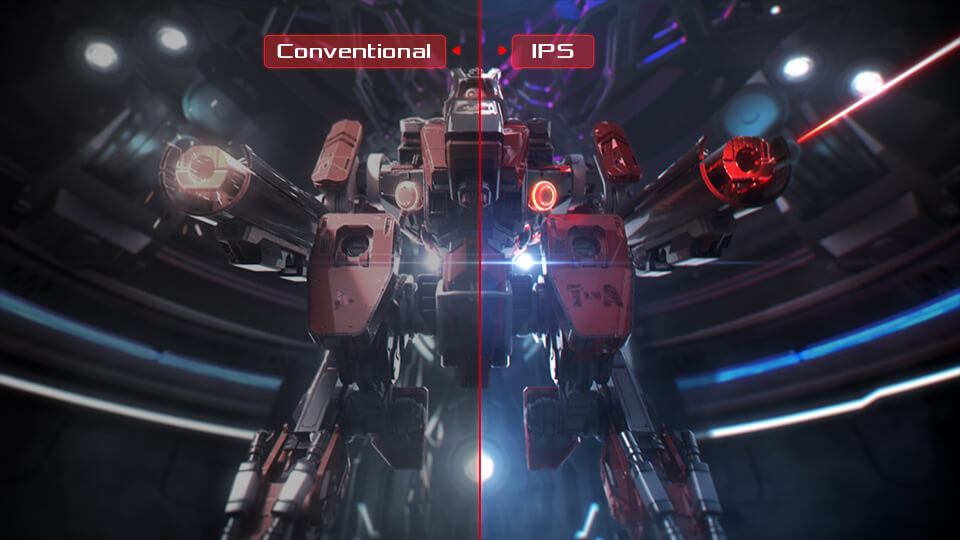
Технология IPS
ЖК-панель, изготовленная по технологии IPS, обеспечивает точную цветопередачу и широкие углы обзора 178°.
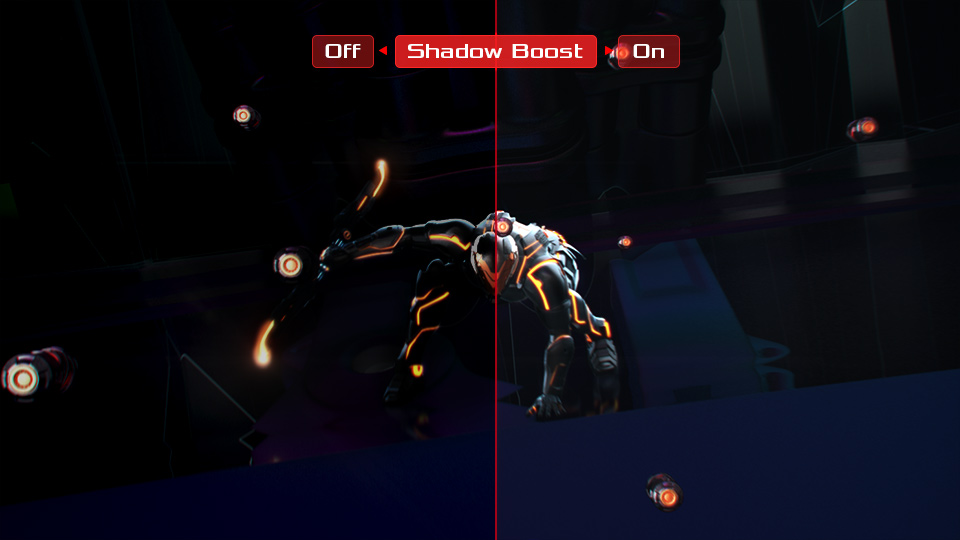
Технология ASUS Shadow Boost
Повышает яркость темных фрагментов игровых сцен, не затрагивая светлые.
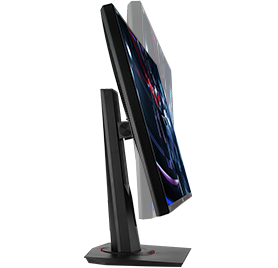
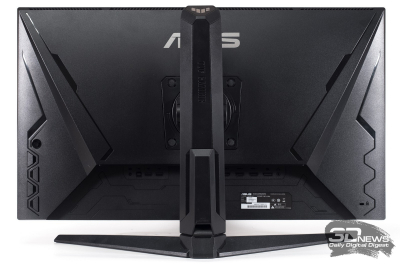
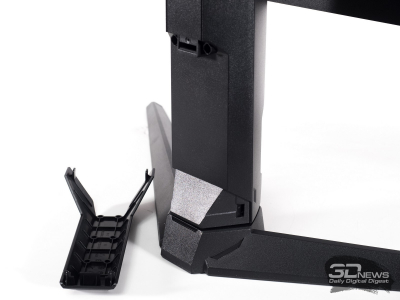
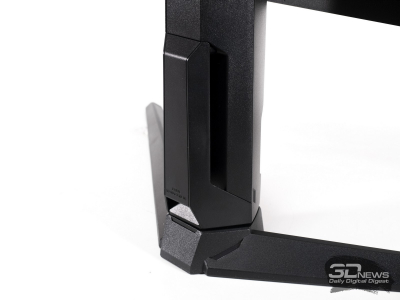
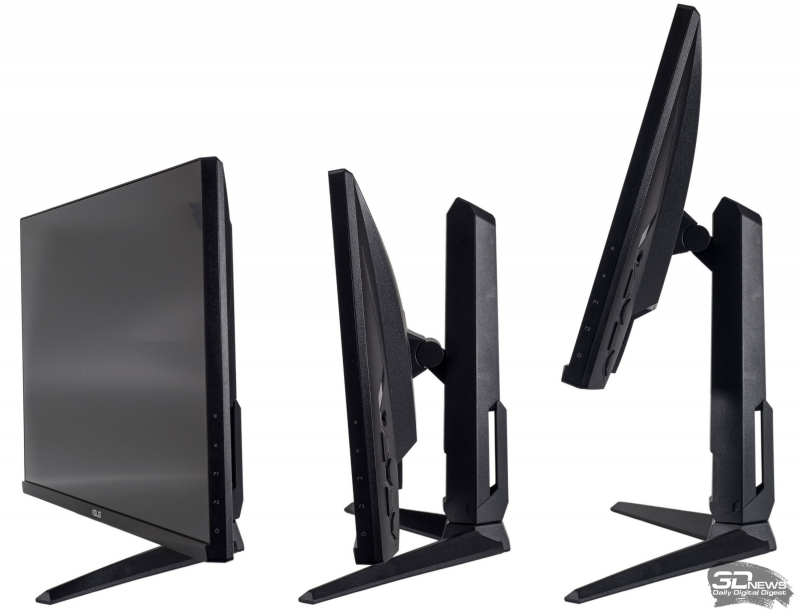
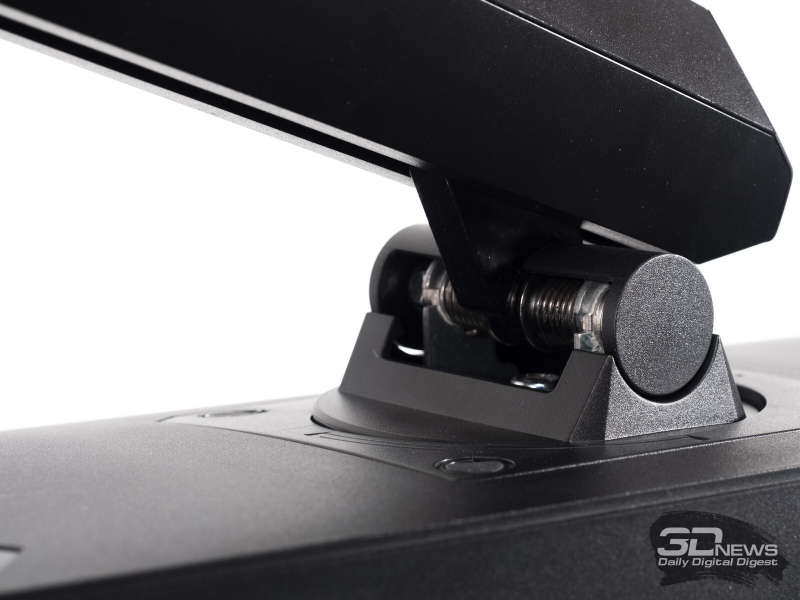
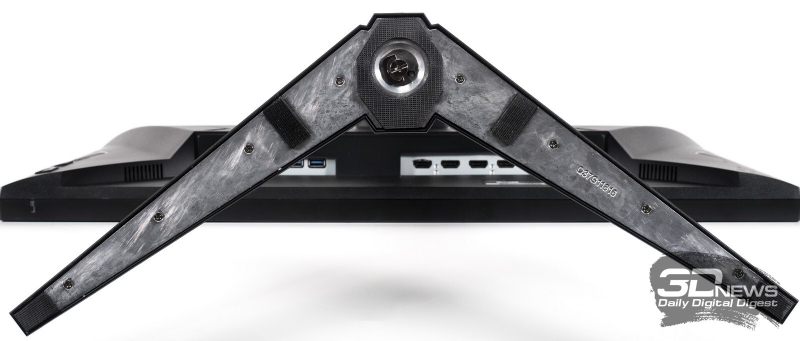
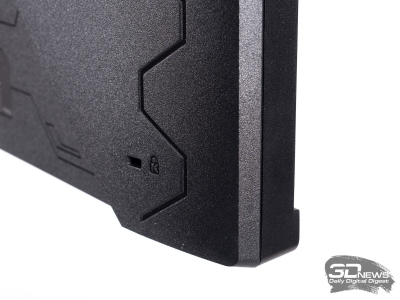
Эргономичная конструкция
Подставка позволяет изменять угол наклона и высоту, поворачивать его вокруг своей оси или переводить в портретный режим.
Технология GameFast Input
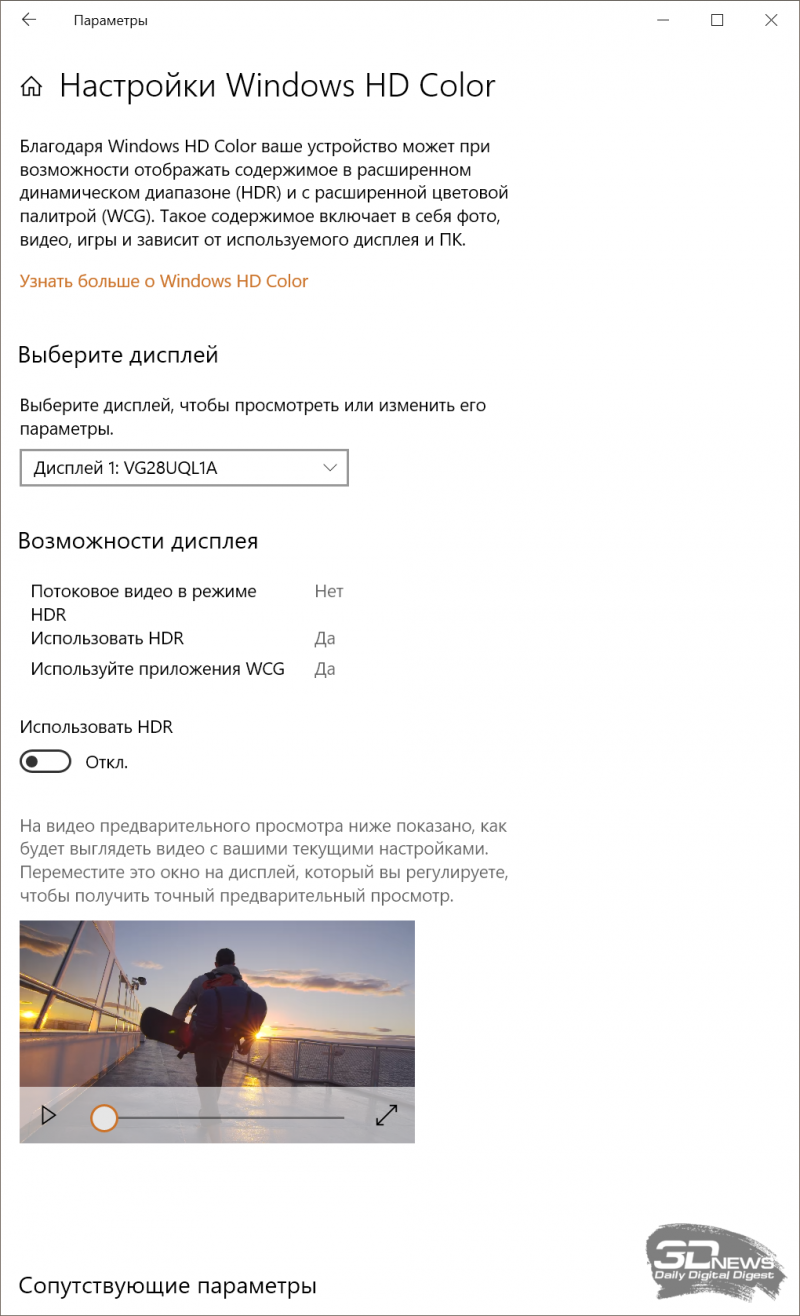
Телевизор
Игра с опозданием реагирует на ваше действие – и в вас попадают.
VG279Q
Игра реагирует на ваше действие моментально – и вы уклоняетесь от атаки.

Настройка высоты: 0
Поворот экрана: +90°

Портретный режим: 90°
(по часовой стрелке и против часовой стрелки)
Угол наклона: +33°

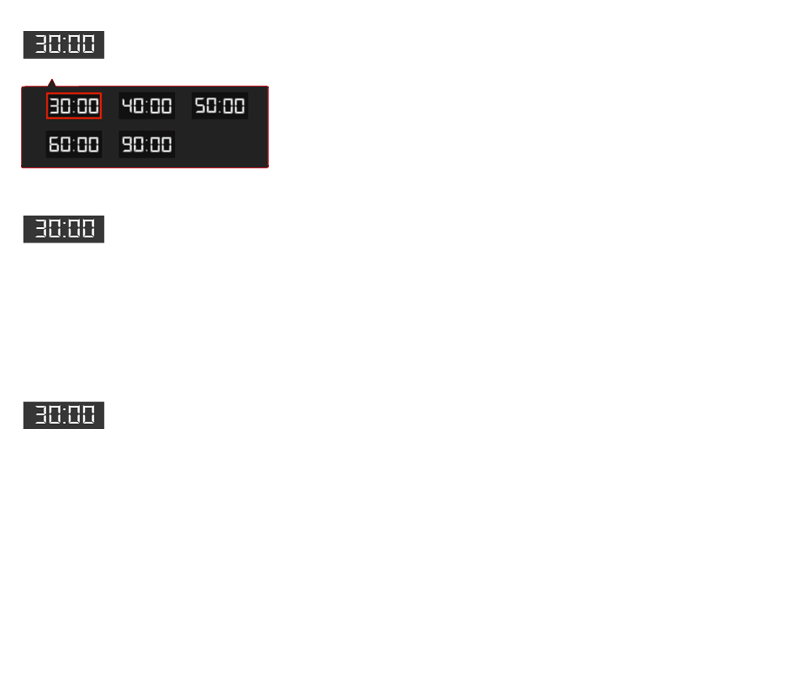


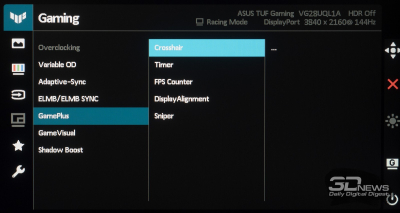
Отображение перекрестия прицела (четыре варианта) для шутеров.
Вывод в левой части экрана таймера для отслеживания прошедшего в игре времени.
При активации данной функции у краев экрана появятся линии, с помощью которых можно будет легко настроить изображение в мультимониторной конфигурации.
Вывод счетчика скорости отображения игры в формате числа кадров в секунду.
Обзор игрового 4K-монитора ASUS TUF Gaming VG28UQL1A: лучше поздно, чем никогда
Даже в 2022 году сложно представить настольный ПК, способный продемонстрировать стабильные 100+ кадров в секунду при высоких настройках графики в требовательных современных играх при рабочем разрешении 3840 × 2160 пикселей. А если вспомнить стоимость самых производительных видеокарт и процессоров, то от финальной суммы, которую придётся выложить за компьютер с такой видеокартой и подходящий монитор, многим станет не по себе. Впрочем, это абсолютно не мешает производителям мониторов продвигать всё более быстрые 4К-модели, максимальная частота которых после прошедшей выставки CES 2022 успела добраться до нескромных 240 Гц. Где взять столько мощности — единственный вопрос, который возникает после таких неожиданных анонсов от крупных компаний.
Поскольку мы ещё не добрались до только представленных новинок (ну или они до нас), то спустимся на землю и поговорим о более реальных и рациональных продуктах. Если рассматривать игровые 4К-дисплеи, то к более реальным и рациональным следует причислить мониторы с частотой 120-144 Гц. Первые подобные решения после трёх лет ожиданий и обещаний производителей появились в продаже летом 2018 года, а первенцем стал монитор ASUS, с которым мы сразу познакомились.
Прошло сколько-то времени, компании переосмыслили свой подход и стали предлагать в несколько раз более доступные решения, но без многозонных систем подсветки FALD-типа, что сдвинуло стартовую цену ближе к 100 тысячам рублей. Теперь же 27-28-дюймовые игровые 4К-мониторы с повышенной частотой вертикальной развёртки и IPS-матрицами предлагаются в диапазоне 60-80 тысяч — и именно в него попадает недавно появившаяся в продаже новинка ASUS VG27UQL1A из среднебюджетной линейки TUF Gaming.
⇡#Справочная информация и технические характеристики
Анонс новинки происходил в два этапа. Первые сведения о VG28UQL1A появились ещё в январе 2021 в ходе выставки CES, и тогда производитель отметил две основные характеристики – 144 Гц и наличие HDMI 2.1. Вторая порция информационных потоков прошла в начале лета и именно тогда ожидался старт продаж, однако до России монитор ASUS добрался только в январе 2022 года, а стартовая цена составила 72 тысячи рублей, сделав решение одним из самых доступных в классе.
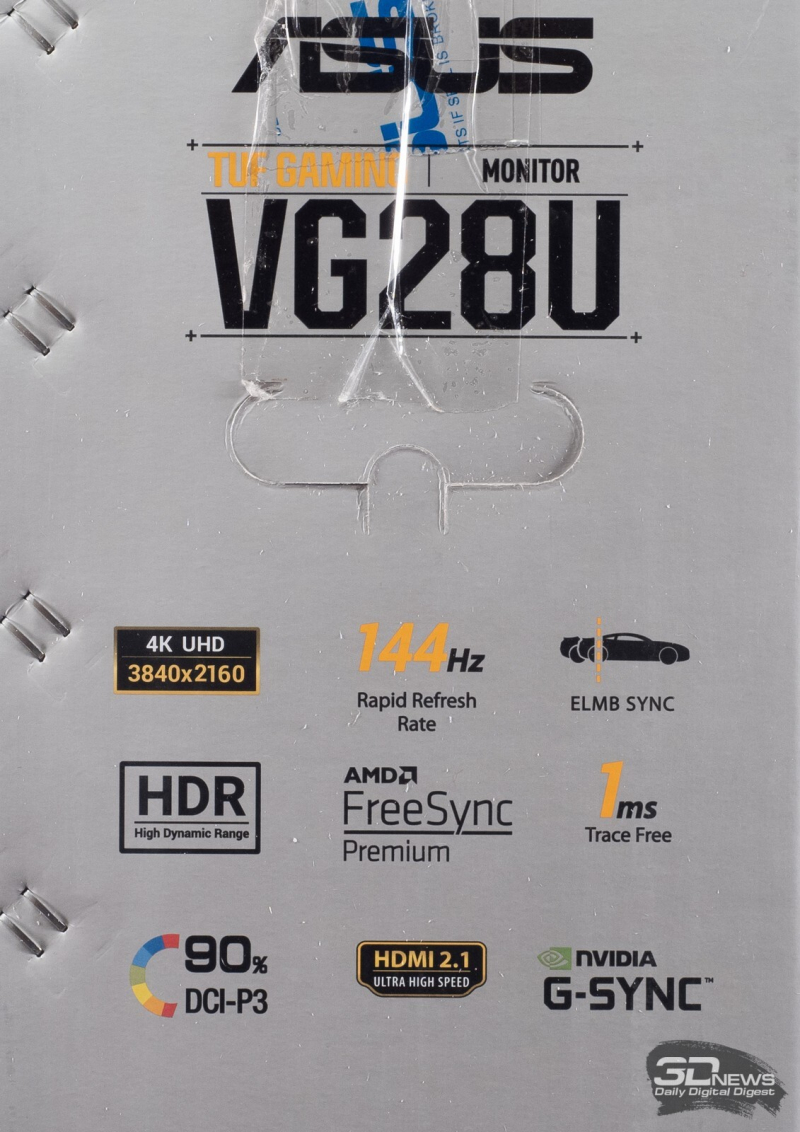
Всего в изучаемом сегменте дисплеев (27-28 дюймов, 4К IPS-type, 100+ Гц, без FALD-подсветки) представлено порядка 7 моделей, причём две из них, от LG, ощутимо дороже и не сильно подходят в качестве прямых конкурентов. Основными же отличиями VG28UQL1A от оставшихся представителей класса являются целых четыре порта HDMI (два из которых версии 2.1) и поддержка технологий ELMB/ELMB-Sync для совместной работы «вставки чёрного кадра» и систем адаптивной синхронизации.
| ASUS TUF Gaming VG28UQL1A | |
|---|---|
| Экран | |
| Диагональ, дюймов | 28 |
| Соотношение сторон | 16:9 |
| Покрытие матрицы | Полуматовое (Haze) |
| Стандартное разрешение, пикс. | 3840 × 2160 |
| PPI | 157 |
| Параметры изображения | |
| Тип матрицы | IPS (AAS Innolux?) |
| Подсветка | W-LED + PFS Phosphor (90 % DCI-P3) |
| Макс. яркость, кд/м 2 | 300 (typical), до 450 (DisplayHDR 400) |
| Контрастность статическая | 1000 : 1 |
| Количество отображаемых цветов | 1,07 млрд |
| Частота вертикальной развёртки, Гц | 48-144 + NVIDIA G-Sync Compatible, AMD FreeSync Premium |
| Время отклика MPRT, мс | НД |
| Время отклика GtG, мс | 1 |
| Максимальные углы обзора по горизонтали/вертикали, ° |
178/178 |
| Разъёмы | |
| Видеовходы | 2 × HDMI 2.1; 2 × HDMI 2.0; 1 × Display Port 1.4 (DSC Support) |
| Видеовыходы | Нет |
| Дополнительные порты | 1 × Audio-In (3,5 мм); 2 × USB 3.0 |
| Встроенные колонки: число × мощность, Вт | 2 × 2 Вт |
| Физические параметры | |
| Регулировка положения экрана | Угол наклона, поворот, изменение высоты, переворот (Pivot) |
| VESA-крепление: размеры (мм) | Есть (100 × 100 мм) |
| Крепление для замка Kensington | Да |
| Блок питания | Внешний |
| Макс. потребляемая мощность в работе / в режиме ожидания, Вт |
33 (при яркости 200 нит) / 0,3 |
| Габаритные размеры (с подставкой, Д × В × Г, мм |
640 × 420-540 × 214 |
| Габаритные размеры (без подставки), Д × В × Г, мм |
640 × 369 × 66 |
| Масса нетто (с подставкой), кг | 6,89 |
| Масса нетто (без подставки), кг | 4,67 |
| Ориентировочная цена | 71 000-80 000 рублей |
Мы не смогли добраться до сервисного меню новинки, как и найти точные данные по установленной матрице, а потому нам остаётся строить догадки. По нашим предположениям, в VG28UQL1A установлена единственная известная на рынке 28-дюймовая 4K IPS-панель с нативной частотой 144 Гц – модель M280DHJ-K7N от китайской компании Innolux. Данное решение в ASUS отнесли к так называемому поколению Fast IPS, для которого заявлена скорость отклика в 1 мс GtG. Официально поддерживается FreeSync Premium и G-Sync Compatible.
Полуматовая панель стандарта UHD с подобной диагональю и разрешением 3840 × 2160 пикселей обеспечивает плотность в 157 ppi, что гарантирует высокую чёткость на экране, но и буквально обязывает пользователя использовать систему масштабирования Windows, к работе которой до сих пор есть определённые вопросы.
Производитель утверждает, что монитор может воспроизводить 1,07 миллиарда цветовых оттенков — это косвенно указывает на использование схемы работы 8 бит + FRC (о настоящих 10 битах в данном сегменте можно не мечтать), а также отлично укладывается в расширенный цветовой охват модели на уровне 90 % DCI-P3. Такой показатель стал доступным благодаря использованию продвинутой системы подсветки (по нашим предположениям, это W-LED + PFS Phosphor). Кроме того, в ASUS заявляют, что подсветка относится к Flicker-Free-решениям (без мерцания), а также что у неё на «аппаратном уровне» смещён синий пик в спектре (сертификат TÜV Low Blue Light Hardware Solution) для увеличения безопасности использования и сопутствующего снижения нагрузки на глаза пользователя.
Чтобы не отставать от конкурентов, производитель внедрил динамическое управление подсветкой с делением на восемь крупных вертикальных зон. В обычном режиме максимальная яркость находится на уровне 300 нит, а в HDR-режиме (доступно несколько соответствующих режимов) она может достигать 450 нит, что вкупе с расширенными возможностями цветовоспроизведения обеспечило монитору сертификат соответствия VESA DisplayHDR 400 и поддержку стандарта HDR10. В свою очередь, с контрастностью тут нет ничего интересного: классические для IPS 1000:1 в максимуме – то, на что вы можете рассчитывать.
При подключении новинки к ПК следует отдать предпочтение интерфейсу DisplayPort 1.4, а для игровых приставок и прочих источников можно воспользоваться двумя HDMI 2.0 и таким же количеством современных HDMI 2.1. Для работы с периферией в мониторе предусмотрены два порта USB 3.0 и 3,5-мм аудиовыход для подключения наушников или внешней акустики.
Герой обзора оснащён двумя простенькими динамиками мощностью по 2 Вт каждый, а из-за большого количества внедрённых интерфейсов производитель не поскупился на поддержку функций PiP/PbP.
В вопросе внешнего вида новый ASUS TUF Gaming VG28UQL1A в целом повторяет многие решения TUF Gaming последних лет. Перед нами стильный корпус с «безрамочной» панелью, лишённый каких-либо систем подсветки внешнего пространства. Его дополняют знакомая по некоторым другим моделям TUF эргономичная V-образная подставка и привычная система управления на базе пятипозиционного джойстика.
В настройках присутствует большое количество различных игровых режимов GameVisual, пресеты Blue Light Filter для снижения синей составляющей спектра при помощи регулировки уровня RGB Gain и яркости подсветки. В арсенале монитора также присутствуют технология высветления теней Shadow Boost, обновлённый набор наэкранных виджетов GamePlus, отдельное включение ELMB и ELMB-Sync с небольшими возможностями дополнительной коррекции, а также 6-уровневая настройка Overdrive.
⇡#Комплектация и внешний вид
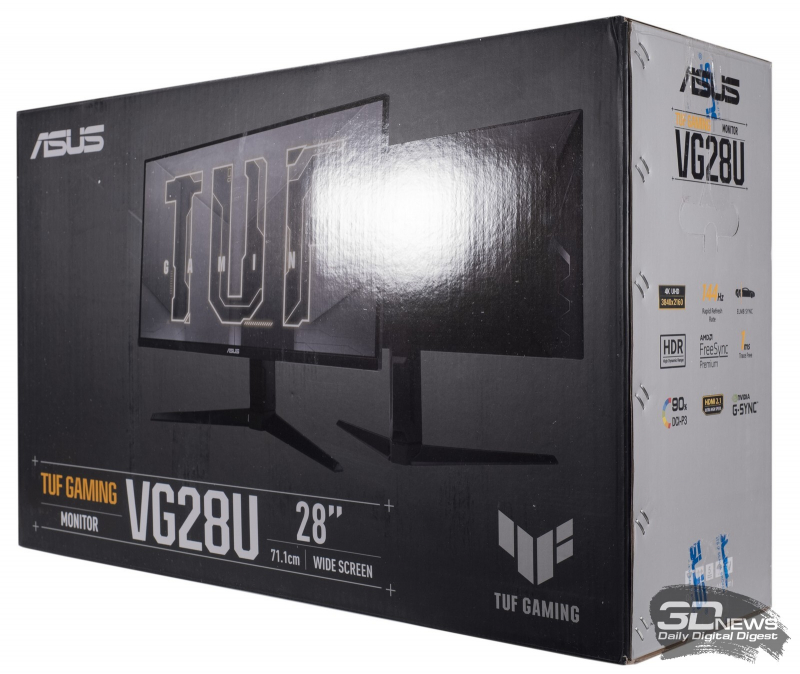
Для новинки TUF Gaming VG28UQL1A в ASUS использовали привычный дизайн упаковки. Монитор поставляется в крупной чёрно-серой коробке с качественной полиграфией, несколькими фотографиями дисплея и перечислением его основных особенностей с помощью различных пиктограмм. Пластиковой ручки, за которую коробку было бы удобно носить, тут нет: вместо неё предлагается воспользоваться двумя вырезами с торцов упаковки.
Одну из сторон коробки производитель практически полностью отдал под более полный список достоинств модели.
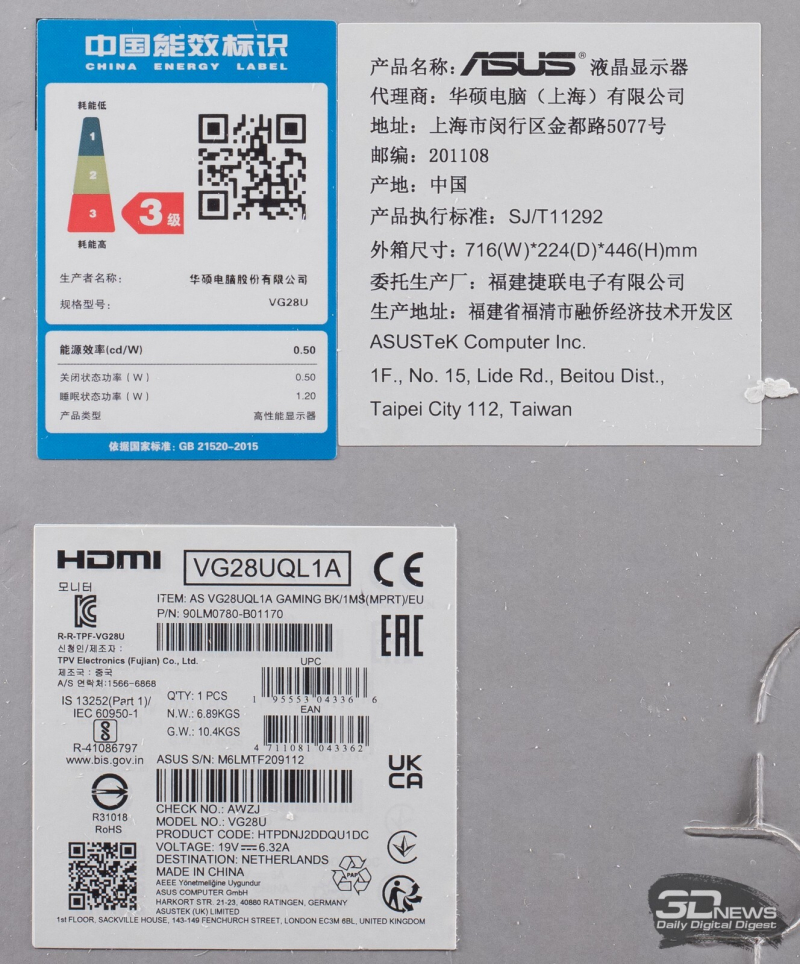
Основная наклейка на упаковке не содержит особо полезной для покупателя информации. Она информирует лишь о том, что дисплей изготовлен в Китае силами известного в индустрии подрядчика TPV Electronics (Fujian).
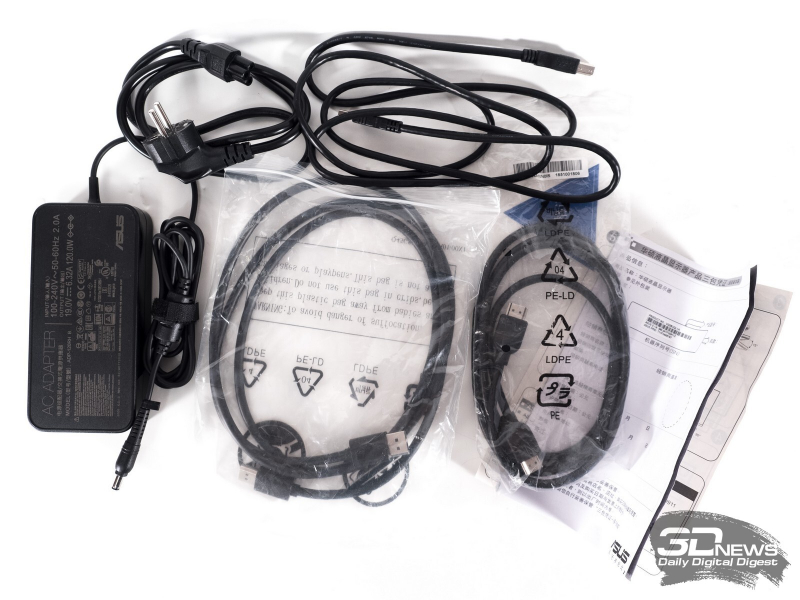
Комплект поставки монитора включает в себя следующее:
- кабель питания;
- внешний БП;
- кабель DisplayPort;
- кабель HDMI;
- кабель USB для подключения к ПК;
- краткое руководство по установке и настройке;
- проспект ASUS VIP Member;
- проспект по безопасному использованию.
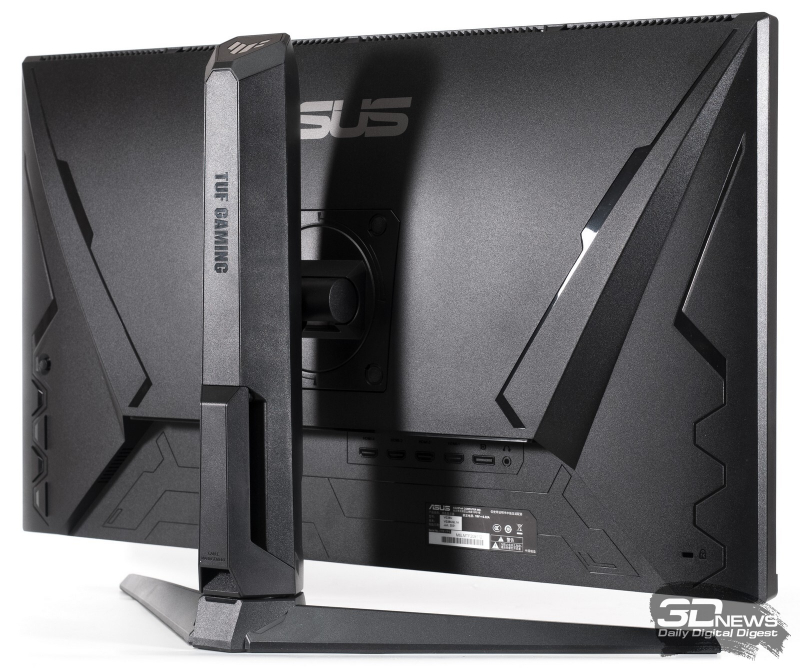
Несмотря на свою дороговизну, монитор продолжает относиться к сравнительно доступной (по крайней мере более доступной, чем мониторы ROG) линейке TUF Gaming, что не могло не сказаться на его внешнем виде и используемых материалах. В VG28UQL1A вы не найдёте металлических поверхностей, как нет и одной из фишек ASUS – тонких пластиковых накладок с четырёх сторон матрицы. В модели используется более классический вариант «безрамочности» — с тонкими рамками с трёх сторон и крупной пластиковой накладкой в нижней части.
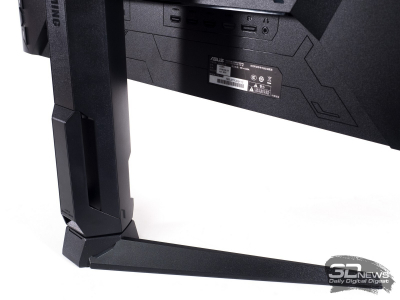
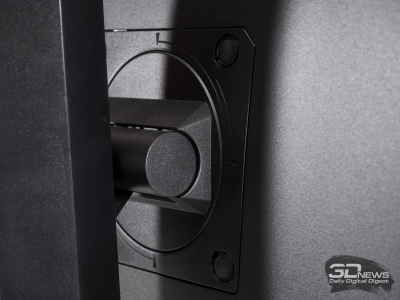
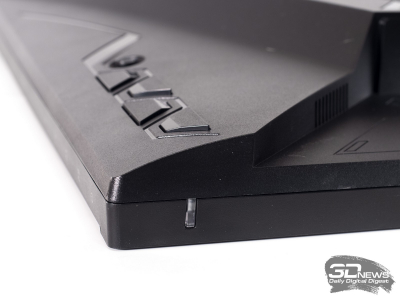
В задней части корпуса наблюдается знакомое переплетение различных поверхностей, сложные геометрические фигуры, а также отсутствие быстросъёмной системы крепления – центральная колонна прикреплена к корпусу четырьмя винтами, скрытыми за силиконовыми заглушками. За ней находится площадка VESA 100 × 100 мм для использования со сторонними кронштейнами.
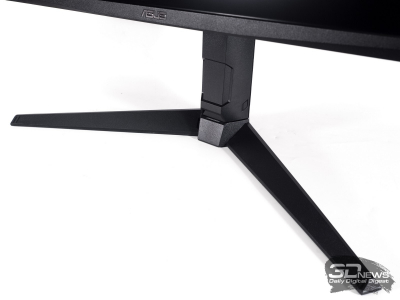
Используемая в мониторе V-образная подставка применяется ASUS и в других моделях линейки TUF. Несмотря на свой минимализм, она обеспечивает широкие возможности эргономики с минимальной точкой опускания корпуса, отличную устойчивость и хорошие внешние данные.
В качестве системы прокладки кабелей используется углубление в центральной стойке, которое прикрыто пластиковым декоративным элементом. Решение, мягко говоря, не самое практичное: максимум, что вы сможете сделать с помощью него, – загнуть кабели ближе к нижней части подставки.
Эргономика подставки обеспечивает регулировку высоты в пределах 120 мм, наклона в диапазоне от -5 до +20 градусов и поворот корпуса на 15 градусов вправо/влево.
Также доступен разворот в портретный режим (Pivot), правда, только в одну сторону. Центровка корпуса из-за этого не лучшая — экран придётся выравнивать по горизонтали после каждого изменения положения в пространстве.
Положение корпуса на подставке можно менять плавно, но необходимо приложить чуть больше усилий в начале регулировки, особенно при повороте корпуса.
Основание подставки и все внутренние крепёжные элементы выполнены из металла. Для лучшего сцепления с рабочей поверхностью используются пять резиновых ножек различной формы.
Рабочую поверхность матрицы можно смело отнести к полуматовым вариантам. Она обладает хорошими антибликовыми свойствами, а кристаллический эффект остаётся еле различимым.
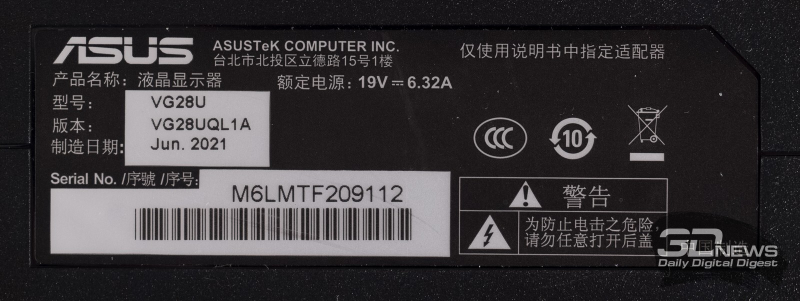
Из одной наклейки в нижней части корпуса мы наконец-то узнали дату производства нашего экземпляра (июнь 2021 года). В остальном же ничего нового почерпнуть не удалось.

Все без исключения порты находятся в задней части корпуса и ориентированы вниз. Благодаря широким возможностям трансформации подставки подключать кабели проще простого, но от дополнительной пары USB на одной из боковых частей корпуса, уверены, никто бы не отказался.
Встроенная акустическая система представлена двумя динамиками по 2 Вт каждый, расположенными в нижней части корпуса. Звук без особого качества, максимальная громкость невелика. Но это лучше, чем ничего.
Качество сборки у изучаемого монитора близко к идеалу: все детали соединены точно и с минимальными равномерными зазорами, люфты отсутствуют, жёсткость конструкции высокая. Дисплей не поддаётся скручиванию, не издаёт хрустов или скрипов при изменении положения корпуса или переноске с места на место.
Используемые материалы пускай и не самые дорогие, но всё равно качественные и практичные (за небольшим и понятным исключением), с различной фактурой: пыль не видна, как и следы от пальцев.
⇡#Меню и управление
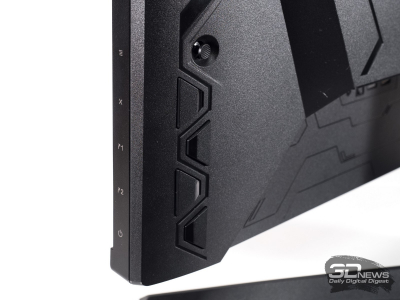
Управлять монитором можно с помощью пятипозиционного джойстика чёрного цвета и четырёх отличных друг от друга по размеру трапециевидных физических кнопок, расположенных в задней части устройства.
На нижней грани разместился неяркий белый светодиод питания, который при желании можно отключить через настройки.
Из четырех кнопок управления одна отвечает за включение монитора, другая является кнопкой отмены или выхода из раздела, а две оставшиеся служат для активации игрового таймера/настраиваемого прицела/счётчика FPS (функция GamePlus, которую мы изменили на регулировку яркости) и быстрого переключения предустановленных режимов GameVisual.
Для навигации по меню используется пятипозиционный джойстик — один из самых удачных способов для работы с OSD-меню. Времени на привыкание требуется минимум, управлять можно без проблем как днём, так и ночью, всё доступно и легко.
Дизайн меню большинства мониторов ASUS давно не претерпевает глобальных изменений. Внешний вид OSD-экрана прост, лаконичен и современен. В случае с новинкой в нём содержится семь разделов со слегка изменённым наполнением.
Первым представлен раздел под названием Gaming — пользователю предлагается установить степень разгона матрицы (Variable OD), настроить функции GamePlus, ELMB/ELMB-Sync, включить Adaptive-Sync, выбрать один из режимов GameVisual и выставить степень высветления теней (Shadow Boost). Есть пункт Overclocking, однако монитор и без него работает на максимальных по ТХ 144 Гц — сам пункт заблокирован, и никаких точных сведений о нём нет даже в полноценной инструкции к монитору.
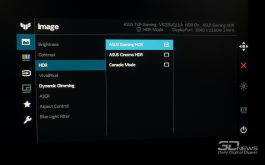
Во втором разделе можно установить уровень яркости и контрастности и включить динамическую подсветку (особой пользы от данной функции вы не получите, ведь зон всего восемь, поэтому работает система очень грубо). Здесь же предлагается выбрать режим работы встроенного скалера, отрегулировать дополнительную контурную резкость (VividPixel), определить степень влияния функции Blue Light Filter на изображение на экране, выбрать один из режимов представления HDR (при активации HDR в системе или игровой приставке) и активировать систему динамической контрастности (ASCR).
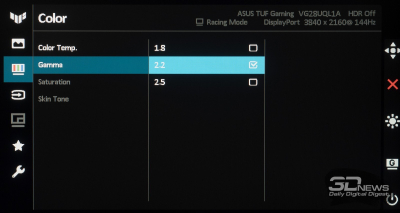
Не менее важные параметры отнесены к разделу Color. В нём вы можете встретить режимы цветовой температуры и возможность вручную определить степень усиления RGB, а также 6-осевую коррекцию насыщенности. Тут же доступны три режима гаммы и регулировка тона лица (возможно поменять только в некоторых режимах GameVisual).
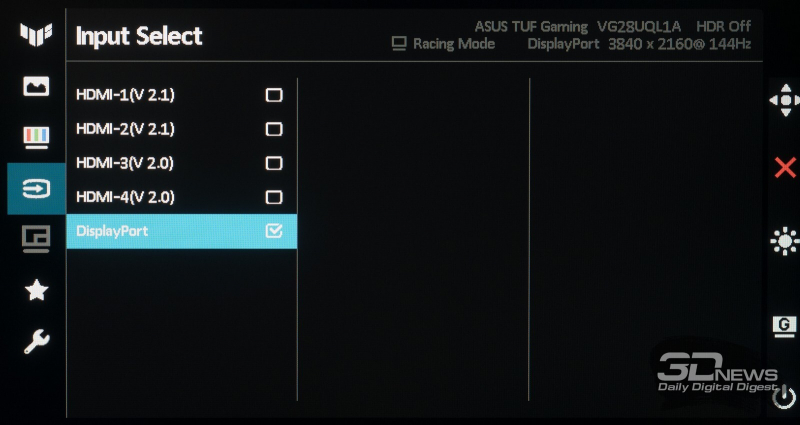
Далее у нас идёт раздел Input Select, где можно выбрать источник сигнала, а до него представлен заблокированный при использовании одного источника раздел с настройками функций PbP/PiP.
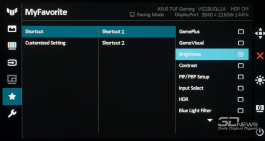
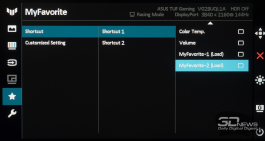
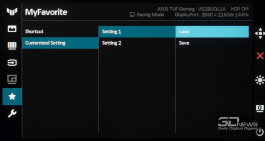
В шестом разделе, MyFavorite, предлагается определить функции с быстрым доступом для двух физических клавиш управления и сохранить все (!) настройки монитора в одну из двух ячеек памяти.
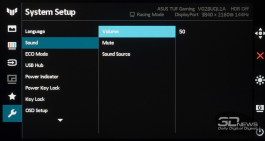
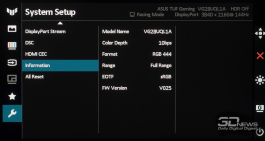
Раздел System Setup содержит в себе параметры, в основном не связанные с качеством изображения на экране. Среди доступных опций настройка внешнего вида и положения OSD-меню, выбор языка локализации меню (русский в наличии, перевод не полный и не очень качественный, но c достойными шрифтами), блокировка клавиш управления, выключение Eco-режима (блокирует максимальную яркость).

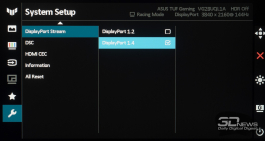
Присутствует подраздел с основной рабочей информацией по монитору, возможность дезактивировать индикатор питания и настроить поведение USB-хаба. Здесь же вы можете выбрать режим работы DisplayPort, отключить поддержку DSC (актуально, если у вас старая видеокарта) и защиту HDMI CEC.
Доступ к сервисному меню найден не был, как и у большинства современных моделей ASUS.
⇡#Методика тестирования
Монитор ASUS TUF Gaming VG28UQL1A был протестирован по нашей методике при помощи колориметра X-Rite i1 Display Pro Plus в сочетании с референсным спектрофотометром X-Rite i1 Pro 2, программного комплекса Argyll CMS c графическим интерфейсом dispcalGUI и программой HCFR Colormeter. Все операции осуществлялись в Windows 10 Pro x64 c последними обновлениями. Во время основного этапа тестирования частота обновления экрана составляла 144 Гц. В ходе проверки использовалась видеокарта RTX 2060.
В соответствии с методикой мы измерим следующие параметры монитора:
- яркость белого, яркость чёрного, коэффициент контрастности при мощности подсветки от 0 до 100% с шагом 10%;
- цветовой охват;
- цветовую температуру;
- гамма-кривые трёх основных цветов RGB;
- гамма-кривую серого цвета;
- отклонения цветопередачи DeltaE (по стандарту CIEDE1994);
- равномерность подсветки, равномерность цветовой температуры (в кельвинах и единицах отклонения DeltaE) при яркости в центральной точке 100 кд/м 2 .
Все описанные выше измерения проводились до и после калибровки. Во время тестов мы измеряем основные профили монитора: выставленный по умолчанию, sRGB (если доступен) и Adobe RGB (если доступен). Калибровка проводится в профиле, выставленном по умолчанию, за исключением особых случаев, о которых будет сказано дополнительно. Для мониторов с расширенным цветовым охватом мы выбираем режим аппаратной эмуляции sRGB, если он доступен. Перед началом всех тестов монитор прогревается в течение 3-4 часов, а все его настройки сбрасываются до заводских.
Также мы продолжим нашу старую практику публикации профилей калибровки для протестированных нами мониторов в конце статьи. При этом тестовая лаборатория 3DNews предупреждает, что такой профиль не сможет на 100% исправить недостатки конкретно вашего монитора. Дело в том, что все мониторы (даже в рамках одной модели) обязательно будут отличаться друг от друга небольшими погрешностями цветопередачи. Изготовить две одинаковые матрицы невозможно физически, поэтому для любой серьёзной калибровки монитора необходим колориметр или спектрофотометр. Но и «универсальный» профиль, созданный для конкретного экземпляра, в целом может поправить ситуацию и у других устройств той же модели, особенно в случае дешёвых дисплеев с ярко выраженными дефектами цветопередачи.
⇡#Рабочие параметры
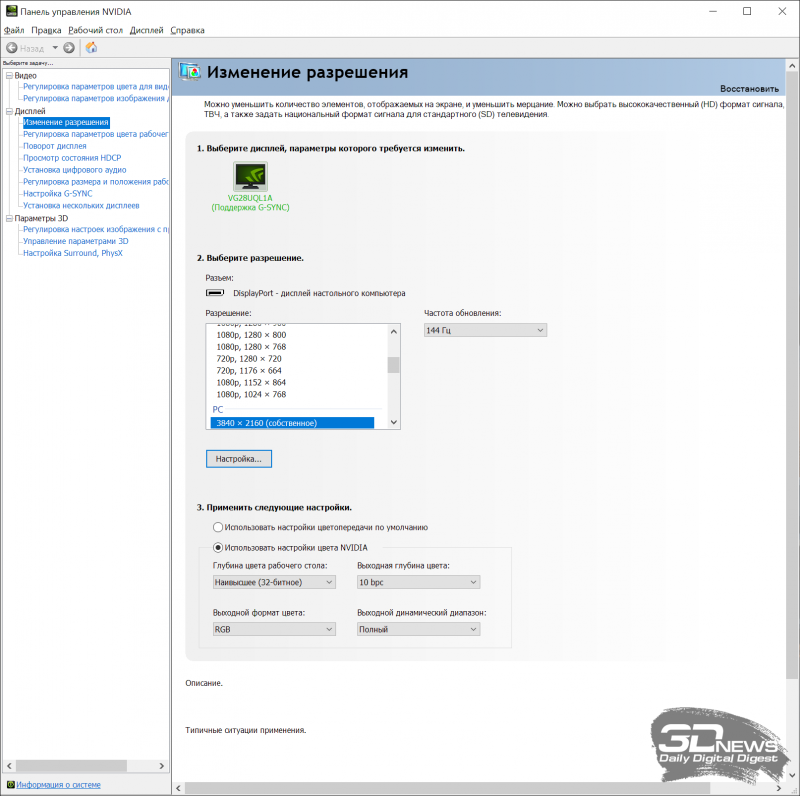
В ASUS TUF Gaming VG28UQL1A производитель предлагает семь предустановленных режимов GameVisual. При тестировании монитора мы использовали интерфейс Display Port 1.4 как наиболее беспроблемный и популярный среди пользователей ПК.
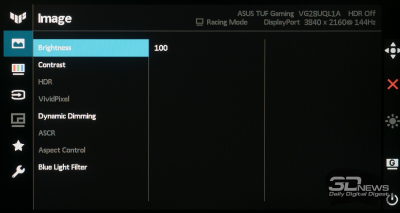
По умолчанию настройки основных параметров выглядят следующим образом:
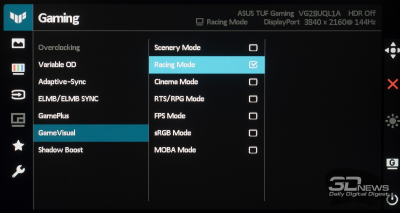
- GameVisual — Racing;
- Brightness — 90 (после выключения функции Eco);
- Contrast — 50;
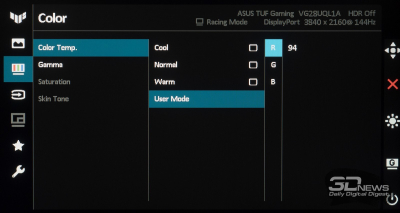
- Color Temp — User (100|100|100);
- Gamma — 2,2;
- Variable OD — Level 2;
- Shadow Boost — Off;
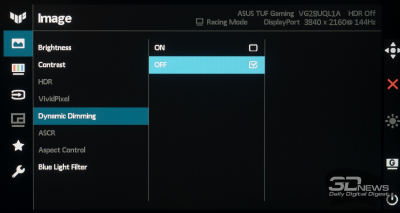
- Dynamic Dimming — Off.
В ходе ручных правок под яркость в центральной точке 100 нит и точку белого 6500 К изменениям подверглись только следующие пункты:
- Brightness — 17;
- Color Temp — User (94|94|99);
- Variable OD — Level 1.
В ходе ручной настройки мы сильно снизили яркость подсветки, отрегулировали степень усиления RGB для получения необходимой точки белого, а для снижения заметности артефактов на движущихся объектах снизили уровень Variable OD. Другие параметры, ответственные за картинку на экране, трогать не советуем — сделаете только хуже.
⇡#Яркость белого, яркость чёрного, коэффициент контрастности
Первоначальная проверка осуществлялась в режиме Racing при настройках по умолчанию:
| Яркость в меню (%) | Яркость белого (кд/м 2 ) | Яркость чёрного (кд/м 2 ) | Статическая контрастность (x:1) |
| 100 | 312 | 0,293 | 1065 |
| 90 | 289 | 0,272 | 1063 |
| 80 | 266 | 0,25 | 1064 |
| 70 | 242 | 0,228 | 1061 |
| 60 | 218 | 0,205 | 1063 |
| 50 | 194 | 0,182 | 1066 |
| 40 | 169 | 0,159 | 1063 |
| 30 | 144 | 0,135 | 1067 |
| 20 | 118 | 0,111 | 1063 |
| 10 | 92 | 0,087 | 1057 |
| 0 | 66 | 0,062 | 1065 |

Максимальная яркость в центральной точке оказалась на уровне 312 кд/м 2 , превзойдя указанное производителем значение для SDR-режима. В случае с активным HDR и зональной подсветкой достигнутый кратковременный максимум оказался близким к 468 нит, что также превышает требуемую яркость для стандарта VESA DisplayHDR 400.
Тем временем доступный минимум составил 66 кд/м 2 — вполне подходящий вариант для тёмных помещений либо работы практически без внешней подсветки.
В вопросе коэффициента контрастности монитор показал среднее значение в 1060:1, то есть превысил цифру из ТХ. Для игрового IPS это хороший результат, не влияющий отрицательно на качество изображения, однако рассчитывать на глубокий чёрный всё же не стоит.
Результаты при стандартных настройках и после включения функции ELMB—Sync
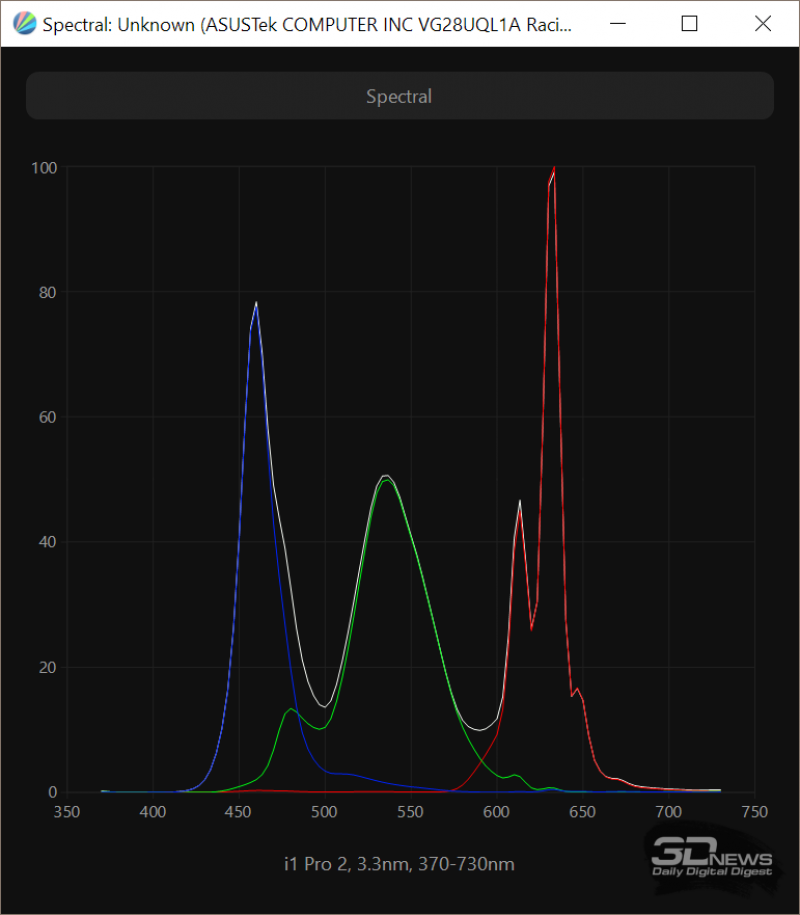
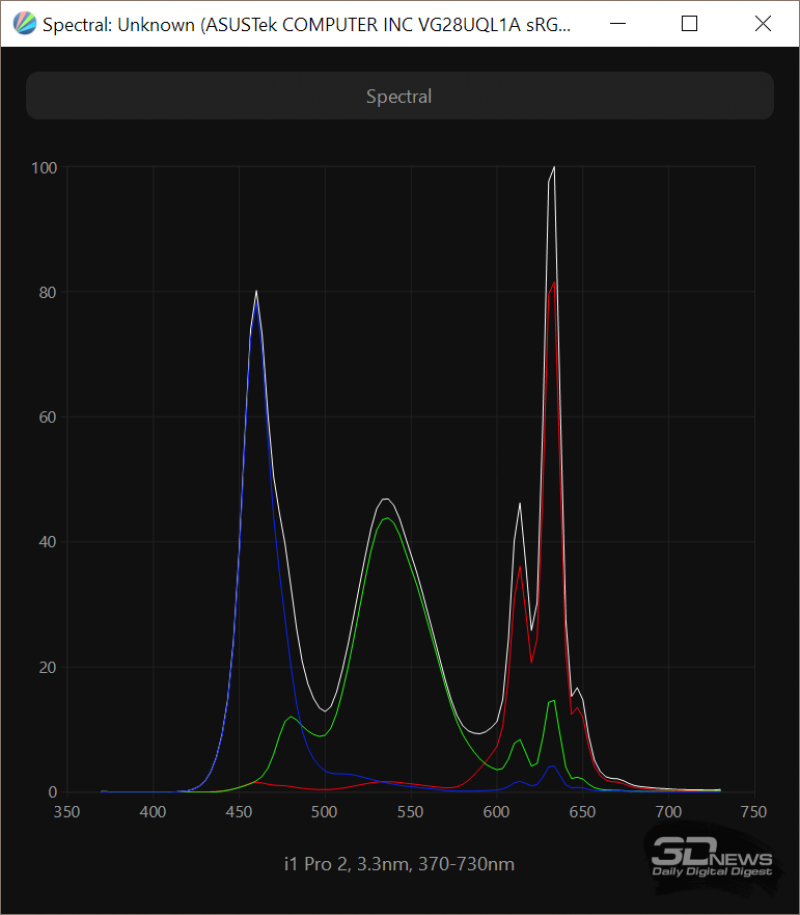
При заводских настройках изучаемый монитор работает в режиме Racing с широким цветовым охватом, который способна продемонстрировать используемая система подсветки на базе W-LED и светорассеивающего слоя PFS-Phosphor. У изучаемого решения слегка сдвинут пик синего в спектре, что обеспечило возможность получения сертификата безопасности от TÜV.
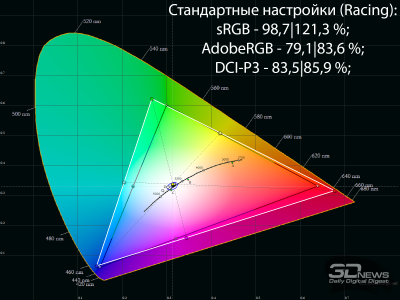
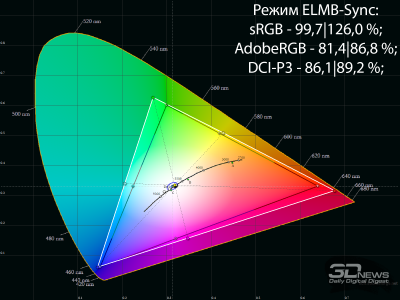
Несмотря на заявление производителя о соответствии DCI-P3 на 90 %, реальные возможности матрицы оказались ниже: 83,5 % при заводских установках и 86,1 % после активации системы вставки «чёрного кадра» ELMB-Sync — удивительная прибавка, на которую мы точно не рассчитывали.
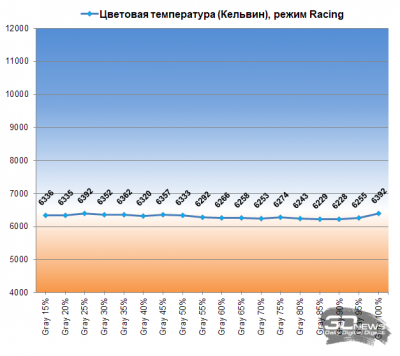
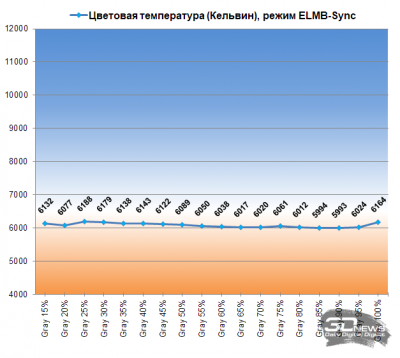

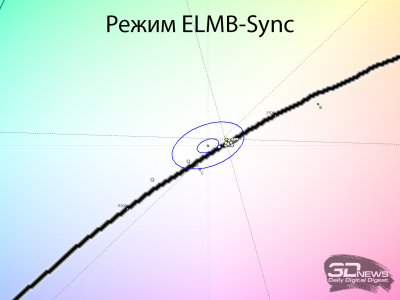
Оба варианта демонстрируют почти идеальную стабильность цветовой температуры оттенков серого со средней по точности установки точкой белого с отклонением на уровне 3-4 единиц DeltaE94.
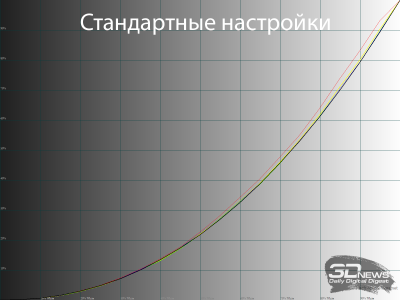
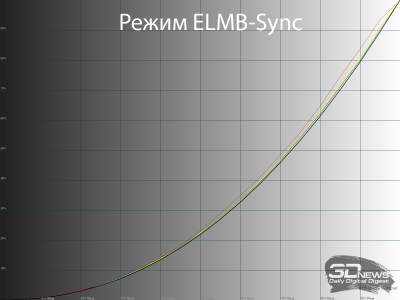
На полученных гамма-кривых в режиме Racing мы видим лишь проблему с красным каналом, а после добавки в виде ELMB-Sync кривые немного отходят от референса, слегка снижая контрастность картинки.
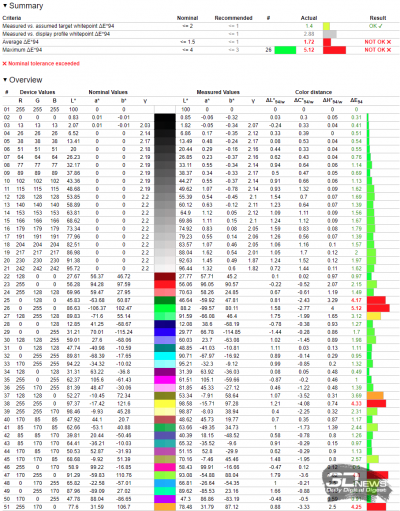
Несмотря на подобные отличия, меньший уровень отклонений DeltaE94 был получен именно после активации ELMB-Sync, в том числе благодаря большему цветовому охвату. В обоих результатах цифры достаточно большие, то есть желательно создать цветовой профиль для уточнения возможностей дисплея и корректировки небольших недочётов.
⇡#Результаты после настройки и калибровки
Новый ASUS TUF Gaming VG28UQL1A не требует больших коррекций и может обойтись небольшими ручными правками и профилем с минимальными изменениями через LUT видеокарты.
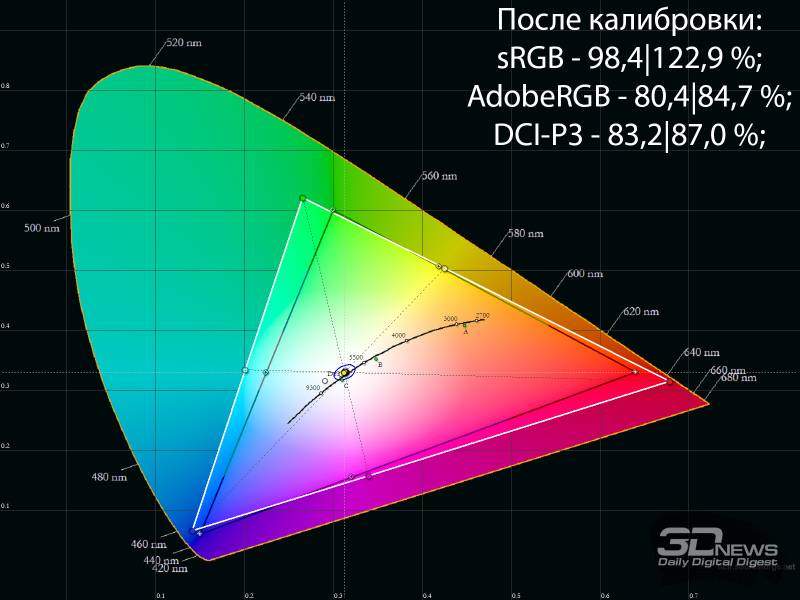
После снижения яркости и правок RGB Gain цветовой охват сохранился на изначальном уровне. Возможности матрицы продолжают значительно превышать пространство sRGB, а потому для правильного снижения насыщенности изображения на экране вам необходимо использовать цветовой профиль устройства.
В ходе ручной настройки мы добились необходимой точки белого без какого-либо паразитного оттенка, но баланс серого клина стал не таким идеальным, как при заводских настройках.

Внесённые в LUT видеокарты правки обеспечили нам почти идеальные гамма-кривые без проблем с красным каналом.
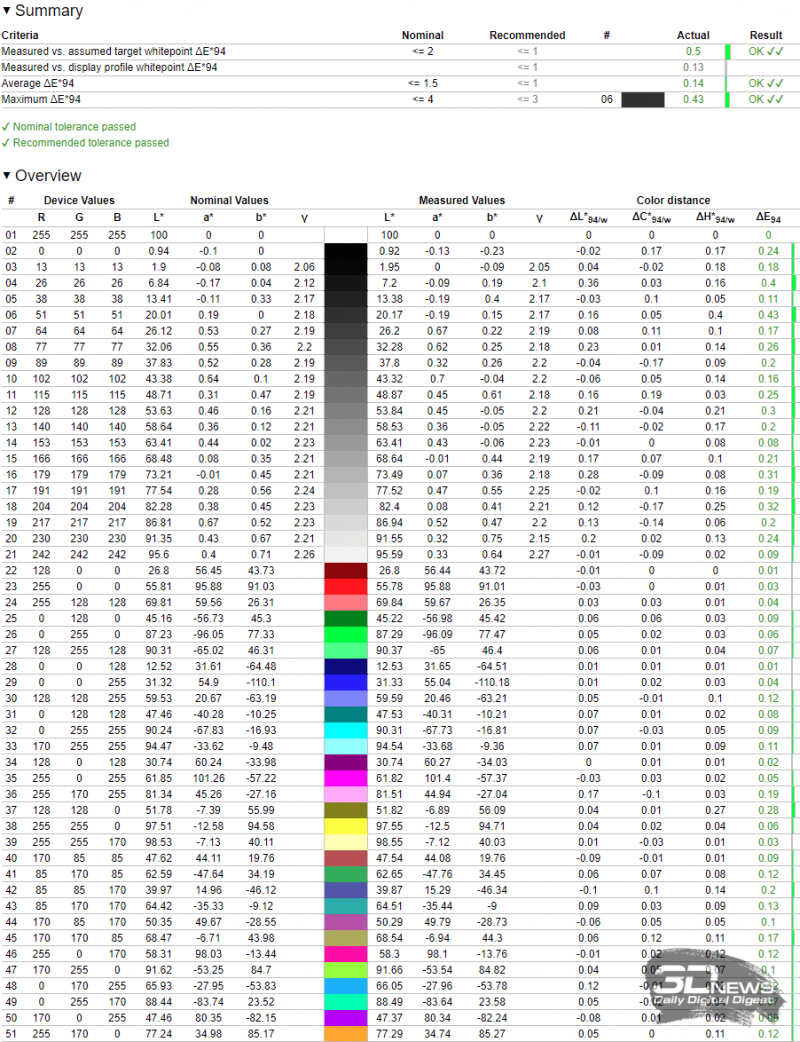
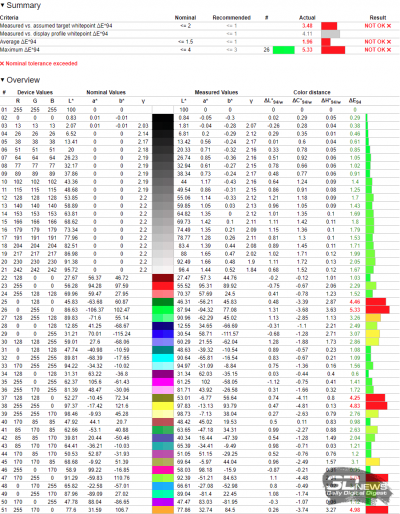
Отчёт Argyll CMS продемонстрировал ожидаемое снижение отклонений. Среднее значение снизилось до 0,14 единицы DeltaE94, а максимум не превысил 0,43. Вопросов к монитору нет. Идём дальше.
Результаты в режиме sRGB
Теперь перейдём к рассмотрению результатов при установке режима эмуляции sRGB. В этом случае производится подмешивание компонент в чистые цвета, что приводит к сужению цветового охвата. Яркость в режиме sRGB по умолчанию установлена на уровне 45 %, но доступна для свободной регулировки в полном диапазоне (не заблокирована)!
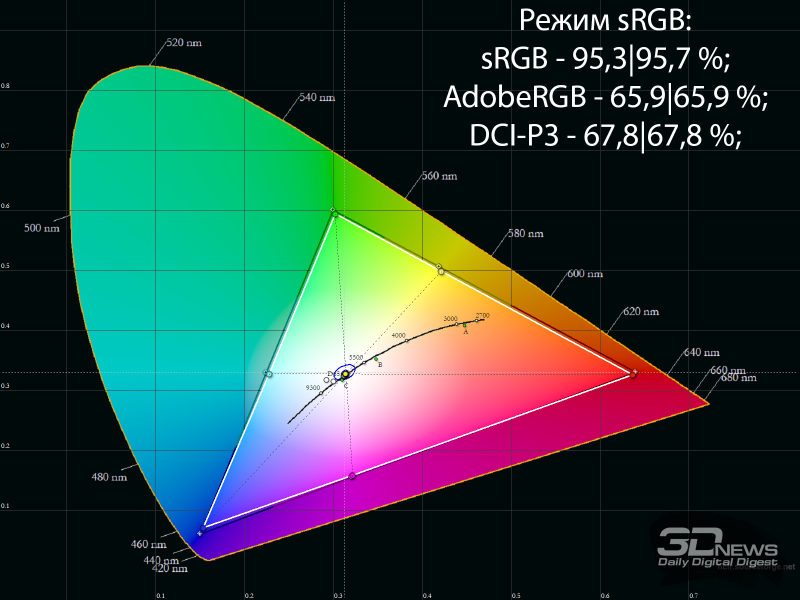
Опорные точки выставлены очень точно, а итоговое соответствие sRGB составляет 95,3 %, что для монитора данного сегмента – прекрасный результат. Именно в таком режиме вы можете быстро добиться правильной насыщенности картинки и приблизиться к тому, что было задумано создателем того или иного изображения, фотографии или видео.
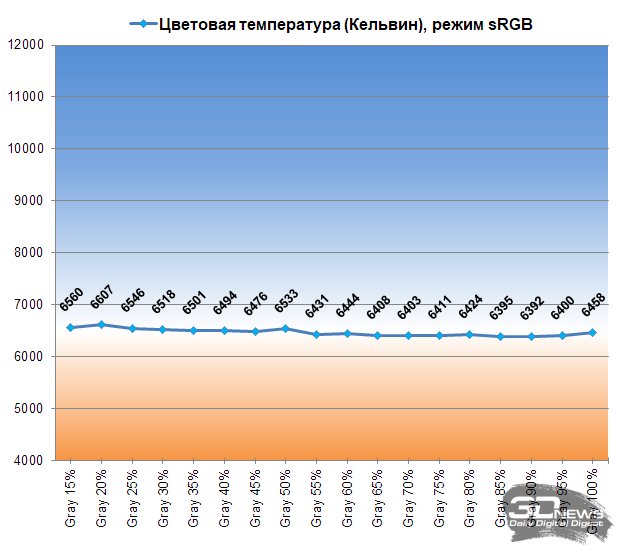
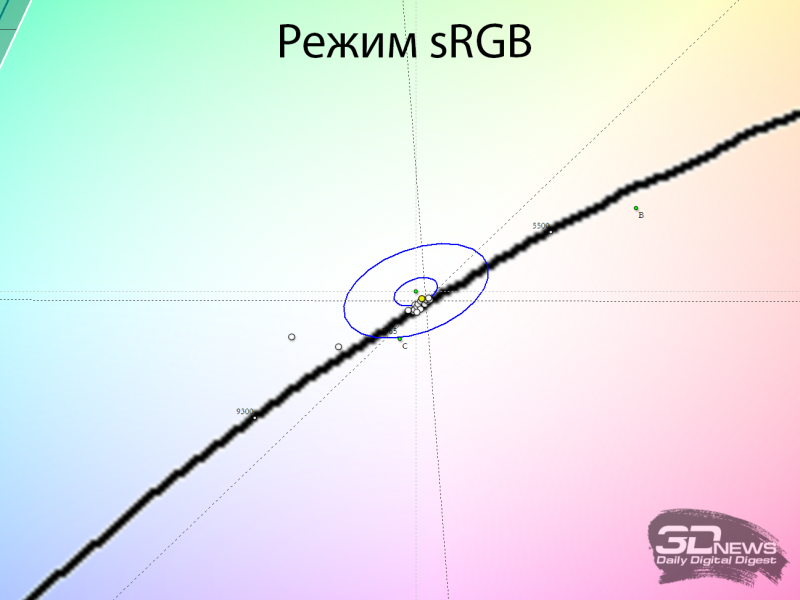
В изучаемом режиме точка белого настроена близко к идеалу, да и к балансу серого нет никаких вопросов – всё на высшем уровне.
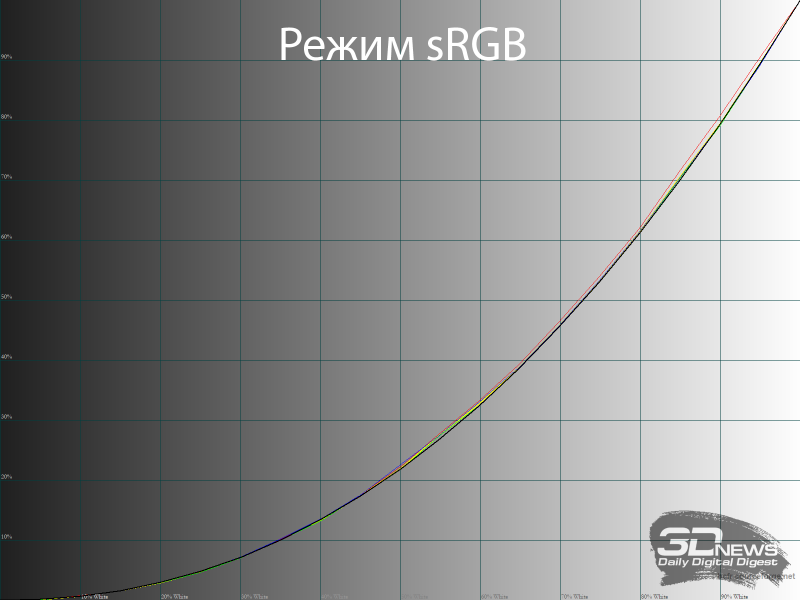
Единственная претензия у нас возникла к гамма-кривым. Монитор не продемонстрировал необходимые коррекции на глубоких тенях, и в целом результат оказался почти таким же, как и в режиме Racing с гаммой, приближенной к значению 2,2.
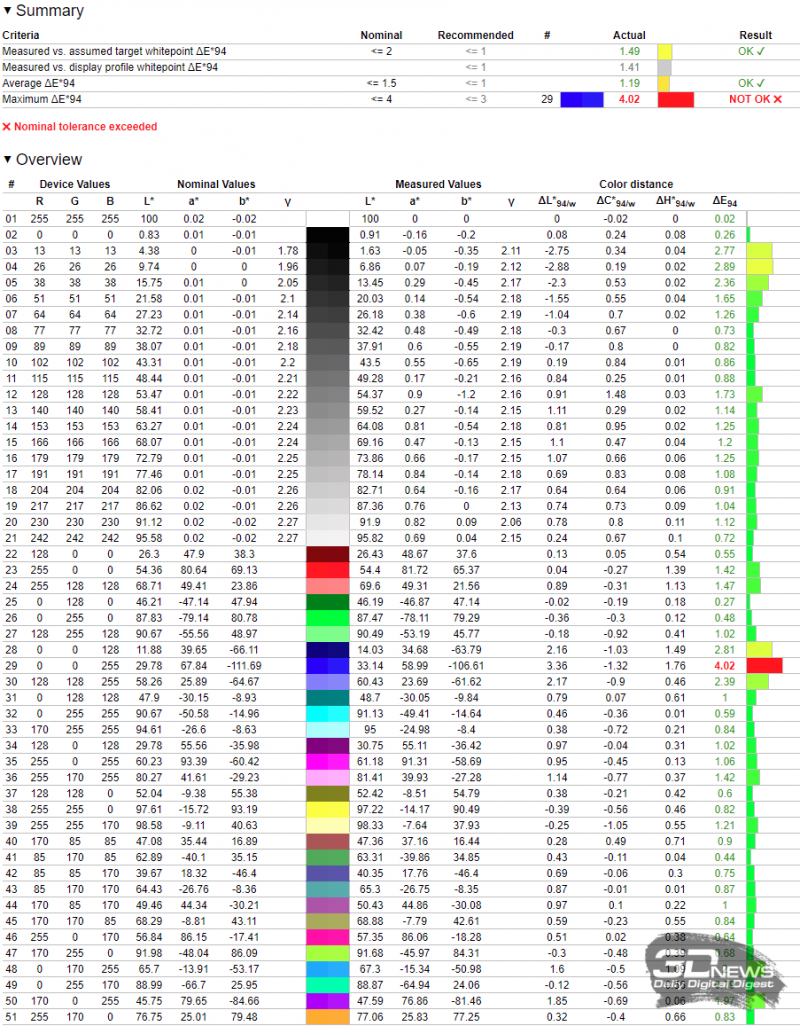
О данной особенности настройки ASUS VG28UQL1A нам сообщает и финальный отчёт Argyll CMS, в котором видны проблемы с тёмными участками, а также необходимость уточнения координат пары других цветов. Если же вы не слишком требовательны к точности цветопередачи, то вас полностью устроят такие результаты: ничего страшного в них нет – всё в пределах допустимых отклонений!
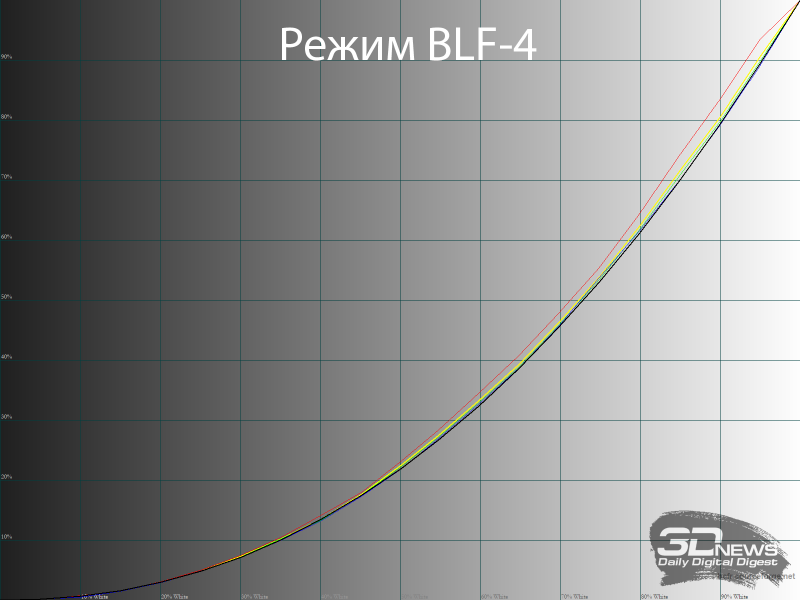
⇡#Результаты в режиме Blue Light Filter 4
Для снижения нагрузки на глаза производители давно предлагают программные режимы вроде Blue Light Filter со сниженной синей составляющей спектра подсветки, в том числе в качестве дополнения для «аппаратных фильтров», как у изучаемой новинки.
В мониторе ASUS у такого режима четыре стандартных уровня воздействия. Первые три влияют только на точку белого с небольшими сдвигами цветовой температуры, а в четвёртом дополнительно происходит понижение яркости — до 163 нит. Именно его, как обычно, мы и решили проверить.
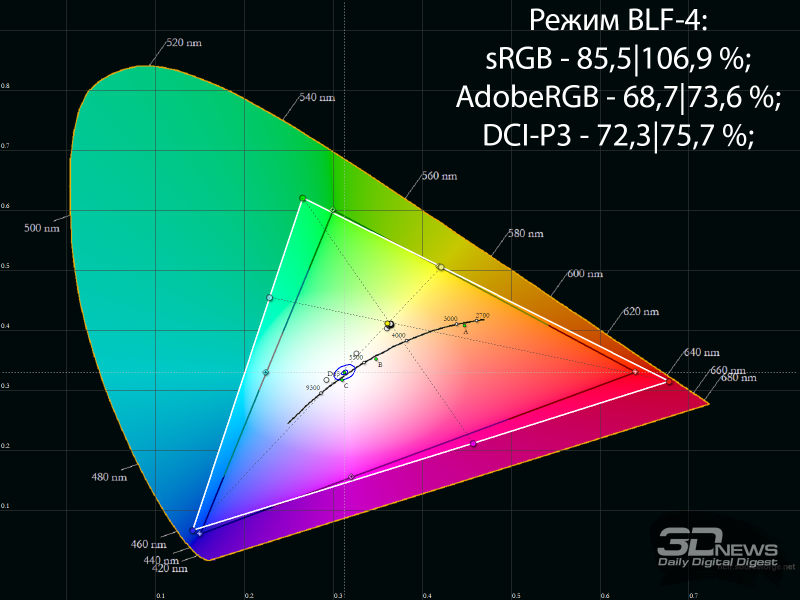
Общие показатели цветового соответствия значительно ниже (но на 2D CIE-диаграмме этого не увидеть), чем в режимах с полным цветовым охватом. Однако вряд ли эти цифры будут волновать вас при включении данного пресета, созданного ASUS исключительно для обывательской работы (к примеру, с документами) при плохом внешнем освещении.
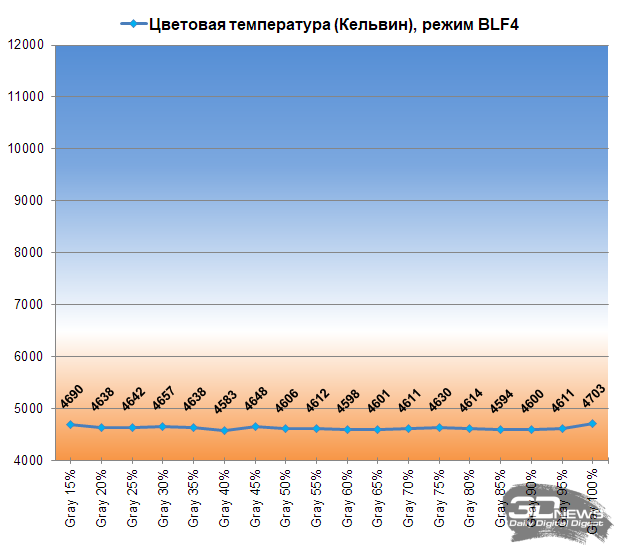
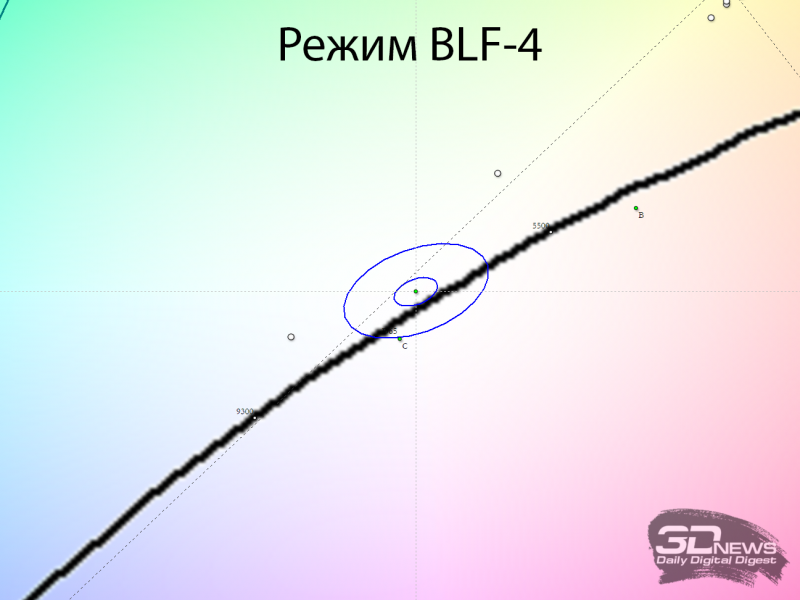
Точка белого переместилась к 4700 К с лёгким зеленоватым паразитным оттенком. Подобное произошло и с оттенками серого, которые плотной группой легли рядом, сохранив тем самым максимально высокую стабильность цветовой температуры.
При этом никаких других важных изменений (таких как снижение контрастности или увеличение различимости тёмных оттенков) для снижения нагрузки на глаза производитель не сделал, а поэтому разница с Racing Mode по умолчанию исключительно в цветовой температуре, общем цветовом балансе и заблокированной на среднем уровне яркости.
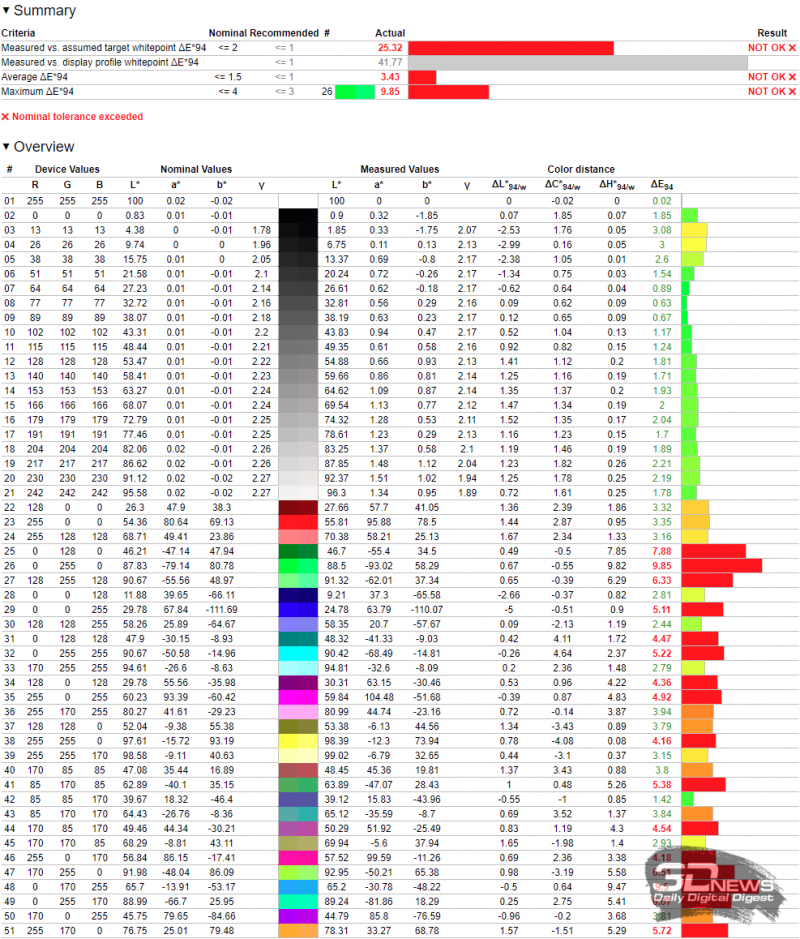
Поэтому нет ничего удивительного и в том, что в тесте Argyll различия сводятся лишь к большим отклонениям на цветных патчах из-за сниженного цветового охвата, тогда как результаты на оттенках серого остались почти на том же уровне, что и в режиме Racing.
⇡#Изучение влияния режимов Shadow Boost и уровней Gamma
В случае с ASUS VG28UQL1A мы решили продемонстрировать вам влияние на цветопередачу трёх режимов Shadow Boost и точность настройки остальных предустановок Gamma.
Система усиления различимости тёмных оттенков у героя обзора работает максимально корректно: плавно, с увеличением степени воздействия и затрагивая исключительно тёмные участки изображения в широком диапазоне. Самое сильное воздействие происходит в динамическом режиме — и именно его вам следует использовать, если нет желания подбирать доступный вариант вручную.
С точки зрения точности установки прочих режимов гаммы изучаемый монитор показал высокий результат, но исключительно в режимах 1,8 и 2,2. Отличия от указанных величин не превышают 0,04, а дисбаланс RGB проявляет себя слабо (всё по тому же красному каналу). Однако режим «Гамма 2,5» просто следовало бы переименовать в «Гамма 2,4» — и тогда вопросов не возникло бы вовсе. Таким образом, выбором двух крайних режимов вы можете быстро увеличить или уменьшить визуальный контраст изображения на экране, а перейдя к заводскому «Гамма 2,2» — вновь вернуть корректный вид изображения.
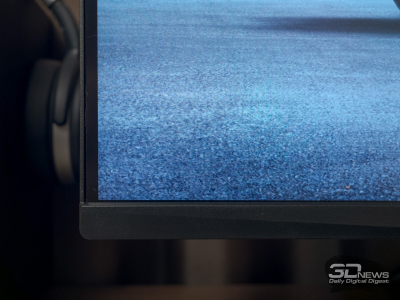
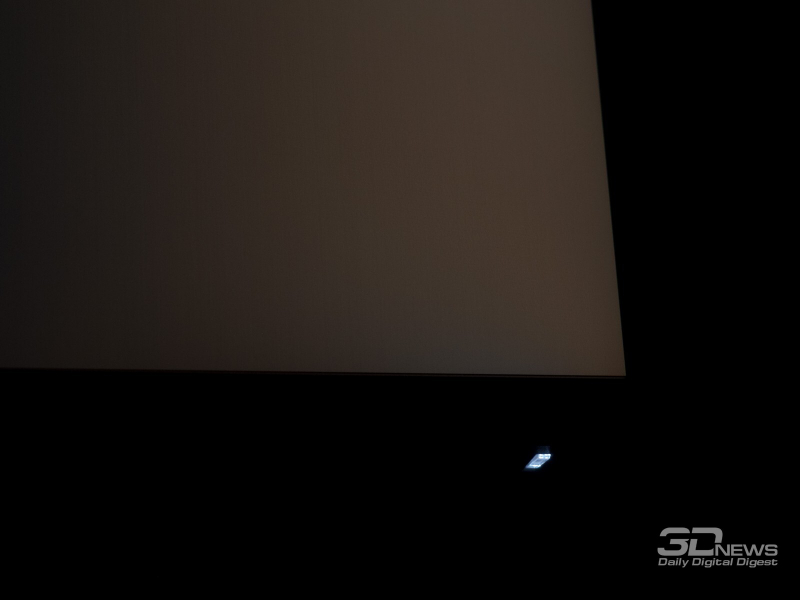
⇡#Равномерность подсветки
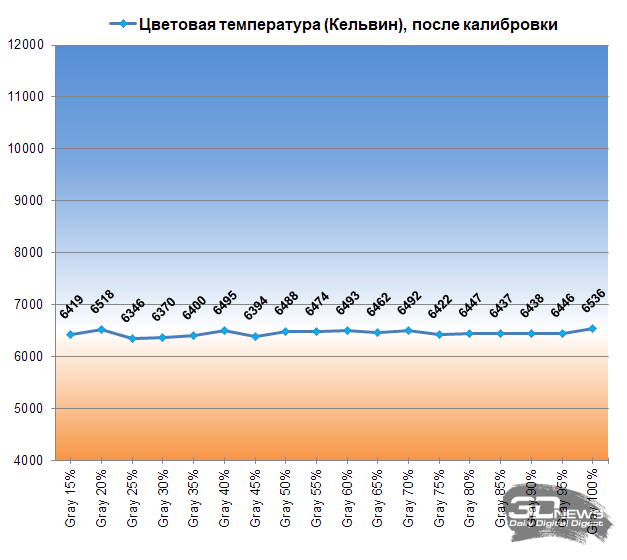
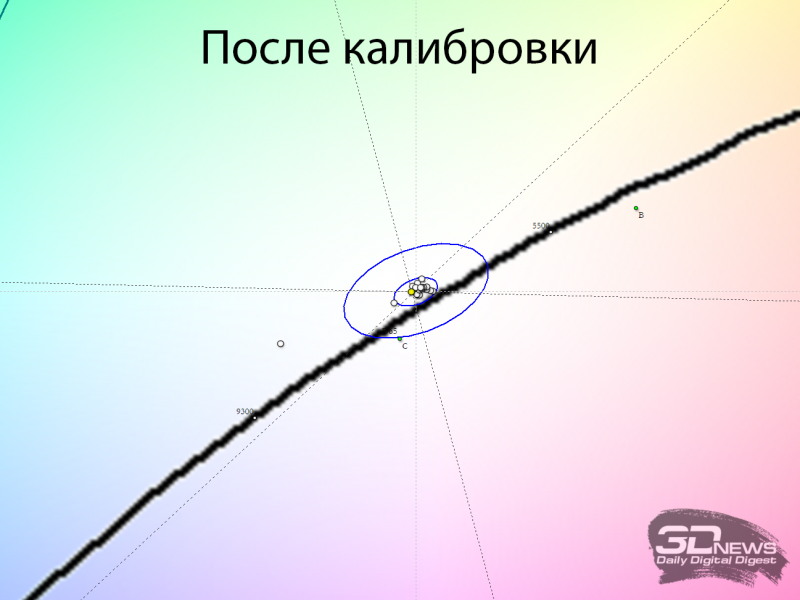
Равномерность подсветки дисплея проверялась после снижения яркости в центральной точке монитора до уровня 100 кд/м 2 и установки цветовой температуры в
6500 кельвин. Система динамической подсветки была дезактивирована.
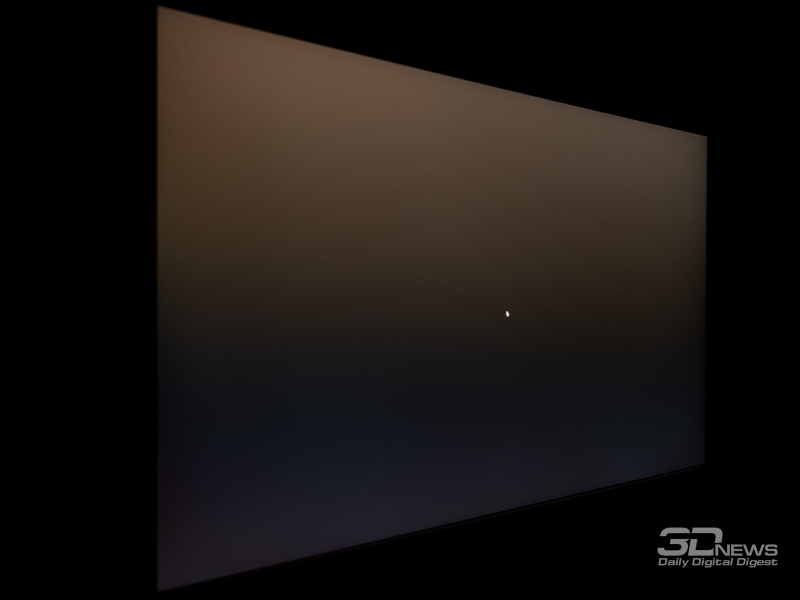
Картинка выше демонстрирует фотографию белого поля при определённой экспопоправке в ходе съёмки (в темноте) и дальнейшей программной обработки для более наглядного представления равномерности подсветки.
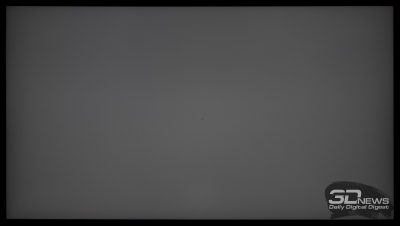
На белом проблемы равномерности подсветки видны не очень сильно, но при взгляде на серые поля рассмотреть их становится в разы проще. У нашего экземпляра наиболее сильно затемнены четыре угла и все края панели.
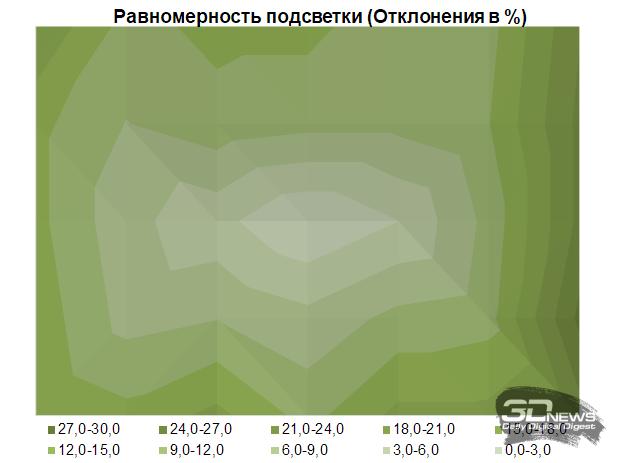
Среднее отклонение от центральной точки составило 12,3 %, а максимальное — 24,8 %. Результат для 28-дюймовой панели очень низкий — и это один из главных выявленных недостатков изучаемой модели.
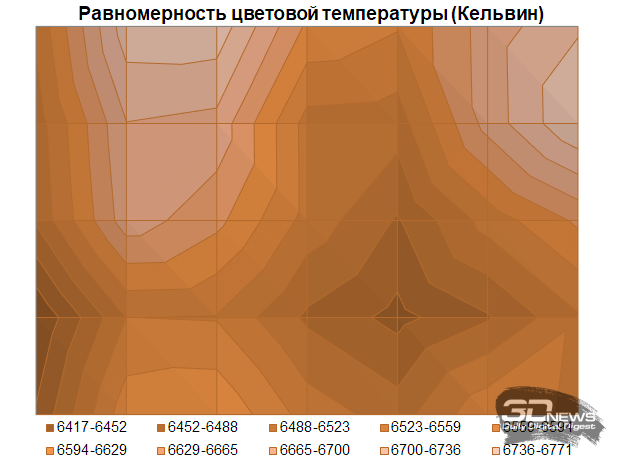
С равномерностью цветовой температуры по полю экрана дела обстоят совсем иначе. У проверенного экземпляра VG28UQL1A разброс составил чуть более 300 К, среднее отклонение от центральной точки 1,2 %, максимальное – 3,4 %. Представить что-то лучше – сложно, ведь даже профессиональные модели для работы с цветом и системами компенсации неравномерности часто не способны на подобную точность.
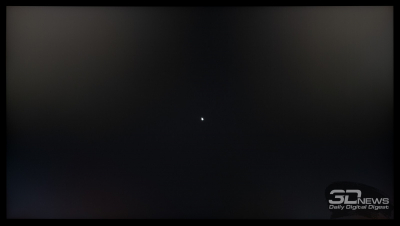
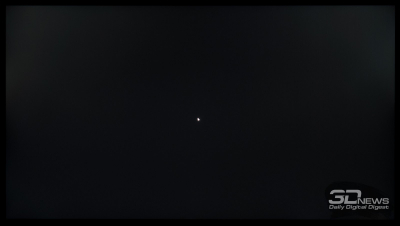
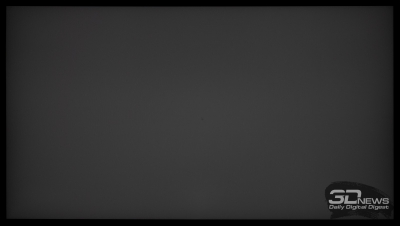
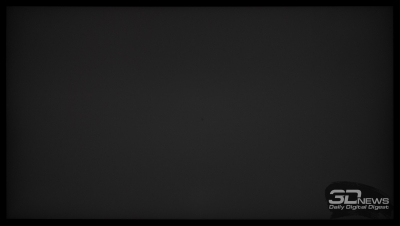
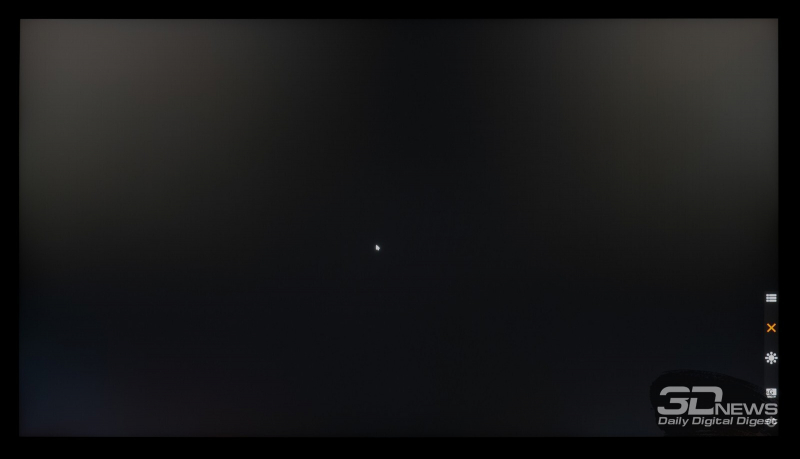
Теперь посмотрим на равномерность подсветки и различные цветовые эффекты в случае с чёрным полем. Сделаем мы это по двум фотографиям, снятым на разном удалении от экрана (
70 и 150 см). Напомним, что в данном эксперименте система Dynamic Dimming была дезактивирована.
С точки зрения углового Glow-эффекта изучаемый монитор показал вполне обычный для IPS-матрицы результат – четыре «засвеченных» угла (верхние значительно сильнее) со слабыми паразитными оттенками. Размер «засветок» зависит от расстояния до экрана – чем ближе, тем они больше. Ну и конечно, от установленной яркости подсветки и уровня внешней освещённости в рабочем помещении. Чем выше яркость экрана и чем ниже яркость в комнате, тем сильнее заметен Glow.
При отдалении от экрана Glow полностью исчезает, но остаются две овальные высветленные области рядом с верхними углами, которые и усиливают Glow-эффект. Результат средний, радоваться тут особо нечему.
⇡#Особенности модели и визуальная оценка изображения
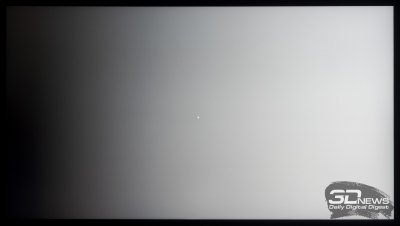
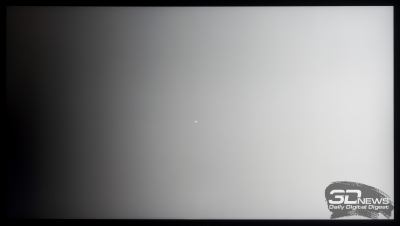
⇡#Работа системы локального затемнения
К особенностям изучаемого монитора мы можем отнести использование локальной системы подсветки, названной Dynamic Dimming. Вся поверхность экрана поделена на достаточно крупные вертикальные зоны в количестве восьми штук, что, как вы понимаете, не способно наделить монитор возможностью правильно работать с HDR-контентом. Зоны слишком большие, а поэтому бесполезные.


Фотографии выше наглядно демонстрируют их размеры и получаемый эффект.
Мы попытались продемонстрировать отсутствие разницы в отработке сценариев срабатывания той или иной зоны в зависимости от положения светлого объекта (в данном случае – курсора мышки). Крупные вертикальные зоны – это максимум, на который способен VG28UQL1A, и выглядит это, мягко говоря, не очень. Для полноценного HDR точно не подходит. Проходим мимо, господа…
⇡#Качество градиентов и «бандинг»
По заявлению производителя, монитор способен воспроизвести более 1 миллиарда цветовых оттенков, что позволяет VG28UQL1A работать в 10-битном режиме, конечно, по схеме 8 бит + FRC, что является нормой для современных игровых решений с расширенным цветовым охватом.
Быстрый взгляд не вызывает вопросов: градиенты ровные, без паразитных оттенков. Высокий результат сохраняется во всех предустановленных режимах и не портится при установке иных режимов гаммы. В ходе же проведения калибровки с минимальными правками в LUT видеокарты в диапазоне 10-40 % появилось несколько грубоватых переходов с минимальными паразитными оттенками, но вряд ли вы столкнётесь с ними на реальных изображениях.
В вопросе воспроизведения сложных тоновых переходов на тёмном (проверка на «бандинг-эффект») изучаемый монитор выступил хорошо. До профессиональных моделей он не добрался, но и не показал тех ужасов, которые способны продемонстрировать многие *VA-модели из разных классов и ценовых сегментов.
⇡#Скорость матрицы
Первые игровые 4К-мониторы быстро добрались до самой популярной цифры вертикальной развёртки и продолжают её удерживать уже больше 3 лет, но теперь без необходимости снижения качества изображения, за что следует сказать спасибо использованию технологии сжатия потока DSC и видеокарт с его поддержкой.
Таким образом, максимальная частота вертикальной развёртки в 144 Гц у новинки доступна без необходимости активации разгона, которого у неё попросту и нет (в меню этот пункт присутствует, правда, не понятно зачем). Время отклика по GtG – 1 мс, и ровно таким же оно остаётся при активации любого из двух вариантов ELMB («вставки чёрного кадра»), в том числе варианта ELMB-Sync, поддерживающего параллельную работу с системами адаптивной синхронизации. Компания ASUS была первой, кто предложил подобную эксклюзивную систему, и остаётся лидером в её интеграции в игровые мониторы из разных сегментов и по сей день.
Для разгона матрицы по времени отклика в VG28UQL1A производитель применяет стандартную технологию OverDrive, названную Variable OD, но на этот раз с шестью уровнями воздействия. При активации ELMB/ELMB-Sync возможность регулировки изменяемого OD блокируется, но появляется выбор из нескольких возможных вариантов Clarity Position и Clarity Level. В нашем случае после активации продвинутого варианта ELMB-Sync остался доступен первый параметр, имеющий три режима работы. Давайте посмотрим на все результаты, полученные строго на частоте 144 Гц:
По умолчанию без «вставки чёрного кадра» установлен режим OD Level 2, продемонстрировавший слабые артефакты, при схожем с показателями других игровых 4К-дисплеев уровне отклика, который не способен на равных бороться с результатами игровых WQHD-моделей с подобной или более высокой частотой развёртки.
При установке любых вариантов OD выше заводского значения артефакты усиливаются, а шлейфы не уменьшаются. Единственным правильным решением, на наш взгляд, выглядит переход к Level 1, где артефакты становятся еле различимыми. Тем же, кто не хочет даже думать о них, мы рекомендуем перейти к Level 0, в котором разгон по скорости отклика будет дезактивирован, но много в реальной скорости вы точно не потеряете – фотографии это доказывают.
Что касается ELMB-Sync, то монитор оказался не столь быстрым, чтобы показать себя молодцом, как на то способны более скоростные модели. В случае с VG28UQL1A мы видим контуры объекта по обе стороны от него, с артефактами и некоторым двоением. Лучший результат, как нам кажется, показал вариант с Clarity Position 3 (ползунок в настройках выставлен в верхнюю часть), где шлейфы по обе стороны от объекта заметны меньше, а дополнительные артефакты не появляются. Этот способ точно увеличит чёткость динамичной картинки на экране, но и значительно повысит нагрузку на глаза – не забывайте об этом и сделайте свой выбор самостоятельно, в том числе в зависимости от игры, в которую вы планируете погрузиться. Для всего же остального активировать ELMB/ELMB-Sync точно не стоит!

Монитор поддерживает все необходимые стандарты адаптивной синхронизации без использования какого-либо аппаратного модуля. Системы прекрасно работают в заявленном диапазоне частот, позволяя добиться отсутствия микролагов и разрывов картинки при сильно плавающем уровне FPS.

Наконец, отметим отсутствие пропуска кадров при максимальной частоте 144 Гц, что подтвердил специальный тест из пакета UFOTest. В этом вопросе у монитора проблем не выявлено.
⇡#Углы обзора и Glow—эффект
С углами обзора у монитора ASUS TUF Gaming VG28UQL1A всё в порядке благодаря качественной IPS-type-матрице.
При незначительных изменениях угла просмотра в горизонтальной плоскости картинка на экране совсем не меняется. Если увеличить угол до 30-45 градусов, то изображение становится чуть менее контрастным, немного снижается насыщенность некоторых цветов, слегка высветляются тени, появляется очень слабый паразитный оттенок в той или иной части экрана — ничего необычного. При изменениях в вертикальной плоскости картинка на экране портится быстрее.

От Glow-эффекта тестируемый монитор не избавлен, поскольку построен на базе матрицы IPS-типа. Именно Glow вносит основной вклад в появление претензий к стабильности картинки на экране и комфорту работы в тёмном помещении, особенно при просмотре фильмов и работе в ПО с тёмным интерфейсом. В зависимости от положения пользователя перед экраном с чёрной заливкой паразитный оттенок и степень его проявления сильно варьируются, но в основном у VG28UQL1A чёрное поле приобретает рыже-коричневый оттенок под углом.
Демонстрирует себя Glow-эффект и на цветных изображениях, особенно если картинка выполнена в тёмных оттенках. В этом случае при взгляде со стороны появляется слабый тёплый или холодный паразитный оттенок — зависит от того, с какой стороны смотреть. При проверке на других картинках результат может быть совсем иным, но общие закономерности останутся в силе.
⇡#Кристаллический эффект, Cross—hatching, ШИМ и резкость
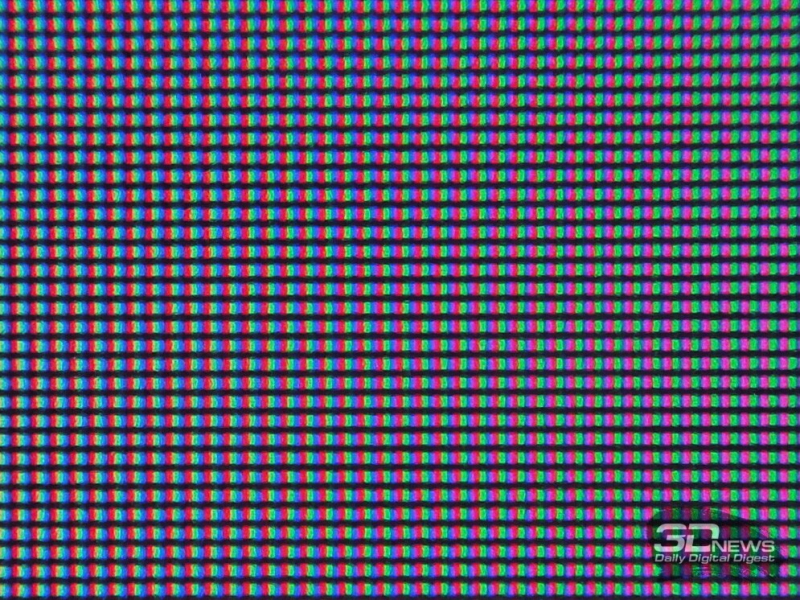
В мониторе ASUS TUF Gaming VG28UQL1A используется матрица с качественной полуматовой поверхностью. Ниже представлены два изображения с цифрового микроскопа, сделанные при фокусировке на структуру пикселей и отдельно на защитную плёнку экрана.
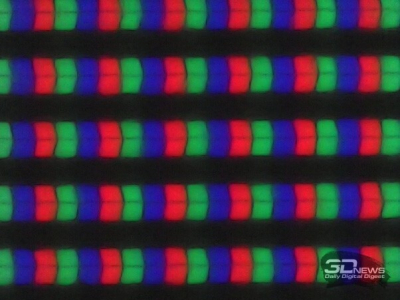
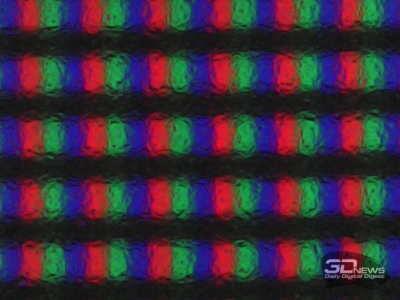
Картинка на экране дисплея приятна для глаз. Кристаллический эффект, несмотря на снимок поверхности, заметен слабо, а многие его не увидят вовсе. При изменении угла просмотра его заметность практически не усиливается. От эффекта Cross-Hatching данная модель дисплея полностью избавлена, а антибликовые свойства панели отлично справляются с возложенными на них обязанностями.


К отображению мелких элементов и прорисовке текста различной величины претензий у нас не возникло. Монитор уверенно проходит все тесты и оставляет положительное впечатление от картинки на экране. Дополнительная настройка не требуется, да и портить изображение с помощью доступной функции VividPixel для увеличения контурной резкости мы не советуем – сделаете только хуже.
![]()
![]()
По заверению производителя, дисплей обладает Flicker-Free-подсветкой, что и было подтверждено в ходе наших тестов. При любом уровне яркости ШИ-модуляция не используется либо её частота составляет несколько килогерц или даже десятки килогерц. За свои глаза потенциальные покупатели могут быть спокойны, но только при соблюдении других простых правил: надо следить за яркостью экрана, правильно подбирать расстояние до монитора и так далее.
Единственным исключением из правил выступают режимы ELMB/ELMB-Sync, при активации которых происходит «вставка чёрного кадра», что приводит нас к частоте работы подсветки на уровне 120-144 Гц (зависит от выставленной частоты развёртки в настройках драйвера видеокарты) либо её динамическая настройка в варианте с ELMB-Sync (с предположительным ограничением в 60 Гц), что ещё сильнее увеличит и без того высокую нагрузку на глаза. Тут выбор за вами: повышенная чёткость движущихся объектов либо некоторая их замыленность и меньшая нагрузка для зрения.
В VG28UQL1A используется внешний блок питания средних размеров. Паразитные звуки ни он, ни управляющая электроника не издают, но всё может сильно зависеть от вашего экземпляра и особенно качества электросети в рабочем помещении.
⇡#Выводы
Новый ASUS VG28UQL1A разбавил пока небольшой ассортимент доступных 4К-моделей из игрового сегмента и оказался пускай и не самым дешевым из них, но точно одним из. Этот тот случай, когда принадлежность к линейке TUF Gaming не позволила сделать цену сильно привлекательной, а прямой конкурент из топовой игровой линейки производителя под названием ROG Strix XG27UQL стоит всего на 3-4 тысячи рублей дороже и предлагает иную 27-дюймовую IPS-панель на своём борту, а единственная его проблема – толстые рамки экрана. Странное положение дел, но так бывает…
Зато протестированный монитор способен порадовать вас достаточно точной настройкой цветопередачи и рабочим режимом эмуляции sRGB с доступной регулировкой уровня яркости, что в моделях ASUS – редкость! Из явных преимуществ для определённой части потребителей VG28UQL1A может похвастаться аж четырьмя портами HDMI разных версий и двумя вариантами работы систем «вставки чёрного кадра» с возможностью ручных корректировок и совместной работы с адаптивной синхронизацией. Качественный корпус, минималистичный дизайн, продвинутая эргономика подставки, встроенная акустическая система и функции PiP/PbP для выполнения широкого спектра задач дополняют список неоспоримых плюсов изученного устройства.
Не самая корректная установка Overdrive с завода решается парой кликов в меню — и вот перед вами достаточно быстрый 4К-монитор с максимальной частотой в 144 Гц, которой окажется достаточно ещё долгие годы (виной чему рынок GPU). Из реальных же недостатков VG28UQL1A мы можем выделить сильный Glow-эффект на чёрном поле (сильнее, чем на многих других IPS) с ярко выраженным паразитным оттенком и низкую равномерность подсветки по уровню яркости как на белом, так и на чёрном поле, где мы нашли (возможно, это проблема только нашего экземпляра) две высветленных овальных области.
В остальном же, если вы не желаете переплачивать за не самые очевидные преимущества (которые ещё стоит хорошенько поискать) в случае с более дорогими решениями того же класса, понимаете бесполезность деления подсветки на восемь зон и осознаёте отсутствие настоящего HDR, а также отдаёте себе полный отчёт в возможностях своего «железа», то герой обзора выглядит потенциальным претендентом на покупку, пускай и сильно задержавшимся по времени появления на прилавках магазинов. Удачи в выборе!
С файлового сервера 3DNews.ru можно скачать цветовой профиль для этого монитора, который мы получили после настройки и профилирования с помощью Argyll CMS.
Обзор монитора ASUS TUF Gaming VG27AQ: геймерам на заметку
Сегмент игровых мониторов является наиболее динамичным среди всех дисплеев. Геймеры готовы платить за дополнительные преимущества в виде более быстрой матрицы, изогнутой панели или повышенной частоты обновления экрана. А производители стремятся угодить запросам как можно более широкого числа пользователей. В итоге за несколько лет на рынок вышло огромное число игровых мониторов с разными характеристиками и ценниками.

Например, максимально функциональные и дорогие модели компания ASUS выпускает в сериях ROG Swift и ROG Strix. Максимально доступные ее игровые мониторы представлены сериями ASUS MG, VG и VP. Между этими полюсами находится серия ASUS TUF Gaming, и в данном обзоре мы познакомимся с 27-дюймовым ее представителем – ASUS TUF Gaming VG27AQ. Он создан на основе IPS-панели c широкими углами обзора, разрешением 2560 х 1440 и высокой скоростью реакции матрицы (1 мс). Об остальных его достоинствах расскажем ниже, а заодно попробуем обнаружить и слабые стороны.
Спецификация
ASUS TUF Gaming VG27AQ
Диагональ, дюймов / см
Видимая область, мм
Скорость реакции матрицы (MPRT), мс
Максимальная яркость, кд/м 2
Горизонтальные / вертикальные углы обзора, °
Количество отображаемых цветов, млн
Частота вертикальной развертки, Гц
48 – 165 (DisplayPort)
1 x DisplayPort 1.2
Мощность встроенных динамиков, Вт
Типичное энергопотребление в активном режиме, Вт
Подстройка экрана по высоте, мм
Поворот экрана в горизонтальной плоскости (Swivel), °
Поворот экрана в вертикальной плоскости (Pivot), °
Поддержка кронштейна VESA, мм
Размеры с подставкой, мм
620 x (377-507) x 211
Масса с подставкой, кг
Упаковка и комплект поставки

ASUS TUF Gaming VG27AQ прибыл к нам в картонной коробке с качественной цветной полиграфией, что соответствует классу устройства. На ее сторонах есть изображение самого монитора и ключевых его преимуществ в виде понятных пиктограмм. А вот подробные технические характеристики отсутствуют. Для удобной транспортировки на верхней части коробки есть пластиковая ручка, а по бокам – дополнительные вырезы.

В комплекте поставки мы нашли бумажную документацию, кабель DisplayPort и блок питания ADP-90YD B с выходной мощностью 90 Вт (19 В при 4,74 А).
Внешний вид и особенности эксплуатации


Монитор получил строгий дизайн. Резкие угловатые формы, вставка красного цвета в виде кольца на основании и надпись «TUF GAMING» кричат о его игровой направленности. Корпус изготовлен из матового черного пластика, который хорошо скрадывает отпечатки пальцев. Дисплей обрамлен небольшой рамкой. Ее толщина сверху и по бокам составляет 6 мм, а снизу – 11 мм.


Внешние интерфейсы расположены в небольшой нише на задней панели. Они подписаны и направлены вниз для удобства доступа в случае настенного монтажа. Всего предусмотрено два порта HDMI, один DisplayPort, один 3,5-мм аудио и разъем DC-In для блока питания. В правом нижнем углу приютился замок Kensington.

Элементы управления расположены в нижнем левом углу задней панели. В наличии кнопка питания, кнопка быстрого выбора предустановленных режимов изображения, кнопка GamePlus, кнопка выхода из экранного меню и 5-позиционный джойстик.
ASUS TUF Gaming VG27AQ обладает хорошей эргономичной подставкой. Его можно поворачивать на 90° в горизонтальной и вертикальной плоскостях, наклонять (-5°…33°) или менять положение по высоте (130 мм). Подставка с резиновыми вставками надежно удерживает монитор на столе. Также есть возможность крепления на стену при помощи кронштейна VESA (100 х 100 мм).
Для воспроизведения звука предусмотрены два динамика общей мощностью 4 Вт. Их следует использовать лишь в крайнем случае, ведь качественным звучанием они не обладают. Если с внешними колонками совсем туго, то лучше подключить к монитору гарнитуру с 3,5-мм аудиоразъемом.
Экранное меню
Структура меню оптимизирована под навигацию с помощью 5-позиционного джойстика. Оно поделено на 5 областей: одну горизонтальную и четыре колонки. В горизонтальной области отображена информация о текущих настройках. В первой колонке находятся пиктограмы 8 основных разделов меню. Во второй – параметры каждого раздела, а остальные колонки визуализируют процесс изменения этих настроек.
Функциональные возможности позволяют выбрать один из предустановленных профилей, задать необходимую степень фильтрации синего света, подстроить яркость и контрастность, задать громкость звучания динамиков либо выключить их совсем, выбрать активный вход или один из трех сохраненных вручную профилей и многое другое.
Тестирование
С описанием методики исследования характеристик можно ознакомиться в соответствующем материале.

В дисплее заложено семь цветовых профилей: «sRGB», «Пейзажный», «Гонки», «Кино», «RTS/RPG», «FPS» и «MOBA». Для удобства все их параметры собрали в единой таблице:
Яркость белого поля, кд/м 2
Яркость черного поля, кд/м 2
Цветовая температура точки белого, К
Объем цветного диапазона sRGB, %
Объем цветного диапазона Adobe RGB, %
Среднее отклонение dE*94 (∆E)
Максимальное отклонение dE*94 (∆E)
Начнем наш анализ с оценки показателей яркости, статической контрастности и цветовой температуры точки белого. В спецификации максимальная яркость достигает 350 кд/м 2 . В реальности получаем близкие значения. В некоторых профилях яркость намеренно снижена, чтобы уменьшить нагрузку на глаза во время работы.
Претензий к статической контрастности также нет. Она держится в пределах 521:1 – 1224:1, что соответствует ожиданиям (1000:1). Это гарантирует вам глубокие и насыщенные цвета.
С показателями температуры точки белого не все однозначно. В основном они немного выше эталонных 6500 К, что гарантирует приемлемый белый цвет. Но в режимах «Гонки» и «Кино» температура превышает 10 000 К, а значит белый цвет будет иметь синий оттенок.
Цветовой охват


Типичный вид CIE-диаграмм для всех профилей для пространств sRGB и Adobe RGB
Объем цветового пространства sRGB почти у всех профилей находится в диапазоне 100-116%, что является очень хорошим показателем. Напомним, что для непрофессиональных решений приемлемым считается 90%.
CIE-диаграммы пространства sRGB в этих профилях имеют одинаковый вид: сдвиг двух опорных точек и перенасыщение в зоне салатовых, желтых и оранжевых оттенков.
Особняком стоит режим «MOBA». Его цветовой диапазон настроен таким образом, чтобы отображались только красный и зеленый цвета. Это позволяет сконцентрировать внимание на полосках HP в играх жанра MOBA.
Точность передачи оттенков

Диаграмма отклонения основных цветов и оттенков от эталонов в профиле «sRGB»

Диаграмма отклонения основных цветов и оттенков от эталонов в профиле «Пейзажный»

Диаграмма отклонения основных цветов и оттенков от эталонов в профиле «Гонки»

Диаграмма отклонения основных цветов и оттенков от эталонов в профиле «Кино»

Диаграмма отклонения основных цветов и оттенков от эталонов в профиле «RTS/RPG»

Диаграмма отклонения основных цветов и оттенков от эталонов в профиле «FPS»

Диаграмма отклонения основных цветов и оттенков от эталонов в профиле «MOBA»
Практически у всех профилей есть проблемы с точностью передачи оттенков. Только в режимах «sRGB» и «Гонки» среднее отклонение ΔE не превышает допустимое значение 1,5, а максимальное – 4. Но ничего критического, поскольку подобные несоответствия смогут уловить далеко не все, особенно парни.
Уровни RGB

График уровней RGB профиля «sRGB»

График уровней RGB профиля «Пейзажный»

График уровней RGB профиля «Гонки»

График уровней RGB профиля «Кино»

График уровней RGB профиля «RTS/RPG»

График уровней RGB профиля «FPS»

График уровней RGB профиля «MOBA»
Настройка уровней RGB у 5 профилей выполнена практически идеально, в диапазоне 90 – 110%. Наибольшее искажение наблюдается в режимах «Кино» и «Гонки»: синяя составляющая завышена, а красная – занижена, поэтому итоговое изображение будет «холодным».
Гамма

График гамма-кривых в профиле «sRGB»

График уровней RGB профиля «Пейзажный»

График гамма-кривых в профиле «Гонки»

График гамма-кривых в профиле «Кино»

График гамма-кривых в профиле «RTS/RPG»

График гамма-кривых в профиле «FPS»

График гамма-кривых в профиле «MOBA»
В идеальном случае все гамма-кривые накладываются на эталонную пунктирную белую линию. Если они лежат выше, то полутона пересвечиваются, и можно потерять детали на светлых участках сцены. А если ниже эталонной, то полутона недосвечиваются, и страдают детали на темных участках.
Лучше всего настройка гамма-кривых выполнена в профилях «sRGB», «Гонки» и «MOBA».
Стабильность контрастности и диапазон изменения яркости
В целом лучшие показатели продемонстрировал профиль «Гонки», поэтому дальнейшие исследования проводились на его основе.

Диапазон яркости составил от 141 до 391 кд/м 2 . Этого хватит для комфортного использования монитора в солнечный день, а вот в полной темноте яркость может быть слегка избыточной. Статическая контрастность показала хорошую стабильность в пределах 1224:1 – 1232:1, что является отличным результатом. В итоге можно рассчитывать на сочную и насыщенную картинку.
Калибровка монитора


CIE-диаграммы откалиброванного профиля для пространств sRGB и Adobe RGB

Диаграмма отклонения основных цветов и оттенков от эталонов в откалиброванном профиле

График уровней RGB откалиброванного профиля

График гамма-кривых в откалиброванном профиле
Полученные результаты до и после аппаратной калибровки сведены в таблицу.
Яркость белого поля, кд/м 2
Яркость черного поля, кд/м 2
Цветовая температура точки белого, К
Объем цветного диапазона sRGB, %
Объем цветного диапазона Adobe RGB, %
Среднее отклонение dE*94 (∆E)
Максимальное отклонение dE*94 (∆E)
Ручная калибровка заметно улучшила лишь график уровней RGB. В остальном вы не почувствуете разницу. Поэтому файл с параметрами калибровки прикладываем, но вовсе не обязательно его использовать – профиль «Гонки» по умолчанию настроен очень качественно.
Равномерность подсветки экрана

Максимальное отклонение яркости относительно центрального участка не превышает 24 кд/м 2 .

Предельное отклонение температуры точки белого от центрального участка находится в диапазоне от -169 до 40 К, что соответствует норме в ±250 К.


В тесте с заливками никаких серьезных проблем не возникло. На черном фоне есть небольшая утечка подсветки по углам экрана, но ничего страшного для 27-дюймовой диагонали. С белым фоном все хорошо.
Скорость матрицы и ШИМ

Заявленная скорость реакции матрицы (MPRT) у ASUS TUF Gaming VG27AQ составляет 1 мс. Фотоаппарат смог зафиксировать небольшие шлейфы от быстродвижущихся объектов, но глаз их точно не заметит. Поэтому монитор хорошо справляется и с динамичными играми.

Для дисплея не просто заявлена поддержка технологий Flicker-free и Low Blue Light – они проверены и сертифицированы авторитетной независимой лабораторией TÜV Rheinland. Наш практический тест также подтверждает отсутствие видимого мерцания подсветки. Это гарантирует более комфортную работу при длительных игровых сессиях.
Углы обзора
С углами обзора у ASUS TUF Gaming VG27AQ все в порядке (178°). Картинка действительно сохраняет высокую контрастность и насыщенность оттенков. Есть лишь небольшое забеливание изображения при взгляде под диагональным углом.


Отличительной особенностью данной модели является возможность одновременной активации технологий снижения времени отклика (ELMB) и адаптивной синхронизации (Adaptive-Sync или G-SYNC Compatible), что гарантирует максимальное качество изображения в динамичных игровых сценах.

А благодаря технологии ASUS Shadow Boost улучшается отображение темных фрагментов игровых сцен. При этом светлые области остаются без существенных изменений. В результате противники не смогут спрятаться от вас в тени, и вы не пропустите потайной проход в бонусную локацию.


Также геймеров может заинтересовать функция GamePlus. Она позволяет вывести на экран таймер, счетчик FPS, обычный прицел (будет полезен в шутерах, например, в Metro Exodus при выборе максимального уровня сложности) или «снайперский» вариант. В последнем случае в центре монитора выделяется небольшая квадратная область с увеличенным изображением.
Итоги

У монитора ASUS TUF Gaming VG27AQ есть ряд неоспоримых преимуществ. В первую очередь, это 27-дюймовая IPS-панель с разрешением 2560 х 1440, адаптивной частотой обновления (48 – 165 Гц) и отличной скоростью реакции матрицы (1 мс). Благодаря этому и некоторым полезным технологиям (ELMB, Adaptive-Sync) он обеспечивает качественную картинку даже в наиболее динамичных сценах современных игр. Также геймерам понравятся дополнительные бонусы в виде технологии ASUS Shadow Boost или GamePlus. А фанаты жанра MOBA оценят специальный режим, позволяющий им сконцентрироваться на показателях здоровья персонажей.
К тому же дисплей может похвастать отличной цветопередачей, достойным уровнем контрастности, хорошей заводской калибровкой, удобным меню и эргономичной подставкой. А благодаря технологии ASUS Flicker-Free и режиму Low Blue Light снижается нагрузка на глаза во время длительных игровых или рабочих сессий.
К слабым сторонам этой модели отнесем не самое высокое качество встроенных динамиков, небольшая утечка подсветки на черном фоне и забеливание картинки при взгляде с острых углов по диагонали. Но ничего критичного.
В итоге ASUS TUF Gaming VG27AQ является хорошим выбором для киберспортсменов и просто заядлый геймеров, которые хотят получить максимально комфортный геймплей.
- качественная IPS-панель с широкими углами обзора;
- отличная скорость реакции (1 мс);
- одновременная поддержка технологии Adaptive-Sync / G-SYNC Compatible (48 – 165 Гц) и ELMB;
- эргономичная подставка;
- высокая точность цветопередачи в некоторых режимах;
- повышенный объем цветовых пространств sRGB и Adobe RGB;
- наличие геймерских функций (ASUS Shadow Boost, GamePlus, GameVisual);
- совместимость со стандартом расширенного динамического диапазона HDR10;
- поддержка технологии ASUS Flicker-Free и режима Low Blue Light.
- низкое качество встроенных динамиков.
Выражаем благодарность компании ASUS за предоставленный для тестирования монитор.
Asus TUF Gaming VG279QM

Over the years we have seen a major investment in the LCD gaming monitor market with one of the most significant improvements being the support for higher refresh rates. Long gone are the days of LCD monitors being limited to only 60Hz input, and we now see a wide range of models from many different manufacturers offering 120Hz+ refresh rates today. 144Hz has rapidly become the norm for gaming displays as some recent market analysis revealed. We also see some screens with higher refresh rates than that, all the way up to a native 240Hz being increasingly common nowadays.
Refresh rate has a direct impact on perceived motion blur for fast moving content and gaming, due to the way that LCD monitors operate. There is a major improvement in motion clarity and performance when jumping from 60Hz to 120/144Hz. There is a smaller, but still noticeable benefit in some situations when increasing refresh rate higher to 240Hz. This may arise from the improved frame rate support, additional benefits from the higher refresh rate for eye tracking of content, and also sometimes because of the way that the pixel response times improve.
Until very recently, 240Hz native refresh rates have been restricted to the fastest TN Film panel technology. We’ve tested quite a few 240Hz TN Film models over the last couple of years, most recently the Acer Nitro XF252Q which is a 24.5″ sized model and impressed us with its fast response times and excellent motion clarity. It is only recently that other panel technologies have been pushed up to 240Hz, which is likely due to their underlying slower pixel response times and the need to improve things quite significantly if they are to keep up. Our high refresh rate monitor and panel roadmap article talks more about all the high refresh rate options, but the first IPS-type panels with 240Hz have now started to appear in the market. We already tested the first 240Hz IPS screen back in November 2019 in the form of the Acer Nitro XV273 X and we’ve seen a few other models emerge in recent times with the same spec.
Not to be outdone, Asus are releasing their new TUF Gaming VG279QM display which we have with us now for review. This increases that 240Hz refresh rate up to a whopping 280Hz via an overclocking feature, making it the highest refresh rate commercially available monitor on the market to date!
The VG279QM is 27″ in size and offers a 1920 x 1080 resolution IPS-type panel. It has an advertised 1ms G2G typical response time from what Asus call their “Fast IPS” technology. There is variable refresh rate support via adaptive-sync for both AMD FreeSync and NVIDIA G-sync systems which helps accommodate the high refresh rate of the screen. The screen has also been certified under the G-sync Compatible scheme. Of other important note is that this screen will also feature Asus’ ELMB-sync technology, which provides a strobing blur reduction backlight that can also be used at the same time as VRR!
If you enjoy our work and want to say thanks, donations to the site are very welcome. If you would like to get early access to future reviews please consider becoming a TFT Central supporter.

| Check Availability and Pricing – Affiliate Links |
|---|
| Amazon | Overclockers UK |
| TFTCentral is a participant in the Amazon Services LLC Associates Programme, an affiliate advertising programme designed to provide a means for sites to earn advertising fees by advertising and linking to Amazon.com, Amazon.co.uk, Amazon.de, Amazon.ca and other Amazon stores worldwide. We also participate in a similar scheme for Overclockers.co.uk. |
Specifications and Features
The following table gives detailed information about the specs of the screen as advertised:

The VG279QM offers a reasonable range of modern connectivity with 1x DisplayPort 1.2 and 2 x HDMI 2.0 offered for video connections. These are located on the back of the screen along with a headphone output. There are no USB ports provided on this model which is rare nowadays. For PC connectivity the DisplayPort is the most common option, with HDMI being available then for connecting external games consoles or Blu-ray players potentially. HDMI supports VRR for games consoles while the DP connection should be used for PC systems, whether that’s an AMD or NVIDIA graphics card. The screen has a small external power supply brick and the screen also comes packaged with the power cable that you need.
Below is a summary of the features and connections of the screen.

Design and Ergonomics

The VG279QM comes in a mostly black design, with matte plastics used for the bezel and rear enclosure. There is a silver ‘asus’ logo in the middle of the bottom bezel, and light grey logos in the bottom left for DisplayPort and HDMI. The bezels are very thin around the sides and top but it’s not a common “borderless” design here, although the total black edges are on this screen are thin overall. There is an 8mm black plastic edge and then an additional 2mm black panel border before the image starts on the sides and top. The bottom of the screen has a thicker 13mm plastic bezel + 2mm black panel border. There is a thin white power LED strip located on the bottom right hand edge of the screen which is out of sight from a normal viewing position.
The back of the screen is encased in a matte black plastic for a simple design. The stand comes ready attached in the box, you need only screw on the foot. This stand can be removed as well, but would need to be unscrewed as there is no quick release mechanism. Behind that there are VESA 100mm mounting holes if you’d rather. The arm for the stand is also a matte black plastic with a cable tidy hole in the back. There is a small section of red plastic trim around the base of the arm as you can see from the first photo. The base of the stand is a matte black plastic as well and provides a decent and sturdy foot for the screen.

The stand offers a good range of ergonomic adjustments. Tilt provides a very wide range of adjustment and is smooth and easy to operate. Height is also smooth and easy, and provides a wide adjustment range as well. It can be lowered to basically sit on the foot of the stand, and at the lowest setting the bottom edge of the screen is only 10mm from the desk. At maximum extension it’s 140mm which provides a decent 130mm adjustment range for the height adjustment as advertised. Side to side swivel is smooth and easy to move, and a rotation function is available, although a little “bumpy” to operate. The screen remains very stable when you are moving it around thanks to the solid and sturdy base.

A summary of the ergonomic adjustments are shown below:

The materials were of a reasonable standard and the build quality felt decent enough. There was no audible noise from the screen, even when conducting specific tests which can often identify buzzing issues. The whole screen remained cool even during prolonged use.


The connections are available on the back of the screen and shown above. The one thing noticeably missing from this model is added USB ports.

The OSD is controlled through a joystick control located on the back right hand side of the screen (when using it from the front). There are also 3 pressable buttons which help you navigate, including two for quick access to certain settings. There is quick launch access to the preset mode menu and additional gaming option controls by default although these quick access buttons can be changed in the main menu if you want. The main OSD menu is split in to 6 sections down the left hand side, with available options shown in the middle and right columns. There are a wide range of settings to play with and configure and navigation was fast, intuitive and simple thanks to the joystick controller.
Power Consumption

We have plotted these results below compared with other screens we have tested. The consumption (comparing the calibrated states) is comparable to most of the other 27″ sized screens we’ve tested as you might expect. The larger screens tend to have additional power usage as does the 27″ Asus ROG Swift PG27UQ with it’s FALD backlight.

Panel and Backlighting

Backlight dimming at calibrated brightness setting (no PWM)
Above: backlight operation showing constant Direct Current voltage instead of PWM. Measured at calibrated brightness level
Brightness and Contrast
This section tests the full range of luminance (the brightness of the screen) possible from the backlight, while changing the monitors brightness setting in the OSD menu. This allows us to measure the maximum and minimum adjustment ranges, as well as identify the recommended setting to reach a target of 120 cd/m 2 for comfortable day to day use in normal lighting conditions. Some users have specific requirements for a very bright display, while others like a much darker display for night time viewing or in low ambient light conditions. At each brightness level we also measure the contrast ratio produced by the screen when comparing a small white sample vs. a black sample (not unrealistic full screen white vs. full screen black tests). The contrast ratio should remain stable across the adjustment range so we also check that.
Graphics card settings were left at default with no ICC profile or calibration active. Tests were made using an X-rite i1 Display Pro Plus colorimeter. It should be noted that we used the BasICColor calibration software here to record these measurements, and so luminance at default settings may vary a little from the LaCie Blue Eye Pro report you will see in other sections of the review.

At the full brightness setting in the OSD the maximum luminance reached a very high 378 cd/m 2 which was a little lower than the 400 peak brightness spec from the manufacturer. There was a pretty decent 280 cd/m 2 adjustment range in total, so at the minimum setting you could reach down to a luminance of 98 cd/m 2 . This doesn’t afford you a super-low luminance option for working in darkened room conditions with low ambient light however so be a little wary if that is a specific requirement for you. A setting of 12 in the OSD menu should return you a luminance of around 120 cd/m 2 at default settings. It should be noted that the brightness regulation is controlled without the need for Pulse Width Modulation for all brightness settings so the screen is flicker free.


We have plotted the luminance trend on the graph above. The screen behaves as it should in this regard, with a reduction in the luminance output of the screen controlled by the reduction in the OSD brightness setting. This is not a linear relationship as settings from 100 – 70 control a steeper adjustment curve, which then flattens out a bit to more subtle changes to the screens luminance between 70 – 0 settings.
The average contrast ratio of the screen was measured at 1128:1 out of the box which was strong for an IPS-type panel. It remained pretty stable across the brightness adjustment range as you can see above.
Testing Methodology

An important thing to consider for most users is how a screen will perform out of the box and with some basic manual adjustments. Since most users won’t have access to hardware colorimeter tools, it is important to understand how the screen is going to perform in terms of colour accuracy for the average user.
We restored our graphics card to default settings and disabled any previously active ICC profiles and gamma corrections. The screen was tested at default factory settings using our new X-rite i1 Pro 2 Spectrophotometer combined with LaCie’s Blue Eye Pro software suite. An X-rite i1 Display Pro Plus colorimeter was also used to verify the black point and contrast ratio since the i1 Pro 2 spectrophotometer is less reliable at the darker end.
Targets for these tests are as follows:
- CIE Diagram – confirms the colour space covered by the monitors backlighting in a 2D view, with the black triangle representing the displays gamut, and other reference colour spaces shown for comparison. Usually shown as a comparison against the common sRGB space
- Colour space coverage volumes – we also measure using a piece of software called ChromaPure the colour space (gamut) volumes produced by the backlight in comparison to the sRGB, DCI-P3 and Rec.2020 colour spaces. sRGB is the most commonly used colour space so it is important to have a decent coverage from the screen here. If the colour space is >100% sRGB then the screen can produce a wider colour gamut, often reaching further in to the wider gamut DCI-P3 (commonly used for HDR) and Rec.2020 reference spaces.
- Gamma – we aim for 2.2 which is the default for computer monitors
- Colour temperature / white point – we aim for 6500k which is the temperature of daylight
- Luminance – we aim for 120 cd/m 2 , which is the recommended luminance for LCD monitors in normal lighting conditions
- Black depth – we aim for as low as possible to maximise shadow detail and to offer us the best contrast ratio
- Contrast ratio (static) – we aim for as high as possible. Any dynamic contrast ratio controls are turned off here if present
- dE average / maximum – we aim for as low as possible. If DeltaE >3, the color displayed is significantly different from the theoretical one, meaning that the difference will be perceptible to the viewer. If DeltaE <2, LaCie considers the calibration a success; there remains a slight difference, but it is barely undetectable. If DeltaE < 1, the color fidelity is excellent.
Default Performance and Setup
Default settings of the screen were as follows:

Initially out of the box the screen was set in the ‘Racing Mode’ preset mode. The display was set with a bright 70% brightness which was not overly bright but still a bit uncomfortable to use for long periods. You will want to turn that down as with most screens. The colour balance felt fairly good and you could tell the screen had a standard sRGB gamut backlight. We went ahead and measured the default state with the i1 Pro 2. The CIE diagram on the left of the image confirms that the monitors colour gamut (black triangle) extends a little bit beyond the sRGB reference space (orange triangle), mostly in green and blue shades but not by anything significant. We measured using ChromaPure software a 108.6% sRGB gamut volume coverage which corresponds to 80.1% of the DCI-P3 reference and 57.4% of the Rec.2020 reference. This is basically a standard sRGB gamut screen with some minor over-coverage. This shouldn’t represent any real issue in practice. Default gamma was recorded at 2.3 average with a minor 3% deviance from the target which was pleasing. There are no gamma modes available in the OSD menu so you are restricted to the default setup unless you have a calibration device. Thankfully the gamma was pretty decent here. White point was measured at 6223k, being a little too warm with a 4% deviance which is ok. This was in the default ‘warm’ mode.
Luminance at the default 70% brightness level was recorded at 237 cd/m 2 which is a bit too high for prolonged general use, you will need to turn that down. The black depth was 0.21 cd/m 2 at this default brightness setting, giving us a strong static contrast ratio for an IPS-type panel of 1135:1. Colour accuracy measurements showed an average dE of 2.2, maximum of 7.6 which was fairly decent but showed most deviance in blue and green shades where there was over-coverage of the sRGB colour space. When testing the screen with colour gradients there were very smooth transitions and no sign of any banding.
We will also briefly mention the sRGB preset mode which we also tested. This does not restrict the gamut of the screen any further and so you still have that minor over-coverage in blue and green shades. Again nothing really to worry about, we just mention it for reference here. This sRGB preset basically just locks the brightness, contrast and colour settings of the display. It is set at a more comfortable brightness level which produces a luminance of
144 cd/m 2 . The gamma curve is slightly more accurate but white point and colour accuracy are basically the same as the default ‘Racing Mode’. Given the sRGB mode locks a lot of the settings, it isn’t of much use.
Optimal Settings Pre-Calibration
We also measured the screen after adjusting only the OSD controls, to obtain the optimal setup without a full calibration, and without the use of an ICC correction profile. This represents what could be achieved through just simple changes to the monitor itself, and also what you could expect when working with content outside of an ICC profile managed workflow. The early stages of our calibration software helped identity these optimal OSD settings.

This has helped correct the white point to approximately 6500k and reduce the brightness to a more comfortable level. The contrast ratio remains strong for an IPS-type panel and basically unchanged from the default setup as we’ve only had to make minor changes to the RGB levels. Further calibration and profiling below will help improve things even further.
Calibration
We used the X-rite i1 Pro 2 Spectrophotometer combined with the LaCie Blue Eye Pro software package to achieve these results and reports. An X-rite i1 Display Pro Plus colorimeter was used to validate the black depth and contrast ratios due to lower end limitations of the i1 Pro device.

The OSD settings were adjusted as shown in the table above, as guided during the calibration process and measurements. These OSD changes allowed us to obtain an optimal hardware starting point and setup before software level changes would be made at the graphics card level. We left the LaCie software to calibrate to “max” brightness which would just retain the luminance of whatever brightness we’d set the screen to, and would not in any way try and alter the luminance at the graphics card level, which can reduce contrast ratio. These adjustments before profiling the screen would help preserve tonal values and limit banding issues. After this we let the software carry out the LUT adjustments and create an ICC profile.
The already pretty decent out of the box gamma curve had been improved to 2.2 average, leaving only a minor 1% deviance after calibration. The white point was also now corrected to 6512k which was great news. The brightness control adjustment had reduced the luminance to a comfortable level now, and the screen maintained a strong static contrast ratio of 1163:1 for an IPS-type panel. Colour accuracy of the resulting profile was very good, with dE average of 0.6 and maximum of 1.7. LaCie would consider colour fidelity to be very good overall. Gradients remained smooth and free from banding.
You can use our settings and try our calibrated ICC profile if you wish, which are available in our ICC profile database. Keep in mind that results will vary from one screen to another and from one computer / graphics card to another.
Setup Comparisons

The comparisons made in this section try to give you a better view of how each screen performs, particularly out of the box which is what is going to matter to most consumers. We have divided the table up by panel technology as well to make it easier to compare similar models. When comparing the default factory settings for each monitor it is important to take into account several measurement areas – gamma, white point and colour accuracy. There’s no point having a low dE colour accuracy figure if the gamma curve is way off for instance. A good factory calibration requires all 3 to be well set up. We have deliberately not included luminance in this comparison since this is normally far too high by default on every screen. However, that is very easily controlled through the brightness setting (on most screens) and should not impact the other areas being measured anyway. It is easy enough to obtain a suitable luminance for your working conditions and individual preferences, but a reliable factory setup in gamma, white point and colour accuracy is important and some (gamma especially) are not as easy to change accurately without a calibration tool.
From these comparisons we can also compare the calibrated colour accuracy, black depth and contrast ratio. After a calibration the gamma, white point and luminance should all be at their desired targets.
Default setup of the screen out of the box was good overall. There was a reliable gamma which was great news as this is often the hardest thing to correct without a calibration device, especially as there are no further gamma settings in the OSD on this model. There was a strong default contrast ratio for an IPS panel, and a reasonably low dE average. White point was also pretty decent, being only very slightly too warm. Overall a decent performance considering it’s a gaming screen and these are often set up with much less accurate options. If you look at most of the other 240Hz screens we’ve tested (the TN Film models), they had a less accurate setup, especially when it came to gamma out of the box – the Acer Nitro XF252Q, AOC AGON AG251FZ and Asus ROG Swift PG25Q. The additional attention to a more accurate setup from Asus was welcome here. We had seen the same thing from the recently tested Acer Nitro XV273 X which features a 240Hz IPS panel like this Asus model, but minus the overclocking boost.

The contrast ratio was strong for an IPS panel and was measured at 1163:1 after calibration. This was higher than some other IPS panels which ranged down to around 850 – 900:1, but of course can’t live up to the much higher contrast ratios of VA-type panels which are more like 2000 – 3000:1 commonly.
| Check Availability and Pricing – Affiliate Links |
|---|
| Amazon | Overclockers UK |
| TFTCentral is a participant in the Amazon Services LLC Associates Programme, an affiliate advertising programme designed to provide a means for sites to earn advertising fees by advertising and linking to Amazon.com, Amazon.co.uk, Amazon.de, Amazon.ca and other Amazon stores worldwide. We also participate in a similar scheme for Overclockers.co.uk. |
Viewing Angles

Viewing angles of the screen were very good as you would expect from an IPS-type panel. Horizontally there was very little colour tone shift until wide angles past about 45°. A slight darkening of the image occurred horizontally from wider angles as you can see above as the contrast shifted slighting. Contrast shifts were slightly more noticeable in the vertical field but overall they were very good. The screen offered the wide viewing angles of IPS technology and was free from the restrictive fields of view of TN Film panels, especially in the vertical plane. It was also free of the off-centre contrast shift you see from VA panels and a lot of the quite obvious gamma and colour tone shift you see from some of the modern VA panel type offerings.

On a black image there is a characteristic pale glow introduced to the image when viewed from a wide angle, commonly referred to as IPS glow. This type of glow is common on most modern IPS-type panels and can be distracting to some users. If you view dark content from a normal head-on viewing position, you may see this glow as your eyes look towards the edges of the screen. The level of glow on this panel was the same as the Acer Nitro XV273 X (not surprising as it uses the same panel), and also comparable to other high refresh rate AUO IPS panels we’ve tested in the past such as the Asus ROG Swift PG279Q and Asus TUF Gaming VG27AQ for instance.
This type of glow is common on most modern IPS-type panels and can be distracting to some users. If you view dark content from a normal head-on viewing position, you may see this glow as your eyes look towards the edges of the screen depending on your viewing position. It will also be more noticeable in darker ambient light conditions and if you’re viewing a lot of dark content. Some people may find this problematic if they are playing a lot of darker games or watching darker movies. In normal day to day uses you couldn’t really notice this unless you were viewing darker content. If you move your viewing position back, which is probably likely for movies and games keep in mind, the effect reduces as you do not have such an extreme angle from your eye position to the screen edges.
Panel Uniformity
We wanted to test here how uniform the brightness was across the screen, as well as identify any leakage from the backlight in dark lighting conditions. Measurements of the luminance were taken at 35 points across the panel on a pure white background. The measurements for luminance were taken using BasICColor’s calibration software package, combined with an X-rite i1 Display Pro colorimeter with a central point on the screen calibrated to 120 cd/m 2 . The below uniformity diagram shows the difference, as a percentage, between the measurement recorded at each point on the screen, as compared with the central reference point.
It is worth noting that panel uniformity can vary from one screen to another, and can depend on manufacturing lines, screen transport and other local factors. This is only a guide of the uniformity of the sample screen we have for review.
Uniformity of Luminance

Luminance uniformity of the screen was moderate on our sample, with 60% of the screen within a 10% deviance of the centrally calibrated area. Along the bottom area and along the sides the screen was a little darker and there was a modest drop in luminance down to 102 cd/m 2 in the most extreme case (-18%) in the bottom right hand corner. This was not too drastic though.
Backlight Leakage

We also tested the screen with an all black image and in a darkened room. A camera was used to capture the result. There was some slight clouding and leakage from the bottom and top left hand corners, most notably in the top area. This was hard to see during normal usage though of course, but might show on darker content.
Note: if you want to test your own screen for backlight bleed and uniformity problems at any point you need to ensure you have suitable testing conditions. Set the monitor to a sensible day to day brightness level, preferably as close to 120 cd/m 2 as you can get it (our tests are once the screen is calibrated to this luminance). Don’t just take a photo at the default brightness which is almost always far too high and not a realistic usage condition. You need to take the photo from about 1.5 – 2m back to avoid capturing viewing angle characteristics, especially on IPS-type panels where off-angle glow can come in to play easily. Photos should be taken in a darkened room at a shutter speed which captures what you see reliably and doesn’t over-expose the image. A shutter speed of 1/8 second will probably be suitable for this.
General and Office Applications
With a 1920 x 1080 resolution, the desktop real estate of the VG279QM feels a pretty big step down compared with all the high resolution panels we’ve tested, and the 27″ 2560 x 1440 models we are used to using day to day. You do lose a large amount of desktop space, and although side by side split screen working is possible, it’s not as easy due to the more limited resolution and space. With a 0.311 mm pixel pitch, text is comfortable and easy to read natively, providing a still fairly sharp and crisp image. It is not as sharp as the 1440p panels we’ve become accustomed to, or of course any ultra HD/4K resolutions where scaling is used, but it is perfectly adequate. We would have preferred a full 1440p resolution on a 27″ screen like this to be honest, although it is primarily aimed at gaming. With the high 280Hz refresh rate in mind, it’s probably more realistic to be powering a 1920 x 1080 resolution than 2560 x 1440 anyway for those purposes. Not to mention the fact that this is one of the first 240Hz IPS panel and it is currently only available at 1080p maximum anyway. It’s just a shame when it comes to more general office work that the resolution is pretty low.
The light AG coating of the IPS technology panel is certainly welcome, and much better than the older grainy and ‘dirty’ appearance of older IPS AG coatings. Although it’s been several years since those more grainy coatings were used. The wide viewing angles provided by this panel technology on both horizontal and vertical planes, helps minimize on-screen colour shift when viewed from different angles.
The out of the box setup was decent enough for these kind of uses, with only minor deviance from our targets for gamma and white point, pretty low dE and decent contrast ratio for an IPS panel. The brightness range of the screen was a bit limited for these kind of uses, with the ability to offer a luminance between 378 and 98 cd/m 2 . This might mean that you are more limited in darker room conditions and low ambient light and for lots of text and office work. Although getting down to 120 cd/m 2 will still be adequate for many users. Again, this is a gaming screen and so most people will want the brighter settings for gaming, especially if you also want to use the ELMB-sync blur reduction mode which will impact brightness quite a lot. We would have just liked to see a lower minimum adjustment for office and general uses ideally.
A setting of 12 in the OSD brightness control should return you a luminance close to 120 cd/m 2 out of the box. The brightness regulation is controlled via a flicker free backlight, without the need for Pulse Width Modulation (PWM), and so those who suffer from eye fatigue or headaches associated with flickering backlights need not worry. There was no audible noise from the screen, even when conducting specific tests which can sometimes cause issues.

Spectral distribution graph showing calibrated mode at 6500k

Spectral distribution graph showing Blue Light Filter mode set to level 4 (maximum)
There are 4 modes provided for Blue Light filtering in the OSD. You can see above a fairly typical backlight spectral output for the screen calibrated to 6500k where the blue light peak is particularly high. Using the Low blue light filter modes makes the image progressively warmer, reducing the blue light and making the image look a little more yellow/green each time. The highest level 4 mode has a locked brightness setting which is close to our calibrated state so is still useable if you want. The other 3 levels can be enabled while still allowing you access to the brightness control of the screen so are a bit more flexible. We have provided the spectral output graph for the maximum level 4 mode above where the colour temperature is warmer at 5081k.
There are no USB ports provided on this screen, which is pretty rare for a modern display. There are also no other extras like ambient light sensors, motion sensors or card readers on this screen which are sometimes useful for office-type uses. There is a decent range of ergonomic adjustments from the stand with tilt, height, swivel and rotate offered. There is also VESA 100mm mounting capabilities for those who want to mount the screen instead.
Responsiveness and Gaming

The screen uses overdrive technology to boost pixel transitions across grey to grey changes as with nearly all modern displays. The part being used is an AU Optronics M270HAN03.0 AHVA (IPS-type) technology panel. Have a read about response time in our specs section if you need additional information about this measurement.
 |
We use an ETC M526 oscilloscope for these measurements along with a custom photosensor device. Have a read of our response time measurement article for a full explanation of the testing methodology and reported data.
Response Times and Refresh Rate
There’s various things you need to consider when it comes to response times and gaming, particularly on a display with high refresh rate support. Gaming screens invariably give you a control for the overdrive impulse in the OSD menu which can help you tweak things, but response time performance and overshoot levels can vary depending on the active refresh rate. This behaviour is often different depending on whether the screen is a traditional G-sync screens (with hardware module) or whether it’s an adaptive-sync screen as well, and not all screens behave in the same way. We always try to test each variable in our reviews but the key considerations you need to make are:
- Performance at 60Hz – this is important if you want to use an external games console (or other device like a Blu-ray player etc) which typically run at 60Hz. Response time performance may well be different than at the higher refresh rates supported, and you may need a different overdrive setting for optimal experience.
- Performance during VRR (Variable Refresh Rate) – bearing in mind that the refresh rate will fluctuate anywhere from 1Hz up to the maximum supported by the screen (e.g. 1 – 144Hz on a 144Hz display). It’s important to understand if the response times and overshoot will vary as the refresh rate changes. There may be a need to switch between different overdrive settings in some cases, depending on your usually attained refresh rate output and graphics card capability. This can sometimes become fiddly if your refresh rates fluctuate a lot, especially between different games, so it’s always easier if you can leave a display on a single overdrive setting which is suited to the whole range. Some screens also feature “variable overdrive” which helps control the response times and overshoot depending on the active refresh rate. This is particularly apparent with traditional G-sync module screens.
- Performance at fixed refresh rates including maximum – this is important for those who have a powerful enough system to consistently output a frame rate to meet the max refresh rate capability of the screen. They may want to run at max refresh rate without VRR active, or even is VRR is active they may know they will be consistently at the upper end of the range. Many gaming screens show their optimal response time performance at the maximum refresh rate. Knowing the performance at high fixed refresh rates may also be applicable if you want to use any added blur reduction backlight which typically operate at a fixed refresh rate.
- Whether the response times can keep up with the frame rate – you will also want to consider whether the response times of the panel can consistently keep up with the frame rate. For instance a 144Hz screen sends a new frame to the display every 6.94ms, so the pixel response times need to ideally be consistently and reliably under this threshold. If they are too slow, it can lead to added blurring in practice and sometimes make the higher refresh rates unusable in real life. We consider this in our analysis.
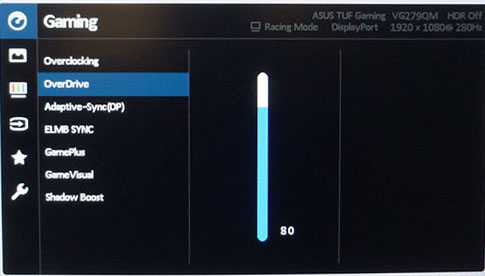
We carried out some initial response time measurements and visual tests in each of the overdrive settings, and at a range of refresh rates. The overdrive control is available in the OSD menu via the ‘Over Drive’ option as shown. There are 6 levels available – 0, 20, 40, 60, 80, 100.
60Hz Refresh Rate


We are going to start with 60Hz and work our way up in this section as there are some considerations when selecting the optimal Over Drive (OD) setting on this screen. At 60Hz we saw some minor improvements in motion clarity as you increased the OD setting between the 3 levels shown above. OD 40 felt the right balance, being slightly clearer than OD 20 but without any noticeable halos or overshoot being evident in visual tests. If you pushed the OD up to 60, there are some noticeable pale halos on moving content from the higher levels of overshoot, and without really any improvements in response time anyway.
Increasing Refresh Rates – Over Drive 60


As the refresh rate increases the response time behaviour is similar to many other adaptive-sync screens we’ve tested in the past. With the OD setting at the same level of 60 here, the response times were slightly slower each time the refresh rate was increased. This was only a minor change overall, but it did also help reduce the overshoot as the refresh rate increased. At 100Hz, the OD 60 mode was probably a bit too high, and there were some pale halos on lighter backgrounds in particular, so at 100Hz you are probably best to drop down to OD 40. For refresh rates above 120Hz the OD 60 mode was optimal and improved the motion clarity and image sharpness compared to OD 40, without any noticeable halos or overshoot. By the time you reach up to 200Hz and above, you can even push the OD setting up higher to 80 as we measure in the next section.
High Refresh Rates – Over Drive 80


We also experimented with the OD 80 setting for the upper refresh rates. We created a couple of custom resolutions at 175Hz and 200Hz to help identify the point where OD 80 becomes useable. At 175Hz the overshoot and pale halos are too noticeable for OD 80, but once you reach 200Hz and above this higher OD setting is perfectly useable. It brings about some minor additional benefits in motion clarity and sharpness compared with OD 60. By the time you reach refresh rates of 240Hz and above, there is no real overshoot present at all.
Achieving 1ms G2G Response Time?

How is the 1ms G2G response time figure achieved then on this screen? Unsurprisingly it is only achieved in unrealistic and unusable circumstances. We pushed the OD setting up to the maximum 100 and ran the screen at the maximum 280Hz overclocked refresh rate. The best response time we measured was now 0.9ms G2G (come on Asus, you’re missing a trick there with “only” a 1ms G2G response time! :p), which was very impressive. However, as we’ve seen from all other 1ms rated IPS screens to date, this is only possible with very high levels of overshoot. The pale halos and artefacts are very obvious in practice and this mode isn’t useable. We will reiterate what we’ve said in other reviews – we would really rather manufacturers didn’t quote silly response times like this when they are in no way useable or practical.
Overclocking and Variable Refresh Rates (VRR)

The native refresh rate of the VG279QM is 240Hz but Asus also offer an overclocking option from within the OSD menu. This can boost the refresh rate up to a maximum 280Hz, although it is not guaranteed and may vary from one sample to another, or depending on your system. If you experience any issues with flickering or artefacts at the overclocked 280Hz mode, there is also the option in the OSD to limit the overclock to 270Hz, so you can also try that. If not, the native 240Hz should work fine for everyone given it’s the native panel refresh rate.

The screen has adaptive-sync support and so natively supports AMD FreeSync for variable refresh rates between 48 and 280Hz with the overclock activated. The screen has also been officially certified under NVIDIA’s recent ‘G-sync Compatible’ scheme. This means you can use it from NVIDIA graphics cards with variable refresh rates with validated performance levels. You can disable and enable ‘Adaptive-Sync’ from within the OSD menu if you want to use FreeSync or G-sync. The screen also supports HDMI-VRR for compatible games consoles.
The support for FreeSync and G-sync will be very useful given the significant system demands of running a screen at 1920 x 1080 resolution and up to 280Hz refresh rate. It was of course very good to see it included here. We will discuss some of the considerations for using VRR in the following section when it comes to response time performance. You might also want to read our newly updated article about Variable Refresh Rates here.
Detailed Response Times
To achieve the optimal performance from the VG279QM you do have to make some considerations about your system performance before selecting the optimal Over Drive mode in the menu. This is similar to many other FreeSync screens we’ve tested in the past, and it makes it a bit more complicated than displays featuring the Native hardware G-sync module where variable overdrive is featured. You can’t just stick with one mode for everything, you will have to change the Over Drive setting depending on your achieved refresh rate if you want optimal performance. Alternatively you can find a middle ground and live with sub-optimal response times/overshoot in certain situations. This may depend on your system, game and game settings. The built-in frame rate counter might be useful to help you identify your active frame rate/refresh rate in VRR situations, and then set the overdrive control to the optimal level from there.
The higher refresh rates supported by the screen really do help improve motion clarity and reduce perceived blur, making the screen far better for gaming than 60Hz-only models. There were also a reasonable improvement in perceived motion clarity we felt when switching between 144Hz and 240/280Hz modes as well, as we had also seen on the Acer Nitro XV273 X. The support for VRR from both AMD and NVIDIA systems was welcome as ever, particularly useful given the high demands of this resolution and refresh rate combination.
Recommended Settings
| Optimal Refresh Rate | 280Hz |
| Optimal Overdrive Setting (for above) | 80 |
| Optimal Overdrive Setting for 60Hz | 40 |
| Optimal Overdrive Setting for VRR | 60 – 120Hz = 40 120 – 200Hz = 60 200 – 280Hz = 80 |
Detailed Measurements at 240Hz, Over Drive 80


We carried out some further response time measurements at 240Hz which is the maximum native refresh rate of the screen. We will test the overclocked refresh rate in a moment too. The screen performed really well for an IPS-type panel, with an average G2G response time of 3.6ms G2G, all with only minor levels of overshoot measured. At this high refresh rate the overshoot was not visible in practice. Moving images looked sharp and clear and with a noticeable improvement in overall motion clarity compared with lower refresh rates, even 144Hz which has become a very popular “high refresh rate” option. We were impressed by the performance here.
We have tested one other 240Hz IPS panel so far, the Acer Nitro XV273 X. The response times on the VG279QM were a bit better than on the Acer, and the overdrive impulse (at the optimal settings) had been applied a bit more aggressively here. Response times were 3.7ms G2G average on the Asus, vs. 4.8ms G2G on the Acer. The overshoot was a little higher as a result, but not visible in practice at these levels.
This additional boost helped ensure that more of the pixel transitions fit within the 240Hz refresh rate cycle, where a new frame is sent to the screen every 4.17ms. On the Asus model here 80% of the measured transitions were within this refresh rate window (compared to only 36.7% on the Acer model). If we added a 1ms leeway to that refresh rate window then 96.7% of the measurements on the Asus were now within that time (compared with 60% on the Acer). This helps ensure that the response times are fast enough to keep up with the refresh rate and avoids any added smearing on moving content which can sometimes become evident when they are not fast enough. As a result, the motion clarity on the Asus was slightly better than the Acer, but both screens were still perfectly useable at 240Hz.
Detailed Measurements at overclocked 280Hz, Over Drive 80


As we had seen before in our initial smaller sample of measurements, the overdrive impulse is turned down a little as the refresh rate increases. So at 280Hz here, we now had a measured 4.0ms G2G average, a little slower than the 3.6ms G2G we’d measured at 240Hz. This did eliminate pretty much all the minor overshoot as well. The response times were now not quite fast enough to keep up with the refresh rate demands, with 33.3% of transitions within the refresh rate window, 73.3% if we allow a 1ms additional leeway. This can lead to a little bit of added smearing on moving content. Actually in practice this was very hard to see, and was offset by the slight improvement in refresh rate which directly impacts perceived motion clarity. On the whole, 280Hz looked visually very similar to 240Hz mode, but does give you a bit of additional frame rate room if you need it. A perfectly useable overclocked refresh rate although in practice it’s not going to be a game changer relative to 240Hz.
Motion Blur Reduction (ELMB-sync mode)

The strobing blur reduction backlight option is available via the ‘ELMB-sync’ setting. This Asus technology is the only strobing blur reduction backlight option in the market currently that can be used at the same time as G-sync/FreeSync in a variable refresh rate (VRR) environment. This makes it a very attractive option for those who like to use blur reduction backlights for games, but don’t want to give up the all-important VRR technology to use it.
If you are using it with a fixed refresh rate (adaptive-sync turned off) then it is only available at 120Hz, 144Hz, 240Hz and the overclocked 270Hz or 280Hz levels. The overdrive control becomes locked when using ELMB-sync and from visual tests it appears to be set at the 80 level for all refresh rates. As we talked about earlier, this is fine for the higher refresh rate end from around 200 – 280Hz, but as the refresh rate lowers there is more noticeable overshoot present in the form of pale halos and trails. This means the ELMB-sync mode is less useable at lower refresh rates sadly. We would have preferred to maintain user control for the overdrive setting while this ELMB-sync mode was used. If it had to be locked like it has been, then we suppose optimising it for the upper refresh rate end is probably the right thing to do.

Normal mode – Example strobing at 280Hz, horizontal scale = 5ms
We measured the on/off strobing using our oscilloscope and confirmed that the strobing is in sync with the refresh rate. So at 280Hz for instance (shown above) the backlight is turned off/on every 3.57ms (280 times per second). As you reduce the refresh rate the strobing remains in sync with it well as you would hope.
The ‘on’ period reduces as the refresh rate increases as with most blur reduction backlights, which would normally mean that the image becomes a bit darker with the higher refresh rates. However, because this feature is designed to be used with VRR, Asus needed to develop it to avoid changes in brightness as the refresh rate changes. That would have been pretty distracting in use. While the strobing frequency and ‘on’ periods will change with the refresh rate, the backlight intensity is also being dynamically controlled to make up for it. We measured the same maximum brightness at a range of refresh rates as shown below. So there are no noticeable fluctuations in brightness as the refresh rate changes which is great news.
Max Brightness
| Refresh Rate | Luminance | Black Point | Contrast Ratio |
| 280Hz | 184.06 | 0.17 | 1083:1 |
| 240Hz | 184.23 | 0.17 | 1084:1 |
| 144Hz | 184.86 | 0.17 | 1087:1 |
When you enable the ELMB-sync mode the brightness control is actually still available. It doesn’t give you a huge range of actual luminance output to play with, but does allow you to adjust the brightness down a bit if you want to. One pleasing aspect is the fact that the ELMB-sync brightness setting and the normal desktop brightness setting are independent from one another, so you don’t need to keep changing your brightness control every time you turn the feature on or off. The maximum brightness achieved at a full 100% brightness setting is shown above. Note that if you lower the brightness control to 0%, it reaches down to 100 cd/m 2 .
Maximum Blur Reduction Brightness – Display Comparison
For ease of reference we have also provided a comparison table below of all the blur reduction enabled displays we’ve tested, showing their maximum luminance before blur reduction is turned on (normal mode) and their maximum luminance with the feature enabled. This will give you an idea of the maximum brightness you can expect from each model when using their blur reduction feature, if that is important to you. A lot of people want a brighter display for gaming and sometimes the relatively low maximum luminance from blur reduction modes is a limitation.
These comparisons are with the refresh rate as high as is available for the blur reduction feature to function. For most this is at 100 – 144Hz. You can often achieve a slightly brighter display if you use the feature at compatible lower refresh rates since the strobes are less frequent, but it’s not a significant amount. That can also introduce more visible flicker in some situations.

Note: Pulse Width setting at max where applicable.
*Note 2: The Acer XB270HU was later updated to include a 120Hz mode, which will produce a slightly darker maximum luminance
Blur Reduction Tests
Of course the main thing we want to test is what improvements the Blur Reduction mode offers when it comes to motion clarity and gaming. The following pursuit camera photos give you an indication of observed motion clarity as the human eye would see it at the top, middle and bottom areas of the screen. These were captured at the maximum refresh rate.

Pursuit camera photos capturing motion clarity with ELMB-sync enabled
Shown at the top, middle and bottom areas of the screen (refresh rate = 280Hz)
As with most strobing blur reduction backlights it did help improve eye tracking of moving objects across the screen, making them sharper and easier to follow. That’s one of the key benefits of this kind of technology. There was low levels of strobe cross talk visible in the middle region of the screen which was good news. In the top and bottom areas of the screen this was a bit more noticeable and it’s impossible to eliminate this all together. Overall we were impressed by the operation of the ELMB-sync mode on this display, it worked well. Given the very fast response times and high refresh rate, many people will find performance without this feature active very fast as well but it’s great to see it available in VRR situations on this display, so you don’t have to even make a choice. The only issue with it really was the fact the overdrive mode has to be locked, and so if your refresh rate drops below about 200Hz, the overshoot starts to become increasingly noticeable.
Gaming Comparisons

We have provided a comparison of the display against many other gaming screens we have reviewed in a similar size range and across a range of panel technologies. This table is now split by panel technology to make life a bit easier and for quicker comparison.

We have recorded the response times at the native 240Hz refresh rate here which we feel is probably the optimal mode for most situations. The overclocked 280Hz mode shows a small drop in the measured response times which leads to lower compliance with the active refresh rate, not quite keeping up with the more rapidly changing frames. Although the additional 40Hz boost does then offset that in practice when it comes to motion clarity as it helps reduce perceived motion blur a bit more. In practice the 240Hz and 280Hz modes look very similar, but considering reaching those kind of refresh rates is going to be a pretty hefty challenge for your system (even at this lower 1080p resolution), it’s probably just as good to stick with the native 240Hz maximum. This also avoids the need to overclock the screen, avoiding any potential flickering or artefacts that it may cause on some systems.
Anyway, considering the 240Hz performance shown above, the VG279QM was the fastest overall IPS panel we have measured to date which was very impressive. With a 3.6ms G2G average it out-performed in response times the recently tested LG 38GL950G ever so slightly (3.7ms G2G). The Asus does of course also then have a higher refresh rate of up to 280Hz, compared with the 175Hz maximum of the LG, but it can’t compete with the size, resolution and immersion of that larger display. The Asus also surpassed the Acer Nitro XV273 X which was the first 240Hz IPS screen we’d tested (4.8ms G2G). Add to these excellent response times and very high refresh rate the support for ELMB-sync blur reduction, and you’ve got a very high-end gaming performance.
You can also compare the response times against the other 240Hz models we’ve tested, all with TN Film panels – the Acer Nitro XF252Q, AOC AGON AG251FZ and Asus ROG Swift PG25Q. They had slightly faster response times down to around 2.6 – 3.4ms. There was a little more overshoot introduced as a result, only minor on the Acer and Asus models, but up to moderate overshoot on the AOC.
Additional Gaming Features
- Aspect Ratio Control – the screen has various settings for hardware level aspect ratio control. This includes options for full, 4:3 or 16:9 (24″). The latter is not available when using adaptive-sync it should be noted. We would have perhaps liked to have seen an “aspect” mode or 1:1 pixel mapping mode included as well, although the native screen aspect ratio of 16:9 is likely to be fine for most inputs anyway and from a PC you can always control the aspect ratio at the graphics card level if you need to.
- Preset Modes – There are quite a few gamer-oriented modes available in the GameVisual menu including modes for Racing, RTS/RPG, FPS and MOBA games. You can also save 4 user modes yourself with custom settings.
- Additional features– there are settings in the OSD menu for additional gamer features like a crosshair, timer, FPS counter, Sniper mode and Shadow Boost controls.
Lag
Read our detailed article about input lag and the various measurement techniques which are used to evaluate this aspect of a display. The screens tested are split into two measurements which are based on our overall display lag tests and half the average G2G response time, as measured by our oscilloscope. The response time element, part of the lag you can see, is split from the overall display lag and shown on the graph as the green bar. From there, the signal processing (red bar) can be provided as a good estimation of the lag you would feel from the display. We also classify each display as follows:
Lag Classification
- Class 1) Less than 8.33ms – the equivalent to 1 frame lag of a display at 120Hz refresh rate – should be fine for gamers, even at high levels
- Class 2) A lag of 8.33 – 16.66ms – the equivalent of one to two frames at a 120Hz refresh rate – moderate lag but should be fine for many gamers. Caution advised for serious gaming
- Class 3) A lag of more than 16.66ms – the equivalent of more than 2 frames at a refresh rate of 120Hz – Some noticeable lag in daily usage, not suitable for high end gaming

At 240Hz the total lag measured was a very impressive 2.30 ms total. The pixel response times should account for pretty much all of that display lag at around 2.0ms, and so we can say that there appears to be almost no added signal processing lag on this screen at around 0.3ms. An impressive result from this display and making it suitable for fast and competitive gaming.
Movies and Video
The following summarises the screens performance for videos and movie viewing:
| Category | Display Specs / Measurements | Comments |
| Size | 27″ widescreen | Fairly typical for a desktop monitor nowadays and smaller than TV’s by a lot |
| Aspect Ratio | 16:9 | Well suited to most common 16:9 aspect content and input devices |
| Resolution | 1920 x 1080 | Can support native 1080p content only, but not Ultra HD natively |
| HDCP | Yes | Suitable for encrypted content |
| Connectivity | 1x DisplayPort 1.2 and 2x HDMI 2.0 | Useful additional 2x HDMI input for external Blu-ray players or games consoles. |
| Cables | DisplayPort and HDMI | Both DisplayPort and HDMI provided which is useful |
| Ergonomics | Tilt, height. swivel and rotate | Good range of adjustments suitable to positioning the screen in a variety of angles for different viewing positions. All pretty easy to move around. |
| Coating | Light Anti-glare | Provides clear, non-grainy image and avoids unwanted reflections of full glossy solutions |
| Brightness range | 98 – 378 cd/m2 | Good adjustment range offered including a fairly high peak brightness only. Flicker free backlight operation with no PWM |
| Contrast | 1163:1 after calibration | Strong IPS contrast ratio which should be fine for most content. Buying an alternative VA technology panel would provide you a higher contrast ratio if you watch a lot of dark content and miss some shadow detail |
| Preset modes | Cinema mode | There is a specific movie which can be customised to your liking, or you can also save one of the 4 user-configurable modes too. |
| Response times | 3.6ms G2G, very low overshoot at 240Hz (Overdrive = 80) 5.3ms G2G at 60Hz with low overshoot (Overdrive = 40) | Response times are excellent overall with no noticeable overshoot when using the optimal response time settings. For 60Hz inputs and external devices you may want to switch to the ’40’ overdrive mode to avoid unwanted overshoot artefacts. Even at 60Hz the response times are decent. |
| Viewing angles | Very good | Thanks to the IPS panel technology, suitable for viewing from a wide range of positions. IPS glow on dark content could present a problem from some wider angles especially in darker room conditions |
| Backlight bleed | No major bleed | Some slight clouding most noticeable in the top left hand corner on our sample but nothing major |
| Audio | Headphone output and 2x 2W speakers | Basic integrated speakers on this model which might be ok for the occasional YouTube clip or mp3 but not much more. A headphone jack is also provided |
| Aspect Ratio Controls | Full , 4:3 and 16:9 (24″) modes | Modest options to account for non-16:9 format inputs via the 4:3 mode but lacking any option to maintain other source aspect ratios. Also lacking any 1:1 pixel mapping mode. Although the native aspect of the screen is likely to be suitable for a lot of content |
| PiP / PbP | Neither supported | n/a |
| HDR support | Nothing meaningful | It can accept an HDR input source, but is only certified to the rather meaningless HDR 400 standard which does not require any form of local dimming and so cannot offer improved dynamic range/contrast. There is also only a standard sRGB gamut and 8-bit colour depth so no additional colour benefits for HDR either. |
Conclusion
If you enjoy our work and want to say thanks, donations to the site are very welcome. If you would like to get early access to future reviews please consider becoming a TFT Central supporter.
The VG279QM was a very impressive, top-end gaming screen with some excellent features and specs. This is the highest refresh rate commercially available monitor on the market to date and despite being an IPS panel, can comfortably keep up with the high demands of even the maximum 280Hz. Response times were the best we have measured from any IPS panel to date, and there were low levels of overshoot as long as you operated at the optimal overdrive settings. Support for G-sync (certified by NVIDIA) and FreeSync via the adaptive-sync technology helped cope with the high system demands of this kind of refresh rate too which was great to see. One thing we did miss was the variable overdrive capabilities offered by Native G-sync module screens, so selection of the right overdrive setting was a bit fiddly and needs user consideration. Input lag was basically non-existent and there was a decent motion blur reduction implementation too. There are only a small hand full of displays that allow you to use blur reduction at the same time as VRR (all from Asus’ TUF line-up at the moment), so if you like this technology but don’t want to give up VRR technology, it’s a very attractive option. It wasn’t perfect, as again the overdrive control meant that when using ELMB-sync mode it was best at 200Hz+, and showed overshoot artefacts below that. It’s a great gaming screen nevertheless, but of course the other major consideration is that at 27″ and only 1080p resolution it is fairly small by modern standards. Still, there are plenty of users out there who only want something of this size and res, so it’s a great option if you’re looking to move into a modern high refresh rate IPS offering.
Away from gaming the default setup of the screen was pretty decent and the panel had a strong contrast ratio for IPS technology. There are decent connectivity options and a versatile stand provided too, along with plenty of options and settings to play with in the menu. Unlike all the TN Film based gaming screens, the IPS panel helps provide great all round performance as well with decent colours, great picture quality and wide viewing angles.