Как включить Wake on Lan в Windows 10
В этой статье поговорим, как включить Wake on Lan в Windows 10, и что это такое. Wake on Lan – крайне любопытная функция современных компьютеров. Многим хорошо известна технология удаленного доступа к компьютеру, с помощью которой пользователь может подключиться к серверу или обычному ПК в другой точке мира и управлять им как локальным устройством. К сожалению, если удаленный компьютер выключен, к нему никак не получить доступ. Для решения этой проблемы создана технология Wake on Lan, позволяющая удаленно запустить компьютер в рамках одной сети или через Интернет.
С переходом от Windows 7 к Windows 10 разработчики немного изменили принцип работы Wake on Lan. В Windows 7 обычное выключение компьютера работает традиционным способом и полностью выключает устройство (классическое выключение, также известное как S5 State). Далеко не все материнские платы поддерживают Wake on Lan с S5 State, а значит не могут включить компьютер удаленно.
В Windows 10 при выключении компьютера система использует так называемое гибридное выключение (S4 State), также известное как Быстрый запуск (Fast Startup). По умолчанию Wake on Lan для S4 State отключен, поскольку пользователи ожидают нулевого потребления энергии при выключении компьютера. Иными словами, вам надо вручную включить Wake on Lan и настроить ОС для работы с этой функцией.
Обратите внимание: Wake on Lan требует поддержки со стороны оборудования. Иными словами, ваша материнская плата или сетевая карта должны поддерживать эту технологию. Обратитесь к руководству пользователя материнской платы для проверки совместимости.
Как включить Wake on Lan в BIOS
- Для начала вам надо перезагрузить компьютер и зайти в BIOS/UEFI с помощью соответствующей кнопки или команды в Windows 10. Это может быть Esc, Delete, F1, F2 или F11. Опять же, это зависит от производителя вашей материнской платы.
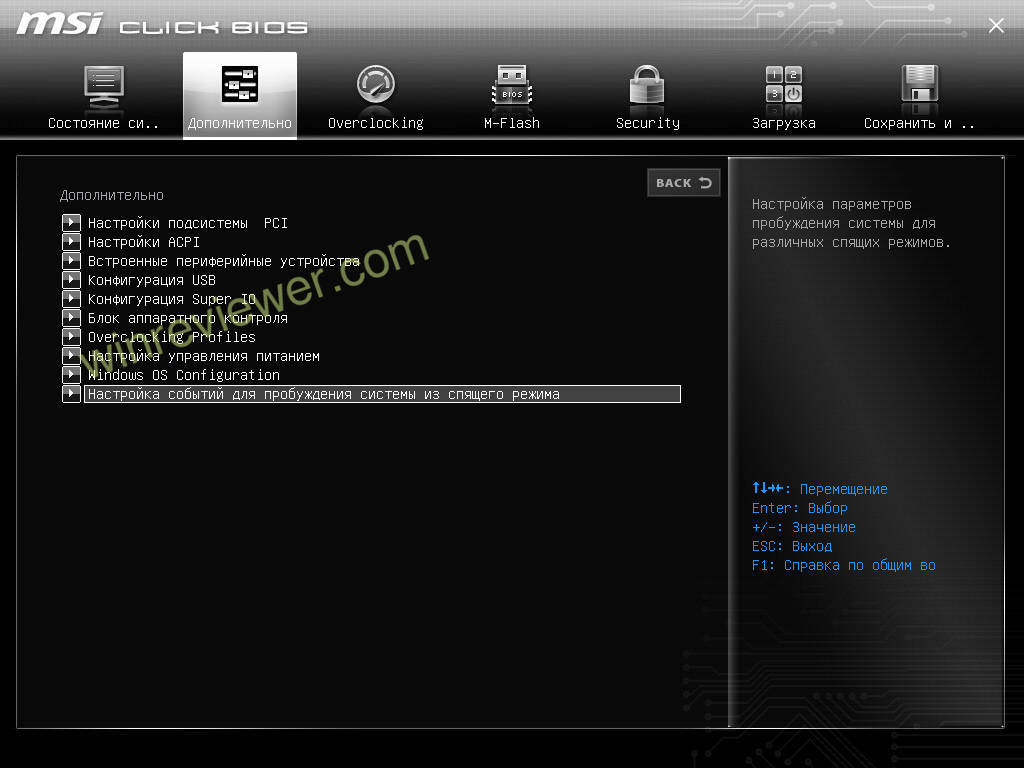
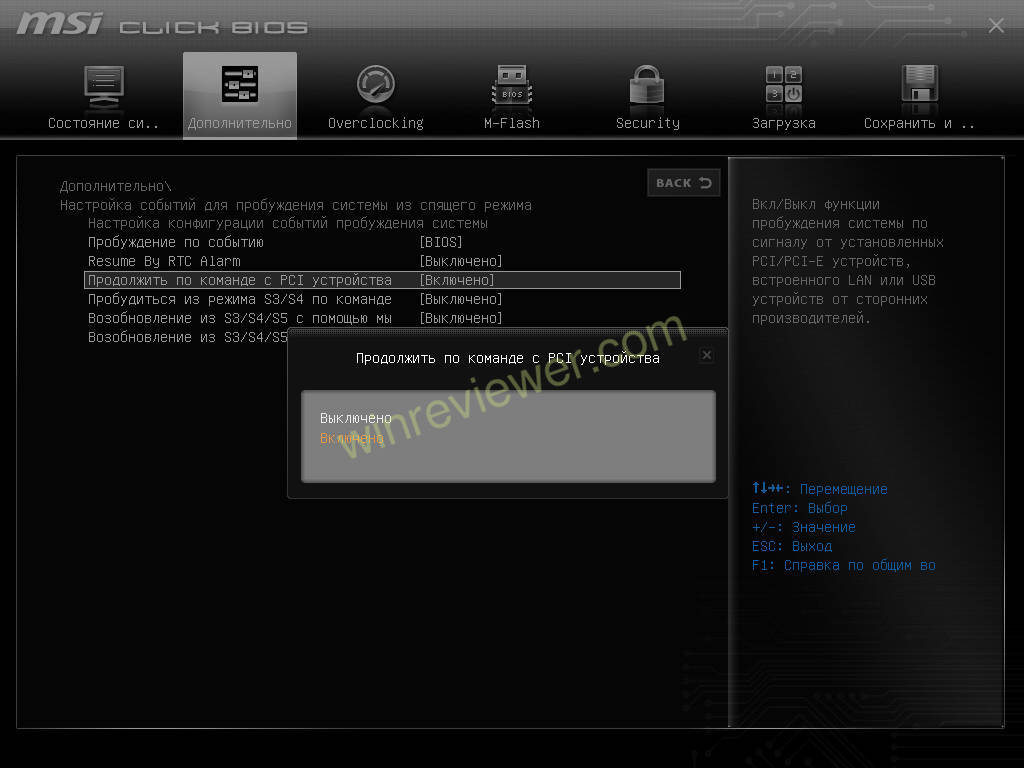
- В самом UEFI/BIOS найдите пункт Wake on Lan или Power On by PCIe, или Resume by PCIe Device, или Продолжить по команде с PCI устройства.
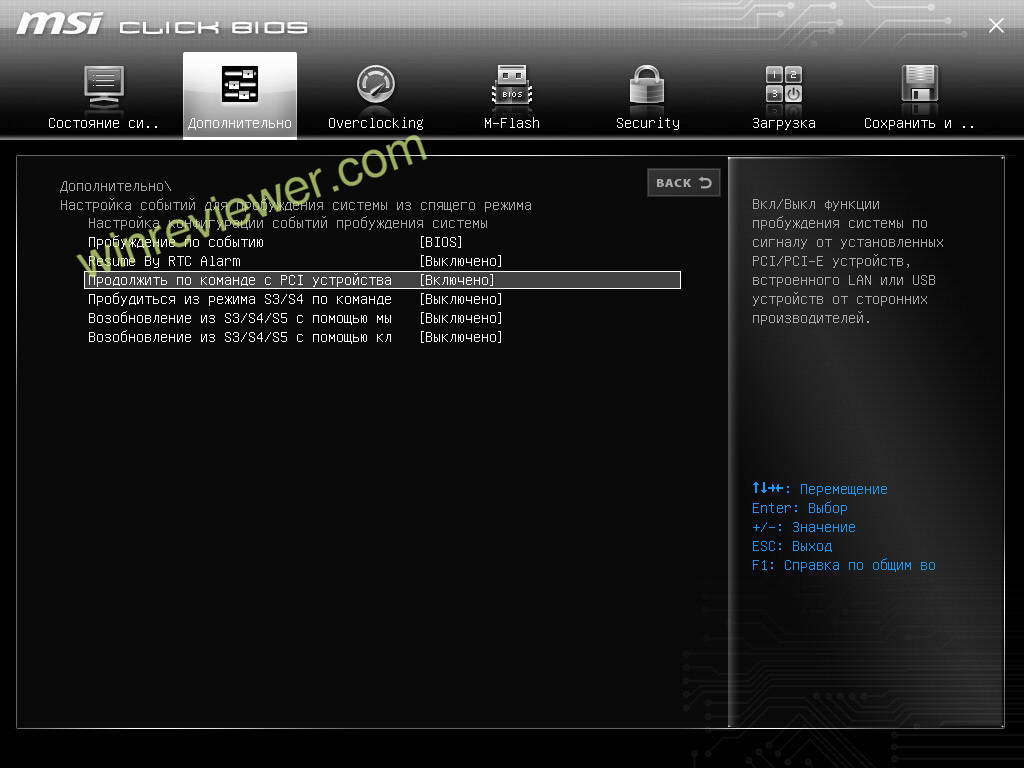
- Включите этот параметр, затем сохраните внесенные изменения.
- Перезагрузите компьютер и запустите операционную систему.
Первичная подготовка к включению Wake on Lan в Windows 10 готова. Теперь вам надо включить эту функцию в самой операционной системе.
Включить Wake on Lan в Windows 10
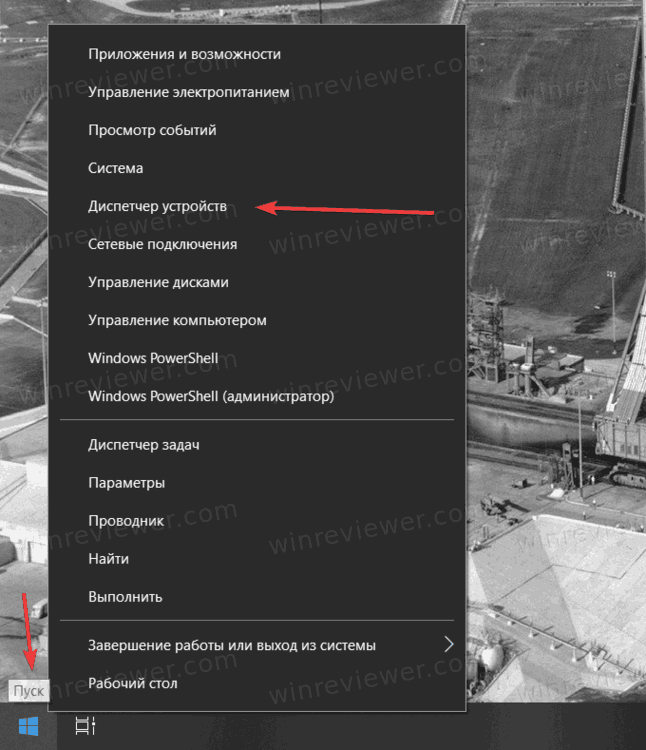
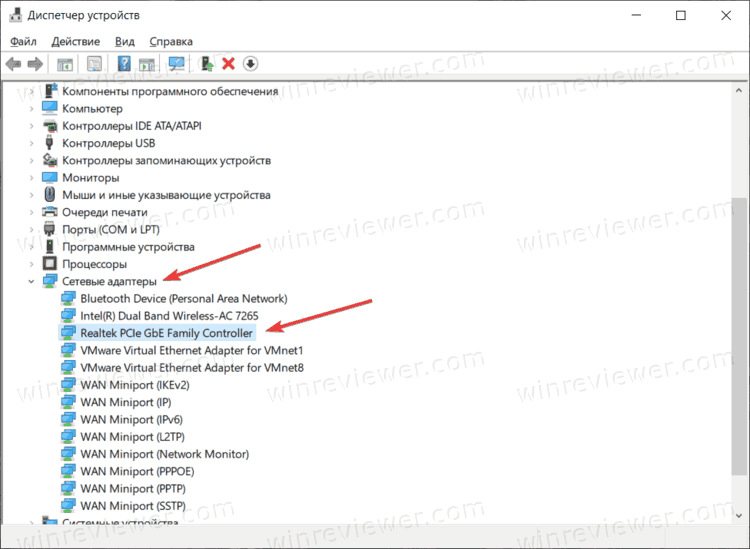
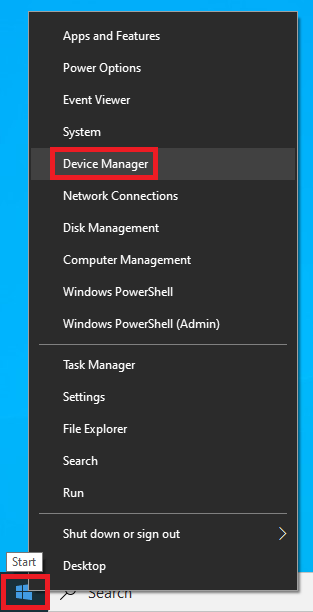
- Войдите в систему и запустите Диспетчер устройств предпочитаемым вами способом. Например, с помощью сочетания клавиш Win + X, выбрав в появившемся меню Диспетчер устройств.
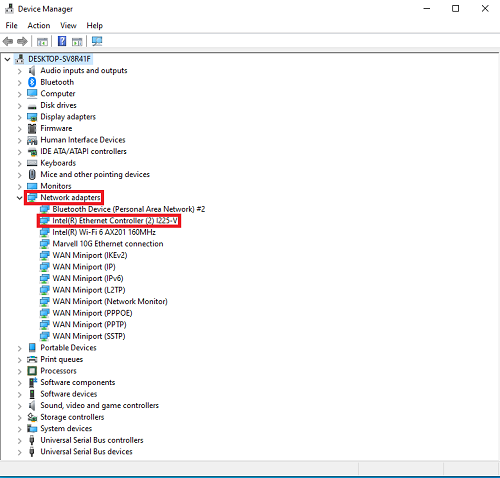
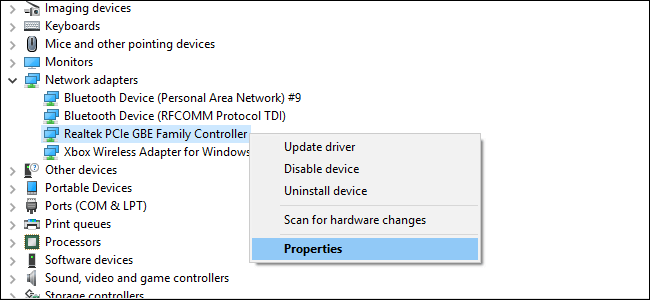
- В списке устройств найдите ветку Сетевые адаптеры. Разверните ее и найдите адаптер, к которому подключен Ethernet-кабель. Дважды щелкните на него.
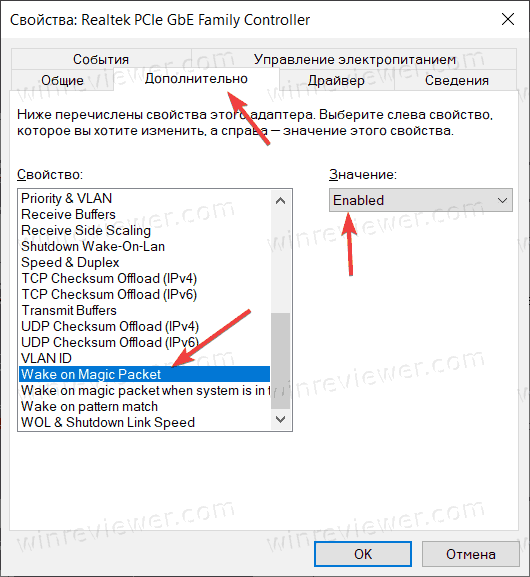
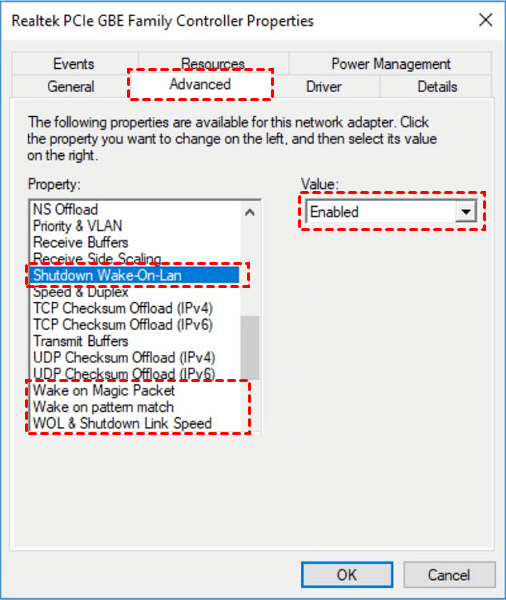
- В появившемся окне перейдите на вкладку Дополнительно. В списке Свойства найдите пункт Wake on Magic Packet.
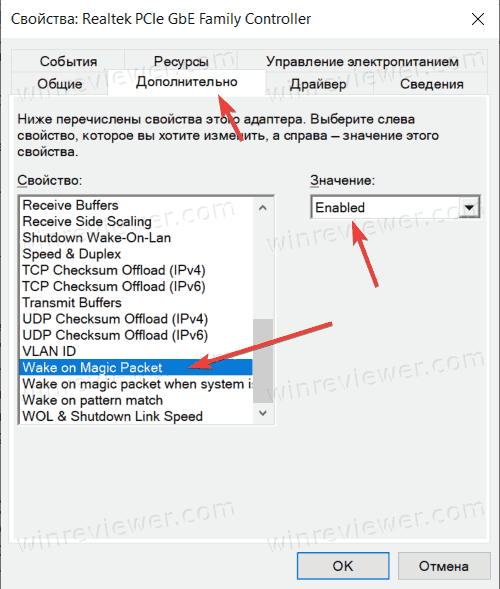
- В правой части окна измените параметр Value на Enabled.
Проделать вышеописанную процедуру также можно из Параметров Windows или Панели управления.
Активировать Wake on Lan в приложении Параметры
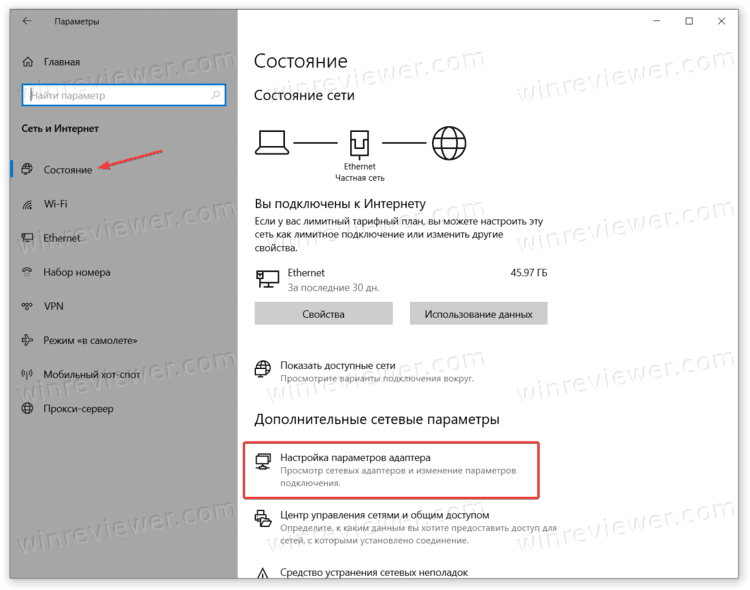
- Нажмите Win + I, чтобы открыть Параметры Windows.
- Перейдите в раздел Сеть и Интернет > Статус. Нажмите Настройка параметров адаптера.
- В появившемся окне найдите адаптер, который хотите использовать для Wake on Lan. Щелкните по нему правой кнопкой мыши и выберите Свойства.
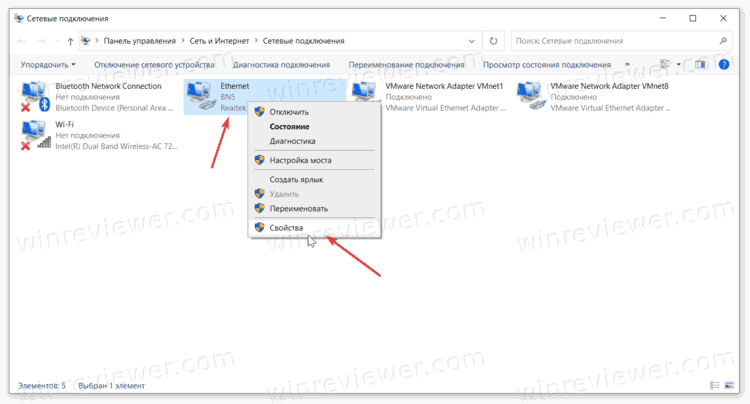
- В появившемся окне выберите Настроить.

- Перейдите на вкладку Дополнительно. В списке свойств найдите пункт Wake on Magic Packet. Измените параметр Value на Enabled.
- Сохраните изменения.
Готово. Ваш компьютер теперь готов к удаленному включению с помощью функции Wake on Lan.
��Узнавайте о новых статьях быстрее. Подпишитесь на наши каналы в Telegram и Twitter.
Судя по тому, что вы читаете этот текст, вы дочитали эту статью до конца. Если она вам понравилась, поделитесь, пожалуйста, с помощью кнопок ниже. Спасибо за вашу поддержку!
Вы здесь: Главная страница » Windows » Windows 10 » Как включить Wake on Lan в Windows 10
Публикации по теме
Автор: Сергей Ткаченко и Тарас Буря
Сергей Ткаченко и Тарас Буря совместно работают над статьями на этом сайте. Благодаря их усилиям здесь появился целый пласт технических публикаций. Посмотреть все записи автора Сергей Ткаченко и Тарас Буря
[Motherboard]How to set and enable WOL(Wake On Lan) function in BIOS
Scan QR code to open this page with your smart phone.
[Motherboard]How to set and enable WOL(Wake On Lan) function in BIOS
Wake-on-LAN (WOL) function allows you to wake system from sleep or hibernate state through the on board LAN
1-1. Please go to ASUS official website and click  to query the motherboard,
For example: ROG MAXIMUS XII FORMULA

1-2. Click [Tech Specs] page

1-3. Find Manageability item and it shows that WOL by PME that supports Wake-on-LAN function

(For example:ROG MAXIMUS XII FORMULA)
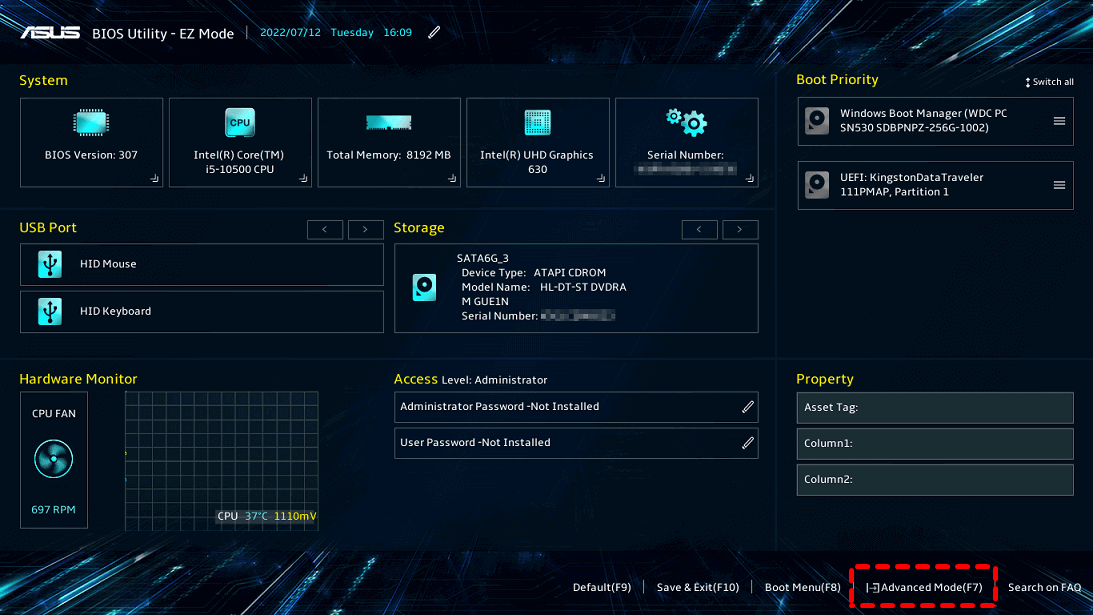
2-1. Power on the system and press <delete> key to enter BIOS [Advanced Mode]
2-2. Click [Advanced] page and select [APM Configuration] item,as below
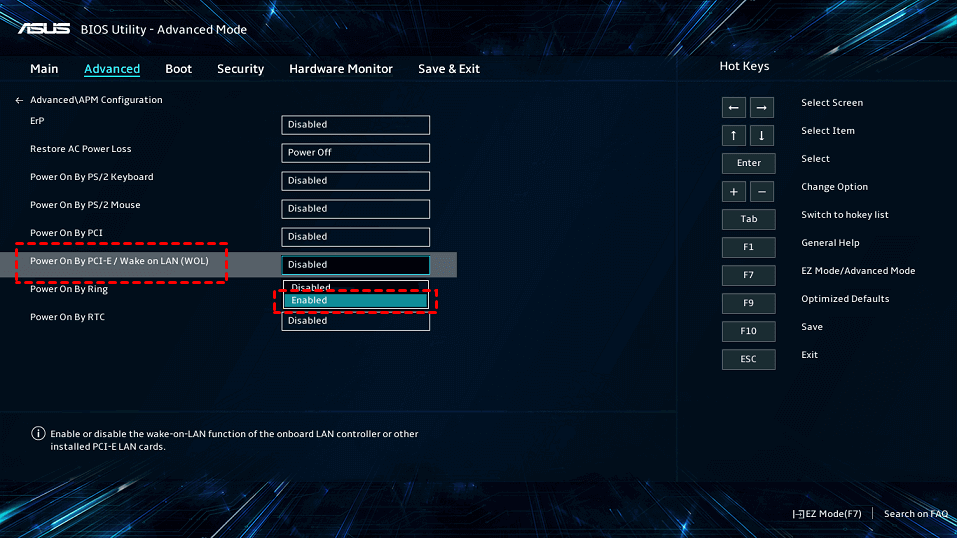
2-3. Click [Power On By PCI-E] item and set to [Enabled]
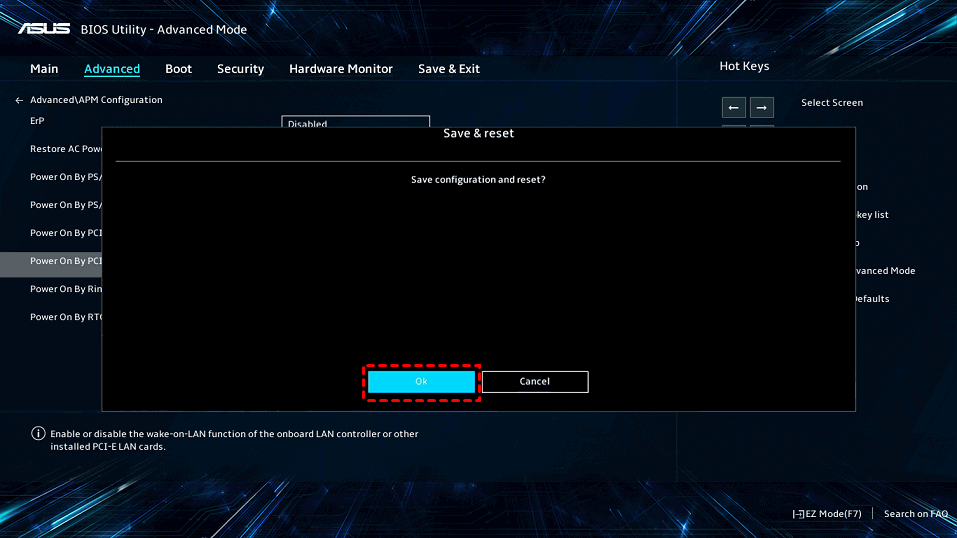
2-4. Press <F10> key and click <OK> , the system will auto reboot
Q: How to fix WOL fail in Windows 10 ?
A: Please follow below steps
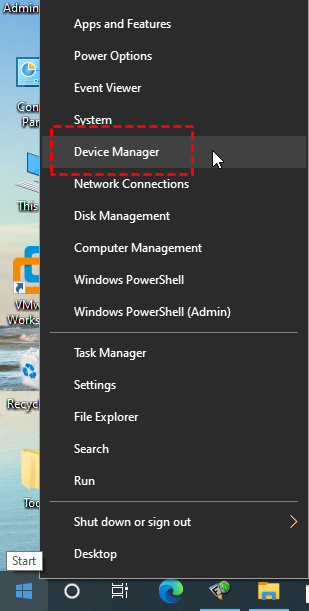
3-1. Right-click Windows startup menu  ,and click [Device Manager]
3-2. Click [Network adapters],and select the network controller
3-3. Click Driver item and confirm driver is installed ,as below ,driver version is 1.0.1.4

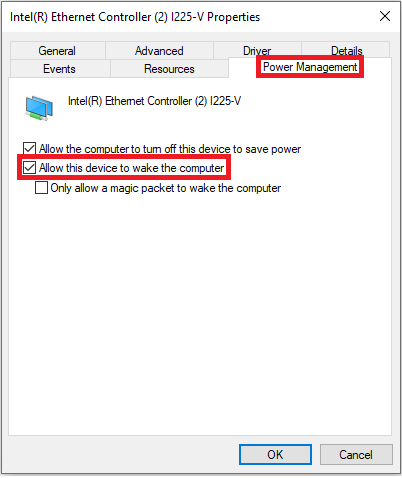
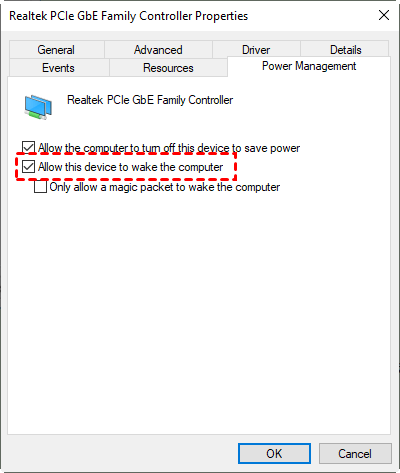
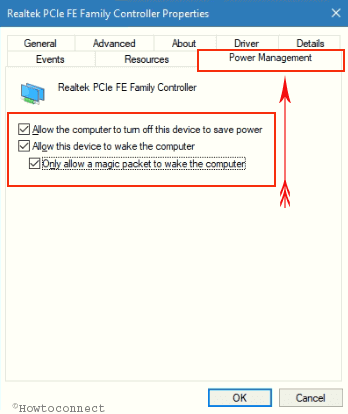
3-4. Click [Power Managerment] page and confirm the checkbox that in front of [Allow this device to wake the computer] is ticked as below
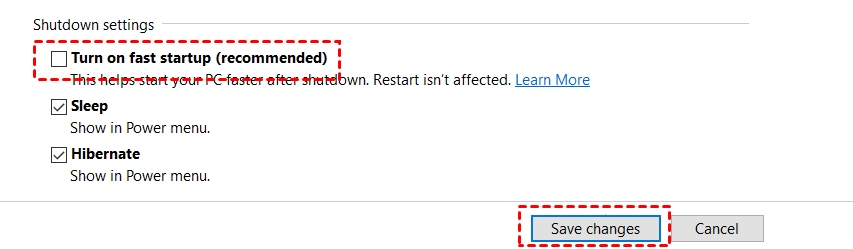
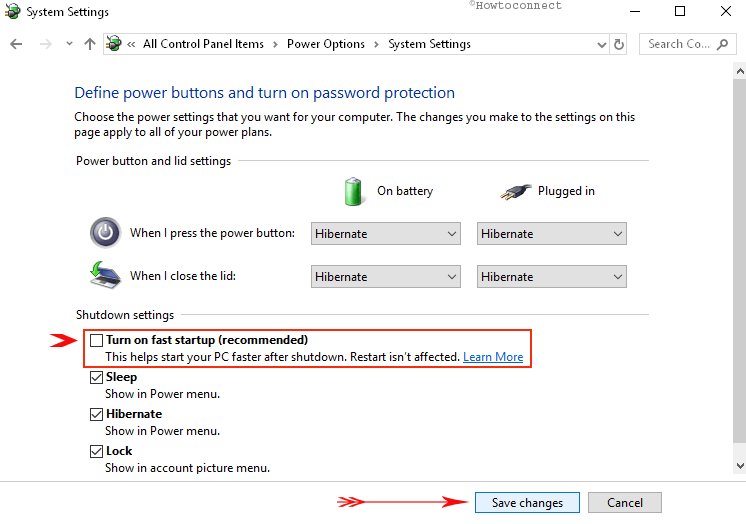
3-5. Confirm whether disable Turn on Fast startup
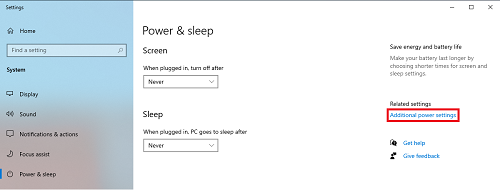
Right-click Windows startup menu  and select [Power Options]

Click [Additional power settings]
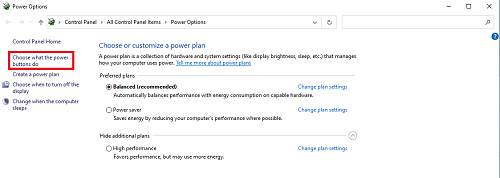
Click [Choose what the power butters do]
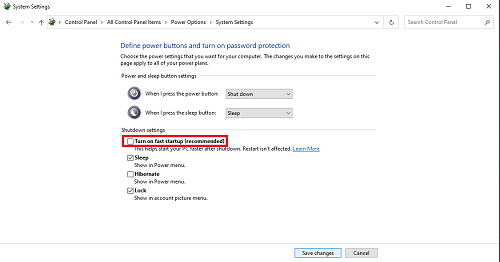
Confirm that the checkbox in front of [Turn on fast startup (recommended)] is not ticked
Was this information helpful?
What we can do to improve the article?
- Above information might be partly or entirely quoted from exterior websites or sources. please refer to the information based on the source that we noted. Please directly contact or inquire the sources if there is any further question and note that ASUS is neither relevant nor responsible for its content/service
- This information may not suitable for all the products from the same category/series. Some of the screen shots and operations could be different from the software versions.
- ASUS provides the above information for reference only. If you have any questions about the content, please contact the above product vendor directly. Please note that ASUS is not responsible for the content or service provided by the above product vendor.
- Brand and product names mentioned are trademarks of their respective companies.
- Support
- Laptops
- Phone
- Motherboards
- Tower PCs
- Monitors
- Networking
- Show All Products
-
Item_other —>
- Tablets
- AIoT & Industrial Solutions
- Power Supply Unit
- Gaming Case
- Cooling
- Graphics Cards
- ROG — Republic Of Gamers
- Projectors
- Single Board Computer
- VivoWatch
- Mini PCs
- Business Networking
- Sound Cards
- Vivobaby
- Stick PCs
- Headphones & Headsets
- Optical Drives & Storage
- All-in-One PCs
- Gaming Networking
- Commercial
Stepwise Tutorial: How to Set Up ASUS BIOS Wake on LAN (WOL)
Wake on LAN (WOL) enables you to awaken computers remotely. This post primarily introduces setting up ASUS BIOS Wake on LAN (WOL). Keep reading if you’re interested.
By Ellie ![]() / Last Updated May 12, 2023
/ Last Updated May 12, 2023
How do I enable Wake-on-LAN on ASUS BIOS?
Wake-on-LAN (WOL) is a protocol allowing computers to be remotely awakened from low-power states, including sleep, hibernate, and shutdown. If you want to remotely wake up a computer that is far away when you are not around, this is somewhat helpful.
But the point is how to configure Wake on LAN. Luckily, here’s the full tutorial on how to set up and use ASUS BIOS Wake on LAN. Keep reading if you’re interested.
ASUS BIOS Wake on LAN tutorial
Before enabling ASUS BIOS Wake on LAN, you must do some preparation checks. Besides, solutions to ASUS Wake on LAN not working are also introduced.
Preparation checks
Before starting, ensure the following ASUS BIOS Wake on LAN settings and hardware requirements are fulfilled:
- Network card that supports Wake-on-LAN.
- Active internet connection.
- Connected to the Internet via LAN cable.
- Computer should be in any of the three power states: sleep, hibernate, or shut down.
How to enable ASUS BIOS Wake on LAN
Enable WOL in BIOS settings and configure the network card to wake a computer via WOL.
Enable WOL in BIOS settings
Step 1. When the computer starts, press and hold the Del key while simultaneously pressing the Power button to bring up the BIOS configuration screen.

Step 2. After entering the BIOS Utility, go to Advanced Mode by pressing Hotkey F7 or using the cursor to click.
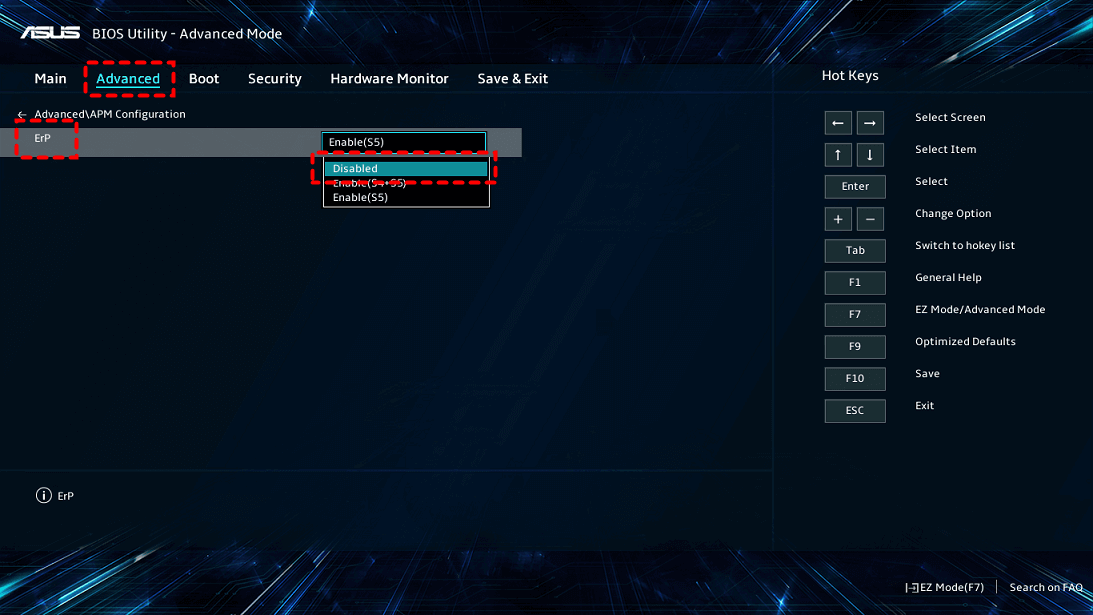
Step 3. After entering the Advanced Mode, select Advanced and then APM Configuration. After entering the APM Configuration, select ErP and set Disabled.
Step 4. Select Power On By PCI-E and set Enabled.
Step 5. Press Hotkey F10 and select Ok to save & exit setup.
Configure Network Card
Step 1. Right-click the Start menu and click Device Manager.
Step 2. Locate and open the Network adapters category. Right-click the network adapter that you are currently using and click Properties.
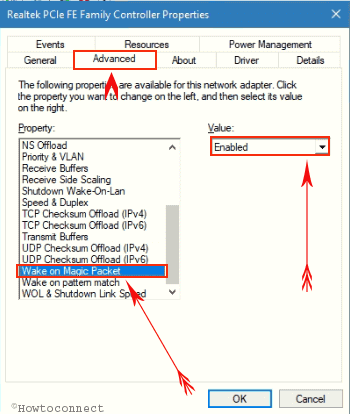
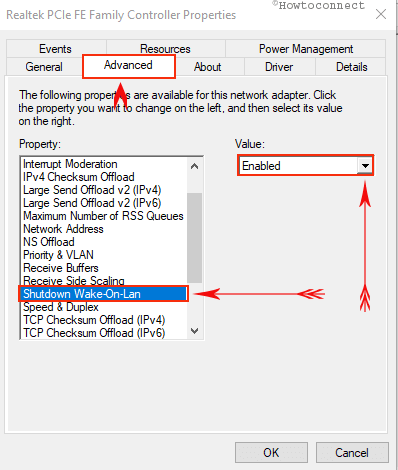
Step 3. Go to the Advanced tab, and configure the Advanced driver properties for the following settings:
- Shutdown Wake-On-Lan: Enabled
- Wake on Magic Packet:Enabled
- Wake on pattern match: Enabled
- WOL & Shutdown Link Speed: 10 Mbps
Step 4. Next, click the Power Management tab and see if Allow this device to wake the computer option is greyed out. If not, check it.
How to fix ASUS Wake on LAN not working
If ASUS BIOS Wake on LAN is not working, the following four solutions may help you fix it.
Way 1. Confirm the AC power is plugged in
The WOL doesn’t work properly if the remote computer is running on battery power. AC power is a must requirement for the WOL to work properly. Therefore, you need to confirm that the AC power is plugged in. You can download Dell Battery Meter from the following website and tick Turn Off Battery Charging:

Way 2. Disable the fast startup
You can also disable the fast startup so the network devices receive power even when the computer is switched off.
Step 1. Open Control Panel, click Large icons, and select Power Options from the menu.

Step 2. On the left-hand side, click Choose what power buttons do option.
Step 3. Click Change settings that are currently unavailable.
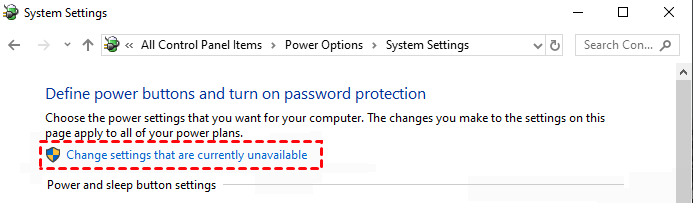
Step 4. Uncheck Turn on fast startup option and click on Save changes.
Way 3. Enable the NetBIOS over TCP/IP Feature
NetBIOS enables computers on a local area network to communicate with network hardware and send data across the network. In the meantime, the NetBIOS over TCP/IP networking protocol enables legacy computer applications that rely on the NetBIOS API to be used on modern TCP/IP networks. If your PC uses the NetBIOS API, it may be worthwhile to enable the NetBIOS over TCP/IP feature to avoid network issues while using WOL.
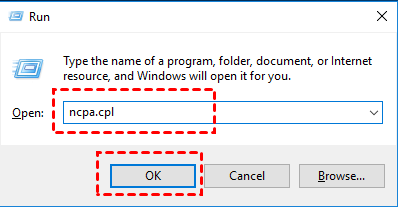
Step 1. Press Win + R to launch the Run command dialog box. Type «ncpa.cpl» and press OK to open the Network Connections window.
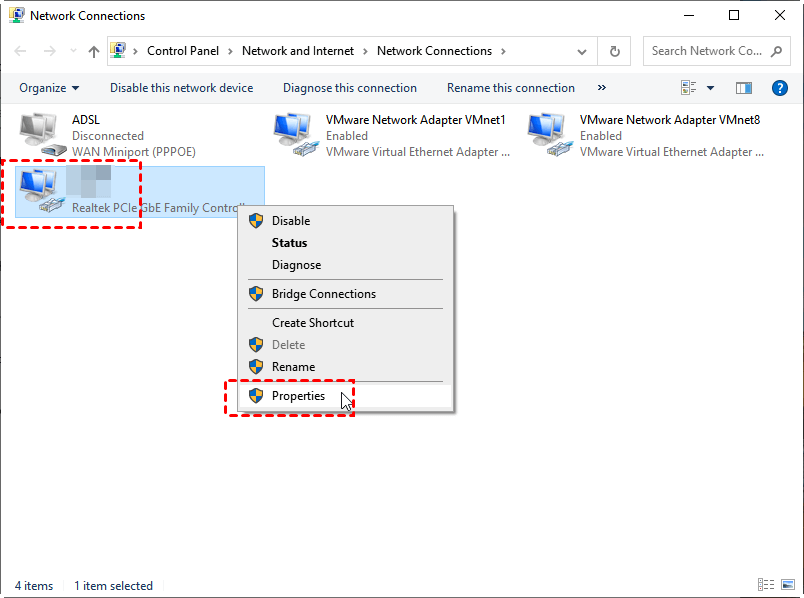
Step 2. Right-click on your Network adapter and then click Properties.
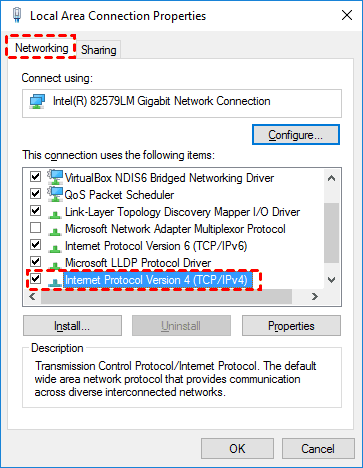
Step 3. Double-click the Internet Protocol Version 4 (TCP/IPv4) option.
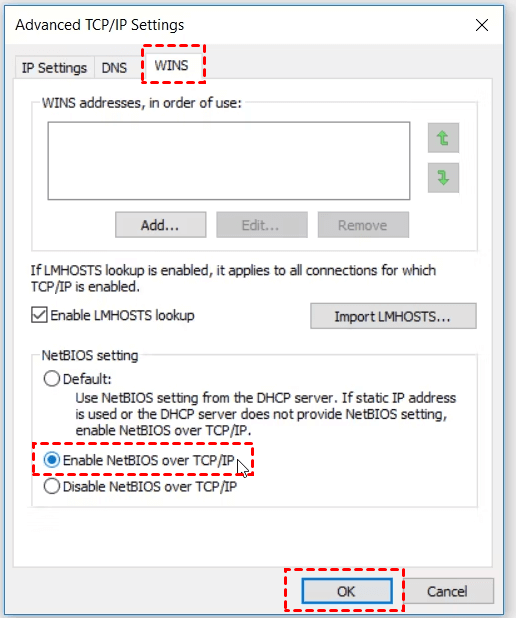
Step 4. In the next window, near the bottom-right corner, click the Advanced button. Navigate to the WINS tab in the Advanced TCP/IP Settings window, then check the Enable NetBIOS over TCP/IP box. Finally, click OK to save these modifications.
Way 4. Modify the Registry key
Please note that this solution will only work if you have a Realtek adapter.
Step 1. Press Win key + R and enter «regedit«. Press Enter or click on OK.

Step 2. Go to: Computer > HKEY_LOCAL_MACHINE > SYSTEM > CurrentControlSet > Control > Class > 4de3e972-e325-11ce-bfc1-08002be10318.
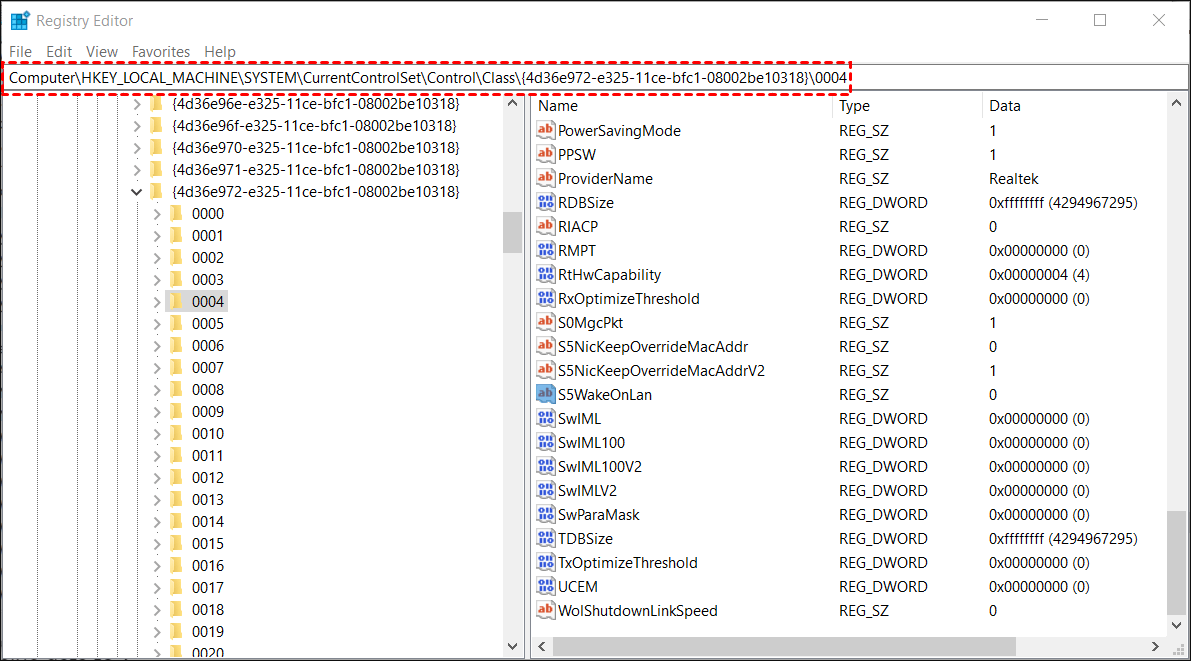
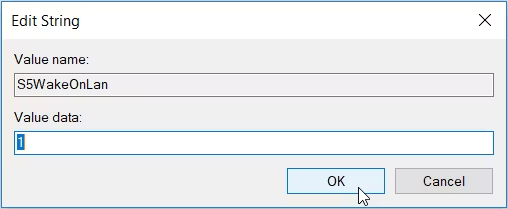
Step 3. Once you find your Realtek adapter, in the right pane you should see S5WakeOnLAN DWORD. Double-click it and change its Value data to 1.
Step 4. Now, double-click PowerDownPll DWORD and set its Value data to 0.

How to remotely control a waking computer
You should use the free remote desktop program AnyViewer to operate the awakening machine remotely. It is the best tool for remote work and remote support. As a powerful remote desktop software, AnyViewer has the following advantages:
▪ Simple installation.
▪ Fast connection speed.
▪ Instant text chat.
▪ Shortcuts for essential programs like Task Manager
▪ Simultaneous control of many PCs.
▪ iOS and Android versions available.
Step 1. Launch AnyViewer after downloading it to both machines. Go to Sign up and then Log in on the Controller computer (you can log in directly if you have previously registered on the website).

Step 2. Fill in the signup information.

Step 3. The account you’ve logged in to will be automatically assigned to your device.

Step 4. A direct connection can be established by selecting One-click control.

Notes:✎. Additionally, it is recommended to change your account’s plan to a Professional or Enterprise one. What a business or professional plan can provide for you is: More devices will be allowed to assign to the same account for unattended remote access. More connection channels for more devices to be able to start remote connection at the same time. One device can connect to more devices simultaneously. Black the remote PC screen and disable the remote keyboard & mouse click to protect privacy. Transfer 1TB files at 10 MB/s.
Closing words
This post primarily introduces how to set up ASUS BIOS Wake on LAN and four tested ways to fix WOL not working on ASUS. Besides, it also introduces the best remote desktop softwareAnyViewer to allow you to control the waking computer remotely. If you need to wake up your home computer from work and access files, follow the steps in this post.
How to Activate Wake on LAN in Windows 10
When you need to power on a system remotely you are fortunate that Microsoft lets you activate Wake on LAN in Windows 10. Using this terrific feature, you can wake up the computer from shut down, sleep or hibernate over a local area network from miles away. Having WoL (Wake on LAN) support in hardware, this special feature turns into the power button. This ability to power on a remote system depends on two things – Network card and your BIOS.
The interesting fact is that you don’t require any particular 3rd party software to enable WOL. You can either activate it using the network card’s firmware or through BIOS. So, here, we will discuss the way to Wake on LAN Windows 10 moreover tweak BIOS settings if necessary.
How to Activate Wake on LAN in Windows 10
Wake on LAN (short form WOL) is known for waking up from either sleep, hibernate or shut down mode. After enabling this feature, you can awake Windows by sending the “magic packet” having MAC address from others. Before going any deeper, you need to ensure the device is in hibernation or sleep mode instead. Additionally, there should be an end to end network between two or more devices and an active Ethernet connection.
Now, pursue the below-given series of steps and activate Wake on LAN in Windows 10.
Step-1: First and foremost, execute a right-click on the Start button on the taskbar. From the menu that shows up on the screen, locate and hit Device Manager.
Step-2: Expand Network Adaptor from left and put a right-click on your network card in use.
Step-3: Select Properties from the list and open Advanced tab from the popup.

Step-4: Roll over the list of Property and select Wake on Magic Packet as depicted in the given image. Once you find it, click the drop-down under Value and choose the Enabled option.
Step-5: Next, head to the Power Management tab as well as check the options entitled with “Allow this device to wake the computer” and “Only allow a magic packet to wake the computer”.
Step-6: Hit on OK button from the bottom with a view to saving changes.
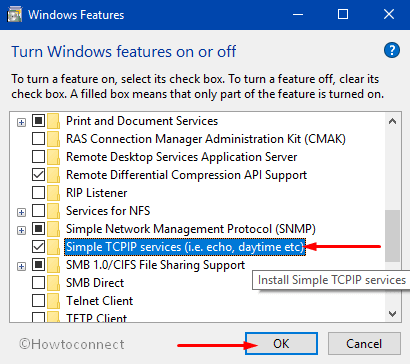
Step-7: Once, you do this, you have to install the simple TCIP Service feature. So, on Cortana text field, type Windows Features and press Enter.
Step-8: On the window that opens up, tick mark the option Simple TCPIP services and click OK.
These guidelines are same for all the manufacturers but enabling WOL on BIOS differs from one to another. So, in the below section, we are going to discuss the series of steps to activate Wake on LAN in Windows 10 in different BIOS setup.
01. Asus BIOS Wake on LAN Configuration
- Enter into “BIOS setup” by hitting any of these keys – ESC, DELETE or F2.
- Conduct a click on Advanced tab from BIOS SETUP UTILITY screen.
- Head to APM and make the “Power on by PCIE/PCI” option Enabled.
If you find the steps are not complying with your one, we recommend you to go through the Motherboard manual provided by the manufacturer. You will get instructions there for your Windows and thus you can follow that for the same purpose.
02. HP BIOS Configuration Wake on LAN
a) Once you power on the system, hit the assigned key to get into BIOS which is generally the “F1, F2, Del, or Esc” key. But it may differ depending on the BIOS version.
b) Open the Power tab using right arrow key and engage using Enter.
c) Reach out to “Hardware Power Management” with the help of arrow keys and hit Enter once selected.
d) Here, ensure that “S5 Wake on LAN” option is set to Enabled. If you find it Disabled, use arrow keys in order to change the status.
For many, the Wake on LAN in Windows 10 fails to perform after the upgradation. If you are also facing issues, follow the given sequence of phases and their steps carefully.
Phase 1 – Update the BIOS
The vital task is to verify whether you hold the latest version of the BIOS. To do so, navigate to the HP official website and ensure to install the appropriate BIOS update for your computer.
Phase 2 – Turn Off Hybrid Shutdown
1. Conduct a right-click on the battery icon at the taskbar and click on Power options as depicted in the following image.
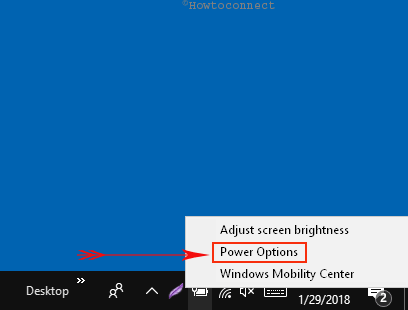
2. Make a click on the option namely Choose what the power button does on the left column of the next window. Moving ahead, click Change settings that are currently unavailable ( see snapshot).
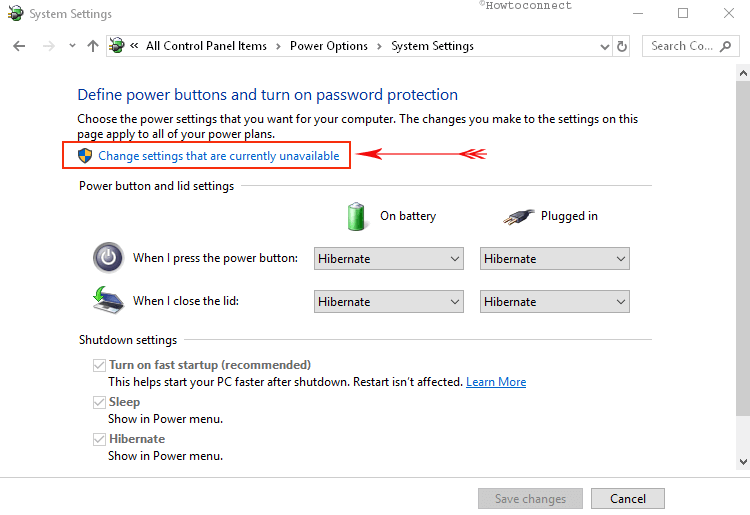
3. Here, ensure to uncheck the option “Turn on fast startup“. Lastly, click Save changes button.
Phase 3 – Activate Wake on LAN in Windows 10 setting for LAN driver
1. First of all, access Device Manager using any of your ways. Once you open it, expand the “Network Adapter” and then identify your LAN driver.
2. After locating the LAN device, conduct a right click on it and choose Properties.
3. Here, head to the Advanced tab and underneath the Property list locate the option Shutdown Wake on LAN. Once you find it, select it. Now, on its right side click the drop-down below Value option and choose Enabled.
4. Now, switch to the Power Management tab and ensure that the option namely “Allow this device to wake the computer” is selected (see snapshot). Finally, click the Ok button and implement the changes you did to the LAN device.

Phase 4 – Manually Include the HP Registry Key
Type the command regedit on Cortana and hit Enter to access the “Registry Editor”. Click Yes upon the prompt of UAC on the screen.
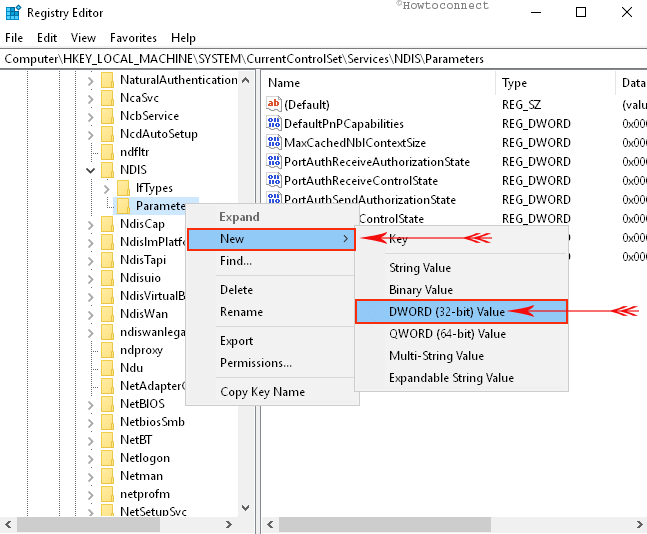
Now, reach out the following path carefully –
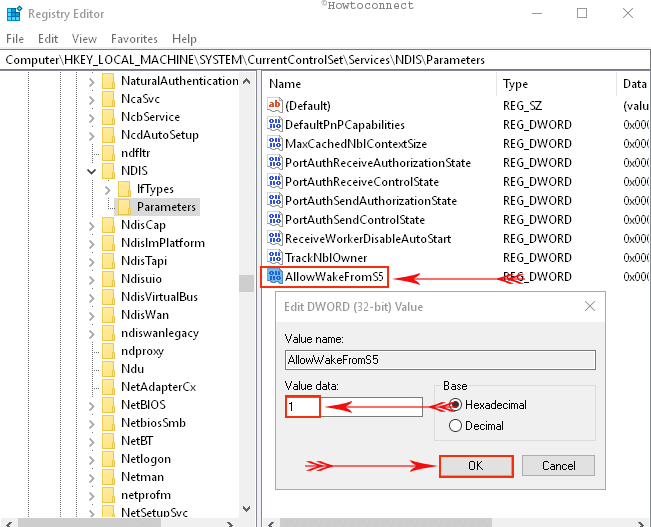
Once you reach Parameters key, right-click and hover the cursor over New. Next, choose DWORD (32 bit-Value) and name it as AllowWakeFromS5.
Double-click on the DWORD and assign its Value as 1 and click Ok to save the modification.
03. Acer BIOS Setting Change for Wake on LAN
First of all, turn on the system and sharply press “F2 or DELETE” key when the logo shows up on the screen and get access to the BIOS. Moving ahead, navigate to Power Management Setup using arrow keys and hit Enter button.
Next, go to Deep Power Off Mode and change its status to Disabled and lastly press Enter key. Now, move to “Power On by PCIE Devices” and set it as Enabled. Lastly, save all these modifications the by pressing F10 key.
04. For Biostar BIOS WOL activation
Power On the Windows and Press F1, F2, Esc and Del keys at the startup. You will be guided to BIOS setup utility and keys will vary from one model to others. Select the Power Management Setup using navigation keys and hit Enter immediately.
Find the option WOL(PME#) From Soft Off in the list and change its status to Enabled. If it is not, then with the help of the arrow keys to highlight it.
05. American Megatrends BIOS settings for Wake on LAN
- Enter into the BIOS setup screen and to do so, first, turn on the system. Upon the first beep, quickly hit one of these keys – F1, F2, Esc and Del key.
- Go to the Advanced menu using the side arrows.
- Now, find Chipset Configuration, select it and hit Enter. Moving on, reach out to Southbridge Configuration, and again press Enter key.
- Here, locate “Wake on LAN from S5” option and set its status as Enabled.
06. Dell BIOS Setting for Wake on LAN
- Follow this link and download Dell Command | Configure in the first place. Once downloading ends, Run it as Administrator.
- Once prompt, select Multi-Platform Package in the type of package. Make changes in the status of following options:
a) “Wake On LAN- Enable
b) Block S3 sleep state- Enable
c) Deep Sleep Control- Disable”
- Hit the Export .EXE button from the bottom. The System will ask the passwords for the sake of authentication. However, you can skip this step as there was no password configured before.
- You can now run the feature by distributing it using the network share. Alternatively, you can execute commands such as PSEXEC or GFI Remote Console.
07. Lenovo
The experts at the Lenovo Community explicitly explains on How to activate Wake on LAN in Windows 10. For Lenovo system, all you need is to configure the network adapter settings shown above. When the computer is in shutdown or in hibernate state, WoL requires crossing the BIOS. So, waking up from sleep will be fine as the LAN card supports it. And it is the operating system that wakes the system up and not the BIOS.
How to Use Wake on LAN in Windows 10 Feature to Resume a System Remotely
Way 1 – By Port- Forwarding
After you activate Wake on LAN in Windows 10 through network card and motherboard, let us learn how you will resume the system.
1. Once you successfully enable the WoL feature, restart your Windows 10 PC. Next, type Windows Firewall on Cortana search field and hit Enter. Click Advanced settings option on the left sidebar of the following window.
2. Conduct a click on Inbound Rules on the left column.
3. Click New Rule option from the right pane. Select Port radio button when a new wizard pops-up and click Next.
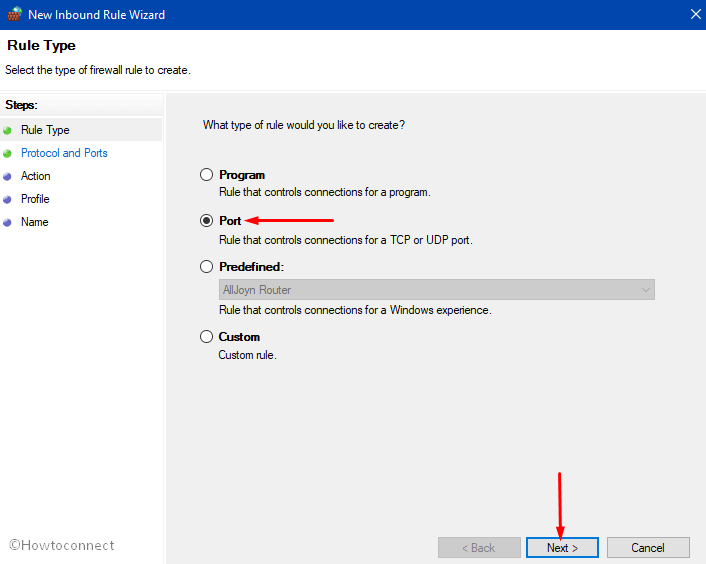
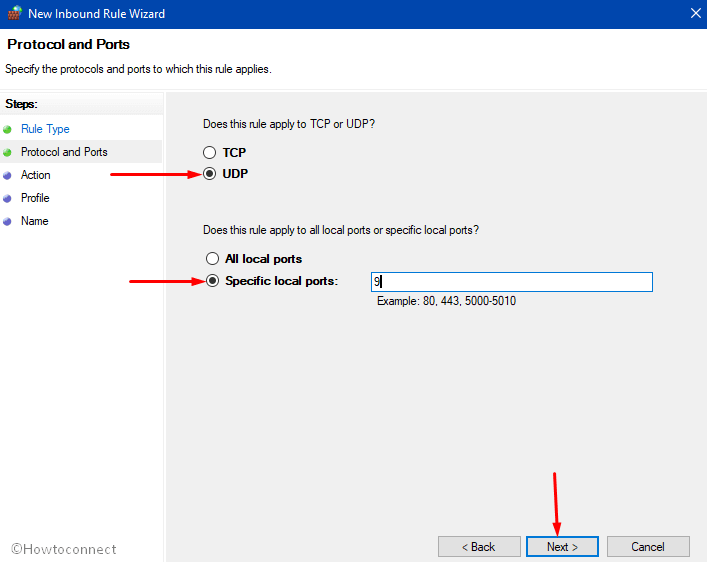
4. First, select UDP and then choose “Specific local ports“. Usually, most utilities use port 7 0r 9, so you can type 9 in the Specific local ports field and click Next. Follow the guidelines of the wizard and finish generating a new Inbound Rule to launch the required port.
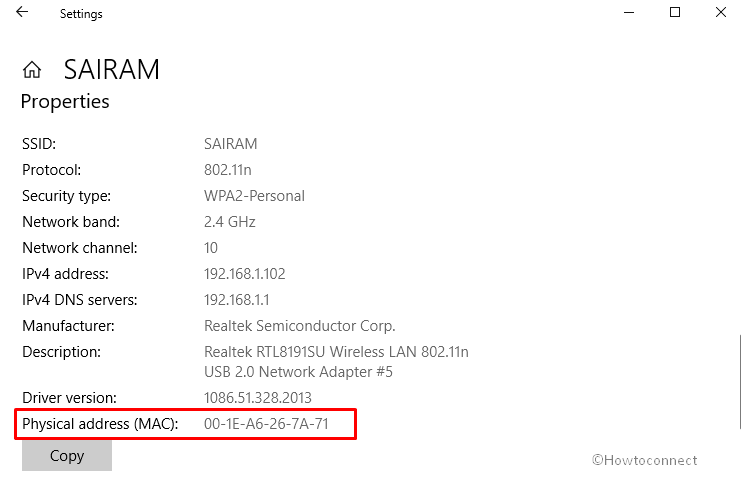
5. Now, you need to note down the MAC address somewhere safely and do to so, launch Settings application using “Win – I” hotkeys.
6. Navigate to Network & Internet => Ethernet and click the connection name on the right side. If you are using a wireless connection, click Wi-Fi and select the connection name.
7. On the next page, scroll down and you can notice the MAC address, note down it somewhere safe.
8. Moving ahead, on another computer, download this free utility WolCmd using the below link.
9. Finally, run this command line utility as per the given below syntax –
wolcmd [mac address] [ip address] [subnet mask] [port number]
10. For example, to resume my computer, I have to run this command –
wolcmd 001EA6267A71 192.168.1.102 255.255.255.0 9
Note – Ensure to remove “–” from the MAC address before running it.
If you are not aware of the IP address, subnet mask, then go through our tutorial on How to Detect IP Address of Router on Windows 10.
11. As the last thing, you can also generate a shortcut of wolcmd and wake up the system with a single click.
Way 2 – Using Remote Software
Another simpler way to resume a system through Wake on LAN is by using a remote software such as TeamViewer. It has a built-in support to awaken the PC. Here, we are taking Team Viewer as an example and let us go through the steps now.
- On the main screen of TeamViewer, click Extras tab and select Options.
- Under Network settings section, locate Wake on LAN option. To set it up, make a click on the Configure button that appears next to it.
- To monitor and manage things remotely, you have to first assign your device to a “TeamViewer account”.
- Follow the guidelines on the dialog and complete the setup in order to use Wake on LAN in Windows 10.
For reference, if you use Team Viewer to remotely access another system, you may like to read our tutorial on How to Connect to Teamviewer Partner Without Password.
Conclusion
For enjoying the ultimate ease of access, Microsoft adorns Windows 10 with a special feature to activate Wake on LAN in Windows 10. Though the procedure is same for but irrespective of different manufacturers, settings in BIOS are different. We have discussed probable setup options so that you can enable this feature for your Windows. If you have some more information on other important motherboards, do share with us.