What is AsusLinkNear.exe?
AsusLinkNear.exe is part of ASUS Link Near and developed by ASUSTek Computer Inc. according to the AsusLinkNear.exe version information.
AsusLinkNear.exe’s description is "ASUS Link Near"
AsusLinkNear.exe is digitally signed by ASUSTeK COMPUTER INC..
AsusLinkNear.exe is usually located in the ‘C:\Windows\System32\DriverStore\FileRepository\asussci2.inf_amd64_0bc4d1cbbe22f0db\ASUSLinkNear\’ folder.
None of the anti-virus scanners at VirusTotal reports anything malicious about AsusLinkNear.exe.
If you have additional information about the file, please share it with the FreeFixer users by posting a comment at the bottom of this page.
Vendor and version information [?]
The following is the available information on AsusLinkNear.exe:
| Property | Value |
|---|---|
| Product name | ASUS Link Near |
| Company name | ASUSTek Computer Inc. |
| File description | ASUS Link Near |
| Internal name | AsusLinkNear.exe |
| Original filename | AsusLinkNear.exe |
| Legal copyright | © ASUSTeK COMPUTER INC. All rights reserved. |
| Product version | 2.0.23.0 |
| File version | 2.0.23.0 |
Here’s a screenshot of the file properties when displayed by Windows Explorer:
| Product name | ASUS Link Near |
| Company name | ASUSTek Computer Inc. |
| File description | ASUS Link Near |
| Internal name | AsusLinkNear.exe |
| Original filename | AsusLinkNear.exe |
| Legal copyright | © ASUSTeK COMPUTER INC. All rights .. |
| Product version | 2.0.23.0 |
| File version | 2.0.23.0 |
Digital signatures [?]
AsusLinkNear.exe has a valid digital signature.
| Property | Value |
|---|---|
| Signer name | ASUSTeK COMPUTER INC. |
| Certificate issuer name | DigiCert EV Code Signing CA (SHA2) |
| Certificate serial number | 07207b3a1acb44e4dc39ebd389a96d65 |
VirusTotal report
None of the 66 anti-virus programs at VirusTotal detected the AsusLinkNear.exe file.

TCP/UDP Listening Ports [?]
AsusLinkNear.exe has been reported to listen on the following TCP/UDP ports.
| Port | Protocol | # Occurrences |
|---|---|---|
| 49669 | TCP v4 | 1 |
| 49679 | TCP v4 | 1 |
Hashes [?]
| Property | Value |
|---|---|
| MD5 | c5aa31bd2db5cf1eb25d37d591eed872 |
| SHA256 | b74285ca2f77c71f249bcf80fd2b7c22ef19128aad4efe8c1d37872afd488c55 |
Error Messages
These are some of the error messages that can appear related to asuslinknear.exe:
asuslinknear.exe has encountered a problem and needs to close. We are sorry for the inconvenience.
asuslinknear.exe — Application Error. The instruction at «0xXXXXXXXX» referenced memory at «0xXXXXXXXX». The memory could not be «read/written». Click on OK to terminate the program.
ASUS Link Near has stopped working.
End Program — asuslinknear.exe. This program is not responding.
asuslinknear.exe is not a valid Win32 application.
asuslinknear.exe — Application Error. The application failed to initialize properly (0xXXXXXXXX). Click OK to terminate the application.
What will you do with the file?
To help other users, please let us know what you will do with the file:
What did other users do?
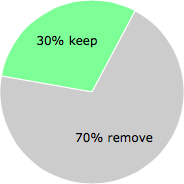
The poll result listed below shows what users chose to do with the file. 70% have voted for removal. Based on votes from 20 users.
NOTE: Please do not use this poll as the only source of input to determine what you will do with the file.
Malware or legitimate?
If you feel that you need more information to determine if your should keep this file or remove it, please read this guide.
And now some shameless self promotion 😉
Hi, my name is Roger Karlsson. I’ve been running this website since 2006. I want to let you know about the FreeFixer program. FreeFixer is a freeware tool that analyzes your system and let you manually identify unwanted programs. Once you’ve identified some malware files, FreeFixer is pretty good at removing them. You can download FreeFixer here. It runs on Windows 2000/XP/2003/2008/2016/2019/Vista/7/8/8.1/10. Supports both 32- and 64-bit Windows.
If you have questions, feedback on FreeFixer or the freefixer.com website, need help analyzing FreeFixer’s scan result or just want to say hello, please contact me. You can find my email address at the contact page.
Comments
Please share with the other users what you think about this file. What does this file do? Is it legitimate or something that your computer is better without? Do you know how it was installed on your system? Did you install it yourself or did it come bundled with some other software? Is it running smoothly or do you get some error message? Any information that will help to document this file is welcome. Thank you for your contributions.
I’m reading all new comments so don’t hesitate to post a question about the file. If I don’t have the answer perhaps another user can help you.
Full Guide: Use Asus Remote Link for PC Remote Control from Phone
Want to control your PC from phone at any time? Let’s see what is Asus Remote Link and how to Asus Remote Link for PC remote control.
By Annie ![]() / Last Updated May 23, 2023
/ Last Updated May 23, 2023
What is Asus Remote Link?
Asus Remote Link can flexibly control your desktop or laptop over WiFi or Bluetooth, and then you can use your Smartphone to control the PC apps. But it should be noted that the app only supports controlling PC that runs Windows 8.1 or later versions. See what Asus Remote Link can do:
- Turns the smartphone into a touchpad and the phone screen is the touchpad screen, recognizing a variety of gestures
- Remotely control Powerpoint presentation on the computer and control the sile from the phone.
- Change the track and adjust the volume for the computer from the phone with Media Remote feature.
- Connect your phone to your smartwatch, then control the PC from the smartwatch
How to use Asus Remote Link for PC remote control
This Asus remote control PC application supports two ways to control a computer remotely. Keep reading to learn more.
Preparation for controlling PC with Asus Remote Link:
- A smart phone with Bluetooth turned on and WiFi connected (applicable to both Android and iOS systems).
- A laptop computer with Windows 10/11 Pro system connected to the same WiFi (the desktop computer needs to be equipped with a Bluetooth module and a wireless network card).
- First install ASUS Smart Gesture on your computer. This is a smart trackpad driver that can help you control more precise gestures, including clicking, tapping, scrolling, dragging, etc.
- A smart phone (Android or iOS ) with Bluetooth turned on and WiFi connected
- A Windows 10/11 Pro laptop that is connected to the same WiFi (For desktop, it should have a Bluetooth module and a WiFi card)
- InstallASUS Smart Gesture on your computer. Asus Smart Gesture is a smart tracked driver that helps you control gestures, including clicking, tapping more preciously
- Install Asus Remote Link on your computer and smart phone.
Way 1. Asus Remote Link: control PC Windows 10/11 over Bluetooth
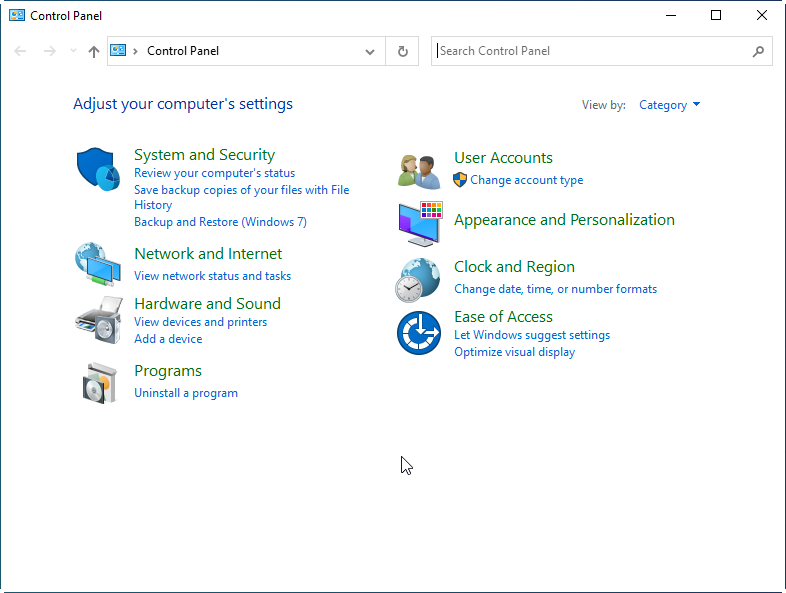
Step 1. On your computer, press Windows + R at the same time, input “control” to open Control Panel.
Step 2. Type “bluetooth” on the search box, locate“Change Bluetooth Settings” under “Device and Printer” and click it.

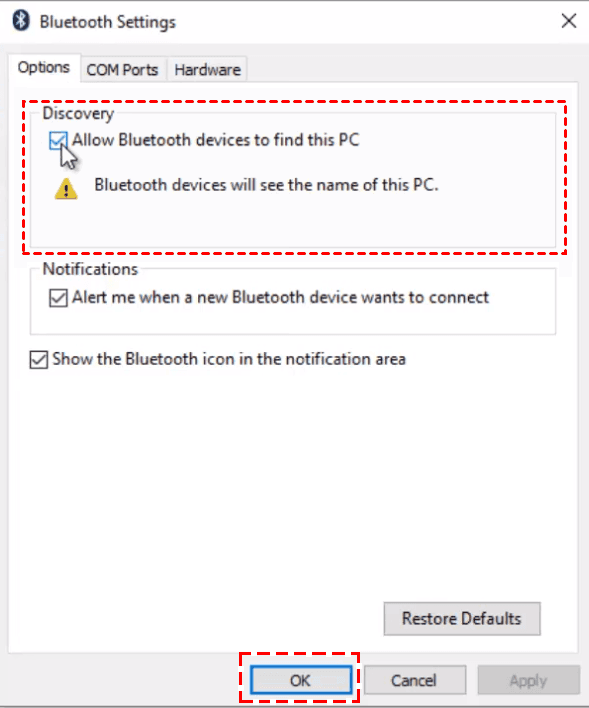
Step 3. On the “Bluetooth Settings” window, locate “Discovery”, tick “Allow Bluetooth devices to find this PC” and click “OK”.
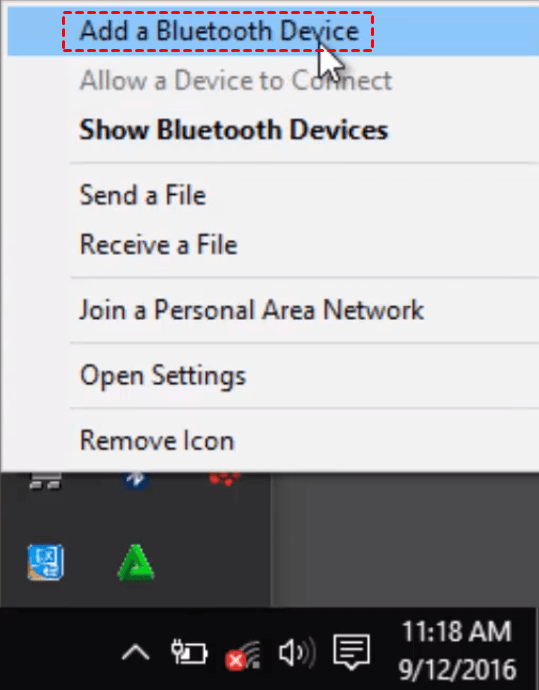
Step 4. Click “ Show hidden icon s” and right-click the “Bluetooth” icon and choose “Add a Bluetooth Device”.
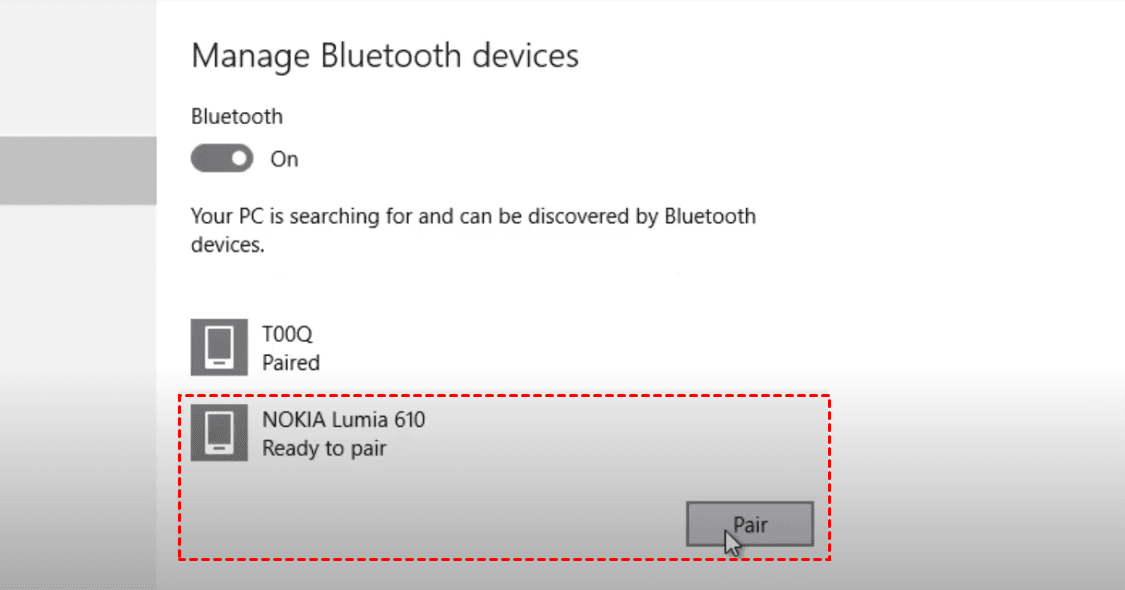
Step 5. On the “Manage Bluetooth devices “window, wait for the search until the to-be-connected phone appears. Then, choose it and click “Pair”.
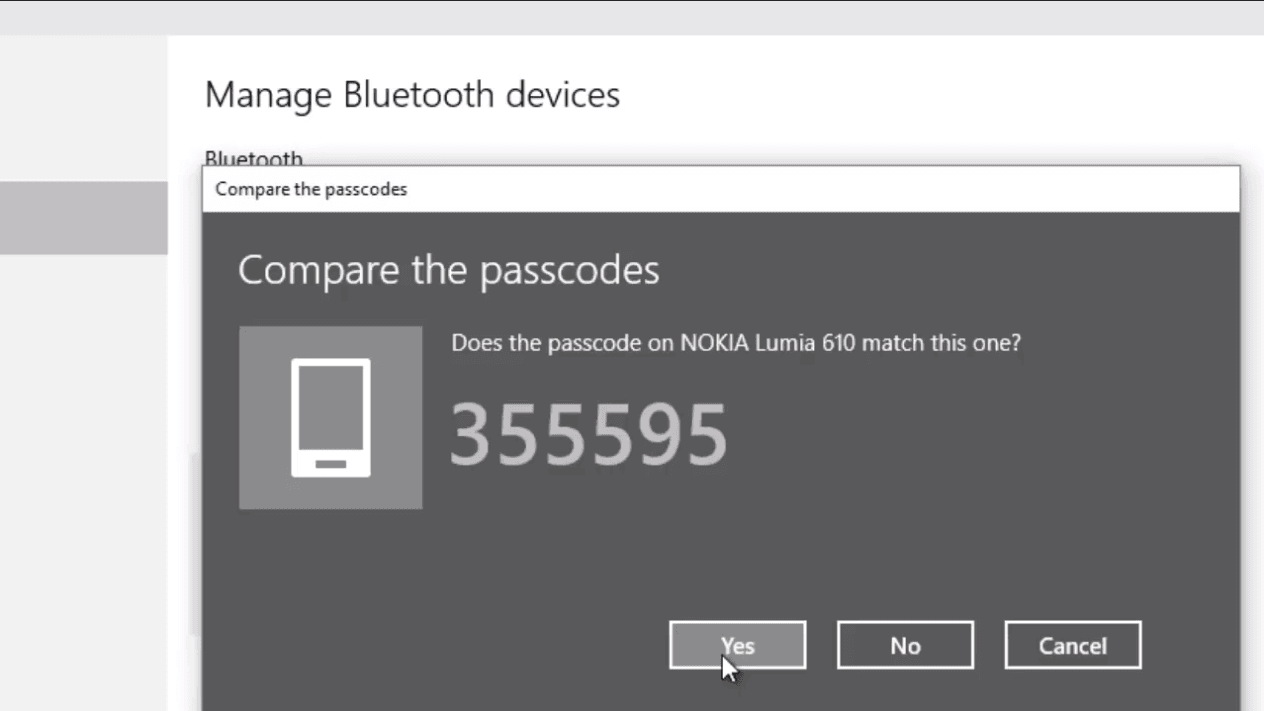
Step 6. Confirm the passcode and click “Yes” to pair.
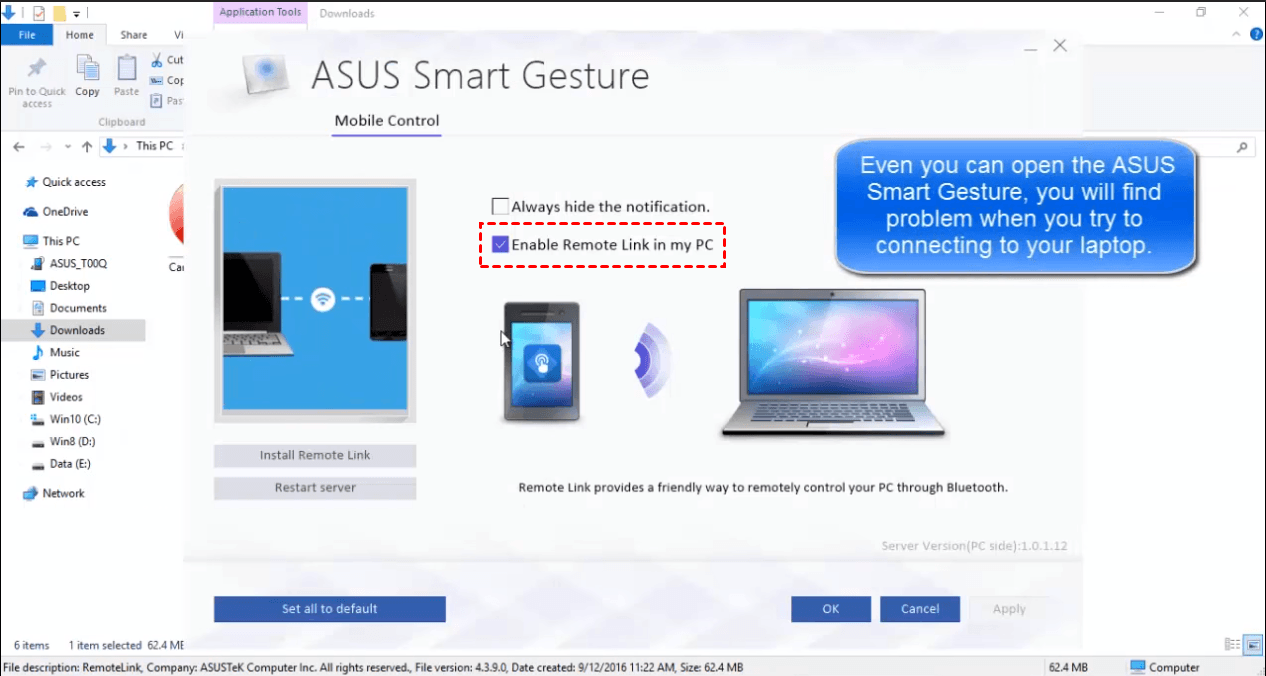
Step 7. Open ASUS Smart Gesture and make sure that “Enable REMOTE Link in my PC” is checked.
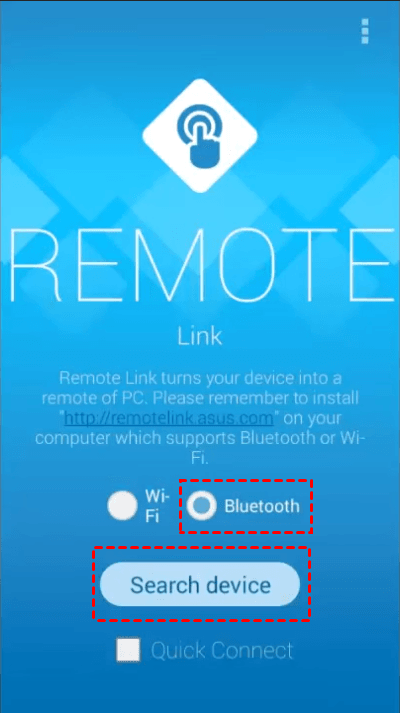
Step 8. On your mobile phone, open Asus Remote Link, choose “Bluetooth “and click “Search device”.
Step 9. Under “Select Device”, choose the computer that you want to control.
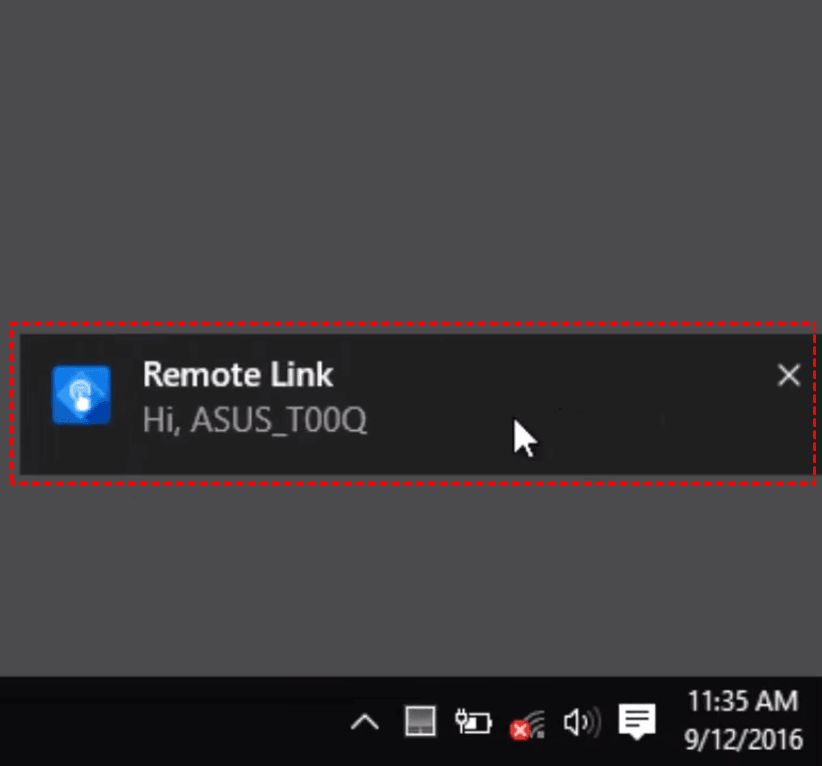
Step 10. Then, you can see that ASUS Remote Link has connected the phone to the computer successfully.
Step 11. If you want to exit, you can choose “Back to the main screen” and click “OK”.
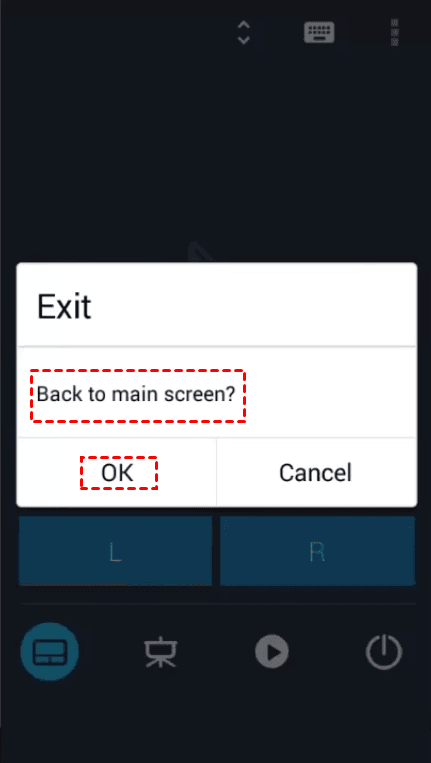
Way 2. Asus Remote Link: control PC over WiFi
Firstly, make sure that the phone and PC are connected to the same WiFi. Then, follow the steps.
Step 1. On the computer, open “ASUS Smart Gesture” and check “Enable Remote Link in my PC”.
Step 2. On the smartphone, open ASUS Remote Link, choose “WiFi” and click “Search Device”.
Step 3. After that, choose the to-be-controlled computer under ”Select Device.»
Step 4. After the remote connection is established, you can take many operations on PC, like rebooting the computer, shutting down the computer, and so on.
Asus Remote Link alternative: control PC for free
If you think it’s a little bit complicated to use Asus Remote Link for PC remote control or Asusu Remote Link isn’t working, you can use a free & safe remote access software to control a PC from an iPhone/Android device or another PC.
Get Asus Remote Link alternative for PC access and control
▶ Take full control of a computer from a phone or a PC.
▶ View remote desktop on the target computer.
▶ Secured by end-to-end ECC algorithm.
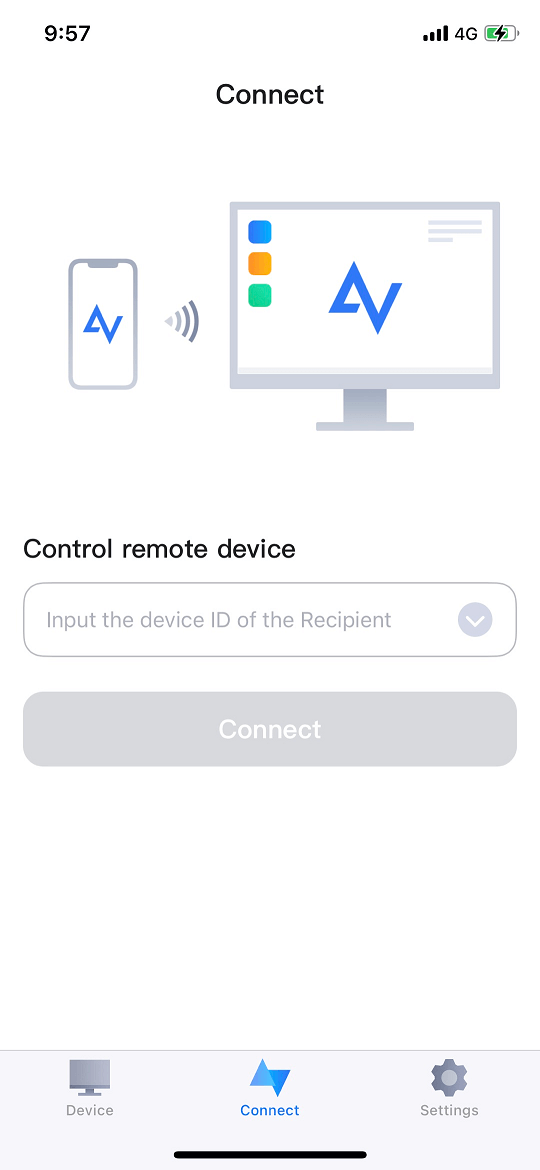
Step 1. Download, and install AnyViewer on the computer (compatible with all editions of Windows 11/10/8.1/8/7). Run it and send the device ID and the temporary security code to the mobile device.
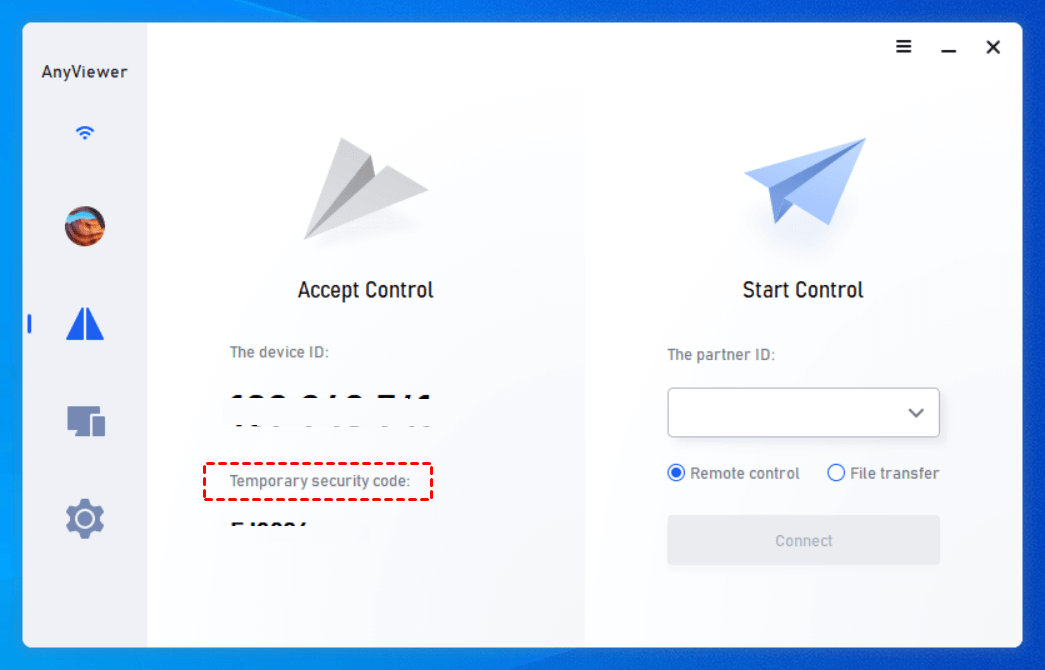
Step 2. Download AnyViewer from the Apple store on your iPhone or iPad or download AnyViewer Android installation package on your Android device. Install and run it. Then, input the device ID of the PC and click «Connect«.
Step 3. Choose «Security code» and input the temporary security code of the target computer.
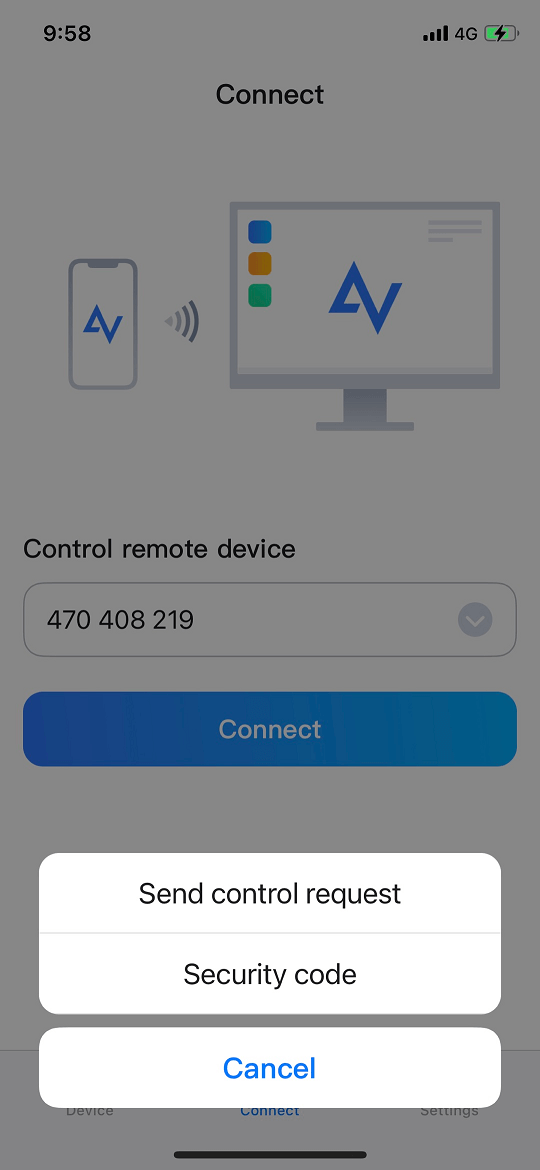
Then, you can use your iPhone, iPad, Android phone, or tablet to control the target computer remotely.
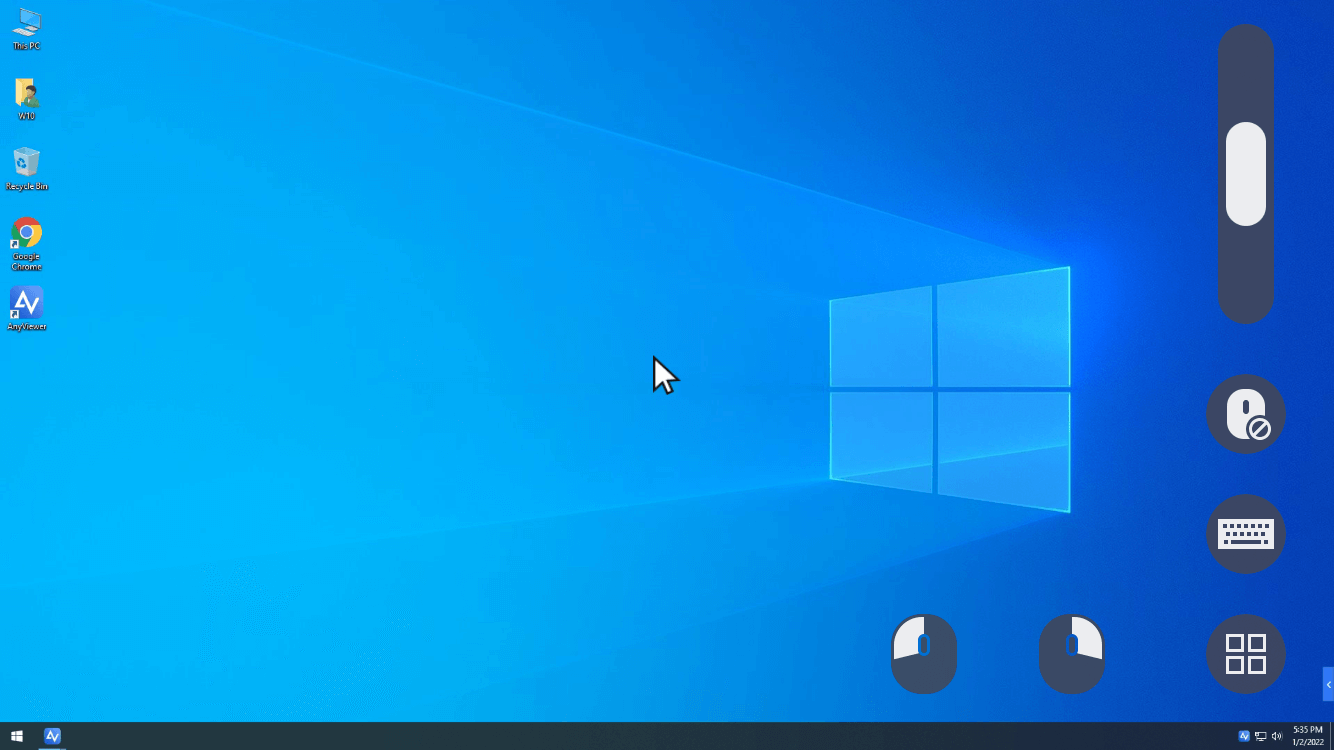
✍ Important note: It’s recommended to upgrade to an AnyViewer advanced plan. After setting up a remote connection to your Asus PC from your mobile phone, you can tap Menu and choose Privacy Mode to black the remote screen and disable the physical keyboard & mouse to prevent your remote PC from being viewed or used by others.
Wrap things up
You can use ASUS Remote Link for PC remote control. But it is a little bit complicated to use for a green hand. Thus, it’s highly recommended to use its free alternative, AnyViewer to access and control your computer from a phone or another computer.
Name already in use
ASUS-G14-Debloating / README.md
- Go to file T
- Go to line L
- Copy path
- Copy permalink
- Open with Desktop
- View raw
- Copy raw contents Copy raw contents
Copy raw contents
Copy raw contents
ASUS ROG Zephyrus G14 — Windows Debloating
Originally posted as the ASUS G14 bloatware cleanup guide here.
- _If you’d like to use a third party tool to control your G14 instead, you could use [G14ControlV2](G14ControlV2 https://github.com/aredden/electron-g14control). I haven’t tried it.
- If you only want to control fan speeds/curves, I use atrofac
- If you want to limit battery charging, I use atrofac
- If you encounter problems, see the Debugging section at the bottom
What does this do?
This guide removes all possible ASUS software (MyASUS, Armoury Crates, and other unnecessary files) while still leaving critical functions intact.
Who is this for?
Advanced users, IT professionals, enthusiasts, people who want to learn how stuff works.
I welcome other people to work on this project. Please say hello if you’d like to contribute.
What still works after this?
- Keyboard Fn keys
- Fan control (with atrofac)
- Battery charge limits (using atkacpi—thanks https://reddit/u/zllovesuki
What doesn’t work after this
- ROG RGB lighting
- AniMe Matrix Display
- None at this time! 🙂
I’ve seen many posts on how to remove ASUS / ROG / Armoury and other software from the ASUS G14 notebooks, however none of them went into the detail I wanted. So I started experimenting. Below is an extensive list for how to properly and cleanly remove almost all ASUS software, without affecting critical functions.
Frankly my laptop is 100% function-first and I prefer as little software on there as possible. I’ve never missed the ASUS software. For example why do I want my PC to be able to «Link» with nearby devices? For me—I don’t!
I’m using the WQHD G14 (2560×1440) which will probably draw more power than the FHD (1920×1080) version. However during general use my laptop sits between 5,400mW and 7,200mW of battery draw, with screen brightness on 30% and keyboard lighting on «low». This guide has reduced power usage by around 1,000mW.
This doesn’t affect performance in a noticable way. It certainly won’t reduce performance. If there is any difference, it will be a few percent improvement.
Some of the ASUS services are actually installed as drivers. So if you simply remove these drivers and services, Windows will reinstall them. This procedure will show you how to cleanly remove the services and cleanup files without triggering Windows to reinstall them.
As we know, there is also the issue of Windows Updates reinstalling things on the ASUS G14. E.g. if you update the AMD or NVIDIA drivers manually, Windows Update may reinstall the official ASUS drivers, even if it’s an older version. If this is the case, see the section ASUS drivers to block those updates from Windows Updates.
Why not just disable drivers?
A lot of people aren’t aware that disabling drivers in Device Manager also may disable the power management for those drivers (e.g. the NVIDIA USBC driver). Some devices may revert to 100% power usage when their corresponding driver is disabled, so this is not best practice.
- How to enable HIPM/DIPM power management for the SSD (see here)
- Disabled Turbo Boost for better power/heat management control (see here)
- Update the Western Digital SSD firmware using Western Digital Dashboard
- To prevent ASUS drivers from reinstalling via Windows Update use the Microsoft «Show or hide updates» troubleshooter
- Windows 10 20H2 Services that are safe to disable Disable Windows 10 20H2 services
- Ensure all Windows Updates are installed and the laptop is in a known-good state.
- I recommend you use a tool like Uninstall Tool to cleans up files missed by several of the uninstallers below.
- To install new NVIDIA and AMD drivers, I recommend installing both in «clean-up» or «clean install» mode, which deletes all the previous drivers and settings, then installing the most minimal set of drivers you need.
Disable MyAsus in BIOS
- Enter BIOS by pressing ESC during the ROG logo
- Usually under Advanced, there is an option to disable auto-downloading of MyAsus in Windows
- Uninstall Armoury Crate
- Uninstall Armoury Service
- Uninstall ASUS Calibration
- Uninstall ROG CustomHotKey
- Uninstall ASUS Framework Service
- Uninstall ASUS Gamefirst IV (supposedly a network optimizer)
- Uninstall ROG Live Service
- Uninstall ROG Font Installer (AniMe Matrix font)
- Uninstall MyASUS (used for ASUS driver and firmware updates. Remove if you prefer to manually install updates)
- Uninstall AURA
- Uninstall AURA Service
- Uninstall ASUS Aac_NBOT HAL (in Uninstall Tool this is under the System tab)
Disable Services (basic)
The ASUS Optimization service is responsible for keyboard shortcuts, so leave that running.
Note that simply disabling some services may actually cause performance issues, if things are trying to query those services and they’re not available.
- Disable ASUSSwitch (look at the folder location for this service first)
- Disable Armoury Crate Control Interface (if it wasn’t uninstalled from the above)
- Disable ASUS Link Near
- Disable ASUS Link Near Extension
- Disable AsusROGLSLService Download ROGLSLoader
- Disable ASUS Link Remote
- Disable ASUS Link Near
- Disable ASUS Software Manager
- Disable Asus System Analysis
- Disable ASUS System Diagnosis
- Disable ASUS Update Service (asus)
- Disable ASUS Update Service (asusm)
Remove ASUS Services (more advanced)
You can remove all the ASUS services except ASUS Optimization which is required for the hotkeys to work.
From an elevated command prompt run:
- sc delete ArmouryCrateControlInterface (This will delete the Amroury Crate service if it wasn’t removed by the uninstaller)
- sc delete ASUSLinkNear
- sc delete ASUSLinkNearExt
- sc delete ASUSLinkRemote
- sc delete ASUSSoftwareManager
- sc delete ASUSSystemAnalysis
- sc delete ASUSSystemDiagnosis
- sc delete asus
- sc delete asusm
- sc delete AsusROGLSLService
- sc delete AsusAppService
- sc delete ASUSSoftwareManager
Delete ASUS Scheduled Tasks
- Delete ASUS Optimization
- Delete ASUS Update Checker 2.0
- Delete AsusSystemAnalysis_
- Delete MyASUSTask
- Disable StartCN (I don’t delete this, simply because it’s AMD, not ASUS)
- Delete ASUS\ArmourySocketServer
- Delete ASUS\UpdateTaskMachineCore
- Delete ASUS\UpdateTaskMachineUA
- Delete ASUS\P508PowerAgent_sdk
- Delete the ASUS folder (right-click, Delete folder)
- Delete leftover ASUS files
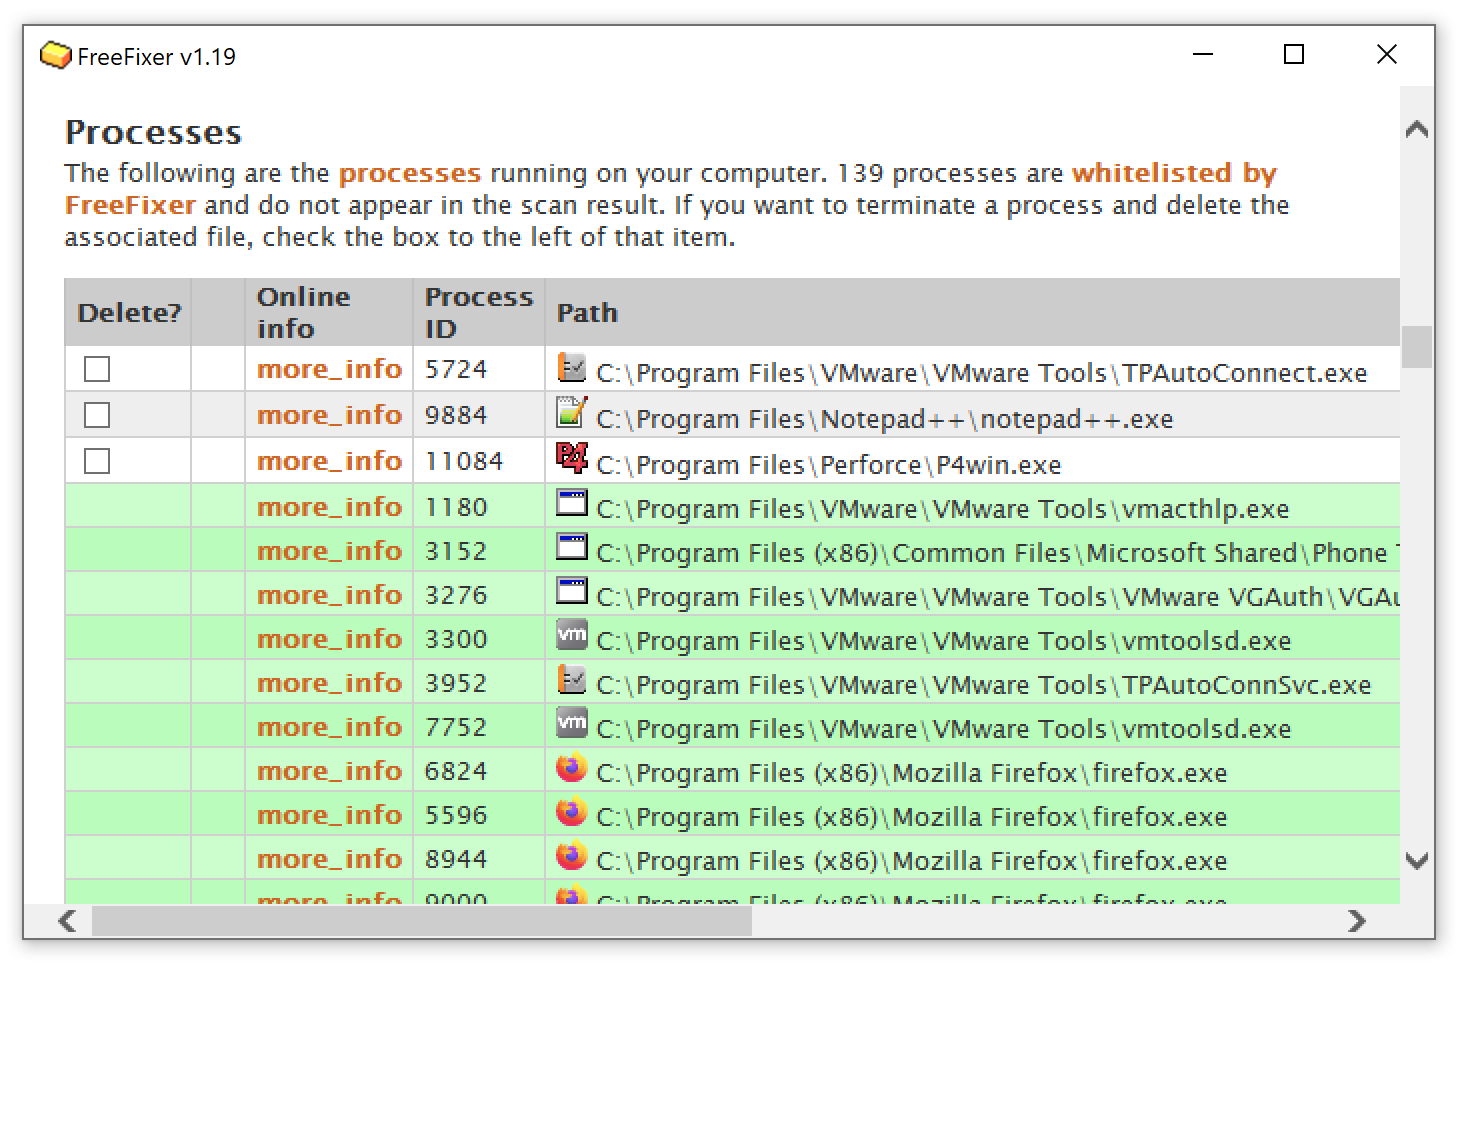
End all processes in Task Manager:
- ASUS*.exe
- Armoury*.exe
- ROG*.exe
- P50*.exe
- Delete the folder C:\Program Files (x86)\ArmouryDevice
- Delete the folder C:\Program Files (x86)\ROG Live Service
- Delete the folder C:\Program Files (x86)\Update (just be careful it belongs to ASUS)
- Delete the folder C:\Program Files (x86)\ASUS
- Delete the folder %LocalAppData%\ASUS
- Delete the folder %ProgramData%\ASUS
- Delete C:\Windows\System32\DriverStore\FileRepository\asussci2.inf_amd64_
\ (you will need to take ownership of these folders) - ASUSLinkNear
- ASUSLinkRemote
- ASUSLinkRemoteLicense
- ASUSSoftwareManager
- ASUSSystemAnalysis
- ASUSSystemDiagnosis
- . Anything else except ASUSOptimization.
- Delete the folder C:\Program Files (x86)\LightingService
- It’s safe to delete the entire folder C:\eSupport\ and contents
- It’s safe to delete the entire folder C:\Drivers\ and contents
- There were folders in C:\Windows\System32\DriverStore\FileRepository starting with armourycrate* which I deleted
- Delete C:\Program Files (x86)\ASUS (whole folder)
- Delete C:\Program Files\ASUS (whole folder)
Enable On-screen display (OSD)
Thank you to u/EbolaBoi for this tip!
To enable the OSD for the Fn buttons, set the following file: C:\Windows\System32\DriverStore\FileRepository\asussci2.inf_amd64_
Note: If you’re happy with the default Windows OSD, you don’t need to run the AsusOSD.exe.
There may also be a few asussci2.inf_amd64_

For further confirmation of using the correct file, this should also be the same file location the Asus Optimization Service runs from. You can copy this location from services.msc, i.e:
Limit maximum battery charge percent
Thanks again to u/EbolaBoi who achieved this by creating a Scheduled Task. THe reason for doing this is to conserve battery life.
- Create a new Scheduled Task called «Limit Charge at 60%» (or 80%, etc.)

- Select «Run with highest privileges»

- Configure the Trigger to «Run at login of any user»

- Configure the Trigger to «Run on a custom filter event» per this screenshot:

- Add an action > Start a program > Powershell.exe (Get-WmiObject -Namespace root/WMI -Class AsusAtkWmi_WMNB).DEVS(0x00120057, 60) (Use 60 for 60%, 80 for 80%, etc.)

- Conditions > Stop if the computer ceases to be idle, Stop if the computer switches to battery power
Note: Armoury Crate Control interface still exists in Device Manager > System devices. I’m going to leave this for now because a) it will just be reinstalled if we remove it, b) it’s likely just an endpoint for the AniMe matrix display, and doesn’t actually do anything without the Armoury Crate software installed, and c) I don’t want to cause any power management issues or use a really hacky solution. (Everything else in this procedure is pretty clean.)
1. Microphone on/off Fn key not working
In some instances, the Keyboard Firmware update (entitled «Hotfix»—ROG Keyboard Firmware Update tool V2.3.0) does not correctly install due to an error in the installall.bat script. To work around this, instead of running installall.bat , do:
- Run installer.exe as Administrator
- Run install.exe as Administrator
- Reboot
The microphone Fn key should now be working.
Note: If you have manually disabled the inbuilt microphone in the Sound Control Panel, the microphone Fn key also won’t work.
Asus link near что это за служба

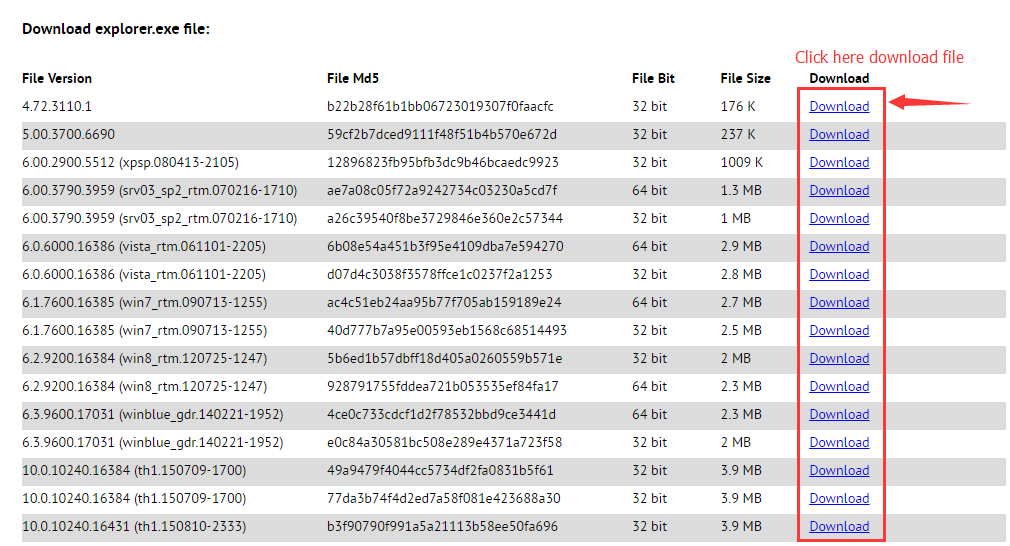
• Can’t find the version of the file you need?
• The downloaded file cannot be used due to unstable network?
You can try to use this file finder. The method is very simple. Enter the file name, and you will find many versions of this file. Select the file version you need to download, this tool will automatically download a complete file for you. Click Here Download File Finder
Your email address will not be published. Required fields are marked *
 [2023-04-17]
Sathi Babu say: After Installing the OPCEnum.EXE file unable to file the OPCEnum in the Windows Services List.sugges .
Reply: It could be a permission issue. Before installing the program, you should use administrator privileg …view >>>
[2023-04-13]
Manuel Rivera say: Hello everyone, I am migrating my project to PB2022 and I find the library pfccom32.dll that I need .
Reply: If you are trying to compile your code into a 64-bit program, it is not as simple as just replacing …view >>>
[2023-04-11]
Dewey Ballard Sr. say: I can’t delete (.exe > from my computer and it has been a pain in my a##. Can someone explain how t .
Reply: This issue cannot be solved simply by deleting the file. It is highly likely that your computer has …view >>>
[2023-04-04]
Kaiser say: How do i remove that from my pc?
Reply: This is a driver file and cannot be manually deleted. If you do so, it may cause system crashes. You …view >>>
[2023-03-30]
Reussian say: HelloI need urgent help with decrypting my iswr files , your help will be much appreciated thank you .
Reply: Hello, I am unable to help you decrypt this file because the software used irreversible encryption. …view >>>
[2023-03-25]
Olaniyi Abraham say: Hi, please I lost a bin file for my GTA 5, installation won’t start, the file name is Data_xe.bin an .
Reply: I’m not sure if this is the version number you are looking for. If it is not, I currently have not f …view >>>