Align text
Text can be aligned with one or both edges (or insets) of a text frame. Text is said to be justified when it is aligned with both edges. You can choose to justify all text in a paragraph excluding the last line (Justify Left or Justify Right), or you can justify text in a paragraph including the last line (Justify All). When you have only a few characters on the last line, you may want to use a special end-of-story character and create a flush space.

When you justify all lines of text and you are using the Adobe Paragraph Composer, InDesign shifts text to ensure that the paragraph has consistent text density and is visually appealing. You can fine-tune spacing in justified text.
When you set center or justify for text in a frame grid, the text will no longer align exactly with the grid. You can also specify paragraph alignment for all the paragraphs in the frame grid.
When you apply Align Towards Spine to a paragraph, text on a left-hand page is right-aligned, but when the same text flows onto (or if the frame is moved to) a right-hand page, it becomes left aligned. Similarly, when you apply Align Away From Spine to a paragraph, text on a left-hand page is left aligned, while text on a right-hand page is right aligned.
In vertical frames, aligning to or away from the spine has no effect, since text alignment is parallel to the spine direction.
If you want the left side of a line of text to be left-aligned and the right side to be right-aligned, position the insertion point where you want to right-align the text, press Tab, and then right-align the rest of the line.
Align paragraphs to a baseline grid
The baseline grid represents the leading for body text in a document. You can use multiples of this leading value for all elements of the page to ensure that text always lines up between columns and from page to page. For example, if the body text in your document has 12‑point leading, you could give your heading text 18‑point leading and add 6 points of space before the paragraphs that follow the headings.
Using a baseline grid ensures consistency in the location of text elements on a page. You can adjust the leading for the paragraph to ensure that its baselines align to the page’s underlying grid. This is useful if you want the baselines of text in multiple columns or adjacent text frames to align. Change settings for the baseline grid by using the Grids section of the Preferences dialog box.
You can also align only the first line of a paragraph to the baseline grid, allowing the rest of the lines to follow the specified leading values.
To view the baseline grid, choose View > Grids & Guides > Show Baseline Grid.
The baseline grid is visible only if the document zoom level is greater than the view threshold setting in Grids Preferences. You may need to zoom in to view the baseline grid.
Выключка по формату: примеры, ошибки, как сделать

Особой требовательностью к набору отличались первопечатные книги. Вот, например, Николай Йенсон, 1474:
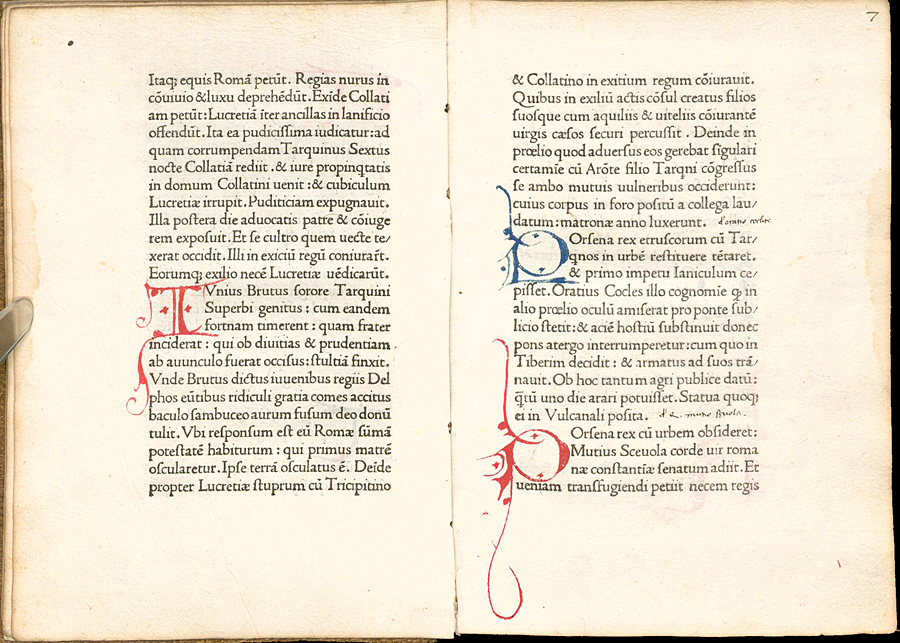
А это Альд Мануций, 1499:

Равномерные межбуквенные и межсловные пробелы делают набор однородно серым. В нем нет ни дыр, ни темных пятен. Тон полосы спокойный, прозрачный и легкий (определения Дмитрия Карпова).
Плохо
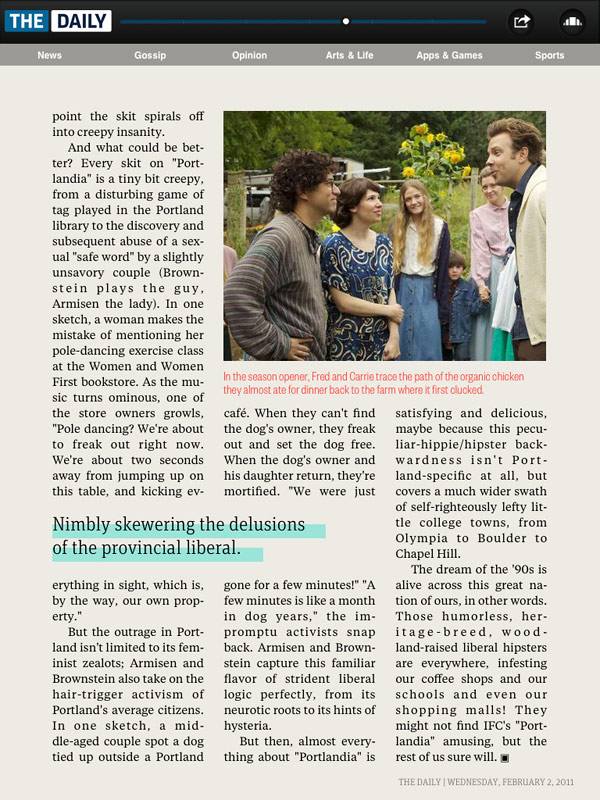
Плохи любые попытки сделать полную выключку в вебе и на мобильных устройствах. Компьютеры еще не научились правильно расставлять переносы и следить за величиной пробелов. Издание The Daily для айпада:
Здесь лучше, но текст всё равно слишком разреженный:
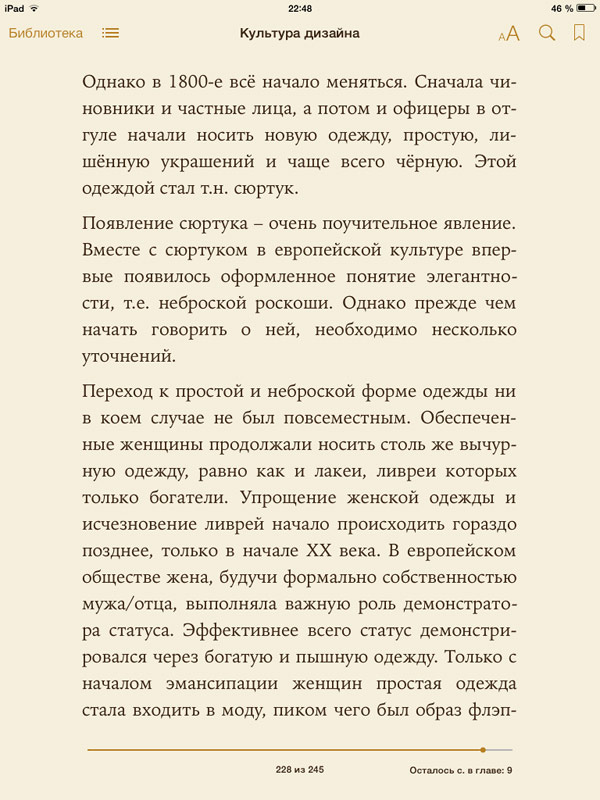
Полная выключка всегда работает плохо на узком формате. Тут необходим левый флаг или центровка:

Ошибки
Выключка по формату — неестественная форма существования текста, отсюда и многочисленные сложности. Ошибки, перечисленные в памятке, делятся на два вида: первые нарушают тон полосы (разреженные и сжатые строки), вторые — ее прямоугольность (висячие и концевые строки).
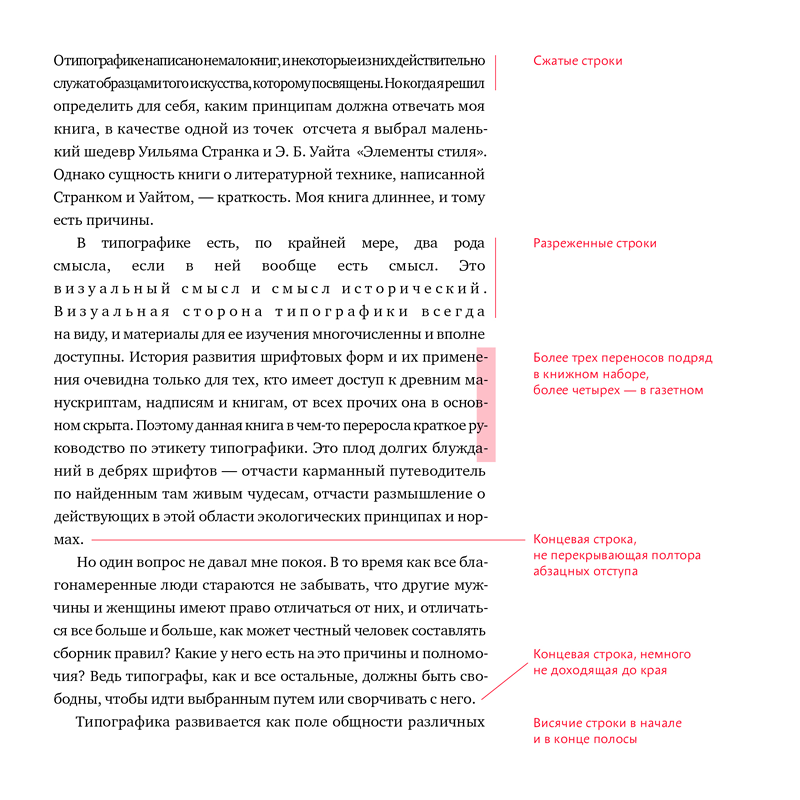
Висячие предлоги, союзы и другие короткие слова не являются ошибкой при полной выключке. Ими жертвуют ради однородного тона. Исключение составляют:
— однобуквенные слова в начале предложения,
— инициалы,
— маркеры списка (цифровые, буквенные и графические),
— сокращения вроде т. е., т. к., и т. д., и др.,
— цифры.

Как сделать в Индизайне
В первую очередь настраиваем вкладку Justification. Межсловное расстояние в интервале от 95 до 130%, межбуквенное — от −3 до 6%. Обратите внимание, что минимальное значение несильно отклоняется от желаемого (Desired): сжатые строки читать труднее, чем разреженные. Разрешаем масштабировать символы, но совсем чуть-чуть, от 99 до 101%:
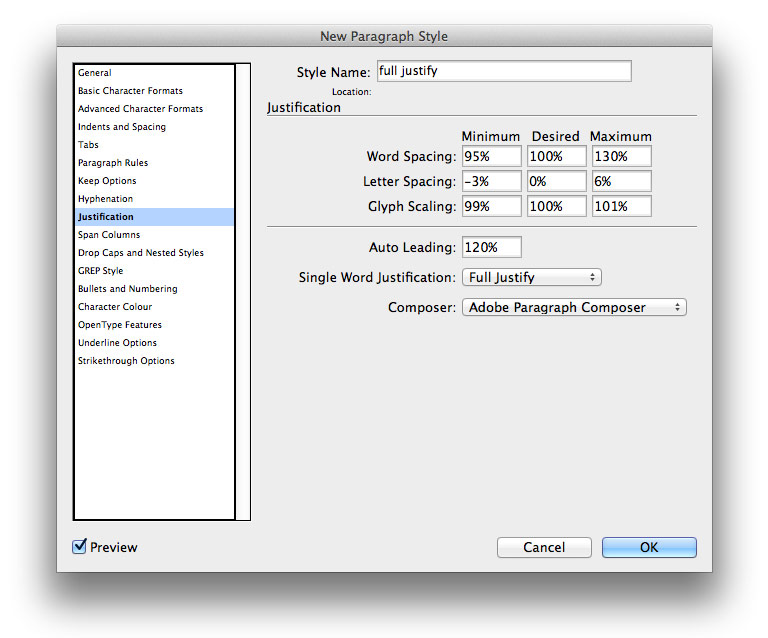
Эти цифры получены опытным путем и лучше всего подходят для книжного набора: 50–60 символов в строке. Для узкой колонки правила нужно ослабить.
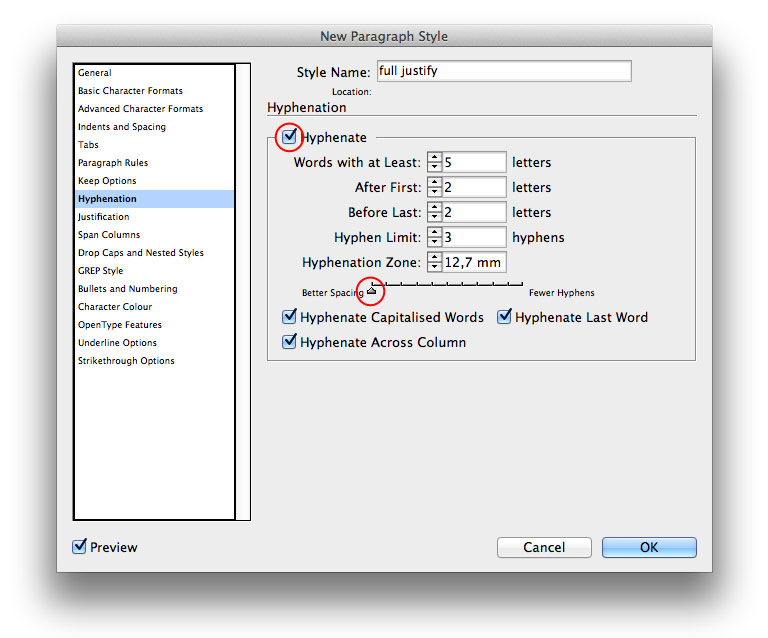
Обязательно включаем переносы во вкладке Hyphenation. Ползунок выкручен в сторону Better Spacing:
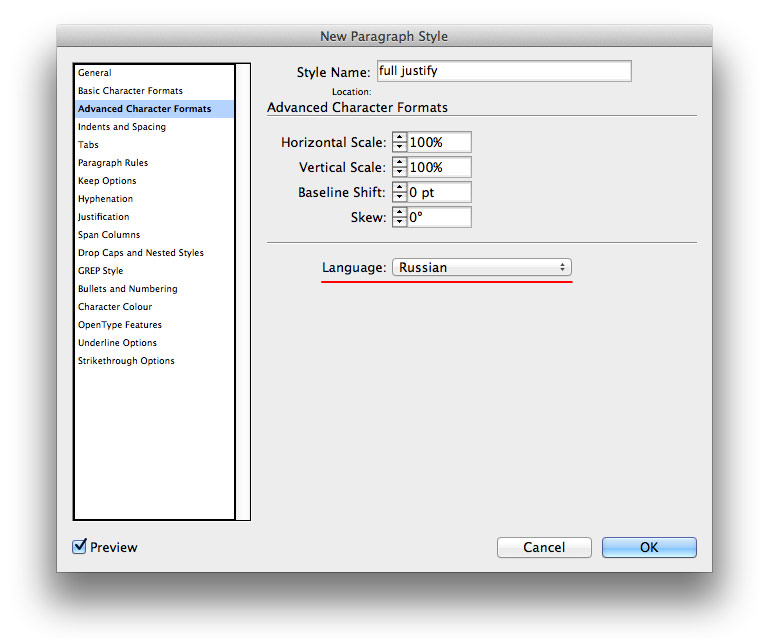
Если не включаются, значит, выбран не тот язык:
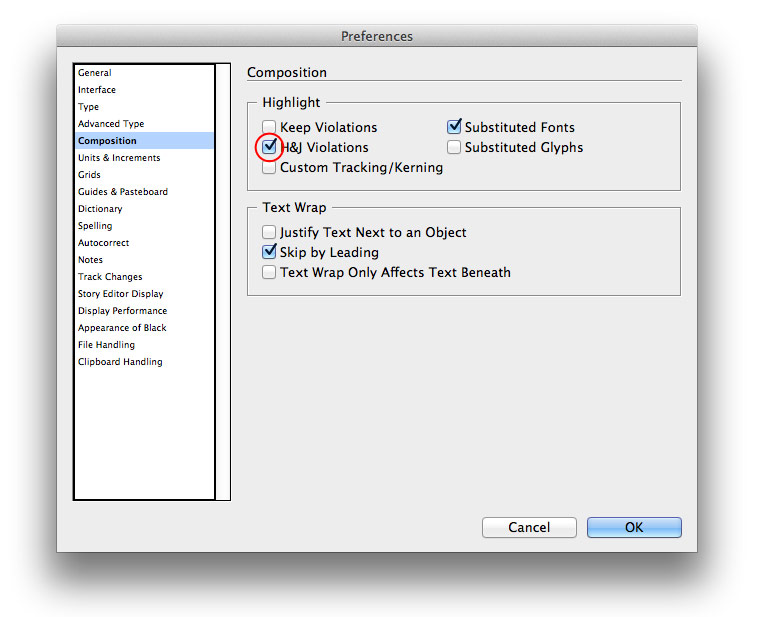
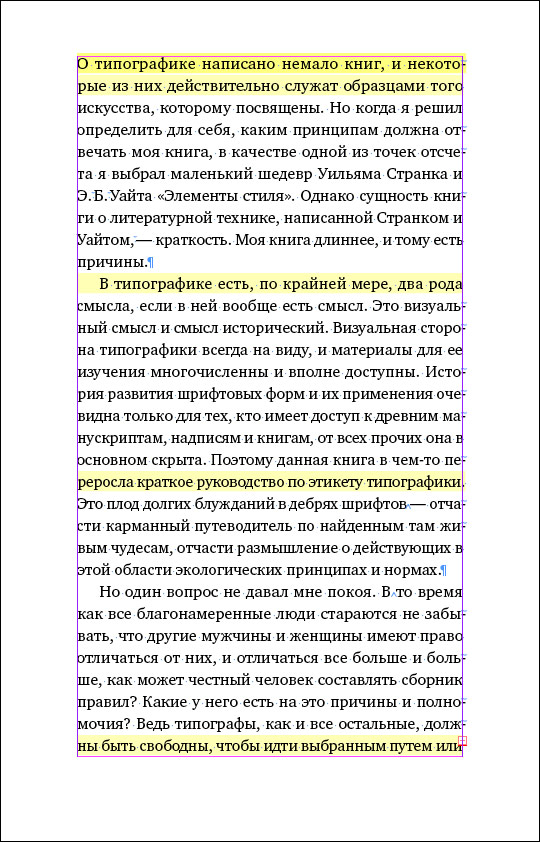
Галочка H&J Violations в панели Preferences подсветит желтым строчки, которые Индизайн не может разверстать по заданным цифрам:
Перечисленные выше настройки уже дадут сносный результат:
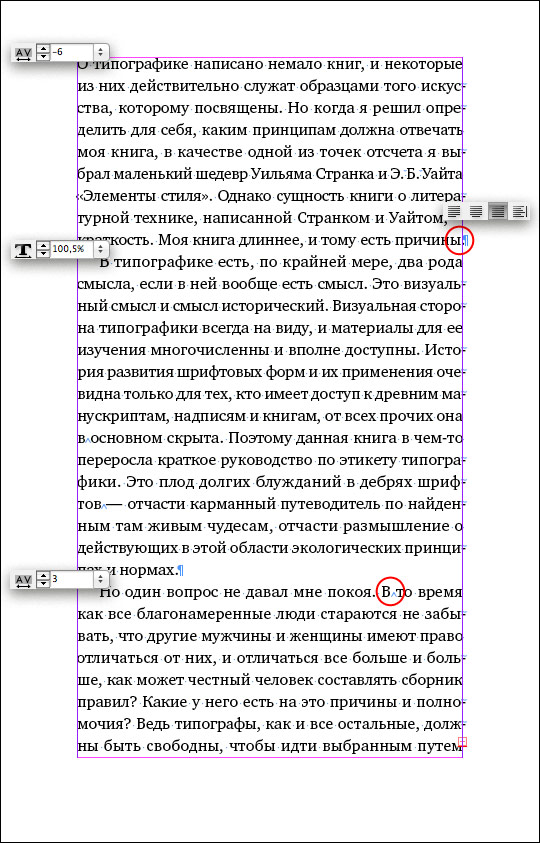
Дальше работаем руками — двигаем строки в проблемных абзацах. Есть несколько способов:
1. Иногда достаточно изменить место переноса в каком-нибудь слове — поставить символ мягкого переноса. Чтобы слово стало неразрывным, мягкий перенос должен стоять перед первой буквой.
Мак: Command + Shift + — (дефис)
Винда: Ctrl + Shift + —
2. Если переносы не помогли, крутим трекинг от −10 до 10 единиц. Трекинг увеличивает или уменьшает все пробелы в строке: и между словами, и между буквами. На горячих клавишах у Индизайна слишком большой шаг, поэтому я ими не пользуюсь.
Плюс 20 единиц:
Option + → (стрелка вправо)
Alt + →
Минус 20 единиц:
Option + ← (стрелка влево)
Alt + ←
3. Можно менять только межсловные пробелы, не трогая межбуквенные.
Плюс 20 единиц:
Command + Option + \ (бэкслеш)
Ctrl + Alt + \
Минус 20 единиц:
Command + Option + Delete
Ctrl + Alt + Backspace
4. Еще одно средство — масштабирование шрифта от 99 до 101%.
5. В сложных случаях слегка растягиваем или сужаем текстовый фрейм — не более, чем на 1–2 мм. (Этого никто не заметит.)
Изменения должны касаться всего абзаца, а не отдельных строк, потому что Индизайн «думает» об абзаце целиком и учитывает соседние строки. То есть сначала выделяем весь абзац, а потом крутим настройки.
С концевыми и висячими строками также справляемся с помощью вгонки и выгонки. Концевую строку, немного не доходящую до края, втягиваем, чтобы пробел стал более внятным, либо доводим до правой границы (см. первый абзац на предыдущей картинке). О допустимости висячих строк можно долго спорить, однако в традиционной книжной верстке они запрещены.
Нельзя менять интерлиньяж и добавлять пробелы между абзацами. Как говорит Брингхерст, «такие фокусы разрушают ткань текста и… поражают книгу в самое сердце».
В конце еще раз внимательно смотрим на полосу, особенно на правый край. Проверяем правильность переносов.
nobelfaik
Памятка верстальщика вызвала большой резонанс, но, судя по комментариям в ЖЖ и на Awdee, мало кто понимает, почему всё именно так, как я нарисовал. Попробую объяснить на примерах. Сегодня речь пойдет о выключке по формату.
Хорошо
Особой требовательностью к набору отличались первопечатные книги. Вот, например, Николай Йенсон, 1474:

А это Альд Мануций, 1499:

Равномерные межбуквенные и межсловные пробелы делают набор однородно серым. В нем нет ни дыр, ни темных пятен. Тон полосы спокойный, прозрачный и легкий (определения Дмитрия Карпова).

Плохо
Плохи любые попытки сделать полную выключку в вебе и на мобильных устройствах. Компьютеры еще не научились правильно расставлять переносы и следить за величиной пробелов. Издание The Daily для айпада:

Здесь лучше, но текст всё равно слишком разреженный:

Полная выключка всегда работает плохо на узком формате. Тут необходим левый флаг или центровка:

Ошибки
Выключка по формату — неестественная форма существования текста, отсюда и многочисленные сложности. Ошибки, перечисленные в памятке, делятся на два вида: первые нарушают тон полосы (разреженные и сжатые строки), вторые — ее прямоугольность (висячие и концевые строки).

Висячие предлоги, союзы и другие короткие слова не являются ошибкой при полной выключке. Ими жертвуют ради однородного тона. Исключение составляют:
— однобуквенные слова в начале предложения,
— инициалы,
— маркеры списка (цифровые, буквенные и графические),
— сокращения вроде т. е., т. к., и т. д., и др.,
— цифры.

Как сделать в Индизайне
В первую очередь настраиваем вкладку Justification. Межсловное расстояние в интервале от 95 до 130%, межбуквенное — от −3 до 6%. Обратите внимание, что минимальное значение несильно отклоняется от желаемого (Desired): сжатые строки читать труднее, чем разреженные. Разрешаем масштабировать символы, но совсем чуть-чуть, от 99 до 101%:
Эти цифры получены опытным путем и лучше всего подходят для книжного набора: 50–60 символов в строке. Для узкой колонки правила нужно ослабить.
Обязательно включаем переносы во вкладке Hyphenation. Ползунок выкручен в сторону Better Spacing:
Если не включаются, значит, выбран не тот язык:
Галочка H&J Violations в панели Preferences подсветит желтым строчки, которые Индизайн не может разверстать по заданным цифрам:
Перечисленные выше настройки уже дадут сносный результат:

Дальше работаем руками — двигаем строки в проблемных абзацах. Есть несколько способов:
1. Иногда достаточно изменить место переноса в каком-нибудь слове — поставить символ мягкого переноса. Чтобы слово стало неразрывным, мягкий перенос должен стоять перед первой буквой.
2. Если переносы не помогли, крутим трекинг от −10 до 10 единиц. Трекинг увеличивает или уменьшает все пробелы в строке: и между словами, и между буквами. На горячих клавишах у Индизайна слишком большой шаг, поэтому я ими не пользуюсь.
Плюс 20 единиц:
Option + → (стрелка вправо)
Alt + →
Минус 20 единиц:
Option + ← (стрелка влево)
Alt + ←
3. Можно менять только межсловные пробелы, не трогая межбуквенные.
Плюс 20 единиц:
Command + Option + \ (бэкслеш)
Ctrl + Alt + \
Минус 20 единиц:
Command + Option + Delete
Ctrl + Alt + Backspace
4. Еще одно средство — масштабирование шрифта от 99 до 101%.
5. В сложных случаях слегка растягиваем или сужаем текстовый фрейм — не более, чем на 1–2 мм. (Этого никто не заметит.)
Изменения должны касаться всего абзаца, а не отдельных строк, потому что Индизайн «думает» об абзаце целиком и учитывает соседние строки. То есть сначала выделяем весь абзац, а потом крутим настройки.

С концевыми и висячими строками также справляемся с помощью вгонки и выгонки. Концевую строку, немного не доходящую до края, втягиваем, чтобы пробел стал более внятным, либо доводим до правой границы (см. первый абзац на предыдущей картинке). О допустимости висячих строк можно долго спорить, однако в традиционной книжной верстке они запрещены.
Нельзя менять интерлиньяж и добавлять пробелы между абзацами. Как говорит Брингхерст, «такие фокусы разрушают ткань текста и. поражают книгу в самое сердце».
В конце еще раз внимательно смотрим на полосу, особенно на правый край. Проверяем правильность переносов.
Controlling Hyphenation and Justification
Hyphenation is the placement of hyphens between syllables in words that don’t completely fit at the end of a line of text ‚ a signal to the reader that the word continues on the next line. InDesign gives you the option to hyphenate or not hyphenate paragraphs, and if you choose to hyphenate , you can customize the settings that determine when and where hyphens are inserted.
Justification is the addition or removal of space between words and/or letters that produces the flush-left/flush-right appearance of justified paragraphs. InDesign’s justification controls let you specify how space is added or removed when paragraphs are justified.
If your pages will contain columns of text, you’ll have to decide whether to use left-aligned or justified paragraphs and whether you want to hyphenate words that don’t entirely fit at the end of a line. As mentioned earlier, if you justify paragraphs, you’ll almost certainly want to hyphenate them, too. If you opt for left-aligned paragraphs, whether to hyphenate is a personal choice.
InDesign offers two hyphenation methods : manual and automatic.
Manual hyphenation
If you want to break a particular word differently from the way InDesign would normally break the word, you can place a discretionary hyphen in the word. If the word falls at the end of a line in a hyphenated paragraph, InDesign will use the discretionary hyphen to split the word if the first syllable fits on the line. To insert a discretionary hyphen, use the shortcut Shift+ z +- (hyphen) or Ctrl+Shift+- (hyphen) in the text where you want the hyphen to appear.
If you place a discretionary hyphen in a word, InDesign will break the word only at that point (or not break it at all). But you can place multiple discretionary hyphens within a single word; InDesign will use the one that produces the best results.
InDesign uses discretionary hyphens only if you have checked the Hyphenate check box in the Paragraph pane or in the Control palette. If Hyphenate is not checked, neither manual nor automatic hyphenation is applied.
Automatic hyphenation
To automatically hyphenate selected paragraphs, all you have to do is check the Hyphenate check box in the Paragraph pane or Control palette. (The Hyphenate check box is displayed only if you choose Show Options from the palette menu.)
If you choose to hyphenate paragraphs, you can control how hyphenation is accomplished via the Hyphenation option in the palette menu. When you choose Hyphenation, the Hyphenation dialog box, shown in Figure 18-5, is displayed.
Here’s a brief description of each option:
Hyphenate check box: This is a duplicate of the Hyphenate check box in the Paragraph pane and Control palette. If you didn’t check it before opening the Hyphenation dialog box, you can check it here.
Words with at Least Letters: Here, you specify the number of letters in the shortest word you want to hyphenate. For example, if you specify four letters, mama can be hyphenated, but any can’t be.
After First Letters: Here, you specify the minimum number of characters that can precede a hyphen. If you enter 2, for example, the word atavistic can be broken after at. If you specify 3, atavistic cannot be broken until after ata.
Before Last Letters: This field is similar to After First Letters, but it determines the minimum number of characters that can follow a hyphen.
Hyphenation Limit: Specify the number of consecutive lines that can be hyphenated in this field. Some designers limit the number of consecutive hyphens to two or three because they believe that too many consecutive hyphens produce an awkward , ladder-like look. If the Hyphenation Limit value you enter prevents hyphenation in a line that would otherwise be hyphenated, the line may look more spaced out than surrounding lines.
Hyphenation Zone: This field applies only to nonjustified text and only when the Adobe Single-Line Composer option is selected (in the Paragraph pane’s palette menu). A hyphenation point must fall within the distance specified in this field to be used. Otherwise-acceptable hyphenation points that do not fall within the specified hyphenation zone are ignored. You can also use the slider below the field to select a value rather than enter a value in this field.
Hyphenate Capitalized Words: Select this option to break capitalized words, such as proper names and the first word of sentences. If you don’t check this box, a capitalized word that would otherwise be hyphenated will get bumped to the next line, possibly producing excessive spacing in the previous line.
Consider changing the After First Letters hyphenation setting to 2 if you have narrow columns or large text. Although many typographers object to two-letter hyphenation ‚ as in ab-dicate or ra-dar ‚ it often looks better than text with large gaps caused by the reluctance to hyphenate such words. Hyphenation also makes sense for many words that use two-letter prefixes such as in-, re-, and co-.
Although I advocate two-letter hyphenation at the beginning of a word, I prefer three-letter hyphenation at the end (set via Before Last Letters). Except for words ending in -ed and sometimes -al, most words don’t lend themselves to two-letter hyphenation at the end of the word. Part of this is functional ‚ it’s easy for readers to lose two letters beginning a line. I prefer two-letter hyphenations at the end of a word only when the alternative is awkward spacing. As with all typography, this ultimately is a personal or house style choice.
Regardless of the two- versus three-letter debate, words broken using minimum settings of 1 look awful . They also go against reader expectations, because the norm is to have several letters after a hyphen. Never use a minimum setting of 1 for After First Letters. If you do, you get hyphenations such as A-sia , a-typical , and u-niform that simply look terrible in print. They also don’t provide enough context for the reader to anticipate the rest of the word. Likewise, never use a minimum of 1 for Before Last Letters because you get hyphenations such as radi-o .
When you’re done specifying hyphenation settings in the Hyphenation dialog box, click OK to close the dialog box and return to your document.
You can prevent a particular word from being hyphenated by highlighting it and choosing No Break from the Control palette or from the palette menu of the Character pane (Window ‚ Type & Tables ‚ Character, or z +T or Ctrl+T) or by placing a discretionary hyphen (Shift+ z +- [hyphen] or Ctrl+Shift+- [hyphen]) in front of the first letter.
Justifications controls
InDesign provides three options for controlling how justification is achieved: You can
Condense or expand the width of spaces, or spacebands, between words.
Add or remove space between letters.
Condense or expand the width of characters, or glyphs.
The options in the Justification dialog box, shown in Figure 18-6, let you specify the degree to which InDesign will adjust normal word spaces, character spacing, and character width to achieve justification. You access this dialog box via the palette menu in the Control palette or in the Paragraph pane, or by pressing Option+Shift+_ z +J or Ctrl+Alt+Shift+J. Although you can use the Justification controls on selected paragraphs, in most cases you will specify Justification settings when you create style sheets, particularly your body-text style sheets.
Here’s a brief description of each option:
Word Spacing: Enter the percentage of a spaceband character that you want to use whenever possible in the Desired field. (The default value is 100%, which uses a font’s built-in width.) Enter the minimum acceptable percentage in the Minimum field; enter the maximum acceptable percentage in the Maximum field. The smallest value you can enter is 0%; the largest is 1000%. Some designers are adamant that only word spaces ‚ not letter spaces ‚ should be adjusted when justifying text. Others allow small adjustments to letter spacing as well.
Letter Spacing: The default value of 0% in this field uses a font’s built-in letter spacing. In the Desired field, enter a positive value to add space (in increments of 1% of an en space) between all letter pairs; enter a negative value to remove space. Enter the minimum acceptable percentage in the Minimum field; enter the maximum acceptable percentage in the Maximum field.
Glyph Scaling: The default value of 100% uses a character’s normal width. In the Desired field, enter a positive value to expand all character widths; enter a negative value to condense character widths. Enter the minimum acceptable percentage in the Minimum field; enter the maximum acceptable percentage in the Maximum field. Some designers adamantly contend that scaling characters is even more unacceptable than letter spacing, while others see no harm in scaling characters, as long as it’s kept to a minimum. If you do apply glyph scaling, it’s best to keep it to a range of 97 to 103 percent at most.
Word spacing ‚ the space between words ‚ is another important contributor to the aesthetics of a document. Think about it: If the words in a sentence are too close to one another, comprehension may be affected because of the difficulty in telling where one word ends and another begins. If the words are too far apart, the reader might have a difficult time following the thought that’s being conveyed.
Here’s a design rule I like to follow: The wider the column, the more space you can add between words. This is why books tend to have more word spacing than magazines. Like all other typographic issues, there’s a subjective component to picking good word spacing. Experiment to see what works best in your documents.
I suggest 85 percent minimum, 100 percent optimum, and 150 percent maximum for word spacing; and ‚ 5 percent minimum, 0 percent optimum, and 10 percent maximum for letter spacing. I prefer minimum settings that are less than the optimum because they help text fit more easily in narrow columns. These settings work well for most newsletters and magazines output on an imagesetter. At the same time, I usually leave the maximum word spacing at 150 percent.
When specifying values in the Justification dialog box, Minimum values must be smaller than Desired values, which in turn must be smaller than Maximum values.
If you use the Multi-Line Composer option (explained in the next section) for justified paragraphs, specifying a narrow range between minimum and maximum Word Spacing, Letter Spacing, and Glyph Scaling will generally produce good-looking results. However, if you choose the Single-Line Composer option, a broader range between Minimum and Maximum gives the composer more leeway in spacing words and letters and hyphenating words and can produce better-looking results. The best way to find out what values work best for you is to experiment with several settings. Print out hard copies and let your eyes decide which values produce the best results.
A paragraph’s justification settings are applied whether the paragraph is justified or not. However, for nonjustified paragraphs, only the Desired values for Word Spacing, Letter Spacing, and Glyph Scaling are used.
The Auto Leading field in the Justification dialog box lets you specify a custom value for Auto Leading (covered in Chapter 17). In InDesign, this is a character-level format, even though it rightfully should be a paragraph format. Although it’s great that InDesign also makes it available in this paragraph-oriented dialog box, it’s a bit hidden here. Plus, it’s too bad you can’t specify an actual number of points (such as +2 to indicate 2 points of leading more than the text size ), which is how leading is traditionally calculated.
Composing text
The Paragraph pane’s palette menu offers two choices for implementing the hyphenation and justification settings you’ve established: the Adobe Single-Line Composer and the Adobe Multi-Line Composer. (These are also available in the Justification dialog box covered in the previous section.)
Adobe Single-Line Composer
In the past, programs like QuarkXPress and PageMaker have used single-line composition methods to flow text. This method marches line by line through a paragraph and sets each line as well as possible using the applied hyphenation and justification settings. The effect of modifying the spacing of one line on the lines above and below is not considered in single-line composition. If adjusting the space within a line causes poor spacing on the next line, tough luck. When you use the Adobe Single-Line Composer, the following rules apply:
Adjusting word spacing is preferred over hyphenation.
Hyphenation is preferred over glyph scaling.
If spacing must be adjusted, removing space is preferred over adding space.
Adobe Multi-Line Composer
InDesign’s Adobe Multi-Line Composer, which is selected by default, takes a broader approach to composition by looking at several lines at once. If a poorly spaced line can be fixed by adjusting the spacing of a previous line, the Multi-Line Composer will reflow the previous line. The Multi-Line Composer is governed by the following principles:
The evenness of letter spacing and word spacing is the highest priority. The desirability of possible breakpoints is determined by how much they cause word and letter spacing to vary from the Desired settings.
Uneven spacing is preferred to hyphenation. A breakpoint that does not require hyphenation is preferred over one that does.
All possible breakpoints are ranked, and good breakpoints are preferred over bad ones.
The multiline composer is more sophisticated than the single-line option, offering generally better overall spacing since it will sacrifice optimal spacing a bit on one line to prevent really bad spacing on another, something the single-line method does not do.
However, there is one frustration dealing with the multiline composer: When you try to edit text or play with tracking to get rid of an orphan or widow, the multiline composer keeps adjusting the text across several lines, often counteracting your nips and tucks. The single-line composer doesn’t do that.