How to use JDBC to connect database in Java project
When working with Java applications, reading and writing data to a relational database is a must-have skill that we need to know. So, in this article, we will learn how to connect our java application to database based on JDBC.
Let’s get started.
Table of contents
How to connect a JDBC driver to the database
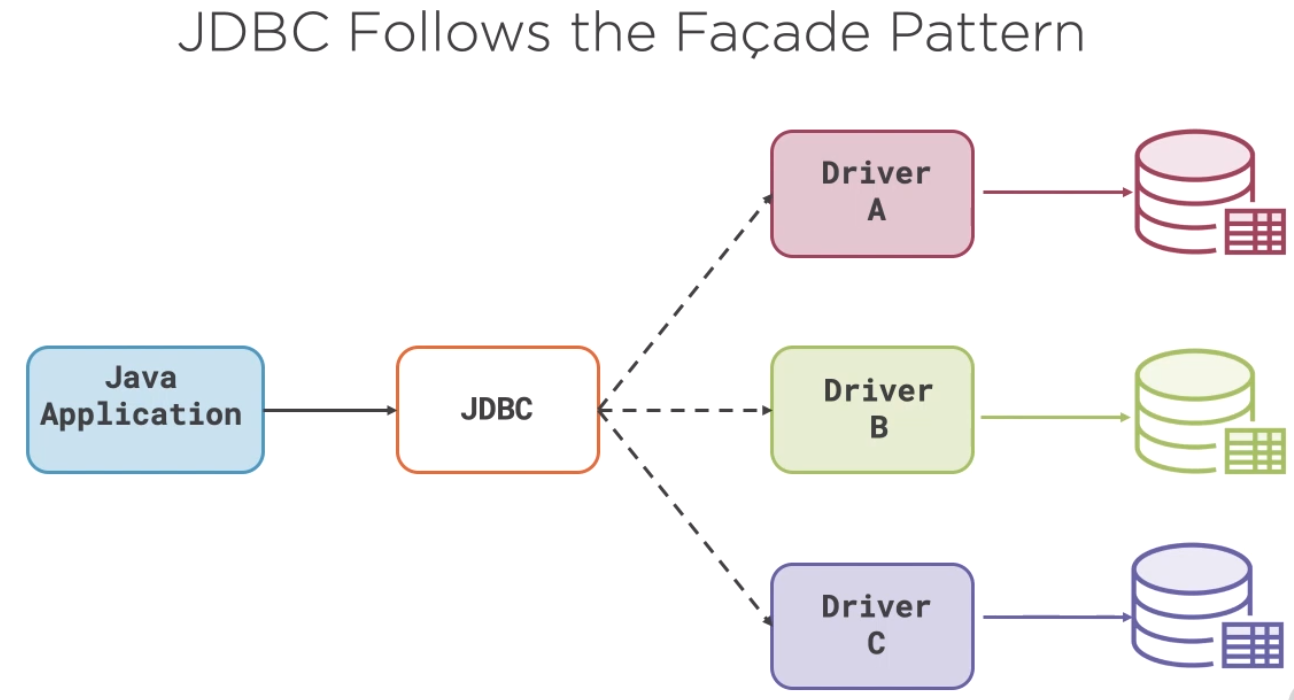
JDBC exemplifies the facade pattern in which the real workings of the specific implementation are hidden behind the standard JDBC API. The JDBC API is always backed by a vendor-specific code generally called by the driver.
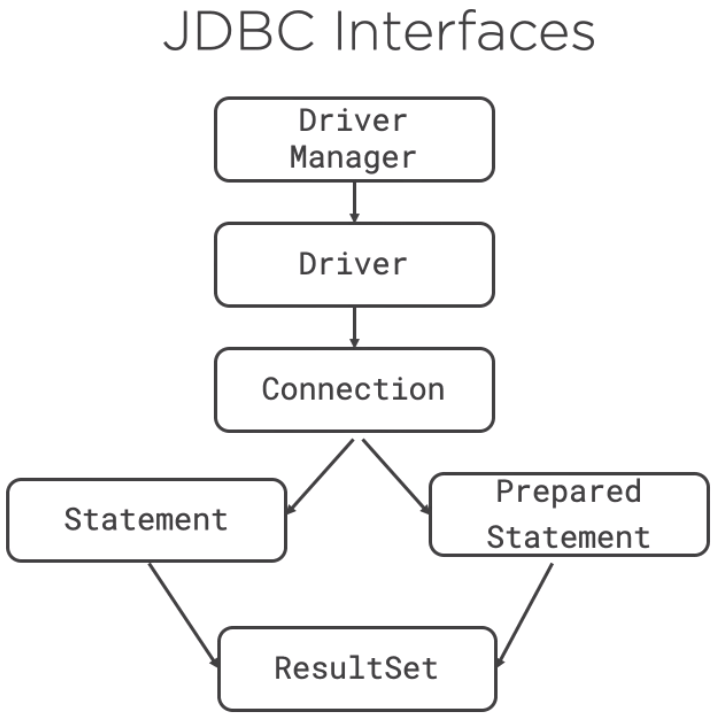
There are several JDBC classes and interfaces that are used by most JDBC applications. These includes the DriverManager , which maintains a registry of drivers, which are the vendor’s implementation of JDBC, the Connection object which represents the actual connection to a relational database.
The Statement and PreparedStatement types which encapsulates the SQL command we want to execute, and the ResultSet which represents the data returned by our SQL command.
There are different ways to connect depending on the circumstances. In this section, we will cover some connection methods:
- DriverManager with Services
- Class.forName() with DriverManager
- JNDI
- Java / Jakarta EE
- CDI
Using DriverManager with Services
When we create a JDBC connection, we do so by giving JDBC a set of properties which consist of a URI identifying the specific driver needed, as well as username, password, and other vendor-specific properties. This operation is performed by the DriverManager when calling the getConnection() method. Since we’re using the MySQL database, we will use the driver provided by MySQL, which is called Connector J . We can tell JDBC to use the Connector J driver by passing in a URI specific to that driver like the following code.
The driver documentation will tell us what this URI should be, but in most cases it follows the pattern of the JDBC schema, which is:
If we want to use an Oracle database, the URI might look like:
If we use SQL Server, the URI might look like:
To test if the connection is valid, we simply call isValid() on the connection object itself. If it connected to the database, it returns true, otherwise, it returns false. It’s important that we always close a database connection. If we do not close a database connection, our application may hold onto the database resources that it’s not using and that can be expensive in terms of memory, network socket connections, and threads.
Each relational database vendor provides their own version of the JDBC driver, but all of them must conform with the interfaces and abstract classes defined by JDBC. At runtime, the JRE will load the vendor-specific driver, so that the JDBC API calls us make will be carried out by the underlying driver. The JRE will look at all of the registered JDBC drivers to determine which one matches the URI used to get the connection and we’ll instantiate that driver and pass it any other properties specified in the URI.
The question we might be asking is how to we register the vendor’s driver.
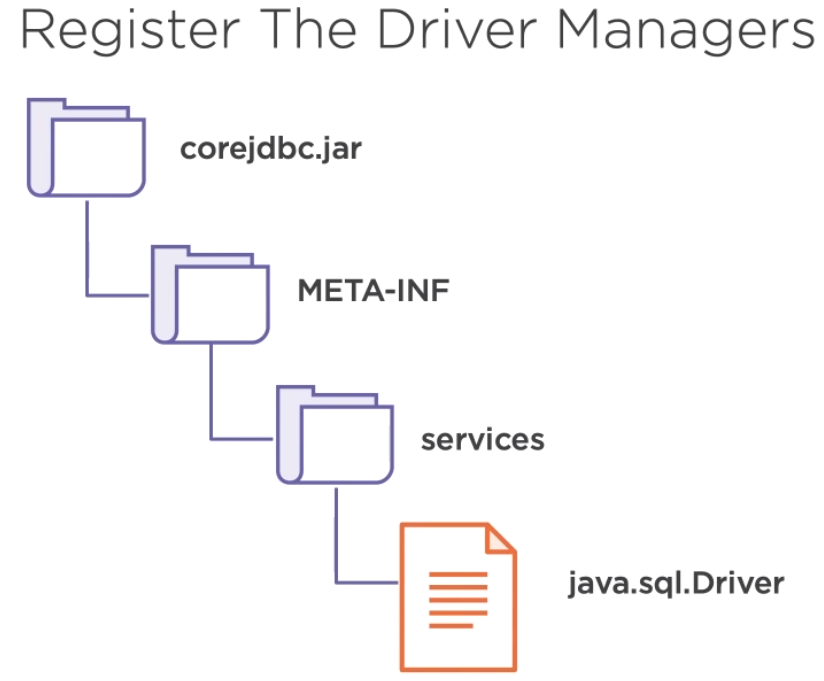
At runtime, the JRE will look into the jar files, META-INF services directory and look for a file name java.sql.Driver which lists the vendor-specific JDBC drivers that will be available at runtim.
Using Class.forName() with DriverManager
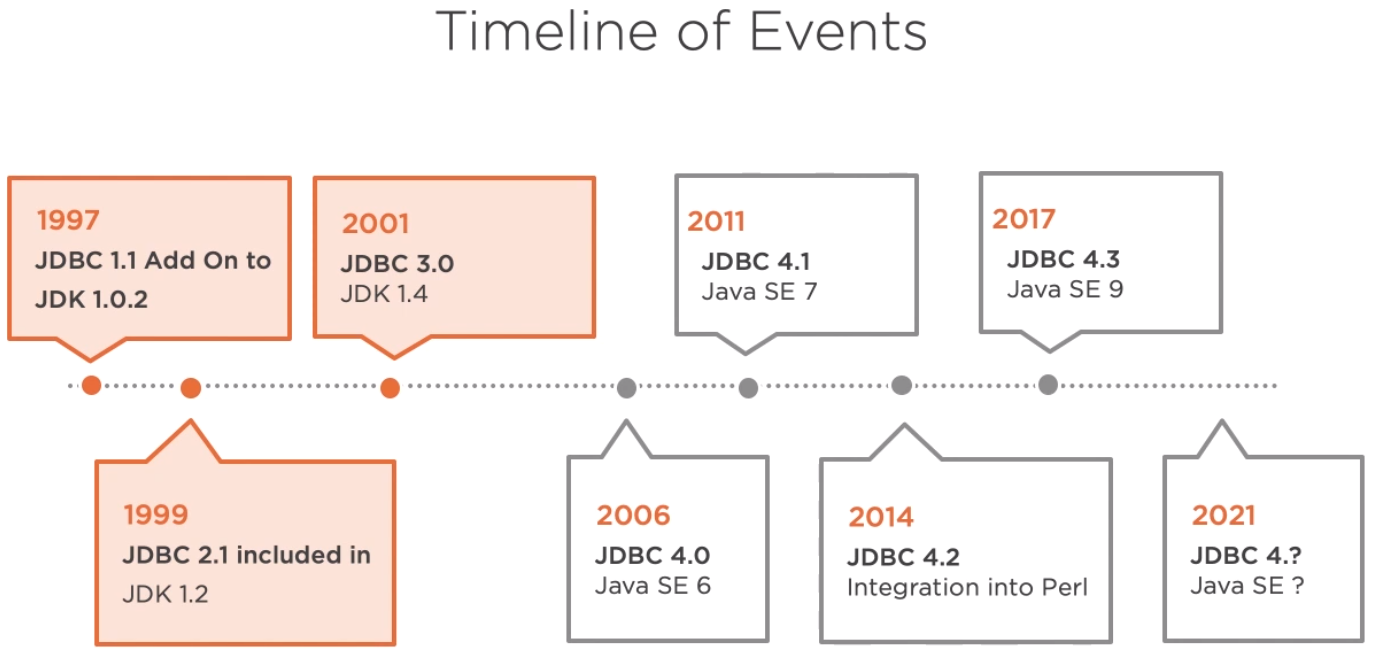
Prior to the JDBC 4, which was introduced with Java SE6, there was an extra step that was required when creating a JDBC connection. The vendor’s driver had to be explicitly loaded prior to being used. This was done using the Class.forName() method.
Until JDBC 4.0, we had to do this if we wanted to load a specific JDBC driver. When the Class.forName() method was executed, it would trigger the class loader to look for that driver and load it. In the process, a static code block in the Driver class was executed that registered the driver with the DriverManager. It was clunky, and when Java services were introduced in Java SE6, the Class.forName() was dropped in favor of listing the drivers and the java.sql.Driver file under the META-INF services directory.
So, if Class.forName() is only used with JDBC drivers predating 4.0.
Using DataSource
If we’re doing development in Java EE, then we will probably be using the JDBC DataSource object instead of the DriverManager to get our connections. The DataSource type was introduced in JDBC 2.0 and first employed in the Java 2 Enterprise edition, the precursor to Java EE 6. The purpose of the DataSource object was to further abstract and encapsulate the process of obtaining a database connection.
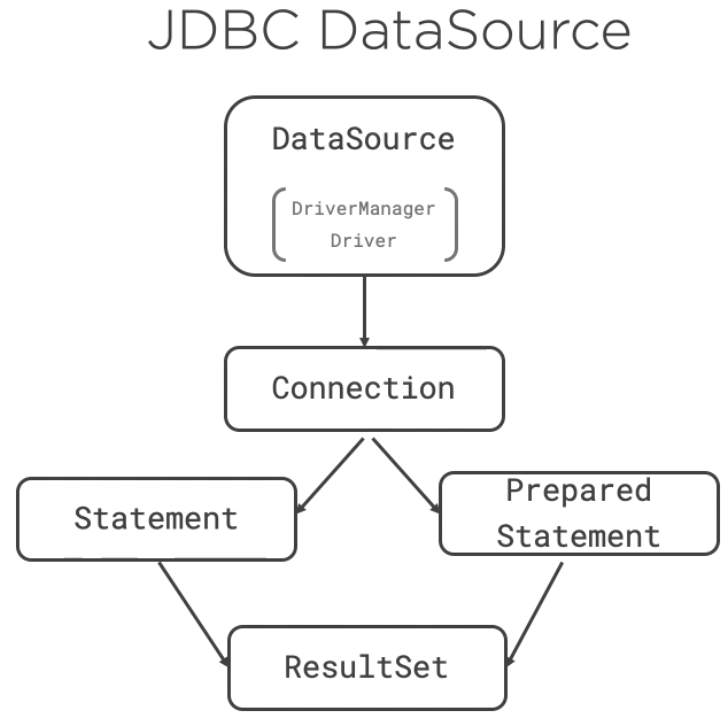
Instead of setting the JDBC driver URI and properties directly in the application code, they were declared in J2EE XML configuration files. At runtime, the J2EE container would read the JDBC XML configuration file and load the drivers it declared configuring them with the URI and properties defined in the configuration file. The developer would then access the DataSource from a context object provided by the J2EE component using JNDI, a directory services API.
If we are working with a really old J2EE code base, we’ll probably see like an above segment code. The DataSource object and the use of JNDI lookup solved a number of problems that were apparent with the use of the DriverManager class, namely it allowed the database connection to be created without having to say anything about the vendor or the database in the application code. That made the code more portable and a little easier to look at.
If we’re doing Enterprise Java development using Java 2 EE or any version of Java EE, we’re going to encounter the use of the JNDI lookup or dependency injection of the JDBC DataSource.
Java / Jakarta EE @Resource annotation
When Java EE 6 was released, it included dependency injection, which spelled the end of the use of the JNDI to obtain JDBC connections and replaced it with @Resource annotation. Using dependency injection made it very simple to access the JDBC DataSource object. It was simply there when it was needed.
CDI @Inject annotation
Dependency Injection of the DataSource is also used in non-JavaEE applications that employ the CDI, the context and dependency injection framework. CDI is a standard dependency injection framework that can be used in conjunction with or separate from Java EE 6 and up.
In some cases, such as when developing microservices, we won’t be using Java EE or Jakarta EE. The @Resource annotation in Java EE type will not be available. In these cases, we’ll use the Java SE @Inject annotation, as well as our own annotations to indicate what is to be injected.
We also create a producer which creates the dataSource behind the sences, which is then injected by the CDI container into our component. In above code, take a look at this CDI being which is annotated with the type of JDBC driver and the standard Java SE inject annotation. In this case, the CDI container looks for a dataSource producer annotated with MySqlDataSource and automatically creates a new dataSource and inject it into the DataSource field.
When using a CDI container, the use of the DataSource with our own custom annotations and a producer is not required, but it is considered good practice, especially when using JDBC connection pooling.
Establishing a Connection
First, you need to establish a connection with the data source you want to use. A data source can be a DBMS, a legacy file system, or some other source of data with a corresponding JDBC driver. Typically, a JDBC application connects to a target data source using one of two classes:
DriverManager : This fully implemented class connects an application to a data source, which is specified by a database URL. When this class first attempts to establish a connection, it automatically loads any JDBC 4.0 drivers found within the class path. Note that your application must manually load any JDBC drivers prior to version 4.0.
DataSource : This interface is preferred over DriverManager because it allows details about the underlying data source to be transparent to your application. A DataSource object's properties are set so that it represents a particular data source. See Connecting with DataSource Objects for more information. For more information about developing applications with the DataSource class, see the latest The Java EE Tutorial.
Note: The samples in this tutorial use the DriverManager class instead of the DataSource class because it is easier to use and the samples do not require the features of the DataSource class.
This page covers the following topics:
Using the DriverManager Class
Connecting to your DBMS with the DriverManager class involves calling the method DriverManager.getConnection . The following method, JDBCTutorialUtilities.getConnection , establishes a database connection:
The method DriverManager.getConnection establishes a database connection. This method requires a database URL, which varies depending on your DBMS. The following are some examples of database URLs:
MySQL: jdbc:mysql://localhost:3306/ , where localhost is the name of the server hosting your database, and 3306 is the port number
Java DB: jdbc:derby:testdb;create=true , where testdb is the name of the database to connect to, and create=true instructs the DBMS to create the database.
Note: This URL establishes a database connection with the Java DB Embedded Driver. Java DB also includes a Network Client Driver, which uses a different URL.
This method specifies the user name and password required to access the DBMS with a Properties object.
Note:
Typically, in the database URL, you also specify the name of an existing database to which you want to connect. For example, the URL jdbc:mysql://localhost:3306/mysql represents the database URL for the MySQL database named mysql . The samples in this tutorial use a URL that does not specify a specific database because the samples create a new database.
In previous versions of JDBC, to obtain a connection, you first had to initialize your JDBC driver by calling the method Class.forName . This methods required an object of type java.sql.Driver . Each JDBC driver contains one or more classes that implements the interface java.sql.Driver . The drivers for Java DB are org.apache.derby.jdbc.EmbeddedDriver and org.apache.derby.jdbc.ClientDriver , and the one for MySQL Connector/J is com.mysql.cj.jdbc.Driver . See the documentation of your DBMS driver to obtain the name of the class that implements the interface java.sql.Driver .
Any JDBC 4.0 drivers that are found in your class path are automatically loaded. (However, you must manually load any drivers prior to JDBC 4.0 with the method Class.forName .)
The method returns a Connection object, which represents a connection with the DBMS or a specific database. Query the database through this object.
Specifying Database Connection URLs
A database connection URL is a string that your DBMS JDBC driver uses to connect to a database. It can contain information such as where to search for the database, the name of the database to connect to, and configuration properties. The exact syntax of a database connection URL is specified by your DBMS.
Java DB Database Connection URLs
The following is the database connection URL syntax for Java DB:
- subsubprotocol specifies where Java DB should search for the database, either in a directory, in memory, in a class path, or in a JAR file. It is typically omitted.
- databaseName is the name of the database to connect to.
- attribute=value represents an optional, semicolon-separated list of attributes. These attributes enable you to instruct Java DB to perform various tasks, including the following:
- Create the database specified in the connection URL.
- Encrypt the database specified in the connection URL.
- Specify directories to store logging and trace information.
- Specify a user name and password to connect to the database.
See Java DB Developer's Guide and Java DB Reference Manual from Java DB Technical Documentation for more information.
MySQL Connector/J Database URL
The following is the database connection URL syntax for MySQL Connector/J:
Как использовать базу данных MySQL в Java
В этой статье мы научимся подключаться к базе данных MySQL из Java-кода и выполнять простые запросы для получения и обновления данных. Для того, чтобы получить доступ к базе данных, мы будем использовать JDBC (Java Database Connectivity) API, который входит в стандартную библиотеку Java. JDBC позволяет подключиться к любой базе данных: Postgres, MySQL, SQL Server, Oracle и т. д. — при наличии соответствующей реализации драйвера, необходимого для подключения. Для базы данных MySQL мы будем использовать драйвер Type 4 JDBC из пакета mysql-connector-java-5.1.23-bin.jar . Он написан на чистой Java, а значит, нам не понадобятся какие-либо нативные библиотеки или ODBC-мост. Все, что нам надо будет сделать — это положить JAR-файл в директорию, содержащуюся в CLASSPATH. JAR-файл содержит класс com.mysql.jdbc.Driver , необходимый для подключения к MySQL. Если его не окажется в CLASSPATH, во время выполнения программы выбросится исключение java.lang.ClassNotFoundException , поэтому убедитесь, что вы правильно настроили пути.
Кстати, если вы ищете хорошую книгу по использованию JDBC, обратите внимание на Practical Database Programming with Java (Ying Bai). Это относительно новая книга, и в ней рассматриваются две самые популярные базы данных: Oracle и SQL Server 2008. В книге используется IDE NetBeans для примеров и описываются все инструменты, необходимые для работы с базами данных в Java. Это отличная книга для начинающих и опытных программистов.
Подключаем базу данных MySQL с помощью JDBC
Для того, чтобы подключить базу данных MySQL, нам потребуется четыре вещи:
- Строка подключения JDBC (например:
jdbc:mysql://localhost:3306/test). - Имя пользователя (root).
- Пароль (root).
- База данных с некоторым количеством таблиц для примера (например, база данных книг).
Строка подключения для MySQL начинается с jdbc:mysql . Это название протокола соединения, за которым следуют хост и порт подключения, на которых запущена база данных. В нашем случае это localhost с портом по умолчанию 3306 (если вы его не поменяли при установке). Следующая часть — test — имя базы данных, которая уже существует в MySQL. Мы можем создать таблицу Books :
и наполнить её хорошими книгами:
Программа на Java, которая использует базу данных
Теперь давайте напишем программу на Java, которая будет подключаться к нашей базе данных, запущенной на localhost . Важно помнить о том, что необходимо закрывать соединение, запросы и результат выполнения после завершения работы с ними. Также важно закрывать их в finally-блоке, со своей try/catch оберткой, поскольку сам метод close() может кинуть исключение, что приведет к утечке ресурсов. За подробной информацией вы можете обратиться к этой статье. Кроме того, вы можете использовать обертку try-with-resource, которая появилась в Java 7. Более того, это стандартный способ работы с ресурсами в Java 1.7.
При первом запуске у вас, возможно, будет ошибка No suitable driver found for jdbc:mysql , если драйвера MySQL нет в CLASSPATH:
Добавим нужный JAR-файл в путь и снова запустим программу. Другая частая ошибка — указать таблицу в строке соединения: jdbc:mysql://localhost:3306/test/book . В этом случае вылетит следущее исключение:
Успешный запуск программы выведет на экран следующее:
Результат верный, поскольку у нас в таблице только две книги: «Effective Java» и «Java Concurrency in Practice».
Кстати, если у вас был драйвер при компиляции, но отсутствует при запуске, вы получите исключение java.lang.ClassNotFoundException: com.mysql.jdbc.Driver . О том, как исправить эту ошибку, вы можете прочитать здесь.
Получаем данные с помощью SELECT-запроса в JDBC
Для получения данных из БД вы можете выполнить SELECT-запрос. В первом примере мы уже его использовали, но получили только количество строк. Теперь мы вернем сами строки. Большая часть программы останется без изменений, за исключением SQL-запроса и кода, возвращающего данные из объекта ResultSet :
Этот код выведет на экран следующее:
Тут есть пара моментов, на которые следует обратить внимание. Метод rs.getInt(1) используется для получения столбца с целочисленным типом, в нашем случае это столбец «id». Индексы в JDBC начинаются с единицы, поэтому rs.getInt(1) вернет значение первого столбца как целое число. В случае, если вы укажете неверный индекс (многие разработчики вызывают rs.getInt(0) для получения первого столбца), выбросится исключение InvalidColumnIndexException . Доступ к столбцам по индексу чреват ошибками, поэтому лучше использовать имя столбца, например, rs.getInt(«id») . Подробнее об этом вы можете прочитать в этой статье. Метод getString() используется для получения строковых значений из базы (например, VARCHAR ). Цикл будет выполняться, пока rs.next() не вернет false . Это значит, что строки закончились. В нашем случае в таблице две строки, поэтому цикл выполнится два раза, выводя информацию о книгах из таблицы на экран.
Добавляем данные с помощью INSERT-запроса в JDBC
Добавление данных мало отличается от их получения: мы просто используем INSERT-запрос вместо SELECT-запроса и метод executeUpdate() вместо executeQuery() . Этот метод используется для запросов INSERT, UPDATE и DELETE, а также для SQL DDL выражений, таких как CREATE, ALTER или DROP. Эти команды не возвращают результата, поэтому мы убираем все упоминания ResultSet ‘а в коде и изменяем запрос соответственно:
После запуска программы вы можете проверить таблицу в СУБД. На этот раз вы увидите три записи в таблице:
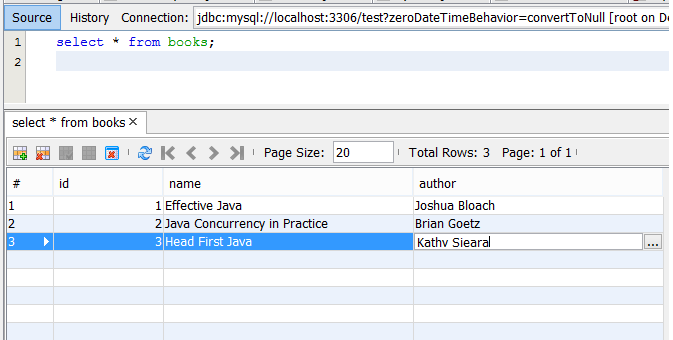
Теперь вы умеете подключаться к MySQL из Java-приложения и выполнять SELECT, INSERT, DELETE и UPDATE-запросы так же, как и в MySQL GUI. Для подключения мы используем объект Connection , для чтения результатов запроса — ResultSet . Убедитесь перед подключением, что сервер MySQL запущен и mysql-connector-java-5.1.17-bin.jar находится в CLASSPATH, чтобы избежать ClassNotFoundException .
Когда разберетесь с подключением и простыми запросами, имеет смысл изучить, как использовать подготавливаемые запросы (Prepared Statement) в Java для избежания SQL-инъекции. В боевом коде всегда следует использовать подготавливаемые запросы и связывание переменных.
Если вам понравилось это руководство и не терпится узнать больше о подключении и работе с базой данных из Java-программ, обратите внимание на следующие статьи:
Connect Java to a MySQL database
Here’s a step by step explanation how to install MySQL and JDBC and how to use it:
Download and install the MySQL server. Just do it the usual way. Remember the port number whenever you’ve changed it. It’s by default 3306 .
Download the JDBC driver and put in classpath, extract the ZIP file and put the containing JAR file in the classpath. The vendor-specific JDBC driver is a concrete implementation of the JDBC API (tutorial here).
If you’re using an IDE like Eclipse or Netbeans, then you can add it to the classpath by adding the JAR file as Library to the Build Path in project’s properties.
If you’re doing it "plain vanilla" in the command console, then you need to specify the path to the JAR file in the -cp or -classpath argument when executing your Java application.
The . is just there to add the current directory to the classpath as well so that it can locate com.example.YourClass and the ; is the classpath separator as it is in Windows. In Unix and clones : should be used.
Create a database in MySQL. Let’s create a database javabase . You of course want World Domination, so let’s use UTF-8 as well.
Create a user for Java and grant it access. Simply because using root is a bad practice.
Yes, java is the username and password is the password here.
Determine the JDBC URL. To connect the MySQL database using Java you need an JDBC URL in the following syntax:
hostname : The hostname where MySQL server is installed. If it’s installed at the same machine where you run the Java code, then you can just use localhost . It can also be an IP address like 127.0.0.1 . If you encounter connectivity problems and using 127.0.0.1 instead of localhost solved it, then you’ve a problem in your network/DNS/hosts config.
port : The TCP/IP port where MySQL server listens on. This is by default 3306 .
databasename : The name of the database you’d like to connect to. That’s javabase .
So the final URL should look like:
Test the connection to MySQL using Java. Create a simple Java class with a main() method to test the connection.
If you get a SQLException: No suitable driver , then it means that either the JDBC driver wasn’t autoloaded at all or that the JDBC URL is wrong (i.e. it wasn’t recognized by any of the loaded drivers). Normally, a JDBC 4.0 driver should be autoloaded when you just drop it in runtime classpath. To exclude one and other, you can always manually load it as below:
Note that the newInstance() call is not needed here. It’s just to fix the old and buggy org.gjt.mm.mysql.Driver . Explanation here. If this line throws ClassNotFoundException , then the JAR file containing the JDBC driver class is simply not been placed in the classpath.
Note that you don’t need to load the driver everytime before connecting. Just only once during application startup is enough.
If you get a SQLException: Connection refused or Connection timed out or a MySQL specific CommunicationsException: Communications link failure , then it means that the DB isn’t reachable at all. This can have one or more of the following causes:
- IP address or hostname in JDBC URL is wrong.
- Hostname in JDBC URL is not recognized by local DNS server.
- Port number is missing or wrong in JDBC URL.
- DB server is down.
- DB server doesn’t accept TCP/IP connections.
- DB server has run out of connections.
- Something in between Java and DB is blocking connections, e.g. a firewall or proxy.
To solve the one or the other, follow the following advices:
- Verify and test them with ping .
- Refresh DNS or use IP address in JDBC URL instead.
- Verify it based on my.cnf of MySQL DB.
- Start the DB.
- Verify if mysqld is started without the —skip-networking option .
- Restart the DB and fix your code accordingly that it closes connections in finally .
- Disable firewall and/or configure firewall/proxy to allow/forward the port.
Note that closing the Connection is extremely important. If you don’t close connections and keep getting a lot of them in a short time, then the database may run out of connections and your application may break. Always acquire the Connection in a try-with-resources statement. Or if you’re not on Java 7 yet, explicitly close it in finally of a try-finally block. Closing in finally is just to ensure that it get closed as well in case of an exception. This also applies to Statement , PreparedStatement and ResultSet .
That was it as far the connectivity concerns. You can find here a more advanced tutorial how to load and store fullworthy Java model objects in a database with help of a basic DAO class.