Firmware upgrade encountered an issue Select recovery mode in Kies on Samsung Galaxy

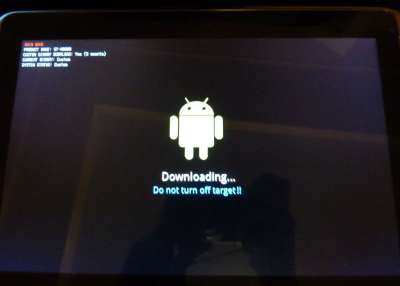
While trying to install new firmware on my Galaxy Note 4, I encountered this error “Firmware Upgrade Encountered an Issue. Please Select Recovery Mode in Kies“. It happened because the firmware I was trying to flash didn’t flash properly, and it gave an error “All threads completed. (succeed 0 / failed 1)“. When I tried to reboot my phone, The phone was stuck in download mode. I was unable to get the phone into recovery mode or restart it.
I have been quite happy with my Note 4. It started with random boots a few weeks back, and I faced severe lag issues. I cleaned the cache partition from recovery; it didn’t help. I factory reset the phone. Matters were still there. I even removed the bloatware and all the unnecessary apps. Nothing seemed to be working out for me. So the last option was to install stock firmware. At the same time, while trying to install firmware via ODIN. I got this error Firmware Upgrade Encountered an issue. Please Select Recovery Mode in Kies. The error arises because ODIN failed to install the firmware correctly.
Fix Firmware Upgrade Encountered an Issue. Please Select Recovery Mode in KIES on Samsung Galaxy Phones:
You need to consider several things if you come across this error. First, it means that the software or operating system has malfunctioned. You will have to install new firmware.
Although the error says, “Use KIES to install the firmware,” when I installed KIES. It said KIES does not support your phone. The same is the case with Smart Switch. Note 4 is not supported by the smartswitch. After all the failed attempts. I had to move back to ODIN. This time I downloaded ODIN from Sammobile. I double-checked the CSC and PDA of ROM. To make sure I have the correct firmware.
The solution to this problem is to install the firmware again correctly. First, I will discuss some precautions. Next, I will guide you step to step on how to install stock firmware using ODIN for the guys who have no experience with ODIN. It will fix the firmware encountered issue error on your Galaxy phone.
Precautions:
- Make sure you use an original data cable or Samsung cable to connect your phone to the computer while flashing the firmware.
- Make sure KIES is not running in the background. Then, use task manager to kill it.
- Run ODIN as Admin. Also, turn off your Antivirus. It might be interfering with flashing.
- Maybe the USB port of your computer is causing the issue. Try again with some other port.
- Restart your PC, and Then try.
- Whenever you try to flash the firmware and get an error, restart the ODIN.
- Try with some other version of ODIN.
Now let us move on to the guide on installing stock firmware on Samsung Galaxy Devices to fix “Firmware Upgrade Encountered an Issue, please Select Recovery Mode in Kies Error”:
First of all, the following are prerequisites that you will need to perform or download before proceeding.
- Download ODIN v3.10.7 from here.
- Download Stock Firmware for your phone from SamMobile. (Enter the model number of your phone, It will display all the stock ROM present for your phone) for Windows. (Link to download the file is under the main heading). Although these drivers are to be installed on your PC, they are essential to recognize your device correctly.
- Make sure your phone’s battery is charged up to 50%.
Make sure you have the correct ROM for your phone. If your phone is carrier unlocked and it is not branded, you can use any carrier-free (unbranded) ROM from the link above. Now how to check if your phone is branded or not. If the logo or any carrier appears when you start your phone, it’s branded; if only the Samsung logo appears when you reboot your phone, it’s clean. Ensure you don’t flash unbranded firmware on branded phones and vice versa.
Steps to install stock firmware to fix firmware upgrade encountered an Issue:
- Download ODIN on your PC
- Install Samsung USB drivers for windows on your PC.
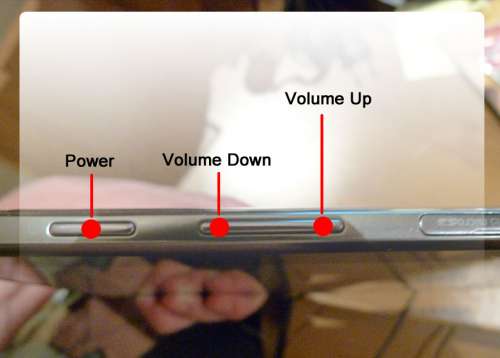
- Now turn off your Note 4 and Get it into Download mode.
- Press Volume Down, Power button, and Home Buttons simultaneously.
- Keep on holding till you see a warning.
- Press the Volume up button to continue.
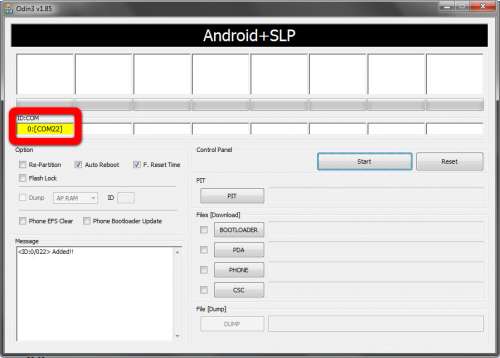
- Now open ODIN on your Windows PC.
- Connect your Samsung Galaxy Phone to your computer using an original data cable.
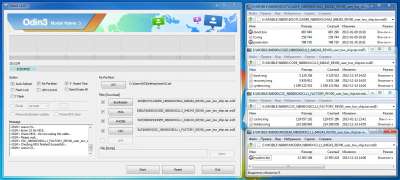
- Once your computer detects your phone, the ID: COM section will turn blue.
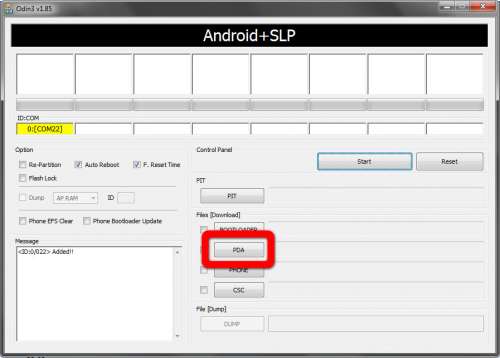
- Click on AP or, in some ODIN versions, PDA.
- Select the stock ROM you downloaded .
- Make sure Only Auto Reboot and F. Reset Time are checked in the options. Like in the screenshot below.
- Click on Start.
Wait for a few minutes. Don’t disconnect your phone from your PC while ROM is flashing if you encounter any error. See the precautions above. Installing firmware from ODIN can sometimes be frustrating. You have to try again and again. But it works in the end. So don’t lose hope.
Suppose you are still having issues. If the above solution didn’t help you out, see this guide.
Note: If the firmware you downloaded extracts more than one file, select the corresponding section according to file type BL belongs to Boot-loader, AP belongs to PDA, CP belongs to Phone(Modem), and select the CSC file in the CSC tab.
If this guide helped you fix “Firmware upgrade encountered an issue. Please Select recovery mode in KIES“. Do let me know in the comments. Also, if you know some other methods to fix this problem, do share them with us. Leave us your questions and queries in the comments; we will get back to you as soon as possible. Do give us feedback on how the above guide worked for you. If you are confused about any step above, feel free to ask us in the comments or by email.
Инструкция по прошивке Samsung устройств через Odin и что такое Odin вообще?
Odin очень полезный инструмент который позволяет вам взаимодействовать с вашим Samsung устройством (в режиме загрузки) и прошивать его. Это Windows программа, которую использовала/использует компания Samsung для прошивки своих устройств (без режима рекавери/восстановления). К счастью для нас этот софт просочился в сеть и у простых смертных есть возможность пользоваться ним.
Существуют разные версии Odin. Вы можете прошивать .tar, tar.md5 или .bin прошивки через Odin на ваше устройство.
Краткий тур по опциям программы.
Auto Reboot — автоматическая перезагрузка устройства после прошивки;
Re-Partition — перераспределяет файловую систему на вашем устройство по умолчанию (RFS);
F. Reset Time — сбрасывает cчётчик прошивок (flash counter);
PIT — Partition Information Table. Если вы выбрали Re-Partition, то вы также должны указать .pit путь к .pit файлу для перераспределения файловой системы устройства;
Bootloader — для прошивки загрузчика (bootloader);
PDA — сборка прошивки. Для выбора файла с прошивкой, ядром и т.д.
Phone — модем. Для выбора файла модема для прошивки;
CSC — Comsumer Software Customization. Для выбора CSC файла, содержащего специфические для региона и оператора данные;
Будьте очень осторожны при испоьзовании Odin, особенно с опцией Re-Partition и правильным .pit файлом. Если у вас нет нужного .pit файла ни в коем случае не ставьте галочку возле Re-Partition.
Внимание: Odin можно использовать только на устройствах от Samsung!
Как прошить Samsung Galaxy с помощью Odin?
1. Скачайте и установите USB драйвера для Samsung. Или можете установить Samsung Kies , при установке которого драйвера будут установлены автоматически.
2. Удостоверьтесь что у вас есть резервные копии всей важной для вас информации (контакты, SMS, MMS, видео, фото, документы и т.д.) на внутренней или внешней SD картах вашего устройства (или на компьютере).
3. Убедитесь что батарея вашего устройства заряжена хотябы на 60-80%, чем больше тем лучше (не хотелось бы брикнуть телефон во время прошивки если пропадет питание).
4. В настройках устройства включите USB debugging/Отладка USB в Developer Options/Для разработчиков.
5. Убедитесь что Samsung Keis не запущен. Можно “убить” процесс через диспетчер задач.
Установка заводских/официальных прошивок через Odin, обычно, довольно безопасное занятие если все делать верно. Но стоит понимать, что всегда существует шанс брикнуть/сломать устройство, пусть и невелик. Так что все это вы будете делат на свой страх и риск, и автор поста не несет никакой ответственности если что-то пойдет не так.
1. Скачайте zip файл с официальной прошивокй для вашего устройства и распакуйте архив себе на компьютер. Вы увидите либо один .tar или .tar.md5 файл, или же несколько файлов:
— если вы увидите один файл, то внутри него уже будет все что вам нужно для успешной прошивки (PDA, PHONE, CSC);
— если же файлов несколько, то используйте отдельные кнопки PDA (в новых версиях AP), PHONE, CSC для выбора соответствующих файлов;
2. Скачайте архив с прикрплённый к посту внизу распакуйте его. Вы увидите следующие файлы:
— Odin3 v3.04.exe;
— tmax.dll;
— zlib.dll;
— Odin3.ini;
3. Запустите Odin3_v3.04.exe на правах администратора (правый клик —> в режиме администратора).
4. Загрузите ваше устройство в режим загрузки (download mode). Для большинства устройств от Samsung для этого надо выключить устройство и после этого одновременно зажать кнопки Home (домой) + Питание + Звук вниз и в появившемся меню подтвердить вход в режим загрузки путём нажатия звука вверх.
5. После того как телефон находится в режиме загрузки, подключите его к компьютеру через USB кабель. Если Odin распознает ваше устройство то поле ID:COM станет желтого или голубого цвета и отобразит номер COM порта (скриншот внизу).
Важно : если вы не увидите номер порта в поле ID:COM или если поле не будет желтого или голубого цвета, пожалуйте не продолжайте операцию. Отключите USB и перезагрузите ваше устройство путем нажатия и долгого удерживания кнопки питания. Проверьте корректно ли установлены USB драйвера для Samsung.
6. Если zip архив с прошивкой имел всего один файл, то кликните на кнопку PDA и через обзор выберите .tar или .tar.md5 файл с вашей прошивкой. В случае же если zip архив с прошивкой имел несколько файлов:
— нажмите на BL (Bootloader) и выберите файл который имеет BL или Bootloader в своём названии;
— нажмите на AP (PDA) и выберите файл который имеет CODE или AP (PDA) в своём названии;
— нажмите на PHONE и выберите файл который имеет MODEM в своём названии;
— нажмите на CSC и выберите файл который имеет CSC в своём названии;
Других файлов не трогайте!
7. Убедитесь что флажки расставлены правильно:
— Auto Reboot и F. Reset Time должны быть отмечены;
— все остальные флажки не отмечены;
8. После выбора соответсвующих файлов и проверки флажков нажмите кнопку Start. Начнется процесс прошивки. Ни в коем случае не отключайте телефон от компьютера во время этого процесса. Это можно занять несколько минут.
9. Как только процесс прошивки завершится, ваше устройство перезагрузится. Теперь вы можете отключить его от компьютера и начать использовать.
Можете использовать эту инструкцию для прошивки устройств от Samsung на Android OS.
Please select recovery mode in kies try again что делать samsung
Samsung Galaxy Note 10.1 — Официальные прошивки
 GT-N8000, GT-N8005, GT-N8010, GT-N8013, GT-N8020
Описание | Обсуждение » | Покупка » | Аксессуары » | Брак и ремонт » | Официальные прошивки » | Неофициальные прошивки » | Модификация и украшательства » | Клуб владельцев »
-
Драйверы и ПО для прошивки:
— пакет драйверов для Windows для корректной работы с планшетом
| SamFirm — программы для загрузки и проверки прошивок для устройств Samsung
— программа для прошивки устройств Samsung
— мобильная версия Odin’а от разработчика Chainfire. Не шьет загрузчик, efs и pit-файл
— программа для прошивки устройства под Linux и MacOS. Инструкция
—————————
В нижней панели из-за кнопки «представление каскадом» не видна стрелочка закрытия панели (однако, нажав на то место, где она находится, панель сворачивается)
-
Note 10.1 3G [N8000]:
- N8000XXSDQA1 | 4.4.2 | 05.01.2017 | 4798185 | Люксембург
- N8000XXSDQA5 | 4.4.2 | 05.01.2017 | 2451855 | Россия
———————— - N8000XXCMC1 | 4.1.2 | 04.03.2013 | 961761 | Россия
[В. — Вопрос / О. — Ответ]
В. Можно ли некоторые приложения переместить на SD card?
О. Да, для этого Вам понадобятся рут-права и программа: Link2SD
В. Что такое PIT-файл? Для чего он нужен? И нужен ли он мне для прошивки?
О. Этот файл нужен для того, чтобы заново переразбить системные разделы при их повреждении. Для простой перепрошивки использование pit-файла не нужно
В. Что такое /efs?
О. Важнейший системный раздел с IMEI, SN, GPSID, MACADDR, WIFIMAC. Рекомендуется сделать резервную копию /efs и хранить её на компьютере/в облаке
В. Как посмотреть версию прошивки?
О. Настройки >> Об устройстве. Строка «Номер сборки»
Сообщение отредактировал Aramir_ — 10.12.22, 17:55
- Odin3 v3.10 (инструмент для прошивки) ;
- Samsung USB драйвера (для Windows) ;
- Архив с прошивкой.


Сообщение отредактировал Aramir_ — 06.05.16, 22:07
Официальная прошивка GT-N8000XXCMC1_SER_MULTI_FACTORY для России и некоторых стран СНГ изготовлена для экстренного (аварийного) восстановления GT-N8000 до заводского состояния.
* Автоматическое переключение на российскую локализацию SER (Возможность получить 100% аналог РСТ девайса из любого серого N8000 со всеми вытекающими ОТА)
* Возможность прошивки PIT файла (pit включен в состав) — необязательная опция, в большинстве случаев нет необходимости прошивать!
* Возможность прошивки отдельно — BOOTLOADER, MODEM, CSC
* Wipe user data (удаляет раздел USERDATA и создает заново с заводскими параметрами)!
* Format Internal SDcard (удаляет раздел sdcard и создает заново с заводскими параметрами)!
* Имеющиеся региональные привязки CSC — SER(по умолчанию), SEK, SKZ, CAC
* Прошивальщик Odin3 v.3.07 включен в состав архива
N8000XXCMC1_SER_MULTI_FACTORY 961761 Яндекс.Диск
Спасибо ув. [email protected] _k_S за перезалив
Сообщение отредактировал Aramir_ — 14.09.15, 01:31
- Разбираем в apktools SystemUI.apk
- Идем по пути res\value
- Открываем в Notepad++ файлик arrays.xml
В самом верху видим код со стоковыми приложениями которые будем менять:

Ну вот вроде и все.
Сообщение отредактировал losinluk — 12.09.13, 15:28
Через Odin:
1. Установить драйверы на ПК.
2. Скачать Odin (на Windows 7 запускать от имени администратора).
3. В Odin’е в поле «AP» выбрать tar-архив с TWRP рекавери. Снимаем галку с Auto Reboot!
4. Выключить планшет и перевести его в Download Mode (зажать кнопки «Питание» и громкость «Минус»). Согласиться с предупреждением «Плюсом».
5. Планшет в режиме Download Mode подключить к ПК. В Odin’е устройство должно определиться — верхнее левое окно загорится голубым цветом.
6. В Odin’е нажимаем «Start» и ждем окончания прошивки.
7. После появления надписи «Finish» отключаем планшет от компьютера и зажимаем кнопки «Питание» и громкость «Плюс». После появления названия отпускаем питание и заходим в рекавери.
Через официальное приложение, если есть Root: Google Play | apk файл
Через терминал, если есть Root:
1. Положить img-образ twrp-3.*-n80**.img в корень внутренней памяти и переименовать для удобства в twrp.img
2. Запустить программу-эмулятор терминала (Например, Android Terminal Emulator), в окне набрать (после каждой строчки — Ввод):
3. Зажать кнопки «Питание» и громкость «Плюс». После появления названия отпускаем питание и заходим в рекавери.
How To Solve “Firmware Upgrade Encountered An Issue” On Samsung
Have you encountered an error message “Firmware upgrade encountered an issue? Please select recovery mode in Kies & try again.” while trying to upgrade, root, or downgrade your Samsung using Odin/Kies?
If so, then don’t panic. In this in-depth guide, I will let you know how to solve “Firmware upgrade encountered an issue” on Samsung.
Before moving to the solutions let’s first look at a real user practical example.
Practical Example: A Samsung Galaxy S4 User Is Asking Solution To Fix “Firmware upgrade encountered an issue”
I get the following message on my Samsung Galaxy S4:
Firmware upgrade encountered an issue. Please select recovery mode in Kies & try again. Recovery mode didn’t work out. Is there an alternative solution?
Like you, there are many Samsung users who are going through this error and wanted solutions to fix it.
So, without wasting time, we will move to the solutions to fix “Firmware upgrade encountered an issue” on Samsung phones and tablets.
Solution 1: Fix “Firmware Update Encountered An Issue” On Samsung Using Kies
You can use Samsung feature known as Kies Firmware Upgrade & Initialization to fix “Firmware upgrade encountered an issue” on Samsung device.
So, follow the below steps to solve “Firmware upgrade encountered an issue” on Samsung with Kies.
Step 1: Download Kies and launch it on your computer and then click on “Tools” and then tap on the “Firmware Upgrade and Initialization” icon.

Step 2: Now, take out the battery from your Samsung device and look at the model number and S/N number on it.

Step 3: After this, type the model and serial number on Kies.


Step 4: Kies will inform you that the firmware upgrade and initialization process will wipe all of your files and settings and your device will be updated to the latest version. Click on “OK” to continue.

Step 5: The software will start downloading firmware upgrade files. You will see the below window once the firmware has been downloaded.
Step 6: Next, enter recovery mode on your Samsung phone. To do this you need to follow the steps in the popup. Tick the mark on the box and hit on “Start Upgrade” button.

Step 7: Now, you need to wait unless you see “Emergency firmware recovery completed”. Don’t unplug your Samsung device from your PC during the process.
Solution 2: Solve “Firmware Upgrade Encountered An Issue” On Samsung With Odin
If the above solution didn’t help then you can use Odin to resolve “Firmware upgrade encountered an issue. Please select recovery mode in kies”.
Before you follow the steps to do this, you need to take care of a few things that are listed below:
- Ensure your Samsung device is fully charged.
- Samsung Kies should not run in the background.
- If you have an SD card on your phone then remove it so that you will not lose data from it.
- Use an original USB cable.
Now, you need to first install some tools on your computer. They are a USB driver, Odin 3, and Stock Firmware that is compatible with your Samsung phone.
Now, follow the below steps to fix the issue via Odin.
Step 1: After, you have downloaded Odin, USB driver, and stock firmware on your Windows PC.
Step 2: Now, enter your Samsung device into downloading mode by pressing and holding the Power + Home + Volume Down keys unless you see a warning prompt. Then press the Volume Up key.

Step 3: Run the Odin app and with the help of USB cable connect your Samsung device to your computer.
Step 4: Now, Odin will automatically recognize your phone. Choose “PDA” or “AP” option for uploading firmware to your bricked Samsung device following direction. Then choose the “Stock Firmware” that you have downloaded earlier on your PC.

Step 5: Next, check “F. Reset Time” or “Only Auto Reboot” settings are selected or not.
Step 6: Hit the “Start” button to start the process of repairing your Samsung smartphone against the error “Firmware upgrade encountered an issue”. Now, you need to wait unless the work is completed. Don’t disconnect your phone when the process is going on.
Step 7: Now, on the left side of your phone’s screen, you will be able to view a notification name as “PASS”. It means that stock ROM flashed your Samsung phone and you can disconnect your phone from PC.

Step 8: Now, boot your Samsung mobile in the normal way and you will have unbricked Samsung phone in your hand.
Solution 3: Try Repair Android Tool To Fix “Firmware Upgrade Encountered An Issue” On Samsung
You can try Android Repair software to fix “Firmware upgrade encountered an issue. Please select recovery mode in kies” on Samsung phone and tablet.
Android System Repair tool has the ability to solve this issue on your Samsung phone.
Besides it, you can also solve many other issues on Samsung phones and tablets such as white/black screen of death, system update failure, Samsung device gets bricked, apps keep crashing, Samsung device stuck at Samsung logo, etc.
It supports all models of Samsung phones and tablets such as Samsung Galaxy Note 2/S23/S22/S21/S21/S10/S8/S7/S6/S4/S3/Galaxy Tab 4/Tab 3/Tab 2/Samsung J100h/i9060/G355h/J210f and all the models available in the market.
Additional Solution: You can also try to factory reset your Samsung Android device to fix this error but it does not always work in fixing the issue. Anyway, you can try it and before doing this, make sure to create a backup of your Samsung device.
Video Solution: How To Fix Firmware Upgrade Encountered An Issue. Please Select Recovery mode In Kies & Try Again
Video Referral – SOUNDTRICK
You May Also Like:
Related Frequently Asked Questions [FAQs]
Answer 1 – If you are rooting your device the first time and don’t know what you are doing with your phone then you may face this type of issue. The main reason for this issue is – when USB debugging is not enabled on your Samsung mobile.
If you are not using the proper way with properly supported files for rooting your Samsung then your device may brick.
Answer 2 – You can fix Android firmware update stuck issue by trying the below-mentioned tips:
- Restart your device.
- Check your network connection.
- Wipe cache partition.
- Turn on and off Airplane mode.
- Clear Android cache and data.
- Perform a factory reset.
Answer 3 – There are multiple factors that can cause firmware not to update on Android smartphone. Some of the major reasons are discussed below:
- Unstable or poor internet connection.
- Google Play Store updates generate issues.
- Low storage space on your phone for updates.
Answer 4 – You can easily update the firmware on your Samsung phone by following the below-mentioned steps.
Step 1: Open Settings app on your Samsung phone.
Step 2: Then scroll down and hit on Software update.
Step 3: After this, tap on Download and install.
Step 4: Now, follow the on-screen steps to update your Samsung phone.
Answer 5 – Yes, you can easily update Samsung firmware.
Answer 6 – You can update firmware on Kies 3 by following the below steps.
Step 1: Firstly download Samsung Kies 3 on your computer from here.
Step 2: Then connect your phone to your PC using USB cable.
Step 3: Now, open Kies 3 on your computer. Kies may show a pop-up message when you connect your device to it
Step 4: Then click on a firmware upgrade to begin the process.
Answer – Before, starting the process, here are some important things you must know.
- Visit Samsung Support and look for your particular device for complete upgrade instructions. An update may not be available for your phone due to unsupported models, wireless service provider limitations or absence of update.
- Kies 2.6 is only available for Windows computer. Each device model has a separate FAQ with complete details for device update.
Alright, let’s start to upgrade the Firmware for Samsung device using Kies 2.6:
Step 1: Make sure that only one version of Kies is downloaded on your Windows PC.
Step 2: Close all the application running on your PC, before launching Kies 2.6.
Step 3: Connect your phone to your PC via USB cable and not through hub. For further help, you can contact PC manufacturer or Samsung device seller.
Note: Firmware upgrades is only possible when you connect your phone via USB cable.
Step 4: Open Kies. If any new version of the firmware is available, you will “New Firmware is available” with a Firmware Upgrade button next to it, in the Basic information tab.
Step 5: Click on “Firmware upgrade” button to begin the upgrade process.

Step 6: A pop-up window will get displayed when you connect your phone to Kies. If you see such pop-up window, then click on “Update”.

Step 7: You will then be forwarded to backup all of your data.
This answer is taken from – HERE.
Wrap Up
We hope this tutorial was able to fix “Firmware upgrade encountered an issue” on Samsung. You can try Repair Android software to fix this issue in just a few clicks.
Please support us by subscribing to our YouTube Channel.

Max Field is a founder of Recover Android Data. He is an Android lover and loves to write tips, tricks, fixes for errors, data recovery solutions and more related to Android. He has 9+ years of experience in this field.