Kernel is not seandroid enforcing samsung что делать

kernel is not Seandroid enforcing
How to solve “kernel is not Seandroid enforcing” error message?
You may want to root your Samsung Galaxy device, but it is not successful because there is an error message after you root it. The error message will be “kernel is not Seandroid Enforcing” that appears on the top of the screen. However, you are not the only person who gets this message. All of the Galaxy users who root the device with incompatible files will slightly get this error message. For example, if you want to root your device that already has the latest 5.11 Lollipop update with the CF Auto Root which is apparently only compatible with the 5.0 firmware, then this error message will appear. So, now you know the reasons it.
If you are not trying to fix the message error of “kernel is not seandroid enforcing”, then you will never be able to use your device again despite you restart the device so many times. Of course, you need an idea to solve this problem that may work on most of the Galaxy series such as Samsung Galaxy Note 4, Galaxy S4, S5, S6, and much more. If you do not want to get stuck on Samsung Logo forever, then you need to follow these two solutions.
The first solution is to do data wiping. In this case, you have to reset your Smartphone to its factory reset but it must be deleting all of the files in the internal memory including app, images, videos as if you buy a new phone. The second solution is to flash the device with special software called Odin Software. This Odin Software is slightly built to solve the error message of “kernel is not Seandroid enforcing”.
Solution 1: How to solve “kernel is not Seandroid enforcing: The Factory Reset Solution
Let us go with the first choice. Hopefully, this first solution will be working on your device. This way is really simple by the way and all of the Android devices can get this factory reset solution. Follow these steps to have factory reset for your Samsung Galaxy.
- Switch off Your device.
- Reboot your smartphone by pressing Power Button, home button, and volume up button all together.
- Then, you will go to the Recovery menu and select Wide Data and Cache, and then click Power Button for the OK.
- Restart your device.
In a certain case, this step is not always working and the error message of “kernel is not seandroid enforcing” still appears. SO, the last way is by flashing the firmware that is compatible with your Smartphone.
Solution 2: How to solve “kernel is not Seandroid enforcing: Flashing Firmware Solution
This solution is quite complicated to conduct. If you do not know about flashing, then you must learn it first or you can go to the Samsung service to get this solution. If you think that you can do it, then you can follow these steps.
[Fixed] Recovery is not Seandroid Enforcing
 Tuesday, January 09, 2018
- What Does ‘Recovery/Kernel is not Seandroid Enforcing’ Mean?
- Method 1. One Click to Fix ‘Recovery/Kernel is not Seandroid Enforcing’ (No Data Loss)
- Method 2. Factory Reset Device in Recovery Mode
- Method 3. Flash A Stock ROM via Odin
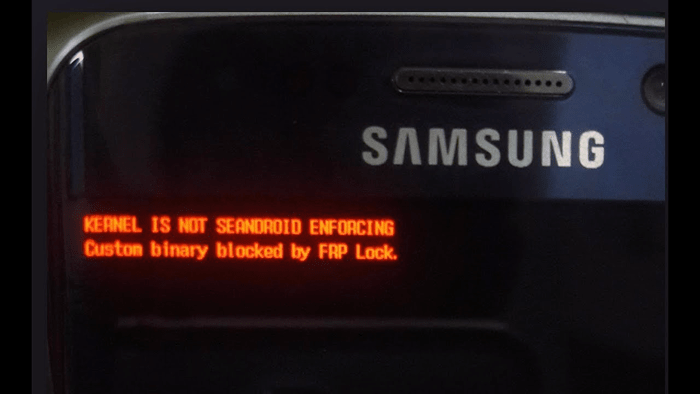
«I have rooted my Samsung Galaxy S5 SM-G900F via Odin successfully and now wanted to flash a custom ROM. Tried to install the ROM with CWM recovery but my phone keeps showing this error in the top left corner:
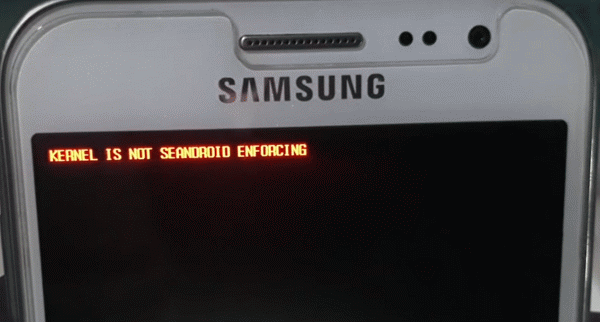
RECOVERY IS NOT SEANDROID ENFORCING
Set Warranty Bit: recovery’
The ‘Recovery/Kernel is not Seandroid Enforcing’ error is usually seen when Samsung users try to root or install a custom ROM on Galaxy S7/S6/S6 Edge/S5/S4/S4, Note 4/3, J7/J5/J2, A5, Galaxy Tab S2. In some cases, users only see ‘Recovery is not Seandroid Enforcing’ or ‘Kernel is not Seandroid Enforcing’; In other cases, the yellow line ‘Set Warranty Bit: recovery’/’Set Warranty Bit: kernel’ is also displayed. In either cases, the phone isn’t bricked and can be fixed with the following methods.
What Does ‘Recovery/Kernel is not Seandroid Enforcing’ Mean?
If you see ‘Recovery is is not Seandroid Enforcing’ or ‘Kernel is not Seandroid Enforcing’, it probably means that you have installed a wrong CWM/TWRP recovery or wrong custom ROM on your phone or try to root the phone with a file that is incompatible with your current firmware. For example, you installed a 4.3 TWRP recovery on an Android 4.4 phone; you rooted your phone on Android 5.1 with a CF-Auto-Root file for Android 5.0.2.
1.One Click to Fix ‘Recovery/Kernel is not Seandroid Enforcing’ (No Data Loss)
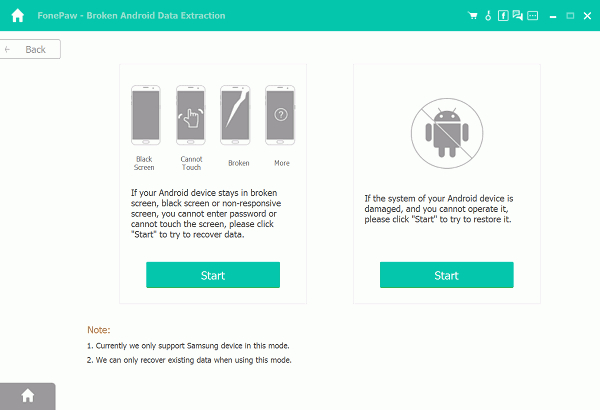
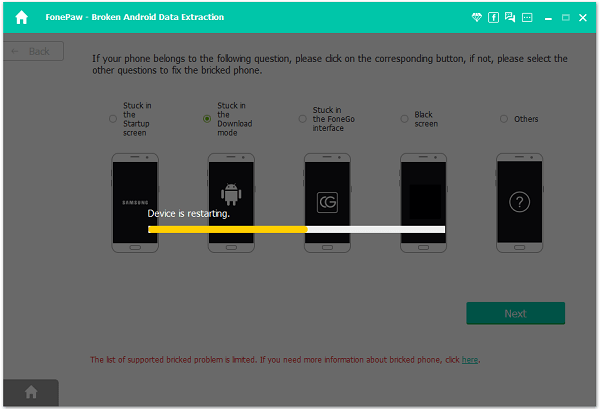
The easiest way to fix ‘Recovery/Kernel is not Seandroid Enforcing’ is using this tool called FonePaw Broken Android Data Extraction. The tool is used to extract data from bricked or broken Android phone, and it also can fix phone stuck in abnormal status. It restarts misbehaving Android phone back to normal without deleting data on the phone. The tool can fix Samsung Galaxy S6/S5/S4, Note 5/Note 4/Note 3 and Tab Pro 10.1 in ‘Recovery/Kernel is not Seandroid Enforcing’ screen.
Video Guide: How to Recover Data from Broken Android
Step 1 Download Broken Android Data Extraction on a Windows PC.
Step 2 Put your Samsung phone in Download mode and connect it to PC with a USB cable. To enter Download mode, power off your phone and use Volume Down, Home and Power buttons to enter Download mode.
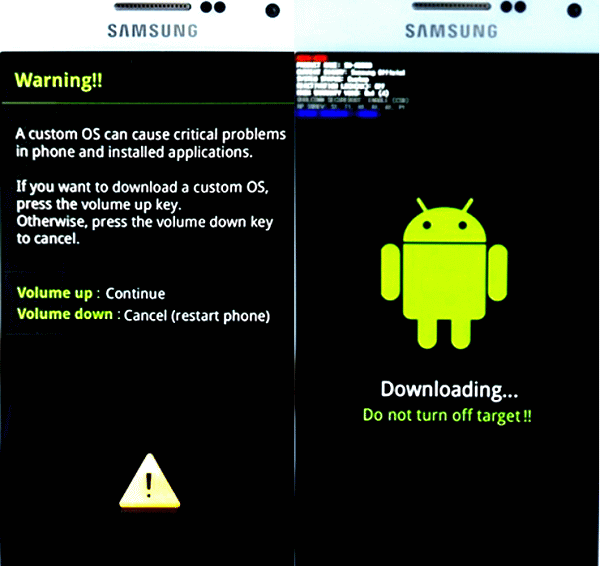
If it won’t work and your phone has a removable battery, remove the battery first, then wait a few minutes and put it back. Hold the Volume Down, Home and Power buttons until the phone boots into Download Mode.
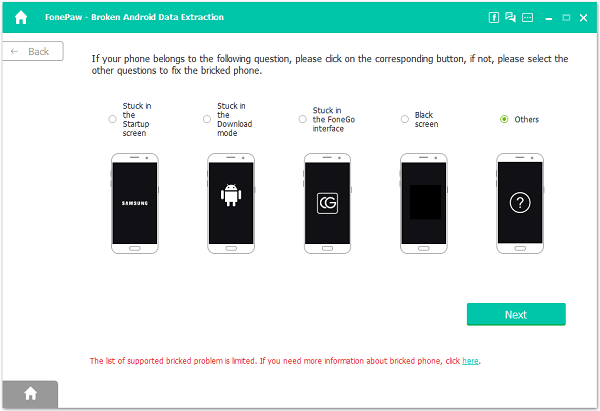
Step 3 Run the program > choose Broken Android Data Extraction > click Start on the right column to restore the phone with system problem.
Step 4 You’ll see the following page, select Stuck in Download Mode.
Step 5 Click Next and the program will begin to fix the phone. When it is done, the phone will reboot. And Recovery/Kernel is not Seandroid Enforcing is fixed.
You can then install a right recovery, flash the phone with a compatible custom ROM or root the phone with a right file.
Method 2: Factory Reset Device in Recovery Mode
Another thing you can try is to put your phone in Recovery mode and then factory reset the phone.
Step 1 Power off your Samsung phone.
Step 2 Pressing Volume Up + Home + Power buttons to enter recovery mode.
Step 3 Under the Recovery mode, choose Wipe Data/Factory Reset. If you are in a TWRP custom recovery, choose Wipe > Swipe to Factory Reset.
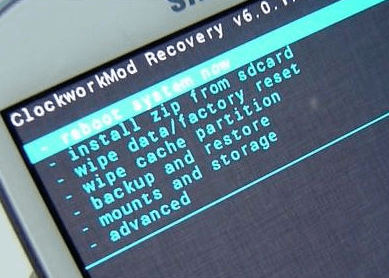
However, many users reported that they can’t get into Recovery mode when the phone shows ‘Recovery is not Seandroid Enforcing’ or ‘Kernel is not Seandroid Enforcing’. If so, use Method 1 or Method 3.
Method 3: Flash A Stock ROM via Odin
If the previous two methods are not options for you, you need to flash a stock firmware with Odin on the phone to fix ‘Recovery is not Seandroid Enforcing’. Here is a guide on how to flash official firmware with Odin (opens new window) . It is important that you have downloaded the correct ROM according to your model number, baseband version and PAD.
In the future, to avoid error like ‘Recovery is not Seandroid Enforcing’ or ‘Kernel is not Seandroid Enforcing’, always double check before you install a custom recovery, custom ROM or root file to make sure that it is compatible with your phone.
Fix – Kernal is Not Seandroid Enforcing for Samsung Devices
Want to get rid of recovery error message on your Samsung phone, i.e., Kernel is not Seandroid Enforcing. The post has a workaround on how to fix it.
Most of the Android users try to install custom Android ROM like CyanogenMod. But before that, you need to root your phone. If you have gained root access on your phone with right file, then you’re good to go. In case, you’ve employed the wrong file; the phone started showing an error message which reads:
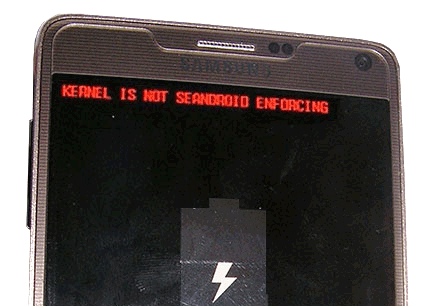
Kernel is Not Seandroid Enforcing
The following message appears on the upper left side of the device screen written in the red color. The worst thing about this issue is that your device fails to boot up.
The condition becomes worst when you have a device like Samsung Galaxy S6 with a non-removable battery. As you won’t be able to remove the battery and reinsert the battery again in the hope that the phone will boot up normally.
Kernel is Not Seandroid Enforcing
The same error message is very popular with Samsung devices. But users with Android phones from other manufacturers like Nokia, LG, HTC, Motorola and other were also reporting about the same issue.
Note: I’m writing this post by keeping Samsung devices in the mind as the issue is very popular with the Samsung devices.
So if you’re seeing the same error message on any of your Samsung devices, then follow the steps mentions in the upcoming workaround.
Kernel is Not Seandroid Enforcing – Workaround
In the following, you need to flash the custom recovery twrp again with the right file. The workaround is straightforward and simple to follow. Even you will able to fix the issue for sure if you follow the steps rightly.
What you’ll Require
- Odin – Samsung ROM Flashing Tool | Download from Official Website
- TWRP – Custom Recovery | Download TWRP Recovery Images – Check supported models
Workaround Steps
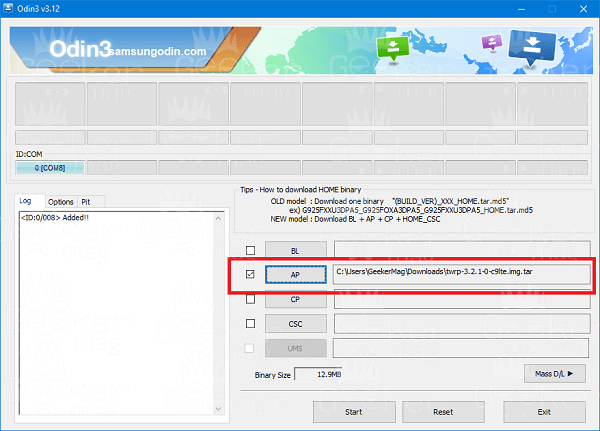
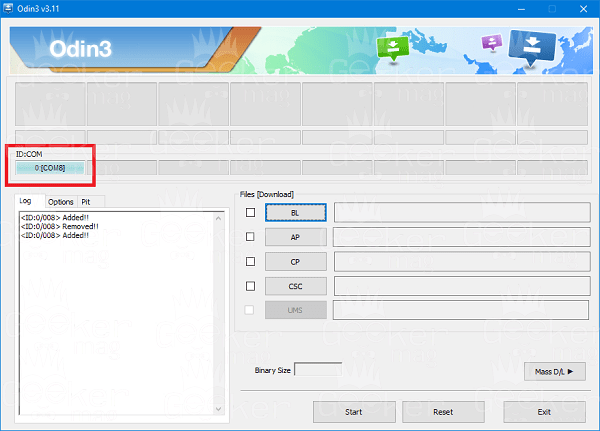
1. Extract the Odin zip file and from the extracted folder Run Odin 3 flashing tool.
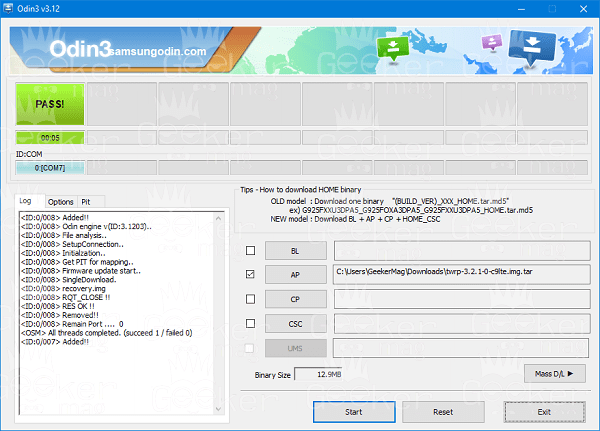
2. In the tool, click on the AP button and select the TWRP Recovery image file which you have downloaded already for your device. The name should be like “twrp-3.2.1-0-c9lte.img.tar” or related.
3. Turn off the device.
For device with removable battery
Remove the battery wait for 2-3 seconds and reinsert it.
For device with non-removable battery
Hold the volume down button and power button for 2-3 seconds, and your phone will shut down.
4. Now Press and hold the Volume Down + Home + Power button at the same time until you see download mode screen. After that Press, the volume up button and connect the phone to PC using the official data cable and leave your device.
When the phone is connected to the computer, in the tool ID:COM will turn blue showing a code 0:
5. On the computer press the Start button available at the bottom. Now let the tool flash the recovery on your phone. Once flashing process is completed, you will see Green color box written “Pass” message inside it.
Your phone will automatically reboot normally without showing an error message, i.e., Kernal is Not Seandroid Enforcing.
The good thing about this method is that no data inside your phone will be deleted during the recovery flashing process which actually happens when you follow the alternative method to fix the same thing by flashing the stock rom.
In case, you’re seeing an error message which reads “Recovery is Not Seandroid Enforcing” then following the same steps you can fix this issue too.
I hope you find this workaround to fix Kernal is Not Seandroid Enforcing error message on Samsung devices. Let me know your thoughts in the comments.
Donate on Paypal or Buy us a coffee or Join Patreon if you find the information shared in this blog post useful. Mention ‘Coffee’ in the Subject. So that I can thank you.
- Website
Himachali, Mechanical Engineer, Snooker Lover, Avid drinker of Scotch, Traveler, and Webmaster.
Решение ошибки «KERNEL IS NOT SEANDROID ENFORCING» на Samsung Galaxy Note 4
Недавно мне в руки попал телефон Samsung Galaxy Note 4, который со слов знакомого перестал нормально включатся. После включения, телефон зависал с сообщением “KERNEL IS NOT SEANDROID ENFORCING” и логотипом телефона.
Выясняя причину появившейся ошибки, я узнал, что владелец телефона попытался получить рут, с помощью какой-то программы.
Первым делом загрузившись в режим восстановления, я попробовал отформатировать телефон с помощью команд «wipe data/factory reset» и «wipe cache partition», однако полный сброс телефона не помог устранить ошибку.
Из лога файлов телефона, я узнал, что к ядру нет доступа, вероятно при получении «Root» повредилось ядро прошивки. Исходя из этого, мной было принято решение скачать и прошить с начала только ядро, а не всю прошивку сразу.
Сказано, сделано, найдя тему о телефоне Samsung SM-N910C Galaxy Note 4 на форуме 4PDA.RU, я нашел и скачал стоковое ядро для своей «N910CXXU2COJ5».
 Нажмите на картинке
Вы спросите, как узнать какая прошивка установлена на телефоне, если он не загружается?
Необходимо нажать сразу три клавиши на выключенном телефоне и подождать несколько секунд, телефон загрузится в режим “Recovery”, где на верху экрана и будет информация о прошивке.
Пример: Android system recovery <3e> LMY47X. N910CXXU2COJ5
ПРОЦЕСС ПРОШИВКИ
1. Скачайте и установите драйверы для вашего телефона.
Для установки драйверов, я использую программы Samsung Kies или Smart Switch PC, при установке которых драйверы всегда правильно определяются операционной системой Windows.
2. Скачайте программу Odin3 и запустите от имени Администратора.
3. Переведите телефон в режим ODIN и подключите с помощью USB шнура к компьютеру, затем нажмите кнопку “Громкость больше”
4. Если драйверы установлены правильно, то в главном окне программы Odin3 появится подключение и номер порта ID:COM.
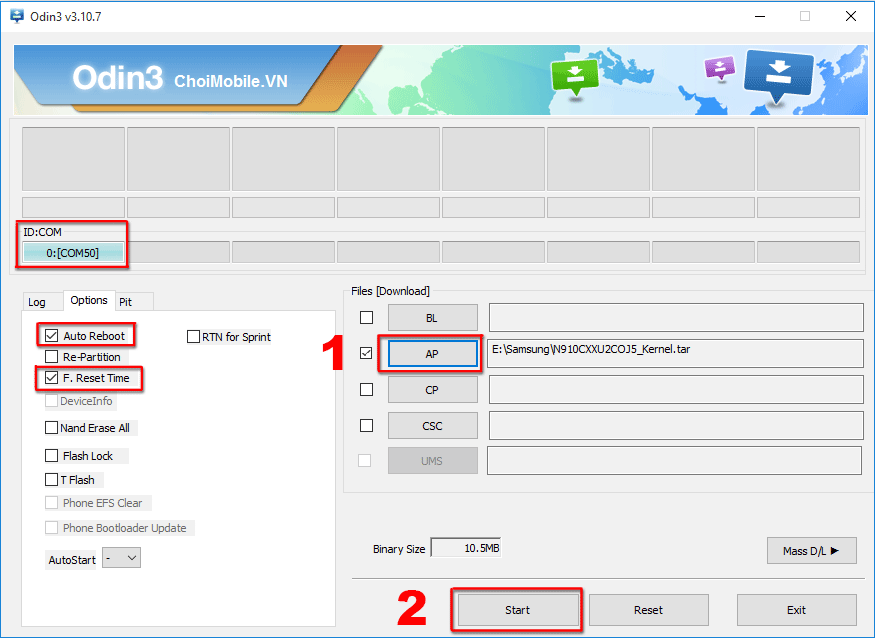
5. Нажмите кнопку «AP» и укажите путь к файлу с ядром. Проверьте в меню «Options» должны быть установлены галочки только на “Auto Reboot и F.Reset Time”.
6. Нажмите кнопку «Start» и дождитесь окончании работы. Телефон перезагрузится сам, теперь его можно отсоединить от компьютера.
В случае получения ошибки, попробуйте другое ядро, USB порт, программу Odin, проверьте шнур и.т.д
P.S Если Вы случайно прошьёте другое ядро (версия ниже или выше), то в телефоне будет постоянно выводится сообщение о нарушении безопасности. Лечится прошивкой родного ядра от вашей версии.