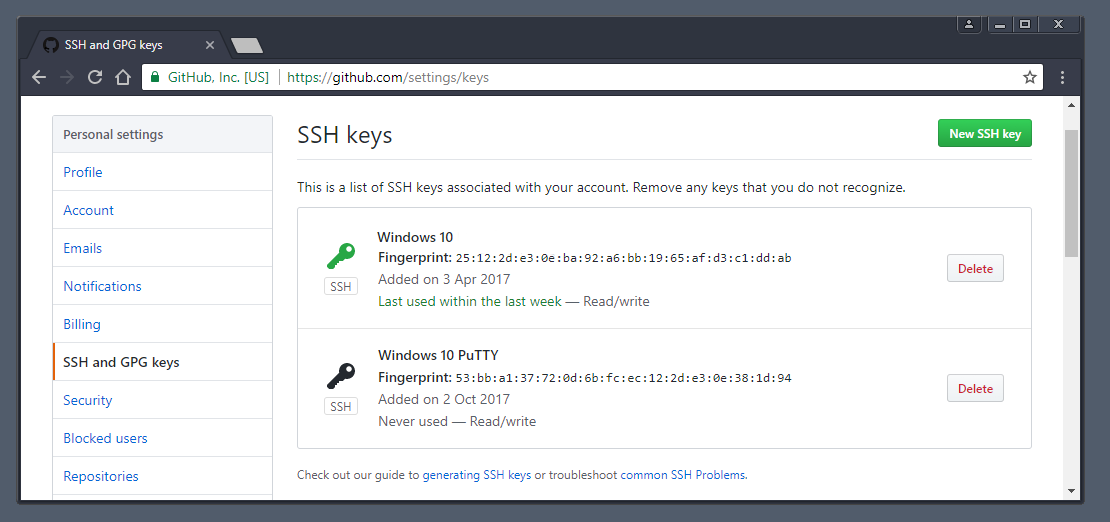
[2023] How to Set Up your SSH key for GitHub on Windows 10/11
One of the most common issues while getting started with Git and GitHub is setting up the SSH private and public keys. On top of this, Git password authentication is no longer available on GitHub.
![]()
![]()
DevOps with Valentine
Last updated: February 2023
Background
As of August 13, 2021, GitHub no longer allows you to use your Github account password to work with Git…
Generating an SSH key
The Secure Shell (SSH) Protocol is a cryptographic network protocol for operating network services securely over an unsecured network. Using the SSH protocol, you can connect and authenticate to remote servers and services.
Table of contents
Considerations
Windows
Windows 10 / 11; Windows Server 2019 / 2022
If you are using Windows 10, you first need to check your Windows version.
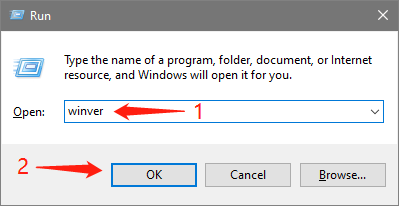
Press the Win key and the R key at the same time to open the run window, enter winver in the window and press Enter , you can see the Windows version you are using in the pop-up window.
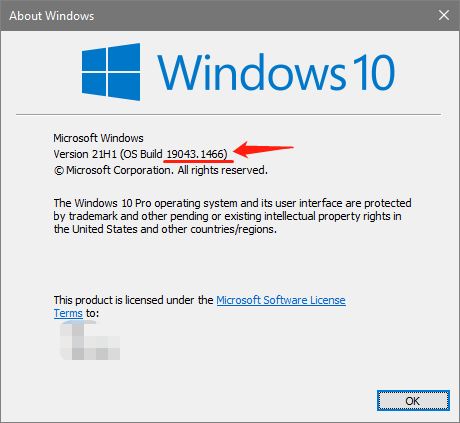
Microsoft integrated OpenSSH into Windows 10 starting with build 1709 . But not stable until the build 1809 and later. If your version is between 1709 and 1809 , try to do your own research on how to use it after completing this section. Or you can check out the next section to use SSH from Git Bash. If your version is lower than 1709 , please go directly to the next section.
Install OpenSSH using Windows Settings
This section will use the GUI method to install OpenSSH, if you want to install it through PowerShell, please check here.
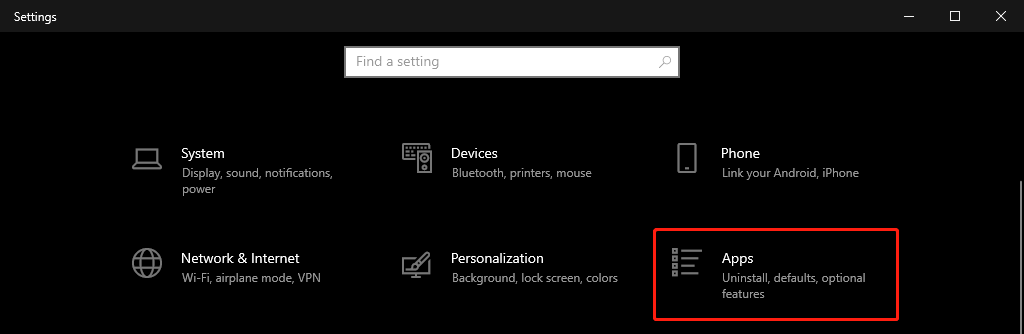
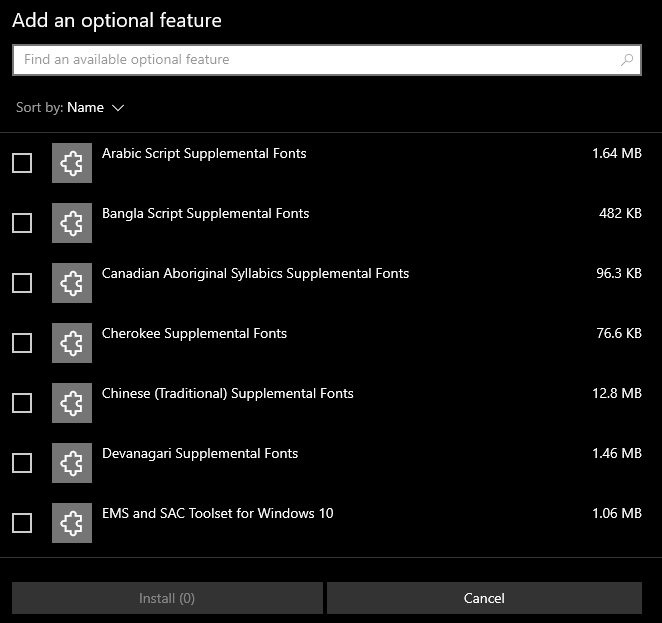
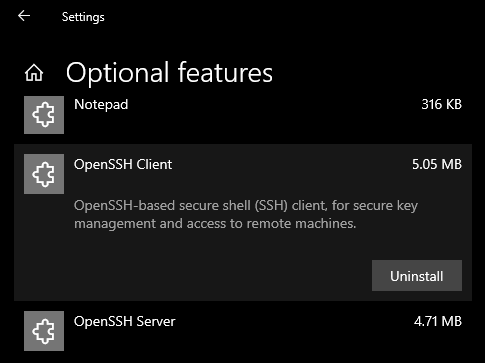
Open Settings, select Apps > Apps & Features, then select Optional Features.

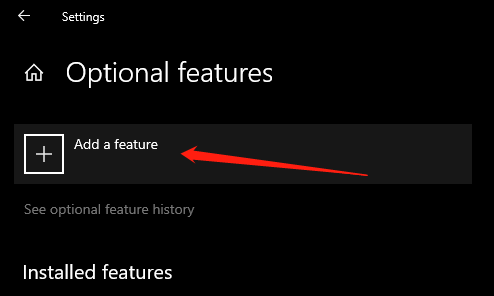
Scan the list to see if the OpenSSH is already installed. If not, at the top of the page, select Add a feature, then:
- Find OpenSSH Client, then click Install
- Find OpenSSH Server, then click Install
Once setup completes, return to Apps > Apps & Features and Optional Features and you should see OpenSSH listed.
To verify that SSH is working, open a command line and type ssh or ssh -V , if you do it correctly, you will get the following output:
Windows 7 / 8; Other Windows
You can completely use PuTTY to complete SSH-related operations, but considering the popularity of PuTTY and the difficulty of PuTTY-related tutorials, here we will use Git Bash to operate.
Git Bash is a BASH emulation installed by default during Git installation. If you haven’t installed Git, please follow this tutorial to install it. To access the Git Bash, you can right-click on any folder (including the desktop) in Windows Explorer and select “Git Bash Here”, you can also find it in the Windows start menu:
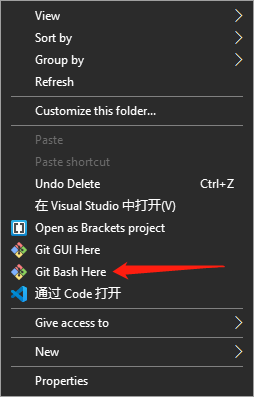
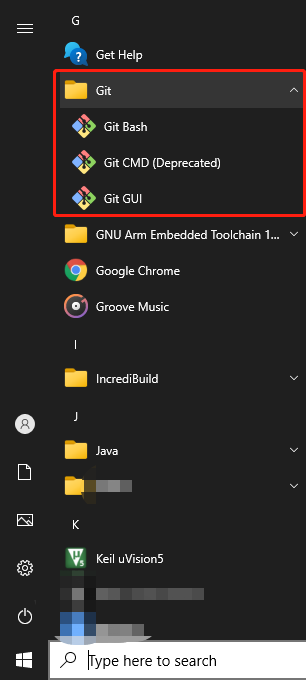
The first picture is the right-click menu, and the second is the start menu. Although the screenshots are for Windows 10 as examples, there are similar options in other Windows.
After open Git Bash, type ssh or ssh -V , if there is output like the following, then SSH is working fine:
Depending on the version of Git and SSH, the output will differ slightly.
macOS
macOS already comes with SSH software to complete this tutorial. However, for security reasons, it is recommended to update SSH for better security.
- You can avoid using the old one that comes with the system by installing the latest one via Homebrew. If you don’t have Homebrew, you can find the Homebrew installation tutorial here.
- Or you can update the entire OpenSSH suite.
Checking for existing SSH keys
Before you generate an SSH key, you can check to see if you have any existing SSH keys.
Open Terminal. If you are Windows OS, open PowerShell or Git Bash.
/.ssh to see if existing SSH keys are present.
Check the directory listing to see if you already have a public SSH key. The file with the .pub extension is the public key, and the file without the extension is the private key. For information security, please do not share the private key on the Internet. By default, the filenames of supported public keys for GitHub are one of the following.
- id_rsa.pub
- id_ecdsa.pub
- id_ed25519.pub
Tip: If you receive an error that
/.ssh doesn’t exist, you do not have an existing SSH key pair in the default location. You can create a new SSH key pair in the next section.
Note: GitHub is improving security by dropping older, insecure key types.
DSA keys ( ssh-dss ) are no longer supported. Existing keys will continue to function through March 15, 2022. You cannot add new DSA keys to your user account on GitHub.com.
RSA keys ( ssh-rsa ) with a valid_after before November 2, 2021 may continue to use any signature algorithm. RSA keys generated after that date must use a SHA-2 signature algorithm. Some older clients may need to be upgraded in order to use SHA-2 signatures.
If you already have an SSH key that you can use, you can choose to continue with the steps in the next section to generate a new SSH key. Make a backup if you don’t want to overwrite the new key over the old one.
Generating a new SSH key
If you don’t have an existing public and private key pair, type the following command to generate a new SSH Key. Note: replace <email> with the email address you used to register GitHub.
Note: If you are using a legacy system that doesn’t support the Ed25519 algorithm, use:
Generate SSH Keys on Windows 10
SSH, the secure shell, is often used to access remote Linux systems. But its authentication mechanism, where a private local key is paired with a public remote key, is used to secure all kinds of online services, from GitHub and Launchpad to Linux running on Microsoft’s Azure cloud.
Generating these keys from Linux is easy, and thanks to Ubuntu on WSL, you can follow the same process from Windows 10. But even without Ubuntu, SSH keys can also be generated with the free and open source OpenSSH client built into Windows 10 or with PuTTY for Windows 8.1 and earlier.
Over the following few steps, we’ll guide you through the process of generating SSH keys using Ubuntu on WSL, OpenSSH, and PuTTY.
Requirements
All you need is a PC running Windows and one of the following installed:
- Ubuntu on WSL for Windows 10
- The OpenSSH client built into Windows 10
- The puttygen.exe executable from PuTTY for Windows 7 or 8.1
If you don’t already have Ubuntu on WSL, take a look at our Install Ubuntu on WSL tutorial.
Originally authored by Graham Morrison.
2. Passphrase considerations
When creating the SSH key pair, as shown in the following steps, you can choose to either lock your private key with a passphrase or use no passphrase at all.
Adding a passphrase requires the same passphrase to be entered whenever the key pair is used. Not adding a passphrase removes this requirement. For this reason, creating a key pair without a passphrase is more convenient and potentially essential for certain scripts and automation tasks. But it’s also less secure.
If a third-party gains access to a private key without a passphrase they will be able to access all connections and services using the public key.
A good compromise between convenience and security is to generate a separate key pair for each service or connection you want to use, adding a passphrase only for critical services. If you suspect a key has been compromised, simply generate a new pair for that service and remove the less secure key.
3. Key generation with Ubuntu on WSL
Launch Ubuntu on WSL from the start menu and make sure SSH is installed by entering following command at the command prompt:
The key generation process is identical to the process on a native Linux or Ubuntu installation. With SSH installed, run the SSH key generator by typing the following:

You will be asked two questions. The first asks where to save the key, and you can press return to accept the default value. The second question asks for the passphrase. As discussed, entering a passphrase will require you to use the same passphrase whenever the key is accessed.
However, the passphrase isn’t a requirement, and pressing return (twice) will generate a key pair without one. Consequently, you won’t be asked for a passphrase when using your key.
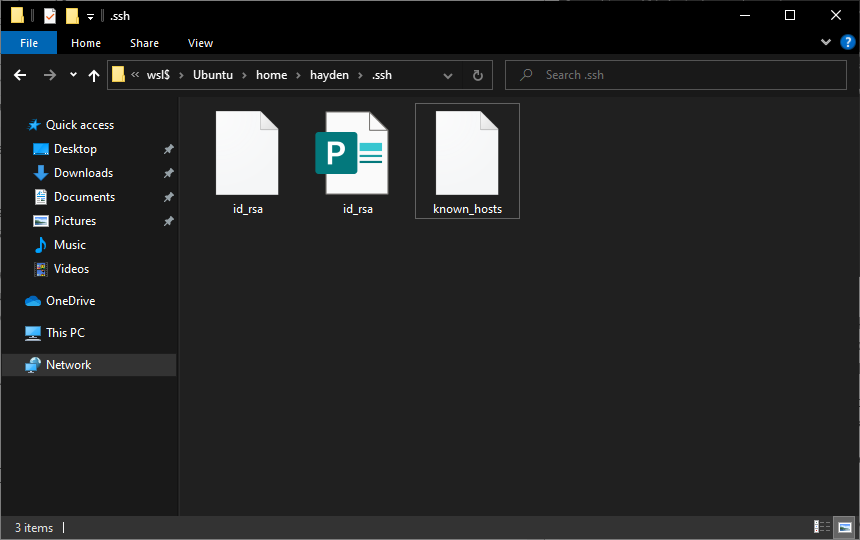
When the process has finished, the private key and the public key can be found in the
/.ssh directory accessible from the Ubuntu terminal, or the following folder from Windows file manager:
4. Key generation with OpenSSH
Recent versions of Windows 10 include the OpenSSH client by default, but if yours does not or you’re unsure, follow these steps:
Open Settings and then navigate to Apps > Apps and Features > Optional Features:


Scan this list to see if OpenSSH client is already installed. If not, at the top of the page select Add a feature, then, to install the OpenSSH client, locate OpenSSH Client and click Install
Once the installation completes, return to Apps > Apps and Features > Optional Features and you should see the OpenSSH component(s) listed:

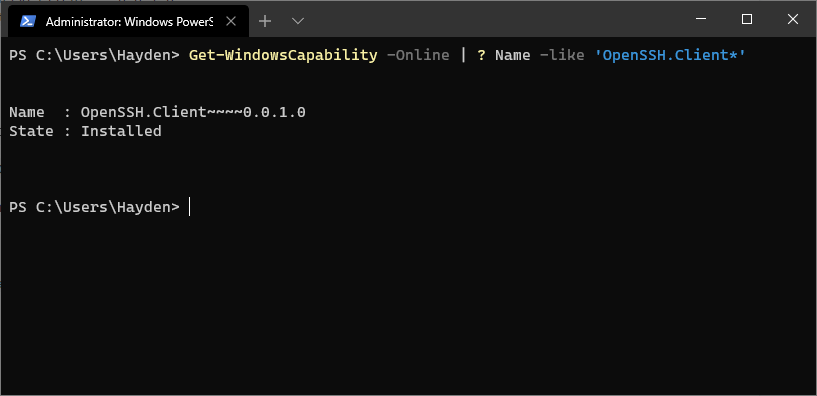
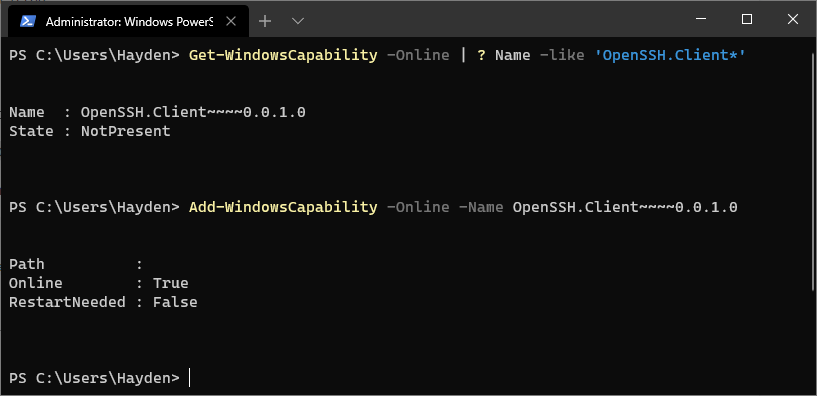
You can optionally install the OpenSSH client using PowerShell, first launch ‘Windows PowerShell’ as an Administrator. To check the status of the OpenSSH client type the command:
This should return:
If OpenSSH client is listed as “NotPresent” you can install by typing:
The command should return:
Finally, to generate your keys, launch ‘Windows PowerShell’ as an Administrator, and type:

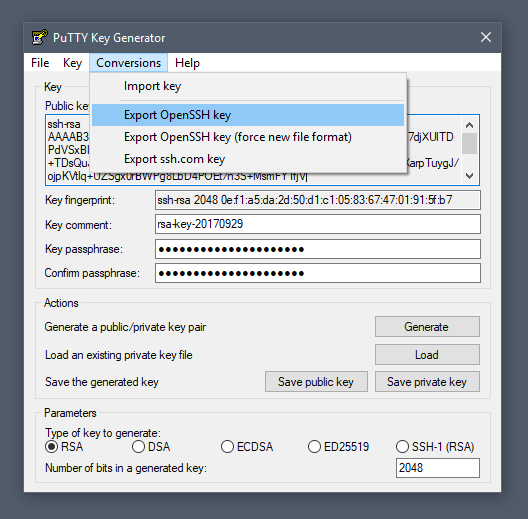
5. Key generation with Putty
To generate a key pair with the PuTTY key generator, simply run puttygen.exe and click the Generate button in the window that appears.
You will be asked to move the mouse and press keys to improve the random number generation at the heart of SSH security. After this, the raw contents of the public key will be displayed alongside its fingerprint and a timestamp comment.
Two important fields, Key passphrase and Confirm passphrase, allow you to enter a passphrase to protect the private key.
Finally, you will need to export both the private and public keys separately:
- to export the private key, select Export OpenSSH key from the Conversions menu
- to export the public key, click Save public key from the main window
Public keys typically use the .pub suffix. By convention, the private key is usually called id_rsa and the public key id_rsa.pub , but this isn’t a requirement. It’s common to have many keys with more descriptive filenames, for instance.
6. Getting help
Congratulations! You have just generated a SSH key pair from Windows 10. You can now add the public key to those services you wish to authenticate.
If you need more details on using SSH keys, take a look at the Ubuntu community documentation, and if you get stuck, help is always at hand:
Manually generating your SSH key in Windows
On Windows, you can create SSH keys in many ways. This document explains how to use two SSH applications, PuTTY and Git Bash.
We recommend ECDSA or RSA keys. DSA keys are supported, but not recomended.
PuTTY
PuTTY is an SSH client for Windows. You can use PuTTY to generate SSH keys. PuTTY is a free open-source terminal emulator that functions much like the Terminal application in macOS in a Windows environment. This section shows you how to manually generate and upload an SSH key when working with PuTTY in the Windows environment.
About PuTTY
PuTTY is an SSH client for Windows that you will use to generate your SSH keys. You can download PuTTY from www.chiark.greenend.org.uk.
When you install the PuTTY client, you also install the PuTTYgen utility. PuTTYgen is what you will use to generate your SSH key for a Windows VM.
| This page gives you basic information about using PuTTY and PuTTYgen to log in to your provisioned machine. For more information on PuTTY, see the PuTTY documentation |
|---|
Generating an SSH key
To generate an SSH key with PuTTYgen, follow these steps:
- Open the PuTTYgen program.
- For Type of key to generate, select SSH-2 RSA.
- Click the Generate button.
- Move your mouse in the area below the progress bar. When the progress bar is full, PuTTYgen generates your key pair.
- Type a passphrase in the Key passphrase field. Type the same passphrase in the Confirm passphrase field. You can use a key without a passphrase, but this is not recommended.
- Click the Save private key button to save the private key. You must save the private key. You will need it to connect to your machine.
- Right-click in the text field labeled Public key for pasting into OpenSSH authorized_keys file and choose Select All.
- Right-click again in the same text field and choose Copy.
Importing your SSH key
Now you must import the copied SSH key to the portal.
- After you copy the SSH key to the clipboard, return to your account page.
- Choose to Import Public Key and paste your SSH key into the Public Key field.
- In the Key Name field, provide a name for the key. Note: although providing a key name is optional, it is a best practice for ease of managing multiple SSH keys.
- Add the key. It will now appear in your table of keys under SSH.
PuTTY and OpenSSH use different formats of public SSH keys. If the text you pasted in the SSH Key starts with —— BEGIN SSH2 PUBLIC KEY , it is in the wrong format. Be sure to follow the instructions carefully. Your key should start with ssh-rsa AAAA… .
Once you upload your SSH key to the portal, you can connect to your virtual machine from Windows through a PuTTY session.
Git Bash
The Git installation package comes with SSH. Using Git Bash, which is the Git command line tool, you can generate SSH key pairs. Git Bash has an SSH client that enables you to connect to and interact with Triton containers on Windows.
- (Download and initiate the Git installer](https://git-scm.com/download/win).
- When prompted, accept the default components by clicking Next.
- Choose the default text editor. If you have Notepad++ installed, select Notepad++ and click Next.
- Select to Use Git from the Windows Command Prompt and click Next.
- Select to Use OpenSSL library and click Next.
- Select to Checkout Windows-style, commit Unix-style line endings and click Next.
- Select to Use MinTTY (The default terminal of mYSYS2) and click Next.
- Accept the default extra option configuration by clicking Install.
When the installation completes, you may need to restart Windows.
Launching GitBash
To open Git Bash, we recommend launching the application from the Windows command prompt:
- In Windows, press Start+R to launch the Run dialog.
- Type C:\Program Files\Git\bin\bash.exe and press Enter.
Generating SSH keys
First, create the SSH directory and then generate the SSH key pair.
One assumption is that the Windows profile you are using is set up with administrative privileges. Given this, you will be creating the SSH directory at the root of your profile, for example:
- At the Git Bash command line, change into your root directory and type.
Change into the .ssh directory C:\Users\joetest\.ssh
- When prompted for a password, type apassword to complete the process. When finished, the output looks similar to:
Uploading an SSH key
To upload the public SSH key to your Triton account:
- Open Triton Service portal, select Account to open the Account Summary page.
- From the SSH section, select Import Public Key.
- Enter a Key Name. Although naming a key is optional, labels are a best practice for managing multiple SSH keys.
- Add your public SSH key.
When Triton finishes the adding or uploading process, the public SSH key appears in the list of SSH keys.