How to Install FFmpeg on Linux, macOS, and Windows
FFmpeg is a cross-platform application that manages various types of multimedia files. The tool contains a set of shared audio and video libraries such as libavformat, libavutil, and libavcodec.
Furthermore, it decodes, encodes, mux, demux, streams, filters, plays, and transcodes media files. When converting video and audio files using FFmpeg, the tool will auto-detect the input and output formats.
FFmpeg is available as a command-line tool and supports different operating systems. In this article, we will explain how to install FFmpeg on Linux, macOS, and Windows.
If you want to install FFmpeg on your Linux VPS, connect to your machine via SSH before proceeding further.

How to Install FFmpeg on Linux
In this section, we will explain how to set up FFmpeg on popular Linux distributions like Ubuntu, Debian, CentOS, Fedora, and RHEL.
Installing FFmpeg on Ubuntu
There are two methods to install FFmpeg on Ubuntu – via the Personal Package Archives (PPA) and the default repository. The former contains a collection of software managed by the Ubuntu community and works best on Ubuntu 18.04 and older versions.
However, the installation must be done via the default repository if your machine runs Ubuntu 20.04 or 22.04.
Ubuntu 18.04
Here’s how to install FFmpeg via the PPA:
- Open the Terminal and log in as a root user.
- Install the software-properties-common package. This will allow you to manage the repositories you install the application from:
- Once done, add mc3man PPA by adding the following command:
- After the PPA is installed on the system, update the repository by running these commands consecutively:
- Next, install FFmpeg by typing in the command below:
Ubuntu 20.04
Follow these steps to install FFmpeg via the default repository:
- Open the Terminal and access it via a root user.
- Update the system and packages installed by running both commands consecutively:
- Insert the command below to install the FFmpeg application:
Installing FFmpeg on Debian
There are two ways to install FFmpeg on Debian – via the default and multimedia repositories.
The former method serves Debian 9 and newer versions, while the latter applies to Debian 8 and older versions.
Debian 9
Here’s how to install FFmpeg using the default repository:
- Open the Terminal and log in via a root user.
- Update the package list and system by running both commands consecutively:
- Next, install FFmpeg by adding the command below:
Debian 8
FFmpeg is unavailable in the official Debian 8 or older repository. Therefore, users must add the Debian multimedia repository to install the codex by editing the sources.list file that contains the list of repositories the APT uses.
Follow these steps to install FFmpeg using the multimedia repository:
- Launch the Terminal and log in as a root user.
- Next, open the source.list file by typing in the following command. Use an editor such as nano or vi:
- Press I to enter Insert mode and start editing.
- Add the following lines at the end of the file:
- Save the file by pressing ESC and close the file by pressing : (colon) and q!
- Finally, update the system by typing in the command below:
- Insert this command to install the deb-multimedia-keyring package:
- Update the system once again to ensure the changes were saved by running the command below:
- Once finished, install the FFmpeg package by typing in the command below:
Installing FFmpeg on CentOS, Fedora, and RHEL
FFmpeg package is not available in the official repository of CentOS, Fedora, and RHEL. Therefore, users need to install it using an additional repository.
CentOS 7
Here’s how to install FFmpeg on CentOS 7 using the Nux Dextop repository:
- Open the Terminal and log in as a root user.
- Install the EPEL repository by typing in this command:
- Update the system and packages by running the following command:
- Use these commands to install the Nux Dextop repository:
- Finally, type in this command to install the FFmpeg and its development package:
RHEL 7/8
Follow these steps to install FFmpeg on RHEL 7/8 via the RPM Fusion repository:
- Open the Terminal and access via a root user.
- Type in the command below and press Enter to update the system:
- Install the EPEL repository by inserting this command and hitting Enter:
- Next, run either of these commands to install RPM fusion:
- Install FFmpeg and its development packages by typing in the following command
Fedora
Here’s how to install FFmpeg on Fedora using the RPM Fusion repository:
- Open the Terminal and log in as a root user.
- Update the system by inserting the following command:
- Add the RPM Fusion repository to install FFmpeg by running the command below:
- Update the system once again to make sure the changes were saved by running the following command:
- Next, install FFmpeg and its development package by inserting this:
Installing FFmpeg on Arch Linux
The official Arch Linux repository, the Packman package manager, provides the FFmpeg codex on their system. Here’s how to install it:
- Open the Terminal and log in to a user account with sudo privileges.
- Update the system packages by running the following command:
- Type in the command below to install FFmpeg:
- Next, install the development package by inserting the following commands consecutively:
- Update the system once again by running this command:
Verifying the FFmpeg Installation
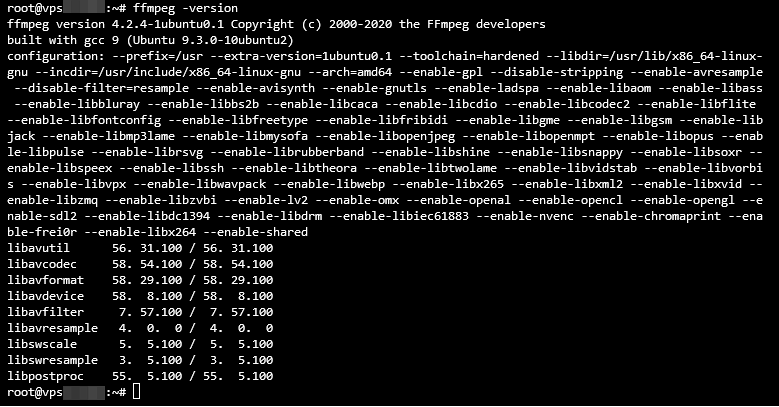
To verify the FFmpeg installation and check what version is running on the machine, insert the following command:
The output should look as shown below:
How to Install FFmpeg on macOS
Follow these steps to set up FFmpeg on macOS:
- Download the FFmpeg package from the official website.
- Choose the Static builds for macOS 64-bit. This will redirect you to the evermeet.cx site.
- Select the ffmpeg-5.0.1 version.
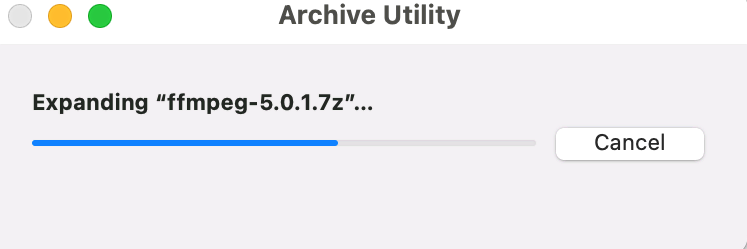
- Open the downloaded file. This will extract it using the Archive Utility and create an executable FFMpeg file.
- Launch the Home folder by opening Finder and using the keyboard shortcut CMD + Shift + H, or clicking the Go button on the menu bar and clicking Home.
- Go to File and click the New folder. Rename it to audio-orchestrator-ffmpeg and press Return to confirm the change.
- Open the newly added folder and create a new folder labeled bin.
- Move the FFmpeg file from Downloads to the newly created bin folder.
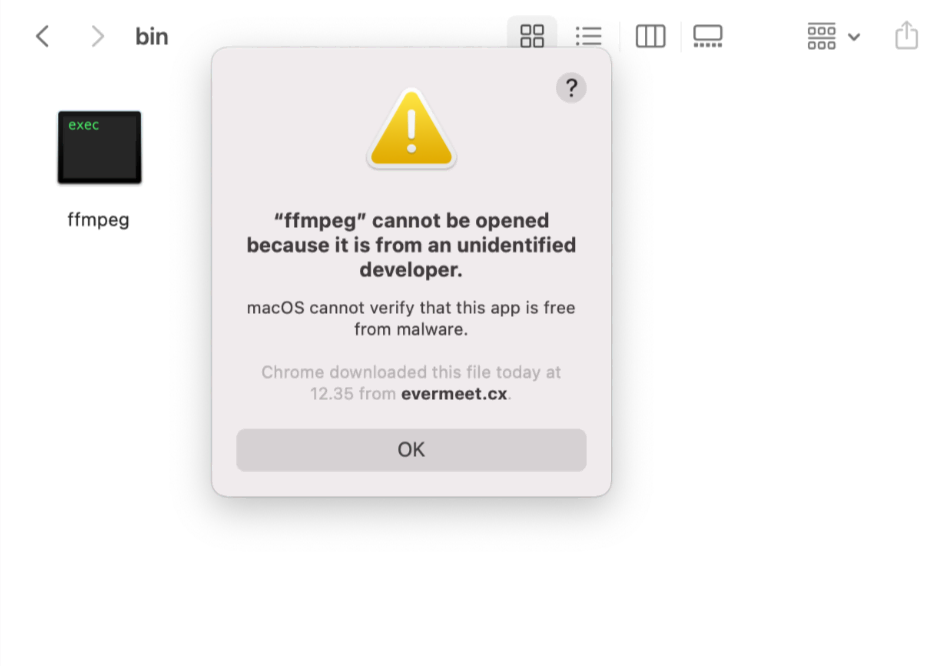
- Double-click to open the FFmpeg file. When the “ffmpeg” can’t be opened because it is from an unidentified developer.” message appears, press OK.
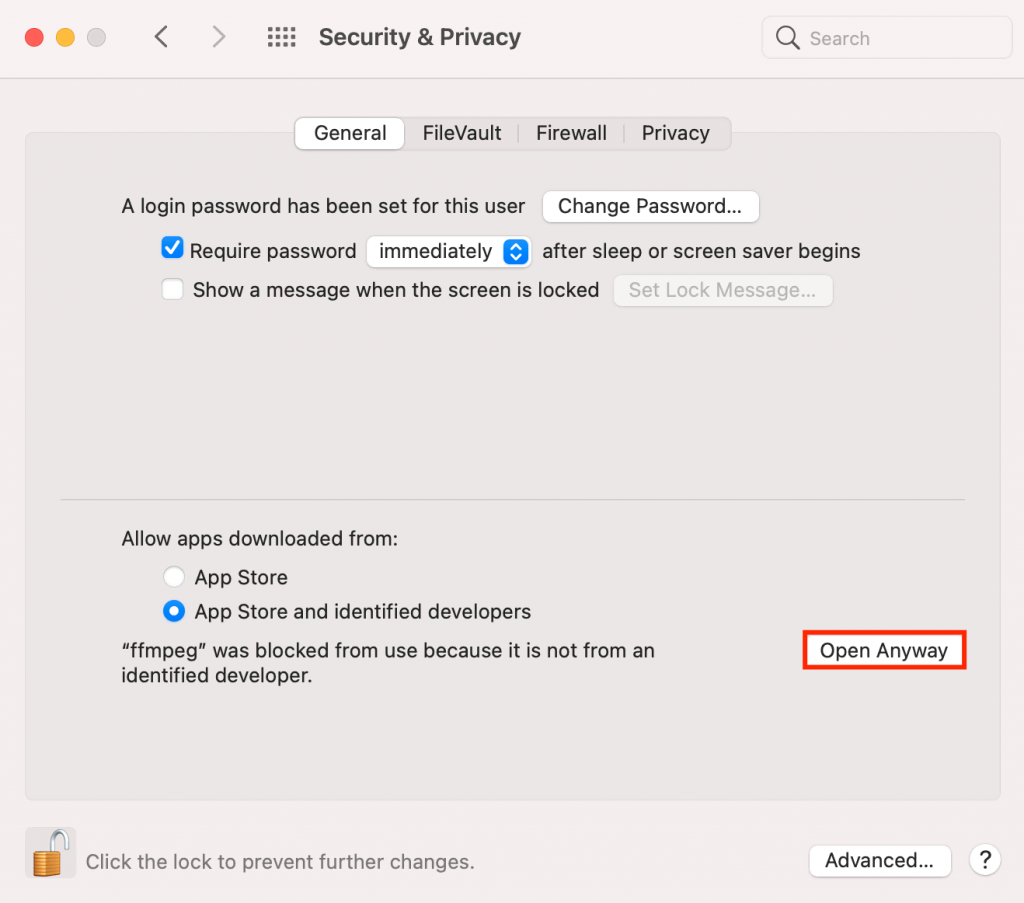
- Go to System Preferences and select Security and Privacy.
- Choose the General tab.
- When a new error message appears, click Open Anyway.
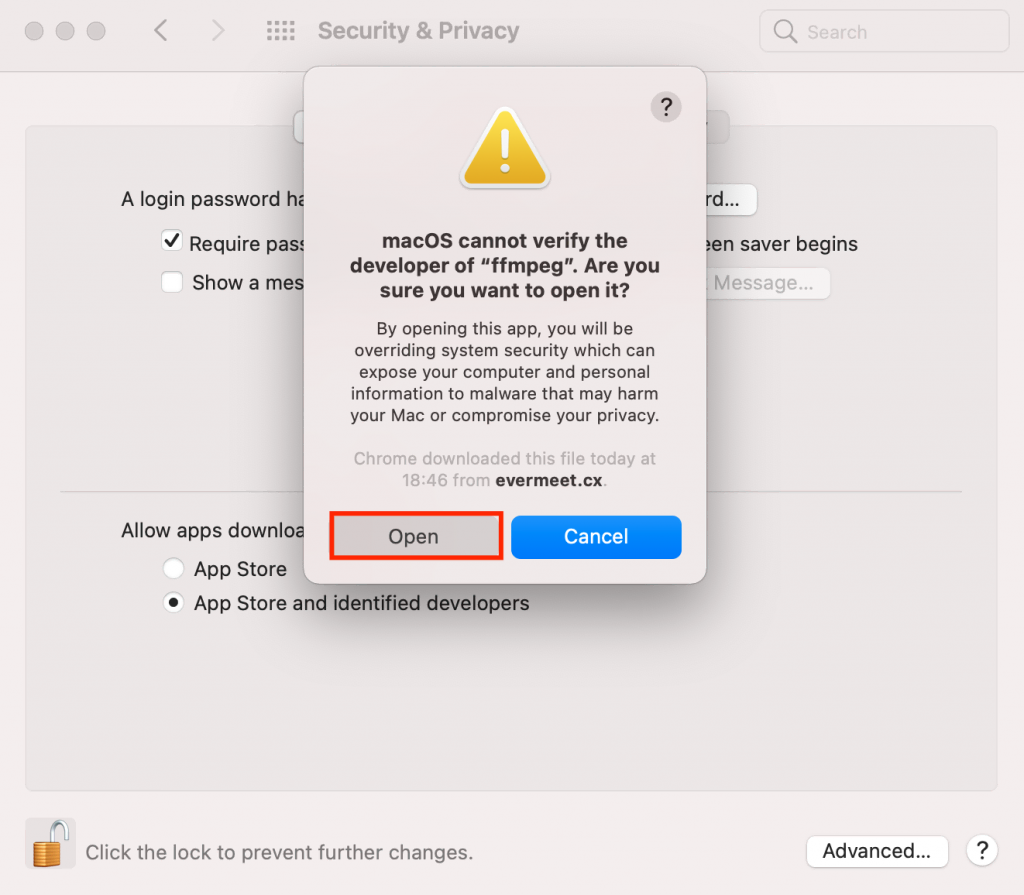
- Another pop-up will appear stating that “macOS cannot verify the developer of “ffmpeg”. Are you sure you want to open it?”. Click Open.
- Double click the FFmpeg file, and a new Terminal window will open. Close it only when the process is complete.
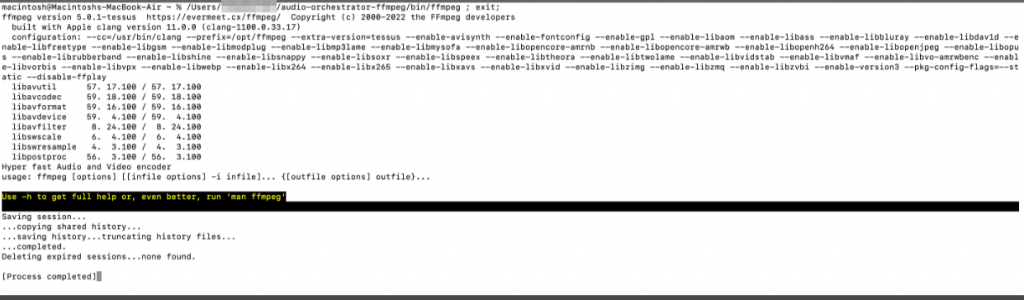
- Congratulations, you have successfully installed FFmpeg.
How to Install FFmpeg on Windows
Before the installation process, it is vital to have a ZIP file utility installed on your system. Here’s how to install FFmpeg on Windows:
- Download the FFmpeg package from the official website.
- Choose the Windows builds from gyan.dev. This will redirect you to the gyan.dev website.
- Select the ffmpeg-git-full.7z version.
- Once downloaded, right-click the FFmpeg folder and select Extract files.
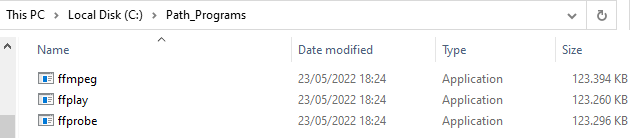
- Once done, open the extracted folder and copy and paste all the EXE files from bin to the root folder of your hard drive. For example, create a separate folder on the Local Disk (C:) to store all the files.
- Type “environment properties” on the search tab and click Open.
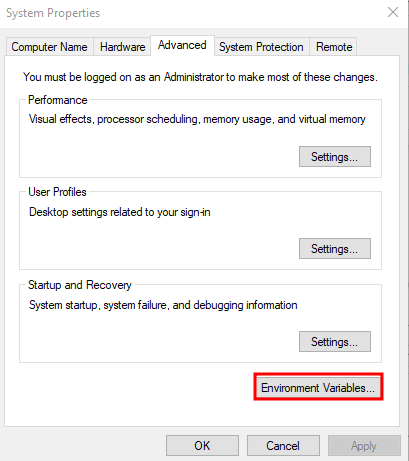
- This will open the System Properties window. Go to the Advanced tab and choose Environment Variables…
- Go to the System variables section. Select Path from the list and click Edit.
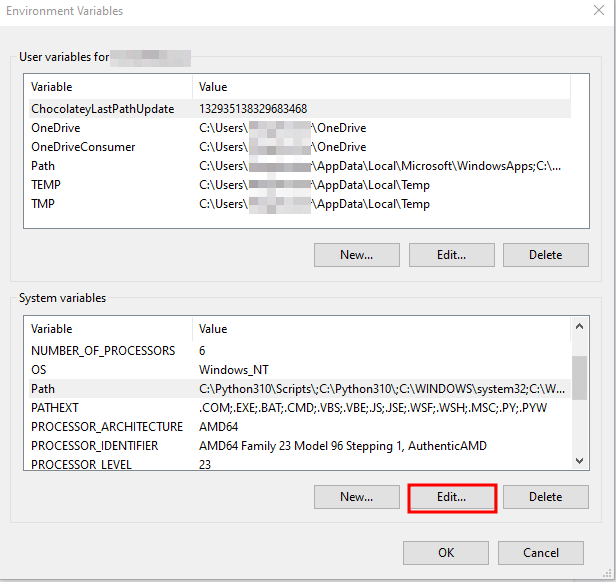
- Choose New and add the FFmpeg path of the folder you have created previously to store the EXE files.
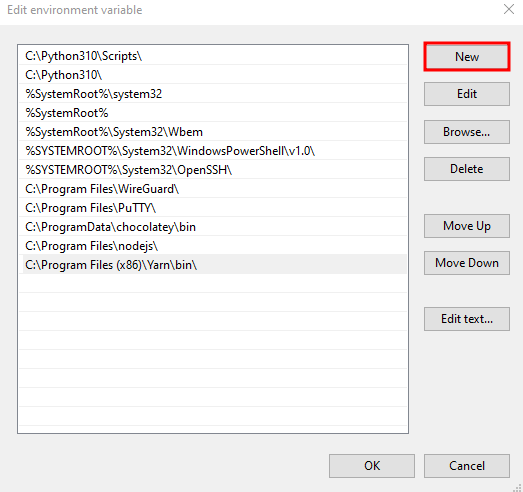
- Once done, click OK to save your changes. This will close the Edit environment variable window.
- Select OK to close the Environment Variables window and click OK once again to close System Properties.
- Open the Command Prompt window or type “cmd” in the search tab.
- Run the following command to verify that FFmpeg is installed:
- The following output should appear, showing the FFmpeg version and default configuration settings:
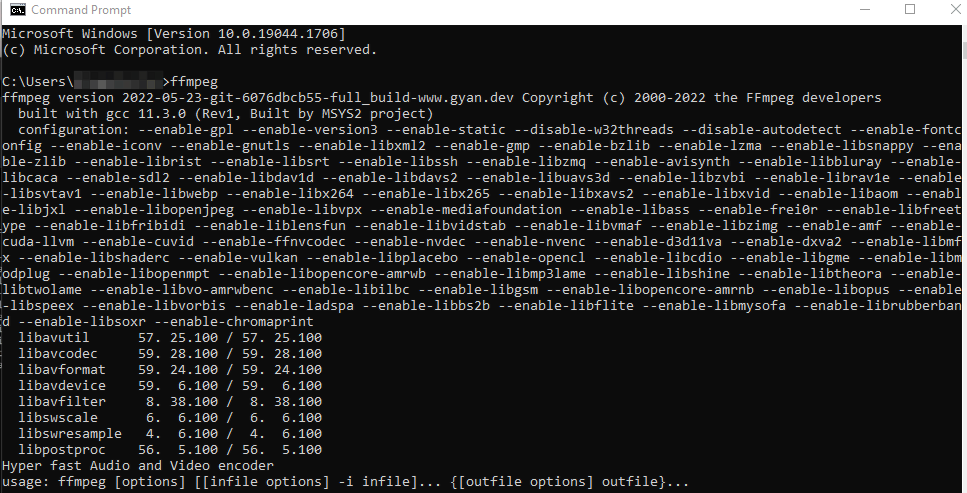
- Congratulations, You have successfully installed the FFmpeg application on your system.
Conclusion
FFmpeg is a cross-platform software that manages multimedia files using a single-line command to execute various actions. In addition, it contains a set of shared audio and video libraries such as libavcodec, libavutil, and libavformat.
We have also explained how to install FFmpeg on different Linux distributions such as Ubuntu, Debian, CentOS, RHEL, Fedora, macOS, and Windows systems.
We hope this article has helped you understand how to install FFmpeg. If you have any questions or suggestions, please leave them in the comments section below.
Edward is a content editor with years of experience in IT writing, marketing, and Linux system administration. His goal is to encourage readers to establish an impactful online presence. He also really loves dogs, guitars, and everything related to space.
Noviantika is a web development enthusiast with customer obsession at heart. Linux commands and web hosting are like music to her ears. When she’s not writing, Noviantika likes to snuggle with her cats and brew some coffee.
Installing FFmpeg on Windows
FFmpeg is a command-line audio and video converter available for Linux, macOS, and Windows. This open-source tool helps users manipulate multimedia content and offers free access to several audio and video libraries.
Even though FFmpeg doesn’t have a clickable GUI, the installation process is straightforward.
In this guide, you will learn how to install FFmpeg on Windows in four simple steps.
- A system running Windows (This tutorial uses Windows 10).
- A file archiver (This guide uses 7-Zip).
- Command Prompt or Windows PowerShell access.
- Administrator privileges.
How To Install FFmpeg on Windows
Installing FFmpeg on Windows requires adding the utility to the Windows PATH. Additionally, users can manually navigate to the folder containing the executable and run the program. However, the process is time-consuming and impractical.
A straightforward way to work with FFmpeg is to add it to PATH by editing Windows environment variables. Therefore, Windows knows where to look for the executable. Users can run FFmpeg directly from the command line without typing in the full path to the app’s folder.
Step 1: Download FFmpeg for Windows
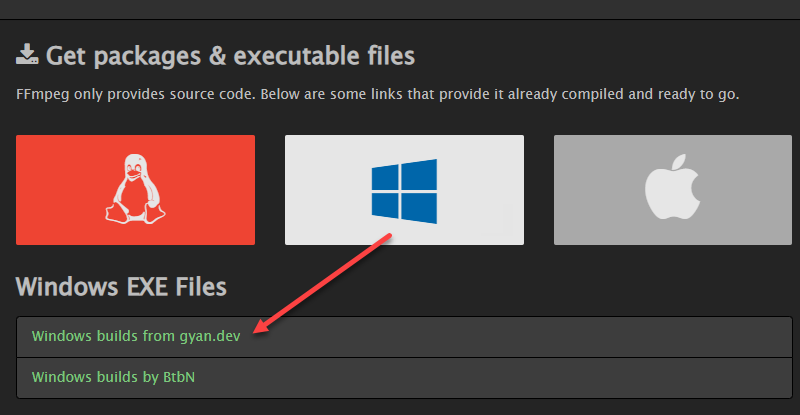
Visit the FFmpeg download page. The More downloading options section has FFmpeg packages and executable files for Linux, Windows, and Mac. To get the Windows version:
1. Hover over the Windows logo and click the Windows builds from gyan.dev link. A new page opens.
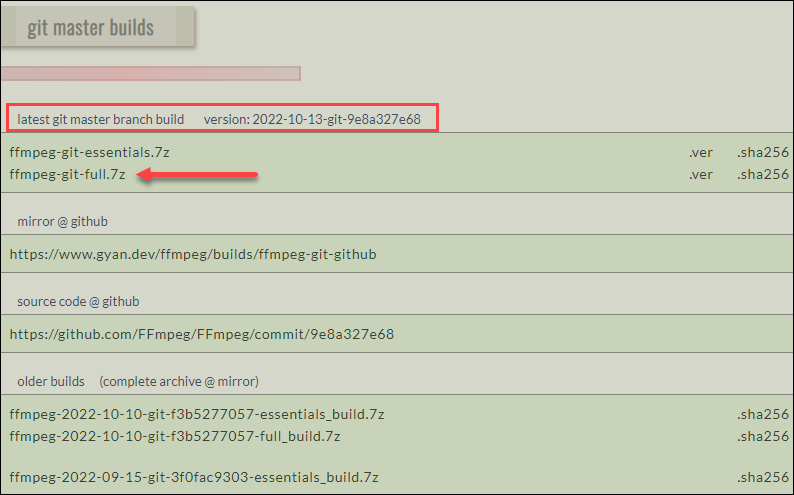
2. In the git master builds section, look for the latest version of the FFmpeg build. Click the ffmpeg-git-full-7z link to download the full build since that version has the most up-to-date libraries.
3. Choose the download location and save the file if the download does not start automatically.
Note: This guide uses the Windows build from gyan.dev. Other builds are available for download, like the one by BtbN. No official documentation confirms any significant differences between different builds.
Step 2: Extract the Downloaded Files
Once downloaded, extract the contents:
1. Locate the downloaded file. The default location is the Downloads folder.
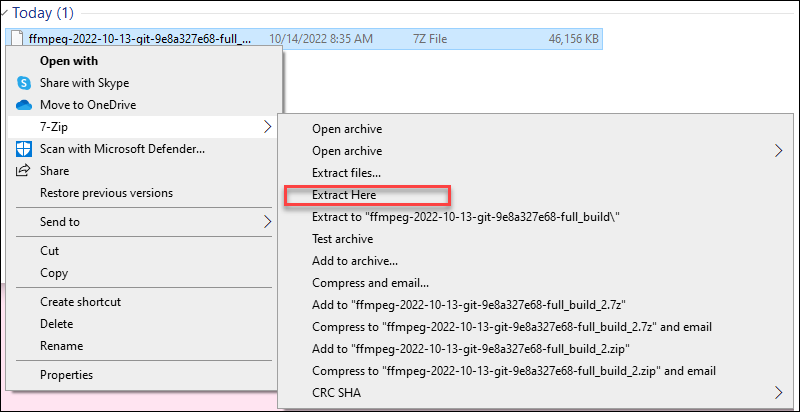
2. Right-click the file and hover over 7-Zip (or another file archiver of choice).
3. From the archiver submenu, choose Extract here. Wait for a few seconds for the extracting process to complete.
5. Rename the extracted folder to ffmpeg.

6. Move the folder to the root of the C drive or the folder of your choice.

Step 3: Add FFmpeg to PATH
Set Windows environment variables to add FFmpeg to the PATH. Follow these steps:
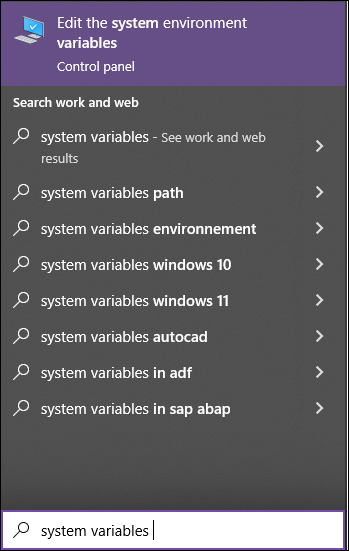
1. Type system variables into the search bar and click the Edit the system environment variables option.
2. Under the User variables section, select Path and click the Edit button.
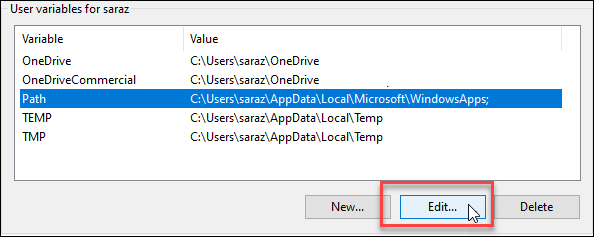
3. Choose New from the side menu.
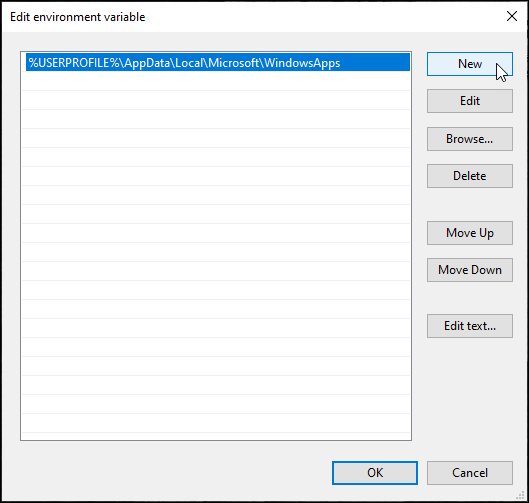
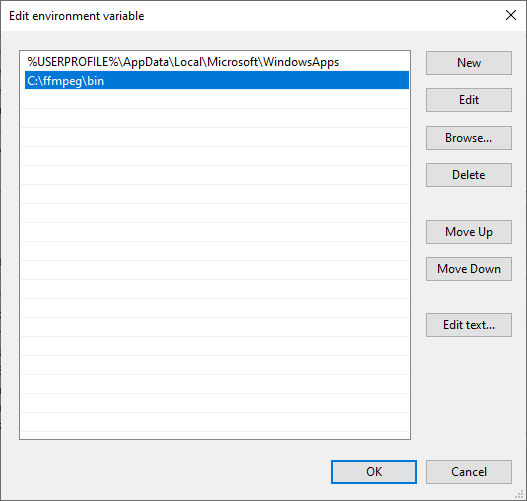
4. Add C:\ffmpeg\bin to the empty field and confirm changes with OK.
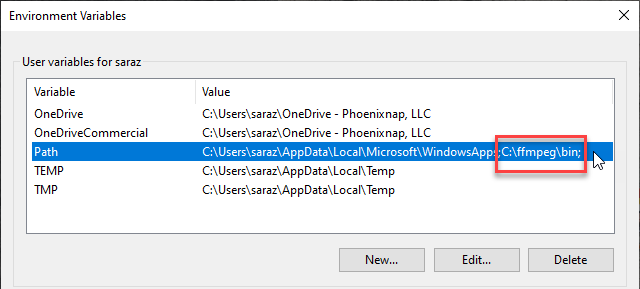
The change in the Path variable line confirms the FFmpeg is added to PATH.
Note: If you stored FFmpeg in a folder other than the C drive, use that path accordingly.
Step 4: Verify FFmpeg PATH
To verify the FFmpeg is correctly added to the Windows PATH, open the Command Prompt or PowerShell and run:
The output confirms the installation:

This article provided an easy step-by-step guide on installing FFmpeg on Windows.
For more tutorials refer to our article and learn how to install FFmpeg on MacOS.
Next, learn how to change or reset the administrator password on the Windows server.
Setup And Install FFMPEG On Windows

If you are looking for a library to help you out with video compression and processing, FFmpeg is certainly the best open-source library you’d find out there. It can be used for blurring, color conversion, rotation, extraction of frames. As well as offer an interface to various video codecs like H.264/AVC, HEVC, AV1.
Here in this tutorial, I’ll discuss briefly what FFmprg really is and how you can install it on windows. On top of it, there are a few basic commands for FFmpeg to get you started.
What is FFMPEG?
FFmpeg is a free and open-source software project consisting of different libraries and programs for handling video, audio, and other multimedia files and streams. FFMPEG is a command-line tool used for processing video and audio files. It is widely used for video transcoding, basic editing (trimming and concatenation), video scaling, and video post-production effects.
How To Install FFMPEG on Windows?
Installing FFMPEG on windows is quite easy, Once the installation process is done we will elaborate on how to set up environment variables in windows for FFMPEG. To install it on your windows machine you need to follow a step-by-step guide as described below.
Before downloading FFMPEG build you must have an app that can decompress files ending with the .7z file extension, such as WinRAR, you must install it before you can continue.
Step 1 — Go to https://ffmpeg.org/download.html and Select the windows icon.
Step 2 — On Clicking the windows icon you will see 2 different options one is Windows build from gyan.dev and other is Windows build by BtbN to download from you can choose anyone. In this article we will follow the first option. Click on Windows build from gyan.dev, It will take you to a page that contains FFMPEG build for windows.
On this page you can see 4 different builds, each build has a specific purpose.
- git full is built from the latest master branch with a large set of libraries.
- git essentials is built from the latest master branch with commonly used libraries.
- release full is built from the latest release branch with a large set of libraries.
- release essentials is built from the latest release branch with a large set of libraries.
Step 3 — To download the latest stable version scroll down to release and click on https://www.gyan.dev/ffmpeg/builds/ffmpeg-release-full.7z , It will start downloading the latest stable release full version in compressed format.
Step 4 — Once the download is finished you can extract the build in the downloads folder and rename the folder to ffmpeg.
Step 5 — Now cut the folder from downloads and paste it into the C drive on your PC.
Now you have FFMPEG installed in your machine. To make it work you need to set its path to environment variables. To set up the path follow below steps:
Step 6 — Search for system variables in windows search, Click on edit system environment variables. It will open a pop up window, in the bottom right corner you will see an option of environment variables, click on it.
Step 7 — Select the Path Variable under “User variables for (your name)” and click edit. It will open up a pop up with a list of paths.
Step 8 — Click on the New button from the right navigation bar in the pop up and add it will show you a new line at the bottom of the path list. Type C:\ffmpeg\bin and click ok.
Now you can see the FFmpeg path in the path list at the end. Click Ok to save your changes. You have now installed FFMPEG and set proper environment variables. To confirm the installation open the command prompt and enter ffmpeg -version.
Some Basic Commands of FFMPEG :
· Convert video from one format to another
ffmpeg -i youtube.flv -c:v libx264 filename.mp4
· Convert a video into an animated GIF
ffmpeg -i video.mp4 -vf scale=500:-1 -t 10 -r 10 image.gif
· Extract image frames from a video
ffmpeg -ss 00:00:15 -i video.mp4 -vf scale=800:-1 -vframes 1 image.jpg
· Convert Video into Images
ffmpeg -i movie.mp4 -r 0.25 frames_%04d.png
· Rotate a video
ffmpeg -i input.mp4 -filter:v ‘transpose=2,transpose=2’ rotated-video.mp4
Conclusion
FFmpeg is a great tool for anyone genuinely interested in video compression and processing. Being an open-source tool it gives you endless capabilities as you can make changes to the source to your requirements.
Как установить ffmpeg на Windows?
FFmpeg — это популярное программное обеспечение для обработки, конвертации или обработки видео и аудио файлов. Программа используется для бесконечных вещей, таких как вращение видео, масштабирование видео, извлечение информации о видео и многое другое. Это программа с открытым исходным кодом, которая просто великолепна для масштабирования видео, транскодирования форматов, декодирования, кодирования, демультиплексирования, потоковой передачи, фильтрации, преобразования аудиофайлов, записи живого аудио/видео, обработки видео и других мультимедийных файлов. Этот мультимедийный каркас предназначен для обработки мультимедийных файлов на основе командной строки, и вы можете вносить базовые изменения с помощью однострочных команд.
Хотя программа проста в использовании, доступ к FFmpeg для выполнения команд немного сбивает с толку. Установка и использование FFmpeg может занять много времени, так как вам нужно вручную открыть папку FFmpeg в командной строке или в терминале Power Shell для доступа к исполнительному файлу FFmpeg для выполнения соответствующих команд для базового редактирования. Если вы застряли с установкой и использованием FFmpeg на вашем компьютере, вы находитесь в правильном месте.
Чтобы упростить задачу, все, что вам нужно сделать, это установить FFmpeg и добавить программу FFmpeg в путь Windows 10 с помощью переменных среды. Таким образом, вы можете получить прямой доступ к FFmpeg из командной строки или Power Shell в любом каталоге. В этой статье мы расскажем, как установить FFmpeg в Windows 10, чтобы получить доступ к FFmpeg напрямую из командной строки или PowerShell.
Получить последнюю сборку FFmpeg можно с официального сайта. Вы можете скачать 32-битную или 64-битную версию, подходящую для вашей системы. Нажмите кнопку Download Build , чтобы начать загрузку.
Программа не работает напрямую в Windows 10. Вам необходимо добавить программу в системный путь, используя переменные среды.
Перейдите в загруженную папку, где находится файл FFmpeg.zip. Щелкните правой кнопкой мыши папку Zip и в раскрывающемся меню выберите извлечь.
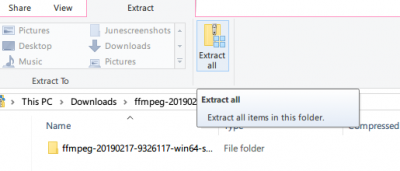
Выберите папку или диск, куда вы хотите извлечь.
Далее переименуйте извлеченную папку. Чтобы переименовать папку, щелкните правой кнопкой мыши папку и выберите «Переименовать» в раскрывающемся меню с заголовком FFmpeg-20180424-d9706f7-win64-static в FFmpeg.
Скопируйте папку FFmpeg и перейдите на диск C. Вставьте папку в корень диска C.
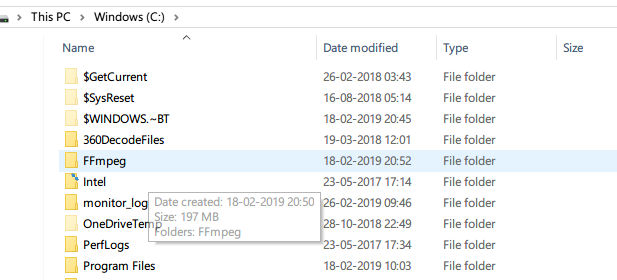
После этого следующим шагом будет включение FFmpeg с помощью командной строки.
Добавьте FFmpeg в path Windows, используя переменные среды
Чтобы использовать FFmpeg в командной строке, сначала необходимо добавить папку bin, содержащую исполняемый файл FFmpeg, в path Windows.
В меню поиска Windows введите Изменить системные переменные среды и нажмите Enter. Откроется окно свойств системы.
Перейдите к кнопке «Дополнительно» и нажмите «Переменные среды» в нижней части окна.
В окне Переменные среды выберите переменную Path и нажмите «Изменить», чтобы изменить переменную Path.
Нажмите Новый и введите путь к папке FFmpeg «C:\ffmpeg\bin\» и нажмите OK.
Введите каталог пути в соответствии с диском или папкой, в которую вы поместили папку FFmpeg.
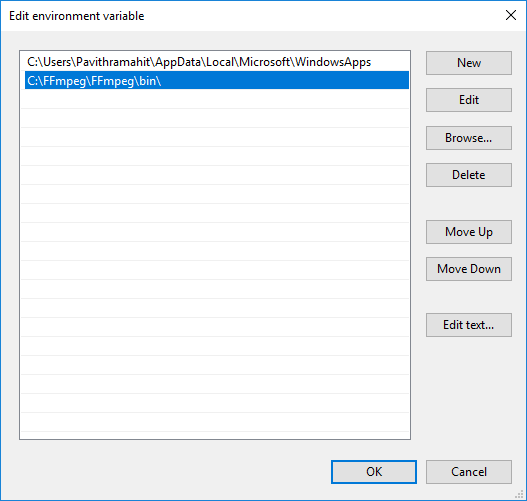
После этого путь добавляется к переменным окружения. Нажмите кнопку ОК, чтобы применить изменения.
Проверьте доступность FFmpeg в командной строке
Запустите командную строку, введите команду ffmpeg в терминале командной строки и нажмите Enter.
Если FFmpeg правильно добавлен в путь к Windows, в командной строке отобразятся сведения о FFmpeg, такие как номер версии, конфигурация и т.д.
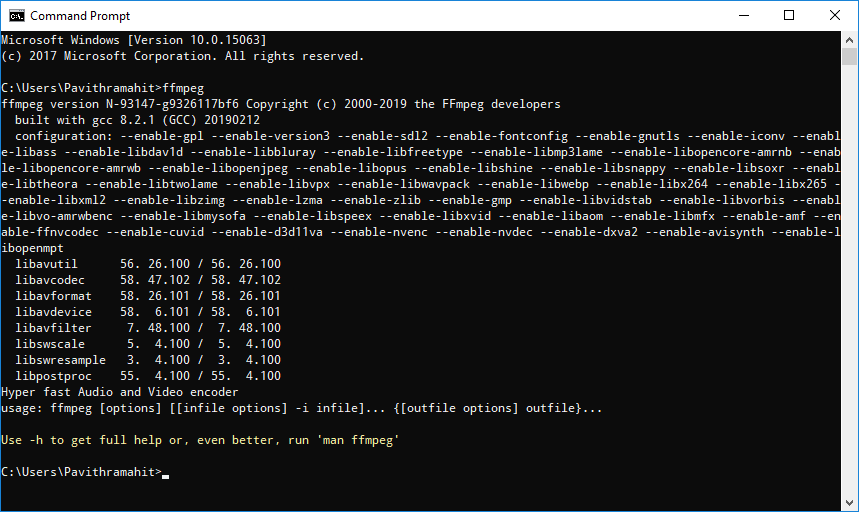
Если вы не добились успеха, это означает, что ваша командная строка не распознала команду. Перепроверьте, правильно ли вы добавили папку FFmpeg в системный путь.