CSS Dropdowns
Создайте всплывающее раскрывающееся меню с помощью CSS.
Демонстрация: примеры выпадающего списка
Наведите указатель мыши на примеры ниже:
Other: 
Основное раскрывающийся список
Создайте раскрывающееся поле, которое появляется, когда пользователь перемещает указатель мыши на элемент.
Пример
<style>
.dropdown <
position: relative;
display: inline-block;
>
.dropdown-content <
display: none;
position: absolute;
background-color: #f9f9f9;
min-width: 160px;
box-shadow: 0px 8px 16px 0px rgba(0,0,0,0.2);
padding: 12px 16px;
z-index: 1;
>
.dropdown:hover .dropdown-content <
display: block;
>
</style>
Пример объяснено
HTML) Используйте любой элемент, чтобы открыть раскрывающееся содержимое, например <span> или элемент <Button>.
Используйте элемент контейнера (например, <div>), чтобы создать раскрывающееся содержимое и добавить в него все, что нужно.
Оберните элемент <div> вокруг элементов, чтобы правильно позиционировать содержимое раскрывающегося списка с помощью CSS.
CSS) Класс .dropdown использует position:relative , который необходим, когда мы хотим, чтобы раскрывающийся контент размещался прямо под кнопкой раскрывающегося списка (с помощью position:absolute ).
Класс .dropdown-content содержит фактическое содержимое раскрывающегося списка. Он скрыт по умолчанию и будет отображаться при наведении курсора (см. ниже). Примечание min-width имеет значение 160пкс. Вы можете изменить это. Совет: Если нужно, чтобы ширина раскрывающегося списка была такой же широкой, как и кнопка раскрывающегося списка, установите width на 100% (и overflow:auto , чтобы включить прокрутку на маленьких экранах).
Вместо использования границы мы использовали свойство CSS box-shadow для того, чтобы выпадающее меню выглядело как «карточка».
Селектор :hover используется для отображения раскрывающегося меню, когда пользователь перемещает указатель мыши на кнопку раскрывающегося списка.
Раскрывающееся меню
Создайте раскрывающееся меню, позволяющее пользователю выбрать вариант из списка:
Этот пример похож на предыдущий, за исключением того, что мы добавляем ссылки внутри раскрывающегося списка и стиль их, чтобы соответствовать стиль выпадающего кнопку:
Пример
<style>
/* Style The Dropdown Button */
.dropbtn <
background-color: #4CAF50;
color: white;
padding: 16px;
font-size: 16px;
border: none;
cursor: pointer;
>
/* The container <div> — needed to position the dropdown content */
.dropdown <
position: relative;
display: inline-block;
>
/* Dropdown Content (Hidden by Default) */
.dropdown-content <
display: none;
position: absolute;
background-color: #f9f9f9;
min-width: 160px;
box-shadow: 0px 8px 16px 0px rgba(0,0,0,0.2);
z-index: 1;
>
/* Links inside the dropdown */
.dropdown-content a <
color: black;
padding: 12px 16px;
text-decoration: none;
display: block;
>
/* Change color of dropdown links on hover */
.dropdown-content a:hover
/* Show the dropdown menu on hover */
.dropdown:hover .dropdown-content <
display: block;
>
/* Change the background color of the dropdown button when the dropdown content is shown */
.dropdown:hover .dropbtn <
background-color: #3e8e41;
>
</style>
Содержимое раскрывающегося списка по правому краю
Если вы хотите, чтобы в выпадающем меню, чтобы перейти от справа налево, а не слева направо, добавить right: 0;
CSS Dropdowns
Other: 
Basic Dropdown
Create a dropdown box that appears when the user moves the mouse over an element.
Example
<style>
.dropdown <
position: relative;
display: inline-block;
>
.dropdown-content <
display: none;
position: absolute;
background-color: #f9f9f9;
min-width: 160px;
box-shadow: 0px 8px 16px 0px rgba(0,0,0,0.2);
padding: 12px 16px;
z-index: 1;
>
.dropdown:hover .dropdown-content <
display: block;
>
</style>
Example Explained
HTML) Use any element to open the dropdown content, e.g. a <span>, or a <button> element.
Use a container element (like <div>) to create the dropdown content and add whatever you want inside of it.
Wrap a <div> element around the elements to position the dropdown content correctly with CSS.
CSS) The .dropdown class uses position:relative , which is needed when we want the dropdown content to be placed right below the dropdown button (using position:absolute ).
The .dropdown-content class holds the actual dropdown content. It is hidden by default, and will be displayed on hover (see below). Note the min-width is set to 160px. Feel free to change this. Tip: If you want the width of the dropdown content to be as wide as the dropdown button, set the width to 100% (and overflow:auto to enable scroll on small screens).
Instead of using a border, we have used the CSS box-shadow property to make the dropdown menu look like a «card».
The :hover selector is used to show the dropdown menu when the user moves the mouse over the dropdown button.
Dropdown Menu
Create a dropdown menu that allows the user to choose an option from a list:
This example is similar to the previous one, except that we add links inside the dropdown box and style them to fit a styled dropdown button:
Example
<style>
/* Style The Dropdown Button */
.dropbtn <
background-color: #4CAF50;
color: white;
padding: 16px;
font-size: 16px;
border: none;
cursor: pointer;
>
/* The container <div> — needed to position the dropdown content */
.dropdown <
position: relative;
display: inline-block;
>
/* Dropdown Content (Hidden by Default) */
.dropdown-content <
display: none;
position: absolute;
background-color: #f9f9f9;
min-width: 160px;
box-shadow: 0 8px 16px 0 rgba(0,0,0,0.2);
z-index: 1;
>
/* Links inside the dropdown */
.dropdown-content a <
color: black;
padding: 12px 16px;
text-decoration: none;
display: block;
>
/* Change color of dropdown links on hover */
.dropdown-content a:hover
/* Show the dropdown menu on hover */
.dropdown:hover .dropdown-content <
display: block;
>
/* Change the background color of the dropdown button when the dropdown content is shown */
.dropdown:hover .dropbtn <
background-color: #3e8e41;
>
</style>
CSS Dropdown Menu: How to Make It + HTML Tutorial

A dropdown menu contains a list of pages and subpages. Users can access its content by clicking on or hovering over the menu.
This design element reduces the clutter of buttons, links, and text which is useful for enhancing a website or an app’s user experience on small screens.
Keep reading as we will cover the steps to create a dropdown menu using HTML and CSS. You will also learn to apply styles to the newly built dropdown menu to match your project’s branding.
How to Create a CSS Dropdown Menu
This tutorial requires a text editor to create the HTML and CSS file containing the dropdown menu’s code. Alternatively, you can do this through the File Manager of your hosting control panel. The following dropdown menu guide will use the latter method.
Step 1. Create a File With HTML Code
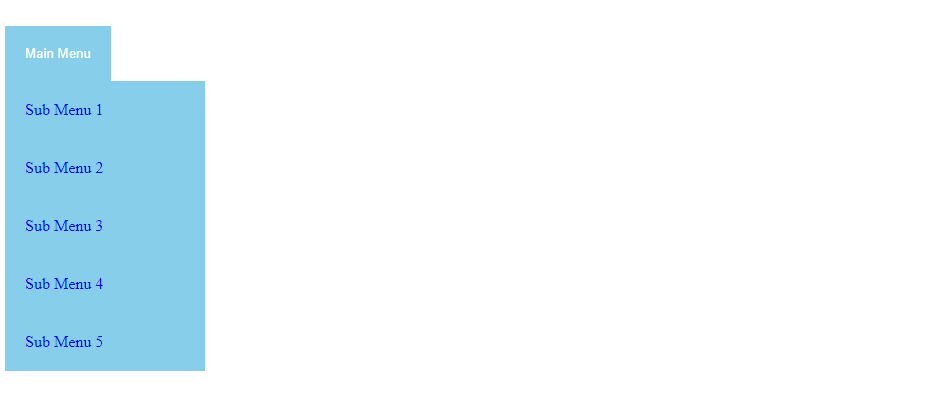
To begin, create an HTML file for the actual dropdown menu content and syntax. Navigate to the File Manager from your hPanel dashboard and generate a new file called menu.html inside the public_html directory.
The menu.html file will contain the dropdown menu’s elements ‒ one parent element with five menu items. Each sub-menu will redirect users to different pages on your website.
Add the following code to the menu.html file:
The dropdown, mainmenubtn, and dropdown-child classes represent different HTML elements. CSS will use them to access a specific element and alter its design.
This is how the HTML menu will look without any CSS rules:

Pro Tip
Don’t forget to replace the links inside the href attributes with the URLs of your website pages and rename the sub-menus to reflect the actual page content.
Step 2. Add CSS and Create the Dropdown Effect
Now that you have HTML elements to work with, let’s create the dropdown effect and CSS rules for each of them.
Generate an internal stylesheet within the menu.html file by placing the following code inside the <style> element:
Pro Tip
In this example, the CSS styles are placed in the same HTML file (internal stylesheet). Use external CSS by linking the HTML document to a separate CSS file for easier modification.
The .mainmenubtn class name contains the CSS properties of the dropdown button. It sets the button’s background and font colors and omits the border. The cursor property dictates that the mouse cursor will change to the hand with the index finger extended symbol when hovering over the dropdown button.
Adding a hover selector to the .mainmenubtn class determines what the dropdown menu will look like when a user hovers over it.
The .dropdown class sets the dropdown menu’s position. In the above example, the CSS rules position the menu items under the parent menu. The inline-block property makes them appear without having a line break separating them.
The .dropdown-child class refers to the actual dropdown menu content. Using a display value of none makes the sub-menus invisible. .dropdown:hover .dropdown-child turns the entire element into a hoverable dropdown menu.
Pro Tip
Feel free to experiment with other CSS properties to get the desired design. You can even add JavaScript to create a responsive dropdown menu with dynamic animations.
Once you’re done, save and download the file. Here’s what the dropdown menu will look like when you open it on a web browser:
Examples of HTML and CSS Dropdown Menus
Plenty of modern CSS dropdown menu templates are available so you don’t have to code one from scratch. At the very least, they’re a great source of inspiration.
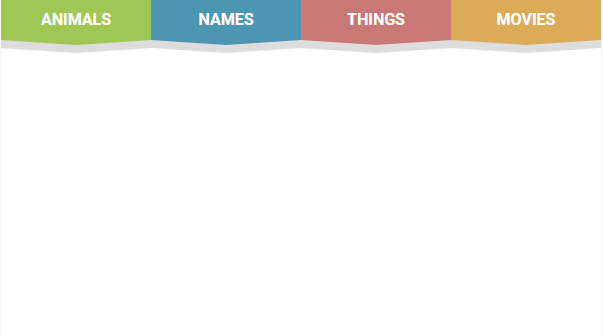
The following dropdown menu template by kkrueger utilizes HTML and CSS. Each parent menu smoothly expands on hover, creating a dynamic and memorable look for the web page.
Another example comes from Bhakti Pasaribu. He utilizes JavaScript to create an interactive dropdown menu. The options appear with a flip animation upon clicking the parent menu. Another animation replaces the parent menu with the selected option, creating a seamless transition effect. This dropdown menu template is simple and dynamic in a unique way.
Minimalism enthusiasts may like what Chris Ota has to offer. His collapsable menu is subtle and doesn’t hog too much space. Still, it places user experience at the forefront. You can easily replace the list item descriptions with icons, further strengthening your site’s branding.

If you’re looking for a more flashy menu with visual effects, we recommend checking out the Molten dropdown menu by Zealand. It utilizes CSS keyframe animations to create an eye-catching flickering flame around the navigation bar.

Recursive Hover Nav by sean_codes offers a mega menu solution without obstructing the site’s user experience. The multi-level dropdown menu is built using HTML, CSS, and JavaScript.
As your mouse hovers over the parent menu, the sub-menus appear with a slide transition animation. While it doesn’t have flashy effects like the other examples, this template is more practical when it comes to managing a menu with lots of content.
Pro Tip
When designing a dropdown menu, make sure to consider the site’s user experience. A beautifully made CSS dropdown menu doesn’t guarantee great usability. In most cases, less is more.
Conclusion
Having a dropdown menu makes it easier to design an effective user interface. It reduces the number of elements cluttering your web page and, with an appropriate design, enhances the site’s aesthetics.
You can create a dropdown menu from scratch using HTML, CSS, and JavaScript. Alternatively, adopt one of the many dropdown menu templates coded by professional designers and adjust it to your preference.
We hope this article has provided you with a better understanding of how to design a CSS dropdown menu. Good luck.
Linas started as a customer success agent and is now a full-stack web developer and Technical Team Lead at Hostinger. He is passionate about presenting people with top-notch technical solutions, but as much as he enjoys coding, he secretly dreams of becoming a rock star.
HTML Drop-down Menu – How to Add a Drop-Down List with the Select Element

Joel Olawanle
Many websites, applications, and web pages use drop-down menus to help display a list of information. You can use them to create navigation menus, options for forms, and more.
If you’re looking at some of these menus or lists, you might imagine how complex creating them could be. And yes – in some cases, it gets a little bit complex.
A drop-down menu is a list of options that gets revealed vertically when a user interacts with the menu by either clicking on it or hovering over it with their cursor.
This menu also disappears when the user stops interacting with the menu by clicking again or taking the cursor away from the menu.
In this article, you will learn how to add a drop-down list to the select element on your webpage. You’ll also learn the various options available, and how to create a hoverable drop-down list/menu.
How to Create an HTML Dropdown List
In HTML, by default, you can always create a drop-down list with the select tag alongside the option tag. This is mainly used within forms to select a value from a list of many options.
The select tag has two primary attributes: the name and id attributes.
You use the name attribute to identify the drop-down when a selection is submitted in a form. You can connect the id attribute to a label that has similar values to its for attribute.
The select tag also has some optional boolean attributes like disabled (which disables the select fields), required (which makes the field required in a form), and lots more.
Within the select tag, you can add many options in the individual option tag. The option tag has an attribute of value that specifies a value that is submitted from the form when an option gets selected.
There are other boolean attributes like disabled (which disables the option in the menu), and selected (which you use to set a particular option as the default selected option when the page loads rather than the first option).
In the above code, the first option has an attribute of disabled , meaning you will not be able to select the option. The fourth option has an attribute of selected , meaning that instead of having JavaScript as the selected value by default, Java will be selected.
How to Create a Hover-able Drop-down Menu
When you scroll through or visit many advanced and modern webpages, you will notice that they have drop-down menus.
These menus are used for navigation to help hold similar links together. Most times, when you hover on the parent menu, then the drop-down list appears.

You can create these types of menues in various ways, as there is no direct syntax to build one.
You can create this using CSS styling to show and hide the drop-down list when the user hovers over the menu. A very good approach is to create a div that holds the menu and the drop-down.
This div serves as a container and you can style it to a position of relative and display of inline-block , so the drop-down options appear below the menu.
You can style your button and the dropdown-options however you wish. But the major style that controls the hover effect, by default, sets the dropdown-options not to display. Then when a mouse hovers over the menu, the display is not set to block , so the options are visible. You also set the position to absolute , so the options appear below the menu, and overflow to auto to enable scroll on small screens.
In the demo below, we add more styling to make the drop-down menu more attractive and nice:
Wrapping Up
In this article, you have learned how to create a drop-down list with the select tag. You’ve also learned how to create the hoverable drop-down menu with CSS to handle the hover effect.