Your first form
The first article in our series provides you with your very first experience of creating a web form, including designing a simple form, implementing it using the right HTML form controls and other HTML elements, adding some very simple styling via CSS, and describing how data is sent to a server. We’ll expand on each of these subtopics in more detail later on in the module.
| Prerequisites: | Basic computer literacy, and a basic understanding of HTML. |
|---|---|
| Objective: | To gain familiarity with what web forms are, what they are used for, how to think about designing them, and the basic HTML elements you’ll need for simple cases. |
What are web forms?
Web forms are one of the main points of interaction between a user and a website or application. Forms allow users to enter data, which is generally sent to a web server for processing and storage (see Sending form data later in the module), or used on the client-side to immediately update the interface in some way (for example, add another item to a list, or show or hide a UI feature).
A web form’s HTML is made up of one or more form controls (sometimes called widgets), plus some additional elements to help structure the overall form — they are often referred to as HTML forms. The controls can be single or multi-line text fields, dropdown boxes, buttons, checkboxes, or radio buttons, and are mostly created using the <input> element, although there are some other elements to learn about too.
Form controls can also be programmed to enforce specific formats or values to be entered (form validation), and paired with text labels that describe their purpose to both sighted and visually impaired users.
Designing your form
Before starting to code, it’s always better to step back and take the time to think about your form. Designing a quick mockup will help you to define the right set of data you want to ask your user to enter. From a user experience (UX) point of view, it’s important to remember that the bigger your form, the more you risk frustrating people and losing users. Keep it simple and stay focused: ask only for the data you absolutely need.
Designing forms is an important step when you are building a site or application. It’s beyond the scope of this article to cover the user experience of forms, but if you want to dig into that topic you should read the following articles:
- Smashing Magazine has some good articles about forms UX, including an older but still relevant Extensive Guide To Web Form Usability article.
- UXMatters is also a very thoughtful resource with good advice from basic best practices to complex concerns such as multipage forms.
In this article, we’ll build a simple contact form. Let’s make a rough sketch.
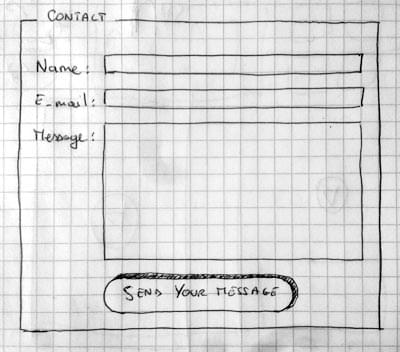
Our form will contain three text fields and one button. We are asking the user for their name, their email and the message they want to send. Hitting the button will send their data to a web server.
Active learning: Implementing our form HTML
Ok, let’s have a go at creating the HTML for our form. We will use the following HTML elements: <form> , <label> , <input> , <textarea> , and <button> .
Before you go any further, make a local copy of our simple HTML template — you’ll enter your form HTML into here.
The <form> element
All forms start with a <form> element, like this:
This element formally defines a form. It’s a container element like a <section> or <footer> element, but specifically for containing forms; it also supports some specific attributes to configure the way the form behaves. All of its attributes are optional, but it’s standard practice to always set at least the action and method attributes:
- The action attribute defines the location (URL) where the form’s collected data should be sent when it is submitted.
- The method attribute defines which HTTP method to send the data with (usually get or post ).
Note: We’ll look at how those attributes work in our Sending form data article later on.
For now, add the above <form> element into your HTML <body> .
The <label> , <input> , and <textarea> elements
Our contact form is not complex: the data entry portion contains three text fields, each with a corresponding <label> :
- The input field for the name is a single-line text field.
- The input field for the email is an input of type email: a single-line text field that accepts only email addresses.
- The input field for the message is a <textarea> ; a multiline text field.
In terms of HTML code we need something like the following to implement these form widgets:
Update your form code to look like the above.
The <li> elements are there to conveniently structure our code and make styling easier (see later in the article). For usability and accessibility, we include an explicit label for each form control. Note the use of the for attribute on all <label> elements, which takes as its value the id of the form control with which it is associated — this is how you associate a form control with its label.
There is great benefit to doing this — it associates the label with the form control, enabling mouse, trackpad, and touch device users to click on the label to activate the corresponding control, and it also provides an accessible name for screen readers to read out to their users. You’ll find further details of form labels in How to structure a web form.
On the <input> element, the most important attribute is the type attribute. This attribute is extremely important because it defines the way the <input> element appears and behaves. You’ll find more about this in the Basic native form controls article later on.
- In our simple example, we use the value text for the first input — the default value for this attribute. It represents a basic single-line text field that accepts any kind of text input.
- For the second input, we use the value email, which defines a single-line text field that only accepts a well-formed email address. This turns a basic text field into a kind of «intelligent» field that will perform some validation checks on the data typed by the user. It also causes a more appropriate keyboard layout for entering email addresses (e.g. with an @ symbol by default) to appear on devices with dynamic keyboards, like smartphones. You’ll find out more about form validation in the client-side form validation article later on.
Last but not least, note the syntax of <input> vs. <textarea></textarea> . This is one of the oddities of HTML. The <input> tag is a void element, meaning that it doesn’t need a closing tag. <textarea> is not a void element, meaning it should be closed with the proper ending tag. This has an impact on a specific feature of forms: the way you define the default value. To define the default value of an <input> element you have to use the value attribute like this:
On the other hand, if you want to define a default value for a <textarea> , you put it between the opening and closing tags of the <textarea> element, like this:
The <button> element
The markup for our form is almost complete; we just need to add a button to allow the user to send, or «submit», their data once they have filled out the form. This is done by using the <button> element; add the following just above the closing </ul> tag:
The <button> element also accepts a type attribute — this accepts one of three values: submit , reset , or button .
- A click on a submit button (the default value) sends the form’s data to the web page defined by the action attribute of the <form> element.
- A click on a reset button resets all the form widgets to their default value immediately. From a UX point of view, this is considered bad practice, so you should avoid using this type of button unless you really have a good reason to include one.
- A click on a button button does nothing! That sounds silly, but it’s amazingly useful for building custom buttons — you can define their chosen functionality with JavaScript.
Note: You can also use the <input> element with the corresponding type to produce a button, for example <input type=»submit»> . The main advantage of the <button> element is that the <input> element only allows plain text in its label whereas the <button> element allows full HTML content, allowing more complex, creative button content.
Basic form styling
Now that you have finished writing your form’s HTML code, try saving it and looking at it in a browser. At the moment, you’ll see that it looks rather ugly.
Note: If you don’t think you’ve got the HTML code right, try comparing it with our finished example — see first-form.html (also see it live).
Forms are notoriously tricky to style nicely. It is beyond the scope of this article to teach you form styling in detail, so for the moment we will just get you to add some CSS to make it look OK.
First of all, add a <style> element to your page, inside your HTML head. It should look like so:
Inside the style tags, add the following CSS:
Save and reload, and you’ll see that your form should look much less ugly.
Note: You can find our version on GitHub at first-form-styled.html (also see it live).
Sending form data to your web server
The last part, and perhaps the trickiest, is to handle form data on the server side. The <form> element defines where and how to send the data thanks to the action and method attributes.
We provide a name attribute for each form control. The names are important on both the client- and server-side; they tell the browser which name to give each piece of data and, on the server side, they let the server handle each piece of data by name. The form data is sent to the server as name/value pairs.
To name the data in a form, you need to use the name attribute on each form widget that will collect a specific piece of data. Let’s look at some of our form code again:
In our example, the form will send 3 pieces of data named » user_name «, » user_email «, and » user_message «. That data will be sent to the URL » /my-handling-form-page » using the HTTP POST method.
On the server side, the script at the URL » /my-handling-form-page » will receive the data as a list of 3 key/value items contained in the HTTP request. The way this script will handle that data is up to you. Each server-side language (PHP, Python, Ruby, Java, C#, etc.) has its own mechanism of handling form data. It’s beyond the scope of this guide to go deeply into that subject, but if you want to know more, we have provided some examples in our Sending form data article later on.
Summary
Congratulations, you’ve built your first web form. It looks like this live:
That’s only the beginning, however — now it’s time to take a deeper look. Forms have way more power than what we saw here and the other articles in this module will help you to master the rest.
HTML Формы
HTML элемент <form> определяет форму, которая используется для сбора пользовательского ввода:
HTML-форма содержит элементы формы.
Элементы формы — это различные типы элементов ввода, такие как текстовые поля, флажки, переключатели, кнопки отправки и т.д.
Элемент <input>
Элемент <input> является наиболее важным элементом формы.
Элемент <input> может отображаться несколькими способами, в зависимости от атрибута type.
вот несколько примеров:
| Тип | Описание |
|---|---|
| <input type="text"> | Определяет однострочное поле ввода текста |
| <input type="radio"> | Определяет переключатель (для выбора одного из множества вариантов) |
| <input type="submit"> | Определяет кнопку отправки (для отправки формы) |
Вы узнаете намного больше о типах ввода позже в этом учебнике.
Ввод текста
<input type=’text’> определяет однострочное поле ввода для text input:
Пример
Вот так это будет выглядеть в браузере:
First name:
Last name:
Примечание: Сама форма не видна. Также обратите внимание, что ширина текстового поля по умолчанию составляет 20 символов.
Радио кнопка ввода
<input type=’radio’> определяет радио кнопку.
Переключатели (радио-кнопки) позволяют пользователю выбрать ОДИН из ограниченного числа вариантов:
Пример
Вот как HTML-код выше будет отображаться в браузере:
Male
Female
Other
Кнопка ‘Отправить’
<input type=’submit’> определяет кнопку для отправки данных формы в обработчик форм.
Обработчик форм обычно представляет собой серверную страницу со скриптом для обработки входных данных.
Обработчик формы указывается в атрибуте action формы:
Пример
Вот как HTML-код выше будет отображаться в браузере:
Атрибут Action
Атрибут action определяет действие, которое будет выполнено при отправке формы.
Обычно данные формы отправляются на веб-страницу на сервере, когда пользователь нажимает кнопку отправки..
В приведенном выше примере данные формы отправляются на страницу на сервере с именем "/action_page.html". Эта страница содержит серверный скрипт, который обрабатывает данные формы:
Если атрибут action пропущен, действие установлено на текущую страницу.
Атрибут Target
Атрибут target указывает, будет ли отправленный результат открываться в новой вкладке браузера, во фрейме или в текущем окне.
По умолчанию значение ‘ _self ‘ означает, что форма будет отправлена в текущем окне.
Чтобы сделать результат формы открытым в новой вкладке браузера, используйте значение " _blank ":
Пример
Другими допустимыми значениями являются ‘ _parent ‘, ‘ _top ‘ или имя, представляющее имя iframe.
Атрибут Method
Атрибут method указывает метод HTTP (GET или POST) который будет использоваться при отправке данных формы:
Пример
Пример
Когда использовать GET?
Метод по умолчанию при отправке данных формы — GET.
Однако при использовании GET отправленные данные формы будут видны в поле адреса страницы.:
Примечания по GET:
- Добавляет данные в форме отправки к URL-адресу в парах имя/значение
- Длина URL-адреса ограничена (около 3000 символов)
- Никогда не используйте GET для отправки конфиденциальных данных! (будет отображаться в URL-адресе)
- Полезно для подачи форм, где пользователь хочет сделать закладку результата
- GET является лучшим вариантом для незащищённых данных, например строк запросов в Google
Когда использовать POST?
Всегда используйте POST, если данные формы содержат конфиденциальную или личную информацию. Метод POST не отображает отправленные данные формы в адресной строке страницы.
Примечания по POST:
- POST не имеет ограничений по размерам и может использоваться для отправки больших объёмов данных
- Отправленные с POST формы нельзя добавить в закладки
Атрибут Name
Каждое поле ввода должно иметь атрибут name для отправки.
Если атрибут name опущен, данные этого поля ввода не будут отправлены вообще.
Этот пример будет отправлять только поле ввода "Last name":
Пример
Группировка данных формы с помощью <fieldset>
Элемент <fieldset> Элемент используется для группировки связанных данных в форме.
Элемент <legend> определяет заголовок для элемента <fieldset> .
A step-by-step guide to getting started with HTML forms
![]()
HTML forms are required when you want to collect some data from the person who visits your website. For example, when you register/login for applications like Uber, Netflix, or Facebook, you enter information like Name, Email, and Password through HTML forms.
Now we will learn all the required elements for creating a form.
NOTE: I have already added the Styling using CSS and so my elements will look different, but they will work in exactly the same way.
If you want to make your elements look like mine then, you can find my CSS file in the links given below:
Custom CSS: https://gist.github.com/abhishekjakhar/493d920a219ed9d88f1846cd31de7751
Normalize CSS:
https://gist.github.com/abhishekjakhar/3a6c25fa61a293b6a56d28f98497808b
Form Element
This is the first element which we will learn. This element wraps all the other elements that go inside of our form. This is the form element.
Our form won’t submit the data anywhere because it is not connected to a server. To connect our form to a server and process our data, we can use any server-side language like Node, Python, Ruby, or PHP. The part of processing the data involves two important attributes that are attached to the form element. Let’s take a look at those attributes.
Attributes:
- action: The action attribute is the web address (URL) of a program that processes the information submitted by our form.
- method: It is the HTTP method that the browser uses to submit the form, the possible values are POST and GET.
- POST — Data from the body of the form is sent to the server.
- GET — Data is sent inside of the URL and parameters are separated with a question mark.
Note: You cannot have forms nested inside another form. That means you cannot have a <form> element inside another<form> element.
Input Element
The input element is the most commonly used form element. It is used to make a text field where the user can type some information for example email, password etc.
Let’s make a text field where the user can type in their name.
Note: The input element is a self-closing tag, so there’s no need to type a closing tag to match the opening tag.
I have added three attributes in the above input tag. Let’s take a look at each one in detail.
type
The type attribute indicates what kind of input we want. If we give a value of text to the type attribute, than what we mean here is that the value which we are entering into the input field is of type text. There are many possible values for this particular attribute. Some possible values are email, tel for telephone and password etc.
Example: When you login into any of your accounts (Amazon/Netflix), you need to enter two things: email and password. So in this particular case the input element is used. The type attribute is given with the value of email and password respectively.
id
The ID attribute is not mandatory, but it’s a good idea to add one. In some cases, this is helpful for targeting elements with CSS/JavaScript. The ID attribute is added so that we can associate labels to specific form controls.
name
The name attribute is necessary. When a form is submitted to the server side code, the server can understand the form data and process the values appropriately.
placeholder
It is a short hint which is displayed in the input field before the user enters a value. As the user starts typing in the input field the placeholder disappears.
Let’s see what a few other basic input elements look like.
Note: Using different values for the type attribute will produce different results. For example you can make input be of type email, text, or password etc. All of them show slightly different behaviour, which you will see below.
Создаем простую форму html
В этом уроке рассмотрим создание красивой формы регистрации html + css. Вот что должно у нас получиться:

Фомы нужны для получения различных данных от пользователя. Для создания форм в html есть тег <form>.
Рассмотрим основные атрибуты, которые используются чаще всего.
action — адрес страницы которая будет обрабатывать данные.
method — метод протокола http, может быть GET или POST
GET- данные будут передаваться в адресной строке, например в форме будут введены имя ivan и пароль qwerty, в адресной строке мы увидим примерно следующее:
POST- посылает на сервер данные в запросе браузера. Этот метод используется, если нам не нужно, чтобы в адресной строке были видны введенные данные. Например нам не нужно чтобы было видно введенный пароль. В адресной строке мы получим http://site.ru/form.php
name — имя формы, нужно для обработки данных.
Приступим к созданию простой формы регистрации html. Дадим имя нашей форме regisrration, страница обработки наших данных будет form.php, метод передачи данных будем использовать POST.
За создание полей формы в html отвечает тег <input>
Для создания формы регистрации нам понадобится три типа инпутов:
type=”text” – текстовое поле
type=”password” – поле пароля
type=”submit” – кнопка отправки формы
Также нам пригодятся следующие атрибуты
name — имя для обработки данных;
value — значение элемента;
required – указание, что поле обязательно для заполнения
Вот такой код html у нас получиться:
Пока наша html форма регистрации выглядит не очень красиво.
Теперь добавим немного стилей css к нашей html форме.
Запихнем нашу форму в блок div и добавим заголовок и ссылку для восстановления пароля. И добавим классы css для наших элементов.
Стили css лучше подключать отдельным файлом, но в нашем уроке мы запишем все стили между тегами <style> … </style>.