How to link JavaScript to HTML
When creating web pages there comes a time when you need to do a bit more than display content. You need to load JavaScript.
One of the first JavaScript files added is Google Analytics to track page loads and visitors.
But how do you link JavaScript to HTML?
In this tutorial, we are going to cover how to link JavaScript to HTML. We will look at:
- Adding JavaScript to a page
- Adding a JavaScript file to a page
- Adding JavaScript from a CDN
Let’s get started.
Adding JavaScript to a page
When you add JavaScript to a page you use a <script> tag. Sounds simple enough. Let’s look at an example.
We will start simple. Say that as soon as the web page loads we want to say “hello”. To do this we can use the alert() JavaScript function.
We will need a very basic HTML page and then load the script like this:
The above is all you would need to say hello when the page loads. The browser reads the page and processes the HTML line by line. When it reads the script tag it knows that this is JavaScript and it will run the code.
When it reads the line alert("hello") it can see we want to display the word “hello” in an alert:
This is a simple example but it shows how you can write JavaScript within an HTML page. This is “inline” JavaScript.
The script tag has some attributes that we can use. These are:
- async
- charset
- defer
- src
- type
For example, we could specify that the script is JavaScript by adding a type like this:
It used to be common to use more than one type of script but JavaScript won that battle. So now browsers default the type to Javascript. So the above code is the same as:
So there is no reason to use the type attribute anymore.
What about the other attributes, what do they do?
The other attributes only work when loading an external JavaScript file. Let’s look at this next.
Adding a JavaScript file to a page
To load an external JavaScript file we need to use the src attribute. src stands for source and it is the path to the script that you want to load. This attribute loads an external JavaScript file.
For example, say that we have a JavaScript file called main.js in the assets folder on your web server. The contents of this file are the same as before:
When the file loads it will alert with the word “hello”.
You would load the external file with this HTML:
Remember, we don’t need to include the type because the file is JavaScript. All we need is the src attribute which is the path to the file.
The HTML will load the script when it loads the page as it did before. When the browser reads that line it will fetch the JavaScript file and run it.
Now that we have an external script we can look at some of the other script attributes. Let’s start with async and defer .
When the browser finds a script tag in the HTML the page loading stops while the browser fetches the script. Once the file is ready the browser runs the code. Once the code has finished running the page will resume loading.
async and defer will improve web performance by allowing the page to continue to load. But they do it in different ways.
Let’s look at async first.
The async attribute tells the browser to download the file in the background. This allows the page to continue loading. As soon as the file has downloaded the browser will run the code.
This is how you would add the async attribute:
How does defer differ? This attribute tells the browser to download the file in the background like async . Yet, it will only run the code once the browser has finished processing loading the page.
This means that defer will not block the page at all. Whereas, async will only block the page when it runs the code. Both attributes mean that they will not block the page when the script is downloading.
Here is how you would use defer :
So which one do you choose and when?
The general rule is that you should use defer because it will never stop the page from loading. Also, if you have more than one script on the page defer will run them in order. With async the code runs as soon as they download and you cannot guarantee order.
There is one more attribute that we have not talked about. It is the charset attribute.
This attribute allows you to specify the encoding of the characters. Which can either be “UTF-8” or “ISO-8859-1”. In 20 years of creating web sites, I have never used this attribute. It is safe to say you can leave the default which is “ISO-8859-1”.
Where should you put your script tags? The general rule is to add them before the </body> tag. This is at the end of the page and means that most of the page has loaded.
This is what the HTML should look like:
The only time you might break this rule is if you have a large JavaScript file. This will take longer to download so you can move this to the <head> section of the page, like this:
With the defer attribute you know the page will not block and the script will download in the background.
We have loaded scripts from the local webserver but what if the file is on another server. One example of this is when you need to load a framework like JQuery.
Let’s look at this next.
Adding JavaScript using a CDN
The last thing that I want to teach you about is loading JavaScript from a CDN. You can load libraries such as JQuery from fast and free CDN’s. This will make your website faster.
Here are a few free options:
-
is an open source project to provide JavaScript files A much smaller selection but with all the power of Google Like Google this is also only a small selection of files but uses Microsoft servers Also an open source project this one can take the files from NPM
Each of these CDNs will allow you to load the latest JQuery. Here is the URL from each of these CDNs:
This is the same file from each of the providers. You only need to pick one. Remember, always use the minified version as it will download faster.
As an example this is what it would look like if we loaded JQuery from the Google CDN:
Key takeaway: If you are loading a common library or framework then use one of these CDN’s to do it.
Wrapping Up, How to link JavaScript to HTML
We have looked at how to link JavaScript to HTML. We have discussed three ways to do it:
- Adding the JavaScript code to the page inside a script tag
- Adding the JavaScript from your web server as an external script
- Adding the JavaScript from a CDN
If you are loading a JavaScript framework such as JQuery use the CDN option as it will load the fastest.
We have also looked at the script tag and some of the attributes that you can use:
3 Ways To Include Javascript In HTML (Simple Examples)
Welcome to a tutorial on how to include Javascript in HTML. So you have just started with Javascript and wondering how to properly “put Javascript” into an HTML file?
- External Javascript, load a Javascript file – <script src=»https://code-boxx.com/javascript-in-html/FILE.JS»></script>
- Internal Javascript, add a block of code in the HTML document itself – <script>DO SOMETHING</script>
- Inline Javascript, directly add Javascript to an HTML element – <input type=»button» value=»Test» onclick=»FUNCTION()»>
That covers the quick basics, but there are more things to take note of. Read on for more examples!
ⓘ I have included a zip file with all the source code at the start of this tutorial, so you don’t have to copy-paste everything… Or if you just want to dive straight in.
Как подключать js скрипты в html

В прошлой статье код javascript непосредственно определялся на веб-странице. Но есть еще один способ подключения кода JavaScript, который представляет вынесение кода во внешние файлы и их подключение с помощью тега <script>
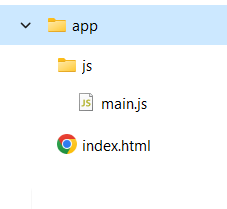
Итак, в прошлой теме мы создали html-страницу index.html , которая находится в каталоге app . Теперь создадим в этом каталоге новый подкаталог. Назовем его js . Он будет предназначен для хранения файлов с кодом javascript. В этом подкаталоге создадим новый текстовый файл, который назовем myscript.js . Файлы с кодом javascript имеют расширение .js . То есть у нас получится следующая структура проекта в папке app :
Откроем файл myscript.js в текстовом редакторе и определим в нем следующий код:
Здесь для добавления на веб-страницу некоторого содержимого применяется метод document.write . Первый вызов метода document.write выводит заголовок <h2> , а второй вызов — обычный текст.
Для совместимости с кодировкой страницы index.html для файла с кодом javascript также желательно устанавливать кодировку utf-8. При работе в Visual Studio Code этот редактор автоматически устанавливает кодировку UTF-8.
Теперь подключим этот файл на веб-страницу index.html :
Чтобы подключить файл с кодом javascript на веб-страницу, применяется также тег <script> , у которого устанавливается атрибут src . Этот атрибут указывает на путь к файлу скрипта. В нашем случае используется относительный путь. Так как веб-страница находится в одной папке с каталогом js, то в качестве пути мы можем написать js/myscript.js .
Также надо учитывать, что за открывающим тегом script должен обязательно следовать закрывающий </script>
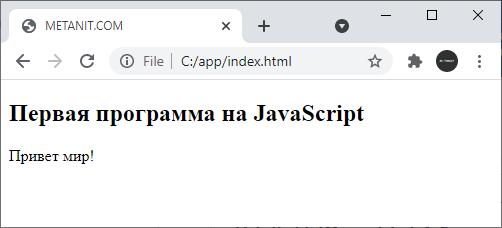
И после открытия файла index.html в браузере отобразится сообщение:
В отличие от определения кода javascript вынесение его во внешние файлы имеет ряд преимуществ:
Мы можем повторно использовать один и тот же код на нескольких веб-страницах
Внешние файлы javascript бразуер может кэшировать, за счет этого при следующем обращении к странице браузер снижает нагрузка на сервер, а браузеру надо загрузить меньший объем информации
Код веб-страницы становится «чище». Он содержит только html-разметку, а код поведения хранится во внешних файлах. В итоге можно отделить работу по созданию кода html-страницы от написания кода javascript
Поэтому, как правило, предпочтительнее использовать код javascript во внешних файлах, а не в прямых вставках на веб-страницу с помощью элемента script.
Подключение скрипта JavaScript

От автора: приветствую вас, друзья. В этой статье мы с вами узнаем, как перенести наш код JavaScript во внешний файл и подключить скрипт JavaScript. Статья ориентирована на новичков, начинающих свое изучение языка JavaScript.
Итак, начнем с вопроса, а зачем вообще нужно выносить код JavaScript во внешний файл? Все просто. Представьте, что ваш скрипт занимает десятки или сотни строк кода. Или даже больше. И, конечно же, этот скрипт нам, скорее всего, потребуется на каждой странице нашего сайта. Согласитесь, будет совсем нехорошо в этом случае дублировать в каждом файле эти сотни строк кода. Да и просто наличие не HTML кода в документе HTML будет смотреться не очень правильно и не очень красиво.
Именно поэтому код JavaScript принято выносить в отдельный файл, который и подключается к страничке. Собственно, все так же, как и в случае с файлами стилей. Как же подключить скрипт JavaScript к основному файлу? Очень просто. Для этого используются уже знакомый нам тег <script>, к которому добавляется атрибут src, точно так же, как и в случае с картинками. Ну и, как вы уже догадались, в атрибуте src указывается путь к подключаемому скрипту JavaScript.
Давайте попробуем перенести нашу программу, состоящую из одной строки кода, во внешний файл и подключим этот файл. Назовем этот файл, к примеру, scripts.js:

Профессия Frontend-разработчик PRO
Готовим Frontend-разработчиков с нуля
На курсе вы научитесь создавать интерфейсы веб-сервисов с помощью языков программирования и дополнительных технологий. Сможете разрабатывать планировщики задач, мессенджеры, интернет-магазины…