Способы добавления стилей на страницу
Для добавления стилей на веб-страницу существует несколько способов, которые различаются своими возможностями и назначением. Далее рассмотрим их подробнее.
Связанные стили
При использовании связанных стилей описание селекторов и их значений располагается в отдельном файле, как правило, с расширением css, а для связывания документа с этим файлом применяется тег <link> . Данный тег помещается в контейнер <head> , как показано в примере 3.1.
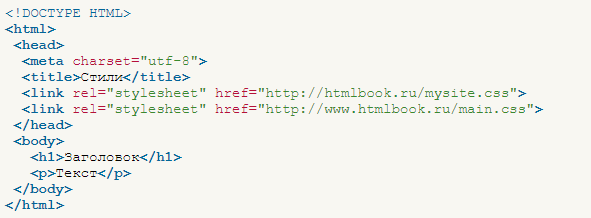
Пример 3.1. Подключение связанных стилей
Значение атрибута тега <link> — rel остаётся неизменным независимо от кода, как приведено в данном примере. Значение href задаёт путь к CSS-файлу, он может быть задан как относительно, так и абсолютно. Заметьте, что таким образом можно подключать таблицу стилей, которая находится на другом сайте.
Содержимое файла mysite.css подключаемого посредством тега <link> приведено в примере 3.2.
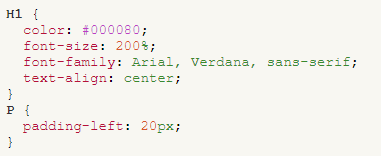
Пример 3.2. Файл со стилем
Как видно из данного примера, файл со стилем не хранит никаких данных, кроме синтаксиса CSS. В свою очередь и HTML-документ содержит только ссылку на файл со стилем, т. е. таким способом в полной мере реализуется принцип разделения кода и оформления сайта. Поэтому использование связанных стилей является наиболее универсальным и удобным методом добавления стиля на сайт. Ведь стили хранятся в одном файле, а в HTML-документах указывается только ссылка на него.
Глобальные стили
При использовании глобальных стилей свойства CSS описываются в самом документе и располагаются в заголовке веб-страницы. По своей гибкости и возможностям этот способ добавления стиля уступает предыдущему, но также позволяет хранить стили в одном месте, в данном случае прямо на той же странице с помощью контейнера <style> , как показано в примере 3.3.
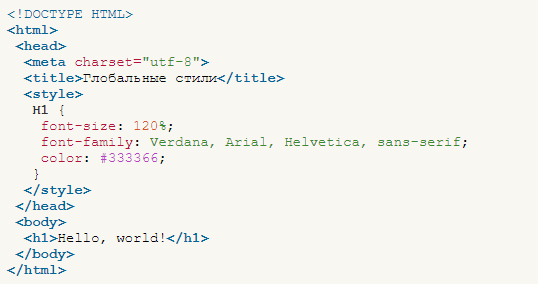
Пример 3.3. Использование глобального стиля
В данном примере задан стиль тега <h1> , который затем можно повсеместно использовать на данной веб-странице (рис. 3.1).
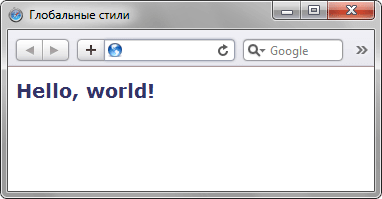
Рис. 3.1. Вид заголовка, оформленного с помощью стилей
Внутренние стили
Внутренний или встроенный стиль является по существу расширением для одиночного тега используемого на текущей веб-странице. Для определения стиля используется атрибут style , а его значением выступает набор стилевых правил (пример 3.4).
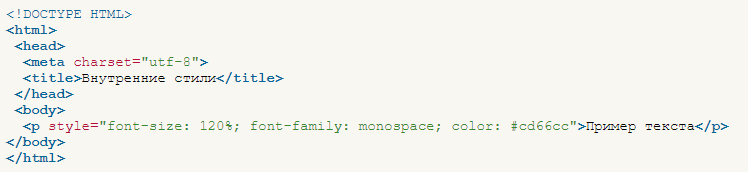
Пример 3.4. Использование внутреннего стиля
В данном примере стиль тега <p> задаётся с помощью атрибута style , в котором через точку с запятой перечисляются стилевые свойства (рис. 3.2).
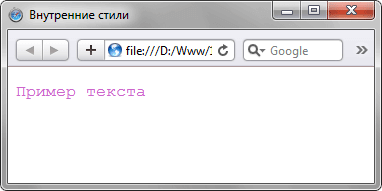
Рис. 3.2. Использование внутренних стилей для изменения вида текста
Внутренние стили рекомендуется применять на сайте ограниченно или вообще отказаться от их использования. Дело в том, что добавление таких стилей увеличивает общий объём файлов, что ведет к повышению времени их загрузки в браузере, и усложняет редактирование документов для разработчиков.
Все описанные методы использования CSS могут применяться как самостоятельно, так и в сочетании друг с другом. В этом случае необходимо помнить об их иерархии. Первым имеет приоритет внутренний стиль, затем глобальный стиль и в последнюю очередь связанный стиль. В примере 3.5 применяется сразу два метода добавления стиля в документ.
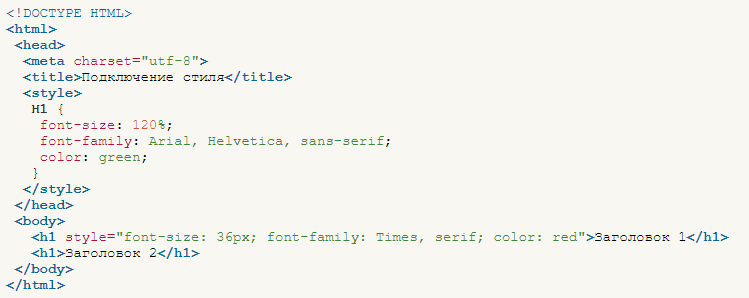
Пример 3.5. Сочетание разных методов
В данном примере первый заголовок задаётся красным цветом размером 36 пикселов с помощью внутреннего стиля, а следующий — зелёным цветом через таблицу глобальных стилей (рис. 3.3).
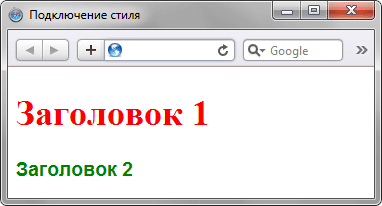
Рис. 3.3. Результат применения стилей
Импорт CSS
В текущую стилевую таблицу можно импортировать содержимое CSS-файла с помощью команды @import . Этот метод допускается использовать совместно со связанными или глобальными стилями, но никак не с внутренними стилями. Общий синтаксис следующий.
После ключевого слова @import указывается путь к стилевому файлу одним из двух приведенных способов — с помощью url или без него. В примере 3.6 показано, как можно импортировать стиль из внешнего файла в таблицу глобальных стилей.
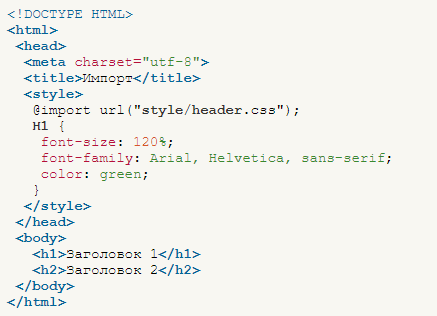
Пример 3.6. Импорт CSS
В данном примере показано подключение файла header.css , который расположен в папке style.
Аналогично происходит импорт и в файле со стилем, который затем подключается к документу (пример 3.7).
@import
The @import CSS at-rule is used to import style rules from other valid stylesheets. An @import rule must be defined at the top of stylesheet, before any other at-rule (except @charset and @layer) and style declaration, else it will be ignored.
Syntax
Is a <string> , a <url> , or a url() function representing the location of the resource to import. The URL may be absolute or relative.
Is a comma-separated list of media queries, which specify the media-dependent conditions for applying the CSS rules defined in the linked URL. If the browser does not support any of these queries, it does not load the linked resource.
Is the name of a cascade layer into which the contents of the linked resource are imported.
Description
Imported rules must come before all other types of rules, except @charset rules and layer creating @layer statements. The @import rule is not a nested statement. Therefore, it cannot be used inside conditional group at-rules.
So that user agents can avoid retrieving resources for unsupported media types, authors may specify media-dependent import conditions. These conditional imports specify comma-separated media queries after the URL. In the absence of any media query, the import is unconditional. Specifying all for the list-of-media-queries has the same effect.
The @import rule can also be used to create a cascade layer by importing rules from a linked resource. Rules can also be imported into an existing cascade layer. The layer keyword or the layer() function is used with @import for this purpose. Declarations in style rules from imported stylesheets interact with the cascade as if they were written literally into the stylesheet at the point of the import.
Formal syntax
Examples
Importing CSS rules
The two examples above show how to specify the url as a <string> and as a url() function.
Importing CSS rules conditionally
The @import rules in the above examples show media-dependent conditions that will need to be true before the linked CSS rules are applied. So for instance, the last @import rule will load the landscape.css stylesheet only on a screen device in landscape orientation.
Importing CSS rules into a cascade layer
In the above example, a cascade layer named utilities is created and it will include rules from the imported stylesheet theme .
In the above example, the rules in headings.css and links.css stylesheets cascade within the same layer as the audio[controls] rule.
This is an example of creating two separate unnamed cascade layers and importing the linked rules into each one separately. A cascade layer declared without a name is an unnamed cascade layer. Unnamed cascade layers are finalized when created: they do not provide any means for re-arranging or adding styles and they cannot be referenced from outside.
Linking Style Sheets to HTML
There are many ways to link style sheets to HTML, each carrying its own advantages and disadvantages. New HTML elements and attributes have been introduced to allow easy incorporation of style sheets into HTML documents.
Linking to an External Style Sheet
An external style sheet may be linked to an HTML document through HTML’s LINK element:
The <LINK> tag is placed in the document HEAD. The optional TYPE attribute is used to specify a media type—text/css for a Cascading Style Sheet—allowing browsers to ignore style sheet types that they do not support. Configuring the server to send text/css as the Content-type for CSS files is also a good idea.
External style sheets should not contain any HTML tags like <HEAD> or <STYLE>. The style sheet should consist merely of style rules or statements. A file consisting solely of
could be used as an external style sheet.
- screen, for presentation on non-paged computer screens;
- print, for output to a printer;
- projection, for projected presentations;
- aural, for speech synthesizers;
- braille, for presentation on braille tactile feedback devices;
- tty, for character cell displays (using a fixed-pitch font);
- tv, for televisions;
- all, for all output devices.
Multiple media are specified through a comma-separated list or the value all.
Netscape Navigator 4. x incorrectly ignores any linked or embedded style sheets declared with MEDIA values other than screen. For example, MEDIA=»screen, projection» will cause the style sheet to be ignored by Navigator 4. x , even if the presentation device is a computer screen. Navigator 4. x also ignores style sheets declared with MEDIA=all.
The REL attribute is used to define the relationship between the linked file and the HTML document. REL=StyleSheet specifies a persistent or preferred style while REL=»Alternate StyleSheet» defines an alternate style. A style is one that is always applied when style sheets are enabled. The absence of the TITLE attribute, as in the first <LINK> tag in the example, defines a persistent style.
A style is one that is automatically applied, such as in the second <LINK> tag in the example. The combination of REL=StyleSheet and a TITLE attribute specifies a preferred style. Authors cannot specify more than one preferred style.
An style is indicated by REL=»Alternate StyleSheet». The third <LINK> tag in the example defines an alternate style, which the user could choose to replace the preferred style sheet.
Note that current browsers generally lack the ability to choose alternate styles.
<LINK REL=StyleSheet HREF=»basics.css» TITLE=»Contemporary»>
<LINK REL=StyleSheet HREF=»tables.css» TITLE=»Contemporary»>
<LINK REL=StyleSheet HREF=»forms.css» TITLE=»Contemporary»>
In this example, three style sheets are combined into one «Contemporary» style that is applied as a preferred style sheet. To combine multiple style sheets into a single style, one must use the same TITLE with each style sheet.
An external style sheet is ideal when the style is applied to numerous pages. With an external style sheet, an author could change the look of an entire site by simply changing one file. As well, most browsers will cache an external style sheet, thus avoiding a delay in page presentation once the style sheet is cached.
Microsoft Internet Explorer�3 for Windows�95/NT4 does not support BODY background images or colors from linked style sheets. Given this bug, authors may wish to provide another mechanism for including a background image or color, such as embedding or inlining the style, or by using the BACKGROUND attribute of the BODY element.
Embedding a Style Sheet
A style sheet may be embedded in a document with the STYLE element:
The STYLE element is placed in the document HEAD. The required TYPE attribute is used to specify a media type, as is its function with the LINK element. Similarly, the TITLE and MEDIA attributes may also be specified with STYLE.
Very old browsers such as Netscape 2.0, unaware of the STYLE element, would normally show its contents as if they were part of the BODY, thus making the style sheet visible to the user. To prevent this, the contents of the STYLE element may be contained within an SGML comment (<!— comment —>), as in the preceding example. This use of comment tokens to hide the style sheet from old browsers should only be used in HTML, where the comment tokens are actually part of the style sheet. In XHTML, the comment tokens would be a real XML comment, and the style sheet would be hidden from browsers that treat the document as XML.
An embedded style sheet should be used when a single document has a unique style. If the same style sheet is used in multiple documents, then an external style sheet would be more appropriate.
Importing a Style Sheet
A style sheet may be imported with CSS’s @import statement. This statement may be used in a CSS file or inside the STYLE element:
Note that other CSS rules may still be included in the STYLE element, but that all @import statements must occur at the start of the style sheet. Any rules specified in the style sheet itself override conflicting rules in the imported style sheets. For example, even if one of the imported style sheets contained DT , definition terms would still have a yellow background.
The order in which the style sheets are imported is important in determining how they cascade. In the above example, if the style.css imported style sheet specified that STRONG elements be shown in red and the punk.css style sheet specified that STRONG elements be shown in yellow, then the latter rule would win out, and STRONG elements would be in yellow.
Imported style sheets are useful for purposes of modularity. For example, a site may separate different style sheets by the selectors used. There may be a simple.css style sheet that gives rules for common elements such as BODY, P, H1, and H2. In addition, there may be an extra.css style sheet that gives rules for less common elements such as CODE, BLOCKQUOTE, and DFN. A tables.css style sheet may be used to define rules for table elements. These three style sheets could be included in HTML documents, as needed, with the @import statement. The three style sheets could also be combined via the LINK element.
Inlining Style
Style may be inlined using the STYLE attribute. The STYLE attribute may be applied to any BODY element (including BODY itself) except for BASEFONT, PARAM, and SCRIPT. The attribute takes as its value any number of CSS declarations, where each declaration is separated by a semicolon. An example follows:
<P STYLE > This paragraph is styled in red with the New Century Schoolbook font, if available.</P>
Note that New Century Schoolbook is contained within single quotes in the STYLE attribute since double quotes are used to contain the style declarations.
Inlining style is far more inflexible than the other methods. To use inline style, one must declare a single style sheet language for the entire document using the Content-Style-Type HTTP header extension. With inlined CSS, an author must send text/css as the Content-Style-Type HTTP header or include the following tag in the HEAD:
<META HTTP-EQUIV=»Content-Style-Type» CONTENT=»text/css»>
Inlining style loses many of the advantages of style sheets by mixing content with presentation. As well, inlined styles implicitly apply to all media, since there is no mechanism for specifying the intended medium for an inlined style. This method should be used sparingly, such as when a style is to be applied on all media to a single occurrence of an element. If the style should be applied to a single element instance but only with certain media, use the ID attribute instead of the STYLE attribute.
The CLASS Attribute
The CLASS attribute is used to specify the style class to which the element belongs. For example, the style sheet may have created the punk and warning classes:
These classes could be referenced in HTML with the CLASS attribute:
<H1 Extensions</H1>
<P proprietary extensions can have negative side-effects, both on supporting and non-supporting browsers.
In this example, the punk class may be applied to any BODY element since it does not have an HTML element associated with it in the style sheet. Using the example’s style sheet, the warning class may only be applied to the P element.
A good practice is to name classes according to their function rather than their appearance. The warning class in the previous example could have been named red, but this name would become meaningless if the author decided to change the style of the class to a different color, or if the author wished to define an aural style for those using speech synthesizers.
Classes can be a very effective method of applying different styles to structurally identical sections of an HTML document. For example, this page uses classes to give a different style to CSS code and HTML code.
The ID Attribute
The ID attribute is used to define a unique style for an element. A CSS rule such as
may be applied in HTML through the ID attribute:
<P to the Web Design Group!</P>
Each ID attribute must have a unique value over the document. The value must be an initial letter followed by letters, digits, or hyphens. The letters are restricted to A-Z and a-z.
Note that HTML 4 allows periods in ID attribute values, but CSS1 does not allow periods in ID selectors. Also note that CSS1 allows the Unicode characters 161-255 as well as escaped Unicode characters as a numeric code, but HTML 4 does not allow these characters in an ID attribute value.
The use of ID is appropriate when a style only needs to be applied once in any document. ID contrasts with the STYLE attribute in that the former allows medium-specific styles and can also be applied to multiple documents (though only once in each document).
The SPAN Element
The SPAN element was introduced into HTML to allow authors to give style that could not be attached to a structural HTML element. SPAN may be used as a selector in a style sheet, and it also accepts the STYLE, CLASS, and ID attributes.
SPAN is an inline element, so it may be used just as elements such as EM and STRONG in HTML. The important distinction is that while EM and STRONG carry structural meaning, SPAN has no such meaning. It exists purely to apply style, and so has no effect when the style sheet is disabled.
Some examples of SPAN follow:
The DIV Element
The DIV element is similar to the SPAN element in function, with the main difference being that DIV (short for «division») is a block-level element. DIV may contain paragraphs, headings, tables, and even other divisions. This makes DIV ideal for marking different classes of containers, such as a chapter, abstract, or note. For example:
<DIV > <H1>Divisions</H1>
<P>The DIV element is defined in HTML 3.2, but only the ALIGN attribute is permitted in HTML 3.2. HTML 4.0 adds the CLASS, STYLE, and ID attributes, among others.</P>
<P>Since DIV may contain other block-level containers, it is useful for marking large sections of a document, such as this note.</P>
<P>The closing tag is required.</P>
</DIV>
A Note about Validation
Few CSS-styled documents will validate at the HTML�3.2 (Wilbur) level. HTML�3.2 does not define the SPAN element, nor the CLASS, STYLE, or ID attributes, and also lacks support for the TYPE and MEDIA attributes on the LINK and STYLE elements.
These style-related elements and attributes are not harmful to non-supporting browsers, as they are safely ignored. Documents using these elements and attributes may be validated against HTML 4.
External CSS Stylesheets – How to Link CSS to HTML and Import into Head

Ilenia Magoni

It is considered a best practice to have your CSS stylesheets in an external file. So how can you link that CSS to your HTML file?
Linking to an external CSS file is an important part of any HTML page boilerplate. And in this article, we’ll learn how to do it.
How to Link a CSS File to an HTML File
You can link your CSS file to your HTML file by adding a link element inside the head element of your HTML file, like so:
The link element has many uses, and it is important to specify the right attributes so that you can use it to import an external CSS stylesheet. We’ll look at some important attributes now.
The rel attribute
The first of the two indispensable attributes is the rel attribute. You will use this attribute to tell the browser what the relationship is with the imported file.
You’ll write rel=»stylesheet» to tell the browser that you are importing a stylesheet.
The href attribute
The second indispensable attribute is the href attribute, which specifies the file to import.
A common situation is that the CSS file and the HTML file are in the same folder. In such a case you can write href=»style.css» .
If the CSS file and the HTML file are in different folders, you need to write the correct path that needs to go from the HTML file to the CSS file.
For example, a common situation is that the CSS file is in a folder that is a sibling to the HTML file, like so:
In this case you would need to write a path like «css/styles.css» .
The type attribute
You use the type attribute to define the type of the content you’re linking to. For a stylesheet, this would be text/css . But since css is the only stylesheet language used on the web, it is not only optional, but it is even a best practice not to include it.
The media attribute
The media attribute is not visible in the example. It’s an optional attribute that you can use to specify when to import a certain stylesheet. Its value must be a media type / media query.
This can be useful in case you want to separate the styles for different devices and screen sizes in different files. You would need to import each CSS file with its own link element.
You can check out these articles (or other sources) on media queries to learn more about what you can write as an attribute value:
Conclusion
In this article, you learned how to add an external style sheet to your web page using the link element and the href and rel attributes.
You also learned that you can import multiple stylesheets and use the media attribute to determine when each one should be applied.