How to Integrate Proxy with Python Requests
Learn how to use the Python Requests module behind a proxy server.
By Ashutosh Krishna on October 25th, 2022

This tutorial will show you how to utilize the Python Requests module using a proxy server. In order to avoid their IP addresses being blocked by websites, developers sometimes utilize many proxies for security and anonymity. Other advantages of proxies include their ability to get around filters and restrictions.
Feel free to learn more about proxy servers and how they work before getting started with the tutorial.
Also, if you want to know more about and try the best-performing proxies in the industry, you can find out more here.
Prerequisites and Installation
This guide is for Python users who want to scrape from behind a proxy. Follow along with the tutorial to get the most out of it. Here are the prerequisites for the tutorial:
Since the tutorial is all about using the requests module behind a proxy, you must have Python installed in your system. If not, install it for your operating system from here.
You should have some experience with Python. As a beginner, you can learn about the requests module here.
Check if the requests module is installed in your system using the command:
The above command will list down all the installed dependencies with their versions. If you don't find the requests module in the list, you can install it using the command below:
How to use Python Requests?
Let us learn how to use the requests package with a simple example.
To make a web request using Python, first, you need to import the requests library. Then you can make an HTTP GET request using the get() method from the requests library. You can store the response that you get from the server in a variable.
In order to read the response from a server, you can use response.text. If the server responds with a JSON response, the requests library has a built-in method response.json() to read JSON-formatted responses.
In the output, you can see the origin IP address is printed.
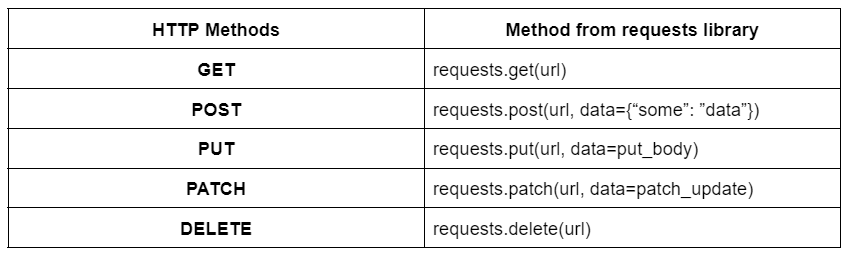
Similar to the get() method, you have several other methods in the requests library. Some of the most popular are:
How to use a Proxy with Python Requests
In order to use a proxy with Python requests, you'll need to pass it while making any request. Let us learn how we can do it.
Similar to the above example, import the requests library at the top.
Next, define the HTTP and HTTPS connections in a proxies dictionary. This variable needs to include a dictionary that associates a protocol with the proxy URL. Create a variable for the URL of the website you are scraping as well.
Create a response variable as the last step that makes use of any of the requests methods. The method will accept two arguments: the URL variable you defined and the dictionary you specified.
In the above example, the proxies dictionary contains URLs for two separate protocols: HTTP and HTTPS. Their values map to the same URLs with the same ports. However, they can also be different.
You can see that the output now shows the origin IP address that is passed in the proxies dictionary.
Note: In the above example, we are using the GET method, but the same proxy setup can also be used for the other HTTP methods.
How to use Proxy Authentication?
The following syntax can be used to modify your code if authentication is required:
How to use Proxy Sessions?
You might also want to scrape from websites that use sessions. In that case, a session object would need to be created. Creating a session variable and assigning it to the requests.Session() method will enable you to achieve this.
Similar to before, you would then use the requests method to send your session proxies, but this time you would only pass in the url as the argument.
Notice in the example above that instead of using requests.get(), session.get() method is used.
How to use environment variables?
In some cases, you might be reusing the same proxy for each request. Instead of defining the proxies dictionary every time, you can set environment variables for the proxies.
To set the environment variables, use the below command:
Now, even if you don't define the proxies within your code, the request will be made using the proxies from the environment variables.
Rotating proxies with Python Requests
Until now, you have seen how to use one proxy. Some developers prefer to use more than one proxy. It's a good practice to use more than one proxy whenever you find yourself constantly scraping from a website because there's a good probability your scraper will be blocked, which will result in the banning of your IP address. So it's better to use rotating proxies to avoid getting banned.
A rotating proxy is a proxy server that gives each connection a different IP address from the proxy pool. You must have a pool of IPs available in order to rotate IP addresses. You can utilize paid services or free proxies that you can find online. But in most cases, you can't rely on free proxies if your application depends highly on scraped data.
How to rotate IPs using Python Requests?
You need a list of free proxies before you can start rotating your IP addresses. Let's now write a script that selects and rotates through proxies.
As always, import the requests library at the top of the script. In addition to that, import the random library to choose IP addresses randomly.
Create a list of IP addresses and a url variable.
Now, within a while loop, choose an IP address randomly from the list of IP addresses and create a dictionary called proxies using the chosen IP address. Make use of this proxies dictionary while making the request. As per your requirement, you can break the loop after the request is made.
Here's the Python script for your reference:
Notice in the above script, you're printing the IP address being used in each request.
Now you can simultaneously rotate and scrape!
Should you use free proxies?
Free proxies can appear tempting due to a perception of ease. You just need to locate the desired place and website. If you're an individual using proxies just for learning purposes or small tasks, then they are a good choice for you.
However, if you're using proxies for business purposes, you should not go with free proxies. First off, I would recommend giving this article by the CEO of Proxyway a read — it goes into detail about the key points to look for when choosing a proxy provider.
But in any case, here are a few reasons why using free proxies for business purposes may be a bad idea:
Most free proxies don't support HTTPS: Surprisingly, around 80% of free proxy servers do not support HTTPS connections, despite the fact that the HTTPS protocol ensures that your connection is encrypted. Practically speaking, this implies that it is simple to monitor all of the data you send. So, free proxies are a bad choice if data privacy is a concern in any manner.
Cookies might get stolen: Since cookies are used to save your login information, protecting them is crucial. However, if you set up a proxy server to act as a middleman between you and a website, the owners of that proxy server have an easy way to steal cookies as they're being created. This would provide them the ability to log in to the highly sensitive websites you've visited as well as to impersonate you online.
Low-quality service: Sadly, even after taking all of the above-mentioned risks, the reward is insufficient. Due to both a lack of financing and the potential for high concurrent usage, free proxies are typically much slower than premium ones.
In short, free proxies are a high-risk, low-reward service when all these elements are taken into account. When compared to free proxies, premium proxies are actually the complete opposite. They are absolutely secure, quick, trustworthy, and genuine. Most provide a range of options depending on the use case, whether you want more advanced Residential Proxies or the usual Datacenter Proxies.
�� Note: If you do not know what residential proxies are and why you may need them, you can learn more here. For more on how residential proxies and datacenter proxies differ, go here.
All of this enables extensive customization that is very important to your business. Additionally, a premium service gives you access to cutting-edge, ever-evolving solutions.
Bright Data is one of the leading web data platforms in the world that provides such premium proxy services. It provides you with a powerful way to browse anonymously from anywhere in the world.
If you are an individual or a business that relies highly on data, you should definitely check out Bright Data. Bright Data offers a variety of quick, highly secure, quality, and ethical proxy services (including powerful residential proxies) with an unending uptime.
Additionally, Bright Data offers excellent pricing choices, such as Pay per use. When you choose Bright Data's premium proxy solutions, you'll be frequently introduced to various developments like artificial intelligence (AI) and machine learning (ML), which significantly boost the effectiveness of proxies, particularly in industries like web scraping.
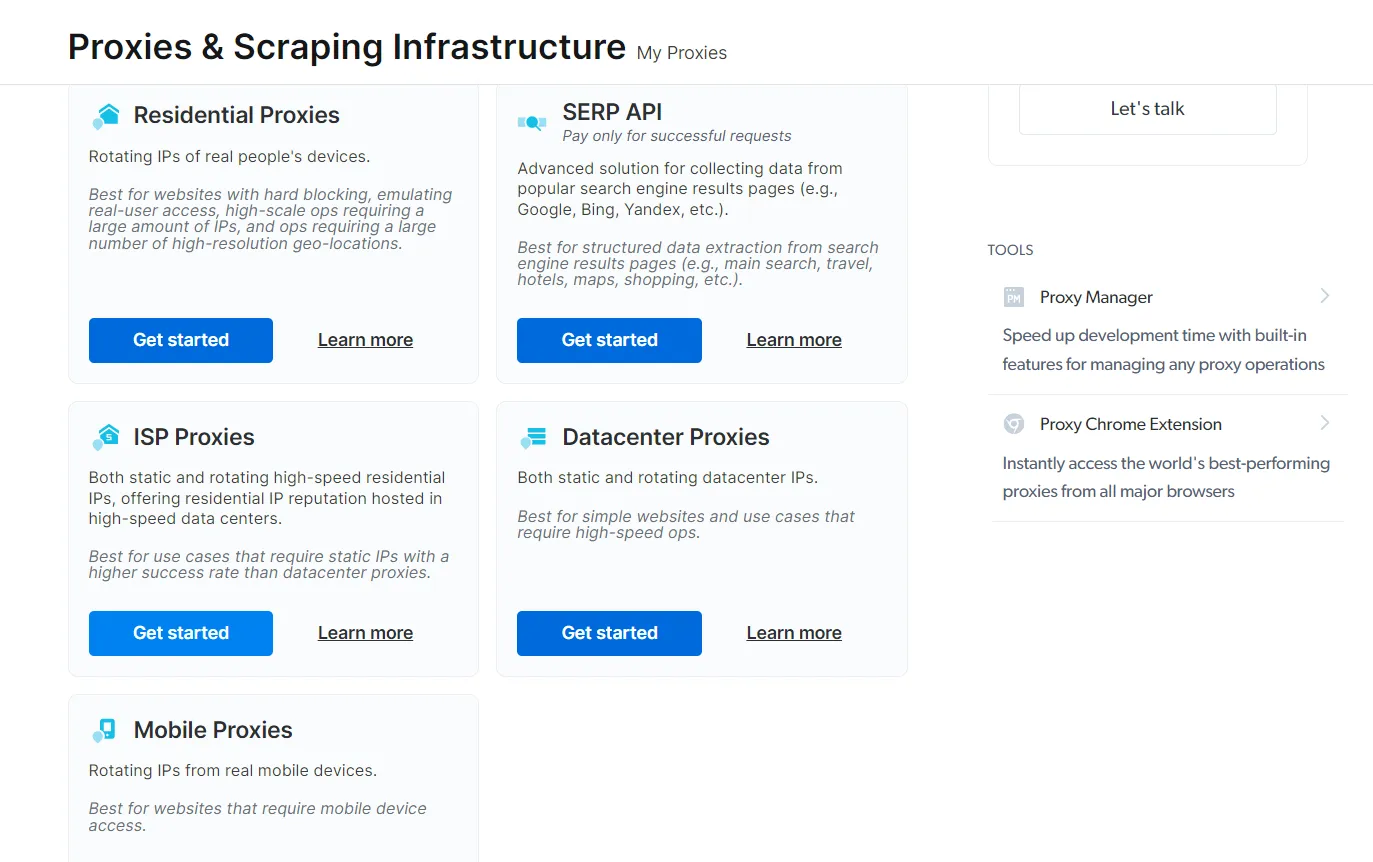
Here are the proxy services you get with Bright Data:
You can choose any of them as per your need without worrying about the problems you face with free proxies.
How to use Bright Data Proxy Service with Python?
As we already discussed why you should not rely on free proxies for business purposes, let us learn how to use Bright Data’s proxy service with Python. It’s actually quite simple, so let’s dig in.
For the sake of this tutorial, we will use ISP Proxies. Register for a free trial by clicking on ‘Start free trial’ and entering your details (you can use your organizational or personal Gmail ID to register for a trial).
Once you’re done, continue with the steps below.
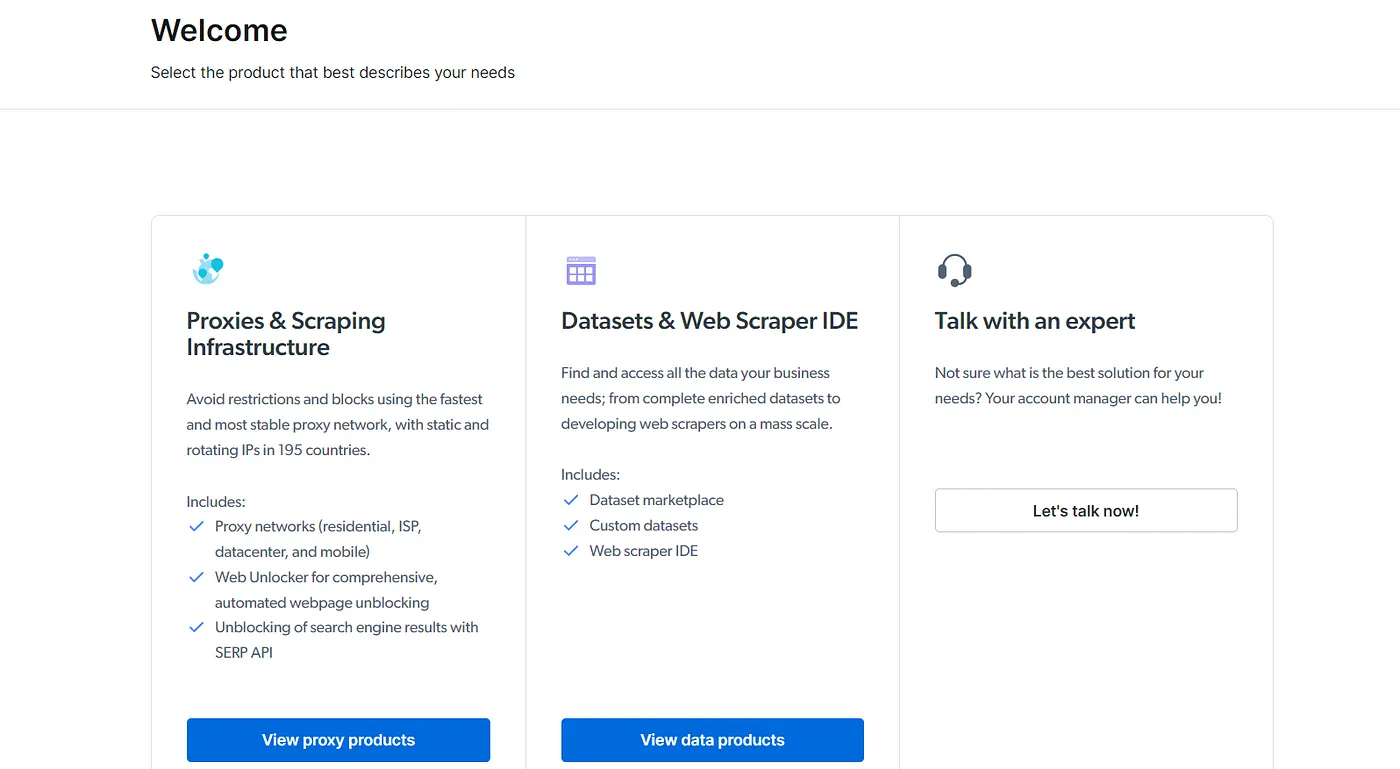
- On the ‘Welcome’ page, click on ‘View proxy products’ under Proxies & Scraping Infrastructure.
- Click on ‘Get Started’ underneath ISP Proxies, this will redirect you to create a new proxy.
- Enter the details as per your need and click on Add Zone to create a proxy.
- Once the proxy is created, you can see the access parameters similar to below:
Click on the **Download IPs list **link to download the list of IPs allocated to you. The IPs will contain your proxy URL, port, username, and password separated by a colon(:). The format of each IP is: proxy_url:port:username:password.
While making a request, you need to authenticate to the proxy. Thus, a sample Python script will look like this:
That's it! We just used Bright Data's Proxy Service to make a successful request.
Conclusion
Even though it may be exciting to immediately begin scraping with your fancy new proxies, there are still a few important things you need to be aware of. To begin with, not all proxies are created equal. There are several varieties, but the three most common are elite proxies, anonymous proxies, and transparent proxies.
The easiest way to avoid being discovered is to utilize an elite proxy, whether it is paid for or available for free. Anonymous proxies might be worthwhile if you just intend to use a proxy for privacy-related purposes. Transparent proxies expose your true IP address and the fact that you are using a proxy server, so it is not advisable to use one unless there is a specific reason to.
Now that everything is clear, it's time to start scraping with a proxy in Python. So go ahead and start making all the requests you can think of!
Using a Proxy Server with Python requests
In this tutorial, you’ll learn how to use the Python requests library to make HTTP requests behind a proxy server. This has numerous benefits, including staying anonymous and secure and preventing having an IP address blocked. You’ll learn how to set HTTP, HTTPS, and FTP proxies.
By the end of this tutorial, you’ll have learned:
- How to set proxy servers when using Python requests
- How to use proxy servers with sessions when using Python requests
- How to authenticate requests when working with proxy servers
Table of Contents
How to Use Proxy Servers with Python requests
In order to use proxies in the requests Python library, you need to create a dictionary that defines the HTTP, HTTPS, and FTP connections. This allows each connection to map to an individual URL and port. This process is the same for any request being made, including GET requests and POST requests.
It’s important to note that while the connections map to individual URLs and ports, they can actually point to the same URL and port.
Let’s see how you can define a set of proxies for the Python requests library:
Let’s break down what we did above:
- We imported the requests library
- We defined a dictionary, proxy_servers , which mapped URLs and ports to HTTP and HTTPS connections
- We then made a GET request and passed in our dictionary into the proxies= argument
How to Authenticate when Using a Proxy Server with Python requests
In order to add authentication to a request made with Python requests , you can follow normal request authentication methods. This allows you to use different types of authentication methods, including basic authentication.
Let’s take a look at how you can use basic HTTP authentication with proxy servers when making a request:
We can see in the GET request we made above, that we passed in authentication information with the auth= parameter.
How to Use Sessions with a Proxy Server with Python requests
In some cases, you’ll want to use sessions when accessing data via an HTTP request. In these cases, using proxies works a little differently. We first need to instantiate a Session object and then assign our proxies using the .proxies attribute.
Let’s see how this can be done:
Let’s break down what we did in the code above:
- We imported the requests library
- We defined our proxy servers dictionary as before
- We then created a Session object, s
- We assigned proxies using the .proxies attribute and assigned our dictionary
- We then performed a GET request which automatically applied our proxies
Conclusion
In this tutorial, you learned how to use proxy servers when making HTTP requests using the Python requests library. Using proxies can help make your requests more secure or anonymous, as well as prevent your IP from being blocked when scraping websites.
You first learned how to use proxies when making requests using the requests library. Then, you learned how to use authentication with proxy servers. Finally, you learned how to use requests Sessions to handle proxy servers.
Proxy Integration With Python Requests
The Python Requests library is a user-friendly de facto standard for managing HTTP/1.1 requests. It’s one of the most popular third-party Python packages, with around 233 million monthly downloads. The Requests library simplifies HTTP requests and responses management without you having to enter query strings in the URL manually.
Integrating proxies with any scraping or web requests library is inevitable. It helps avoid undesirable IP blocks by the targeted websites and minimizes vulnerabilities associated with revealing your IP.
This guide will show you how to integrate Oxylabs Residential and Datacenter Proxies with Python Requests and demonstrate two methods to rotate Datacenter Proxies.
Installing Requests
Installing the Python Requests library is straightforward. Open your integrated development environment’s (IDE) Python command terminal and execute the following pip command:
On a Windows device, use the following command:
Once installed, you can import the Requests library by using the following statement:
Python Requests code example
The Python Requests module supports different methods to send HTTP requests, including GET , POST , and PUT . For the sake of demonstration, the following code snippet uses the requests.get() method to send an HTTP GET request to http://httpbin.org/ip.
The above code sends an HTTP GET request and stores the response in the resp object. Next, it prints status_code and the received content in different formats, as can be seen in the output snippet below:
Configuring proxies
You can provide your proxy IP and proxy authentication credentials within the get() function. Python Requests proxy integration is a three-step procedure.
Step 1: Assuming that you have already installed the Python Requests library, you must first import the Requests library before using any of its functionalities:
Step 2: Create a dictionary variable containing all the information about your proxy endpoint, including the proxy address, port number, and proxy authentication credentials:
Here, USERNAME and PASSWORD are your Oxylabs sub-user’s credentials. The request PROTOCOL can be HTTP or HTTPS and isn’t necessarily the same as the PROXY_TYPE.
Residential Proxies
The following code demonstrates creating a dictionary with one Residential Proxy endpoint for an HTTP request, and another for HTTPS:
Here, you can use country-specific entries. For example, if you enter gb-pr.oxylabs.io instead of PROXY_ADDRESS and 20000 instead of PORT, you’ll acquire a United Kingdom exit node. Please refer to our documentation for a complete list of country-specific entry nodes and sticky session details.
Datacenter Proxies
The following table summarizes the proxy server configuration for both Shared and Dedicated Datacenter Proxies:
| Datacenter Proxy | Proxy Type | Proxy Address | Port | User Credentials |
|---|---|---|---|---|
| Dedicated | HTTP or SOCKS5 | Your selected IP from the acquired list | 60000 | Oxylabs sub-user’s username and password |
| Shared | HTTP | dc.pr.oxylabs.io | 10000 | Oxylabs sub-user’s username and password |
In the case of Dedicated Datacenter Proxies, you’ll have to choose an IP address from the acquired list. Take a look at our documentation to learn more.
You can also use country-specific entries with Shared Datacenter Proxies. For instance, if you enter dc.fr-pr.oxylabs.io in place of PROXY_ADDRESS and 42000 instead of PORT, you’ll have a French exit node. Please refer to our documentation for the entire list of country-specific entries.
Step 3: The last step is to send an HTTP request using a method of your choice— get() , post() , or put() —and pass the proxies dictionary along the target URL.
The following code sends a GET request to http://httpbin.org/ip by using the Residential Proxy server configuration described in step 2. It further prints the response in different formats:
The combined code of the above three steps should produce the output like this:
Configuring session proxies
Some scraping targets require a session for HTTP communications. In this case, you need to configure proxies with the request session you create.
The following code demonstrates creating a request session and configuring a residential proxy:
As you can see, first, you have to create a new request session and store it in session_obj . Next, you must set the proxies property with one of the proxy endpoints.
The configured session_obj is then used to generate a GET request to http://httpbin.org/ip. Lastly, the code prints the returned response in different formats.
Testing proxy connection
You can test your proxy server settings by sending a GET request to http://httpbin.org/ip.
Use the following code to test the proxy connectivity. Don’t forget to use your Oxylabs sub-user’s username and password:
If the status code is 200 and the output IP differs from your actual network IP address, then your proxy server is configured correctly.
How to rotate proxies with Python Requests?
Some websites discourage automated scraping of content and can block any suspected IP addresses. If you’re using a single proxy server IP for iterative scraping requests, there is a good chance your proxy IP will be blocked.
Oxylabs Residential Proxies can either randomly change the proxy address for each request or use the same proxy IP for up to 30 minutes. Shared Datacenter Proxies also offer the options mentioned above but can keep the same IP unlimitedly. Thus, Oxylabs Residential and Shared Datacenter Proxies perform proxy rotation intrinsically and don’t require external rotation. Check out our documentation for Residential and Shared Datacenter Proxies to find out more.
However, Dedicated Datacenter Proxies don’t have an in-built rotation feature, but they can be implemented with our Proxy Rotator. With this tool, you can easily automate the rotation of our Dedicated Datacenter Proxies.
Alternatively, Python Requests proxy rotation can be achieved in Python. Unfortunately, the Requests library doesn’t have a built-in rotation feature, but you can still rotate proxies using the following two methods.
Selecting a proxy endpoint randomly from a proxy list
This straightforward process involves creating a list of proxy endpoints and randomly selecting one before every new HTTP request.
Assuming you have a proxy list, you can use the following code to rotate the proxies from the given proxy list:
The above code creates a list of proxy endpoints and uses random.choice() which returns a randomly selected element from the specified sequence, in our case proxies . Each call to the choice() method randomly selects new proxy, which is then used to create the proxy dictionary for the subsequent HTTP request.
The for loop in this code makes five different GET requests to http://httpbin.org/ip. It uses a random proxy endpoint from the proxies for each new HTTP request.
The choice() method can select the same proxy endpoint multiple times. Each value from the given range is always equally likely in each choice() call. Thus, there can be a possibility of repeating the same endpoints several times in consecutive HTTP requests.
Iterating over the proxy list
The randomness in the previous proxy-rotation scheme makes it non-deterministic. However, you might want to use a more deterministic rotating technique. You can do that by using a pattern similar to the round-robin.
In this scheme, you create a list of proxy endpoints and iterate over the list indices until you reach the end of the list. Thanks to modular arithmetics, the next value of i is mapped to the 0th index. It goes on until the for loop completes all of its iterations.
The following code provides the implementation of this method:
The for loop makes HTTP requests two times the length of the proxies . Notice the calculation of the index in each iteration. The expression i%length keeps the index value within the proxies bounds. It maps all the values of i between 0 and the length-1. Thus, ensuring a smooth rotation of proxies.
Conclusion
Integrating proxies with any scraping or request library is inevitable. With the proxies set up in Python Requests, you can begin your web scraping projects without worrying about IP blocks and geo-restrictions.
If you have any questions or need assistance, please feel free to contact us.
Please be aware that this is a third-party tool not owned or controlled by Oxylabs. Each third-party provider is responsible for its own software and services. Consequently, Oxylabs will have no liability or responsibility to you regarding those services. Please carefully review the third party's policies and practices and/or conduct due diligence before accessing or using third-party services.
Useful resources
HTTPX vs Requests vs AIOHTTP
Find out about the critical features of HTTPX, Requests, and AIOHTTP and how they differ from each other.
Python Web Scraping Tutorial: Step-By-Step
We take you through every step of building your first web scraper. Find out how to get started in data acquisition with Python.
Web Scraping with Selenium and Python
Learn how the fundamentals of web scraping work by using Selenium, one of the better known tools for automating web browser interactions.
Advanced usage of requests module in python

requests is one of the most prevalent libraries used for HTTP communications in python. Additionally, requests also provides automatic Keep Alive and Connection Pooling mechanisms. Having said that, we all have definitely worked with the basics of requests module. This article discusses the advanced usage of the requests module.
Take Away:

At the end of the this article, we should have a fair idea of the following.
- Creating session objects using requests
- Persist session level data for all the requests made from a session.
- Provide default data to the request methods.
- Event hooks for call back
- Configure proxies for a session
- Configure timeouts and retries per request
HTTP Sessions:
First, let’s understand how to create a HTTP session . So, why go through all the pain of working with sessions while we can do things at the request level? Well, the answer is quite simple. We may want to set few metadata at a session level rather than setting for every single request.
Setting retries for a session:
Notably, we are creating a http session here and setting the number of retries to 3. Ideally 3 number of retries is recommended.
However, you could choose the number of retries of your interest. Therefore, for any request that is send using http_session , the retry would be set automatically to 3.
In addition, we will also set the base URLs for a session. If you are wondering if we can do that, Of course we can. Just like we set a base URL in postman .
Setting base URLs using requests-toolbelt:
Predominantly, we may be accessing a single API with different routes in our use cases. The effort of repeatedly mentioning the base URL for every single request can be saved by setting the base URL at session level.
We have requests-toolbelt library to do this for us.
Setting proxies:
In general, most of the organisations have a proxy or firewall configured which could be painful and annoying because the developer’s time is exhausted in debugging the infrastructure issues. Using an internal library makes it even more difficult if it somehow has configured to use a proxy.Having said that, requests module provides an option to set
- Request level proxy
- Session level proxy
Request level proxy:
Session level proxy:
Configuring Event hooks:
Requests has a hook system that you can use to manipulate portions of the request process, or signal event handling. In addition to a single request, the hooks can also be added to a session. Most of the time we may need a call back mechanism or a notification of any kind as soon as we receive a response. In such scenarios, event hooks can be leveraged.
One such use case is to display a progress bar, while downloading files. If you want to learn how to display progress bar during uploads and downloads, kindly check here.
Event hooks for a request:
Event hooks for a session:
Setting timeout:
Most requests to external servers should have a timeout attached, in case the server is not responding in a timely manner. By default, requests do not time out unless a timeout value is set explicitly. Without a timeout, your code may hang for minutes or more.
The timeout value will be applied to both the connect and the read timeouts.
Summary:
In conclusion, session objects are useful as much as requests are. This can be used to have your own customized, timeouts , requests , proxies , hooks at a framework level to comply with DRY policies.