Как создать таблицу в tkinter python
Для отображения данных в виде таблицы параметру show предпочтительно передать значение «headings» (если надо отображать заголовки), либо » » (для таблицы без заголовков). Определим небольшую таблицу с тремя столбцами:
Здесь данные, которые будут отображаться в таблице, определены в виде списка people, который хранит набор кортежей. Каждый кортеж состоит из трех элементов. Условно будем считать, что первый элемент кортежа представляет имя пользователя, второй — возраст, а третий — электронный адрес. И эти данные нам надо отобразить в таблице:
Для отображения этих данных определяем три столбца: name, age и email в виде кортежа и передаем их параметру columns :
Далее нам надо настроить заголовки столбца с помощью метода heading() класса Treeview (по умолчанию столбцы не имеют никаких заголовков). Данный метод принимает ряд параметров:
Первый параметр указывает на имя столбца. В примере выше определяем также параметр text , который определяет текст заголовка
И последний момент — добавляем сами данные в таблицу с помощью метода insert() класса Treeview
Первый параметр — пустая строка «» указывает, что элемент добавляется как элемент верхнего уровня (то есть у него нет родительского элемента). Значение END указывает, что элемент добавляется в конец набора. И параметр values в качестве добавляемых данных устанавливает кортеж person.
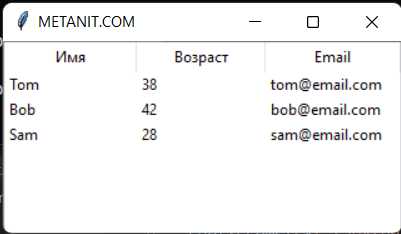
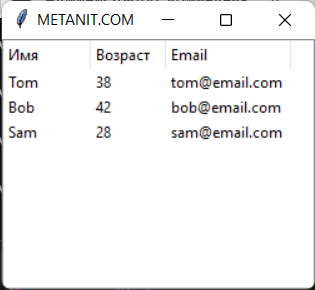
В итоге мы получим следующую таблицу:
Настройка столбца
Вполне возможно, что изначальные настройки столбцов нас не устроят. Например, текст заголовка располагается по умолчанию по центру, а данные столбца выравниваются по левому краю. Кроме того, каждый столбец имеет некоторую начальную ширину, в следствие чего ширина виджета может оказаться больше ширины окна. Либо мы захотим как-то иначе настроить вид столбца.
Прежде всего мы можем настроить заголовки столбца с помощью метода heading() :
column : имя настраиваемого столбца
text : текст заголовка
image : картинка для заголовка
anchor : устанавливает выравнивание заголовка по определенному краю. Может принимать значения n, e, s, w, ne, nw, se, sw, c
command : функция, выполняемая при нажатии на заголовок
Для настройки столбца в целом применяется метод column() :
column : индекс настраиваемого столбца в формате «# номер_столбца»
width : ширина столбца
minwidth : минимальная ширина
anchor : устанавливает выравнивание заголовка по определенному краю. Может принимать значения n, e, s, w, ne, nw, se, sw, c
stretch : указывает, будет ли столбец растягиваться при растяжении контейнера. Если будет, то значение True , иначе значение False
Применим некоторые из этих параметров:
В данном случае для заголовков устанавливаем выравнивание по левому краю. Для столбцов запрещаем растяжение и устанавливаем ширину.
При добавлении изображения оно помещается в правой части. Например, установка изображения для третьего столбца:
Как создать таблицу в tkinter python
Python offers multiple options for developing a GUI (Graphical User Interface). Out of all the GUI methods, Tkinter is the most commonly used method. It is a standard Python interface to the Tk GUI toolkit shipped with Python. Python with Tkinter is the fastest and easiest way to create GUI applications. Creating a GUI using Tkinter is an easy task.
Note: For more information, refer to Python GUI – tkinter
Creating Tables Using Tkinter
A table is useful to display data in the form of rows and columns. Unfortunately, Tkinter does not provide a Table widget to create a table. But we can create a table using alternate methods. For example, we can make a table by repeatedly displaying entry widgets in the form of rows and columns.
To create a table with five rows and four columns we can use two for loops as:
Inside these loops, we have to create an Entry widget by creating an object of Entry class, as:
Now, we need logic to place this Entry widget in rows and columns. This can be done by using grid() method to which we can pass row and column positions, as:
We can insert data into the Entry widget using insert() method, as:
Here, ‘END’ indicates that the data continuous to append at the end of previous data in the Entry widget.
This is the logic that is used in the program given below using the data that is coming from a list. We have taken a list containing 5 tuples and each tuple contains four values which indicate student id, name, city and age.
Hence, we will have a table with 5 rows and 4 columns in each row. This program can also be applied on data coming from a database to display the entire data in the form of a table.
Source Code:
Creating a Tkinter Table

You can use the GUI as standalone or integrated applications in a wider variety of applications.
This tutorial shows how to create a Tkinter table in Python, and also, we will discuss an approach related to the Tkinter table in Python.
Use Entry Widget to Create Table in Tkinter
Tkinter helps create tables, but it does not provide a user interface for the table widget. You can create a table by repeatedly displaying entry widgets in rows and columns.
However, to make a table with six rows and four columns, we will have to use a for loop (see below).
We need to create an Entry widget within these loops by creating an Entry class object (see below).
Now, we need to set this intersection in the rows and columns. This can be done using a grid() method, in which we can pass row and column as arguments, such as below.
Now we can use the insert() method to insert data into the Entry widget (see below).
The insert() method takes two parameters, END and data . The End parameter is responsible for adding continuous data at the end of the previous data in the Entry() widget.
You will create the data parameter by yourself; it can be a list, Excel sheet or database.
This is a logical approach used in the system below using data from the list. In this code, we take a list containing 6 tuples, and each contains four values holding the Employee id , Name , City and Age .
So, we will have a table with 6 rows and 4 columns in each row. This program can also be used with an Excel sheet or database to display all data in a table format.
Python Tkinter Table Tutorial
In this Python Tkinter tutorial, we will learn How to create a Table in Python Tkinter and we will also cover different examples related to Tkinter Table. And, we will cover these topics.
- Python Tkinter Table
- Python Tkinter Table with Scrollbar
- Python Tkinter Table Widget
- Python Tkinter Table Input
- Python Tkinter Table List
- Python Tkinter Table Refresh
- Python Tkinter Table Canvas
- Python Tkinter Table Sort
- Python Tkinter Editable Table
Table of Contents
Python Tkinter Table
In this section, we learn about the Python Tkinter table and we create a Tkinter table with the help of Treeview. Treeview refers to hierarchical representation.
The Tkinter.ttk module is used to drive a tree view and we use the tree view to make a table. A table is useful to display data or information that is visible in form of rows and columns.
Code:
- In this code, we take mygame .column() to represent the columns in Python Tkinter Table.
- mygame.heading() is used to display the headings in the Python Tkinter Table.
- mygame.insert() is used to insert the values in the Python Tkinter Table.
- ttk.Treeview() helps us to create a table.
- ‘bg‘ is defining the background color with ‘#AC99F2’.
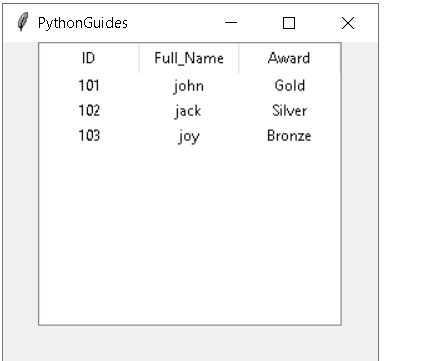
Output:
After running this example, we have the following output which shows the data in the form of rows and columns inside a table.

Python Tkinter Table with Scrollbar
In this section, we will cover How to create a python Tkinter table with scrollbars.
- At times, the screen size is not enough to display the entire data. So to navigate around the data scrollbars are used.
- There are two types of scrollbars:
- Horizontal Scrollbar
- Vertical Scrollbar
- Horizontal Scrollbar allows you to navigate in right and left directions.
- Vertical Scrollbar allows you to navigate in Up and down directions.
There are two ways to implement a scrollbar. The first is to implement directly on the main window and the second way is to create a frame and put other widgets on the LEFT and scrollbar on the RIGHT.
Source code :
In this example, we have demonstrated horizontal and vertical scrollbars in Python Tkinter.
In the above example, we are using game_scroll.pack(side=RIGHT,fill=Y) for horizontal scrollbar and game_scroll.pack(side= BOTTOM,fill=X) for the vertical scrollbar.
Output:

Python Tkinter Table Widget
The table is a tabular representation of data in rows and column format.
Python Tkinter does not have a specific Table widget using which we can create a table.Python Tkinter Table widget or Python Tk Table widget can be created using List, Pandas, or Treeview from the ttk package.
Let us understand with the help of an example.
Here is the output of the above example.
Python Tkinter Table Input
In this section, we will learn how to create a table with input fields in Python Tkinter.
- Firstly, we will create a entry field where we will give the input, and the input which we give will be shown in the table.
- And it will also have the following fileds
- Labels: labels which describe the word or term.
- Entry: Entry where we can give the input.
Code :
So, in this example, we are using the entry box for taking the input. And when we enter the data as input in the entry box, the data will show in the table.
Output:

In this table, we already have some data and now to add more data to the list, we can give input in the entry box. And the input which we give in the entry by clicking on the input record button the data will show on the table.

After click on the Input Record, the input which we gave in the entry box will show on the table.

Python Tkinter Table List
In this section, we will learn how to create a table using a list in Python Tkinter.
- We create the list by using treeview, in which we insert data to make a list insert(parent=”,index, iid= None ,text=”).
- Parent: The Parent is the item, or empty string to create top level item.
- The index is an integer or value end.
- Here, iid is an identifier, iid is not present in the table , a new different identifier is generated all time.
Code :
In this output, the data is display in the form of a Table list. We can store the data in form of numbers or strings. This table list only shows the string we can also put numbers in the table list.

Python Tkinter Table Refresh
In this section, we will learn how to refresh table data in Python Tkinter.
The Refresh function is meant to be used when we update anything inside our table data. And that updated data will be visible in the table once the table is refreshed.
- In the below code, we have used labels like name, ID, and rank. And we have also added two buttons.
- One button is selecting the records that was filled by user and another button will be used in updating the record and refresh the updated results inside the table.
Code:
Let’s understand this code with an example and the code for the example is as follows.
In the above code, my_game.focus() is used to grab the record, and my_game.item() is used to grab the record value.
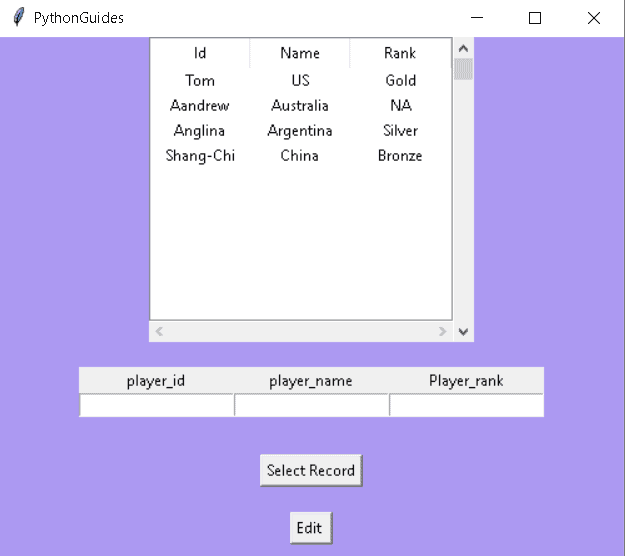
Output:
After running the above code, we will have this output in which we have some entries of record which having labels as player_id, Player_name, Player_record. And we can also see the buttons to select and refresh the records.

In this, we are selecting the record and updating the Player_name and Player_rank.

In this, we have updated the record and after clicking on the Refresh button the records will be updated.

Python Tkinter Table Canvas
In this section, we will learn to create a Table using canvas in Python Tkinter. The canvas is used for drawing pictures, graphics text, or frames.
In this example, we have demonstrated a table using canvas. And for this, we have created a table of 3 rows and each row contains 3 squares.
Code:
In the above example, the canvas.create_rectangle() is used to create rectangle pieces on canvas.
Output :
By using the above code, we will get an output with a canvas having a table with 3 rows and 3 columns. And it is also having a grid view inside a table that helps to separate rows and columns.

Python Tkinter Table Sort
In this section, we will learn how to add a sort filter on Table in Python Tkinter.
So, we are learning about table sort and first, we need to understand what is sort?
In Python, sort is a function that is used to rearrange the values in form of ascending or descending order. But here, we are talking about sorting table data and we will be explaining how column sort works in the Tkinter table.Example:
So, here we have given an example in which we will be able to arrange the columns of a table using drag and drop.
In the example, we have generated 4 labels with alphabets ‘A‘, ‘B‘, ‘C‘, and ‘D‘ with some values. But columns are not arranged properly. So, by using a drag method, we would be able to sort the columns as we required.
Output:
After running the following code, we come up with this output where we can see that the columns are not arranged in order. As column C values should come after column D. So, here we just drag the column through mouse hover and re-arrange the following in ascending order.

We can see in this figure that label ‘C‘ is swapped with label ‘D‘ and the columns are sorted now.

As we can see in this figure, all the columns are sorted in order and arranged properly.

Python Tkinter Editable Table
In this section, we will learn how to edit data inside a table in Python Tkinter.
- In the below code, we have taken labels and buttons in which buttons are functioning the role of selection and editing of the records inside a table.
- By Editing, we mean any data which was filled incorrectly by a user and wants to update that data again in the records with the help of the edit function. And we can use the edit option to make changes to records and makes our information correct.
Here comes the code that helps to explain the data editing inside a table.
Code:
After running the above code, we have the following output in which displays some records of data. Also, it has two buttons that are used to select and edit a record that was filled incorrectly.
In the given image, it is showing us how a user can select or edit data in records inside a table.

The below image is showing us the record that is edited and updates inside a table data.

You may also like to read the following articles.
So, in this tutorial, we discussed Python Table Tkinter and we have also covered different examples related to its implementation. Here is the list of examples that we have covered.
- Python Tkinter Table with Scrollbar
- Python Tkinter Table Widget
- Python Tkinter Table Input
- Python Tkinter Table List
- Python Tkinter Table Refresh
- Python Tkinter Table Canvas
- Python Tkinter Table Sort
- Python Tkinter Editable Table
- Python Tkinter Table

I am Bijay Kumar, a Microsoft MVP in SharePoint. Apart from SharePoint, I started working on Python, Machine learning, and artificial intelligence for the last 5 years. During this time I got expertise in various Python libraries also like Tkinter, Pandas, NumPy, Turtle, Django, Matplotlib, Tensorflow, Scipy, Scikit-Learn, etc… for various clients in the United States, Canada, the United Kingdom, Australia, New Zealand, etc. Check out my profile.