Пишем форму авторизации на Python Tkinter
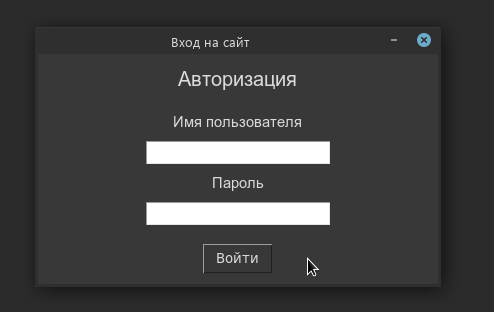
В данной статье мы рассмотрим с Вами как можно быстро создать графическое приложение с использованием библиотеки Python Tkinter. Проектировать мы будем экран авторизации, в который пользователь должен ввести свой логин и пароль. Версия Python, которая используется в коде 3.8. Код с комментариями представлен ниже.
# импортируем библиотеку tkinter всю сразу
from tkinter import *
from tkinter import messagebox
# главное окно приложения
window = Tk()
# заголовок окна
window.title('Авторизация')
# размер окна
window.geometry('450×230')
# можно ли изменять размер окна — нет
window.resizable(False, False)
# кортежи и словари, содержащие настройки шрифтов и отступов
font_header = ('Arial', 15)
font_entry = ('Arial', 12)
label_font = ('Arial', 11)
base_padding = <'padx': 10, 'pady': 8>
header_padding =
# обработчик нажатия на клавишу 'Войти'
def clicked():
# получаем имя пользователя и пароль
username = username_entry.get()
password = password_entry.get()
# выводим в диалоговое окно введенные пользователем данные
messagebox.showinfo('Заголовок', '
# заголовок формы: настроены шрифт (font), отцентрирован (justify), добавлены отступы для заголовка
# для всех остальных виджетов настройки делаются также
main_label = Label(window, text='Авторизация', font=font_header, justify=CENTER, **header_padding)
# помещаем виджет в окно по принципу один виджет под другим
main_label.pack()
# метка для поля ввода имени
username_label = Label(window, text='Имя пользователя', font=label_font , **base_padding)
username_label.pack()
# поле ввода имени
username_entry = Entry(window, bg='#fff', fg='#444', font=font_entry)
username_entry.pack()
# метка для поля ввода пароля
password_label = Label(window, text='Пароль', font=label_font , **base_padding)
password_label.pack()
# поле ввода пароля
password_entry = Entry(window, bg='#fff', fg='#444', font=font_entry)
password_entry.pack()
# кнопка отправки формы
send_btn = Button(window, text='Войти', command=clicked)
send_btn.pack(**base_padding)
# запускаем главный цикл окна
window.mainloop()
Теперь проясню пару моментов в коде:
1) в коде используется вот такая конструкция **header_padding — это операция разложения словаря в составляющие переменные. В нашем примере преобразование будет выглядеть следующим образом: **header_padding = <'padx': 10, 'pady': 12>-> header_padding -> padx=10, pady=12. Т.е. в конструктор класса Label, например, фактически будут передаваться правильные параметры. Это сделано для удобства, чтобы несколько раз не писать одни и теже настройки отступов. 2) у виджетов (Label, Button, Entry) — есть несколько менеджеров расположения, которые определяют, как дочерний виджет будет располагаться в родительском окне (контейнере). В примере, был использован метод pack(), который, по умолчанию, располагает виджет один под другим.
Таким образом, мы создали кроссплатформенное графическое приложение на Python — авторизация пользователя, которое может пригодиться на практике, остается добавить логику авторизации в методе clicked.
А для тех кто интересуется языком Python — я записал видеокурс Программированию на Python с Нуля до Гуру, в 5-ом разделе которого Создание программ с GUI подробно описывается все компоненты, необходимые для создания Python приложения c графическим интерфейсом.

Копирование материалов разрешается только с указанием автора (Михаил Русаков) и индексируемой прямой ссылкой на сайт (http://myrusakov.ru)!
Добавляйтесь ко мне в друзья ВКонтакте: http://vk.com/myrusakov.
Если Вы хотите дать оценку мне и моей работе, то напишите её в моей группе: http://vk.com/rusakovmy.
Если Вы не хотите пропустить новые материалы на сайте,
то Вы можете подписаться на обновления: Подписаться на обновления
Если у Вас остались какие-либо вопросы, либо у Вас есть желание высказаться по поводу этой статьи, то Вы можете оставить свой комментарий внизу страницы.
Порекомендуйте эту статью друзьям:
Если Вам понравился сайт, то разместите ссылку на него (у себя на сайте, на форуме, в контакте):
Она выглядит вот так:
Комментарии ( 0 ):
Для добавления комментариев надо войти в систему.
Если Вы ещё не зарегистрированы на сайте, то сначала зарегистрируйтесь.
Login/Registration Form with Python Flask and MySQL.
Download and install Python, for this tutorial I’ll be using Python 3.9.
Download and install MySQL Community Server and MySQL Workbench. You can skip this step if you already have a MySQL server installed.
Or download it here
Install Python Flask with the command:
Exit fullscreen mode
- Install Flask-MySQLdb with the command:
Exit fullscreen mode
File Structure & Setup
Exit fullscreen mode
Creating the Database and setting-up Tables
Execute the following SQL statements:
Exit fullscreen mode
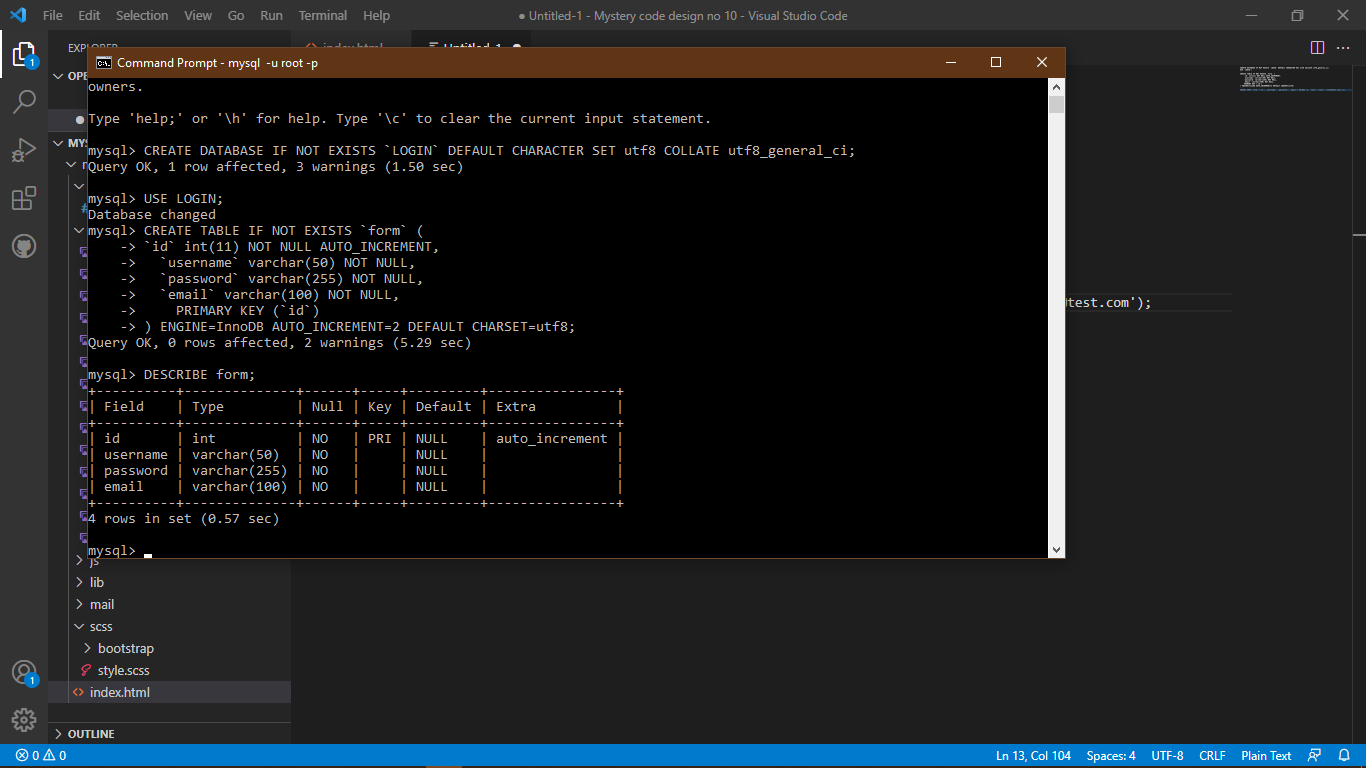
The above SQL statement will create our database LOGIN with the table form, along with a test account that we can use for testing purposes.
Creating the Login Form.
Import the modules you are going to use in the main.py file as follows;
Exit fullscreen mode
Then create the MySQL and app related variables and configure the MySQL connection details.
Exit fullscreen mode
Create the login page. we will create a new route.
Exit fullscreen mode
Creating the Login Template.
Add the following code to index.html
Exit fullscreen mode
Creating the Stylesheet (CSS3).
Add the following code to style.css
Exit fullscreen mode
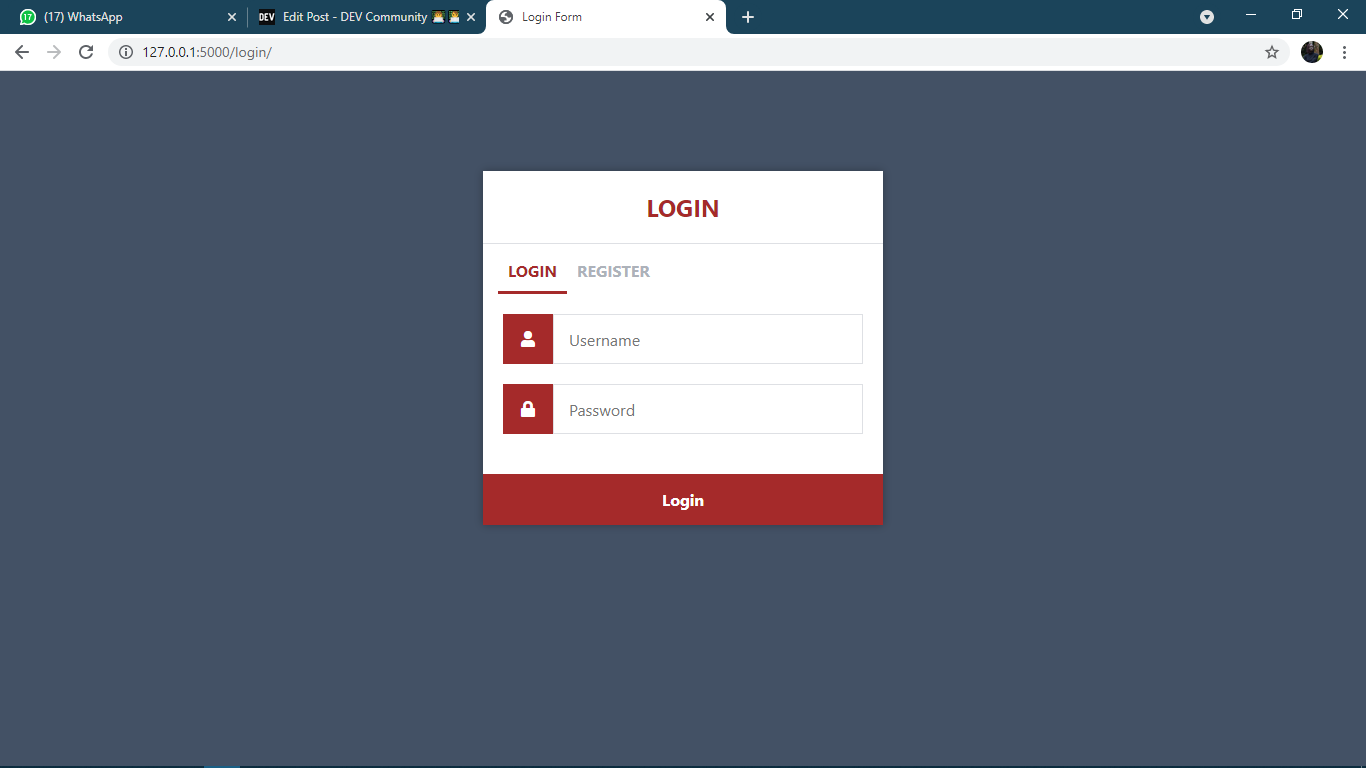
If we navigate to http://localhost:5000/login/ in our web browser, it will look like the following:
Authenticating Users with Python.
Now we can add the authentication code to our login route that we created.
Exit fullscreen mode
The above code uses an if statement to check if the requested method is POST and check if the username and password variables exist in the form request.
If they both exist, the username and password variables will be created and associated with the form variables.
Then add the following code;
Exit fullscreen mode
The code above will execute a SQL query that will retrieve the account from our form table in our MySQL database. The username and password variables are associated with this query as that is what we will use to find the account.
Exit fullscreen mode
From the code above, if account exists the session variables are declared.
These session variables will be remembered for the user as they will be used to determine if the user is logged-in or not.
If the account doesn’t exist, we can simply output the error on the login form.
To make sure everything is working correctly, navigate to http://localhost:5000/login/
Input «test» in the username and «1234» in the password fields, and then click the Login button. You should receive a message that outputs «Logged in successfully!».
Creating the Logout Script.
For a user to logout, all we have to do is remove the session variables that were created when the user logged-in.
Add the following code to the main.py file:
Exit fullscreen mode
When we navigate to the following URL: http://localhost:5000/login/logout the use is logged out and redirected to the login page.
Creating the Registration System.
We need a registration system that users can use to register on our.
We will create a new register route and create the registration template, along with the registration form, input fields.
Registration Template
Add the following code to register.html
Exit fullscreen mode
#Registering Users with Python
Once we have created the registration template we need to register users.
To do this we will create «register» route that will handle the POST request and insert a new account into our form table, but only if the submitted fields are valid.
Add the following code to main.py file;
Exit fullscreen mode
We will create the «register» route and add validation that will check if all the form fields exist. If they don’t, then output a simple error.
The code above will also select an account with the submitted username and password fields.
If the account doesn’t exist, we can proceed to validate the input data. Validation will check if the submitted email is valid and check if the username contains only letters and numbers.
The code will also insert a new account into our form tables.
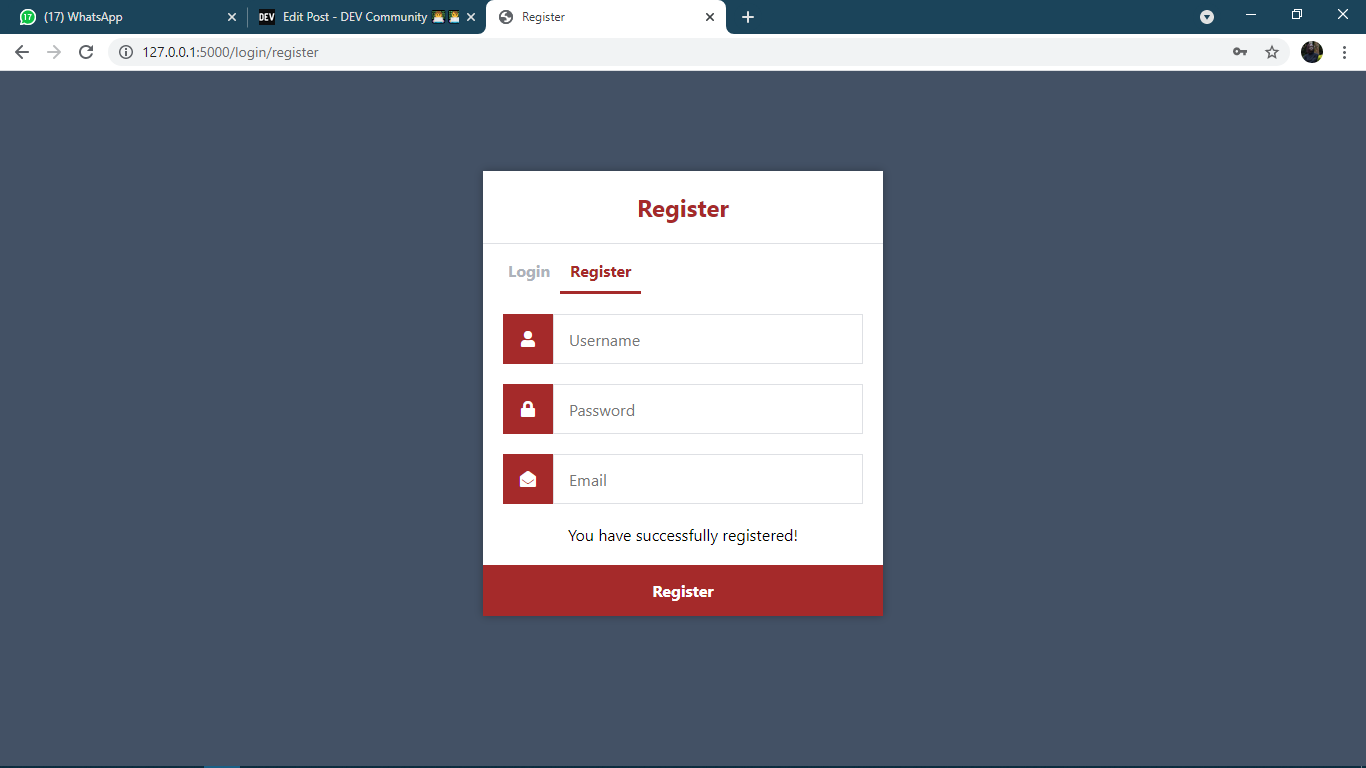
To test that it is working correctly, navigate to http://localhost:5000/login/register and fill out the form and click the Register button.
If everything is okay you will receive the following response:
Creating the Home Page.
The home page will be restricted to logged-in users only. Non-registered users cannot access this page.
Add the following code to main.py file
Exit fullscreen mode
The above code will create the home route function. If the user is logged-in, they will have access to the home page, if not, they will be redirected to the login page.
Create home template.
Add the following code to home.html
Exit fullscreen mode
We also need to create the layout for our logged-in pages, edit the layout.html file and add:
Exit fullscreen mode
The user will now be redirected to the home page when they log-in.
If we enter the correct details into the login form and click the Login button, we will see the following:
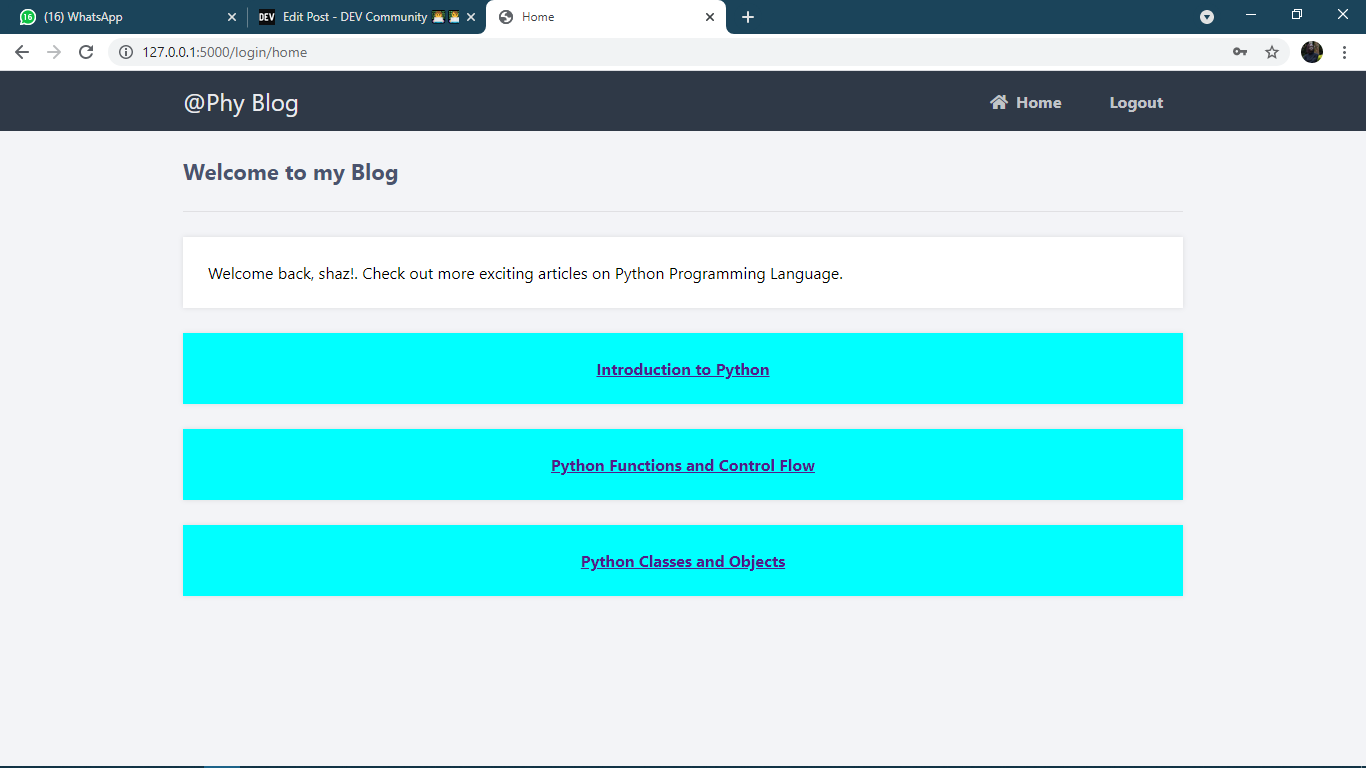
We have now created our login and registration system using Python Flask and MySQL with the following features:
Users can login only if their credentials are present in the database.
Without logging in, user cannot go to next page, even using that particular pages route.
When logged user can go to other pages using routes.
After clicking on logout, the user cannot go next page instead redirected to login form.
If email or username already exist in database, user will not create account.
Окно регистрации/авторизации на Python Tkinter
Окно регистрации. Проблема такая, что по нажатию на кнопку "Зарегистрироваться" вновь появляются строки с вводом логина, пароля, возможно ли как то это предотвратить?
 Код не мой, прилагаю ниже

Так они не появляются вновь, они просто не убираются. Т.е. вам надо отчищать свой root от ненужных виджетов. Для этого можно воспользоваться методом destroy , которая удаляет виджет. Так можно отчистить весь скрин от всего:
В 33 строку ты написал "registration", тем самым вызывая регистрацию ещё раз
Дизайн сайта / логотип © 2023 Stack Exchange Inc; пользовательские материалы лицензированы в соответствии с CC BY-SA . rev 2023.6.8.43486
Нажимая «Принять все файлы cookie» вы соглашаетесь, что Stack Exchange может хранить файлы cookie на вашем устройстве и раскрывать информацию в соответствии с нашей Политикой в отношении файлов cookie.
Register/Login and authentication through terminal
This is a registration and login program I made in Python that runs through the terminal. I am new to programming so I didn’t have any actual use for this, I simply made it for practice. Please give me tips on minimizing code and making things shorter, point out any bad programming practices I used here and how I can change them and look out for them next time.

4 Answers 4
In your validate function, instead of doing a conditional, returning True if is passes and False if it does not, just return the conditional that you are checking.
Here is what I mean:
This will return True if the expression evaluates to True , and False if it evaluates to False . No conditional needed.
Or, if you wish to further simplify this function, just return the length of form . Python treats 0 as False so if the length is 0, it will act as False in a conditional.
At that point, it may not even be worth it as a function.
In your login function, you wrote this in your first if statement:
Which looks almost exactly like your validate function, except for the not .
If you have the function validate , you might as well use it when you need it:
You to be repeating something like this throughout your code:
And the only thing that is really changing is this thing that can’t be blank.
I recommend making a function so you can aren’t repeating yourself as much.
Here is what I came up with
Then, you can use the function like this:
Add some documentation to your functions.
In your documentation, you should include things like what each parameter means (if there are any), what the return means (if there is any), and a short description of what the function does.
I wrote this for your loginauth function:
Note the placement of the, as it is called, docstring.
On statements like this:
I’m not sure how much of a difference this makes in efficiency (if it makes a difference in anything at all), but the else part is unnecessary.
If the conditional passes, continue will run and skip over everything else to go back to the top of the loop. If it does not run, it can just call down to break and exit the loop. No else needed.
So the above code snippet will become this:
I recommend creating a class for users so information is more easily stored.
It doesn’t have to be too complicated; just a simple storage of values:
Then, when inserting new User s into users , just do:
In case in the future you make some mail parser, don’t make it too complicated by storing the mail separated by strings («Sender», «Subject», «Context»); store it in an object. Depending on what the user wrote, those strings can make messages really confusing.
Why not store mail in an object?
Here is what I came up with:
I threw in an extra to_string method to format the object’s properties in a way that made sense to output.
This is not coding related, but I believe the correct word would be «content» rather than «context».
If you continue to work on this code, you are going to build up quite a big if/elif/else statement in your session function.
As an easier way to solve this problem, create a dictionary containing the name of the command and the function to call for that command.
Here is what I mean:
Then, your session function can be reduced to:
Now, a command should return False if the session is supposed to stop after execution of the command.
Yes, before in your string of if/elif statements, you had a whole if block to if the user was in the group «admin».
Since you don’t have this anymore, just create a function for it:

your program looks nice, and seems to follow most of PEP8.
There are two rather long lines, and so you may want to put some information onto the next line.
Limit all lines to a maximum of 79 characters.
This way it is easier to read. As I misread it at a glance.
I thought the following was kinda strange, so you may want to change:
It stuck out, and is easier to understand at a glance.
I personally love the str.format function. Whilst you can’t exploit all of its features, it’s still nice. It’s mostly something to look into.
However for simple print(‘username: ‘ + username) , it is not needed.
Whilst your comparison operators are good, they are not pythonic. Whilst it is correct, it is long-winded.
For sequences, (strings, lists, tuples), use the fact that empty sequences are false.
And the .lower and in functions are helpful when wanting to validate input.
This is so that you have both a shorthand, of ‘y’, but also you can put ‘Yes’, ‘YEs’, ‘yEs’, etc.
You should wrap the information in the global scope in if __name__ == «__main__»:
This is so that if someone accidentally imports this file at a later date, it doesn’t start an unintended program.
You can change your main loop into a dictionary lookup.
This is as functions are first-class citizens in Python! This means that if we ask for login , it will tell us it’s place in memory. But if we call it with () then it will execute. To see what I am on about, you can try this:
Using a dictionary for lookup is a nice trick that you can do to make there be a lot of functions, and adding a new function is just adding another entry to the dictionary. But as this is a small program the if else statement is perfectly good.
give me tips on minimizing code and making things shorter
Well I don’t want to write a book, so this will be the last thing I will comment on.
If you look at your program, you see that you use this structure a lot.
This can easily be changed to a function.
This would cut down a lot of your code. And, if you were to build on your program, then you would use the yes/no question more. And you would want to change it into a function.
As this is a user input program, you need lots of print statements, and that is a lot of your program. And so it would be hard to reduce this more. Unless you remove print statements. Which, if you did, «\r\b» is nice!
The first two quotes are from PEP8, the Python style guide.
If you have any problems, just say. Hope this helps! Sorry for the light novel, I just wrote about the things that stuck out to me.