How Do I Program Arduino in Python
Microcontrollers have been used for a very long time, from simple daily use household items to complex machinery. Communication with microcontrollers was not an easy task until Arduino, an open-source platform, makes this possible and has made electronic circuits more accessible to users. Arduino communicates with microcontrollers through C++ language but due to advancement and diverse interest of peoples, multiple new languages have emerged such as Python. In this article, we will look at how we can control Arduino boards using Python.
Arduino and Python
Arduino is an electronic platform that uses C++ as default to communicate between Arduino boards and users. It’s based upon both hardware like Arduino boards and software known as IDE. Arduino IDE has made it easy to control Arduino boards through multiple languages. Python is one of those languages which comes with Arduino support packages.
Python is a high-level object-oriented programming used in data structure, machine learning, software developments and automated tasks using microcontroller boards such as Arduino.
How to Program Arduino Using Python
Arduino can be programmed using Python. We just need to install Python packages using pip which is a package manager tool used for Python programming. Different Python packages are available to build serial communicating bridge with microcontrollers such as:
-
- MicroPython
- pyFirmata
- pySerial
In this article we will continue with pyFirmata as it is easy to use. Also, Arduino IDE comes with preinstalled pyFirmata packages that makes it easy to install.
Setup Arduino Board with Python
Before we go further here is a list of tools needed to continue:
-
- Arduino Board (UNO)
- Arduino IDE
- Python 3.10.6
- Pip package 22.2.2
- LED
- Breadboard
To continue further, first we will download our Python installer and pip package to install pyFirmata which helps us to develop serial communication between Arduino board and Python. Follow along these steps to setup Python with Arduino.
Download All the Required Software and Packages
First, download all the required software and packages:
Step 1: Download Python by going to the official site. Click here to download.
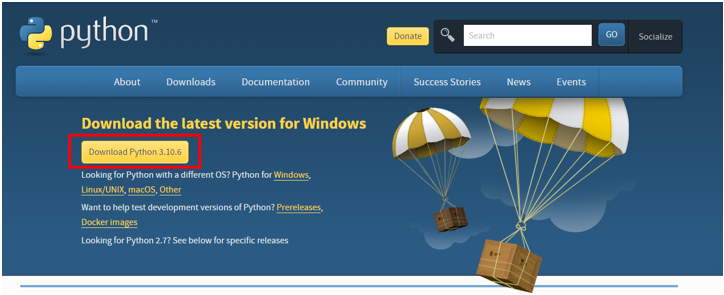
Once Python is downloaded open the Python installer to complete the Python installation process.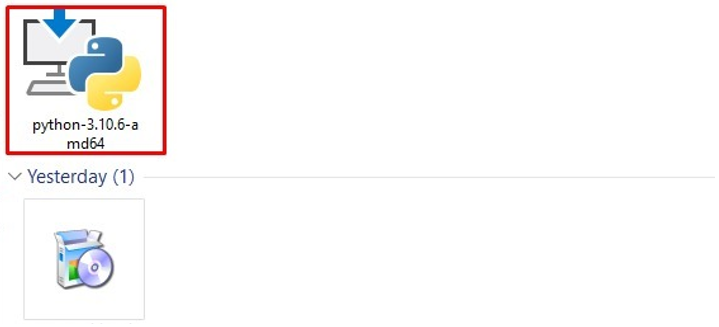
Step 2: It is time to install pip package manager. Open command prompt: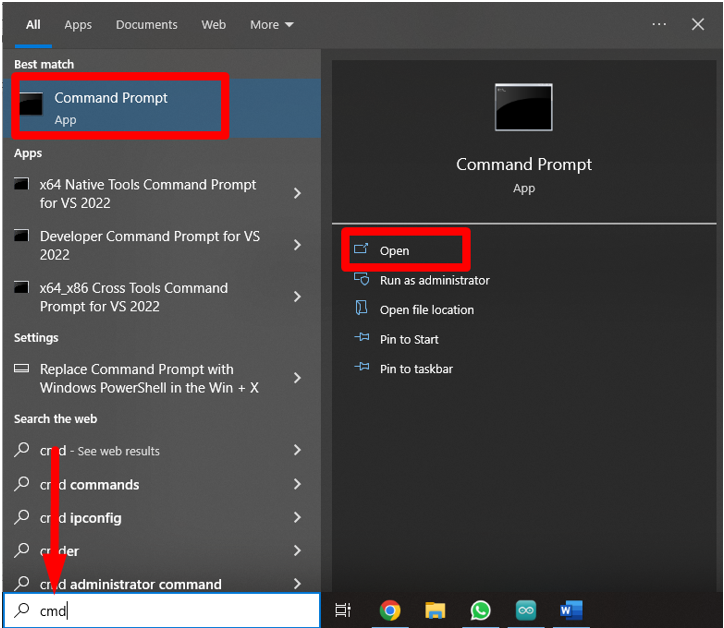
Download pip using:
To install it use:
Type the following command in command prompt window to update pip package:Step 3: The last software needed to set up is Arduino IDE. It can be downloaded by visiting their official downloads page where multiple download files are available according to the required OS.
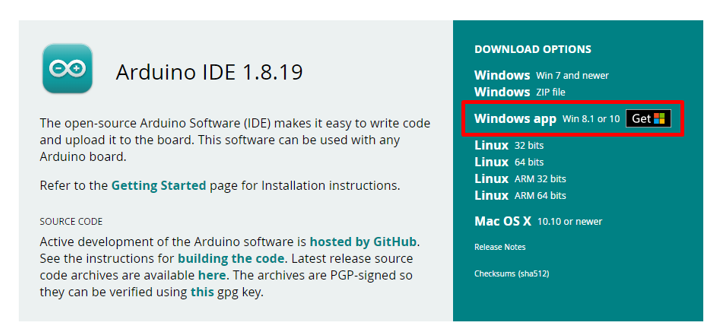
Installation of pyFirmata and pySerial PackagesThrough pip package manager install pyFirmata and pySerial packages:
Step 1: To install pyFirmata using pip, type the command given below:
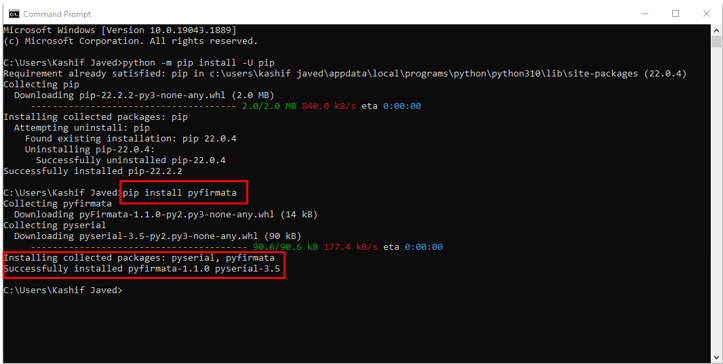
Step 2: Another very famous protocol used to communicate with Arduino boards is pySerial by typing this command it can be installed easily: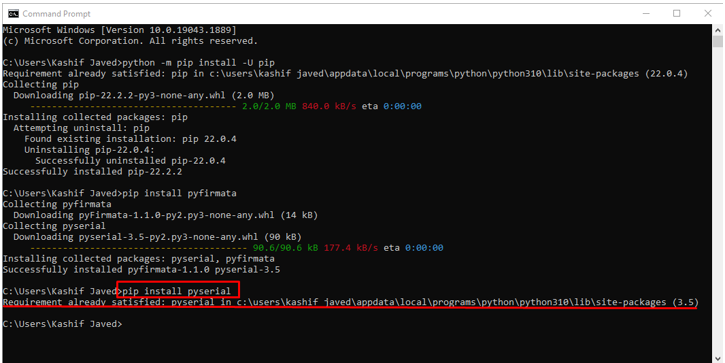
Setting up of pyFirmata with Arduino IDEAfter installing the Arduino IDE installer, open it by double clicking the shortcut icon or by typing IDE in the window search bar. To install the pyFirmata package with an Arduino board follow below given steps:
Step 1: Open Arduino IDE. A new window will open, with a blank sketch.
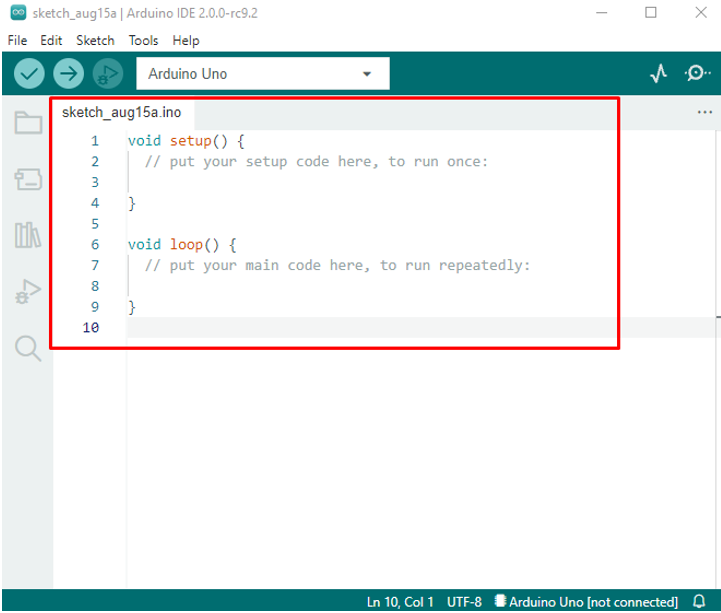
Step 2: Setup Arduino board ports. Latest version of IDE (version 2.0) can detect Arduino boards automatically but on older version go to: Tools>Boards>Arduino AVR Boards>Arduino Uno:For port selection go to: Tools>Port>Serial ports>COM:
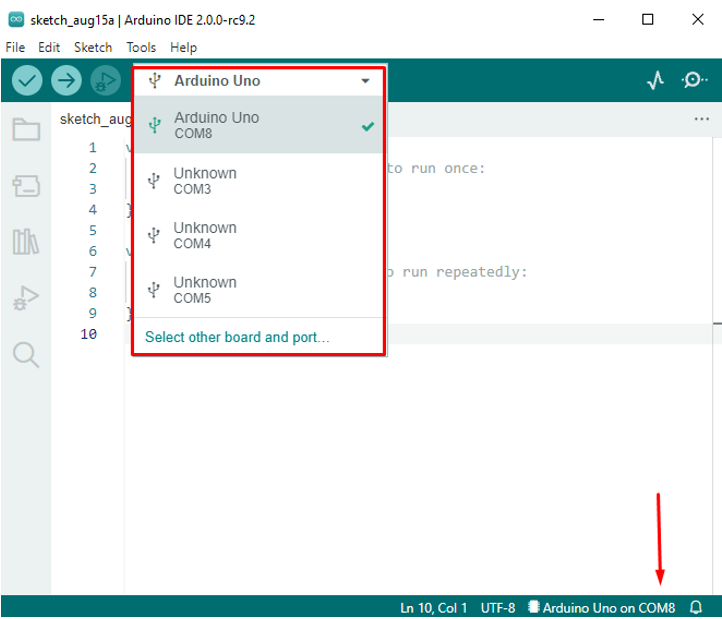
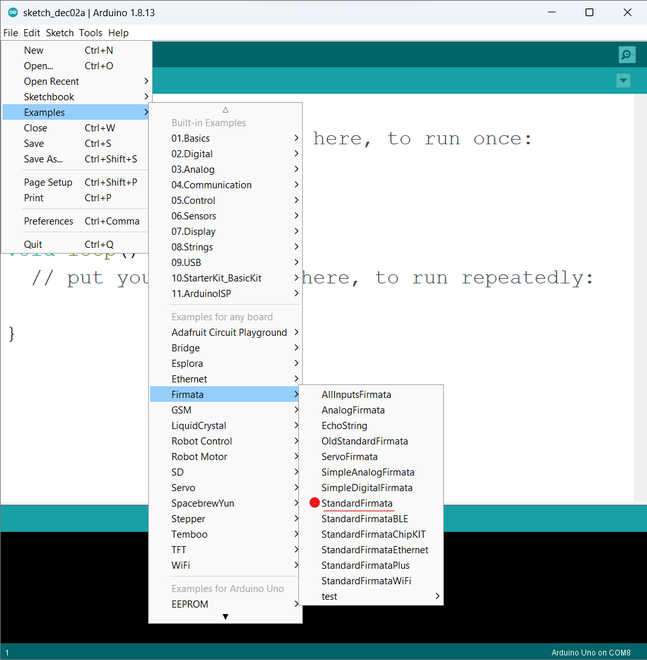
Step 3: Load pyFirmata sketch in Arduino IDE, for that go to: File>Example>Firmata>StandardFirmata: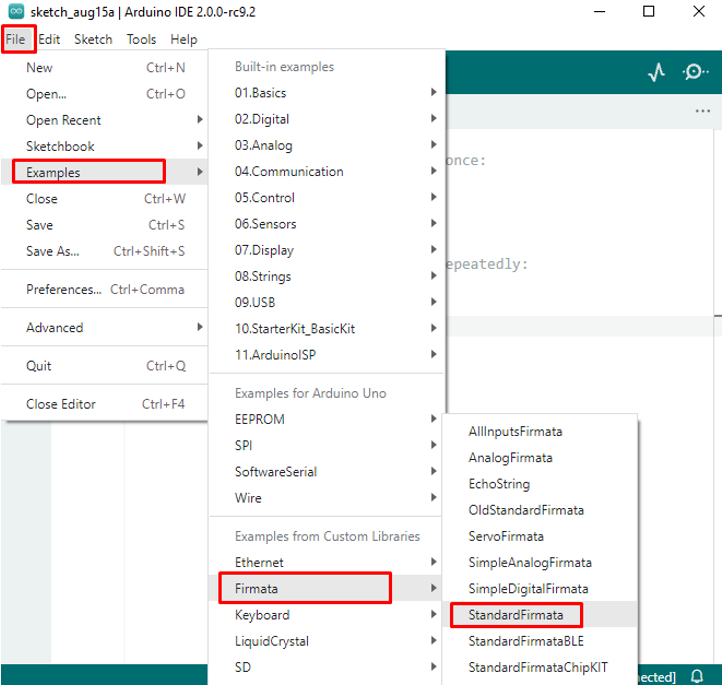
Step 4: New window is showing StandardFirmata sketch: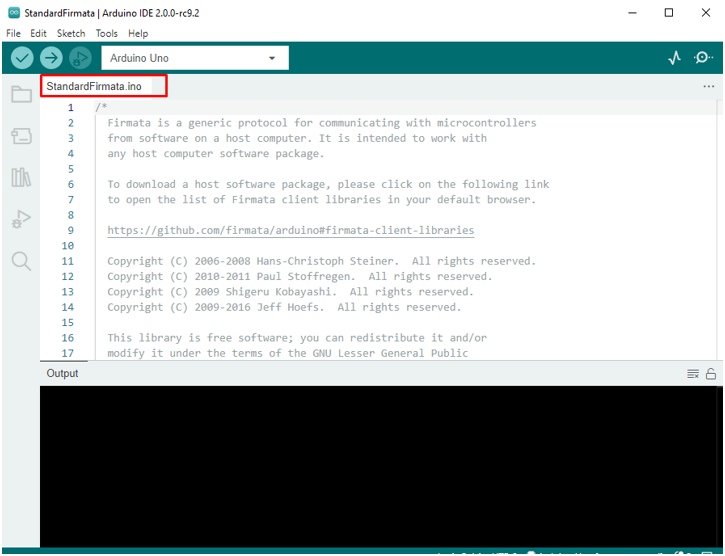
Step 5: Compile and Upload this sketch into the Arduino board using the mentioned buttons on top left corner.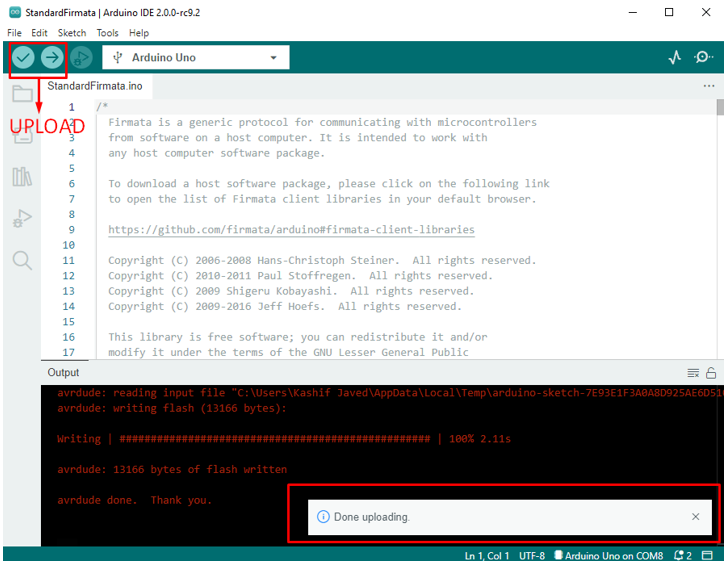
After successfully uploading a sketch. The Arduino board is ready to program using Python language.Upload LED Blinking Program in Arduino Uno Using Python
We have just set up our Arduino board with Python to write the first Arduino program using Python. Here are a few steps that show how to write an LED blinking program in Python and upload it to the Arduino board.
Step 1: Open Python IDLE using the Windows search box option.
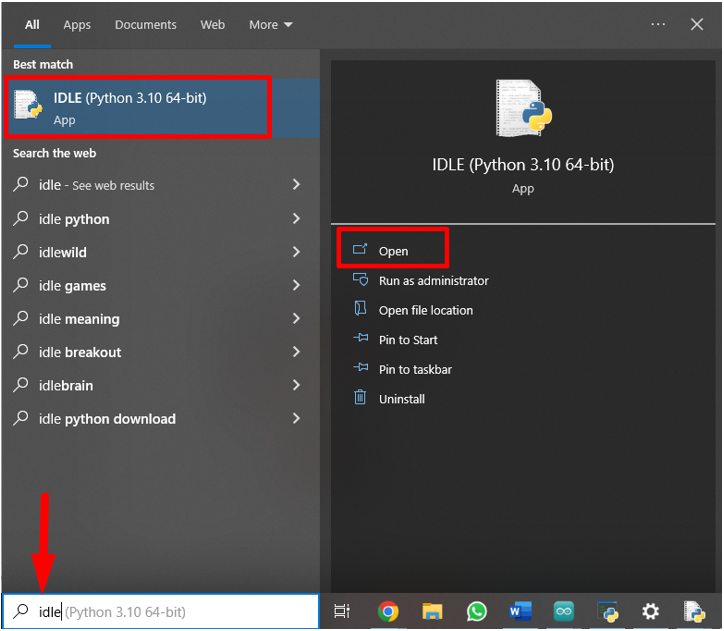
Step 2: New window will open showing the Python IDLE shell where we can write an Arduino program in the Python programming language.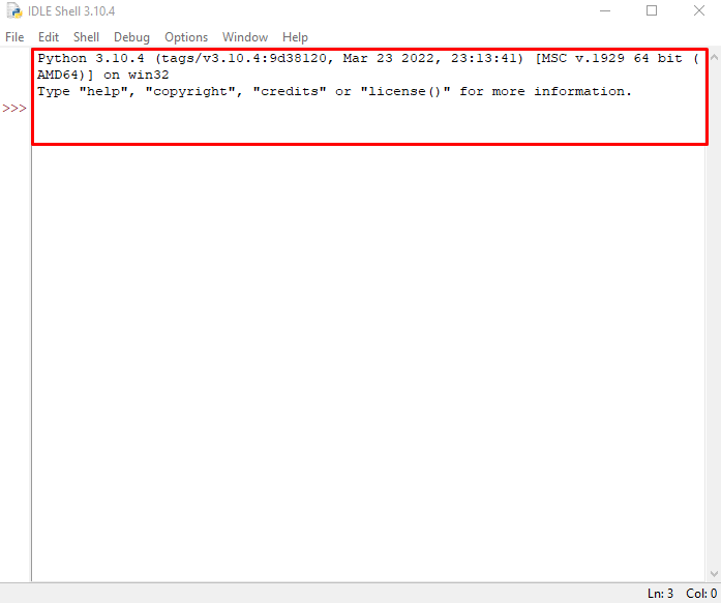
Step 3: Press Ctrl+N or click File then New File.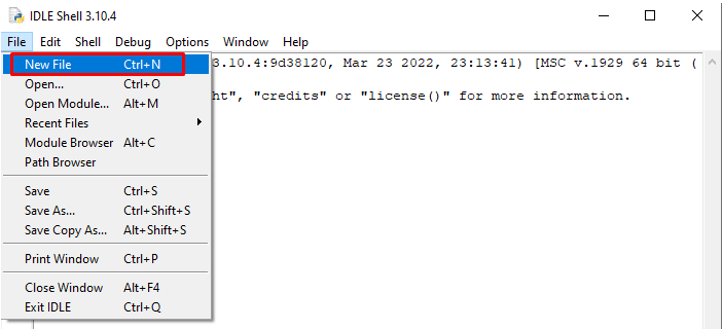
Step 4: New window will open type code below to run LED on Arduino board at pin 13. Connect the positive end of LED at pin 13 and negative or shorter leg of LED at GND pin.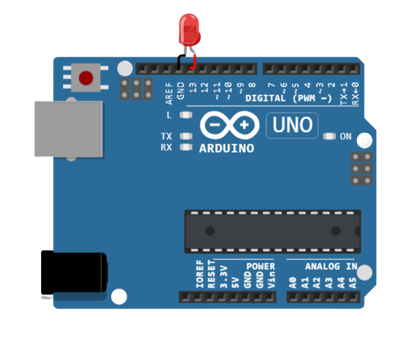
Step 5: Now, copy and paste the given code in the Python IDLE: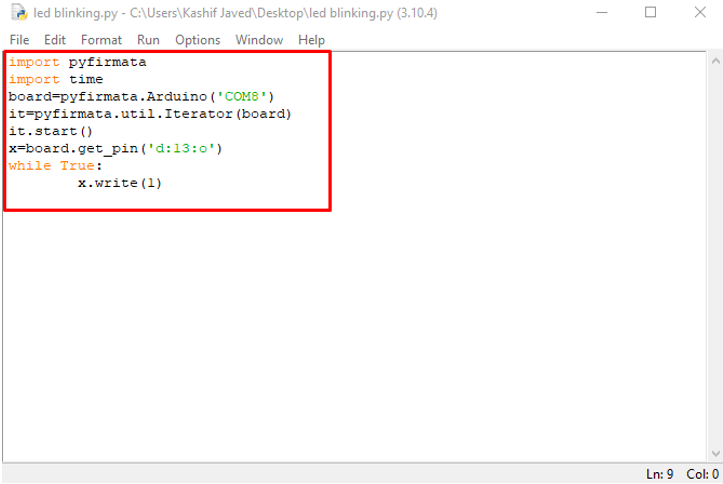
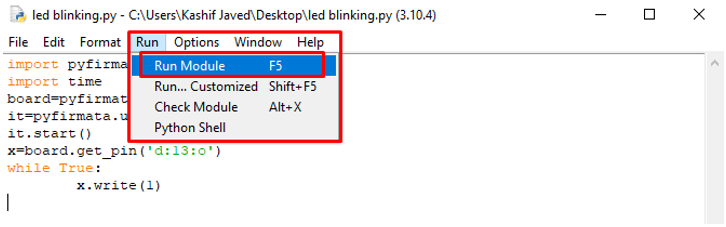
We started code by importing our pyFirmata protocol in Python IDE to establish connection between Arduino and Python. After that, it declared the COM port at which Arduino is connected. Next using board.get_pin we declared the output pin at which LED is connected. In the while section x.write(1) function will glow LED continuously.Step 6: Once our circuit and Python code is ready, it’s time to upload our code in the Arduino board. First save Python code then Press F5 or go to: Run>Run Module to upload code in Arduino UNO.
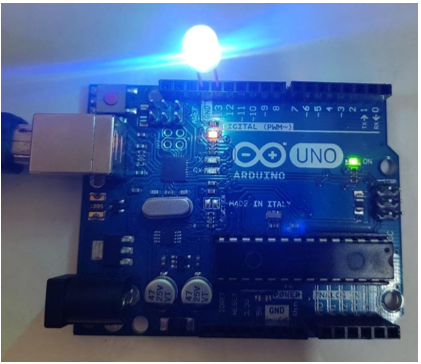
The above Python code will keep the LED ON. Let’s move on and check how we can make it blink.Python LED Blinking Code Arduino
Now upload an LED blinking program:
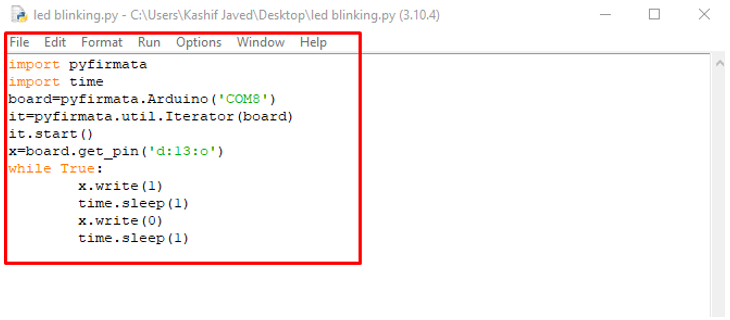
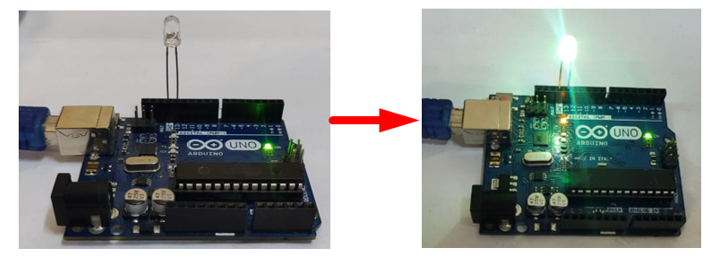
First, we must upload pyFirmata to establish serial connection with the Arduino board, which is declared at line 3 as an object board after that we have defined the pin 13 at which output will be shown as our led is connected at pin 13.In while section output is declared as high using 1 and Low using 0. LED will glow for 1 sec then it will turn off due to time.sleep function for 1 sec.
Conclusion
In this article we highlighted how we can use Python code in an Arduino board using pyFirmata. It makes it easy to run Python code in Arduino boards. Using pyFirmata we can use multiple other Arduino libraries with Python but in complex applications pyFirmata is limited.
About the author

Kashif
I am an Electrical Engineer. I love to write about electronics. I am passionate about writing and sharing new ideas related to emerging technologies in the field of electronics.
Using Python to control an Arduino
Python is used in many applications including data science, machine learning, and web development. Another area where we can use Python is external hardware control. What do I mean by external hardware? A piece of external hardware could be a light or a sensor. External hardware includes multimeters or spectral analyzers. I consider anything connected to a computer that isn’t typically connected to a computer as external hardware. So not a keyboard, mouse, headphones, webcams, USB drives, but things like motors, light arrays, solenoids, linear actuators, pressure sensors, etc. In this post, we’ll review over how to use Python to control an LED that is connected to an Arduino. Python running on a computer will turn the Arduino LED on and off.
Collect the hardware
In this project, we are going to use a couple pieces of hardware. Below is the list of harware we need to complete the project:
Component Item and Link Arduino SparkFun RedBoard — Programmed with Arduino Jumper Wires Jumper Wires Premium 6″ M/M Pack of 10 LED LED Rainbow Pack — 5mm PTH 330 Ohm Resistor Resistor 330 Ohm ⅙ Watt PTH — 20 pack Breadboard Breadboard — Self-Adhesive (White) USB cable SparkFun USB Mini-B Cable — 6 Foot Install PySerial
To start a new Python project, it is best practice to create a new virtual environment. I have the Anaconda distribution of Python installed on my Windows 10 machine. When you install Anaconda, it comes with the very useful Anaconda Prompt. Using the Anaconda Prompt is a bit like using the terminal on a MacOS or Linux. To start the Anaconda Prompt on Windows 10, go to the Windows Start Button on the lower left and select Anaconda Prompt.
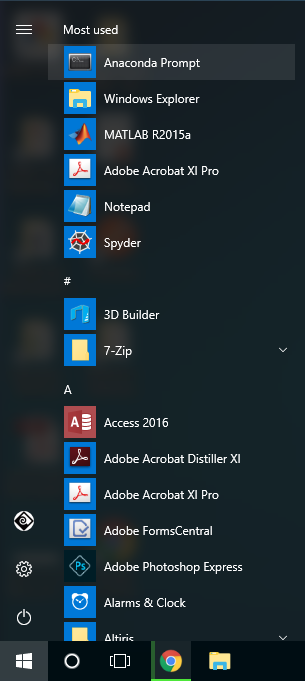
Now using the Anaconda Prompt, let’s create a new virtual environment for our Arduino LED project. Note the arrow symbol > does not need to be typed. The arrow symbol > is just shown to indicate the Anaconda Prompt.
The conda create command builds the new virtual environment. The —name arduino flag gives our new virtual environment the name arduino . I like to name my virtual environments the same name as the project that uses the virtual environment. Including python=3.7 ensures the new virtual environment has an up to date version of Python.
Type y to confirm and create the new virtual environment. To use the new virtual environment arduino , you need to first activate it by typing:
You know you are in the arduino virtual environment when (arduino) is in parenthesis at the start of the Anaconda Prompt:
To communicate with the Arduino using Python, we need to install the PySerial package. You can install the PySerial package at the Anaconda Prompt using the command conda install pyserial . Note the (arduino) virtual environment should be active when you run the conda install command.
To confirm PySerial is installed, open the Python REPL while the (arduio) virtual environment is active. At the >>> REPL prompt, import PySerial with the command import serial . Note that although we installed PySerial with the command conda install pyserial , we import PySerial using the line import serial . The command exit() exits out of the Python REPL and brings us back to the Anaconda Prompt.
Download the Arduino IDE
The next step is to download the Arduino IDE. IDE stands for Integrated Development Environment. The Arduino IDE is a program that runs on your computer used to edit Arduino code. The Arduino IDE is also used to compile and upload code to an Arduino. We’ll use the Arduino IDE to upload two different sketches to our Arduino. A sketch is the name given to Arduino programs. Arduino sketches end in the .ino file extension.
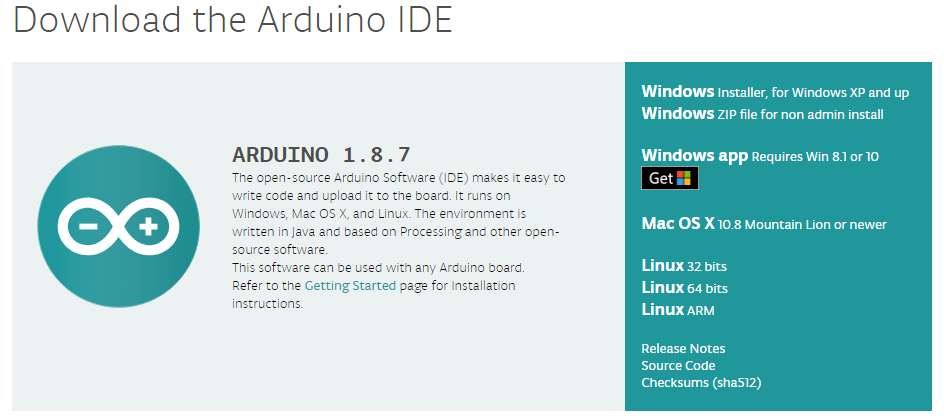
Download the Arduino IDE using the following link: https://www.arduino.cc/en/Main/Software
Scroll down the page to the Download the Arduino IDE section. Be sure to select: Windows ZIP file for non-admin install if you don’t have the administrator privileges to install software on the computer you’re using. You can choose JUST DOWNLOAD from the donation screen. Extract the downloaded .zip folder to your thumb drive or the desktop.
Wire an LED and a resistor to the Arduino
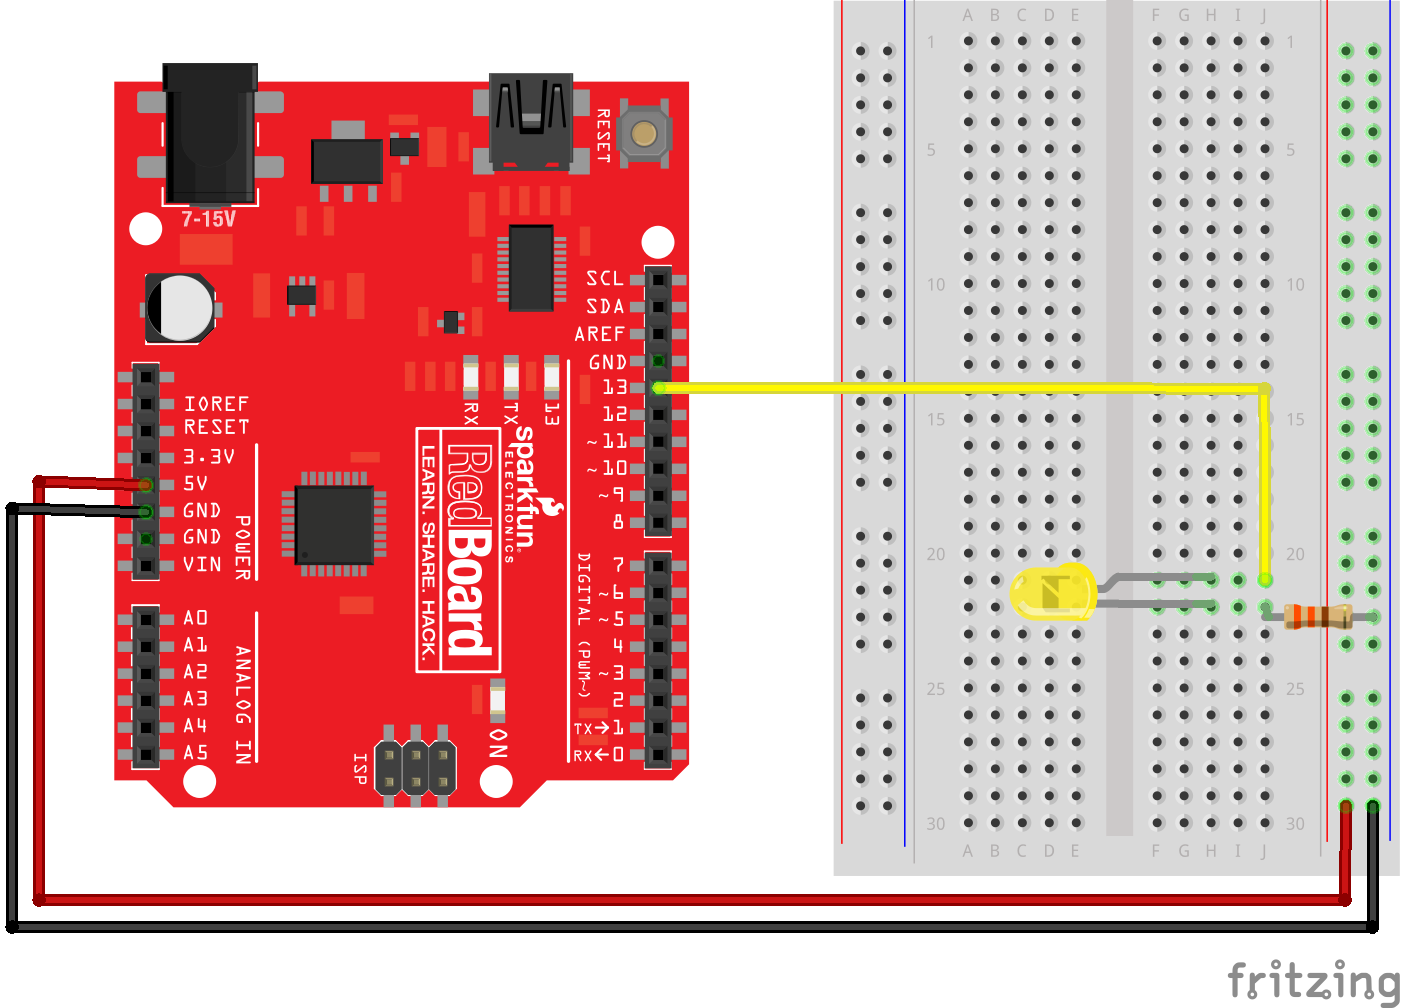
Take out an LED (any color), a 330 Ohm resistor, three jumper wires (red, yellow and black), the Arduino, and a white breadboard. Connect the LED, resistor, and colored jumper wires as shown below. Note the LED has two different sized «legs.» Ensure the LED is wired in the correct orientation. Current can only flow in one direction through an LED.
- short LED leg → resistor → ground
- long LED leg → Pin 13 on Arduino.
Also see the SparkFun Inventor’s kit online guide:
Connect the Arduino to the computer and check the COM port
Connect the Arduino to the computer using a USB cable. On SparkFun Redboards (a type of Arduino), the cable needs to be a USB 2.0 type A to Mini-B 5-pin cable. One end of the cable looks like a regular USB cable. Connect that end to the computer. The other end of the cable has a small connector that sort of looks like a phone charging cable, but a little different. Connect this smaller end of the cable to the Arduino.
Now we need to determine which COM Port the Arduino is connected to. We will need to know which COM Port the Arduino is connected to when we upload code to the Arduino or attempt to communicate with the Arduino.
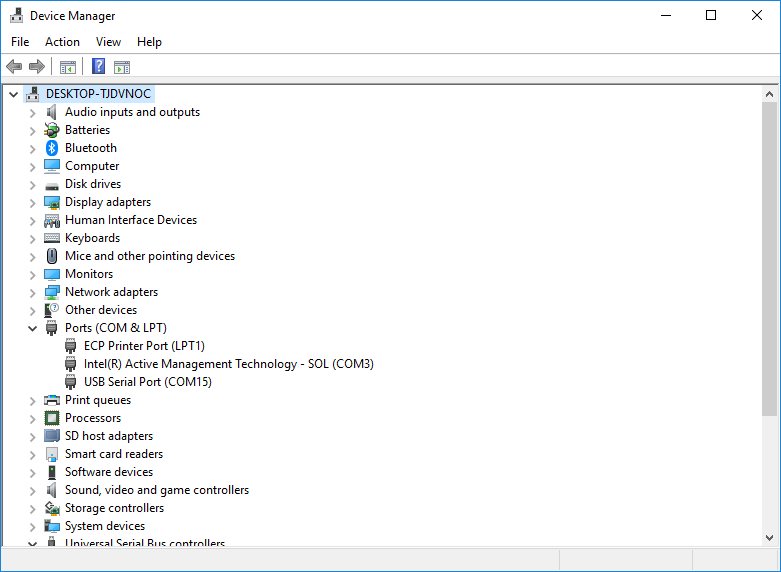
You can use the Windows Device Manager to determine which serial port the Arduino is connected to. On my Windows 10 laptop, the port the Arduino is connected to usually comes up as COM4 . You can find the serial port by looking in the Ports (COM & LPT) category of the Windows Device Manager. Look for something like USB Serial Port (COM4) in the Ports (COM & LPT) menu. It is the COM# that you are looking for.
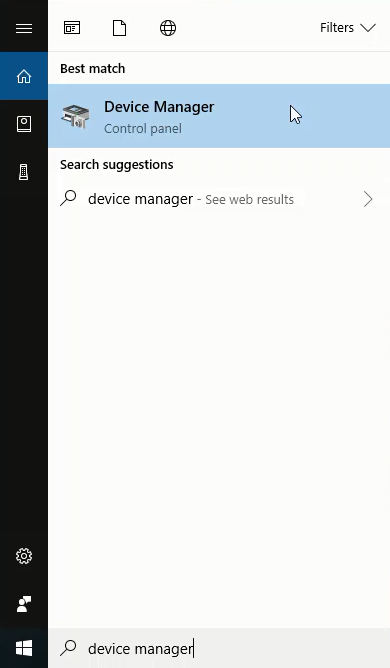
In the picture below, I can see the COM# is COM15 see Ports (COM & LPT) menu → USB Serial Port (COM15). Your COM# is likely to be different.
Upload the Arduino example sketch Blink.ino onto the Arduino. Confirm the Arduino and LED blinks
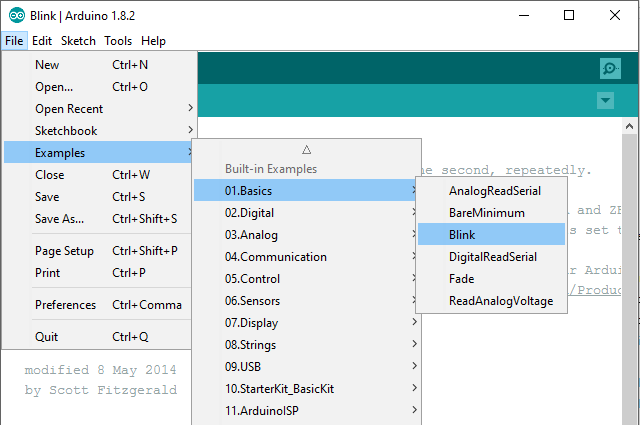
Open the extracted Arduino IDE folder and double-click the Arduino.exe program. Open the Arduino Blink.ino sketch by going to: File → Examples → 01.Basics → Blink
Now ensure that the Port and the Board type are set correctly in the Arduino IDE. In the Arduino IDE Tools menu, select the following:
- Tools → Port → COM4 (or whichever port the Arduino is connected to, found with the Windows Device Manager)
- Tools → Board → Arduino / Genuino Uno
In the Arduino IDE Window that contains the Blink.ino sketch, click the check mark to Verify then click the arrow to Upload.


Once the upload is complete, the Arduino and LED should blink on and off. If you don’t see the Arduino and LED blinking, you need to do some troubleshooting. Check the COM Port or try unplugging and re-plugging in the Arduino. Also check the wiring. Ensure the two LED «legs» are wired correctly.
Upload the Arduino example sketch PhysicalPixel.ino onto the Arduino
Open the Arduino sketch PhysicalPixel.ino by going to File → Examples → 04.Communication → PhysicalPixel
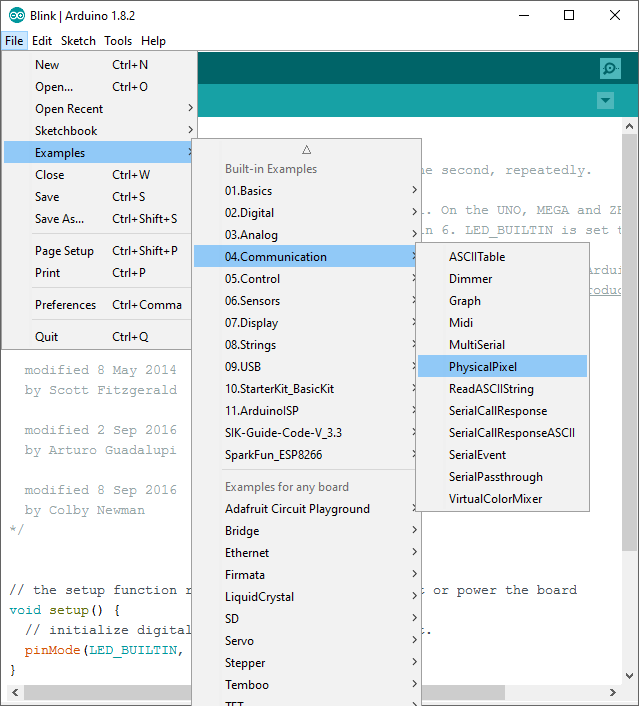
Once again, click the check mark to Verify then click the arrow to Upload.
Use the Arduino Serial Monitor to turn the Arduino LED on and off
In the Arduino IDE Window that contains the PhysicalPixel.ino sketch, open the Arduino Serial Monitor by going to Tools → Serial Monitor
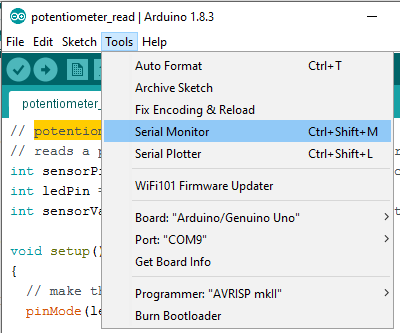
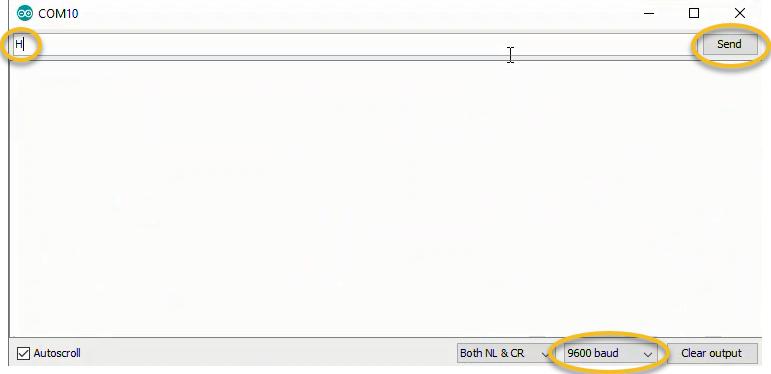
In the Arduino Serial Monitor type: H and click Send (or press ENTER). Then type: L and click Send (or press ENTER). The letters H and L need to be uppercase. When you click Send or press ENTER, you should see the Arduino LED turn on and off. If have trouble, make sure the Port is set correctly in Tools → Port and make sure the Serial Monitor is set to 9600 baud. You can also try unplugging and replugging in the Arduino and closing then reopening the Arduino IDE.
Use the Python REPL to turn the Arduino LED on and off.
Open the Anaconda Prompt and activate the (arduino) virtual environment (if it is not currently active). Then start the Python REPL by typing python at the prompt.
Type the following commands to turn the Arduino LED on and off. Note the arrow symbols > and >>> should not be typed. The arrow symbols > and >>> are just shown to indicate the prompt.
You should see the Arduino LED turn on and off when you type the commands ser.write(b’H’) and ser.write(b’L’) . These commands send the characters H and L over the serial line to the Arduino. The Arduino reads these characters and turns the LED on and off. Make sure you run the ser.close() command at the end. If the serial line is not closed, you may have trouble opening the serial line again and running these same commands a second time.
If you have trouble, make sure the Arduino Serial Monitor is closed before you run the commands at the Ananconda Prompt. If the Arduino Serial Monitor is open, you can’t communicate with the Arduino with the Anaconda Prompt.
Write a Python Script to turn the LED on and off
Now that the Arduino LED turns on and off based on sending H and L with the Python REPL, let’s write a Python script to turn the LED on and off. Again, the serial communication between the Python script and the Arduino is facilitated by the PySerial package. Ensure PySerial is installed before running the Python script.
Open a new script called arduino_blink.py. At the top of the Python script, import the PySerial package. Note that even though the package is called PySerial, the line import serial is used. Python’s built-in time module is also imported as the time.sleep() function will be used in the script. Include the following code in arduino_blink.py:
In the next part of arduino_blink.py, create a loop that blinks the LED on and off for about 5 seconds. Note the byte string b’H’ is sent to the Arduino, not the unicode string ‘H’ . The unicode string ‘H’ is pre-pended with the letter b in the line ser.write(b’H’) . Make sure the ‘COM#’ is set correctly. This ‘COM#’ is the COM port we found using the Windows Device Manager. It may be ‘COM4’ , but you may have to change it to something else.
Run the arduino_blink.py script. You should see the Arduino LED blink on and off 10 times.
Write a Python script to prompt a user to turn the LED on and off
Once the LED blinks on and off successfully using a for loop in a Python script, let’s write a new Python script called arduino_LED_user.py that allows a user to turn the LED on and off.
Create a new file called arduino_LED_user.py. At the top of the arduino_LED_user.py script, import the PySerial package and built-in time module. Then define the serial port. Make sure to include the correct ‘COM#’ . Use the ‘COM#’ you found in the Windows Device Manager. If the ‘COM#’ is not set correctly, the script will not run. Include the code below in arduino_LED_user.py:
Run the Python script arduino_LED_user.py. Type H and L and observe the Arduino LED turn on and off. Type q to end the program.
Summary
In this post, we reviewed how to control an Arduino LED with Python.
We accomplished this task in a couple steps. First, we created a virtual environment and installed the PySerial package into it. Next, we downloaded the Arduino IDE. Then we wired up an LED to an Arduino and uploaded the blink.ino sketch to the Arduino. This ensured the Arduino was worked properly. After that, we uploaded the PhysicalPixel.ino sketch to the Arduino and turned the Arduino LED on and off with the Arduino Serial Monitor. Once that was successful, we used the Python REPL and PySerial to turn the LED on and off. Finally, we constructed a Python script to turn the Arduino LED on and off based on user input.
Related Posts:
About Peter Kazarinoff
I teach engineering at a community college in the Pacific Northwest. I am interested in programming and how to help students. Here I mostly blog about Python, and how programing can be incorporated into engineering education.Как программировать и управлять Arduino с помощью Python

Python взял штурмом мир кодирования. Наряду с появлением этого нового языка, сцена электроники DIY также процветала. Макетные платы и одноплатные компьютеры от таких компаний, как Arduino и Raspberry Pi изменили способ создания домашней электроники. Разве это не было бы здорово, если бы вы могли программировать Arduino с Python?
Нет лучшего ощущения, чем сочетание двух классных вещей. К сожалению, невозможно напрямую программировать Arduino с помощью Python, так как на платах нет возможности встроенной интерпретации языка. Однако возможно прямое управление USB с помощью программы Python.
Эта статья расскажет вам, как настроить Arduino UNO (хотя любая плата, совместимая с плату здесь), которое будет программироваться и управляться из командной строки с помощью программ Python. Этот учебник написан для Windows 10, но также работает для Mac и Linux. Вы даже можете использовать этот рабочий процесс для управления Arduino напрямую из Raspberry Pi с об окончательном опыте «сделай сам».
Настройка вашего Arduino для Python
Для сегодняшнего проекта мы будем использовать Arduino Uno вместе с интерфейсом pyFirmata для Python. Для этого вы можете использовать практически любую Arduino-совместимую плату, хотя на момент написания интерфейса PyFfirmata поддерживались только Arduino Uno, Mega, Due и Nano. Если вы уже являетесь гуру Python, вы можете добавить свою собственную поддержку плат в pyFirmata — обязательно обновите GitHub, если вы это сделаете!

Если вы этого еще не сделали, установите Arduino IDE. Если вы совершенно новичок в мире микроконтроллеров, наше руководство для начинающих по Arduino руководство для поможет вам все на месте.
Подключите плату Arduino и откройте IDE. Убедитесь, что в меню « Инструменты» выбраны правильные плата и порт. Загрузите пример эскиза StandardFirmata и загрузите его на доску. Это позволит вам напрямую управлять Arduino, если он подключен к компьютеру через USB. Если эскиз загружен на вашу доску без ошибок, вы готовы двигаться дальше.
Python и управление из командной строки
Мы будем использовать Python 3.4 для управления нашим Arduino, поскольку модуль, который вы будете устанавливать, определяет его как последнюю совместимую версию. Любая версия до этого должна работать нормально, и сообщалось, что более поздние версии будут работать. Вы можете скачать Python 3.4 для Windows 10 с сайта Python Software Foundation . Если вы хотите запустить несколько версий Python, наше руководство по виртуальным средам Python сможет вам помочь.
После того, как вы установили Python, мы хотим добавить его в переменную PATH вашей системы. Это позволит нам запускать код Python непосредственно из командной строки без необходимости находиться в каталоге, в котором он был установлен. Это можно сделать, открыв Панель управления , выполнив поиск Среды и нажав Изменить системные переменные среды . В нижней части окна выберите Переменные среды . Это вызовет это окно:

Если вы уже видите PATH в списке, нажмите «Изменить» и добавьте каталог Python и Python / Scripts . Если у вас нет переменной PATH, нажмите new и добавьте ее. Обратите внимание, что Python был установлен прямо в C: \ здесь. Если вы установили его в другом месте, вам нужно изменить его, чтобы отразить это. Нажмите OK, чтобы вернуться в цепочку окон, и вы почти готовы управлять своим Arduino с помощью Python!
Волшебная смазка
Вам понадобится один последний кусочек головоломки, чтобы Python хорошо говорил с нашим Arduino. Это происходит в форме интерфейса Python, называемого pyFirmata . Этот интерфейс, созданный Tino de Bruijn, доступен для загрузки с github, хотя вы можете установить его прямо из командной строки, набрав:
Все хорошо, он должен установить и выглядеть так:

Если это не удается, перейдите к добавлению Python в раздел Переменная среды и убедитесь, что вы указали правильный путь к каталогу Python.
Как это случилось
Теперь все настроено, и вы можете создать программу на Python для своего Arduino, чтобы протестировать ее. Откройте IDE по вашему выбору. Мы будем использовать Eclipse сегодня, но вы также можете легко использовать любой текстовый редактор или даже IDE в облаке.
Создайте новый скрипт и сохраните его как blink.py . Нарушая традицию со стандартной программой мигающих светодиодов, вы создадите программу, которая запрашивает у пользователя количество раз, которое они хотят, чтобы светодиод мигал перед его выполнением. Это короткая программа, которую вы можете скачать здесь, если хотите перейти прямо к ней, но давайте разберем ее.
Во-первых, вы захотите импортировать то, что вам нужно, из модуля pyFirmata вместе со стандартным модулем Python Time .
Теперь вы хотите настроить плату Arduino. В этой статье предполагается, что вы используете плату Arduino Uno , хотя поддерживаются несколько других плат Arduino. Обратитесь к pyFirmata github за подробной информацией о поддержке платы.
Проверьте, какой COM-порт вы используете в Arduino IDE, и введите его в свой код в качестве переменной платы .
Теперь вы настроите приглашение пользователя. Те, кто знаком с Python, узнают все здесь. Вы выводите вопрос на экран с помощью функции ввода и сохраняете ответ как переменную. После того, как пользователь предоставил номер, программа сообщает, сколько раз будет мигать светодиод.
Чтобы светодиод мигал соответствующее количество раз, используйте цикл for . Если вы новичок в Python , будьте осторожны с отступом, так как в отличие от других языков пробелы являются частью синтаксиса. Обратите внимание, что контакт 13 является встроенным светодиодом для Arduino Uno, вам нужно будет изменить его, если ваша плата отличается.
Здесь вы преобразуете переменную loopTimes в целое число, так как ввод от пользователя будет автоматически сохранен в виде строки. В этой простой демонстрации мы предполагаем, что пользователь введет числовое значение. Любая другая запись, например, «восьмерка», выдаст ошибку.
Сохраните сценарий и откройте командную строку .
Мигающие огни и другие откровения
Все готово к работе, все, что вам нужно сделать, это перейти туда, где находится скрипт, и запустить его. Для этого введите cd [путь к каталогу скрипта], а затем введите python blink.py .
Все в порядке, ваша программа запустится с небольшой задержкой, так как Arduino инициализирует, запросит у вас номер, а затем мигнет много раз, используя встроенный светодиод.
Вывод программы должен выглядеть так:

Как только вы нажмете Enter после выбранного количества миганий, Arduino выполнит ваши заказы.
Маленькие Начало
Этот проект стал началом взаимодействия между Python и платой Arduino. Этот подход сильно отличается от обычного рабочего процесса загрузки скриптов в сам Arduino, но он открывает совершенно новый способ работы с платформой, особенно если вам нравится язык программирования Python.
Если вы используете сервер Linux дома, этот метод связи с платами Arduino может превратить этот сервер в полноценную систему домашней автоматизации DIY. Комбинируя скрипты Python, управляющие микроконтроллером, со схемой автоматизации «Сделай сам , ваш ящик для хранения NAS может взять на себя целый ряд новых полезных функций.
Чтобы сделать его незабываемым, почему бы не создать свой собственный NAS- и использовать его для управления своими приборами? Представьте, как здорово было бы нажать кнопку воспроизведения на Plex. сервера и имейте света выключите автоматически!
Вы уже управляете Arduino с помощью Python? Есть ли удивительные обходные пути, о которых мы просто еще не знаем? Дайте нам знать в разделе комментариев ниже!
Как программировать ардуино на python
In this article, we will learn how to link an Arduino to a Python script in order to operate the Arduino. This example of constructing a 4-bit binary up-counter using Python script to control Arduino helps us understand this better.
Components Required:
- An Arduino Board (We will be using Arduino UNO, but other similar boards like Arduino Mini, MEGA, or even Node MCU will also work with suitable declarations in the code)
- USB cable for Arduino
- Breadboard
- Jumper wires
- LEDs (we will need 4, but you can try with more)
- 4 resistors of resistance 200-500Ω (any in this range will work)
- An Arduino board.
- Computer with Arduino IDE. (Raspberry Pi 4, 3B+, or even 3B will also work)
Now let us quickly summarise the steps to achieve our Goal. You can directly skip to the required parts by scrolling along:
- Install PyFirmata Module
- Upload “StandardFirmata” to Arduino
- Making the connections
- Write the Python program and Run it
Installing PyFirmata Module
You should have Python and pip Installed in your system. Then you can run the following command to install the PyFirmata module in your system.
Upload “StandardFirmata” to Arduino
StandardFirmata is a code that helps Python get access to the Arduino board.
First, connect your Arduino to the computer/raspberry pi/laptop using the USB cable.
Know the port name the Arduino is connected to. In windows, the port name will be something like “COMx” (where x is an integer), while in Linux it will be a string starting with “/dev/tty”. You might find this information by opening Device Manager in Windows.

Windows Device Manager view
If you are using Linux, please refer to the official Arduino Documentation.
Next, you can open the Arduino IDE and follow the steps to upload the StandardFirmata to the board.
Get StandardFirmata: File -> Examples -> Firmata -> Standard Firmata
Specify Correct Board and Port: Tools -> Board -> Select Arduino UNO (or your own board) -> Tools -> Port -> Select your Port
Upload the StandardFirmata: Click on the upload button to upload the code to Arduino.
Making the connections

Make the connections like the image above. Here I have connected the 4 LEDs to the 13th, 12th, 11th, and 10th pins. There was no specific reason to connect them in that manner. You can use any other digital pin.