How to Create Dialogs in Python
In this post, I demonstrate dialogs that are provided in the Python standard library by showing you how to use them and what they look like.
Why Are These Dialogs Useful?
The dialogs in this post work on Windows, Linux and Mac and look exactly like the default dialogs the OS provides for other applications. Since they look the same as the ‘default’ dialogs, users are used to the look and feel, so they already know how to use them.
As these dialogs come with Python, they are easy to access and have had their time of debugging so are quite robust and predictable.
Dialog Types and Their Returns
Each dialog does something different, takes different input to be created and returns particular values. Understanding what each call returns in different situations is necessary to be able to use these dialogs correctly.
Some of these dialogs make sounds as you would typically find with dialogs displaying an error
In these examples, I will be referencing a parent . This parent is a tkinter.Tk object which acts as the «base» of the dialogs. Using a parent also allows you to set an icon on the dialog window and task-bar item. Here is an example:
When using an icon like this, the .ico must be an icon format — do not just rename the file.
You do not have to create a parent of your own and in that case, leave parent=parent out of the code snippets below. I do however recommend that you look at the side effects if you don’t provide a parent as a tkinter.Tk object will be created which will then show a window that you cannot control. Using the parent snippet above makes things a lot easier.
It is important to note that all these dialog calls below are blocking. This means execution will not continue until the user has made a selection or this code is put into another thread.
Message dialogs are a simple way to display a message with a title. There are three types of dialogs that simply provide an «OK» button; information, warning and error. Each of these dialogs display a title, message and icon that corresponds to the type of dialog.
Looking at the values of each info , warn and error after executing the lines, you will notice that they all have been assigned value «ok». If the user clicks the OK button or even closes the window using the cross, these dialogs will always return «ok».
| Method | OK Clicked | Dialog Closed (X) |
|---|---|---|
| messagebox.showinfo | «ok» | «ok» |
| messagebox.showwarning | «ok» | «ok» |
| messagebox.showerror | «ok» | «ok» |

Question dialogs allow you to ask a user a particular question with a title and have them reply in one of two ways (or three in one case).
| Method | OK | Retry | Yes | No | Cancel | Dialog Closed (X) |
|---|---|---|---|---|---|---|
| messagebox.askokcancel | True | False | False | |||
| messagebox.askretrycancel | True | False | False | |||
| messagebox.askyesno | True | False | Not Possible | |||
| messagebox.askyesnocancel | True | False | None | None |

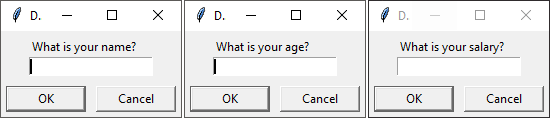
Input dialogs ask for a particular type of value; in this case that is either of type string, integer or float. Unfortunately like all the other dialogs, the icon from the parent will not be used due to how these dialogs are constructed. If you plan on consistently taking input from a user I recommend creating your own input dialog.
| Method | OK | Cancel | Dialog Closed (X) |
|---|---|---|---|
| simpledialog.askstring | Input String | None | None |
| simpledialog.askinteger | Input Integer | None | None |
| simpledialog.askfloat | Input Float | None | None |
File / Folder Dialogs
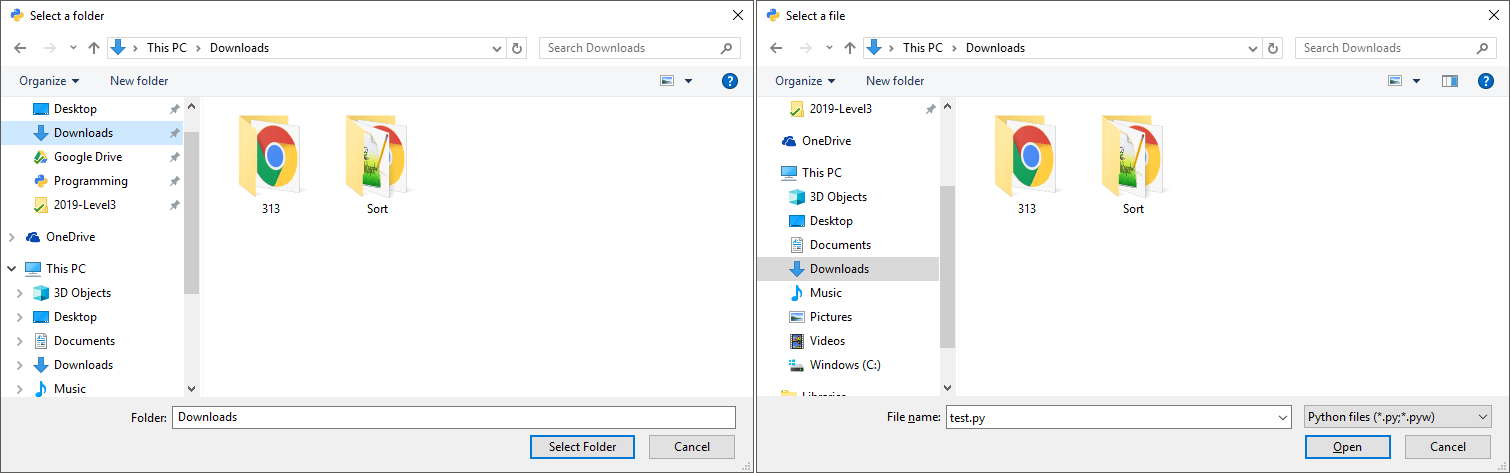
File and folder dialogs allow you to ask the user select a folder, single file, multiple files or chose a location to save a file as.
| Method | OK | Cancel | Dialog Closed (X) |
|---|---|---|---|
| filedialog.askdirectory | Directory Path | » | » |
| filedialog.askopenfilename | File Path | » | » |
| filedialog.askopenfilenames | List of File Paths | » | » |
| filedialog.asksaveasfilename | File Path | » | » |
When using any of these file dialog calls, you can also supply a string to the parameter initialdir which will put the user in a particular directory when the dialog first opens; for example:
When asking for a file to open or save as, you can specify what type of files the user can select (based off file extension) using the filetypes argument. This argument takes a list of tuples, where each of these tuples contain a string of the group name and a string of file extensions separated by ; if required. The tuple that is the first in the list is the default selection. An example of the usage of filetypes :
Color Picker Dialog
Color pickers are used to ask a user to select a color. These aren’t seen in may places but when a color needs to be selected, this is a great option as it contains everything needed.
| Method | OK | Cancel | Dialog Closed (X) |
|---|---|---|---|
| filedialog.askdirectory | ((Red Int, Green Int, Blue Int), ‘Hex Value‘) | (None, None) | (None, None) |
As an example of the output, if I select cyan, I will get ((0.0, 255.99609375, 255.99609375), ‘#00ffff’) . The numbers are large as they are floats but this means 0 red, 256 green and 256 blue. We can also see that the second value in the tuple is the hex value for cyan.

Owner of PyTutorials and creator of auto-py-to-exe. I enjoy making quick tutorials for people new to particular topics in Python and tools that help fix small things.
# Создание диалогового окна
Диалоговые окна, как элементы графического интерфейса, предназначены для вывода сообщений пользователю, получения от него какой-либо информации, а также управления.
Создадим свое диалоговое окно. Для примера оно создается используя несколько виджетов:
Мы получили простейшее диалоговое окно, и хотя диалоговые окна весьма разнообразны, их вид уже устоялся. Нет необходимости создавать диалоговые окна с нуля, для это можно использовать «заготовки».
# Messagebox — окно с информацией
Для информирования пользователя о процессах происходящих в ПК можно использовать messagebox — окно с информацией. При этом требуется дополнительно импортировать «подмодуль» tkinter — tkinter.messagbox , в котором описаны классы для окон данного типа.
Код созданного информационного окна может быть следующим:
Для привлечения внимания можно использовать окно предупреждения:
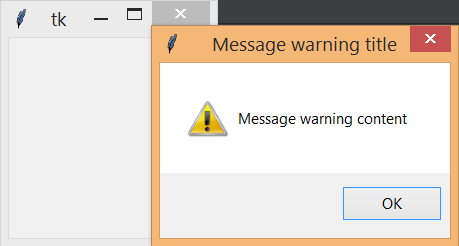
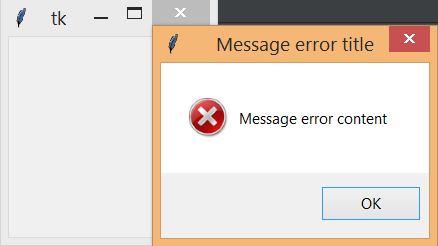
Окно с возникшей ошибкой ПО думаю встречал каждый, на питоне его можно создать, написав следующий код:
# Messagebox — окно с вопросом
Следующие примеры диалоговых окон, служат для ведения диалога программы с пользователем и сохранением его ответа в переменной.
Попробуйте создать следующие примеры диалоговых окон, подумайте об их различий и где они могут применяться? Напишите комментарий в коде к каждому диалоговому окну:
# Упражнения
- Исследование: после каждого вызова диалогового окна добавьте команду print(response) , которая выведет в консоль значение выбранного варианта ответа.
# Окна открытия и сохранения файлов
Рассмотрим, как запрограммировать с помощью tkinter вызов диалоговых окон открытия и сохранения файлов и работу с ними. При этом требуется дополнительно импортировать «подмодуль» tkinter — tkinter.filedialog , в котором описаны классы для окон данного типа:
Здесь создаются два объекта ( document_open и document_save ): один вызывает диалоговое окно «Открыть», а другой «Сохранить как…». При выполнении скрипта, они друг за другом выводятся на экран после появления главного окна. Если не создать root, то оно все-равно появится на экране, однако при попытке его закрытия в конце возникнет ошибка.
Tkinter Dialogs
tkinter.simpledialog — Standard Tkinter input dialogs
The tkinter.simpledialog module contains convenience classes and functions for creating simple modal dialogs to get a value from the user.
tkinter.simpledialog. askfloat ( title , prompt , ** kw ) ¶ tkinter.simpledialog. askinteger ( title , prompt , ** kw ) ¶ tkinter.simpledialog. askstring ( title , prompt , ** kw ) 
The above three functions provide dialogs that prompt the user to enter a value of the desired type.
class tkinter.simpledialog. Dialog ( parent , title = None ) 
The base class for custom dialogs.
body ( master ) 
Override to construct the dialog’s interface and return the widget that should have initial focus.
buttonbox ( ) 
Default behaviour adds OK and Cancel buttons. Override for custom button layouts.
tkinter.filedialog — File selection dialogs
The tkinter.filedialog module provides classes and factory functions for creating file/directory selection windows.
Native Load/Save Dialogs
The following classes and functions provide file dialog windows that combine a native look-and-feel with configuration options to customize behaviour. The following keyword arguments are applicable to the classes and functions listed below:
Static factory functions
The below functions when called create a modal, native look-and-feel dialog, wait for the user’s selection, then return the selected value(s) or None to the caller.
tkinter.filedialog. askopenfile ( mode = ‘r’ , ** options ) ¶ tkinter.filedialog. askopenfiles ( mode = ‘r’ , ** options ) 
The above two functions create an Open dialog and return the opened file object(s) in read-only mode.
tkinter.filedialog. asksaveasfile ( mode = ‘w’ , ** options ) 
Create a SaveAs dialog and return a file object opened in write-only mode.
tkinter.filedialog. askopenfilename ( ** options ) ¶ tkinter.filedialog. askopenfilenames ( ** options ) 
The above two functions create an Open dialog and return the selected filename(s) that correspond to existing file(s).
tkinter.filedialog. asksaveasfilename ( ** options ) 
Create a SaveAs dialog and return the selected filename.
tkinter.filedialog. askdirectory ( ** options ) 
The above two classes provide native dialog windows for saving and loading files.
Convenience classes
The below classes are used for creating file/directory windows from scratch. These do not emulate the native look-and-feel of the platform.
class tkinter.filedialog. Directory ( master = None , ** options ) 
Create a dialog prompting the user to select a directory.
The FileDialog class should be subclassed for custom event handling and behaviour.
Create a basic file selection dialog.
cancel_command ( event = None ) 
Trigger the termination of the dialog window.
Event handler for double-click event on directory.
Event handler for click event on directory.
Event handler for double-click event on file.
Event handler for single-click event on file.
filter_command ( event = None ) 
Filter the files by directory.
Retrieve the file filter currently in use.
Retrieve the currently selected item.
go ( dir_or_file = os.curdir , pattern = ‘*’ , default = » , key = None ) 
Render dialog and start event loop.
Exit dialog returning current selection.
Exit dialog returning filename, if any.
Set the file filter.
Update the current file selection to file.
class tkinter.filedialog. LoadFileDialog ( master , title = None ) 
A subclass of FileDialog that creates a dialog window for selecting an existing file.
Test that a file is provided and that the selection indicates an already existing file.
class tkinter.filedialog. SaveFileDialog ( master , title = None ) 
A subclass of FileDialog that creates a dialog window for selecting a destination file.
Test whether or not the selection points to a valid file that is not a directory. Confirmation is required if an already existing file is selected.
Let’s Write a Chat App in Python

Not too frequently, you happen to create something astonishingly simple yet fun to use thing, and you just can’t wait to share it with the world.
That’s exactly what happened to me, and indeed I’m here to share how I made a simple chat app with quite concise Python code. What’s more; I’ve implemented the code without any third party dependencies! So let’s just dive in!
First, I created a chat server through which can recieve incoming requests from clients wanting to communicate. For this, I used good ole’ sockets and a bit of multithreading. Using frameworks like Twisted and SocketServer was an option, but that seemed to be an overkill to me for a software as simple as ours.
The Server
Here’s how we begin our server script (for this app, there are just two scripts: one for server and another for client):
We will be using TCP sockets for this purpose, and therefore we use AF_INET and SOCK_STREAM flags. We use them over UDP sockets because they’re more telephonic, where the recipient has to approve the incoming connection before communication begins, and UDP sockets are more post-mail sort of thing (anyone can send a mail to any recipient whose address s/he knows), so they don’t really require an establishment of connection before communication can happen. Clearly, TCP suit more to our purpose than UDP sockets, therefore we use them. You can know more about sockets here.
After imports, we set up some constants for later use:
Now, we break our task of serving into accepting new connections, broadcasting messages and handling particular clients. Let’s begin with accepting connections:
This is just a loop that waits forever for incoming connections and as soon as it gets one, it logs the connection (prints some of the connection details) and sends the connected client a welcome message. Then it stores the client’s address in the addresses dictionary and later starts the handling thread for that client. Of course, we haven’t yet defined the target function handle_client() for that, but here’s how we do it:
Naturally, after we send the new client the welcoming message, it will reply with the name s/he wants to use for further communication. In the handle_client() function, the first task we do is we save this name, and then send another message to the client, regarding further instructions. After this comes the main loop for communication: here we recieve further messages from the client and if a message doesn’t contain instructions to quit, we simply broadcast the messsage to other connected clients (we’ll be defining the broadcast method in a moment). If we do encounter a message with exit instructions (i.e., the client sends a
Now comes our broadcast() function:
This is pretty much self-explanatory; it simply sends the msg to all the connected clients, and prepends an optional prefix if necessary. We do pass a prefix to broadcast() in our handle_client() function, and we do it so that people can see exactly who is the sender of a particular message.
That was all the required functionalities for our server. Finally, we put in some code for starting our server and listening for incoming connections:
We join() ACCEPT_THREAD so that the main script waits for it to complete and doesn’t jump to the next line, which closes the server.
This completes our server script, which is presented in the following gist (for those who’re reading this on smartphones, visit this link for the complete server code):
The Client
This is more fun beause we’ll be writing a GUI! We use Tkinter, Python’s “batteries included” GUI building tool for our purpose. Let’s do some imports first:
Now we’ll write functions for handling sending and receiving of messages. We start with receive:
Why an infinite loop again? Because we’ll be receiving messages quite non-deterministically, and independent of how and when we send the messages. We don’t want this to be a walkie-talkie chat app which can only either send or receive at a time; we want to receive messages when we can, and send them when we want. The functionality within the loop is pretty straightforward; the recv() is the blocking part. It stops execution until it receives a message, and when it does, we move ahead and append the message to msg_list . We will soon define msg_list , which is basically a Tkinter feature for displaying the list of messages on the screen.
Next, we define the send() function:
We’re using event as an argument because it is implicitly passed by Tkinter when the send button on the GUI is pressed. my_msg is the input field on the GUI, and therefore we extract the message to be sent usin g msg = my_msg.get() . After that, we clear the input field and then send the message to the server, which, as we’ve seen before, broadcasts this message to all the clients (if it’s not an exit message). If it is an exit message, we close the socket and then the GUI app (via top.close() )
We define one more function, which will be called when we choose to close the GUI window. It is a sort of cleanup-before-close function and shall close the socket connection before the GUI closes:
This sets the input field to
Then we create a frame for holding the list of messages. Next, we create a string variable, primarily for storing the value we get from the input field (which we shall define soon). We set that variable to "Type your messages here." to prompt the user for writing their message. After that, we create a scrollbar for scrolling through this message frame. Here’s the code:
Now we define the message list which will be stored in messages_frame and then pack in (at the appropriate places) all the stuff we’ve created till now:
After this, we create the input field for the user to input their message, and bind it to the string variable defined above. We also bind it to the send() function so that whenever the user presses return, the message is sent to the server. Next, we create the send button if the user wishes to send their messages by clicking on it. Again, we bind the clicking of this button to the send() function. And yes, we also pack all this stuff we created just now. Furthermore, don’t forget to make use of the cleanup function on_closing() which should be called when the user wishes to close the GUI window. We do that by using the protocol method of top . Here’s the code for all of this:
(Almost) done. We haven’t yet written code for connecting to the server. For that, we have to ask the user for the server’s address. I’ve done that by simply using input() , so the user is greeted with some command line prompt asking for host address before the GUI begins. It may be a little inconvenient, and you can add GUI for that, but I leave that to you as homework ��. Here’s my code:
Once we get the address and create a socket to connect to it, we start the thread for receiving messages, and then the main loop for our GUI application:
That’s it! We’ve coded our chat application. Again, the complete client script is given in the following gist (and for readers on their smartphones, here’s the link to the gist):
This feels great to be tested on multiple computers. You can, of course, run the server and the client on the same machine for testing (using 127.0.0.1 for HOST in your client), but seeing the communication happen in realtime among different computers feels awesome. The server script will log which IP addresses are accessing it, and the client script will generate a GUI (after asking for the host address) similar to the following screenshots:
Honestly speaking, the GUI looks good considering the number of lines of Python code behind it, but not great! I leave it to you to make this look better (and more intuitive), perhaps by making a left-right chat interface like Facebook’s Messenger. You may even use third-party libraries like Kivy for more beauty and cross-platform portability, or a Web interface instead — post your ideas in the comments. Finally, thanks for bearing with me and reading till the last character! I applaud your patience ��.
P.S: For my other projects (some smaller and others much larger), visit my GitHub profile.
Furthermore, I’m new to blogging, so constructive criticism is not only needed, but very much wanted! I’m open to better writing styles, techniques and pedagogy — feel free to mention them in the comments.